window DODGE VIPER 2010 ZB II / 2.G User Guide
[x] Cancel search | Manufacturer: DODGE, Model Year: 2010, Model line: VIPER, Model: DODGE VIPER 2010 ZB II / 2.GPages: 80, PDF Size: 8.08 MB
Page 10 of 80
KEY FOB
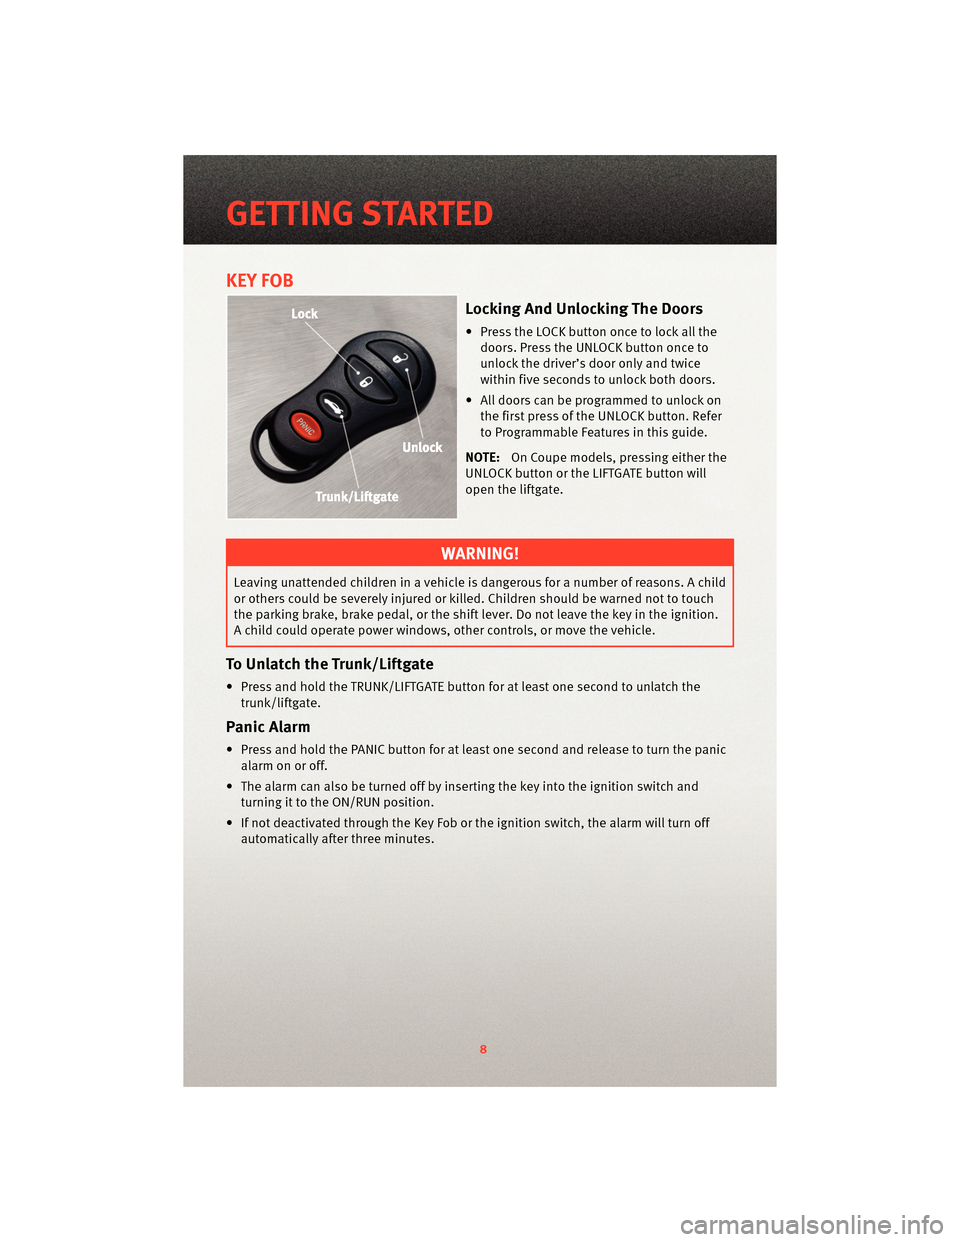
Locking And Unlocking The Doors
• Press the LOCK button once to lock all thedoors. Press the UNLOCK button once to
unlock the driver’s door only and twice
within five seconds to unlock both doors.
• All doors can be programmed to unlock on the first press of the UNLOCK button. Refer
to Programmable Features in this guide.
NOTE: On Coupe models, pressing either the
UNLOCK button or the LIFTGATE button will
open the liftgate.
WARNING!
Leaving unattended children in a vehicle is dangerous for a number of reasons. A child
or others could be severely injured or killed. Children should be warned not to touch
the parking brake, brake pedal, or the shift lever. Do not leave the key in the ignition.
A child could operate power windows, other controls, or move the vehicle.
To Unlatch the Trunk/Liftgate
• Press and hold the TRUNK/LIFTGATE button for at least one second to unlatch the trunk/liftgate.
Panic Alarm
• Press and hold the PANIC button for at least one second and release to turn the panicalarm on or off.
• The alarm can also be turned off by inserting the key into the ignition switch and turning it to the ON/RUN position.
• If not deactivated through the Key Fob or the ignition switch, the alarm will turn off automatically after three minutes.
GETTING STARTED
8
Page 21 of 80
MANUAL CLIMATE CONTROLS
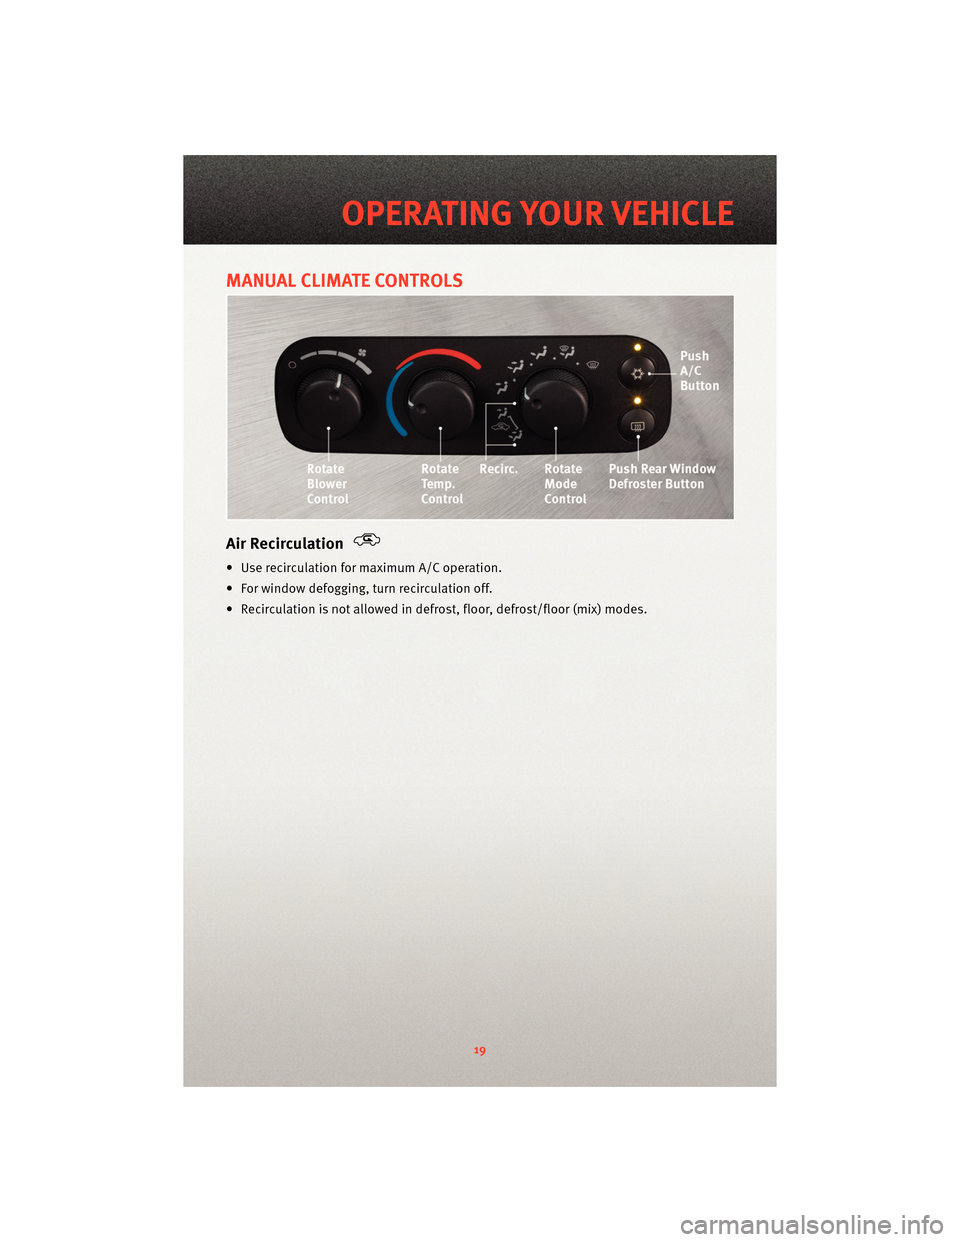
Air Recirculation
• Use recirculation for maximum A/C operation.
• For window defogging, turn recirculation off.
• Recirculation is not allowed in defrost, floor, defrost/floor (mix) modes.
19
OPERATING YOUR VEHICLE
Page 23 of 80
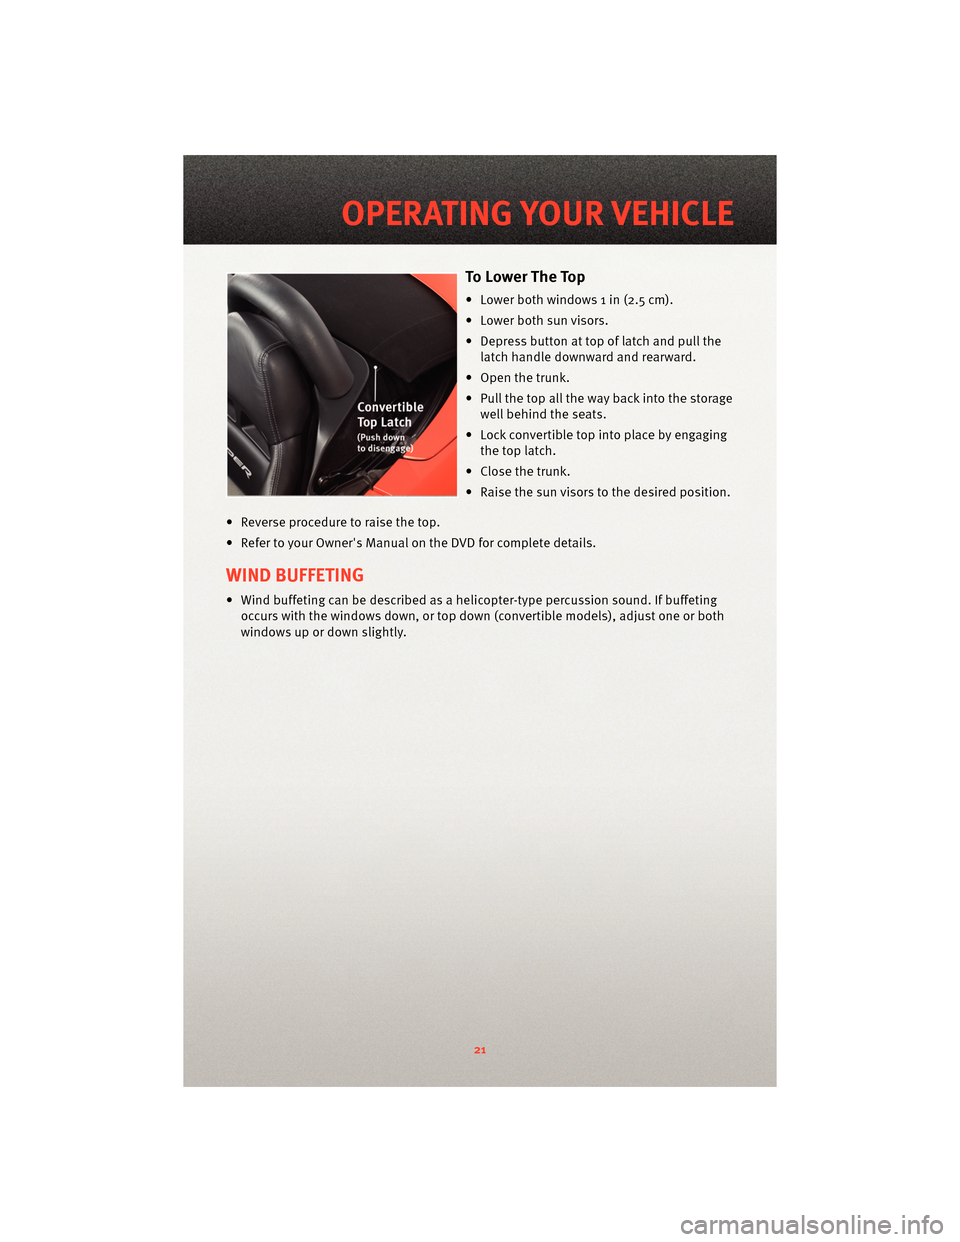
To L o w e r T h e To p
• Lower both windows 1 in (2.5 cm).
• Lower both sun visors.
• Depress button at top of latch and pull thelatch handle downward and rearward.
• Open the trunk.
• Pull the top all the way back into the storage well behind the seats.
• Lock convertible top into place by engaging the top latch.
• Close the trunk.
• Raise the sun visors to the desired position.
• Reverse procedure to raise the top.
• Refer to your Owner's Manual on the DVD for complete details.
WIND BUFFETING
• Wind buffeting can be described as a helicopter-type percussion sound. If buffeting occurs with the windows down, or top down (convertible models), adjust one or both
windows up or down slightly.
21
OPERATING YOUR VEHICLE
Page 66 of 80
FUSES
Power Distribution Center (PDC)
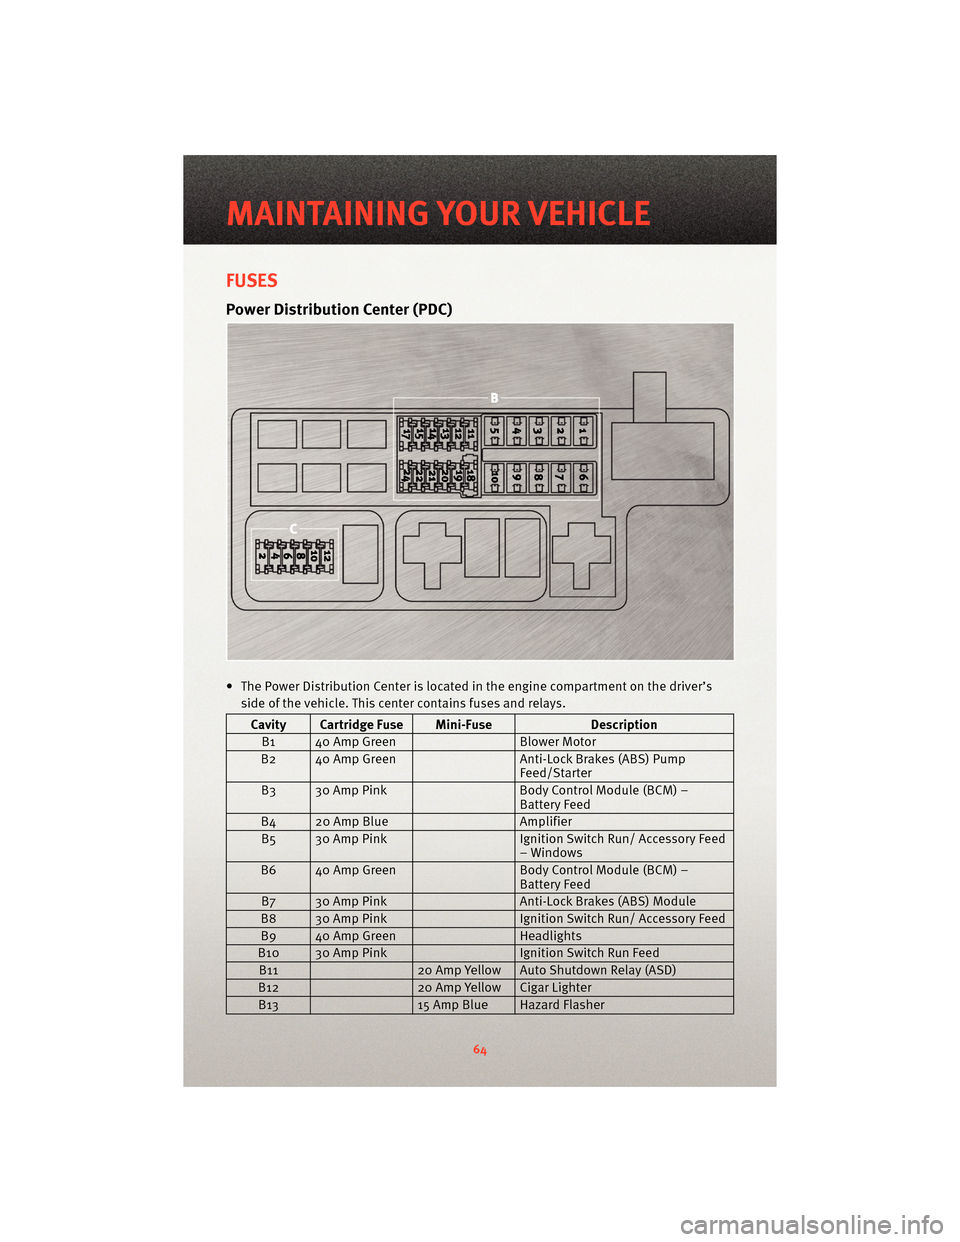
• The Power Distribution Center is located in the engine compartment on the driver’s
side of the vehicle. This center contains fuses and relays.
Cavity Cartridge Fuse Mini-Fuse Description
B1 40 Amp Green Blower Motor
B2 40 Amp Green Anti-Lock Brakes (ABS) Pump
Feed/Starter
B3 30 Amp Pink Body Control Module (BCM) –
Battery Feed
B4 20 Amp Blue Amplifier
B5 30 Amp Pink Ignition Switch Run/ Accessory Feed
– Windows
B6 40 Amp Green Body Control Module (BCM) –
Battery Feed
B7 30 Amp Pink Anti-Lock Brakes (ABS) Module
B8 30 Amp Pink Ignition Switch Run/ Accessory Feed
B9 40 Amp Green Headlights
B10 30 Amp Pink Ignition Switch Run Feed
B11 20 Amp Yellow Auto Shutdown Relay (ASD)
B12 20 Amp Yellow Cigar Lighter
B13 15 Amp Blue Hazard Flasher
MAINTAINING YOUR VEHICLE
64
Page 67 of 80
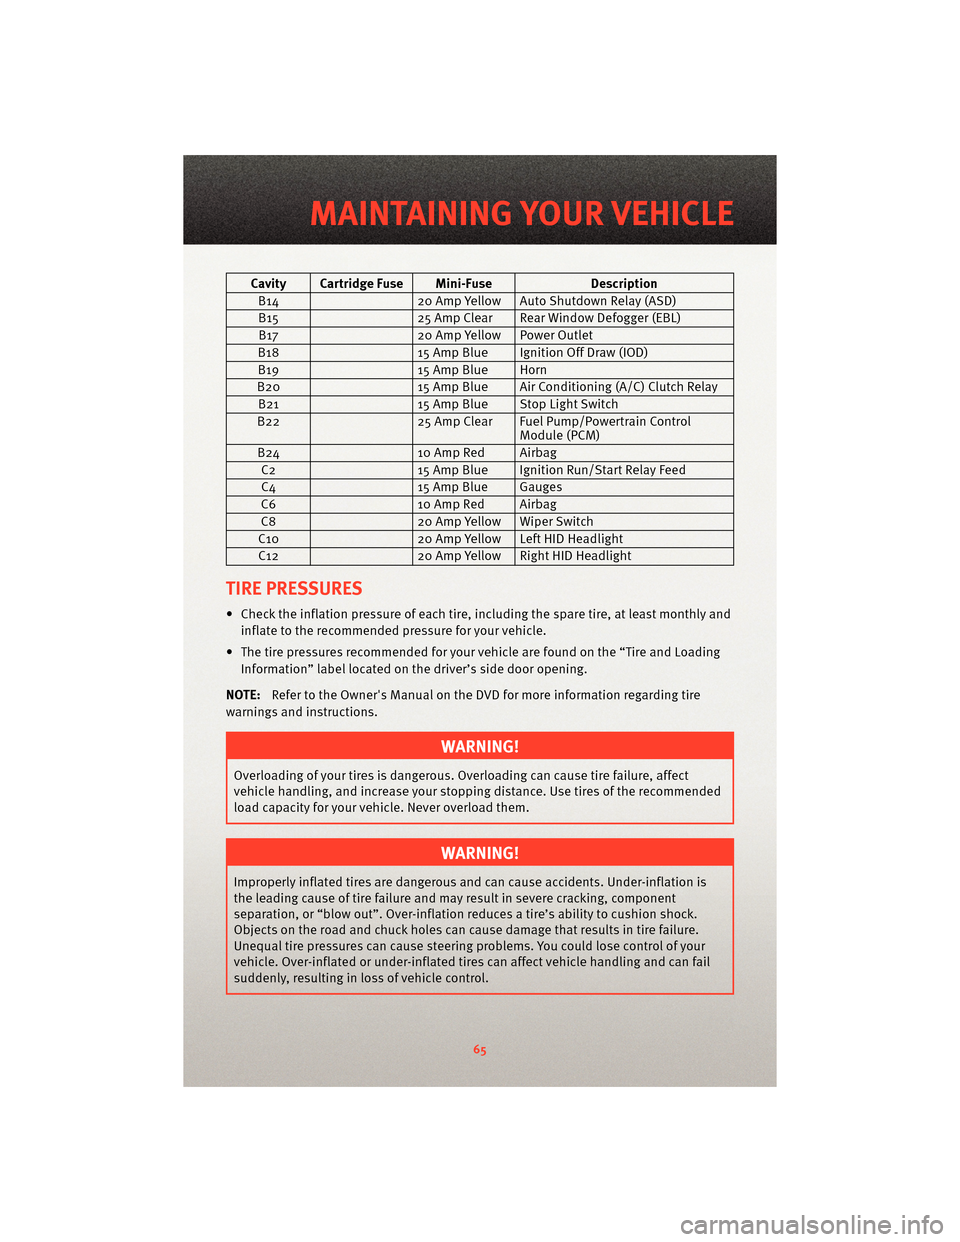
Cavity Cartridge Fuse Mini-FuseDescription
B14 20 Amp Yellow Auto Shutdown Relay (ASD)
B15 25 Amp Clear Rear Window Defogger (EBL)
B17 20 Amp Yellow Power Outlet
B18 15 Amp Blue Ignition Off Draw (IOD)
B19 15 Amp Blue Horn
B20 15 Amp Blue Air Conditioning (A/C) Clutch Relay
B21 15 Amp Blue Stop Light Switch
B22 25 Amp Clear Fuel Pump/Powertrain Control
Module (PCM)
B24 10 Amp Red Airbag
C2 15 Amp Blue Ignition Run/Start Relay Feed
C4 15 Amp Blue Gauges
C6 10 Amp Red Airbag
C8 20 Amp Yellow Wiper Switch
C10 20 Amp Yellow Left HID Headlight
C12 20 Amp Yellow Right HID Headlight
TIRE PRESSURES
• Check the inflation pressure of each tire, including the spare tire, at least monthly and
inflate to the recommended pressure for your vehicle.
• The tire pressures recommended for your vehicle are found on the “Tire and Loading Information” label located on the driver’s side door opening.
NOTE: Refer to the Owner's Manual on the DVD f or more information regarding tire
warnings and instructions.
WARNING!
Overloading of your tires is dangerous. Ov erloading can causetire failure, affect
vehicle handling, and increase your stopping distance. Use tires of the recommended
load capacity for your vehicle. Never overload them.
WARNING!
Improperly inflated tires are dangerous and can cause accidents. Under-inflation is
the leading cause of tire failure and may result in severe cracking, component
separation, or “blow out”. Over-inflation r educes a tire’s ability to cushion shock.
Objects on the road and chuck holes can cause damage that results in tire failure.
Unequal tire pressures can cause steering problems. You could lose control of your
vehicle. Over-inflated or under-inflated ti res can affect vehicle handling and can fail
suddenly, resulting in loss of vehicle control.
65
MAINTAINING YOUR VEHICLE
Page 70 of 80
NOTE:To help prevent the battery from dischar ging during shorter periods of inactivity,
perform the following:
• Make sure that the trunk/liftgate, hood, doors, windows, and convertible top are completely closed.
• Make sure that Key Fob is operating and that the battery is good.
• Make sure that the HOOD, TRUNK/LIFTGATE, and DOOR switches are in adjustment. Perform the quick system check, which follows:
• Use the remote transmitter to set the alarm. If the alarm SET light comes on and flashes, the system is operating properly. If not, there is a problem with a switch or the
system. See your authorized dealer for service.
• Cover the vehicle whenever possible to prevent accidental damage to the finish.
MAINTAINING YOUR VEHICLE
68