engine DODGE VIPER 2013 VX / 3.G Owner's Manual
[x] Cancel search | Manufacturer: DODGE, Model Year: 2013, Model line: VIPER, Model: DODGE VIPER 2013 VX / 3.GPages: 100, PDF Size: 3.1 MB
Page 73 of 100
• If the light remains lit with the engine running, your vehicle will usually be drivable;however, see an authorized service center immediately. If the light is flashing when the
engine is running, immediate service is required and you may experience reduced
performance, an elevated/rough idle or engine stall and your vehicle may require
towing.
- Air Bag Warning Light
• If the light is not on during starting, stays on, or turns on while driving, have the vehicleserviced by an authorized service center immediately.
IF YOUR ENGINE OVERHEATS
• In any of the following situations, you can reduce the potential for overheating by takingthe appropriate action.
• On the highways — slow down.
• In city traffic — while stopped, place the transmission in NEUTRAL, but do not increase engine idle speed.
NOTE:
There are steps that you can take to slow down an impending overheat condition:
• If your air conditioner (A/C) is on, turn it off. The A/C system adds heat to the engine cooling system and turning the A/C off can help remove this heat.
• You can also turn the temperature control to maximum heat, the mode control to floor and the blower control to high. This allows the heater core to act as a supplement to the
radiator and aids in removing heat from the engine cooling system.
CAUTION!
Driving with a hot cooling system could damage your vehicle. If the temperature gauge
reads HOT (H), pull over and stop the vehicle. Idle the vehicle with the air conditioner
turned off until the pointer drops back into the normal range. If the pointer remains on
HOT (H), and you hear continuous chimes, turn the engine off immediately, and call for
service.
WARNING!
You or others can be badly burned by hot engine coolant (antifreeze) or steam from your
radiator. If you see or hear steam coming from under the hood, do not open the hood
until the radiator has had time to cool. Never try to open a cooling system pressure cap
when the radiator or coolant bottle is hot.
WHAT TO DO IN EMERGENCIES
71
Page 76 of 100
3. Place the TIREFIT kit flat on the ground next to the deflated tire.
4. Remove the cap from the valve stem and then screw the fitting at the end of theSealant Hose (6) onto the valve stem.
5. Uncoil the Power Plug (8) and insert the plug into the vehicle’s 12 Volt power outlet.
6. Do not remove foreign objects (e.g., screws or nails) from the tire.
(C) Injecting TIREFIT Sealant Into The Deflated Tire:
• Always start the engine before turning ON the TIREFIT kit.
NOTE:
Manual transmission vehicles must have the parking brake engaged and the shift lever in
NEUTRAL.
• After pressing the Power Button (4), the sealant (white fluid) will flow from the Sealant Bottle (1) through the Sealant Hose (6) and into the tire.
NOTE:
Sealant may leak out through the puncture in the tire.
• If the sealant (white fluid) does not flow within 0 – 10 seconds through the Sealant
Hose (6):
1. Press the Power Button (4) to turn Off the TIREFIT kit. Disconnect the Sealant Hose (6) from the valve stem. Make sure the valve stem is free of debris. Reconnect the
Sealant Hose (6) to the valve stem. Check that the Mode Select Knob (5) is in the
Sealant Mode position and not Air Mode. Press the Power Button (4) to turn On the
TIREFIT kit.
2. Connect the Power Plug (8) to a different 12 Volt power outlet in your vehicle or another vehicle, if available. Make sure the engine is running before turning ON the
TIREFIT kit.
3. The Sealant Bottle (1) may be empty due to previous use. Call for assistance.
NOTE:
If the Mode Select Knob (5) is on Air Mode and the pump is operating, air will dispense
from the Air Pump Hose (7) only, not the Sealant Hose (6).
• If the sealant (white fluid) does flow through the Sealant Hose (6):
1. Continue to operate the pump until sealant is no longer flowing through hose (typically takes 30 - 70 seconds). As the sealant flows through the Sealant Hose (6), the
Pressure Gauge (3) can read as high as 70 psi (5 kPa). The Pressure Gauge (3) will
decrease quickly from approximately 70 psi (5 kPa) to the actual tire pressure when
the Sealant Bottle (1) is empty.
2. The pump will start to inject air into the tire immediately after the Sealant Bottle (1) is empty. Continue to operate the pump and inflate the tire to the pressure indicated
on the tire pressure label on the driver-side latch pillar (recommended pressure).
Check the tire pressure by looking at the Pressure Gauge (3).
WHAT TO DO IN EMERGENCIES
74
Page 80 of 100
JUMP-STARTING
• If your vehicle has a discharged battery itcan be jump-started using a set of
jumper cables and a battery in another
vehicle or by using a portable battery
booster pack.
• Jump-starting can be dangerous if done improperly so please follow the proce-
dures in this section carefully.
NOTE:
When using a portable battery booster pack
follow the manufacturer’s operating instruc-
tions and precautions.
Preparations for Jump-Start
• The battery is stored under an access cover in the trunk. Remote battery posts are located on the left side of the engine compartment for jump-starting.
NOTE:
The remote battery posts are viewed by standing on the left side of the vehicle looking over
the fender.
• Set the parking brake, shift the transmission into gear and turn the ignition to OFF.
• Turn off the heater, radio, and all unnecessary electrical accessories.
• If using another vehicle to jump-start the battery, park the vehicle within the jumper cables reach, set the parking brake and make sure the ignition is OFF.
Jump-Starting Procedure
• Connect the positive (+) end of the jumper cable to the remote positive (+) post of the discharged vehicle.
• Connect the opposite end of the positive (+) jumper cable to the positive (+) post of the booster battery.
• Connect the negative end (-) of the jumper cable to the negative (-) post of the booster battery.
• Connect the opposite end of the negative (-) jumper cable to the remote negative (-) post of the vehicle with the discharged battery.
• Start the engine in the vehicle that has the booster battery, let the engine idle a few minutes, and then start the engine in the vehicle with the discharged battery.
Once the engine is started, remove the jumper cables in the reverse sequence:
• Disconnect the negative (-) jumper cable from the remote negative (-) post of the vehicle with the discharged battery.
• Disconnect the negative end (-) of the jumper cable from the negative (-) post of the booster battery.
WHAT TO DO IN EMERGENCIES
78
Page 81 of 100
• Disconnect the opposite end of the positive (+) jumper cable from the positive (+) postof the booster battery.
• Disconnect the positive (+) end of the jumper cable from the remote positive (+) post of the discharged vehicle.
• If frequent jump-starting is required to start your vehicle you should have the battery and charging system inspected at your authorized dealer.
CAUTION!
• Do not use a portable battery booster pack or any other booster source with a system
voltage greater than 12 Volts or damage to the battery, starter motor, alternator or
electrical system may occur.
• Failure to follow these procedures could result in damage to the charging system of the booster vehicle or the discharged vehicle.
• Accessories that can be plugged into the vehicle power outlets draw power from the vehicle’s battery, even when not in use (i.e., cellular phones, etc.). Eventually, if
plugged in long enough, the vehicle’s battery will discharge sufficiently to degrade
battery life and/or prevent the engine from starting.
WARNING!
• When temperatures are below the freezing point, electrolyte in a discharged batterymay freeze. Do not attempt jump-starting because the battery could rupture or
explode and cause personal injury. Battery temperature must be brought above
freezing point before attempting a jump-start.
• Take care to avoid the radiator cooling fan whenever the hood is raised. It can start anytime the ignition switch is on. You can be injured by moving fan blades.
• Remove any metal jewelry, such as watch bands or bracelets, that might make an
inadvertent electrical contact. You could be severely injured.
• Batteries contain sulfuric acid that can burn your skin or eyes and generate
hydrogen gas which is flammable and explosive. Keep open flames or sparks away
from the battery.
• Do not allow vehicles to touch each other as this could establish a ground connection and personal injury could result.
• Failure to follow this procedure could result in personal injury or property damage due to battery explosion.
• Do not connect the cable to the negative post (-)of the discharged battery. The
resulting electrical spark could cause the battery to explode and could result in
personal injury.
WHAT TO DO IN EMERGENCIES
79
Page 84 of 100
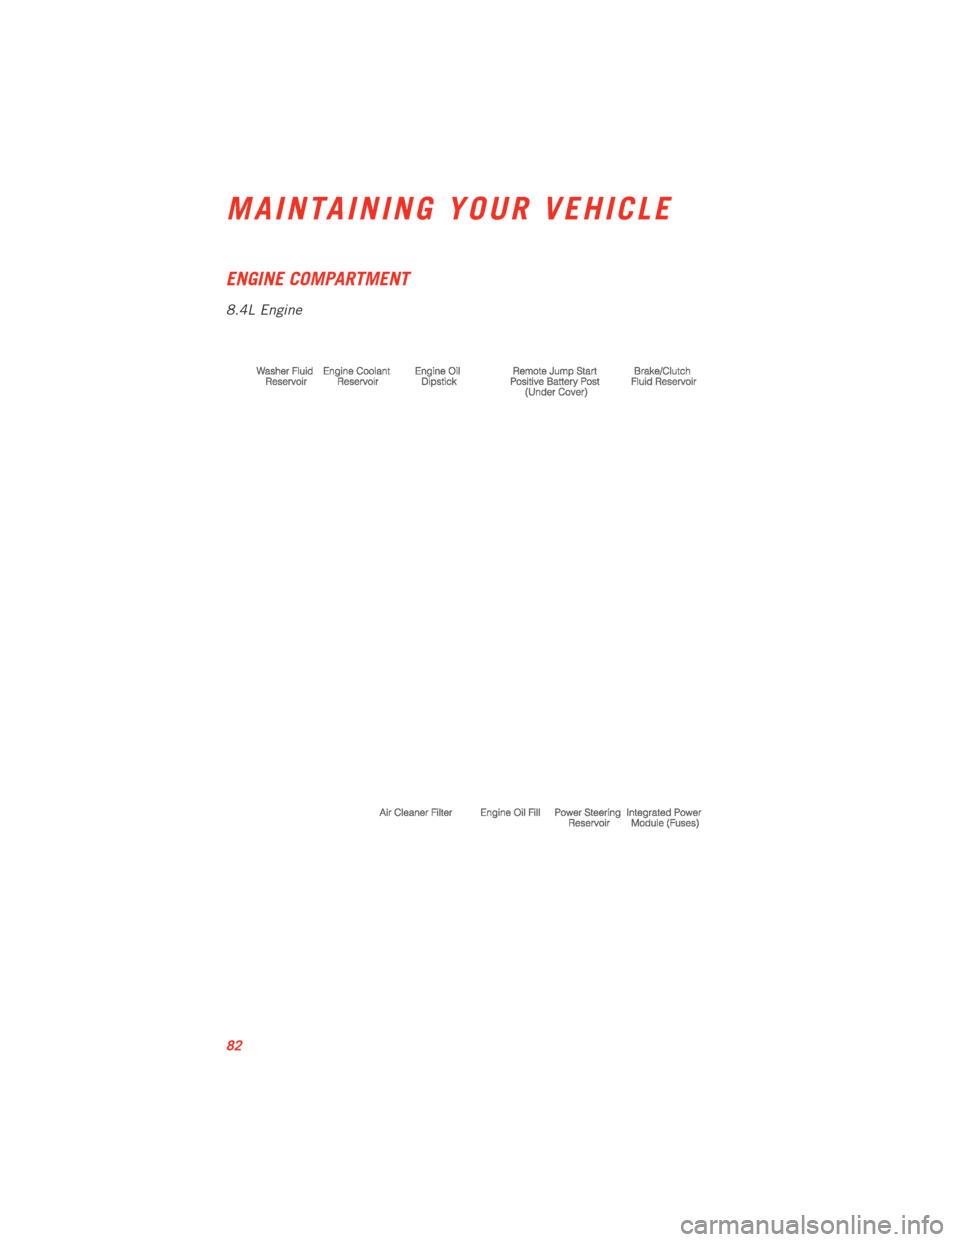
ENGINE COMPARTMENT
8.4L Engine
MAINTAINING YOUR VEHICLE
82
Page 85 of 100
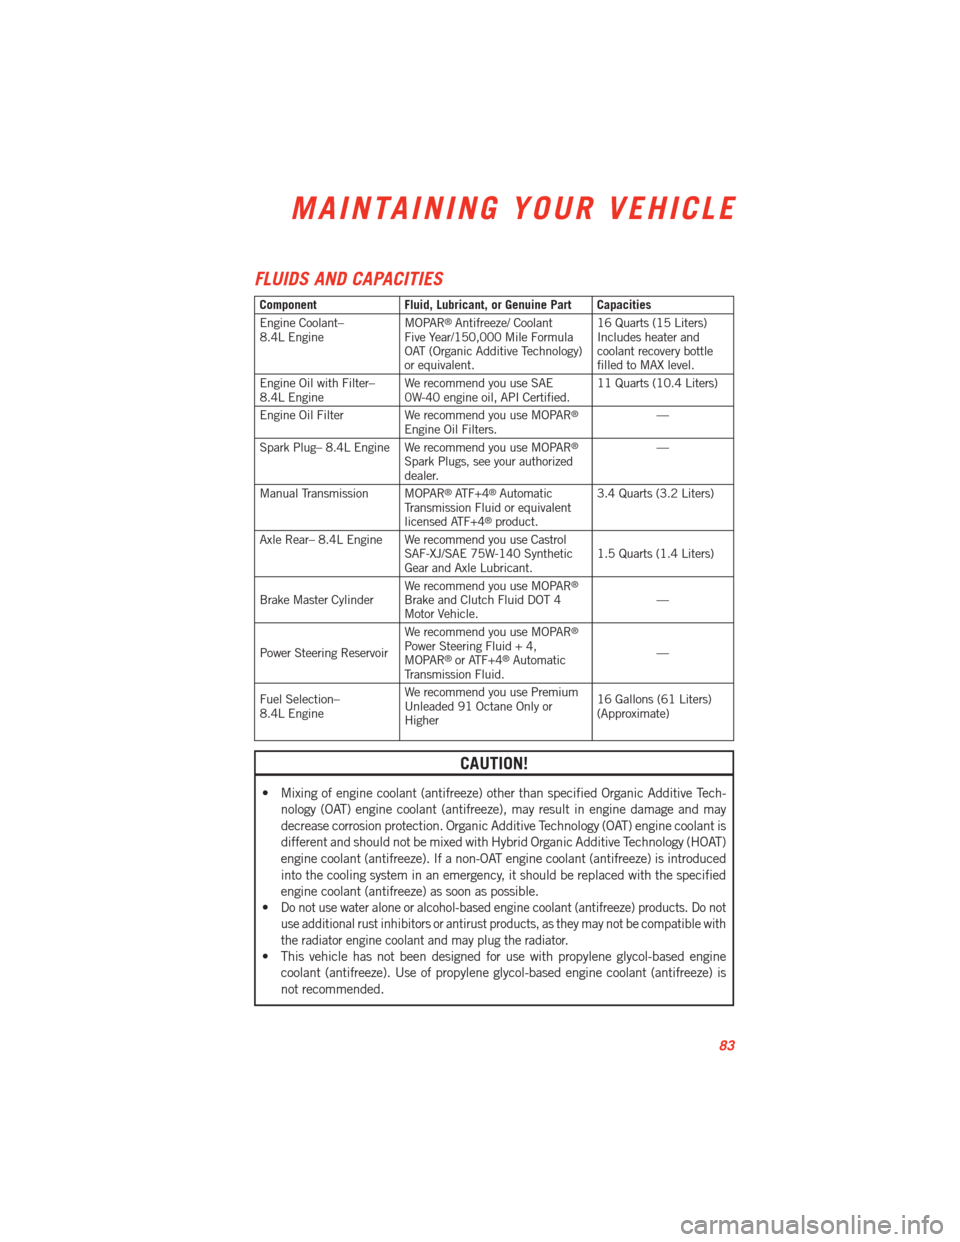
FLUIDS AND CAPACITIES
ComponentFluid, Lubricant, or Genuine Part Capacities
Engine Coolant–
8.4L Engine MOPAR®Antifreeze/ Coolant
Five Year/150,000 Mile Formula
OAT (Organic Additive Technology)
or equivalent. 16 Quarts (15 Liters)
Includes heater and
coolant recovery bottle
filled to MAX level.
Engine Oil with Filter–
8.4L Engine We recommend you use SAE
0W-40 engine oil, API Certified. 11 Quarts (10.4 Liters)
Engine Oil Filter We recommend you use MOPAR
®
Engine Oil Filters. —
Spark Plug– 8.4L Engine We recommend you use MOPAR®
Spark Plugs, see your authorized
dealer. —
Manual Transmission MOPAR
®ATF+4®Automatic
Transmission Fluid or equivalent
licensed ATF+4
®product. 3.4 Quarts (3.2 Liters)
Axle Rear– 8.4L Engine We recommend you use Castrol SAF-XJ/SAE 75W-140 Synthetic
Gear and Axle Lubricant. 1.5 Quarts (1.4 Liters)
Brake Master Cylinder We recommend you use MOPAR
®
Brake and Clutch Fluid DOT 4
Motor Vehicle. —
Power Steering Reservoir We recommend you use MOPAR
®
Power Steering Fluid + 4,
MOPAR®or ATF+4®Automatic
Transmission Fluid. —
Fuel Selection–
8.4L Engine We recommend you use Premium
Unleaded 91 Octane Only or
Higher 16 Gallons (61 Liters)
(Approximate)
CAUTION!
• Mixing of engine coolant (antifreeze) other than specified Organic Additive Tech-
nology (OAT) engine coolant (antifreeze), may result in engine damage and may
decrease corrosion protection. Organic Additive Technology (OAT) engine coolant is
different and should not be mixed with Hybrid Organic Additive Technology (HOAT)
engine coolant (antifreeze). If a non-OAT engine coolant (antifreeze) is introduced
into the cooling system in an emergency, it should be replaced with the specified
engine coolant (antifreeze) as soon as possible.
•
Do not use water alone or alcohol-based engine coolant (antifreeze) products. Do not
use additional rust inhibitors or antirust products, as they may not be compatible with
the radiator engine coolant and may plug the radiator.
• This vehicle has not been designed for use with propylene glycol-based engine
coolant (antifreeze). Use of propylene glycol-based engine coolant (antifreeze) is
not recommended.
MAINTAINING YOUR VEHICLE
83
Page 86 of 100
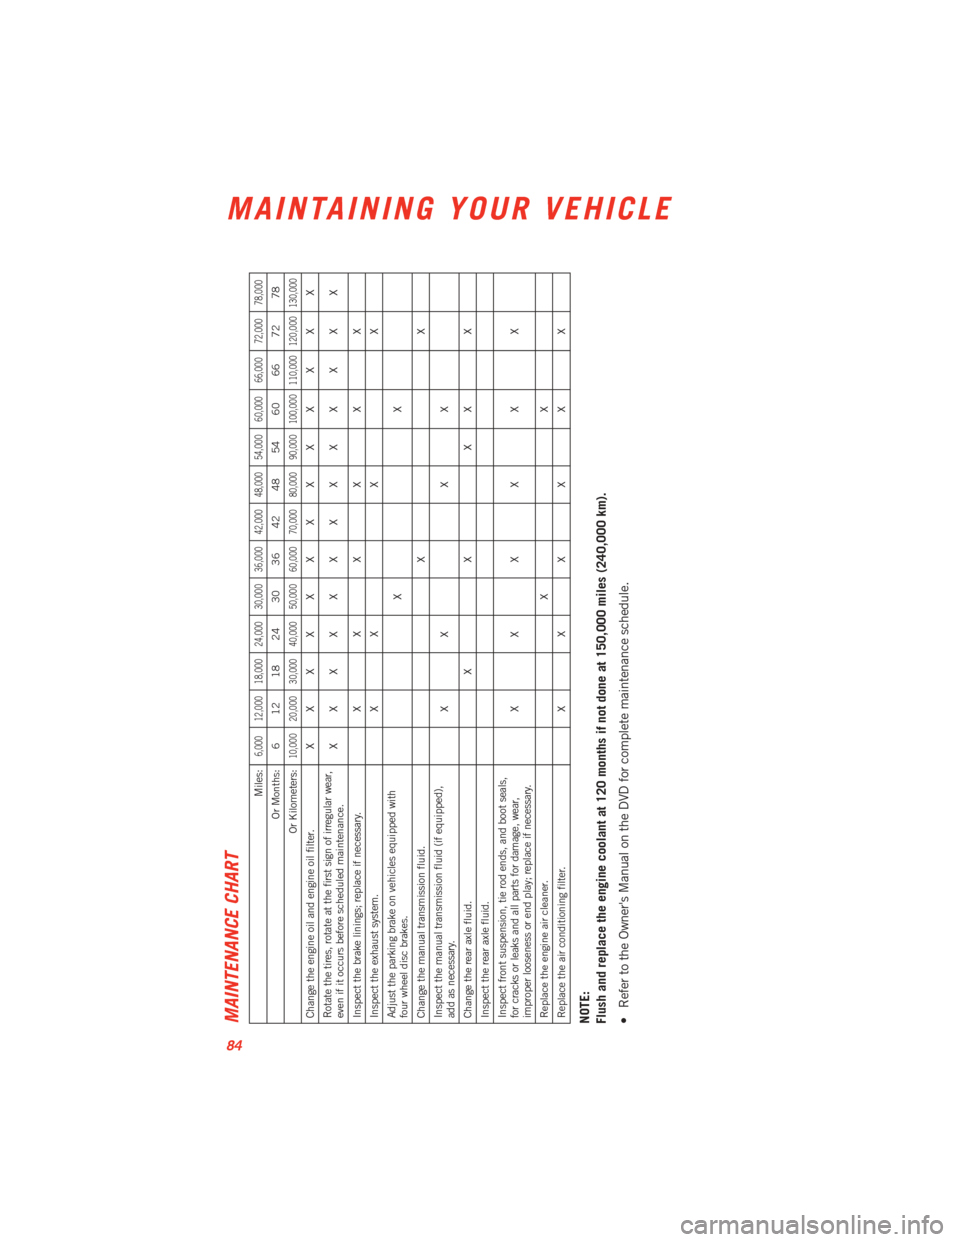
MAINTENANCE CHART
Miles:
6,000 12,000 18,000 24,000 30,000 36,000 42,000 48,000 54,000 60,000 66,000 72,000 78,000
Or Months: 6 12 18 24 30 36 42 48 54 60 66 72 78
Or Kilometers:
10,000 20,000 30,000 40,000 50,000 60,000 70,000 80,000 90,000 100,000 110,000 120,000 130,000
Change the engine oil and engine oil filter. XXXXXXXXX X X X X
Rotate the tires, rotate at the first sign of irregular wear,
even if it occurs before scheduled maintenance. XXXXXXXXX X X X X
Inspect the brake linings; replace if necessary. X X X X X X
Inspect the exhaust system. X X X X
Adjust the parking brake on vehicles equipped with
four wheel disc brakes. XX
Change the manual transmission fluid. X X
Inspect the manual transmission fluid (if equipped),
add as necessary. XX X X
Change the rear axle fluid. X X X X X
Inspect the rear axle fluid.
Inspect front suspension, tie rod ends, and boot seals,
for cracks or leaks and all parts for damage, wear,
improper looseness or end play; replace if necessary. XXXX X X
Replace the engine air cleaner. X X
Replace the air conditioning filter. X X X X X XNOTE:
Flush and replace the engine coolant at 120 months if not done at 150,000 miles (240,000 km).
• Refer to the Owner's Manual on the DVD for complete maintenance schedule.
MAINTAINING YOUR VEHICLE
84
Page 88 of 100
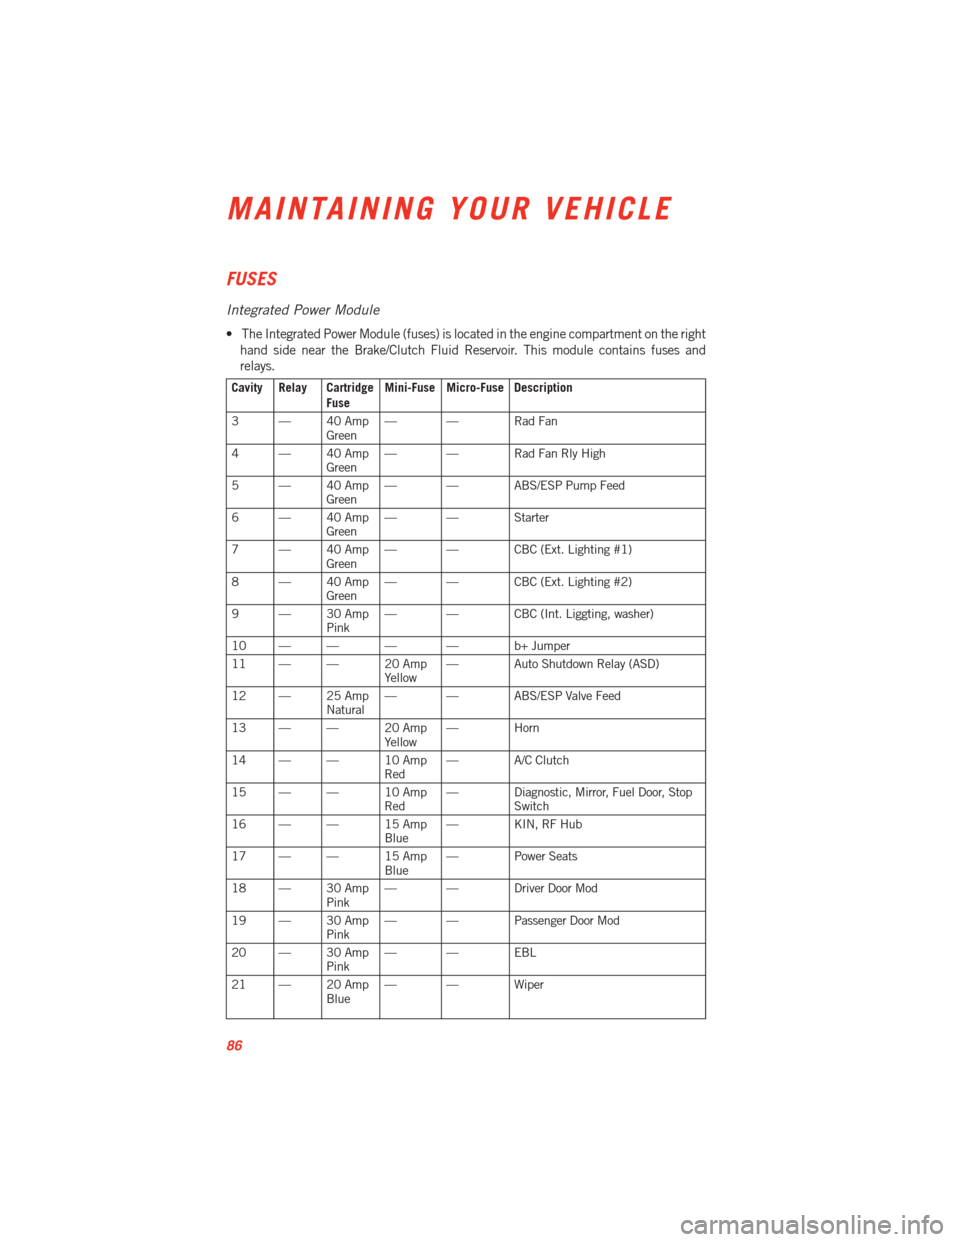
FUSES
Integrated Power Module
• The Integrated Power Module (fuses) is located in the engine compartment on the righthand side near the Brake/Clutch Fluid Reservoir. This module contains fuses and
relays.
Cavity Relay Cartridge
FuseMini-Fuse Micro-Fuse Description
3 — 40 Amp Green— — Rad Fan
4 — 40 Amp Green— — Rad Fan Rly High
5 — 40 Amp Green— — ABS/ESP Pump Feed
6 — 40 Amp Green— — Starter
7 — 40 Amp Green— — CBC (Ext. Lighting #1)
8 — 40 Amp Green— — CBC (Ext. Lighting #2)
9 — 30 Amp Pink— — CBC (Int. Liggting, washer)
10 — — — — b+ Jumper
11 — — 20 Amp Yellow— Auto Shutdown Relay (ASD)
12 — 25 Amp Natural— — ABS/ESP Valve Feed
13 — — 20 Amp Yellow— Horn
14 — — 10 Amp Red— A/C Clutch
15 — — 10 Amp Red— Diagnostic, Mirror, Fuel Door, Stop
Switch
16 — — 15 Amp Blue— KIN,RFHub
17 — — 15 Amp Blue— Power Seats
18 — 30 Amp Pink— — Driver Door Mod
19 — 30 Amp Pink— — Passenger Door Mod
20 — 30 Amp Pink— — EBL
21 — 20 Amp Blue— — Wiper
MAINTAINING YOUR VEHICLE
86
Page 93 of 100
CHRYSLER GROUP LLC CUSTOMER CENTER
P.O. Box 21–8004 Auburn Hills, MI 48321–8004 Phone: 1–855–SRT–TEAM
CHRYSLER CANADA INC. CUSTOMER CENTER
P.O. Box 1621 Windsor, Ontario N9A 4H6 Phone: 1–800–465–2001 (English)
Phone: 1–800–387–9983 (French)
ASSISTANCE FOR THE HEARING IMPAIRED
•To assist customers who have hearing difficulties, the manufacturer has installed special
TDD (Telecommunication Devices for the Deaf) equipment at its customer center. Any
hearing or speech impaired customer, who has access to a TDD or a conventional
teletypewriter (TTY) in the United States, can communicate with the manufacturer by
dialing 1–800–380–CHRY. Canadian residents with hearing difficulties that require
assistance can use the special needs relay service offered by Bell Canada. For TTY
teletypewriter users, dial 711 and for Voice callers, dial 1–800–855–0511 to connect
with a Bell Relay Service operator.
WARNING!
Engine exhaust, some of its constituents, and certain vehicle components contain, or
emit, chemicals known to the State of California to cause cancer and birth defects, or
other reproductive harm. In addition, certain fluids contained in vehicles and certain
products of component wear contain, or emit, chemicals known to the State of
California to cause cancer and birth defects, or other reproductive harm.
PUBLICATIONS ORDERING
• If you are the first registered retail owner of your vehicle, you may obtain one free
printed copy of the Owner's Manual, Warranty Booklet or Radio Manuals on your DVD
by calling 1–800–423–6343 (U.S.) or 1–800–387–1143 (Canada) or by contacting
your dealer.
• Replacement User Guide kits or DVDs or, if you prefer, additional printed copies of the Owner's Manual, Warranty Booklet or Radio Manuals may be purchased by visiting
www.techauthority.com or by calling 1–800–890–4038 (U.S.) or 1–800–387–1143
(Canada). Visa, Master Card, American Express and Discover orders are accepted.
If you prefer mailing your order, please call the above numbers for an order form.
NOTE:
• A street address is required when ordering manuals (no P.O. Boxes).
• The Owner's Manual and User Guide electronic files are also available on the Chrysler, Jeep, Ram Truck and Dodge websites.
• Click on the "For Owners" tab, select "Owner/Service Manuals", then select your desired model year and vehicle from the drop down lists.
CONSUMER ASSISTANCE
91
Page 96 of 100
Adjustable Pedals............16
Airbag ..................10
Air Conditioning .............22
Arming Theft System (Security Alarm) ............9
Automatic Headlights ..........20
Automatic Temperature Control(ATC).............22
Automatic Transmission FluidType ..............83
AxleFluid ................83
Back-Up Camera ............23
Belts, Seat ................10
BrakeFluid ...............83
Break-In Recommendations, NewVehicle .............18
Bulb Replacement ............90
Calibration, Compass ..........58
Child Restraint Tether Anchors .....13
ClimateControl .............22
Compass Calibration ...........58
Cooling System Coolant Capacity ..........83
Cruise Control (Speed Control) .....20
CruiseLight ...............20
Customer Assistance ..........91
Customer Programmable Features . . .59
Defects, Reporting ............92
Dimmer Control .............20
Dimmer Switch, Headlight .......20
Electronics Your Vehicle's Sound System . . .24
Electronic Speed Control (CruiseControl)............20
Electronic Vehicle Information Center (EVIC) .............59
Emergency, In Case of BrakeWarningLight ........69
Freeing Vehicle When Stuck ....80
Overheating .............71
Emergency Key ..............8 Engine
Break-In Recommendations ....18
Compartment ............82
OilSelection ............83
Overheating .............71
Starting ................9
Stopping ...............9
Event Data Recorder ...........81
ExteriorLights..............90
Fluid Capacities .............83
Fluids ..................83
FogLights................20
FreeingAStuckVehicle.........80
Fuel Specifications ............83
Fuse ...................86
Fuses ...................86
Garage Door Opener (HomeLink
®)...61
Headlights Automatic ..............20
Dimmer Switch ...........20
High Beam .............19
High Beam/Low Beam Select (Dimmer) Switch ...........19
HomeLink
®(Garage Door Opener) . . .61
Instrument Cluster Indicators ...............7
Intermittent Wipers (Delay Wipers) . . .19
Introduction ................2
Jump Starting ..............78
KeyFob..................8
Key Fob Programmable Features ....60
Keyless Enter-N-Go Starting/Stopping ..........9
LATCH (Lower Anchors and Tether forCHildren).............13
Lights Tire Pressure Monitoring
(TPMS) ...............68
INDEX
94