ignition DODGE VIPER 2013 VX / 3.G User Guide
[x] Cancel search | Manufacturer: DODGE, Model Year: 2013, Model line: VIPER, Model: DODGE VIPER 2013 VX / 3.GPages: 100, PDF Size: 3.1 MB
Page 7 of 100

A. Turn Signal/Wiper/Washer/High BeamsLever (behind steering wheel) pg. 19
B. Tachometer
C. Ignition Start/Stop Button (behind steering wheel) pg. 9
D. Uconnect™ 8.4AN pg. 43
E. Emergency Brake F. Hazard Button
G. Power Outlets pg. 63
H. Automatic Climate Control
• Automatic Climate Controls pg. 22
• Air Conditioning (A/C) pg. 22
• Recirculation pg. 22
• Heated Mirrors pg. 22 I. Electronic Speed Control pg. 20
J. Adjustable Pedals pg. 16
K. Electronic Vehicle Information Center
(EVIC) Messages pg. 58
L. Headlight Switch pg. 20
M. Power Mirrors
N. Power Door Locks
CONTROLS AT A GLANCE
5
Page 9 of 100
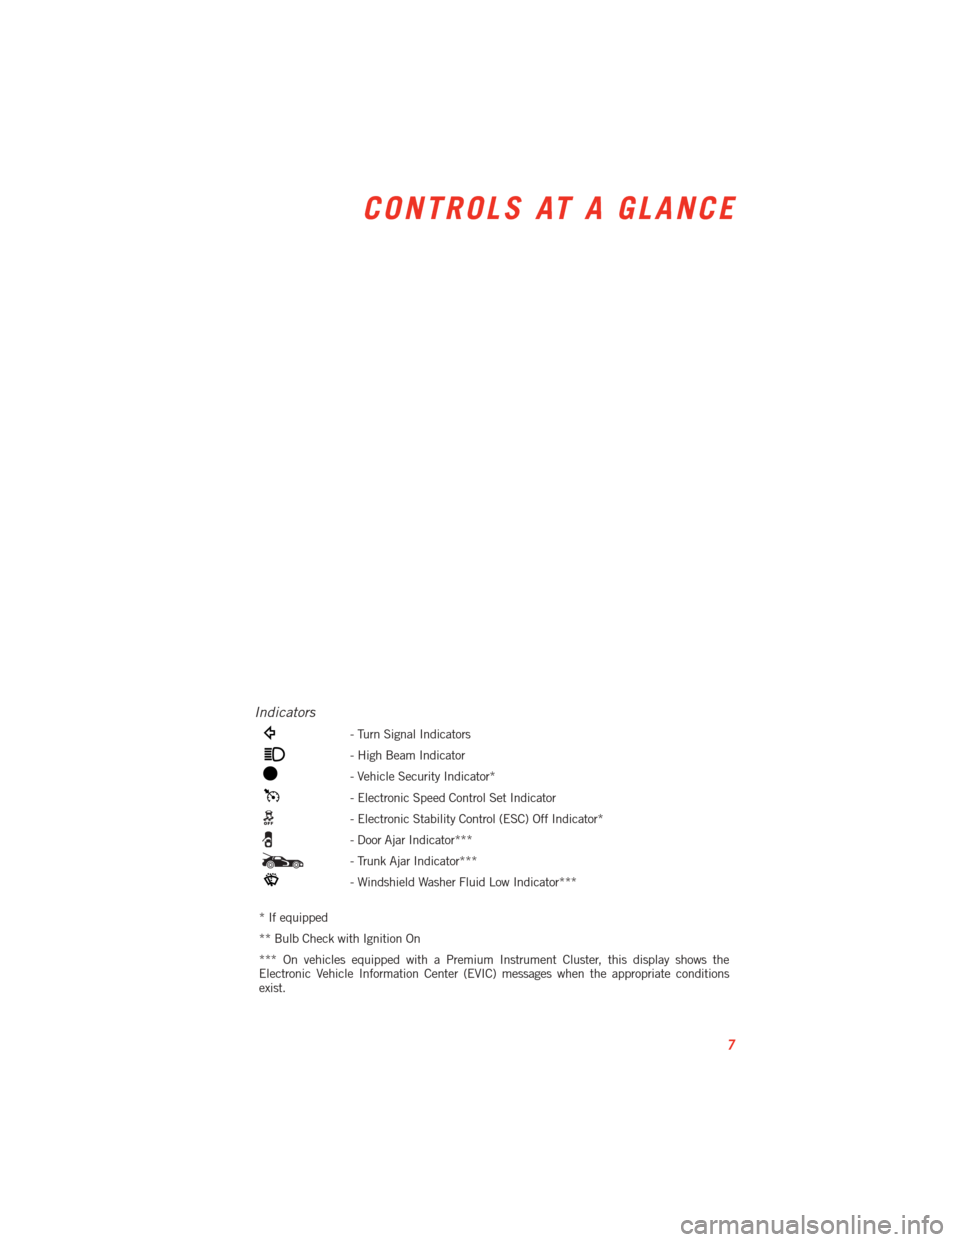
Indicators
- Turn Signal Indicators
- High Beam Indicator
- Vehicle Security Indicator*
- Electronic Speed Control Set Indicator
- Electronic Stability Control (ESC) Off Indicator*
- Door Ajar Indicator***
- Trunk Ajar Indicator***
- Windshield Washer Fluid Low Indicator***
* If equipped
** Bulb Check with Ignition On
*** On vehicles equipped with a Premium Instrument Cluster, this display shows the
Electronic Vehicle Information Center (EVIC) messages when the appropriate conditions
exist.
CONTROLS AT A GLANCE
7
Page 10 of 100
KEY FOB
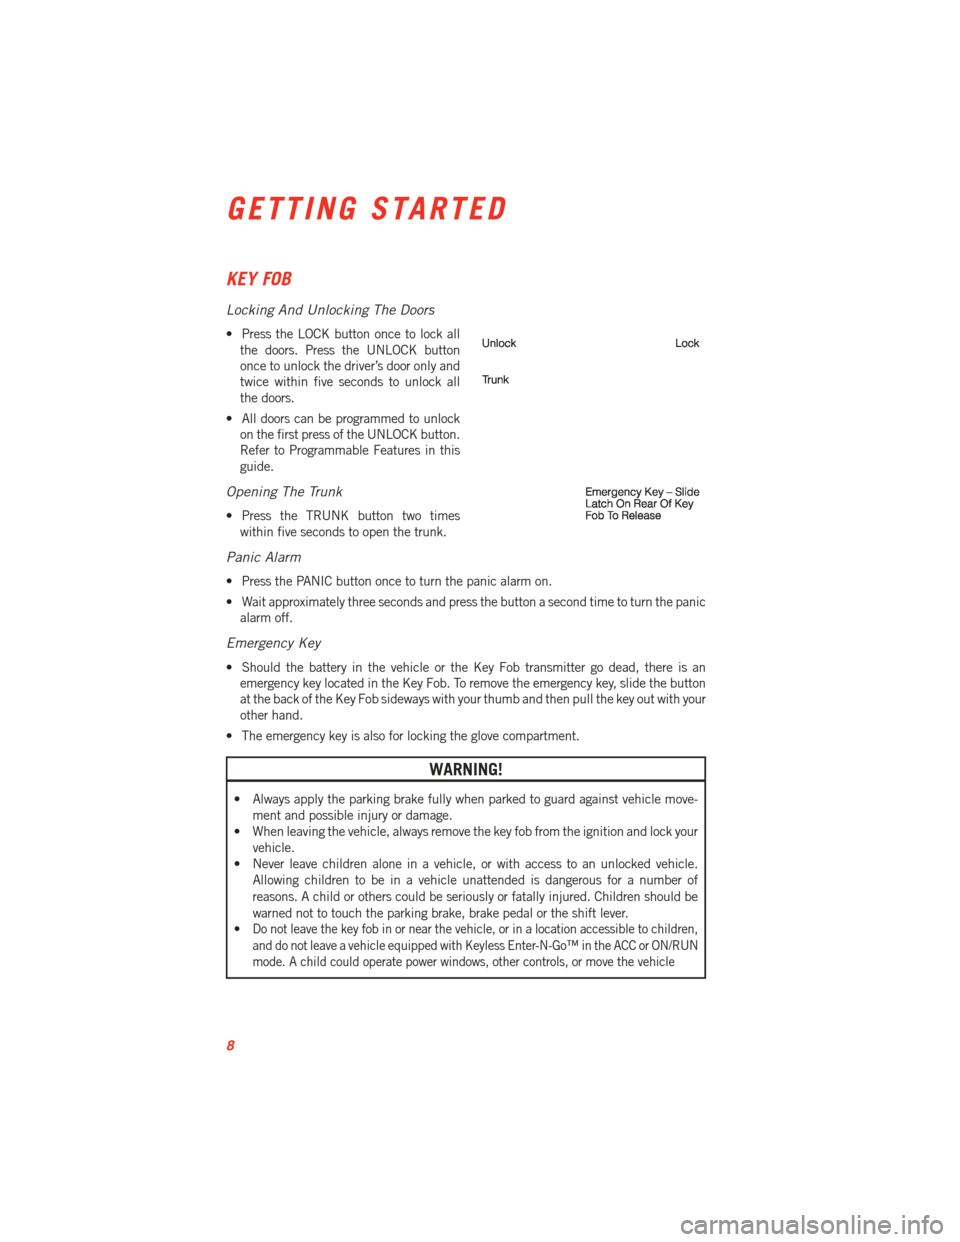
Locking And Unlocking The Doors
• Press the LOCK button once to lock allthe doors. Press the UNLOCK button
once to unlock the driver’s door only and
twice within five seconds to unlock all
the doors.
• All doors can be programmed to unlock on the first press of the UNLOCK button.
Refer to Programmable Features in this
guide.
Opening The Trunk
• Press the TRUNK button two timeswithin five seconds to open the trunk.
Panic Alarm
• Press the PANIC button once to turn the panic alarm on.
• Wait approximately three seconds and press the button a second time to turn the panicalarm off.
Emergency Key
• Should the battery in the vehicle or the Key Fob transmitter go dead, there is anemergency key located in the Key Fob. To remove the emergency key, slide the button
at the back of the Key Fob sideways with your thumb and then pull the key out with your
other hand.
• The emergency key is also for locking the glove compartment.
WARNING!
• Always apply the parking brake fully when parked to guard against vehicle move- ment and possible injury or damage.
• When leaving the vehicle, always remove the key fob from the ignition and lock your
vehicle.
• Never leave children alone in a vehicle, or with access to an unlocked vehicle.
Allowing children to be in a vehicle unattended is dangerous for a number of
reasons. A child or others could be seriously or fatally injured. Children should be
warned not to touch the parking brake, brake pedal or the shift lever.
•
Do not leave the key fob in or near the vehicle, or in a location accessible to children,
and do not leave a vehicle equipped with Keyless Enter-N-Go™ in the ACC or ON/RUN
mode. A child could operate power windows, other controls, or move the vehicle
GETTING STARTED
8
Page 11 of 100
ENGINE STARTING/STOPPING
Starting
1. Fully apply the parking brake.
2. Press the clutch pedal to the floor.
3. Place the shift lever in NEUTRAL.
4. Press the red ENGINE START/STOPbutton located on the instrument panel.
Release the button when the engine
starts.
NOTE:
The engine will not start unless the clutch pedal is pressed to the floor.
Stopping
1. Bring the vehicle to a complete stop.
2. Fully apply the parking brake.
3. Press the clutch pedal to the floor.
4. Place the shift lever in NEUTRAL/1st Gear.
5. Press the ENGINE START/STOP button once. The ignition switch will return to the OFF position.
THEFT ALARM
To Arm:
Follow these steps to arm the Vehicle Security Alarm:
• Press LOCK on the interior power door lock switch with the driver and/or passenger dooropen.
• Press the LOCK button on the Remote Keyless Entry (RKE) transmitter.
NOTE:
Using the key to open the liftgate while the Vehicle Security Alarm is armed will not trigger
the theft alarm.
To Disarm:
The Vehicle Security Alarm can be disarmed using any of the following methods:
• Press the UNLOCK button on the Remote Keyless Entry (RKE) transmitter.
• Cycle the vehicle ignition system out of the OFF position.
GETTING STARTED
9
Page 62 of 100
Key Fob Programmable Features
• The following features may also be programmed by using the Key Fob transmitter or theignition switch and driver's door lock switch.
NOTE:
Pressing the LOCK button while you are inside the vehicle will activate the Vehicle
Security Alarm. Opening a door with the Vehicle Security Alarm activated will cause the
alarm to sound. Press the UNLOCK button to deactivate the Vehicle Security Alarm.
Unlock On First Press
• To unlock either the driver's side, or all doors, on the first press of the UNLOCK button: • Press and hold the LOCK button for at least 4 seconds, but no longer than10 seconds. Then, press and hold the UNLOCK button while still holding the LOCK
button.
• Release both buttons at the same time.
Auto Unlock Doors On Exit
• To have all of the vehicle doors unlock when any door is opened: • Enter your vehicle and close all the doors, and fasten your seat belt.
• Cycle the ignition switch between the LOCK and ON position four times, ending in
the LOCK position (do not start the engine).
• Press the power door UNLOCK switch to unlock the doors. A single chime will indicate that programming is complete.
Sound Horn With Lock
• To turn the horn chirp on or off when the doors are locked: • Press the LOCK button for at least 4 seconds, but no longer than 10 seconds. Then,
press the PANIC button while still holding the LOCK button.
• Release both buttons at the same time.
Flashing Lights With Lock
• The turn signal lights flashing, when the doors are locked or unlocked, feature can be turned on or off. To turn this feature on or off:• Press and hold the UNLOCK button for at least 4 seconds, but no longer than
10 seconds. Then, press and hold the LOCK button while still holding the UNLOCK
button.
• Release both buttons at the same time.
ELECTRONICS
60
Page 63 of 100
UNIVERSAL GARAGE DOOR OPENER (HomeLink®)
•HomeLink®replaces up to three hand-held transmitters that operate devices such as
garage door openers, motorized gates, lighting or home security systems. The HomeLink®
unit is powered by your vehicles 12 Volt battery.
• The HomeLink®buttons that are located in the overhead console or sunvisor designate
the three different HomeLink®channels.
• The HomeLink
®indicator is located above the center button.
Before You Begin Programming
HomeLink®
• Be sure that your vehicle is parked out- side of the garage before you begin pro-
gramming.
•
For more efficient programming and accu-
rate transmission of the radio-frequency
signal it is recommended that a new bat-
tery be placed in the hand-held transmit-
ter of the device that is being programmed
to the HomeLink
®system.
• Erase all channels before you begin programming. To erase the channels, place the
ignition switch into the ON/RUN position, then press and hold the two outside
HomeLink
®buttons (I and III) for up 20 seconds or until the red indicator flashes.
NOTE:
• Erasing all channels should only be performed when programming HomeLink
®for the
first time. Do not erase channels when programming additional buttons.
• If you have any problems, or require assistance, please call toll-free 1–800–355–3515 or, on the Internet at www.HomeLink.com for information or assistance.
Programming A Rolling Code
• For programming Garage Door Openers that were manufactured after 1995. TheseGarage Door Openers can be identified by the “LEARN” or “TRAIN” button located
where the hanging antenna is attached to the Garage Door Opener. It is NOT the button
that is normally used to open and close the door. The name and color of the button may
vary by manufacturer.
• Place the ignition switch into the ON/RUN position.
• Place the hand-held transmitter 1 to 3 in (3 to 8 cm) away from the HomeLink
®button
you wish to program while keeping the HomeLink®indicator light in view.
• Simultaneously press and hold both the HomeLink
®button you want to program and
the hand-held transmitter button.
ELECTRONICS
61
Page 64 of 100
• Continue to hold both buttons and observe the indicator light. The HomeLink®
indicator will flash slowly and then rapidly after HomeLink®has received the frequency
signal from the hand-held transmitter. Release both buttons after the indicator light
changes from slow to rapid.
• At the garage door opener motor (in the garage), locate the “LEARN” or “TRAINING” button. This can usually be found where the hanging antenna wire is attached to the
garage door opener motor. Firmly press and release the “LEARN” or “TRAINING”
button.
NOTE:
You have 30 seconds in which to initiate the next step after the LEARN button has been
pressed.
• Return to the vehicle and press the programmed HomeLink
®button twice (holding the
button for two seconds each time). If the device is plugged in and activates, program-
ming is complete.
NOTE:
If the device does not activate, press the button a third time (for two seconds) to complete
the training.
• To program the remaining two HomeLink
®buttons, repeat each step for each remain-
ing button. DO NOT erase the channels.
Programming A Non-Rolling Code
• For programming Garage Door Openers manufactured before 1995.
• Turn the ignition switch to the ON/RUN position.
• Place the hand-held transmitter 1 to 3 in (3 to 8 cm) away from the HomeLink
®button
you wish to program while keeping the HomeLink®indicator light in view.
• Simultaneously press and hold both the HomeLink
®button you want to program and
the hand-held transmitter button.
• Continue to hold both buttons and observe the indicator light. The HomeLink
®
indicator will flash slowly and then rapidly after HomeLink®has received the frequency
signal from the hand-held transmitter. Release both buttons after the indicator light
changes from slow to rapid.
• Press and hold the programmed HomeLink
®button and observe the indicator light.
NOTE: • If the indicator light stays on constantly, programming is complete and the garagedoor (or device) should activate when the HomeLink
®button is pressed.
• To program the two remaining HomeLink
®buttons, repeat each step for each
remaining button. DO NOT erase the channels.
ELECTRONICS
62
Page 70 of 100
INSTRUMENT CLUSTER WARNING LIGHTS
- Electronic Stability Control (ESC) Activation/Malfunction Indicator Light
• The “ESC Activation/Malfunction Indicator Light” in the instrument cluster will comeon when the ignition switch is turned to the ON/RUN position. It should go out with the
engine running. If the “ESC Activation/Malfunction Indicator Light” comes on continu-
ously with the engine running, a malfunction has been detected in the ESC system.
• If this light remains on after several ignition cycles, and the vehicle has been driven several miles (kilometers) at speeds greater than 30 mph (48 km/h), we recommend
you drive to the nearest service center and have the vehicle serviced immediately.
- Tire Pressure Monitoring System (TPMS) Light
• Each tire, including the spare (if provided), should be checked monthly, when cold andinflated to the inflation pressure recommended by the vehicle manufacturer on the
vehicle placard or tire inflation pressure label. (If your vehicle has tires of a different
size than the size indicated on the vehicle placard or tire inflation pressure label, you
should determine the proper tire inflation pressure for those tires.)
• As an added safety feature, your vehicle has been equipped with a Tire Pressure Monitoring System (TPMS) that illuminates a low tire pressure telltale when one or
more of your tires is significantly under-inflated. Accordingly, when the low tire pressure
telltale illuminates, you should stop and check your tires as soon as possible, and
inflate them to the proper pressure. Driving on a significantly under-inflated tire causes
the tire to overheat and can lead to tire failure. Under-inflation also reduces fuel
efficiency and tire tread life, and may affect the vehicle’s handling and stopping ability.
• IF THE LIGHT STARTS FLASHING INDICATING A LOW TIRE PRESSURE, ADJUST THE AIR
PRESSURE IN THE LOW TIRE TO THE AIR PRESSURE SHOWN ON THE VEHICLE PLACARD
OR TIRE INFLATION PRESSURE LABEL LOCATED ON THE DRIVER'S DOOR.
NOTE:
AFTER INFLATION, THE VEHICLE MAY NEED TO BE DRIVEN FOR 20 MINUTES BEFORE
THE FLASHING LIGHT WILL TURN OFF.
• Please note that the TPMS is not a substitute for proper tire maintenance, and it is the driver’s responsibility to maintain correct tire pressure, even if under-inflation has not
reached the level to trigger illumination of the TPMS low tire pressure telltale.
• Your vehicle has also been equipped with a TPMS malfunction indicator to indicate when the system is not operating properly. The TPMS malfunction indicator is
combined with the low tire pressure telltale. When the system detects a malfunction,
the telltale will flash for approximately one minute and then remain continuously
illuminated. This sequence will continue each time the vehicle is restarted as long as
the malfunction exists.
• When the malfunction indicator is illuminated, the system may not be able to detect or signal low tire pressure as intended. TPMS malfunctions may occur for a variety of
reasons, including the installation of replacement or alternate tires or wheels on the
vehicle that prevent the TPMS from functioning properly. Always check the TPMS
WHAT TO DO IN EMERGENCIES
68
Page 72 of 100
WARNING!
Driving a vehicle with the red brake light on is dangerous. Part of the brake system may
have failed. It will take longer to stop the vehicle. You could have a collision. Have the
vehicle checked immediately.
- Malfunction Indicator Light (MIL)
• Certain conditions, such as a poor fuel quality, etc., may illuminate the MIL afterengine start. The vehicle should be serviced if the light stays on through several typical
driving cycles. In most situations, the vehicle will drive normally and not require towing.
• If the MIL flashes when the engine is running, serious conditions may exist that could lead to immediate loss of power or severe catalytic converter damage. We recommend
you do not operate the vehicle. Have the vehicle serviced immediately.
- Electronic Stability Control (ESC) OFF Indicator Light
• This light indicates the Electronic Stability Control (ESC) is off.
- Charging System Light
• This light shows the status of the electrical charging system. If the charging systemlight remains on, it means that the vehicle is experiencing a problem with the charging
system.
• We recommend you do not continue driving if the charging system light is on. Have the vehicle serviced immediately.
- Oil Pressure Warning Light
• This light indicates low engine oil pressure. If the light turns on while driving, stop thevehicle and shut off the engine as soon as possible. A chime will sound when this light
turns on.
• We recommend you do not operate the vehicle or engine damage will occur. Have the vehicle serviced immediately.
- Anti-Lock Brake (ABS) Light
• This light monitors the Anti-Lock Brake System (ABS).
• If the light is not on during starting, stays on, or turns on while driving, we recommendyou drive to the nearest service center and have the vehicle serviced immediately.
- Electronic Throttle Control (ETC) Indicator Light
• This light informs you of a problem with the Electronic Throttle Control (ETC) system.
• If a problem is detected, the light will come on while the engine is running. Cycle theignition when the vehicle has completely stopped and the shift lever is placed in the
NEUTRAL position; the light should turn off.
WHAT TO DO IN EMERGENCIES
70
Page 75 of 100
Using The Deflation Button
• Press the Deflation Button (2) to reduce the air pressure in the tire if it becomes over-inflated.
TIREFIT Usage Precautions
• Replace the TIREFIT Sealant Bottle (1) and Sealant Hose (6) prior to the expirationdate (printed on the bottle label) to assure optimum operation of the system. Refer to
“Sealing a Tire with TIREFIT” section (F) “Sealant Bottle and Hose Replacement”.
• The Sealant Bottle (1) and Sealant Hose (6) are a one tire application use. After each use, always replace these components immediately at an authorized dealer.
• When the TIREFIT sealant is in a liquid form, clean water, and a damp cloth will remove the material from the vehicle or tire and wheel components. Once the sealant dries, it
can easily be peeled off and properly discarded.
• For optimum performance, make sure the valve stem on the wheel is free of debris before connecting the TIREFIT kit.
• You can use the TIREFIT air pump to inflate bicycle tires. The kit also comes with two needles, located in the Accessory Storage Compartment (on the bottom of the air
pump) for inflating sport balls, rafts, or similar inflatable items. However, use only the
Air Pump Hose (7) and make sure the Mode Select Knob (5) is in the Air Mode when
inflating such items to avoid injecting sealant into them. The TIREFIT Sealant is only
intended to seal punctures less than 1/4 in (6 mm) diameter in the tread of your
vehicle.
• Do not lift or carry the TIREFIT kit by the hoses.
Sealing A Tire With TIREFIT
(A) Whenever You Stop To Use TIREFIT:
1. Pull over to a safe location and turn on the vehicle’s Hazard Warning flashers.
2. Verify that the valve stem (on the wheel with the deflated tire) is in a position that is near to the ground. This will allow the TIREFIT Hoses (6) and (7) to reach the valve
stem and keep the TIREFIT kit flat on the ground. This will provide the best positioning
of the kit when injecting the sealant into the deflated tire and running the air pump.
Move the vehicle as necessary to place the valve stem in this position before
proceeding.
3. Place the transmission in PARK (auto transmission) or in Gear (manual transmission) and turn Off the ignition.
4. Set the parking brake.
(B) Setting Up To Use TIREFIT:
1. Turn the Mode Select Knob (5) to the Sealant Mode position.
2. Uncoil the Sealant Hose (6) and then remove the cap from the fitting at the end of the hose.
WHAT TO DO IN EMERGENCIES
73