manual transmission DODGE VIPER 2013 VX / 3.G User Guide
[x] Cancel search | Manufacturer: DODGE, Model Year: 2013, Model line: VIPER, Model: DODGE VIPER 2013 VX / 3.GPages: 100, PDF Size: 3.1 MB
Page 3 of 100
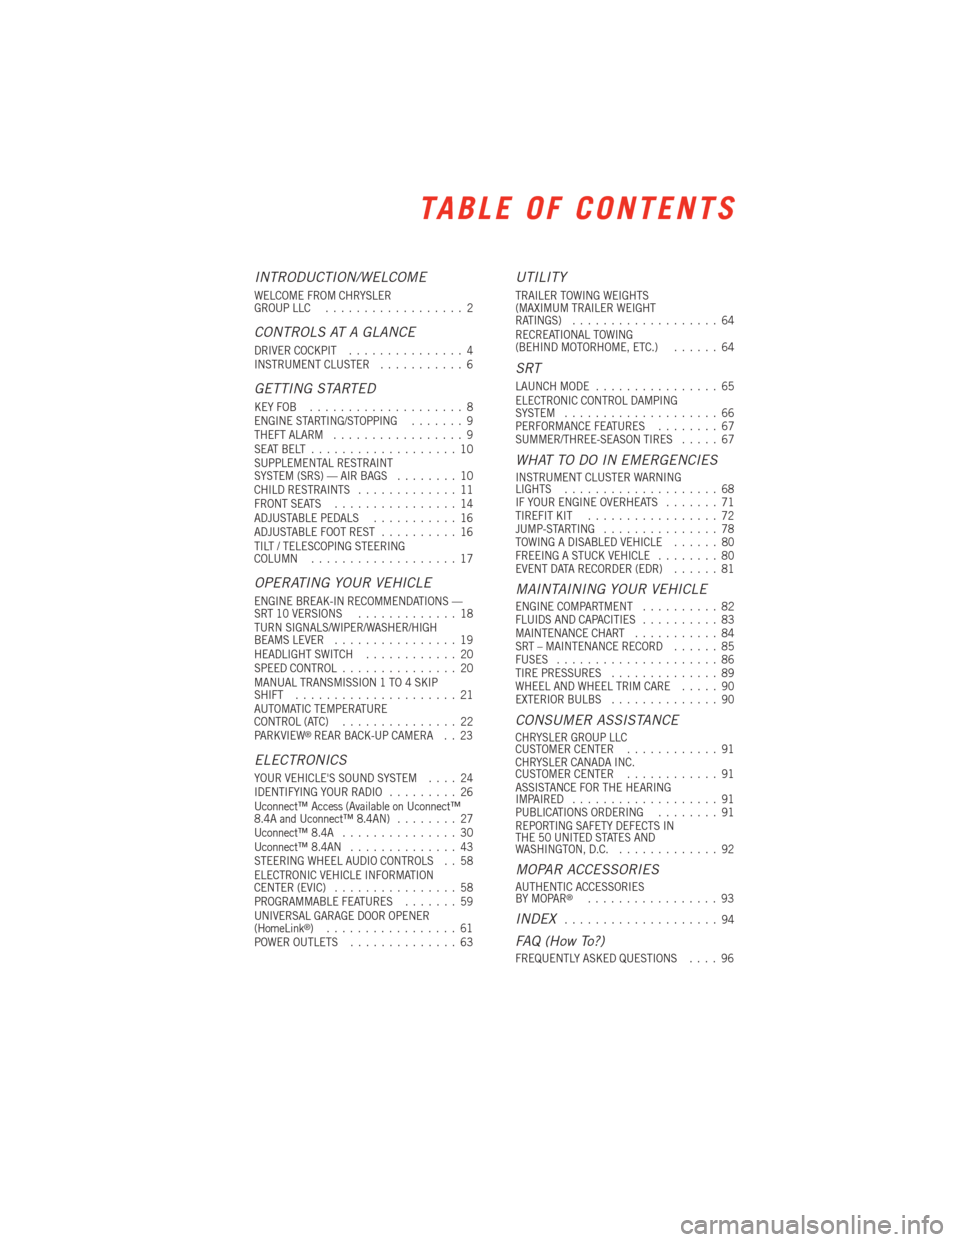
INTRODUCTION/WELCOME
WELCOME FROM CHRYSLER
GROUP LLC..................2
CONTROLS AT A GLANCE
DRIVER COCKPIT ...............4
INSTRUMENT CLUSTER ...........6
GETTING STARTED
KEYFOB ....................8
ENGINE STARTING/STOPPING .......9
THEFT ALARM .................9
SEATBELT ...................10
SUPPLEMENTAL RESTRAINT
SYSTEM (SRS) — AIR BAGS ........10
CHILD RESTRAINTS .............11
FRONT SEATS ................14
ADJUSTABLE PEDALS ...........16
ADJUSTABLE FOOT REST ..........16
TILT / TELESCOPING STEERING
COLUMN ...................17
OPERATING YOUR VEHICLE
ENGINE BREAK-IN RECOMMENDATIONS —
SRT 10 VERSIONS .............18
TURN SIGNALS/WIPER/WASHER/HIGH
BEAMS LEVER ................19
HEADLIGHT SWITCH ............20
SPEED CONTROL ...............20
MANUAL TRANSMISSION 1 TO 4 SKIP
SHIFT .....................21
AUTOMATIC TEMPERATURE
CONTROL (ATC) ...............22
PARKVIEW
®REAR BACK-UP CAMERA . . 23
ELECTRONICS
YOUR VEHICLE'S SOUND SYSTEM ....24
IDENTIFYING YOUR RADIO .........26
Uconnect™ Access (Available on Uconnect™
8.4A and Uconnect™ 8.4AN) ........27
Uconnect™ 8.4A ...............30
Uconnect™ 8.4AN ..............43
STEERING WHEEL AUDIO CONTROLS . . 58
ELECTRONIC VEHICLE INFORMATION
CENTER (EVIC) ................58
PROGRAMMABLE FEATURES .......59
UNIVERSAL GARAGE DOOR OPENER
(HomeLink
®) .................61
POWER OUTLETS ..............63
UTILITY
TRAILER TOWING WEIGHTS
(MAXIMUM TRAILER WEIGHT
RATINGS)...................64
RECREATIONAL TOWING
(BEHIND MOTORHOME, ETC.) ......64
SRT
LAUNCH MODE................65
ELECTRONIC CONTROL DAMPING
SYSTEM ....................66
PERFORMANCE FEATURES ........67
SUMMER/THREE-SEASON TIRES .....67
WHAT TO DO IN EMERGENCIES
INSTRUMENT CLUSTER WARNING
LIGHTS....................68
IF YOUR ENGINE OVERHEATS .......71
TIREFIT KIT .................72
JUMP-STARTING ...............78
TOWING A DISABLED VEHICLE ......80
FREEING A STUCK VEHICLE ........80
EVENT DATA RECORDER (EDR) ......81
MAINTAINING YOUR VEHICLE
ENGINE COMPARTMENT..........82
FLUIDS AND CAPACITIES ..........83
MAINTENANCE CHART ...........84
SRT – MAINTENANCE RECORD ......85
FUSES .....................86
TIRE PRESSURES ..............89
WHEEL AND WHEEL TRIM CARE .....90
EXTERIOR BULBS ..............90
CONSUMER ASSISTANCE
CHRYSLER GROUP LLC
CUSTOMER CENTER ............91
CHRYSLER CANADA INC.
CUSTOMER CENTER ............91
ASSISTANCE FOR THE HEARING
IMPAIRED ...................91
PUBLICATIONS ORDERING ........91
REPORTING SAFETY DEFECTS IN
THE 50 UNITED STATES AND
WASHINGTON, D.C. .............92
MOPAR ACCESSORIES
AUTHENTIC ACCESSORIES
BY MOPAR®.................93
INDEX....................94
FAQ (How To?)
FREQUENTLY ASKED QUESTIONS ....96
TABLE OF CONTENTS
Page 23 of 100
Accel/Decel
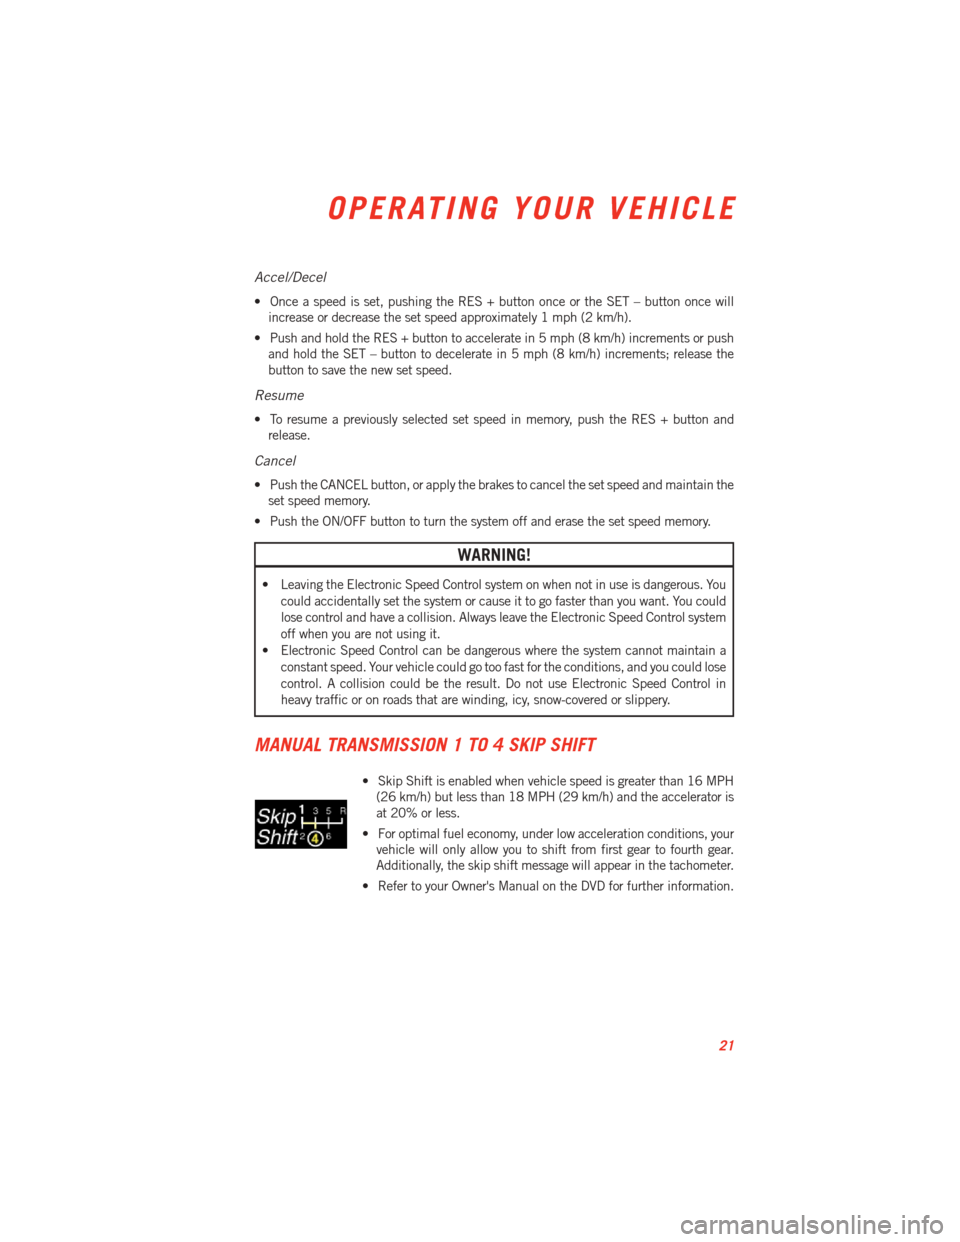
• Once a speed is set, pushing the RES + button once or the SET – button once willincrease or decrease the set speed approximately 1 mph (2 km/h).
• Push and hold the RES + button to accelerate in 5 mph (8 km/h) increments or push and hold the SET – button to decelerate in 5 mph (8 km/h) increments; release the
button to save the new set speed.
Resume
• To resume a previously selected set speed in memory, push the RES + button andrelease.
Cancel
• Push the CANCEL button, or apply the brakes to cancel the set speed and maintain theset speed memory.
• Push the ON/OFF button to turn the system off and erase the set speed memory.
WARNING!
• Leaving the Electronic Speed Control system on when not in use is dangerous. You could accidentally set the system or cause it to go faster than you want. You could
lose control and have a collision. Always leave the Electronic Speed Control system
off when you are not using it.
• Electronic Speed Control can be dangerous where the system cannot maintain a constant speed. Your vehicle could go too fast for the conditions, and you could lose
control. A collision could be the result. Do not use Electronic Speed Control in
heavy traffic or on roads that are winding, icy, snow-covered or slippery.
MANUAL TRANSMISSION 1 TO 4 SKIP SHIFT
• Skip Shift is enabled when vehicle speed is greater than 16 MPH(26 km/h) but less than 18 MPH (29 km/h) and the accelerator is
at 20% or less.
• For optimal fuel economy, under low acceleration conditions, your vehicle will only allow you to shift from first gear to fourth gear.
Additionally, the skip shift message will appear in the tachometer.
• Refer to your Owner's Manual on the DVD for further information.
OPERATING YOUR VEHICLE
21
Page 66 of 100
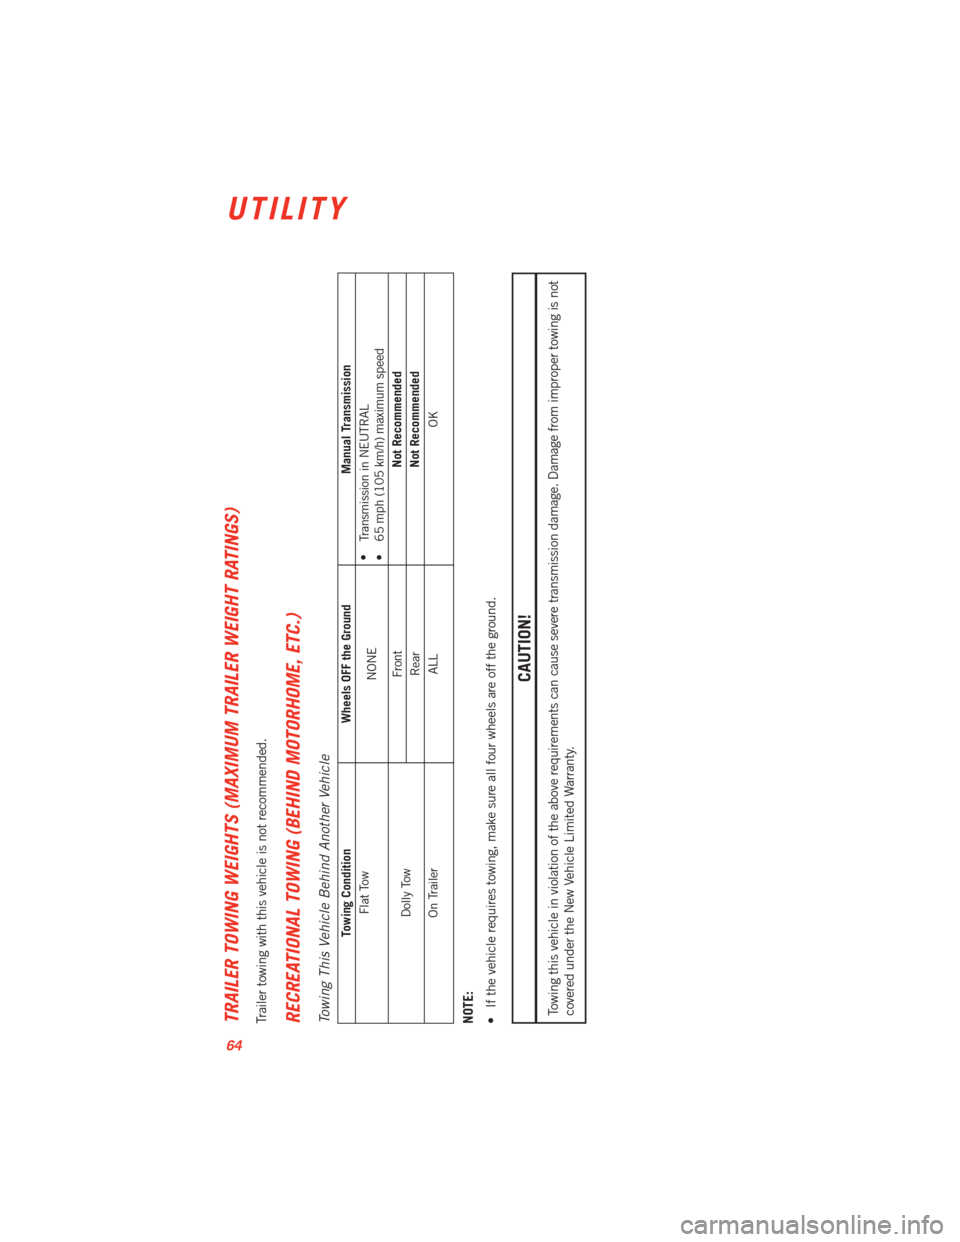
TRAILER TOWING WEIGHTS (MAXIMUM TRAILER WEIGHT RATINGS)Trailer towing with this vehicle is not recommended.RECREATIONAL TOWING (BEHIND MOTORHOME, ETC.)Towing This Vehicle Behind Another Vehicle
Towing ConditionWheels OFF the Ground Manual Transmission
Flat Tow NONE•
Transmission in NEUTRAL
• 65 mph (105 km/h) maximum speed
Dolly Tow Front
Not Recommended
Rear Not Recommended
On Trailer ALL OK
NOTE:
• If the vehicle requires towing, make sure all four wheels are off the ground.
CAUTION!
Towing this vehicle in violation of the above requirements can cause severe transmission damage. Damage from improper towing is not
covered under the New Vehicle Limited Warranty.
UTILITY
64
Page 75 of 100
Using The Deflation Button
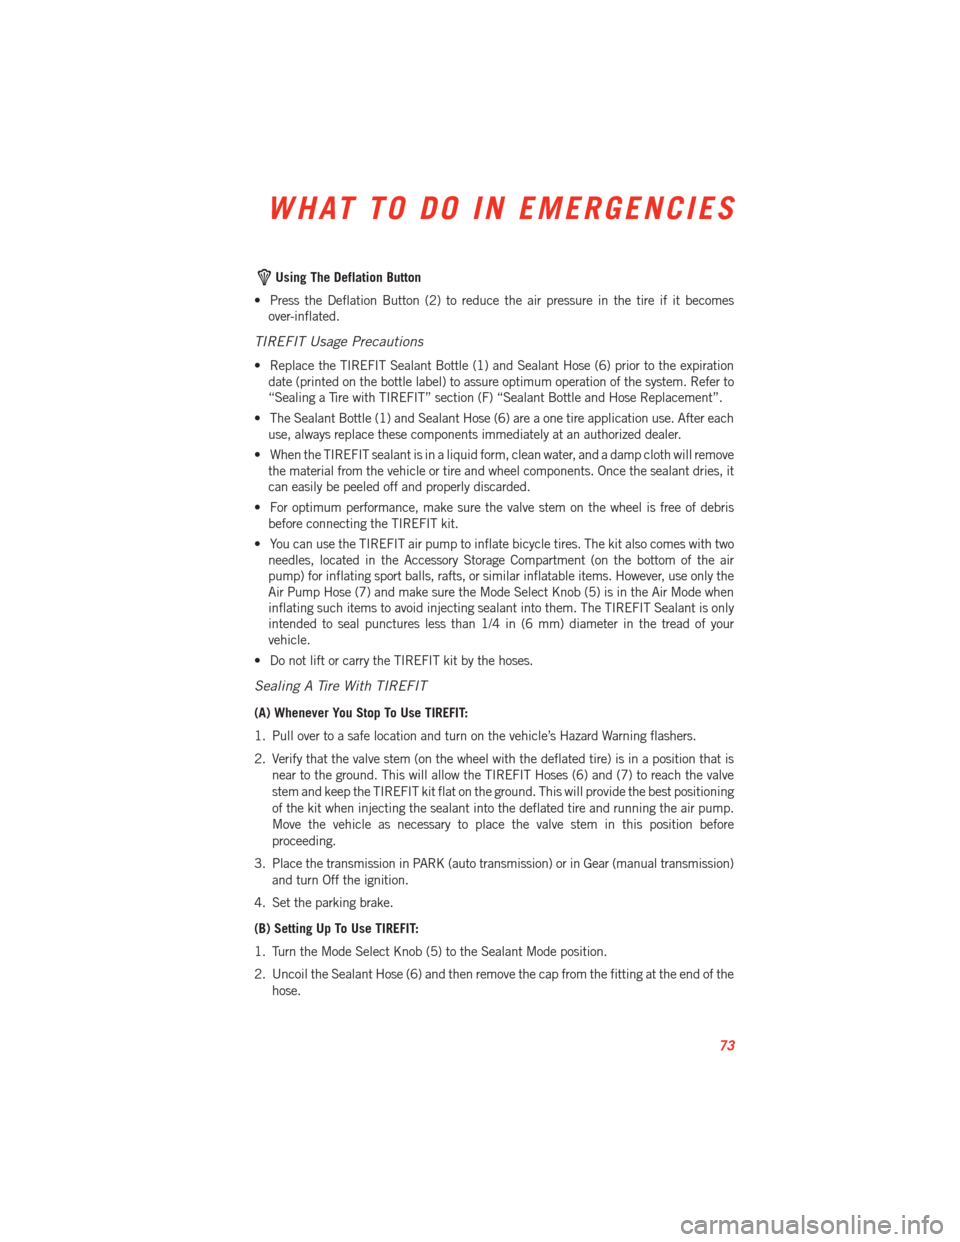
• Press the Deflation Button (2) to reduce the air pressure in the tire if it becomes over-inflated.
TIREFIT Usage Precautions
• Replace the TIREFIT Sealant Bottle (1) and Sealant Hose (6) prior to the expirationdate (printed on the bottle label) to assure optimum operation of the system. Refer to
“Sealing a Tire with TIREFIT” section (F) “Sealant Bottle and Hose Replacement”.
• The Sealant Bottle (1) and Sealant Hose (6) are a one tire application use. After each use, always replace these components immediately at an authorized dealer.
• When the TIREFIT sealant is in a liquid form, clean water, and a damp cloth will remove the material from the vehicle or tire and wheel components. Once the sealant dries, it
can easily be peeled off and properly discarded.
• For optimum performance, make sure the valve stem on the wheel is free of debris before connecting the TIREFIT kit.
• You can use the TIREFIT air pump to inflate bicycle tires. The kit also comes with two needles, located in the Accessory Storage Compartment (on the bottom of the air
pump) for inflating sport balls, rafts, or similar inflatable items. However, use only the
Air Pump Hose (7) and make sure the Mode Select Knob (5) is in the Air Mode when
inflating such items to avoid injecting sealant into them. The TIREFIT Sealant is only
intended to seal punctures less than 1/4 in (6 mm) diameter in the tread of your
vehicle.
• Do not lift or carry the TIREFIT kit by the hoses.
Sealing A Tire With TIREFIT
(A) Whenever You Stop To Use TIREFIT:
1. Pull over to a safe location and turn on the vehicle’s Hazard Warning flashers.
2. Verify that the valve stem (on the wheel with the deflated tire) is in a position that is near to the ground. This will allow the TIREFIT Hoses (6) and (7) to reach the valve
stem and keep the TIREFIT kit flat on the ground. This will provide the best positioning
of the kit when injecting the sealant into the deflated tire and running the air pump.
Move the vehicle as necessary to place the valve stem in this position before
proceeding.
3. Place the transmission in PARK (auto transmission) or in Gear (manual transmission) and turn Off the ignition.
4. Set the parking brake.
(B) Setting Up To Use TIREFIT:
1. Turn the Mode Select Knob (5) to the Sealant Mode position.
2. Uncoil the Sealant Hose (6) and then remove the cap from the fitting at the end of the hose.
WHAT TO DO IN EMERGENCIES
73
Page 76 of 100
3. Place the TIREFIT kit flat on the ground next to the deflated tire.
4. Remove the cap from the valve stem and then screw the fitting at the end of theSealant Hose (6) onto the valve stem.
5. Uncoil the Power Plug (8) and insert the plug into the vehicle’s 12 Volt power outlet.
6. Do not remove foreign objects (e.g., screws or nails) from the tire.
(C) Injecting TIREFIT Sealant Into The Deflated Tire:
• Always start the engine before turning ON the TIREFIT kit.
NOTE:
Manual transmission vehicles must have the parking brake engaged and the shift lever in
NEUTRAL.
• After pressing the Power Button (4), the sealant (white fluid) will flow from the Sealant Bottle (1) through the Sealant Hose (6) and into the tire.
NOTE:
Sealant may leak out through the puncture in the tire.
• If the sealant (white fluid) does not flow within 0 – 10 seconds through the Sealant
Hose (6):
1. Press the Power Button (4) to turn Off the TIREFIT kit. Disconnect the Sealant Hose (6) from the valve stem. Make sure the valve stem is free of debris. Reconnect the
Sealant Hose (6) to the valve stem. Check that the Mode Select Knob (5) is in the
Sealant Mode position and not Air Mode. Press the Power Button (4) to turn On the
TIREFIT kit.
2. Connect the Power Plug (8) to a different 12 Volt power outlet in your vehicle or another vehicle, if available. Make sure the engine is running before turning ON the
TIREFIT kit.
3. The Sealant Bottle (1) may be empty due to previous use. Call for assistance.
NOTE:
If the Mode Select Knob (5) is on Air Mode and the pump is operating, air will dispense
from the Air Pump Hose (7) only, not the Sealant Hose (6).
• If the sealant (white fluid) does flow through the Sealant Hose (6):
1. Continue to operate the pump until sealant is no longer flowing through hose (typically takes 30 - 70 seconds). As the sealant flows through the Sealant Hose (6), the
Pressure Gauge (3) can read as high as 70 psi (5 kPa). The Pressure Gauge (3) will
decrease quickly from approximately 70 psi (5 kPa) to the actual tire pressure when
the Sealant Bottle (1) is empty.
2. The pump will start to inject air into the tire immediately after the Sealant Bottle (1) is empty. Continue to operate the pump and inflate the tire to the pressure indicated
on the tire pressure label on the driver-side latch pillar (recommended pressure).
Check the tire pressure by looking at the Pressure Gauge (3).
WHAT TO DO IN EMERGENCIES
74
Page 85 of 100
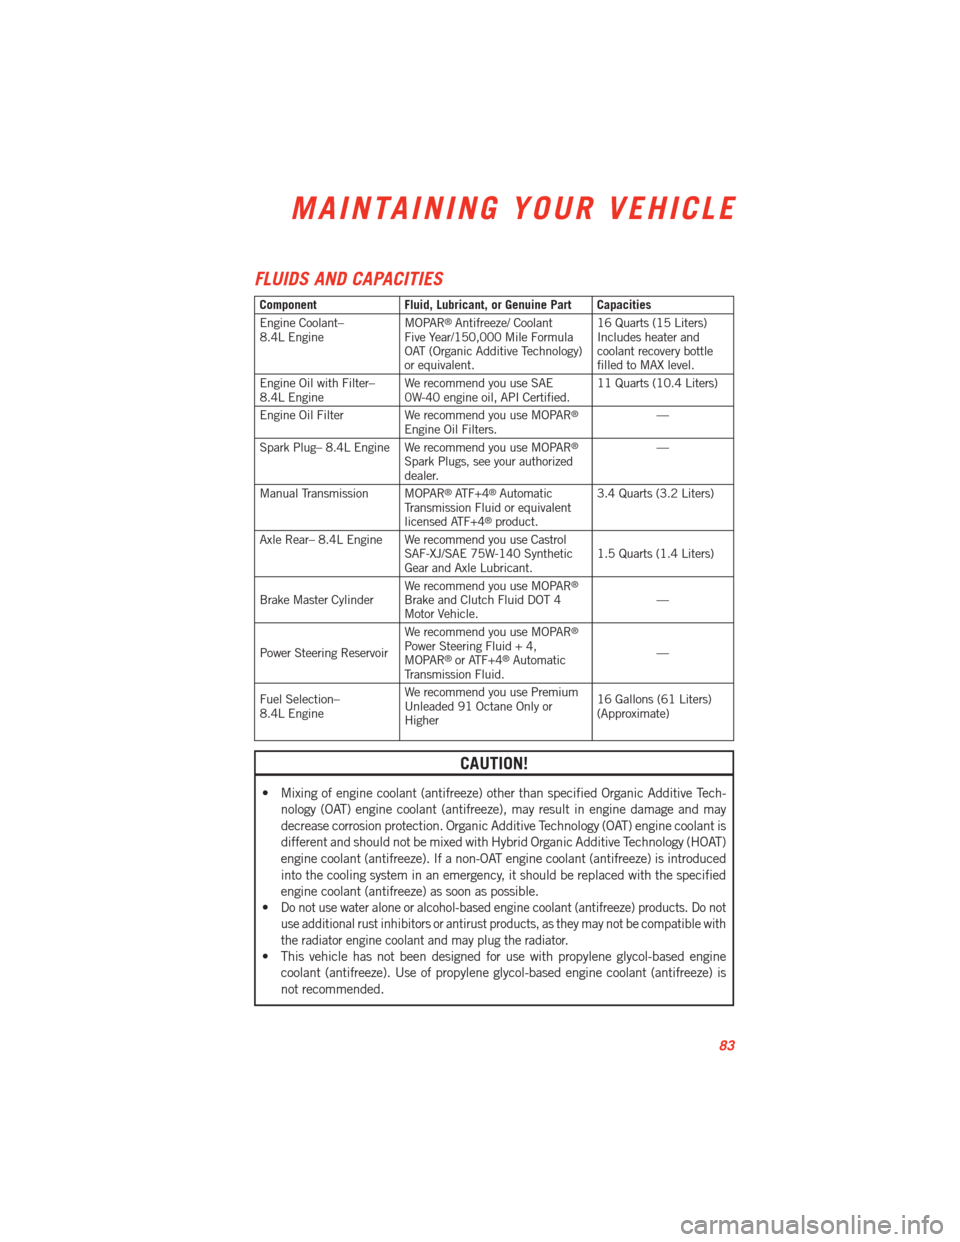
FLUIDS AND CAPACITIES
ComponentFluid, Lubricant, or Genuine Part Capacities
Engine Coolant–
8.4L Engine MOPAR®Antifreeze/ Coolant
Five Year/150,000 Mile Formula
OAT (Organic Additive Technology)
or equivalent. 16 Quarts (15 Liters)
Includes heater and
coolant recovery bottle
filled to MAX level.
Engine Oil with Filter–
8.4L Engine We recommend you use SAE
0W-40 engine oil, API Certified. 11 Quarts (10.4 Liters)
Engine Oil Filter We recommend you use MOPAR
®
Engine Oil Filters. —
Spark Plug– 8.4L Engine We recommend you use MOPAR®
Spark Plugs, see your authorized
dealer. —
Manual Transmission MOPAR
®ATF+4®Automatic
Transmission Fluid or equivalent
licensed ATF+4
®product. 3.4 Quarts (3.2 Liters)
Axle Rear– 8.4L Engine We recommend you use Castrol SAF-XJ/SAE 75W-140 Synthetic
Gear and Axle Lubricant. 1.5 Quarts (1.4 Liters)
Brake Master Cylinder We recommend you use MOPAR
®
Brake and Clutch Fluid DOT 4
Motor Vehicle. —
Power Steering Reservoir We recommend you use MOPAR
®
Power Steering Fluid + 4,
MOPAR®or ATF+4®Automatic
Transmission Fluid. —
Fuel Selection–
8.4L Engine We recommend you use Premium
Unleaded 91 Octane Only or
Higher 16 Gallons (61 Liters)
(Approximate)
CAUTION!
• Mixing of engine coolant (antifreeze) other than specified Organic Additive Tech-
nology (OAT) engine coolant (antifreeze), may result in engine damage and may
decrease corrosion protection. Organic Additive Technology (OAT) engine coolant is
different and should not be mixed with Hybrid Organic Additive Technology (HOAT)
engine coolant (antifreeze). If a non-OAT engine coolant (antifreeze) is introduced
into the cooling system in an emergency, it should be replaced with the specified
engine coolant (antifreeze) as soon as possible.
•
Do not use water alone or alcohol-based engine coolant (antifreeze) products. Do not
use additional rust inhibitors or antirust products, as they may not be compatible with
the radiator engine coolant and may plug the radiator.
• This vehicle has not been designed for use with propylene glycol-based engine
coolant (antifreeze). Use of propylene glycol-based engine coolant (antifreeze) is
not recommended.
MAINTAINING YOUR VEHICLE
83
Page 86 of 100
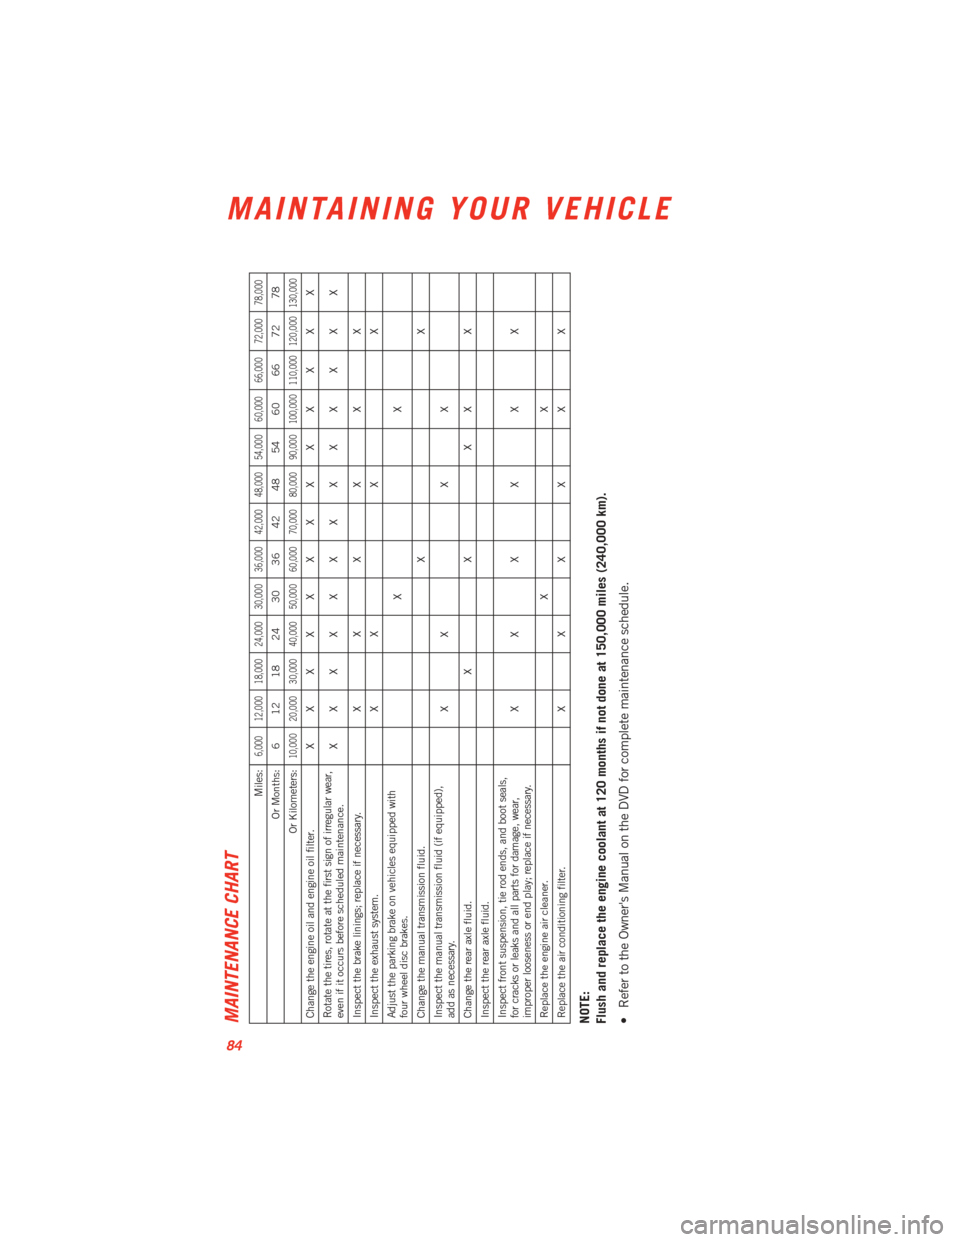
MAINTENANCE CHART
Miles:
6,000 12,000 18,000 24,000 30,000 36,000 42,000 48,000 54,000 60,000 66,000 72,000 78,000
Or Months: 6 12 18 24 30 36 42 48 54 60 66 72 78
Or Kilometers:
10,000 20,000 30,000 40,000 50,000 60,000 70,000 80,000 90,000 100,000 110,000 120,000 130,000
Change the engine oil and engine oil filter. XXXXXXXXX X X X X
Rotate the tires, rotate at the first sign of irregular wear,
even if it occurs before scheduled maintenance. XXXXXXXXX X X X X
Inspect the brake linings; replace if necessary. X X X X X X
Inspect the exhaust system. X X X X
Adjust the parking brake on vehicles equipped with
four wheel disc brakes. XX
Change the manual transmission fluid. X X
Inspect the manual transmission fluid (if equipped),
add as necessary. XX X X
Change the rear axle fluid. X X X X X
Inspect the rear axle fluid.
Inspect front suspension, tie rod ends, and boot seals,
for cracks or leaks and all parts for damage, wear,
improper looseness or end play; replace if necessary. XXXX X X
Replace the engine air cleaner. X X
Replace the air conditioning filter. X X X X X XNOTE:
Flush and replace the engine coolant at 120 months if not done at 150,000 miles (240,000 km).
• Refer to the Owner's Manual on the DVD for complete maintenance schedule.
MAINTAINING YOUR VEHICLE
84