DODGE VIPER 2015 VX / 3.G User Guide
Manufacturer: DODGE, Model Year: 2015, Model line: VIPER, Model: DODGE VIPER 2015 VX / 3.GPages: 148, PDF Size: 21.7 MB
Page 121 of 148
CAUTION!
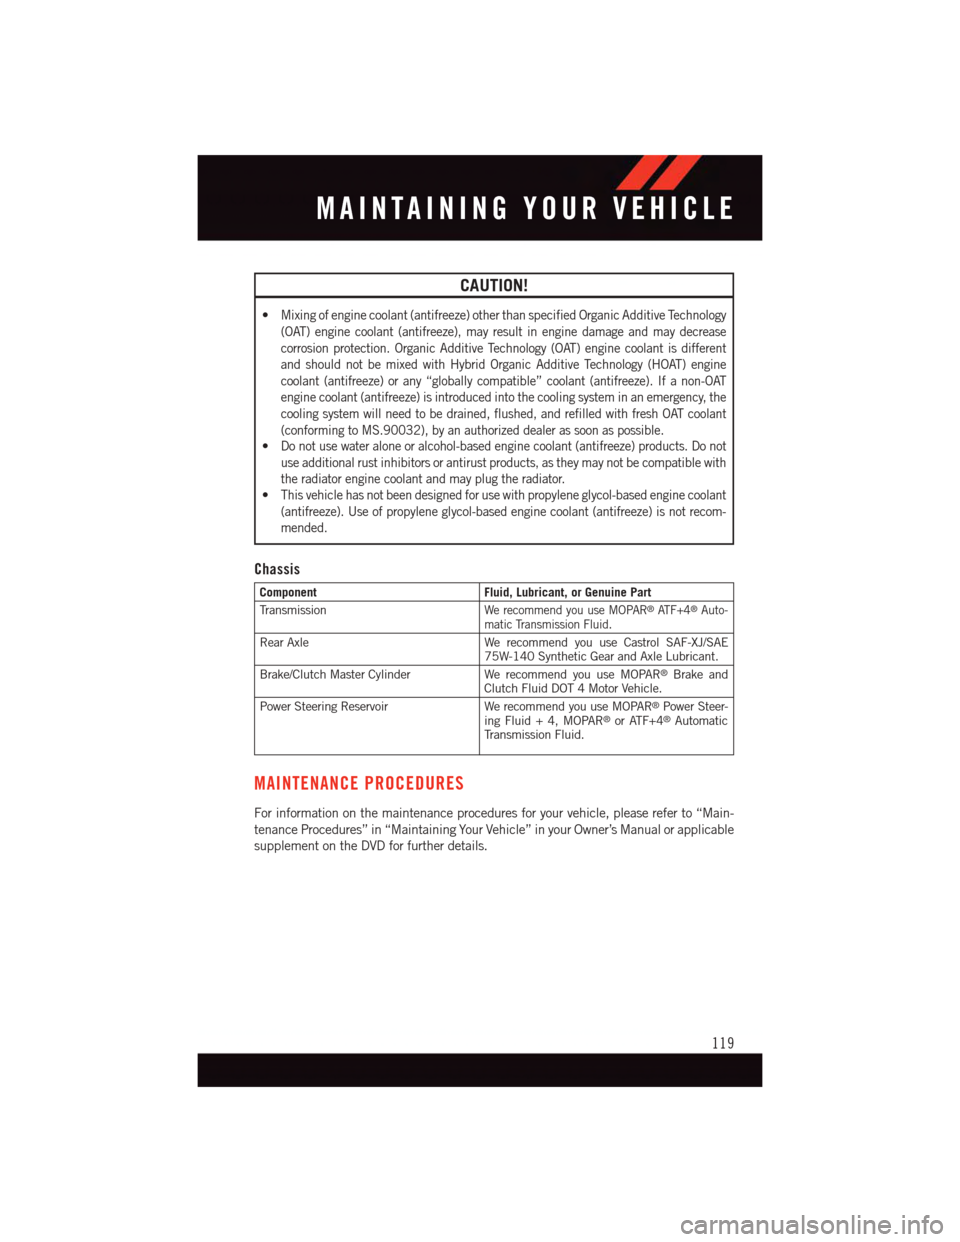
•Mixing of engine coolant (antifreeze) other than specified Organic Additive Technology
(OAT) engine coolant (antifreeze), may result in engine damage and may decrease
corrosion protection. Organic Additive Technology (OAT) engine coolant is different
and should not be mixed with Hybrid Organic Additive Technology (HOAT) engine
coolant (antifreeze) or any “globally compatible” coolant (antifreeze). If a non-OAT
engine coolant (antifreeze) is introduced into the cooling system in an emergency, the
cooling system will need to be drained, flushed, and refilled with fresh OAT coolant
(conforming to MS.90032), by an authorized dealer as soon as possible.
•Do not use water alone or alcohol-based engine coolant (antifreeze) products. Do not
use additional rust inhibitors or antirust products, as they may not be compatible with
the radiator engine coolant and may plug the radiator.
•This vehicle has not been designed for use with propylene glycol-based engine coolant
(antifreeze). Use of propylene glycol-based engine coolant (antifreeze) is not recom-
mended.
Chassis
ComponentFluid, Lubricant, or Genuine Part
Tr a n s m i s s i o nWe recommend you use MOPAR®AT F + 4®Auto-matic Transmission Fluid.
Rear AxleWe recommend you use Castrol SAF-XJ/SAE75W-140 Synthetic Gear and Axle Lubricant.
Brake/Clutch Master CylinderWe recommend you use MOPAR®Brake andClutch Fluid DOT 4 Motor Vehicle.
Power Steering Reservoir We recommend you use MOPAR®Power Steer-ing Fluid + 4, MOPAR®or ATF+4®AutomaticTr a n s m i s s i o n F l u i d .
MAINTENANCE PROCEDURES
For information on the maintenance procedures for your vehicle, please refer to “Main-
tenance Procedures” in “Maintaining Your Vehicle” in your Owner’s Manual or applicable
supplement on the DVD for further details.
MAINTAINING YOUR VEHICLE
119
Page 122 of 148
MAINTENANCE SCHEDULES
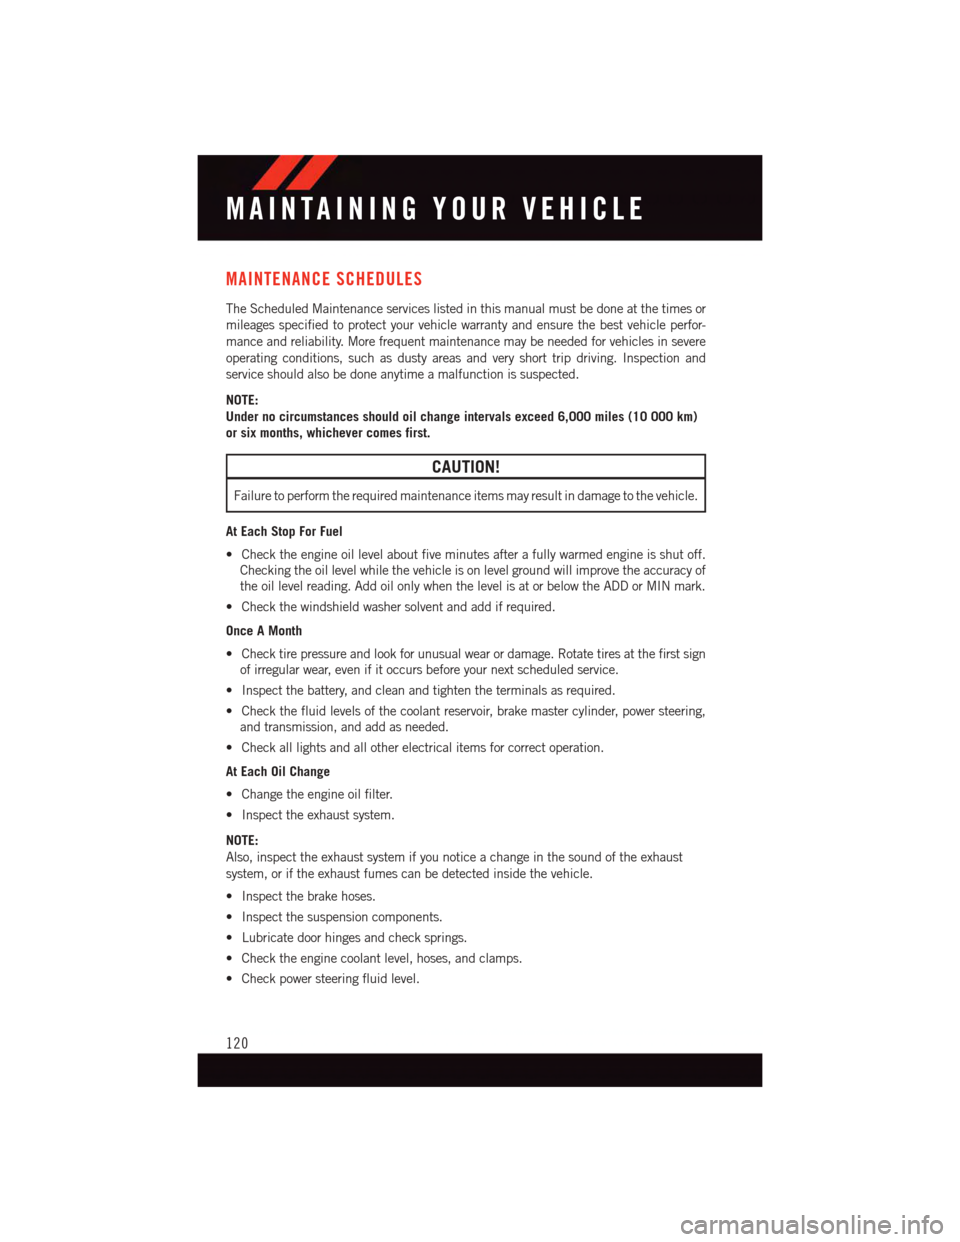
The Scheduled Maintenance services listed in this manual must be done at the times or
mileages specified to protect your vehicle warranty and ensure the best vehicle perfor-
mance and reliability. More frequent maintenance may be needed for vehicles in severe
operating conditions, such as dusty areas and very short trip driving. Inspection and
service should also be done anytime a malfunction is suspected.
NOTE:
Under no circumstances should oil change intervals exceed 6,000 miles (10 000 km)
or six months, whichever comes first.
CAUTION!
Failure to perform the required maintenance items may result in damage to the vehicle.
At Each Stop For Fuel
•Checktheengineoillevelaboutfiveminutesafterafullywarmedengineisshutoff.
Checking the oil level while the vehicle is on level ground will improve the accuracy of
the oil level reading. Add oil only when the level is at or below the ADD or MIN mark.
•Checkthewindshieldwashersolventandaddifrequired.
Once A Month
•Checktirepressureandlookforunusualwearordamage.Rotatetiresatthefirstsign
of irregular wear, even if it occurs before your next scheduled service.
•Inspectthebattery,andcleanandtightentheterminalsasrequired.
•Checkthefluidlevelsofthecoolantreservoir,brakemastercylinder,powersteering,
and transmission, and add as needed.
•Checkalllightsandallotherelectricalitemsforcorrectoperation.
At Each Oil Change
•Changetheengineoilfilter.
•Inspecttheexhaustsystem.
NOTE:
Also, inspect the exhaust system if you notice a change in the sound of the exhaust
system, or if the exhaust fumes can be detected inside the vehicle.
•Inspectthebrakehoses.
•Inspectthesuspensioncomponents.
•Lubricatedoorhingesandchecksprings.
•Checktheenginecoolantlevel,hoses,andclamps.
•Checkpowersteeringfluidlevel.
MAINTAINING YOUR VEHICLE
120
Page 123 of 148
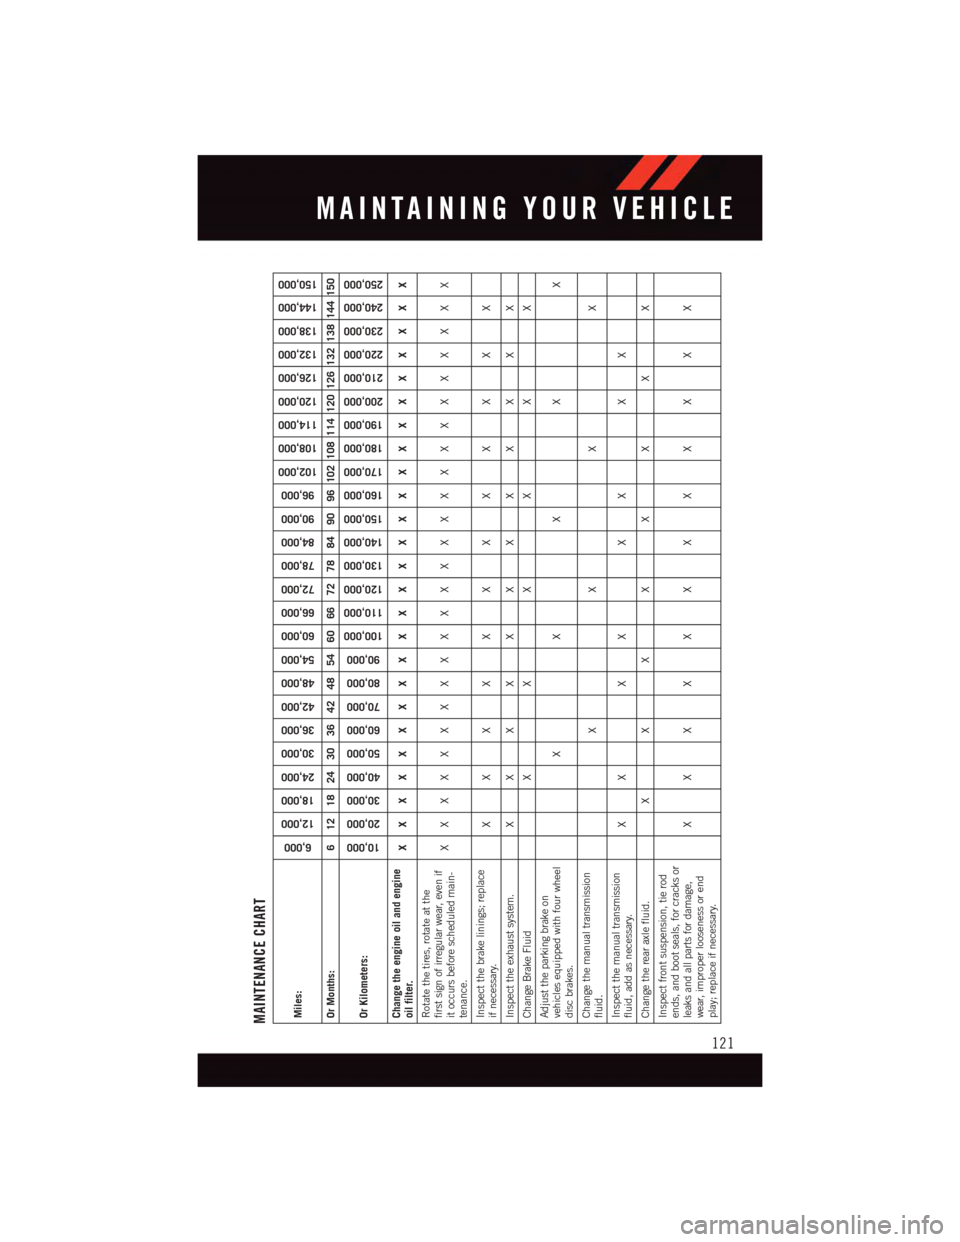
MAINTENANCE CHARTMiles:
6,000
12,000
18,000
24,000
30,000
36,000
42,000
48,000
54,000
60,000
66,000
72,000
78,000
84,000
90,000
96,000
102,000
108,000
114,000
120,000
126,000
132,000
138,000
144,000
150,000
Or Months:
6 12 18 24 30 36 42 48 54 60 66 72 78 84 90 96 102 108 114 120 126 132 138 144 150
Or Kilometers:
10,000
20,000
30,000
40,000
50,000
60,000
70,000
80,000
90,000
100,000
110,000
120,000
130,000
140,000
150,000
160,000
170,000
180,000
190,000
200,000
210,000
220,000
230,000
240,000
250,000
Change the engine oil and engineoil filter.
XXXXXXXXXXXXXXXXXXXXXXXXX
Rotate the tires, rotate at thefirst sign of irregular wear, even ifit occurs before scheduled main-tenance.
XXXXXXXXXXXXXXXXXXXXXXXXX
Inspect the brake linings; replaceif necessary.
XXXXXXXXXXXX
Inspect the exhaust system.
XXXXXXXXXXXX
Change Brake Fluid
XXXXXX
Adjust the parking brake onvehicles equipped with four wheeldisc brakes.
XXXXX
Change the manual transmissionfluid.
XXXX
Inspect the manual transmissionfluid, add as necessary.
XX XX XX XX
Change the rear axle fluid.
XXXXXXXX
Inspect front suspension, tie rodends, and boot seals, for cracks orleaks and all parts for damage,wear, improper looseness or endplay; replace if necessary.
XXXXXXXXXXXX
MAINTAINING YOUR VEHICLE
121
Page 124 of 148
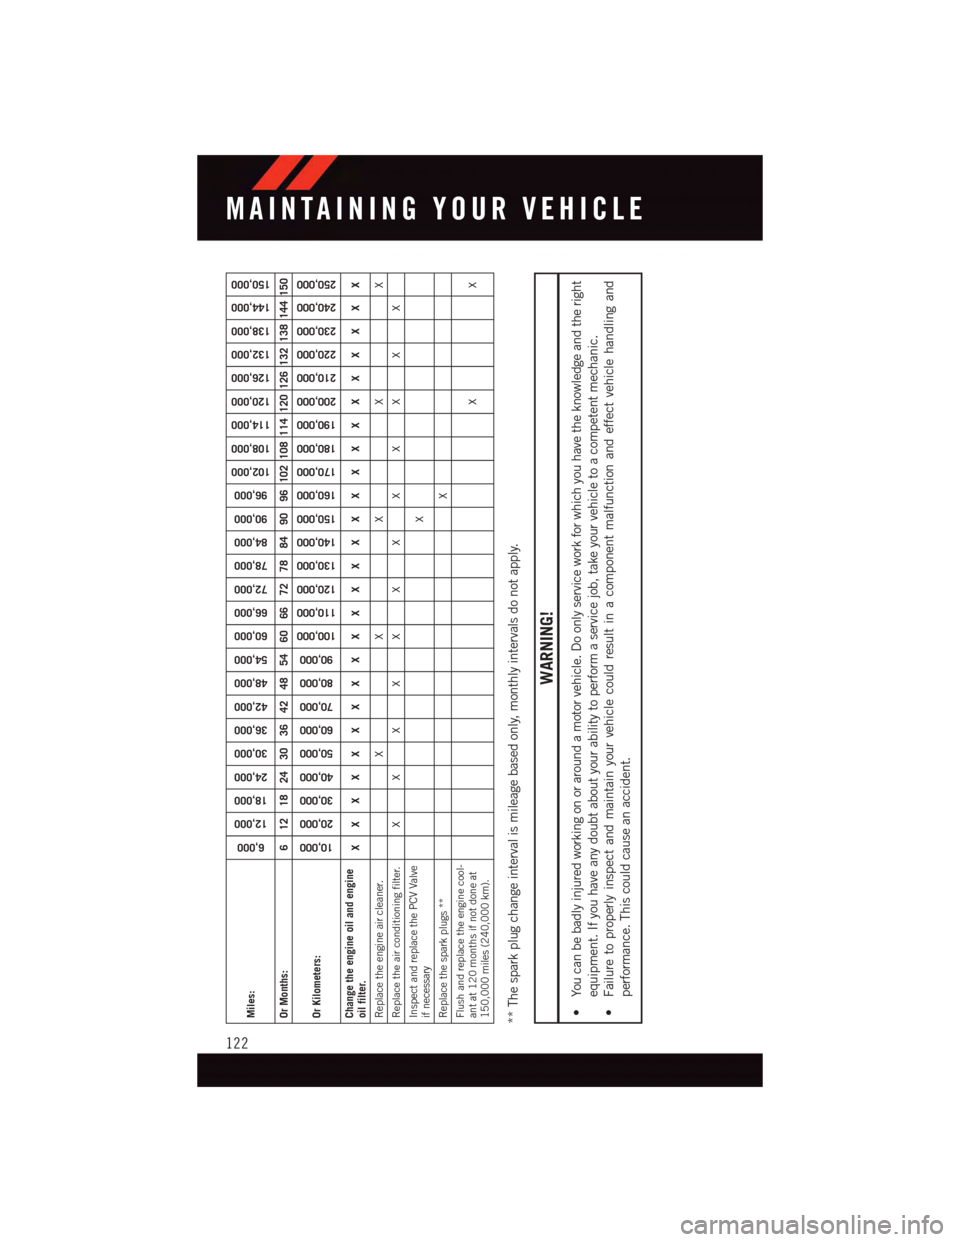
Miles:
6,000
12,000
18,000
24,000
30,000
36,000
42,000
48,000
54,000
60,000
66,000
72,000
78,000
84,000
90,000
96,000
102,000
108,000
114,000
120,000
126,000
132,000
138,000
144,000
150,000
Or Months:
6 12 18 24 30 36 42 48 54 60 66 72 78 84 90 96 102 108 114 120 126 132 138 144 150
Or Kilometers:
10,000
20,000
30,000
40,000
50,000
60,000
70,000
80,000
90,000
100,000
110,000
120,000
130,000
140,000
150,000
160,000
170,000
180,000
190,000
200,000
210,000
220,000
230,000
240,000
250,000
Change the engine oil and engineoil filter.
XXXXXXXXXXXXXXXXXXXXXXXXX
Replace the engine air cleaner.
XXXXX
Replace the air conditioning filter.
XXXXXXXXXXXX
Inspect and replace the PCV Valveif necessary
X
Replace the spark plugs **
X
Flush and replace the engine cool-ant at 120 months if not done at150,000 miles (240,000 km).
XX
** The spark plug change interval is mileage based only, monthly intervals do not apply.
WARNING!
•Youcanbebadlyinjuredworkingonoraroundamotorvehicle.Doonlyserviceworkforwhichyouhavetheknowledgeandtheright
equipment. If you have any doubt about your ability to perform a service job, take your vehicle to a competent mechanic.
•Failuretoproperlyinspectandmaintainyourvehiclecouldresultinacomponentmalfunctionandeffectvehiclehandlingand
performance. This could cause an accident.
MAINTAINING YOUR VEHICLE
122
Page 125 of 148
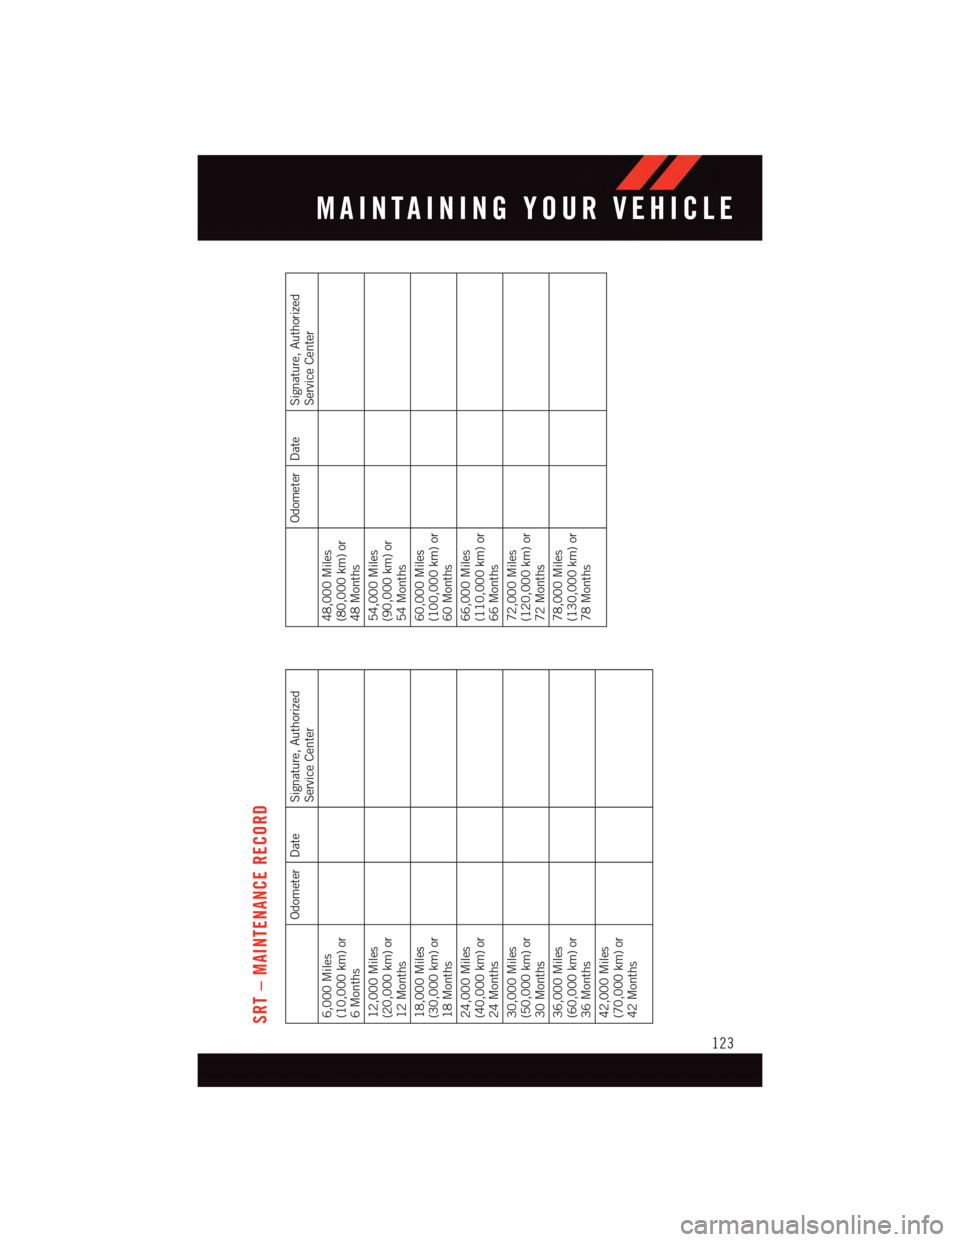
SRT – MAINTENANCE RECORD
Odometer Date Signature, Authorized
Service Center
6,000 Miles(10,000 km) or6Months12,000 Miles(20,000 km) or12 Months18,000 Miles(30,000 km) or18 Months24,000 Miles(40,000 km) or24 Months30,000 Miles(50,000 km) or30 Months36,000 Miles(60,000 km) or36 Months42,000 Miles(70,000 km) or42 Months
Odometer Date Signature, Authorized
Service Center
48,000 Miles(80,000 km) or48 Months54,000 Miles(90,000 km) or54 Months60,000 Miles(100,000 km) or60 Months66,000 Miles(110,000 km) or66 Months72,000 Miles(120,000 km) or72 Months78,000 Miles(130,000 km) or78 Months
MAINTAINING YOUR VEHICLE
123
Page 126 of 148
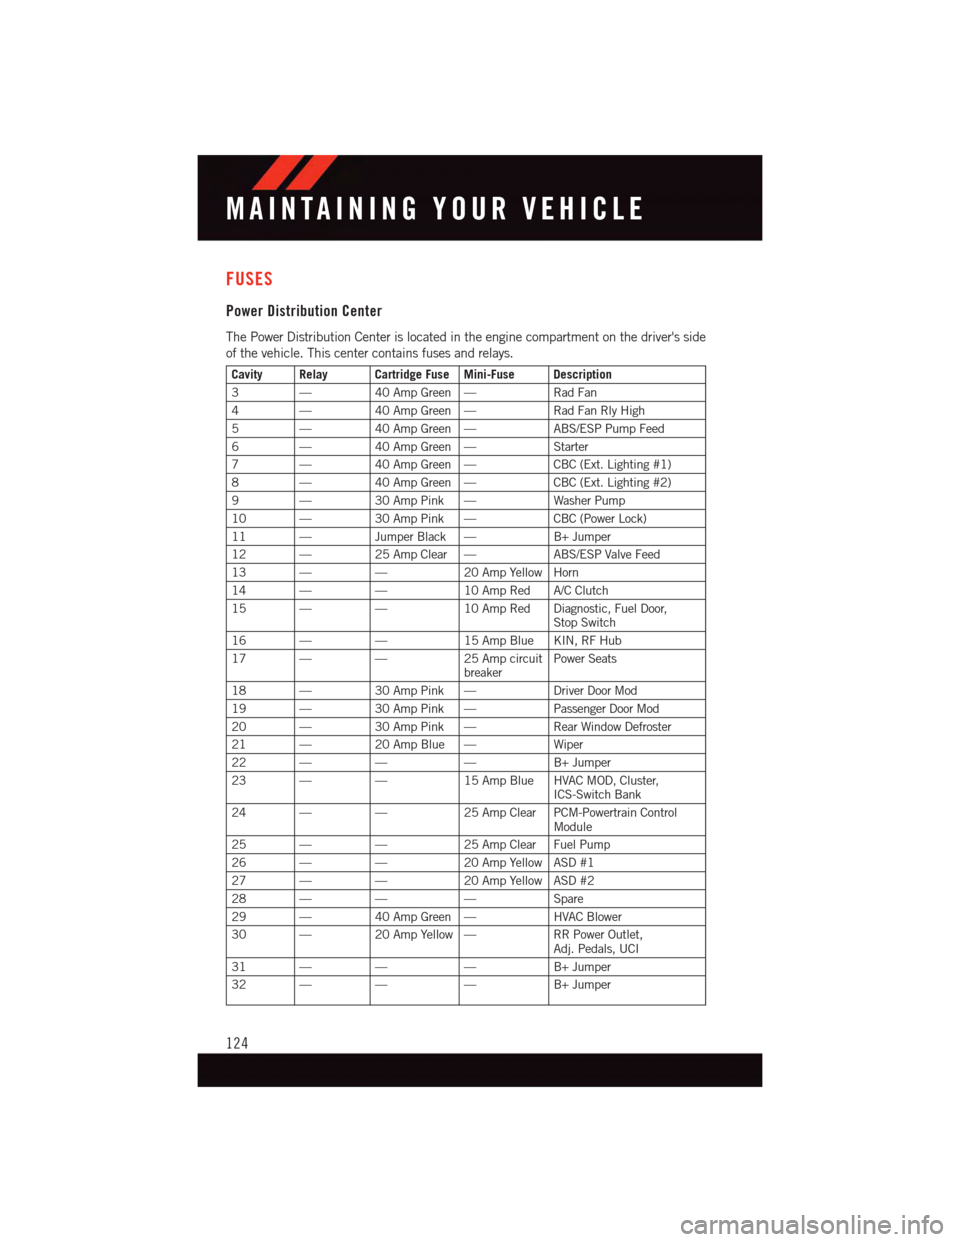
FUSES
Power Distribution Center
The Power Distribution Center is located in the engine compartment on the driver's side
of the vehicle. This center contains fuses and relays.
Cavity Relay Cartridge Fuse Mini-Fuse Description
3—40 Amp Green —Rad Fan
4—40 Amp Green —Rad Fan Rly High
5—40 Amp Green —ABS/ESP Pump Feed
6—40 Amp Green —Starter
7—40 Amp Green —CBC (Ext. Lighting #1)
8—40 Amp Green —CBC (Ext. Lighting #2)
9—30 Amp Pink —Washer Pump
10 —30 Amp Pink —CBC (Power Lock)
11 —Jumper Black —B+ Jumper
12 —25 Amp Clear —ABS/ESP Valve Feed
13 ——20 Amp Yellow Horn
14 ——10 Amp Red A/C Clutch
15 ——10 Amp Red Diagnostic, Fuel Door,Stop Switch
16 ——15 Amp Blue KIN, RF Hub
17 ——25 Amp circuitbreakerPower Seats
18 —30 Amp Pink —Driver Door Mod
19 —30 Amp Pink —Passenger Door Mod
20 —30 Amp Pink —Rear Window Defroster
21 —20 Amp Blue —Wiper
22 ———B+ Jumper
23 ——15 Amp Blue HVAC MOD, Cluster,ICS-Switch Bank
24 ——25 Amp Clear PCM-Powertrain ControlModule
25 ——25 Amp Clear Fuel Pump
26 ——20 Amp Yellow ASD #1
27 ——20 Amp Yellow ASD #2
28 ———Spare
29 —40 Amp Green —HVAC Blower
30 —20 Amp Yellow —RR Power Outlet,Adj. Pedals, UCI
31 ———B+ Jumper
32 ———B+ Jumper
MAINTAINING YOUR VEHICLE
124
Page 127 of 148
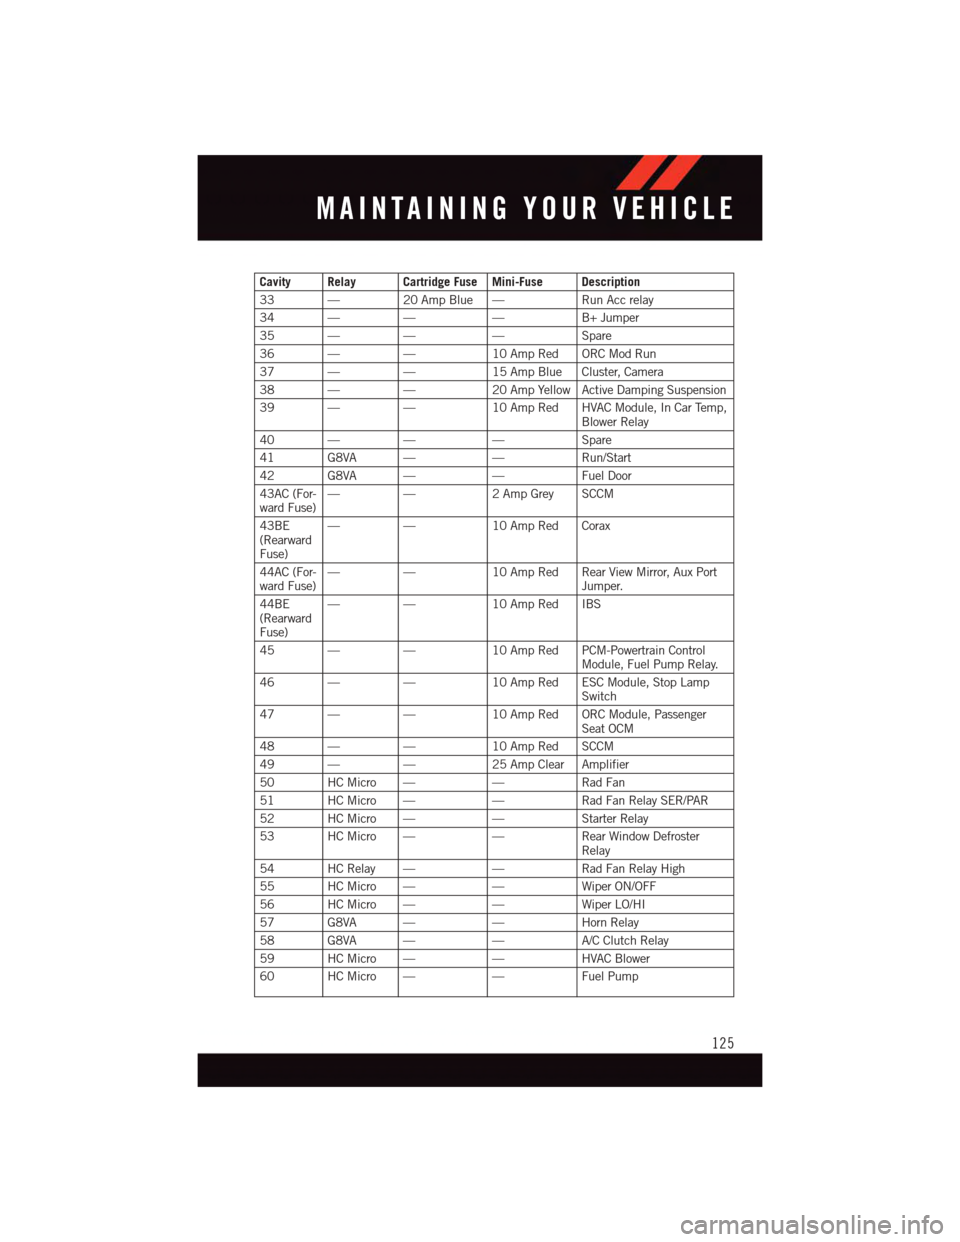
Cavity Relay Cartridge Fuse Mini-Fuse Description
33 —20 Amp Blue —Run Acc relay
34 ———B+ Jumper
35 ———Spare
36 ——10 Amp Red ORC Mod Run
37 ——15 Amp Blue Cluster, Camera
38 ——20 Amp Yellow Active Damping Suspension
39 ——10 Amp Red HVAC Module, In Car Temp,Blower Relay
40 ———Spare
41 G8VA ——Run/Start
42 G8VA ——Fuel Door
43AC (For-ward Fuse)——2AmpGrey SCCM
43BE(RearwardFuse)
——10 Amp Red Corax
44AC (For-ward Fuse)——10 Amp Red Rear View Mirror, Aux PortJumper.
44BE(RearwardFuse)
——10 Amp Red IBS
45 ——10 Amp Red PCM-Powertrain ControlModule, Fuel Pump Relay.
46 ——10 Amp Red ESC Module, Stop LampSwitch
47 ——10 Amp Red ORC Module, PassengerSeat OCM
48 ——10 Amp Red SCCM
49 ——25 Amp Clear Amplifier
50 HC Micro ——Rad Fan
51 HC Micro ——Rad Fan Relay SER/PAR
52 HC Micro ——Starter Relay
53 HC Micro ——Rear Window DefrosterRelay
54 HC Relay ——Rad Fan Relay High
55 HC Micro ——Wiper ON/OFF
56 HC Micro ——Wiper LO/HI
57 G8VA ——Horn Relay
58 G8VA ——A/C Clutch Relay
59 HC Micro ——HVAC Blower
60 HC Micro ——Fuel Pump
MAINTAINING YOUR VEHICLE
125
Page 128 of 148
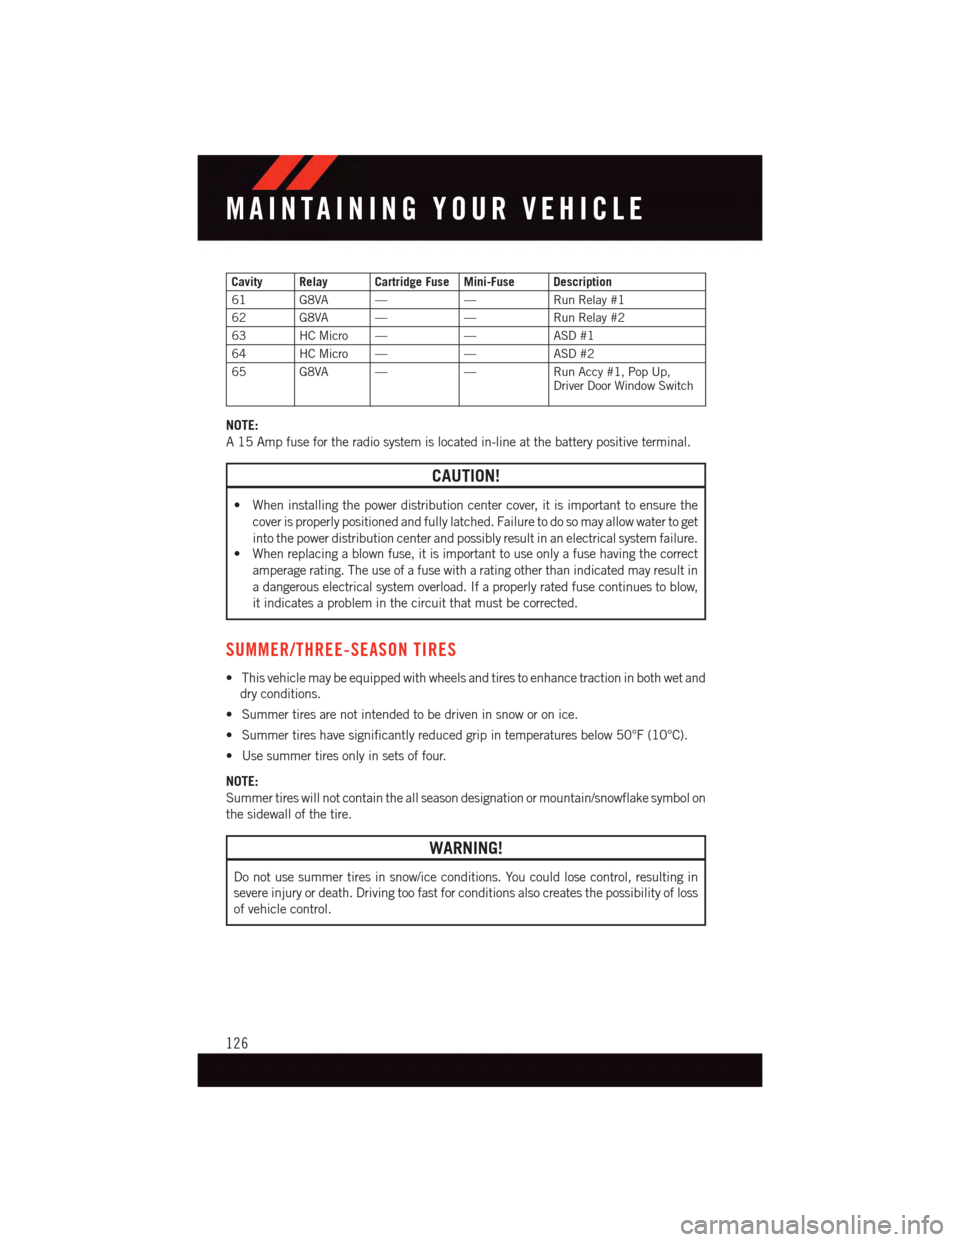
Cavity Relay Cartridge Fuse Mini-Fuse Description
61 G8VA ——Run Relay #1
62 G8VA ——Run Relay #2
63 HC Micro ——ASD #1
64 HC Micro ——ASD #2
65 G8VA ——Run Accy #1, Pop Up,Driver Door Window Switch
NOTE:
A15Ampfusefortheradiosystemislocatedin-lineatthebatterypositiveterminal.
CAUTION!
•Wheninstallingthepowerdistributioncentercover,itisimportanttoensurethe
cover is properly positioned and fully latched. Failure to do so may allow water to get
into the power distribution center and possibly result in an electrical system failure.•Whenreplacingablownfuse,itisimportanttouseonlyafusehavingthecorrect
amperage rating. The use of a fuse with a rating other than indicated may result in
adangerouselectricalsystemoverload.Ifaproperlyratedfusecontinuestoblow,
it indicates a problem in the circuit that must be corrected.
SUMMER/THREE-SEASON TIRES
•Thisvehiclemaybeequippedwithwheelsandtirestoenhancetractioninbothwetand
dry conditions.
•Summertiresarenotintendedtobedriveninsnoworonice.
•Summertireshavesignificantlyreducedgripintemperaturesbelow50°F(10°C).
•Usesummertiresonlyinsetsoffour.
NOTE:
Summer tires will not contain the all season designation or mountain/snowflake symbol on
the sidewall of the tire.
WARNING!
Do not use summer tires in snow/ice conditions. You could lose control, resulting in
severe injury or death. Driving too fast for conditions also creates the possibility of loss
of vehicle control.
MAINTAINING YOUR VEHICLE
126
Page 129 of 148
TIRE PRESSURES
Check the inflation pressure of each tire, including the spare tire (if equipped), at least
monthly and inflate to the recommended pressure for your vehicle.
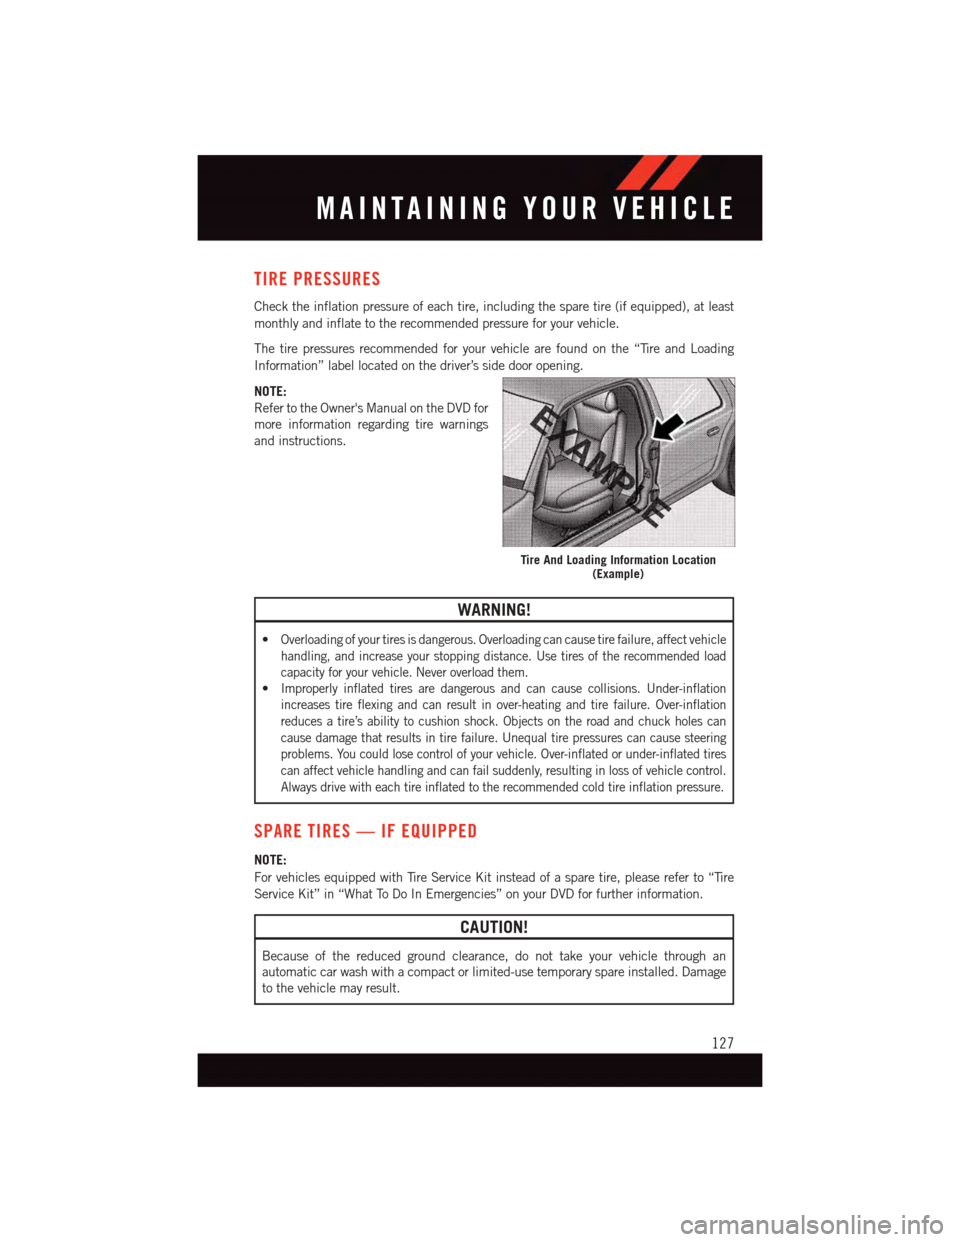
The tire pressures recommended for your vehicle are found on the “Tire and Loading
Information” label located on the driver’s side door opening.
NOTE:
Refer to the Owner's Manual on the DVD for
more information regarding tire warnings
and instructions.
WARNING!
•Overloading of your tires is dangerous. Overloading can cause tire failure, affect vehicle
handling, and increase your stopping distance. Use tires of the recommended load
capacity for your vehicle. Never overload them.
•Improperly inflated tires are dangerous and can cause collisions. Under-inflation
increases tire flexing and can result in over-heating and tire failure. Over-inflation
reduces a tire’s ability to cushion shock. Objects on the road and chuck holes can
cause damage that results in tire failure. Unequal tire pressures can cause steering
problems. You could lose control of your vehicle. Over-inflated or under-inflated tires
can affect vehicle handling and can fail suddenly, resulting in loss of vehicle control.
Always drive with each tire inflated to the recommended cold tire inflation pressure.
SPARE TIRES — IF EQUIPPED
NOTE:
For vehicles equipped with Tire Service Kit instead of a spare tire, please refer to “Tire
Service Kit” in “What To Do In Emergencies” on your DVD for further information.
CAUTION!
Because of the reduced ground clearance, do not take your vehicle through an
automatic car wash with a compact or limited-use temporary spare installed. Damage
to the vehicle may result.
Tire And Loading Information Location(Example)
MAINTAINING YOUR VEHICLE
127
Page 130 of 148
Spare Tire Matching Original Equipped Tire And Wheel — If Equipped
Yo u r v e h i c l e m a y b e e q u i p p e d w i t h a s p a r e t i r e a n d w h e e l e q u i v a l e n t i n l o o k a n d f u n c t i o n
to the original equipment tire and wheel found on the front or rear axle of your vehicle. This
spare tire may be used in the tire rotation for your vehicle. If your vehicle has this option,
refer to an authorized tire dealer for the recommended tire rotation pattern.
Compact Spare Tire — If Equipped
The compact spare is for temporary emergency use only. You can identify if your vehicle
is equipped with a compact spare by looking at the spare tire description on the Tire and
Loading Information Placard located on the driver’s side door opening or on the sidewall
of the tire. Compact spare tire descriptions begin with the letter “T” or “S” preceding the
size designation. Example: T145/80D18 103M.
T, S = Temporary Spare Tire
Since this tire has limited tread life, the original equipment tire should be repaired
(or replaced) and reinstalled on your vehicle at the first opportunity.
Do not install a wheel cover or attempt to mount a conventional tire on the compact spare
wheel, since the wheel is designed specifically for the compact spare tire. Do not install
more than one compact spare tire and wheel on the vehicle at any given time.
WARNING!
Compact spares are for temporary emergency use only. With these spares, do not drive
more than 50 mph (80 km/h). Temporary use spares have limited tread life. When the
tread is worn to the tread wear indicators, the temporary use spare tire needs to be
replaced. Be sure to follow the warnings, which apply to your spare. Failure to do so
could result in spare tire failure and loss of vehicle control.
Full Size Spare — If Equipped
The full size spare is for temporary emergency use only. This tire may look like the
originally equipped tire on the front or rear axle of your vehicle, but it is not. This spare tire
may have limited tread life. When the tread is worn to the tread wear indicators, the
temporary use full size spare tire needs to be replaced. Since it is not the same as your
original equipment tire, replace (or repair) the original equipment tire and reinstall on the
vehicle at the first opportunity.
Limited-Use Spare — If Equipped
The limited-use spare tire is for temporary emergency use only. This tire is identified by a
label located on the limited-use spare wheel. This label contains the driving limitations for
this spare. This tire may look like the original equipped tire on the front or rear axle of your
vehicle, but it is not. Installation of this limited-use spare tire affects vehicle handling.
Since it is not the same as your original equipment tire, replace (or repair) the original
equipment tire and reinstall on the vehicle at the first opportunity.
MAINTAINING YOUR VEHICLE
128