change time DODGE VIPER 2015 VX / 3.G User Guide
[x] Cancel search | Manufacturer: DODGE, Model Year: 2015, Model line: VIPER, Model: DODGE VIPER 2015 VX / 3.GPages: 148, PDF Size: 21.7 MB
Page 4 of 148
WELCOME FROM FCA US LLC
Congratulations on selecting your new FCA US LLC vehicle. Be assured that it represents
precision workmanship, distinctive styling, and high quality - all essentials that are
traditional to our vehicles.
Yo u r n e w F C A U S L L C v e h i c l e h a s c h a r a c t e r i s t i c s t o e n h a n c e t h e d r i v e r ' s c o n t r o l u n d e r
some driving conditions. These are to assist the driver and are never a substitute for
attentive driving. They can never take the driver's place. Always drive carefully.
Yo u r n e w v e h i c l e h a s m a n y f e a t u r e s f o r t h e c o m f o r t a n d c o n v e n i e n c e o f y o u a n d y o u r
passengers. Some of these should not be used when driving because they take your eyes
from the road or your attention from driving. Never text while driving or take your eyes more
than momentarily off the road.
This guide illustrates and describes the operation of features and equipment that are
either standard or optional on this vehicle. This guide may also include a description of
features and equipment that are no longer available or were not ordered on this vehicle.
Please disregard any features and equipment described in this guide that are not available
on this vehicle. FCA US LLC reserves the right to make changes in design and specifica-
tions and/or make additions to or improvements to its products without imposing any
obligation upon itself to install them on products previously manufactured.
This User Guide has been prepared to help you quickly become acquainted with the
important features of your vehicle. It contains most things you will need to operate and
maintain the vehicle, including emergency information.
The DVD includes a computer application containing detailed owner's information which
can be viewed on a personal computer or MAC computer. The multimedia DVD also
includes videos which can be played on any standard DVD player (including the
Uconnect®To u c h s c r e e n R a d i o s i f e q u i p p e d w i t h D V D p l a y e r c a p a b i l i t i e s ) . A d d i t i o n a l
DVD operational information is located on the back of the DVD sleeve.
For complete owner information, refer to your Owner's Manual on the DVD in the owner’s
kit provided at the time of new vehicle purchase.For your convenience, the information
contained on the DVD may also be printed and saved for future reference.
FCA US LLC is committed to protecting our environment and natural resources. By
converting from paper to electronic delivery for the majority of the user information for
your vehicle, together we greatly reduce the demand for tree-based products and lessen
the stress on our environment.
INTRODUCTION/WELCOME
2
Page 23 of 148
SRT ENGINE BREAK-IN RECOMMENDATIONS
SRT Engine Break-In Recommendations: The following tips will be helpful in obtaining
optimum performance and maximum durability for your new SRT Vehicle.
Despite modern technology and World Class manufacturing methods, the moving parts of
the vehicle must still wear in with each other. This wearing in occurs mainly during the first
500 miles (805 km) and continues through the first oil change interval.
It is recommended for the operator to observe the following driving behaviors during the
new vehicle break-in period:
0to100miles(0to161km):
•Donotallowtheenginetooperateatidleforanextendedperiodoftime.
•Depress the accelerator pedal slowly and not more than halfway to avoid rapid accelera-
tion.
•Avoidaggressivebraking.
•Drivewiththeenginespeedlessthan3,500RPM.
•Maintainvehiclespeedbelow55mph(88km/h)andobservelocalspeedlimits.
100 to 300 miles (161 to 483 km):
•Depress the accelerator pedal slowly and not more than halfway to avoid rapid acceleration
in lower gears (1st to 3rd gears).
•Avoidaggressivebraking.
•Drivewiththeenginespeedlessthan5,000RPM.
•Maintainvehiclespeedbelow70mph(112km/h)andobservelocalspeedlimits.
300 to 500 miles (483 to 805 km):
•Exercisethefullenginerpmrange,shiftingmanually(paddlesorgearshift)athigher
rpms when possible.
•Donotperformsustainedoperationwiththeacceleratorpedalatwideopenthrottle.
•Maintainvehiclespeedbelow85mph(136km/h)andobservelocalspeedlimits.
For the first 1500 mi (2414 km):
•Donotparticipateintrackevents,sportdrivingschools,orsimilaractivitiesduringthe
first 1500 mi (2414 km).
NOTE:
Check engine oil with every refueling and add if necessary. Oil and fuel consumption may
be higher through the first oil change interval.
OPERATING YOUR VEHICLE
21
Page 61 of 148
Replay
Lets you replay up to 44 minutes of the content of the current SiriusXM channel.
Replay Option Option Description
Play/Pause Press to Pause content playback. Press Pause/Play again to resumeplayback.
Rewind/RW Rewinds the channel content in steps of five seconds. Press and hold torewind continuously, then release to begin playing content at that point.
Fast Forward/FW Forwards the content, and works similarly to Rewind/RW. However, FastForward/FW can only be used when content has been previouslyrewound.
Replay Time Displays the amount of time in the upper center of the screen by whichyour content lags the Live channel.
Live Resumes playback of Live content at any time while replaying rewoundcontent.
•SiriusXMservicesrequiresubscriptions,soldseparatelyafterthe12-monthtrial
included with the new vehicle purchase.If you decide to continue your service at the
end of your trial subscription, the plan you choose will automatically renew and bill at
then-current rates until you call SiriusXM at 1-866-635-2349 for U.S. residents and
1-888-539-7474 for Canadian residents to cancel. See SiriusXM Customer Agreement
for complete terms at www.siriusxm.com (US residents) or siriusxm.ca (Canadian
residents).All fees and programming subject to change. Our satellite service is
available only to those at least 18 and older in the 48 contiguous USA and D.C. Our
Sirius satellite service is also available in PR (with coverage limitations). Our Internet
radio service is available throughout our satellite service area and in AK and HI. ©2014
Sirius XM Radio Inc. Sirius, XM and all related marks and logos are trademarks of Sirius
XM Radio Inc.
Disc Operation (If Equipped)
•YourvehiclemayhavearemoteCDplayerlocatedinthelowercenterconsolestorage
bin, or in the lower center bench seat bin.
•CD/DiscModeisenteredbyeitherinsertingaCD/DiscorbypressingtheMEDIAbutton
located on the side of the display. Once in Media Mode, select “Disc.”
•GentlyinsertoneCDintotheCDplayerwiththeCDlabelfacingasindicatedonthe
illustration located on the Disc player.
Seek Up/Down Buttons
•PresstoseekthroughDisctracks.
•Holdeitherbuttontobypasstrackswithoutstopping.
Browse
•Pressthe“Browse”buttononthetouchscreentoscrollthroughandselectadesired
track on the Disc. Press the “Exit” button on the touchscreen if you wish to cancel the
browse function.
ELECTRONICS
59
Page 63 of 148
NOTE:
When connecting your iPod®device for the first time, the system may take several
minutes to read your music, depending on the number of files. For example, the system
will take approximately 5 minutes for every 1,000 songs loaded on the device. Also during
the reading process, the Shuffle and Browse functions will be disabled. This process is
needed to ensure the full use of your iPod®features and only happens the first time it is
connected. After the first time, the reading process of your iPod®will take considerably
less time unless changes are made or new songs are added to the playlist.
•TheUSBportsupportscertainMini,Classic,Nano,Touch,andiPhone®devices. The
USB port also supports playing music from compatible external USB Mass Storage
Class memory devices. Some iPod®software versions may not fully support the USB
port features. Please visit Apple’s website for iPod®software updates.
SD Card
•PlaysongsstoredonanSDcardinsertedintotheSDcardslot.
•SongplaybackcanbecontrolledusingtheradioorSteeringWheelAudioControlsto
play, skip to the next or previous track, browse, and list the contents.
Bluetooth® Streaming Audio
•IfequippedwithUconnect®Voice Command, your Bluetooth-equipped iPod®devices,
cell phones or other media players, may also be able to stream music to your vehicle's
sound system. Your connected device must be Bluetooth-compatible, and paired with
your system (see Uconnect®Phone for pairing instructions). You can access the music
from your connected Bluetooth®device by pressing the Bluetooth®button on the
touchscreen while in Media mode.
Uconnect® 8.4AN Available Media Hubs
Uconnect®
8.4ANMedia Hub(USB, AUXPorts)
Media Hub(SD, USB,AUX Ports)
Remote USBPort (FullyFunctional)
Remote USBPort (Charg-ing Only)
Dual Charg-ing Ports
-S---
S=StandardEquipment
O=OptionalEquipment
ELECTRONICS
61
Page 95 of 148
Flashing Lights With Lock
The turn signal lights flash when the doors are locked, which can be turned on or off.
To t u r n t h i s f e a t u r e o n o r o f f :
•PushandholdtheUNLOCKbuttonandtheLOCKbuttonatthesametimeforatleast
four seconds, but no longer than 10 seconds.
•Releasebothbuttonsatthesametime.
PERFORMANCE PAGES
DID Performance Features
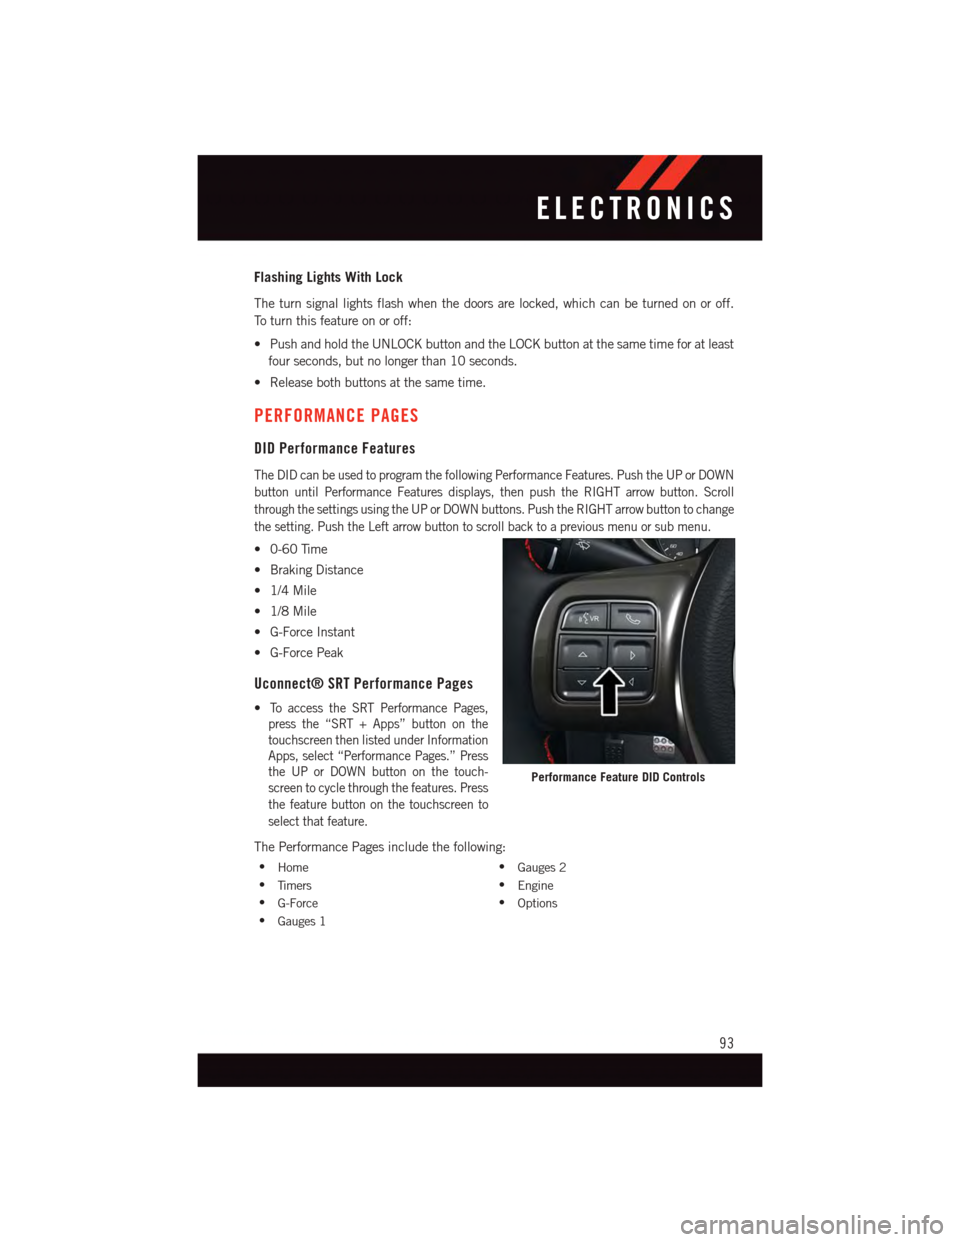
The DID can be used to program the following Performance Features. Push the UP or DOWN
button until Performance Features displays, then push the RIGHT arrow button. Scroll
through the settings using the UP or DOWN buttons. Push the RIGHT arrow button to change
the setting. Push the Left arrow button to scroll back to a previous menu or sub menu.
•0-60Time
•BrakingDistance
•1/4Mile
•1/8Mile
•G-ForceInstant
•G-ForcePeak
Uconnect® SRT Performance Pages
•To a c c e s s t h e S R T P e r f o r m a n c e P a g e s ,
press the “SRT + Apps” button on the
touchscreen then listed under Information
Apps, select “Performance Pages.” Press
the UP or DOWN button on the touch-
screen to cycle through the features. Press
the feature button on the touchscreen to
select that feature.
The Performance Pages include the following:
•Home•Gauges 2
•Ti m e r s•Engine
•G-Force•Options
•Gauges 1
Performance Feature DID Controls
ELECTRONICS
93
Page 97 of 148
To e r a s e t h e c h a n n e l s , p l a c e t h e i g n i t i o n s w i t c h i n t o t h e O N / R U N p o s i t i o n , t h e n p u s h a n d
hold the two outside HomeLink®buttons (I and III) for up to 20 seconds or until the red
indicator flashes.
NOTE:
Erasing all channels should only be performed when programming HomeLink®for the first
time. Do not erase channels when programming additional buttons.
If you have any problems, or require assistance, please call toll-free 1-800-355-3515 or,
on the Internet at HomeLink.com for information or assistance.
Programming A Rolling Code
NOTE:
For programming Garage Door Openers that were manufactured after 1995. These Garage
Door Openers can be identified by the “LEARN” or “TRAIN” button located where the
hanging antenna is attached to the Garage Door Opener. It is NOT the button that is
normally used to open and close the door. The name and color of the button may vary by
manufacturer.
1. Place the ignition switch into the ON/RUN position.
2. Place the hand-held transmitter 1 to 3 inches (3 to 8 cm) away from the HomeLink®
button you wish to program while keeping the HomeLink®indicator light in view.
3. Push and hold the HomeLink®button you want to program while you push and hold
the hand-held transmitter button.
4. Continue to hold both buttons and observe the indicator light. The HomeLink®
indicator will flash slowly and then rapidly after HomeLink®has received the fre-
quency signal from the hand-held transmitter. Release both buttons after the indicator
light changes from slow to rapid.
5. At the garage door opener motor (in the garage), locate the “LEARN” or “TRAINING”
button. This can usually be found where the hanging antenna wire is attached to the
garage door opener motor. Firmly push and release the “LEARN” or “TRAINING”
button.
NOTE:
Yo u h a v e 3 0 s e c o n d s i n w h i c h t o i n i t i a t e t h e n e x t s t e p a f t e r t h e L E A R N b u t t o n h a s b e e n
pushed.
6.Return to the vehicle and push the programmed HomeLink®button twice (holding the
button for two seconds each time). If the device is plugged in and activates, programming
is complete.
NOTE:
If the device does not activate, push the button a third time (for two seconds) to complete
the training.
7. To program the remaining two HomeLink®buttons, repeat each step for each
remaining button. DO NOT erase the channels.
ELECTRONICS
95
Page 98 of 148
Programming A Non-Rolling Code
NOTE:
For programming Garage Door Openers manufactured before 1995.
1. Turn the ignition switch to the ON/RUN position.
2. Place the hand-held transmitter 1 to 3 inches (3 to 8 cm) away from the HomeLink®
button you wish to program while keeping the HomeLink®indicator light in view.
3. Push and hold the HomeLink®button you want to program while you push and hold
the hand-held transmitter button.
4. Continue to hold both buttons and observe the indicator light. The HomeLink®
indicator will flash slowly and then rapidly after HomeLink®has received the fre-
quency signal from the hand-held transmitter. Release both buttons after the indicator
light changes from slow to rapid.
5. Push and hold the programmed HomeLink®button and observe the indicator light.
If the indicator light stays on constantly, programming is complete and the garage door
(or device) should activate when the HomeLink®button is pushed.
6. To program the two remaining HomeLink®buttons, repeat each step for each
remaining button. DO NOT erase the channels.
Using HomeLink®
To o p e r a t e , p u s h a n d r e l e a s e t h e p r o g r a m m e d H o m e L i n k®button. Activation will now
occur for the programmed device (i.e., garage door opener, gate operator, security system,
entry door lock, home/office lighting, etc.,). The hand-held transmitter of the device may
also be used at any time.
WARNING!
•Yourmotorizeddoororgatewillopenandclosewhileyouareprogrammingthe
universal transceiver. Do not program the transceiver if people or pets are in the
path of the door or gate.
•Donotrunyourvehicleinaclosedgarageorconfinedareawhileprogrammingthe
transceiver. Exhaust gas from your vehicle contains Carbon Monoxide (CO) which is
odorless and colorless. Carbon Monoxide is poisonous when inhaled and can cause
you and others to be severely injured or killed.
ELECTRONICS
96
Page 122 of 148
MAINTENANCE SCHEDULES
The Scheduled Maintenance services listed in this manual must be done at the times or
mileages specified to protect your vehicle warranty and ensure the best vehicle perfor-
mance and reliability. More frequent maintenance may be needed for vehicles in severe
operating conditions, such as dusty areas and very short trip driving. Inspection and
service should also be done anytime a malfunction is suspected.
NOTE:
Under no circumstances should oil change intervals exceed 6,000 miles (10 000 km)
or six months, whichever comes first.
CAUTION!
Failure to perform the required maintenance items may result in damage to the vehicle.
At Each Stop For Fuel
•Checktheengineoillevelaboutfiveminutesafterafullywarmedengineisshutoff.
Checking the oil level while the vehicle is on level ground will improve the accuracy of
the oil level reading. Add oil only when the level is at or below the ADD or MIN mark.
•Checkthewindshieldwashersolventandaddifrequired.
Once A Month
•Checktirepressureandlookforunusualwearordamage.Rotatetiresatthefirstsign
of irregular wear, even if it occurs before your next scheduled service.
•Inspectthebattery,andcleanandtightentheterminalsasrequired.
•Checkthefluidlevelsofthecoolantreservoir,brakemastercylinder,powersteering,
and transmission, and add as needed.
•Checkalllightsandallotherelectricalitemsforcorrectoperation.
At Each Oil Change
•Changetheengineoilfilter.
•Inspecttheexhaustsystem.
NOTE:
Also, inspect the exhaust system if you notice a change in the sound of the exhaust
system, or if the exhaust fumes can be detected inside the vehicle.
•Inspectthebrakehoses.
•Inspectthesuspensioncomponents.
•Lubricatedoorhingesandchecksprings.
•Checktheenginecoolantlevel,hoses,andclamps.
•Checkpowersteeringfluidlevel.
MAINTAINING YOUR VEHICLE
120