instrument cluster DODGE VIPER 2015 VX / 3.G User Guide
[x] Cancel search | Manufacturer: DODGE, Model Year: 2015, Model line: VIPER, Model: DODGE VIPER 2015 VX / 3.GPages: 148, PDF Size: 21.7 MB
Page 3 of 148
INTRODUCTION/WELCOME
WELCOME FROM FCA US LLC.......2
CONTROLS AT A GLANCE
DRIVER COCKPIT...............4INSTRUMENT CLUSTER...........6
GETTING STARTED
KEY FOB . . . . . . . . . . . . . . . . . . . . . 8ENGINE STARTING/STOPPING.......9VEHICLE SECURITY ALARM........10SEAT BELT SYSTEMS............11SUPPLEMENTAL RESTRAINTSYSTEM (SRS) — AIR BAGS........12CHILD RESTRAINTS............14NON-ADJUSTABLE HEAD RESTRAINTS...17FRONT SEATS................18ADJUSTABLE PEDALS...........19ADJUSTABLE FOOT REST..........20TILT STEERING COLUMN.........20
OPERATING YOUR VEHICLE
SRT ENGINE BREAK-INRECOMMENDATIONS............21TURN SIGNALS/WIPER/WASHER/HIGHBEAMS LEVER................22HEADLIGHT SWITCH............23ELECTRONIC SPEED CONTROL......24LAUNCH MODE................26ELECTRONIC CONTROL DAMPINGSYSTEM....................27ELECTRONIC STABILITY CONTROL(ESC)......................28MANUAL TRANSMISSION 1 TO 4 SKIPSHIFT.....................29ADDING FUEL................30AUTOMATIC TEMPERATURECONTROL (ATC)...............33PA R K V I E W®REAR BACK-UP CAMERA...35
ELECTRONICS
YOUR VEHICLE'S SOUND SYSTEM....36YOUR RADIO.................38Uconnect®ACCESS.............38Uconnect®8.4AN...............54Uconnect®8.4AN VOICE RECOGNITIONQUICK TIPS..................67Uconnect®PHONE..............82STEERING WHEEL AUDIO CONTROLS . . . 90DRIVER INFORMATION DISPLAY (DID) . . . 91PERFORMANCE PAGES...........93PROGRAMMABLE FEATURES.......94UNIVERSAL GARAGE DOOR OPENER(HomeLink®).................94POWER OUTLETS..............97
UTILITY
TRAILER TOWING WEIGHTS(MAXIMUM TRAILER WEIGHTRATINGS)...................98RECREATIONAL TOWING(BEHIND MOTORHOME, ETC.)......98
WHAT TO DO IN EMERGENCIES
ROADSIDE ASSISTANCE..........99INSTRUMENT CLUSTER WARNINGLIGHTS....................99INSTRUMENT CLUSTER INDICATORLIGHTS...................103IF YOUR ENGINE OVERHEATS......104TIRE SERVICE KIT.............105JUMP-STARTING..............111TOWING A DISABLED VEHICLE.....113FREEING A STUCK VEHICLE.......113EVENT DATA RECORDER (EDR).....114
MAINTAINING YOUR VEHICLE
OPENING THE HOOD...........115ENGINE COMPARTMENT.........116FLUID CAPACITIES............118FLUIDS, LUBRICANTS, ANDGENUINE PARTS..............118MAINTENANCE PROCEDURES......119MAINTENANCE SCHEDULES......120SRT – MAINTENANCE RECORD.....123FUSES....................124SUMMER/THREE-SEASON TIRES....126TIRE PRESSURES.............127SPARE TIRES — IF EQUIPPED......127WHEEL AND WHEEL TRIM CARE....129EXTERIOR BULBS.............129
CONSUMER ASSISTANCE
FCA US LLC CUSTOMER CENTER....130FCA CANADA INC. CUSTOMERCENTER...................130ASSISTANCE FOR THE HEARINGIMPAIRED..................130PUBLICATIONS ORDERING........130REPORTING SAFETY DEFECTS INTHE UNITED STATES............131
MOPAR® ACCESSORIES
AUTHENTIC ACCESSORIESBY MOPAR®.................132
FREQUENTLY ASKED QUESTIONS
FREQUENTLY ASKED QUESTIONS....133
INDEX.....................134
TABLE OF CONTENTS
Page 6 of 148
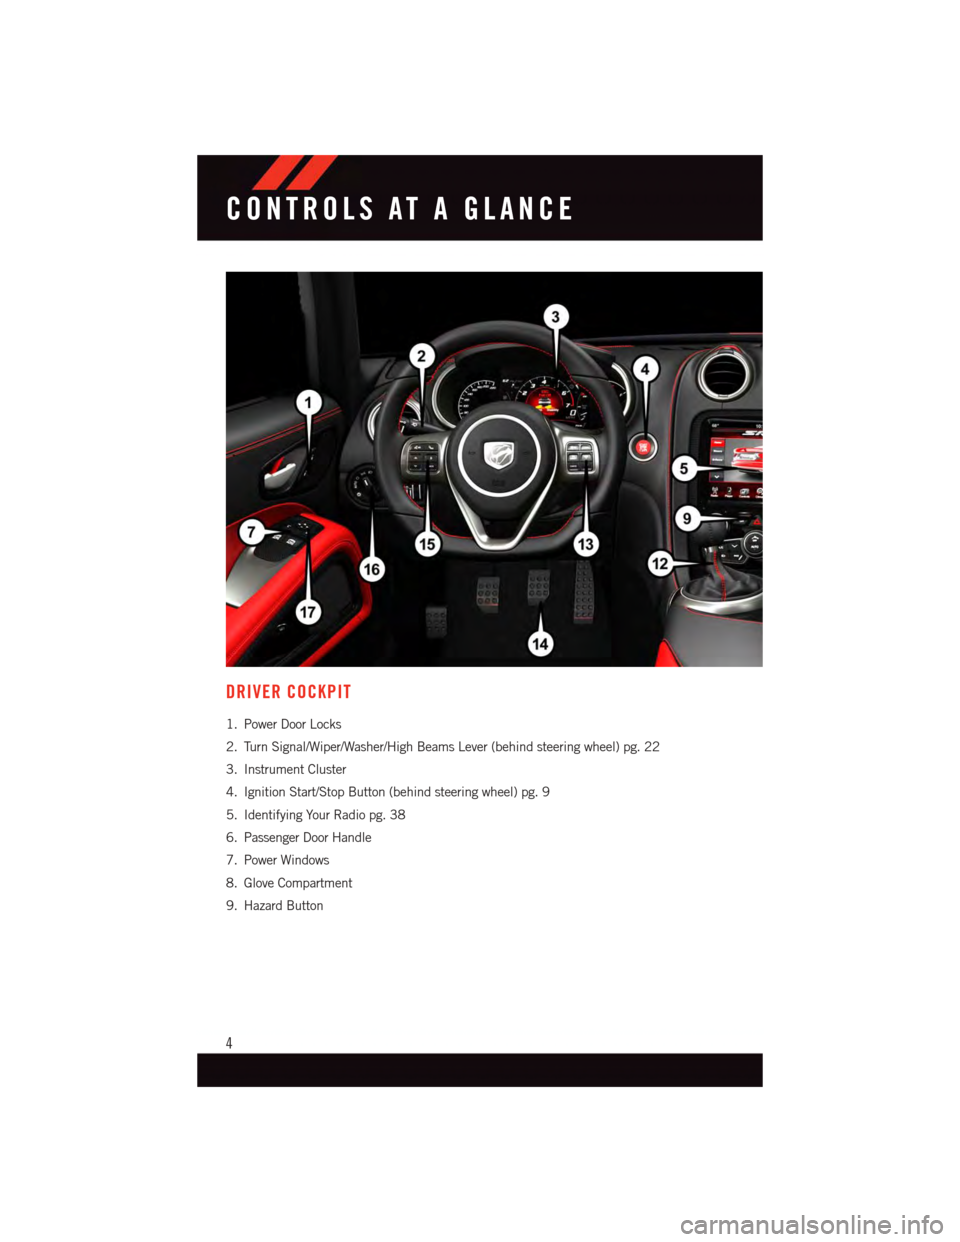
DRIVER COCKPIT
1. Power Door Locks
2. Turn Signal/Wiper/Washer/High Beams Lever (behind steering wheel) pg. 22
3. Instrument Cluster
4. Ignition Start/Stop Button (behind steering wheel) pg. 9
5. Identifying Your Radio pg. 38
6. Passenger Door Handle
7. Power Windows
8. Glove Compartment
9. Hazard Button
CONTROLS AT A GLANCE
4
Page 8 of 148
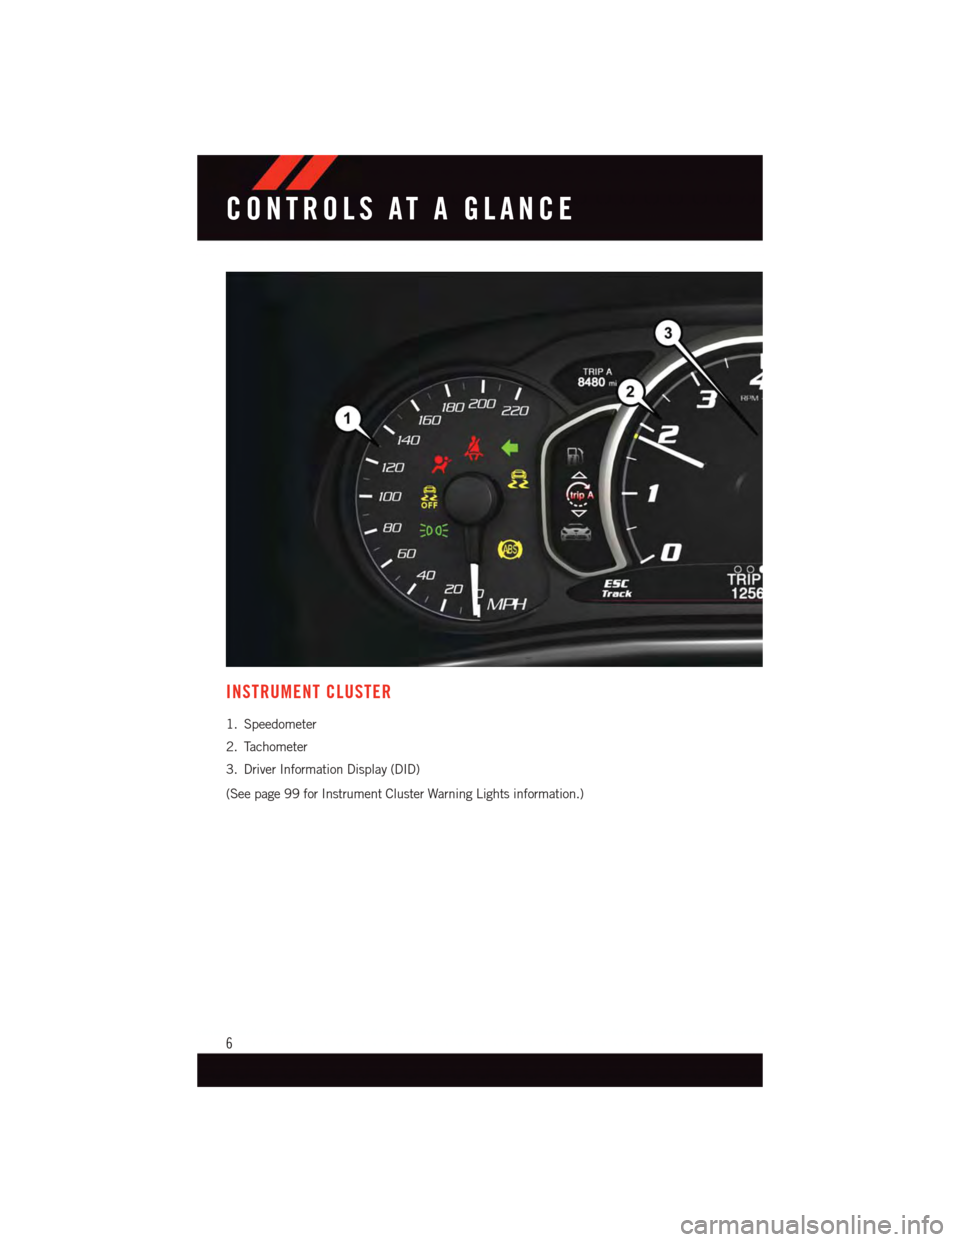
INSTRUMENT CLUSTER
1. Speedometer
2. Tachometer
3. Driver Information Display (DID)
(See page 99 for Instrument Cluster Warning Lights information.)
CONTROLS AT A GLANCE
6
Page 9 of 148
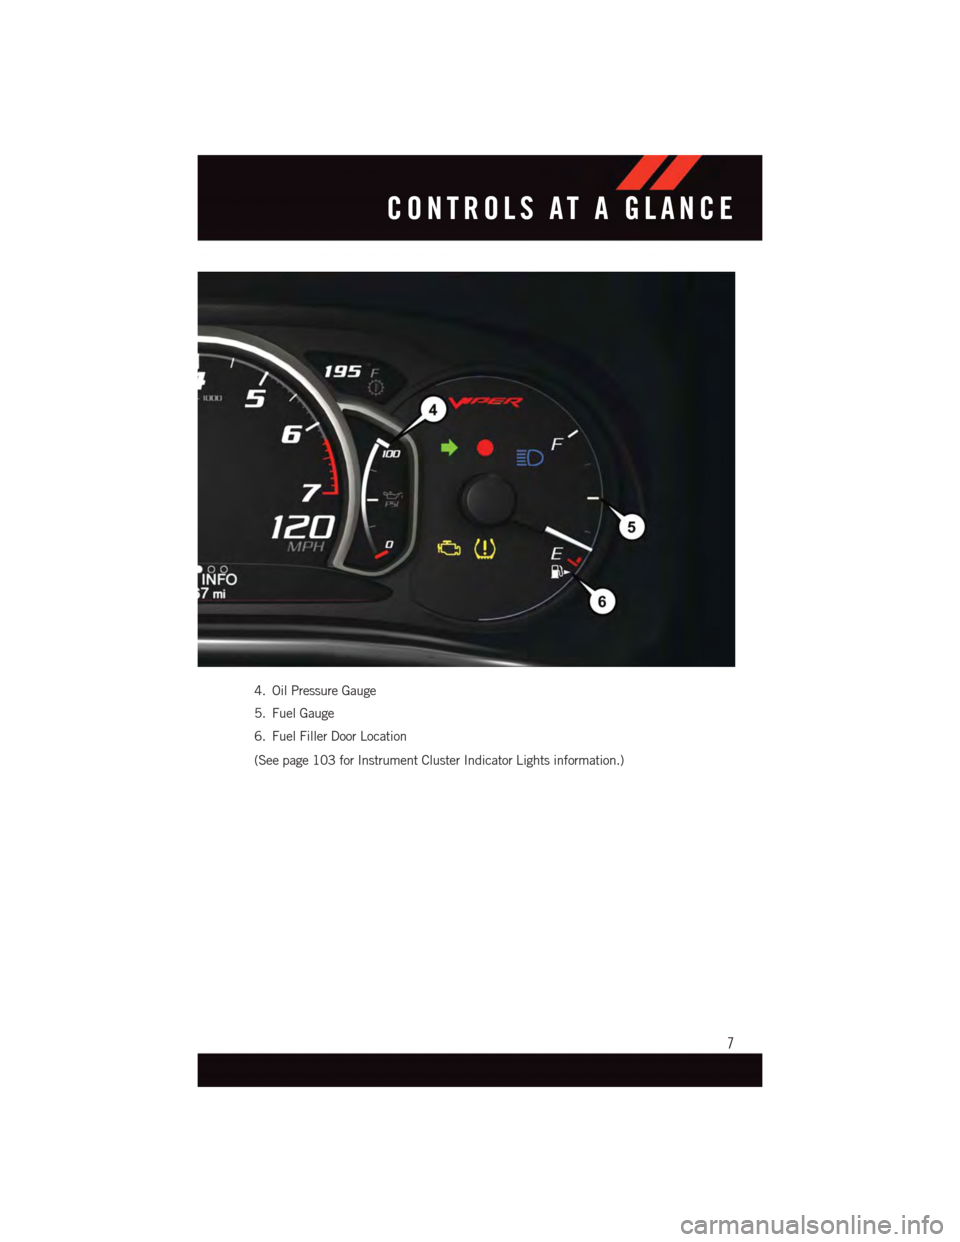
4. Oil Pressure Gauge
5. Fuel Gauge
6. Fuel Filler Door Location
(See page 103 for Instrument Cluster Indicator Lights information.)
CONTROLS AT A GLANCE
7
Page 10 of 148
KEY FOB
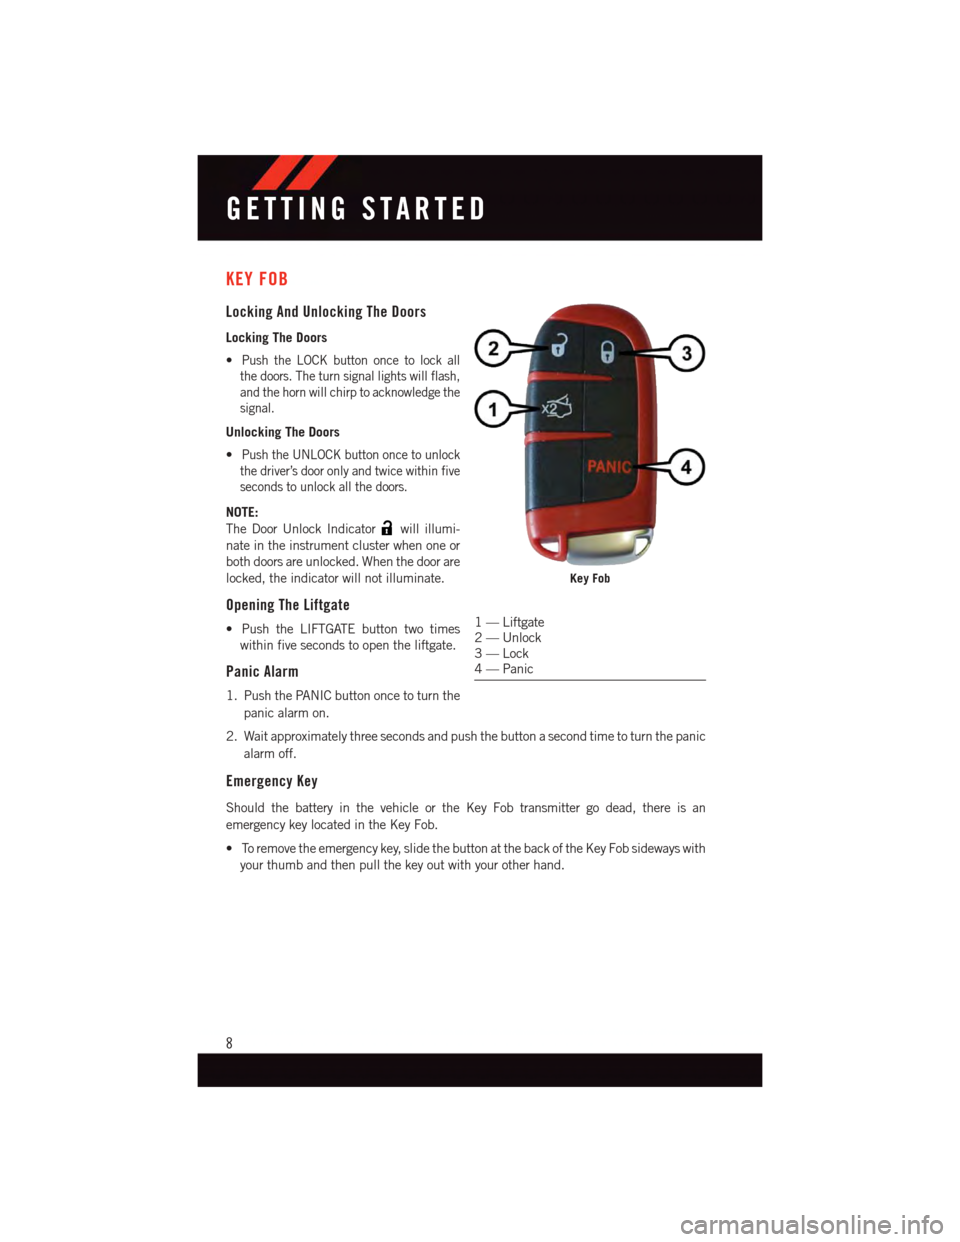
Locking And Unlocking The Doors
Locking The Doors
•Push the LOCK button once to lock all
the doors. The turn signal lights will flash,
and the horn will chirp to acknowledge the
signal.
Unlocking The Doors
•Push the UNLOCK button once to unlock
the driver’s door only and twice within five
seconds to unlock all the doors.
NOTE:
The Door Unlock Indicatorwill illumi-
nate in the instrument cluster when one or
both doors are unlocked. When the door are
locked, the indicator will not illuminate.
Opening The Liftgate
•PushtheLIFTGATEbuttontwotimes
within five seconds to open the liftgate.
Panic Alarm
1. Push the PANIC button once to turn the
panic alarm on.
2. Wait approximately three seconds and push the button a second time to turn the panic
alarm off.
Emergency Key
Should the battery in the vehicle or the Key Fob transmitter go dead, there is an
emergency key located in the Key Fob.
•Toremovetheemergencykey,slidethebuttonatthebackoftheKeyFobsidewayswith
your thumb and then pull the key out with your other hand.
Key Fob
1—Liftgate2—Unlock3—Lock4—Panic
GETTING STARTED
8
Page 12 of 148
VEHICLE SECURITY ALARM
The Vehicle Security Alarm monitors the vehicle doors for unauthorized entry and the
Keyless Enter-N-Go™ START/STOP button for unauthorized operation. While the Vehicle
Security Alarm is armed, interior switches for door locks and decklid release are disabled.
If something triggers the alarm, the Vehicle Security Alarm will provide the following
audible and visible signals: the horn will pulse, the park lamps and/or turn signals will
flash, and the Vehicle Security Light in the instrument cluster will flash.
To Arm:
Follow these steps to arm the Vehicle Security Alarm:
•PushLOCKontheinteriorpowerdoorlockswitchwiththedriverand/orpassengerdoor
open.
•PushtheLOCKbuttonontheRemoteKeylessEntry(RKE)transmitter.
•TheVehicleSecurityLightintheinstrumentclusterwillflashfor16seconds.This
shows that the Vehicle Security Alarm is arming. During this period, if a door is opened,
the ignition is cycled to ON/RUN, or the power door locks are unlocked in any manner,
the Vehicle Security Alarm will automatically disarm.
NOTE:
•Duringthe16-secondarmingperiod,ifadoorisopenedortheignitioniscycledto
ON/RUN, the Vehicle Security Alarm will automatically disarm.
•Oncearmed,theVehicleSecurityAlarmdisablestheunlockswitchonthedriverdoor
trim panel and passenger door trim panel.
•UsingthekeytoopentheliftgatewhiletheVehicleSecurityAlarmisarmedwillnot
trigger the theft alarm.
To Disarm:
The Vehicle Security Alarm can be disarmed using any of the following methods:
•PushtheUNLOCKbuttonontheRemoteKeylessEntry(RKE)transmitter.
•CyclethevehicleignitionsystemoutoftheOFFposition.
GETTING STARTED
10
Page 26 of 148
ELECTRONIC SPEED CONTROL
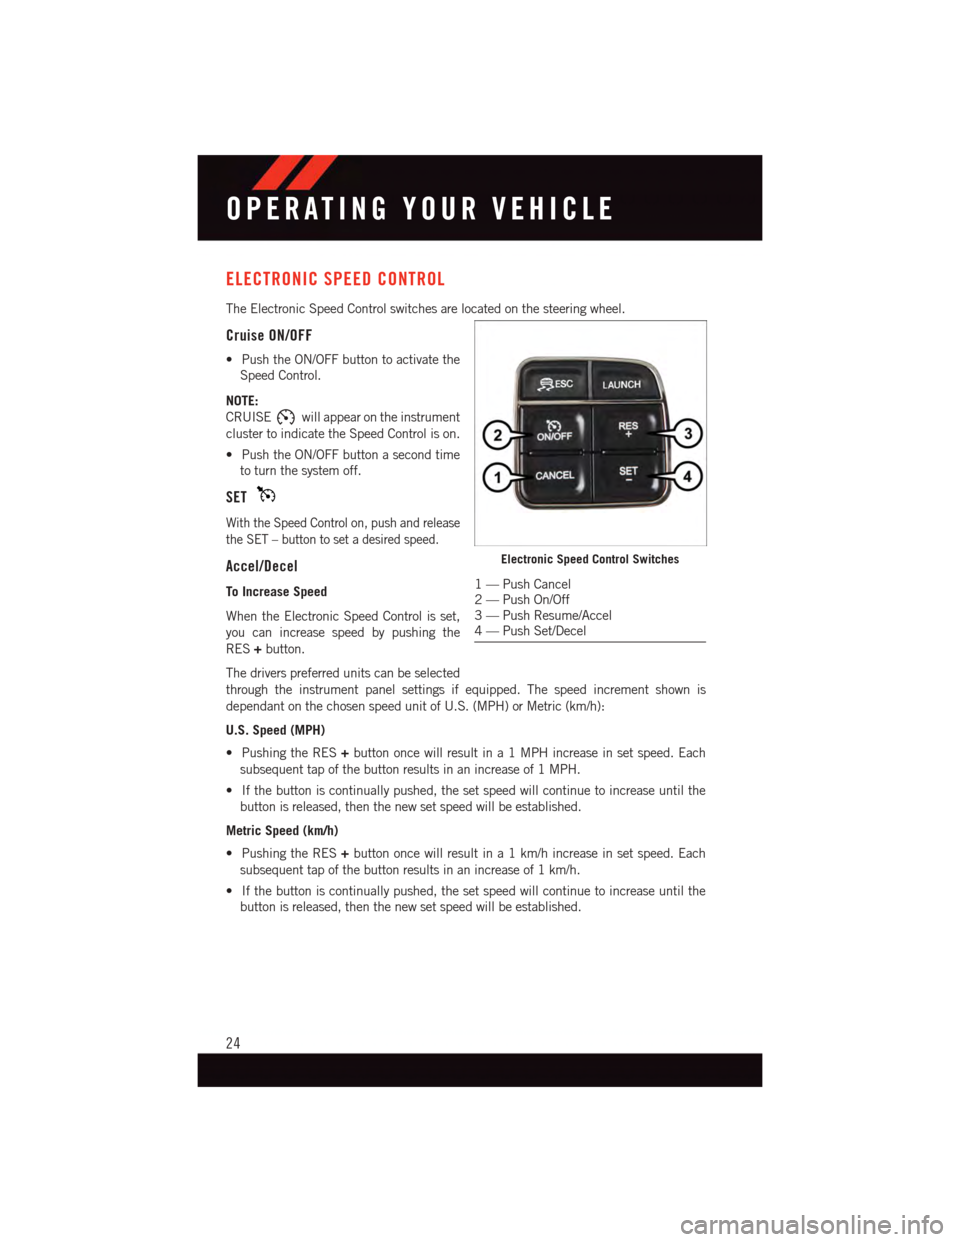
The Electronic Speed Control switches are located on the steering wheel.
Cruise ON/OFF
•PushtheON/OFFbuttontoactivatethe
Speed Control.
NOTE:
CRUISEwill appear on the instrument
cluster to indicate the Speed Control is on.
•PushtheON/OFFbuttonasecondtime
to turn the system off.
SET
With the Speed Control on, push and release
the SET – button to set a desired speed.
Accel/Decel
To Increase Speed
When the Electronic Speed Control is set,
you can increase speed by pushing the
RES+button.
The drivers preferred units can be selected
through the instrument panel settings if equipped. The speed increment shown is
dependant on the chosen speed unit of U.S. (MPH) or Metric (km/h):
U.S. Speed (MPH)
•PushingtheRES+button once will result in a 1 MPH increase in set speed. Each
subsequent tap of the button results in an increase of 1 MPH.
•Ifthebuttoniscontinuallypushed,thesetspeedwillcontinuetoincreaseuntilthe
button is released, then the new set speed will be established.
Metric Speed (km/h)
•PushingtheRES+button once will result in a 1 km/h increase in set speed. Each
subsequent tap of the button results in an increase of 1 km/h.
•Ifthebuttoniscontinuallypushed,thesetspeedwillcontinuetoincreaseuntilthe
button is released, then the new set speed will be established.
Electronic Speed Control Switches
1—PushCancel2—PushOn/Off3—PushResume/Accel4—PushSet/Decel
OPERATING YOUR VEHICLE
24
Page 29 of 148
ELECTRONIC CONTROL DAMPING SYSTEM
•Thisvehiclemaybeequippedwithanelectroniccontrolleddampeningsystem.This
system reduces body roll and pitch in many driving situations including cornering,
acceleration and braking.
•Thissystemallowsforastreetsuspensiondampingsettingorafirmerracesuspension
damping setting. There are two modes of operation:
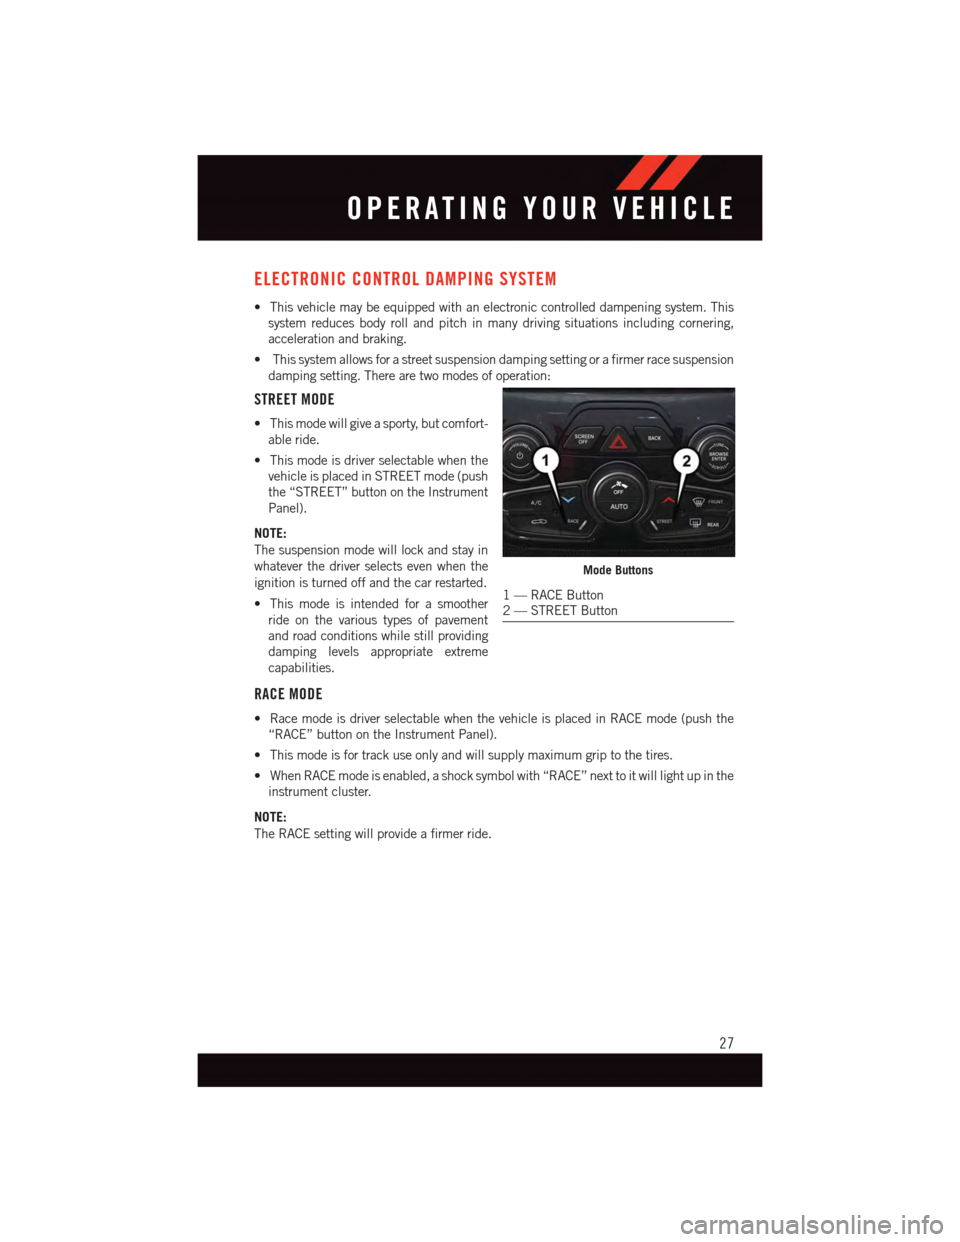
STREET MODE
•Thismodewillgiveasporty,butcomfort-
able ride.
•Thismodeisdriverselectablewhenthe
vehicle is placed in STREET mode (push
the “STREET” button on the Instrument
Panel).
NOTE:
The suspension mode will lock and stay in
whatever the driver selects even when the
ignition is turned off and the car restarted.
•Thismodeisintendedforasmoother
ride on the various types of pavement
and road conditions while still providing
damping levels appropriate extreme
capabilities.
RACE MODE
•RacemodeisdriverselectablewhenthevehicleisplacedinRACEmode(pushthe
“RACE” button on the Instrument Panel).
•Thismodeisfortrackuseonlyandwillsupplymaximumgriptothetires.
•WhenRACEmodeisenabled,ashocksymbolwith“RACE”nexttoitwilllightupinthe
instrument cluster.
NOTE:
The RACE setting will provide a firmer ride.
Mode Buttons
1—RACEButton2—STREETButton
OPERATING YOUR VEHICLE
27
Page 93 of 148
DRIVER INFORMATION DISPLAY (DID)
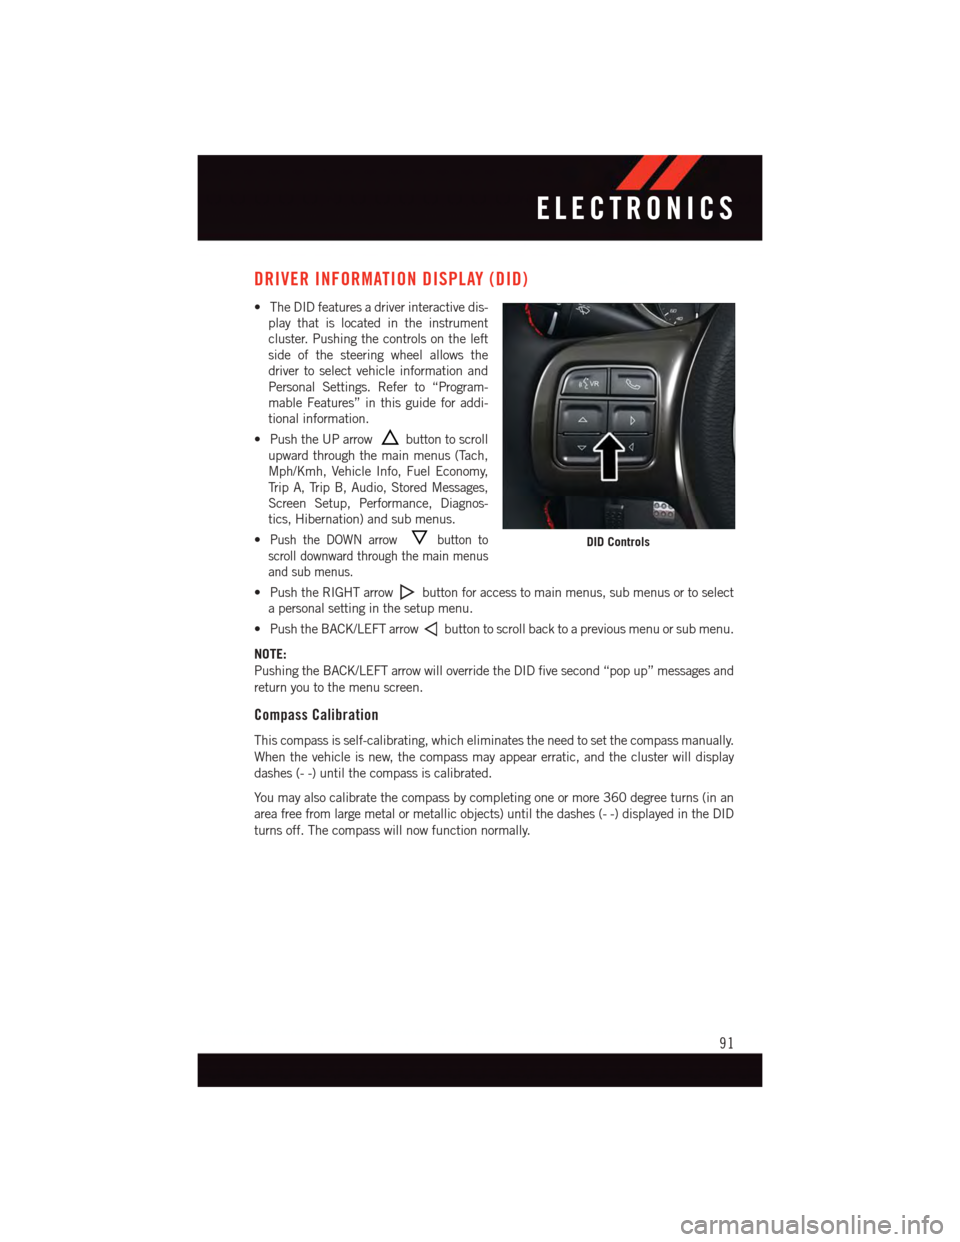
•TheDIDfeaturesadriverinteractivedis-
play that is located in the instrument
cluster. Pushing the controls on the left
side of the steering wheel allows the
driver to select vehicle information and
Personal Settings. Refer to “Program-
mable Features” in this guide for addi-
tional information.
•PushtheUParrowbutton to scroll
upward through the main menus (Tach,
Mph/Kmh, Vehicle Info, Fuel Economy,
Tr i p A , Tr i p B , A u d i o , S t o r e d M e s s a g e s ,
Screen Setup, Performance, Diagnos-
tics, Hibernation) and sub menus.
•Push the DOWN arrowbutton to
scroll downward through the main menus
and sub menus.
•PushtheRIGHTarrowbutton for access to main menus, sub menus or to select
apersonalsettinginthesetupmenu.
•PushtheBACK/LEFTarrowbutton to scroll back to a previous menu or sub menu.
NOTE:
Pushing the BACK/LEFT arrow will override the DID five second “pop up” messages and
return you to the menu screen.
Compass Calibration
This compass is self-calibrating, which eliminates the need to set the compass manually.
When the vehicle is new, the compass may appear erratic, and the cluster will display
dashes (- -) until the compass is calibrated.
Yo u m a y a l s o c a l i b r a t e t h e c o m p a s s b y c o m p l e t i n g o n e o r m o r e 3 6 0 d e g r e e t u r n s ( i n a n
area free from large metal or metallic objects) until the dashes (- -) displayed in the DID
turns off. The compass will now function normally.
DID Controls
ELECTRONICS
91
Page 101 of 148
ROADSIDE ASSISTANCE
Dial toll-free 1-800-521-2779 for U.S. Residents or 1-800-363-4869 for Canadian
Residents.
•Provideyourname,vehicleidentificationnumber,licenseplatenumber,andyour
location, including the telephone number from which you are calling.
•Brieflydescribethenatureoftheproblemandanswerafewsimplequestions.
•Youwillbegiventhenameoftheserviceproviderandanestimatedtimeofarrival.
If you feel you are in an “unsafe situation”, please let us know. With your consent, we
will contact local police or safety authorities.
INSTRUMENT CLUSTER WARNING LIGHTS
–LowFuelWarningLight
This warning light indicates when the fuel level reaches approximately 2.0 gal (7.8 L).
This light will turn on and a single chime will sound.
–ChargingSystemLight
This light shows the status of the electrical charging system. If the charging system light
remains on, it means that the vehicle is experiencing a problem with the charging system.
We recommend you do not continue driving if the charging system light is on. Have the
vehicle serviced immediately.
–OilPressureWarningLight
This light indicates low engine oil pressure. If the light turns on while driving, stop the
vehicle and shut off the engine as soon as possible. A chime will sound when this light
turns on.
We recommend you do not operate the vehicle or engine damage will occur. Have the
vehicle serviced immediately.
–Anti-LockBrake(ABS)Light
This light monitors the Anti-Lock Brake System (ABS).
If the light is not on during starting, stays on or turns on while driving, we recommend you
contact the nearest authorized dealer and have the vehicle serviced immediately.
–AirBagWarningLight
If the light is not on during starting, stays on, or turns on while driving, have the vehicle
serviced by an authorized dealer immediately.
WHAT TO DO IN EMERGENCIES
99