turn signal bulb FIAT 124 SPIDER 2016 2.G Owners Manual
[x] Cancel search | Manufacturer: FIAT, Model Year: 2016, Model line: 124 SPIDER, Model: FIAT 124 SPIDER 2016 2.GPages: 216, PDF Size: 3.1 MB
Page 29 of 216
If the indicator light continues to flash
after a turn, manually return the lever to
its original position.
The turn signal indicators (green)
in the instrument cluster flash
according to the operation of the turn
signal lever to show which signal is
working.
If an indicator light stays on without
flashing or if it flashes abnormally, one
of the turn signal bulbs may be burned
out.
LANE CHANGE SIGNALS
Move the lever halfway toward the
direction of the lane change (until the
indicator flashes) and hold it there. It will
return to the off position when released.
Three-flash turn signal
After releasing the turn signal lever, the
turn signal indicator flashes three times.
The operation can be cancelled by
moving the lever in the direction
opposite to which it was operated.
Adaptive Front Lighting
System (AFS)
(where provided)
The adaptive front lighting system (AFS)
automatically adjusts the headlight
beams to the left or right in conjunction
with the operation of the steering wheel
after the headlights have been turned
on.A system malfunction or operation
conditions are indicated by a warning.
Refer to “Warning lights on instrument
panel” paragraph in “Knowing the
instrument panel” chapter.
NOTE
Headlights are equipped which do
not blind drivers approaching in the
opposite direction no matter what side
of the road you must drive your vehicle
(left-hand or right-hand traffic).
Therefore, it is not necessary to adjust
the optical axis of the headlights when
switching temporarily to driving on the
opposite side of the road (left-hand or
right-hand traffic).
The Adaptive Front Lighting System
(AFS) function can be switched to
operable/ inoperable using the
personalisation function. Refer to
“Personalisation features” paragraph in
“Knowing the instrument panel”
chapter.
27
HEADLAMP LEVELLING
The number of passengers and weight
of cargo in the luggage compartment
change the angle of the headlights.
Auto type
The angle of the headlights will be
automatically adjusted when turning on
the headlights.Manual type
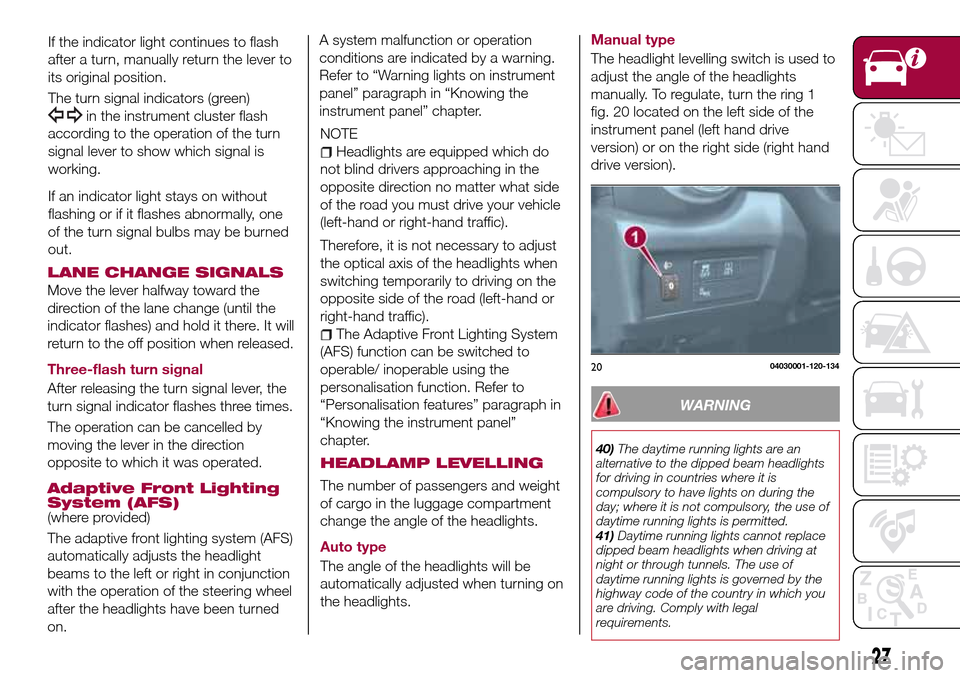
The headlight levelling switch is used to
adjust the angle of the headlights
manually. To regulate, turn the ring 1
fig. 20 located on the left side of the
instrument panel (left hand drive
version) or on the right side (right hand
drive version).
2004030001-120-134
WARNING
40)The daytime running lights are an
alternative to the dipped beam headlights
for driving in countries where it is
compulsory to have lights on during the
day; where it is not compulsory, the use of
daytime running lights is permitted.
41)Daytime running lights cannot replace
dipped beam headlights when driving at
night or through tunnels. The use of
daytime running lights is governed by the
highway code of the country in which you
are driving. Comply with legal
requirements.
Page 129 of 216
HAZARD WARNING
LIGHTS
CONTROL
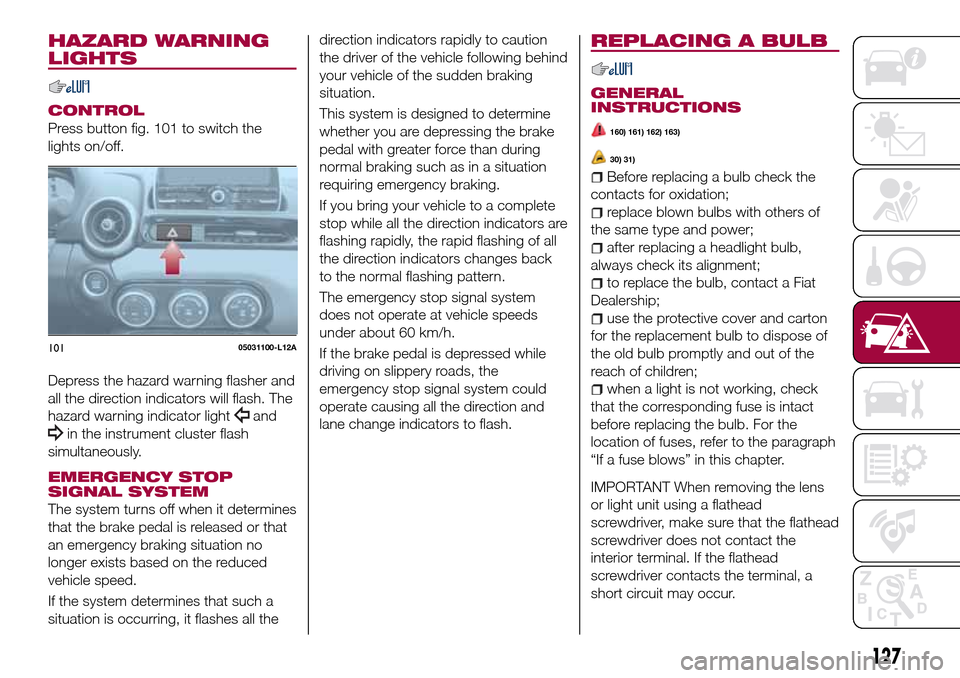
Press button fig. 101 to switch the
lights on/off.
Depress the hazard warning flasher and
all the direction indicators will flash. The
hazard warning indicator light
and
in the instrument cluster flash
simultaneously.
EMERGENCY STOP
SIGNAL SYSTEM
The system turns off when it determines
that the brake pedal is released or that
an emergency braking situation no
longer exists based on the reduced
vehicle speed.
If the system determines that such a
situation is occurring, it flashes all thedirection indicators rapidly to caution
the driver of the vehicle following behind
your vehicle of the sudden braking
situation.
This system is designed to determine
whether you are depressing the brake
pedal with greater force than during
normal braking such as in a situation
requiring emergency braking.
If you bring your vehicle to a complete
stop while all the direction indicators are
flashing rapidly, the rapid flashing of all
the direction indicators changes back
to the normal flashing pattern.
The emergency stop signal system
does not operate at vehicle speeds
under about 60 km/h.
If the brake pedal is depressed while
driving on slippery roads, the
emergency stop signal system could
operate causing all the direction and
lane change indicators to flash.
REPLACING A BULB
GENERAL
INSTRUCTIONS
160) 161) 162) 163)
30) 31)
Before replacing a bulb check the
contacts for oxidation;
replace blown bulbs with others of
the same type and power;
after replacing a headlight bulb,
always check its alignment;
to replace the bulb, contact a Fiat
Dealership;
use the protective cover and carton
for the replacement bulb to dispose of
the old bulb promptly and out of the
reach of children;
when a light is not working, check
that the corresponding fuse is intact
before replacing the bulb. For the
location of fuses, refer to the paragraph
“If a fuse blows” in this chapter.
IMPORTANT When removing the lens
or light unit using a flathead
screwdriver, make sure that the flathead
screwdriver does not contact the
interior terminal. If the flathead
screwdriver contacts the terminal, a
short circuit may occur.
10105031100-L12A
127
Page 137 of 216
Reverse light / Rear fog light
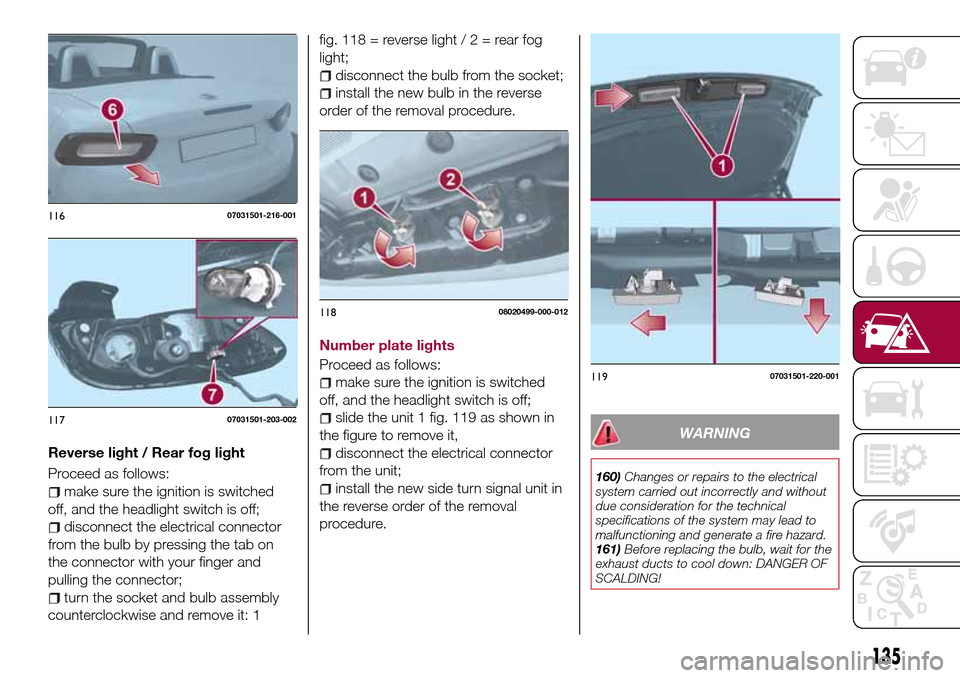
Proceed as follows:
make sure the ignition is switched
off, and the headlight switch is off;
disconnect the electrical connector
from the bulb by pressing the tab on
the connector with your finger and
pulling the connector;
turn the socket and bulb assembly
counterclockwise and remove it: 1fig. 118 = reverse light/2=rearfog
light;
disconnect the bulb from the socket;
install the new bulb in the reverse
order of the removal procedure.
Number plate lights
Proceed as follows:
make sure the ignition is switched
off, and the headlight switch is off;
slide the unit 1 fig. 119 as shown in
the figure to remove it,
disconnect the electrical connector
from the unit;
install the new side turn signal unit in
the reverse order of the removal
procedure.
WARNING
160)Changes or repairs to the electrical
system carried out incorrectly and without
due consideration for the technical
specifications of the system may lead to
malfunctioning and generate a fire hazard.
161)Before replacing the bulb, wait for the
exhaust ducts to cool down: DANGER OF
SCALDING!
11607031501-216-001
11707031501-203-002
11808020499-000-012
11907031501-220-001
135
Page 213 of 216
Lane change signals...........27
Load limiter (pretensioner)........79
Maintaining the finish.........167
Manual climate control system.....32
Manual transmission..........110
Message indicated on display.....65
Mirrors....................22
Multimedia.................186
Navigation................198
Occupant protection systems.....75
Odometer/Trip meter...........48
Outside mirrors...............22
Owner maintenance precautions . . .154
Paintwork (preserving).........167
Parking brake...............109
Parking Sensor System.........118
Passenger Air Bag............95
Passenger occupant classification
system.................100
Performance...............182
Periodic checks (scheduled
servicing)................154
Power mirrors...............23
Power window lock switch.......37
Power windows..............36
Prescriptions for handling the
vehicle at the end of its life.....185Pretensioners................79
Radio 3”.................188
Radio 7”..................193
Read this carefully..............2
Rear camera (ParkView rear
backup camera)...........121
Rear fog lights...............26
Refuelling procedure..........120
Refuelling the vehicle..........120
Replacing a bulb.............127
Replacing a tire..............165
Replacing exterior light bulbs.....131
Replacing fuses.............136
Rims and tires..............173
Rims and tires provided........174
SBA system (Seat Belt Alert)......79
Scheduled servicing plan.......156
Seat belt precautions...........76
Seat belt pretensioner and load
limiting systems.............79
Seat Belt Pretensioners.........95
Seat belts..................76
Seat belts (fastening/unfastening)}.......................77
Seats.....................19
Seats (manual adjustment).......19
Seats and fabric parts (cleaning) . . .169
Shift-lock override (automatic
gearbox)................112
Shift-lock system (automatic
gearbox)................112Side Air Bags................95
Snow chains...............165
Speed limiter...............117
Starting the engine.........11,109
Steering wheel...............22
Supplementary restraint system
(SRS) - Air bag.............93
Symbols....................3
TCS (Traction Control System).....67
Theft deterrent system..........15
Tips, controls and general
information...............187
Tire service kit..............143
Tires rotation (recommendations) . .165
Tool storage................143
Towing the vehicle............150
Towing trailers..............125
TPMS (Tire Pressure Monitoring
System)..................71
Turn signals.................26
Turning the engine off...........13
Vehicle security alarm..........15
Warning lights and messages.....51
Weights..................176
Wheel and tire specifications.....173
Wheels and tires.............165
Window and headlight washer
fluid (level check)...........162
Windscreen washer............30
Windscreen wipers............29