cooling FIAT 124 SPIDER 2017 2.G Owners Manual
[x] Cancel search | Manufacturer: FIAT, Model Year: 2017, Model line: 124 SPIDER, Model: FIAT 124 SPIDER 2017 2.GPages: 300, PDF Size: 121.24 MB
Page 51 of 300
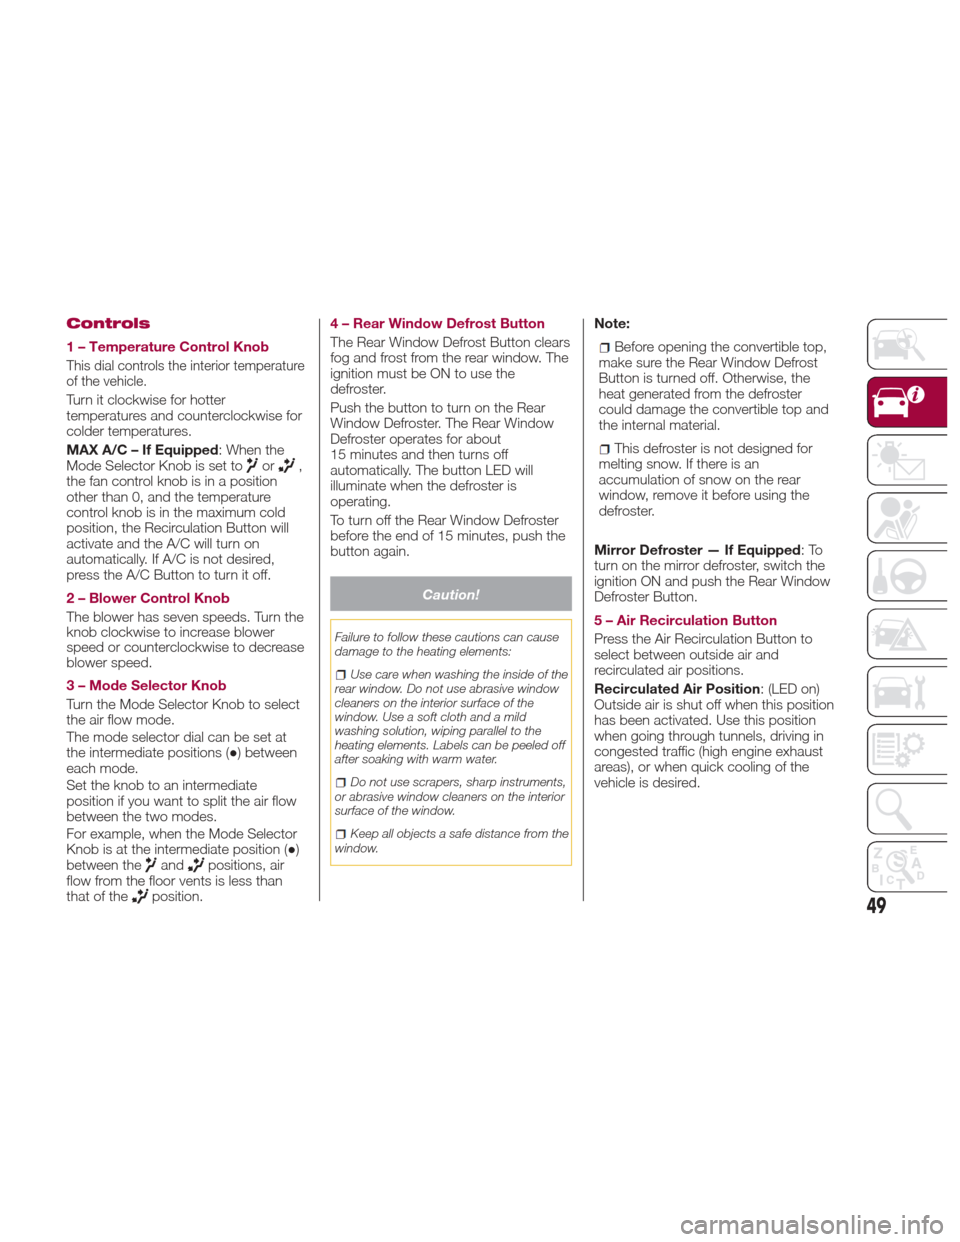
Controls
1 – Temperature Control Knob
This dial controls the interior temperature
of the vehicle.
Turn it clockwise for hotter
temperatures and counterclockwise for
colder temperatures.
MAX A/C – If Equipped: When the
Mode Selector Knob is set to
or,
the fan control knob is in a position
other than 0, and the temperature
control knob is in the maximum cold
position, the Recirculation Button will
activate and the A/C will turn on
automatically. If A/C is not desired,
press the A/C Button to turn it off.
2 – Blower Control Knob
The blower has seven speeds. Turn the
knob clockwise to increase blower
speed or counterclockwise to decrease
blower speed.
3 – Mode Selector Knob
Turn the Mode Selector Knob to select
the air flow mode.
The mode selector dial can be set at
the intermediate positions ( ●) between
each mode.
Set the knob to an intermediate
position if you want to split the air flow
between the two modes.
For example, when the Mode Selector
Knob is at the intermediate position ( ●)
between the
andpositions, air
flow from the floor vents is less than
that of the
position. 4 – Rear Window Defrost Button
The Rear Window Defrost Button clears
fog and frost from the rear window. The
ignition must be ON to use the
defroster.
Push the button to turn on the Rear
Window Defroster. The Rear Window
Defroster operates for about
15 minutes and then turns off
automatically. The button LED will
illuminate when the defroster is
operating.
To turn off the Rear Window Defroster
before the end of 15 minutes, push the
button again.
Caution!
Failure to follow these cautions can cause
damage to the heating elements:
Use care when washing the inside of the
rear window. Do not use abrasive window
cleaners on the interior surface of the
window. Use a soft cloth and a mild
washing solution, wiping parallel to the
heating elements. Labels can be peeled off
after soaking with warm water.
Do not use scrapers, sharp instruments,
or abrasive window cleaners on the interior
surface of the window.
Keep all objects a safe distance from the
window.
Note:
Before opening the convertible top,
make sure the Rear Window Defrost
Button is turned off. Otherwise, the
heat generated from the defroster
could damage the convertible top and
the internal material.
This defroster is not designed for
melting snow. If there is an
accumulation of snow on the rear
window, remove it before using the
defroster.
Mirror Defroster — If Equipped :To
turn on the mirror defroster, switch the
ignition ON and push the Rear Window
Defroster Button.
5 – Air Recirculation Button
Press the Air Recirculation Button to
select between outside air and
recirculated air positions.
Recirculated Air Position : (LED on)
Outside air is shut off when this position
has been activated. Use this position
when going through tunnels, driving in
congested traffic (high engine exhaust
areas), or when quick cooling of the
vehicle is desired.
49
Page 52 of 300
Outside Air Position: (LED off)
Outside air is allowed to enter the
cabin. Use this mode for ventilation or
windshield defrosting.
Note:
Do not use the Outside Air Position in
cold or rainy weather is dangerous as it
will cause the windows to fog up. Your
vision will be hampered, which could
lead to a serious accident.
6 – A/C Button
Push the A/C Button to turn on the air
conditioner.
The LED on the switch will illuminate
when the Blower Control Knob is in any
position except the OFF position.
Push the button again to turn off the air
conditioner.
Note: The air conditioner may not
function when the outside temperature
approaches 32 °F (0 °C).
Heating
Proceed as follows:
1. Set the Mode Selector Knob to
the
position.
2. Set the Air Recirculation Button to
the outside air position.
3. Set the Temperature Control Dial to
the hot position. 4. Set the Blower Control Knob to the
desired speed.
5. If dehumidified heating is desired,
turn on the air conditioner.
If the windshield fogs up easily, set the
Mode Selector Knob to the
position.
If cooler air is desired at face level, set
the Mode Selector Knob to the
position and adjust the Temperature
Control Knob to maintain comfort.
The floor vents will blow warmer air
while the side air vents will blow cooler
air (except when the temperature
control dial is set at the maximum hot
or cold position).
Cooling (With Air
Conditioner)
Proceed as follows:
1. Set the Mode Selector Knob to
the
position.
2. Set the Temperature Control Knob
to the cold position.
3. Set the Blower Control Knob to the
desired speed.
4. Turn on the air conditioner by
pushing the A/C Button.
5. After cooling begins, adjust the
Blower Control Knob and Temperature
Control Knob as needed to maintain
comfort. Note:
If the air conditioner is used while
driving up large hills or in heavy traffic,
monitor the Engine Coolant
Temperature Warning Light to see if it
is illuminated or flashing. The air
conditioner may cause engine
overheating in these situations. If the
warning light is illuminated or flashing,
turn the air conditioning off
immediately.
When maximum cooling is desired,
set the Temperature Control Knob to
the extreme cold position, push the Air
Recirculation Button to activate the
recirculated air position, and then turn
the fan control dial fully clockwise.
If warmer air is desired at floor level,
set the Mode Selector Knob to the
position, and adjust the
Temperature Control Knob to maintain
comfort.
The floor vents will blow warmer air
while the side air vents will blow cooler
air (except when the temperature
control dial is set at the maximum hot
or cold position).
50
GETTING TO KNOW YOUR VEHICLE
Page 56 of 300
Controls
1 – Temperature Control Knob
This knob controls internal temperature
of the vehicle. Turn it clockwise for
hotter temperatures and
counterclockwise for colder
temperatures.
2 – Blower Control Knob
The fan has seven speeds. Turn the
clockwise to increase blower speed or
counterclockwise to decrease blower
speed/enter Auto mode.
AUTO Position: The blower speed is
automatically controlled by the system
based upon the set temperature.
0 Position : To turn off the system, set
the dial to 0 position.
3 – Mode Selector Dial
Turn the Mode Selector Knob to select
the air flow mode.
AUTO Position : The air flow
automatically adjusts based upon the
selected temperature.
Note:
With the air flow mode set to theposition, and the Temperature
Control Knob is set to a medium
temperature, the floor vents will blow
warmer air, and the center and side air
vents will blow cooler air.
When the Blower Control Knob is
ON, and the Mode Selector Knob is in
the
position, the air conditioner is automatically turned on, and the Air
Recirculation Button is automatically
set to the outside air position for
windshield defrosting.
4 – Rear Window Defrost Button
The Rear Window Defroster clears fog
and frost from the rear window. The
ignition must be switched ON to use
the defroster.
Push the button to turn on the Rear
Window Defroster.
The Rear Window Defroster operates
for about 15 minutes, and then turns off
automatically.
The button LED will illuminate when the
defroster is operating.
To turn off the Rear Window Defroster
before the end of 15 minutes, push the
switch again.
Caution!
Failure to follow these cautions can cause
damage to the heating elements:
Before opening the convertible top,
make sure the Rear Window Defrost Button
is turned OFF. Otherwise, the heat
generated from the defroster could
damage the convertible top and the
internal material.
Use care when washing the inside of the
rear window. Do not use abrasive window
cleaners on the interior surface of the
window. Use a soft cloth and a mild
washing solution, wiping parallel to the
heating elements. Labels can be peeled off
after soaking with warm water.
Do not use scrapers, sharp instruments,
or abrasive window cleaners on the interior
surface of the window.
Keep all objects a safe distance from the
window.
Note: This defroster is not designed for
melting snow. If there is an
accumulation of snow on the rear
window, remove it before using the
defroster.
Mirror Defroster — If Equipped :To
turn on the mirror defroster, switch the
ignition ON and push the Rear Window
Defroster Button.
5 – Air Recirculation Button
Press the Air Recirculation Button to
select between outside air and
recirculated air positions.
Recirculated Air Position : (LED On)
Outside air is shut off when this position
has been activated. Use this position
when going through tunnels, driving in
congested traffic (high engine exhaust
areas), or when quick cooling of the
vehicle is desired.
54
GETTING TO KNOW YOUR VEHICLE
Page 202 of 300
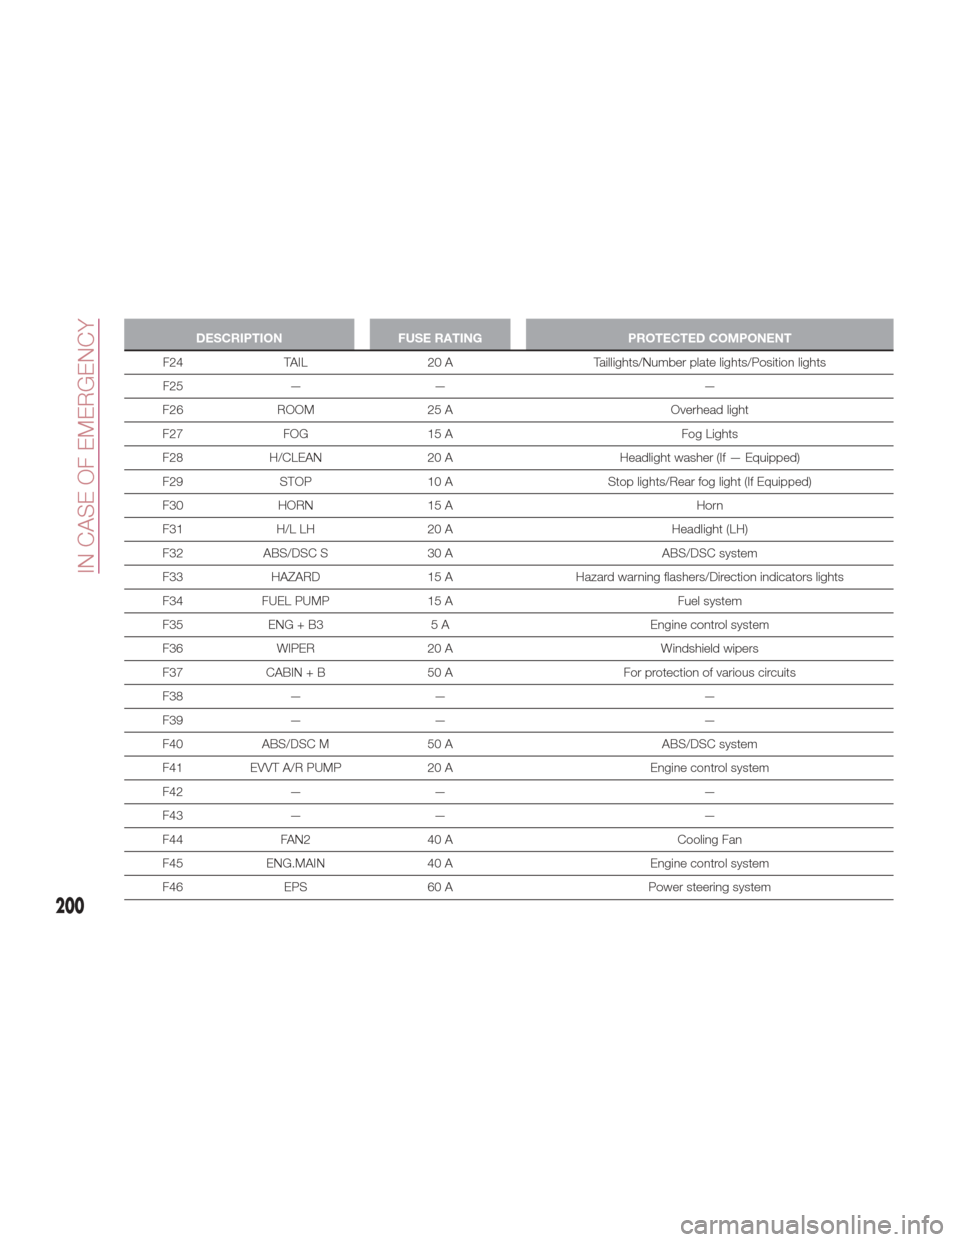
DESCRIPTIONFUSE RATING PROTECTED COMPONENT
F24 TAIL 20 A Taillights/Number plate lights/Position lights
F25
— — —
F26 ROOM 25 A Overhead light
F27 FOG 15 A Fog Lights
F28 H/CLEAN 20 A Headlight washer (If — Equipped)
F29 STOP 10 A Stop lights/Rear fog light (If Equipped)
F30 HORN 15 A Horn
F31 H/L LH 20 A Headlight (LH)
F32 ABS/DSC S 30 A ABS/DSC system
F33 HAZARD 15 AHazard warning flashers/Direction indicators lights
F34 FUEL PUMP 15 A Fuel system
F35 ENG + B3 5 A Engine control system
F36 WIPER 20 A Windshield wipers
F37 CABIN + B 50 A For protection of various circuits
F38 — — —
F39 — — —
F40 ABS/DSC M 50 A ABS/DSC system
F41 EVVT A/R PUMP 20 A Engine control system
F42 — — —
F43 — — —
F44 FAN2 40 A Cooling Fan
F45 ENG.MAIN 40 A Engine control system
F46 EPS 60 A Power steering system
200
IN CASE OF EMERGENCY
Page 222 of 300
4. Connect one end of a jumper cables
to the positive terminal on the
discharged battery.
5. Connect the other end to the
positive terminal on the booster battery.
6. Connect one end of the other
jumper cables to the negative terminal
of the booster battery.
7. Connect the other end to a good
engine ground of the vehicle with the
discharged battery (exposed metal part
of the engine) away from the battery
and the fuel injection system.
8. Start the engine of the booster
vehicle and run it a few minutes. Then
start the engine of the other vehicle.
9. Once the engine is started, remove
the jumper cables in the reverse
sequence.
10. Replace the positive terminal
cover. Make sure cover is secure.
Bump Starting
Never jump start the engine by pushing,
towing or coasting downhill.
Note:
You cannot start a vehicle with an
automatic transmission by pushing it.
Do not push-start a vehicle that has
a manual transmission. It can damage
the emission control system.
STARTING A FLOODED
ENGINE
If the engine fails to start, it may be
flooded (excessive fuel in the engine).
Follow this procedure:
1. If the engine does not start within
5 seconds on the first try, wait
10 seconds and try again.
2. Make sure the parking brake is on.
3. Depress the accelerator all the way
and hold it there.
4. Depress the clutch pedal (manual
transmission) or the brake pedal
(automatic transmission), then push the
push button start. If the engine starts,
release the accelerator immediately
because the engine will suddenly rev
up.
5. If the engine fails to start, crank it
without depressing the accelerator.
If the engine still does not start using
the above procedure, have your vehicle
inspected an Authorized Dealer.
OVERHEATING
Overheating
In any of the following situations, you
can reduce the potential for overheating
by taking the appropriate action.
On the highways — slow down.
In city traffic — while stopped, place
the transmission in NEUTRAL, but do
not increase engine idle speed.
Note: There are steps that you can
take to slow down an impending
overheat condition:
If your air conditioner (A/C) is on,
turn it off. The A/C system adds heat
to the engine cooling system and
turning the A/C off can help remove
this heat.
You can also turn the temperature
control to maximum heat, the mode
control to floor and the blower control
to high. This allows the heater core to
act as a supplement to the radiator
and aids in removing heat from the
engine cooling system.
220
IN CASE OF EMERGENCY
Page 223 of 300
Warning!
You or others can be badly burned by hot
engine coolant (antifreeze) or steam from
your radiator. If you see or hear steam
coming from under the hood, do not open
the hood until the radiator has had time to
cool. Never try to open a cooling system
pressure cap when the radiator or coolant
bottle is hot.
Caution!
Driving with a hot cooling system could
damage your vehicle. If temperature gauge
reads “H”, pull over and stop the vehicle.
Idle the vehicle with the air conditioner
turned off until the pointer drops back into
the normal range. If the pointer remains on
the “H”, turn the engine off immediately,
and call for service.
If Steam Is Coming From The
Engine Compartment:
Do not go near the front of the vehicle.
Stop the engine. Wait until the steam
dissipates, then open the hood and
start the engine.
If Neither Coolant Nor Steam Is
Escaping:
Open the hood and idle the engine until
it cools.
Note:
If the cooling fan does not operate
while the engine is running, the engine
temperature will increase. Stop the
engine and contact an Authorized
Dealer.
If the engine continues to overheat
or frequently overheats, have the
cooling system inspected. The engine
could be seriously damaged unless
repairs are made. Contact an
Authorized Dealer.
TOWING THE
VEHICLE
Attaching The Tow Eyes
Warning!
Stand clear of vehicles when pulling with
tow eyes.
Do not use a chain with a tow eye.
Chains may break, causing serious injury or
death.
Do not use a tow strap with a tow eye.
Tow straps may break or become
disengaged, causing serious injury or
death.
Failure to follow proper tow eye usage
may cause components to break resulting
in serious injury or death.
221
Page 235 of 300
Engine Oil
Warning!
Be very careful when working in the
engine compartment when the engine is
hot: you may get burned.
Do not get too close to the radiator
cooling fan: the electric fan may start;
danger of injury.
Loose clothing might be pulled by
moving parts.
Recommended Oil
Refer to “Fluids and Lubricants”
paragraph in “Technical Specifications”
chapter.
Inspecting engine oil level
Proceed as follows:
1. Be sure the vehicle is on a level
surface.
2. Warm up the engine to normal
operating temperature.
3. Turn it off and wait at least five
minutes for the oil to return to the
sump.
4. Pull out the dipstick, wipe it clean,
and reinsert it fully. 5. Pull the dipstick out again and
examine the level. The level is normal if
it is between Low and Full. If it is near
or below Low, open the engine oil
cap/filler 2 and add enough oil to bring
the level to Full.
Note:
Do not overfill the engine oil.
This may cause engine damage.
6. Make sure the O-ring on the dipstick
is positioned properly before reinserting
the dipstick.
7. Reinsert the dipstick fully.
Engine oil consumption
During the initial period of use the
engine oil consumption conditions
should stabilize after the first 3000 –
3500 miles (5000 – 6000 km).
Engine Coolant
Warning!
You or others can be badly burned by hot
engine coolant (antifreeze) or steam from
your radiator. If you see or hear steam
coming from under the hood, do not open
the hood until the radiator has had time to
cool. Never try to open a cooling system
pressure cap when the radiator or coolant
bottle is hot.
Inspecting Coolant Level
Note: Changing the coolant should be
done by your Authorized Dealer.
Inspect the antifreeze protection and
coolant level in the coolant reservoir at
least once a year, at the beginning of
the winter season, and before traveling
where temperatures may drop below
freezing.
Inspect the condition and connections
of all cooling system and heater hoses.
Replace any that are worn or
deteriorated.
07030403-121-001Engine Compartment
1 — Engine Oil Dipstick
2 — Engine Oil Cap
233
Page 236 of 300
Warning!
Do not open hot engine cooling system.
Never add engine coolant (antifreeze) when
the engine is overheated. Do not loosen or
remove the cap to cool an overheated
engine. Heat causes pressure to build up in
the cooling system. To prevent scalding or
injury, do not remove the pressure cap
while the system is hot or under pressure.
Do not use a pressure cap other than
the one specified for your vehicle. Personal
injury or engine damage may result.
The coolant should be at full in the
radiator and between the F (Full) and L
(Low) marks on the coolant reservoir
when the engine is cool. If it is at or near L (Low), add coolant by
mixing a minimum solution of 50%
Mopar Long Life Coolant Concentrate
for FIAT Spider. Use higher
concentrations (not to exceed 70%) if
temperatures below −34°F (−37°C) are
anticipated. Bring the level to F (Full).
Please contact your Authorized Dealer
for assistance.
Securely tighten the coolant reservoir
tank cap after adding coolant.
If the coolant reservoir is empty or new
coolant is required frequently, contact
your Authorized Dealer.
Brake/Clutch Fluid
Inspecting Brake/Clutch Fluid Level
The brakes and clutch draw fluid
from the same reservoir.
Inspect the fluid level in the reservoir
regularly.
It should be kept between the MAX
and MIN lines.
The level normally drops with
accumulated use, a condition
associated with wear of brake and
clutch linings. If it is excessively low,
have the brake/clutch system
inspected. Contact your Authorized
Dealer.
Warning!
Use only manufacturer's recommended
brake fluid. Refer to “Fluids And Lubricants”
in “Technical Specifications” for further
information. Using the wrong type of brake
fluid can severely damage your brake
system and/or impair its performance. The
proper type of brake fluid for your vehicle is
also identified on the original factory
installed hydraulic master cylinder reservoir.
To avoid contamination from foreign
matter or moisture, use only new brake
fluid or fluid that has been in a tightly
closed container. Keep the master cylinder
reservoir cap secured at all times. Brake
fluid in a open container absorbs moisture
from the air resulting in a lower boiling
point. This may cause it to boil
unexpectedly during hard or prolonged
braking, resulting in sudden brake failure.
This could result in a collision.
07030501-121-001Coolant Reservoir
07030601-121-002Brake Fluid Reservoir
234
SERVICING AND MAINTENANCE
Page 255 of 300
STORING THE
VEHICLE
If the vehicle is left inactive for longer
than a month, the following precautions
should be observed:
Park the vehicle in covered, dry and if
possible well-ventilated premises and
slightly open the windows.
Check that the parking brake is not
activated.
Disconnect the negative battery
terminal and check the battery charge.
Repeat this check once every three
months during storage.
If the battery is not disconnected
from the electrical system, check its
state of charge every thirty days.
Clean and protect the painted parts
using protective wax.
Clean and protect the shiny metal
parts using special compounds
available commercially.
Sprinkle talcum powder on the
windshield and rear window wiper
rubber blades and lift them off the
glass.
Cover the vehicle with a fabric or
perforated plastic sheet, paying
particular care not to damage the
painted surface by dragging any dust
that may have accumulated on it. Do not use compact plastic sheets
which do not allow humidity to
evaporate from the surface of the
vehicle.
Inflate the tires at a pressure of
+7.25 psi (+0.5 bar) higher than
recommended on the tire placard and
check it periodically.
Do not drain the engine cooling
system.
Any time the vehicle is left inactive for
two weeks or more, operate the air
conditioning system with engine idling
for at least five minutes, setting external
air and with fan set to maximum speed.
This operation will ensure appropriate
lubrication for the system, thus
minimizing the possibility of damage to
the compressor when the system is
operated again.
Note: After placing the ignition in the
OFF mode and having closed the driver
side door, wait at least one minute
before disconnecting the electrical
supply from the battery. When
reconnecting the electrical supply to the
battery, make sure that the ignition in
the OFF mode and the driver side door
is closed.
BODYWORK
Protection From
Atmospheric Agents
The vehicle is equipped with the best
available technological solutions to
protect the bodywork against corrosion.
These include:
Painting products and systems
which give the vehicle resistance to
corrosion and abrasion.
Use of galvanized (or pre-treated)
steel sheets, with high resistance to
corrosion.
Spraying of plastic parts, with a
protective function in the more exposed
points: underdoor, inner fender, edges,
etc.
Use of “open” boxed sections to
prevent condensation and pockets of
moisture which could favour the
formation of rust inside.
Use of special films to protect
against abrasion in exposed areas (e.g.
rear fender, doors, etc.).
Corrosion Warranty
Your vehicle is covered by Corrosion
Warranty against perforation due to rust
of any original element of the structure
or bodywork. For the general terms of
this Corrosion Warranty, refer to the
Warranty Booklet.
253
Page 278 of 300
Caution!
Mixing of engine coolant (antifreeze) other than specified Organic Additive Technology (OAT) engine coolant (antifreeze), may result in
engine damage and may decrease corrosion protection. Organic Additive Technology (OAT) engine coolant is different and should not be
mixed with Hybrid Organic Additive Technology (HOAT) engine coolant (antifreeze) or any “globally compatible” coolant (antifreeze). If a
non-OAT engine coolant (antifreeze) is introduced into the cooling system in an emergency, the cooling system will need to be drained,
flushed, and refilled with fresh OAT coolant (conforming to MS.90032), by an authorized dealer as soon as possible.
Do not use water alone or alcohol-based engine coolant (antifreeze) products. Do not use additional rust inhibitors or antirust products, as
they may not be compatible with the radiator engine coolant and may plug the radiator.
This vehicle has not been designed for use with propylene glycol-based engine coolant (antifreeze). Use of propylene glycol-based engine
coolant (antifreeze) is not recommended.
276
TECHNICAL SPECIFICATIONS