wheel FIAT 124 SPIDER 2019 Owner handbook (in English)
[x] Cancel search | Manufacturer: FIAT, Model Year: 2019, Model line: 124 SPIDER, Model: FIAT 124 SPIDER 2019Pages: 228, PDF Size: 5.08 MB
Page 104 of 228
HOW THE SRS AIR BAGS
WORK
121) 122) 123) 124) 125) 126) 127) 128) 129) 130) 131) 134)
139)
Your vehicle is equipped with the
following types of SRS air bags. SRS air
bags are designed to work together
with the seat belts to help to reduce
injuries during an accident. The SRS air
bags are designed to provide further
protection for passengers in addition to
the seat belt functions. Be sure to wear
seat belts properly.
Seat Belt Pretensioners
The seat belt pretensioners are
designed to deploy in moderate or
severe frontal, near frontal collisions. In
addition, during a side collision, the
pretensioner operates on the side in
which the collision occurs. The
pretensioners operate differently
depending on what types of air bags
are equipped. For more details about
seat belt pretensioner operation, refer
to the SRS Air Bag Deployment Criteria.
Driver Air Bag
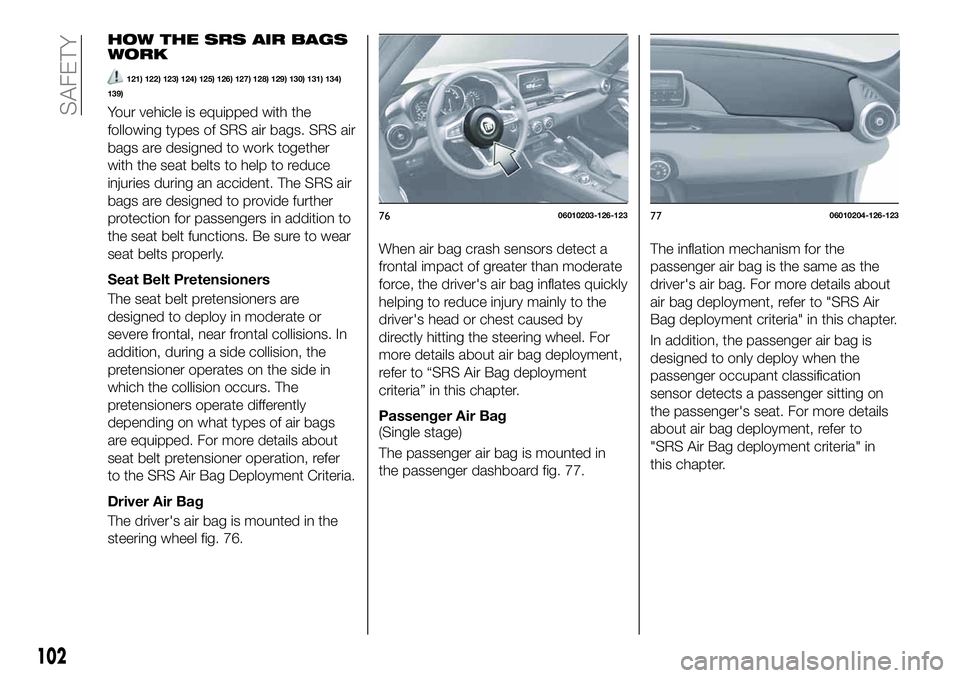
The driver's air bag is mounted in the
steering wheel fig. 76.When air bag crash sensors detect a
frontal impact of greater than moderate
force, the driver's air bag inflates quickly
helping to reduce injury mainly to the
driver's head or chest caused by
directly hitting the steering wheel. For
more details about air bag deployment,
refer to “SRS Air Bag deployment
criteria” in this chapter.
Passenger Air Bag
(Single stage)
The passenger air bag is mounted in
the passenger dashboard fig. 77.The inflation mechanism for the
passenger air bag is the same as the
driver's air bag. For more details about
air bag deployment, refer to "SRS Air
Bag deployment criteria" in this chapter.
In addition, the passenger air bag is
designed to only deploy when the
passenger occupant classification
sensor detects a passenger sitting on
the passenger's seat. For more details
about air bag deployment, refer to
"SRS Air Bag deployment criteria" in
this chapter.
7606010203-126-1237706010204-126-123
102
SAFETY
Page 108 of 228
LIMITATIONS TO SRS AIR
BAG
In severe collisions such as those
described in "SRS Air Bag deployment
criteria" paragraph, the applicable SRS
air bag equipment will deploy.
However, in some accidents, the
equipment may not deploy depending
on the type of collision and its severity.
Limitations to front / near front
collision detection
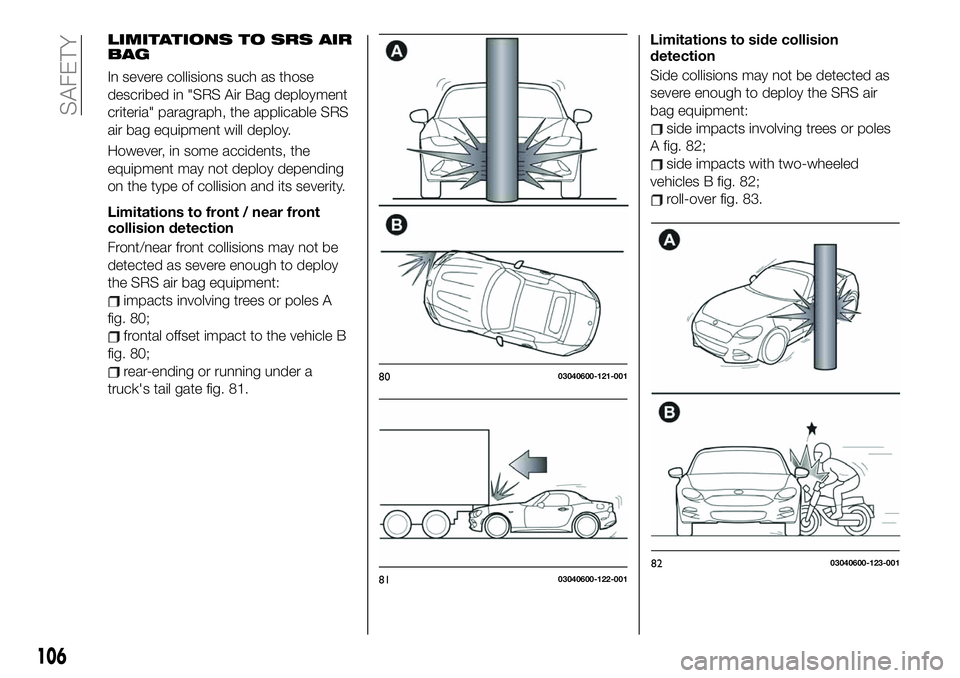
Front/near front collisions may not be
detected as severe enough to deploy
the SRS air bag equipment:
impacts involving trees or poles A
fig. 80;
frontal offset impact to the vehicle B
fig. 80;
rear-ending or running under a
truck's tail gate fig. 81.Limitations to side collision
detection
Side collisions may not be detected as
severe enough to deploy the SRS air
bag equipment:
side impacts involving trees or poles
A fig. 82;
side impacts with two-wheeled
vehicles B fig. 82;
roll-over fig. 83.
8003040600-121-001
8103040600-122-001
106
SAFETY
8203040600-123-001
Page 112 of 228
WARNING
118)Seat belts must be worn in air bag
equipped vehicles. Depending only on the
air bags for protection during an accident
is dangerous. Alone, air bags may not
prevent serious injuries. The appropriate air
bags can be expected to inflate only in the
first accident, such as frontal, near frontal
or side collisions that are at least
moderate. Vehicle occupants should
always wear seat belts.
119)Always make sure the passenger air
bag deactivation OFF indicator light is
illuminated when using a child restraint
system. Seating a child in a child-restraint
system that is installed on the passenger
seat with the passenger air bag
deactivation OFF indicator light not
illuminated is extremely dangerous. In an
accident, an air bag could inflate and
cause serious injuries or even death to the
child seated in the child restraint system.
Always make sure the passenger air bag
deactivation OFF indicator light is
illuminated.120)EXTREME HAZARD! Never use a
rear-facing child-restraint system on the
passenger seat with an air bag that could
deploy. NEVER use a rearward facing child
restraint on a seat protected by an ACTIVE
AIR BAG in front of it, DEATH or SERIOUS
INJURY to the CHILD can occur. Even in a
moderate collision, the child-restraint
system can be hit by a deploying air bag
and moved violently backward resulting in
serious injury or death to the child. If your
vehicle is equipped with on passenger
occupant classification system, always
make sure the passenger air bag
deactivation OFF indicator light is
illuminated.
121)Do not sit too close to the driver and
passenger air bags. Sitting too close to the
driver and passenger air bag modules or
placing hands or feet on them is extremely
dangerous. The driver and passenger air
bags inflate with great force and speed.
Serious injuries could occur if someone is
too close. The driver should always hold
onto only the rim of the steering wheel. The
passenger should keep both feet on the
floor. Seat occupants should adjust their
seats as far back as possible and always
sit upright against the seat backs with seat
belts worn properly.122)Do not sit too close to a door or lean
against doors in vehicles with side air bags.
Sitting too close to the side air bag
modules or placing hands on them is
extremely dangerous. A side air bag
inflates with great force and speed directly
out of the outer shoulder of the seat and
expands along the door on the side the car
is hit. Serious injury could occur if someone
is sitting too close to the door or leaning
against a window in the seats.
Furthermore, sleeping up against the door
or hanging out the driver-side window while
driving could block the side air bag and
eliminate the advantages of supplementary
protection. Give the side air bags room to
work by sitting in the center of the seat
while the vehicle is moving with seat belts
worn properly.
123)Sit in the center of the seat and wear
seat belts properly. Sitting too close to the
side air bag modules or placing hands on
them, or sleeping up against the door or
hanging out the windows is extremely
dangerous. The side air bags inflate with
great force and speed directly expanding
along the door on the side the car is hit.
Serious injury could occur if someone is
sitting too close to the door. Give the side
air bags room to work by sitting in the
center of the seat while the vehicle is
moving with seat belts worn properly.
124)Do not attach objects on or around
the area where driver and passenger air
bags deploy. Attaching an object to the
driver and passenger air bag modules or
placing something in front of them is
dangerous. In an accident, an object could
interfere with air bag inflation and injure the
occupants.
110
SAFETY
Page 114 of 228
132)Do not operate a vehicle with
damaged air bag/seat belt pretensioner
system components. Expended or
damaged air bag/seat belt pretensioner
system components must be replaced
after any collision which caused them to
deploy or damage them. Only a trained
expert repairer, we recommend a Fiat
Dealership that can fully evaluate these
systems to see that they will work in any
subsequent accident. Driving with an
expended or damaged air bag or
pretensioner unit will not afford you the
necessary protection in the event of any
subsequent accident which could result in
serious injury or death.
133)Do not remove interior air bag parts.
Removing any components such as the
seats, front instrument panel, the steering
wheel, containing air bag parts or sensors
is dangerous. These parts contain essential
air bag components. The air bag could
accidentally activate and cause serious
injuries. Always have a Fiat Dealership
remove these parts.134)Do not allow an occupant in the
passenger's seat to sit with a posture
which makes it difficult for the passenger
occupant classification sensor to detect
the occupant correctly. Sitting in the
passenger's seat with a posture which
makes it difficult for the passenger
occupant classification sensor to detect
the occupant correctly is dangerous. If the
passenger occupant classification sensor
cannot detect the occupant sitting on the
passenger's seat correctly, the passenger
front and side air bags and pretensioner
system may not operate (non-deploy) or
they may operate (deploy) accidentally. The
passenger will not have the supplementary
protection of the air bags or the accidental
operation (deployment) of the air bags
could result in serious injury or death.
135)Properly dispose of the air bag
system. Improper disposal of an air bag or
a vehicle with live air bags in it can be
extremely dangerous. Unless all safety
procedures are followed, injury could
result. Have an expert repairer, contact a
Fiat Dealership safely dispose of the air bag
system or scrap an air bag equipped
vehicle.
136)When an air bag deploys, a loud
inflation noise can be heard and some
smoke will be released. Neither is likely to
cause injury, however, the texture of the air
bags may cause light skin injuries on body
parts not covered with clothing through
friction.
137)Should you sell your vehicle, we urge
you to tell the new owner of its air bag
systems and that familiarization with all
instructions about them, from the Owner's
Manual, is important.138)Vehicles with a passenger air bag
have a warning label attached (consult
“Passenger side front air bag and child
restraint systems” paragraph). This warning
label is displayed in compliance with
regulations.
139)Under the following conditions, the
passenger occupant classification sensor
cannot detect a passenger sitting on the
passenger's seat correctly and the
deployment/non-deployment of the air
bags cannot be controlled as indicated in
the passenger air bag deactivation
indicator light on/off condition chart. For
example: luggage or other items placed
under the passenger seat or between the
passenger seat and driver seat that push
up the passenger seat bottom / An object,
such as a seat cushion, is put on the
passenger's seat or between the
passenger's back and the seat back / A
seat cover is put on the passenger's seat /
Luggage or other items are placed on the
seat with the child in the child restraint
system / The seat is washed / Liquids are
spilled on the seat / The passenger seat is
moved backward, pushing into luggage or
other items placed behind it / Luggage or
other items are placed between the
passenger seat and driver seat / An electric
device is put on the passenger's seat. The
passenger front and side air bags and seat
belt pretensioner systems will deactivate if
the passenger air bag deactivation OFF
indicator light turns on.
112
SAFETY
Page 118 of 228
STARTING THE
ENGINE
140) 141) 142)
24)
Before starting the engine, adjust the
seat, the interior rear view mirrors, the
door mirrors and fasten the seat belt
correctly.
Never press the accelerator pedal for
starting the engine.
For starting procedure see “Starting the
engine” in “Getting to know your
vehicle” chapter.
STOPPING THE ENGINE
Proceed as follows:
park the car in a position that is not
dangerous for oncoming traffic; engage
a gear (versions with manual
transmission) or position the gear lever
to P (Parking) (versions with automatic
transmission);
turn the ignition device to STOP with
the engine idling.
WARNING
140)It is dangerous to run the engine in
enclosed areas. The engine takes in
oxygen and releases carbon dioxide,
carbon monoxide and other toxic gases.
141)The brake servo is not active until the
engine is started, so you would need to
apply much more force than usual to the
brake pedal.
142)Do not start the engine by pushing,
towing or driving downhill. These
manoeuvres may damage the catalytic
converter.
IMPORTANT
24)A quick burst on the accelerator before
turning off the engine serves absolutely no
practical purpose; it wastes fuel and is
damaging for the engine.
PARKING
Keep away the key when leaving the
vehicle and take it with you.
When parking and leaving the vehicle,
proceed as follows:
engage a gear (first gear if facing
uphill or reverse if facing downhill) and
leave the wheels turned;
stop the engine and engage the
handbrake.
Block the wheels with a wedge or a
stone if the car is parked on a steep
slope.
On versions equipped with automatic
transmission, before releasing the brake
pedal, wait for letter P to be displayed.
IMPORTANT NEVER leave the vehicle
with the gearbox in neutral (or, on
versions equipped with automatic
transmission, before placing the gear
lever at P).
116
STARTING AND OPERATING
Page 119 of 228
PARKING BRAKE
143) 144) 145)
IMPORTANT Driving with the parking
brake on will cause excessive wear of
the brake parts.
Setting the parking brake
Depress the brake pedal and then firmly
pull the parking brake lever fully
upwards with sufficient force to hold the
vehicle in a stationary position.
Releasing the parking brake
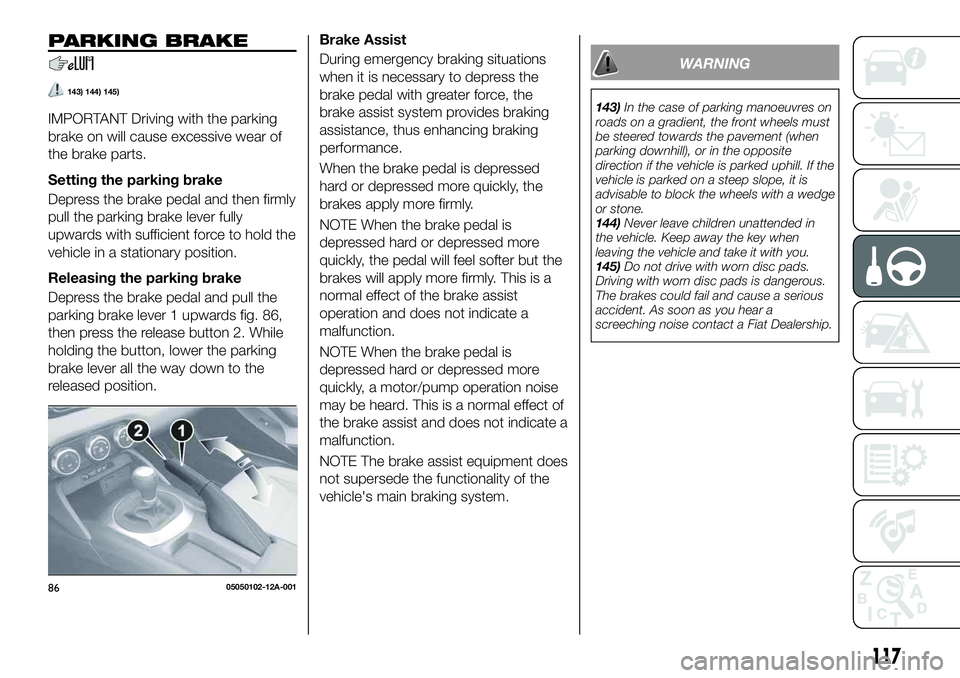
Depress the brake pedal and pull the
parking brake lever 1 upwards fig. 86,
then press the release button 2. While
holding the button, lower the parking
brake lever all the way down to the
released position.Brake Assist
During emergency braking situations
when it is necessary to depress the
brake pedal with greater force, the
brake assist system provides braking
assistance, thus enhancing braking
performance.
When the brake pedal is depressed
hard or depressed more quickly, the
brakes apply more firmly.
NOTE When the brake pedal is
depressed hard or depressed more
quickly, the pedal will feel softer but the
brakes will apply more firmly. This is a
normal effect of the brake assist
operation and does not indicate a
malfunction.
NOTE When the brake pedal is
depressed hard or depressed more
quickly, a motor/pump operation noise
may be heard. This is a normal effect of
the brake assist and does not indicate a
malfunction.
NOTE The brake assist equipment does
not supersede the functionality of the
vehicle's main braking system.
WARNING
143)In the case of parking manoeuvres on
roads on a gradient, the front wheels must
be steered towards the pavement (when
parking downhill), or in the opposite
direction if the vehicle is parked uphill. If the
vehicle is parked on a steep slope, it is
advisable to block the wheels with a wedge
or stone.
144)Never leave children unattended in
the vehicle. Keep away the key when
leaving the vehicle and take it with you.
145)Do not drive with worn disc pads.
Driving with worn disc pads is dangerous.
The brakes could fail and cause a serious
accident. As soon as you hear a
screeching noise contact a Fiat Dealership.
8605050102-12A-001
117
Page 121 of 228
AUTOMATIC
TRANSMISSION
(where provided)
VARIOUS LOCKOUTS
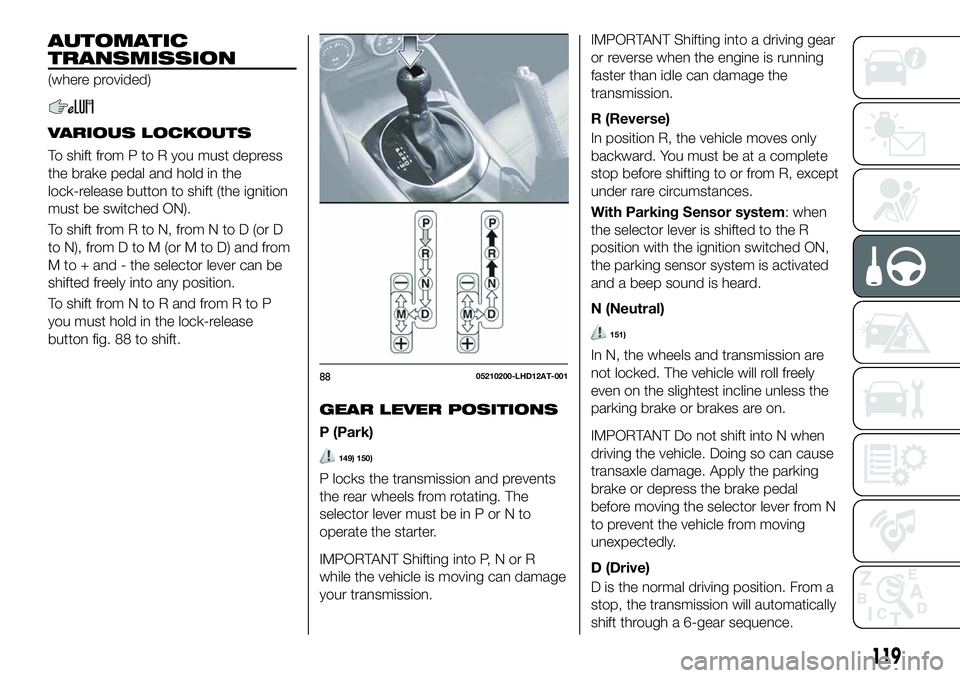
To shift from P to R you must depress
the brake pedal and hold in the
lock-release button to shift (the ignition
must be switched ON).
To shift from R to N, from N to D (or D
to N), from D to M (or M to D) and from
M to + and - the selector lever can be
shifted freely into any position.
To shift from N to R and from R to P
you must hold in the lock-release
button fig. 88 to shift.
GEAR LEVER POSITIONS
P (Park)
149) 150)
P locks the transmission and prevents
the rear wheels from rotating. The
selector lever must be in P or N to
operate the starter.
IMPORTANT Shifting into P, N or R
while the vehicle is moving can damage
your transmission.IMPORTANT Shifting into a driving gear
or reverse when the engine is running
faster than idle can damage the
transmission.
R (Reverse)
In position R, the vehicle moves only
backward. You must be at a complete
stop before shifting to or from R, except
under rare circumstances.
With Parking Sensor system: when
the selector lever is shifted to the R
position with the ignition switched ON,
the parking sensor system is activated
and a beep sound is heard.
N (Neutral)
151)
In N, the wheels and transmission are
not locked. The vehicle will roll freely
even on the slightest incline unless the
parking brake or brakes are on.
IMPORTANT Do not shift into N when
driving the vehicle. Doing so can cause
transaxle damage. Apply the parking
brake or depress the brake pedal
before moving the selector lever from N
to prevent the vehicle from moving
unexpectedly.
D (Drive)
D is the normal driving position. From a
stop, the transmission will automatically
shift through a 6-gear sequence.
8805210200-LHD12AT-001
119
Page 127 of 228
SPEED LIMITER
(where provided)
158) 159)
The speed limiter can be set between
30 km/h and 200 km/h.
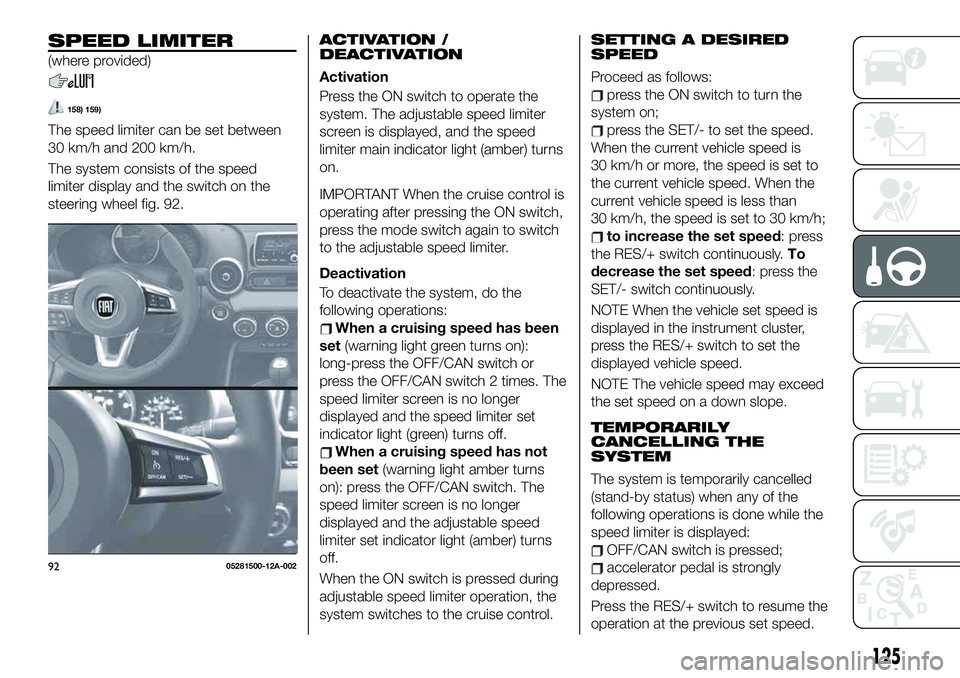
The system consists of the speed
limiter display and the switch on the
steering wheel fig. 92.
ACTIVATION /
DEACTIVATION
Activation
Press the ON switch to operate the
system. The adjustable speed limiter
screen is displayed, and the speed
limiter main indicator light (amber) turns
on.
IMPORTANT When the cruise control is
operating after pressing the ON switch,
press the mode switch again to switch
to the adjustable speed limiter.
Deactivation
To deactivate the system, do the
following operations:
When a cruising speed has been
set(warning light green turns on):
long-press the OFF/CAN switch or
press the OFF/CAN switch 2 times. The
speed limiter screen is no longer
displayed and the speed limiter set
indicator light (green) turns off.
When a cruising speed has not
been set(warning light amber turns
on): press the OFF/CAN switch. The
speed limiter screen is no longer
displayed and the adjustable speed
limiter set indicator light (amber) turns
off.
When the ON switch is pressed during
adjustable speed limiter operation, the
system switches to the cruise control.
SETTING A DESIRED
SPEED
Proceed as follows:
press the ON switch to turn the
system on;
press the SET/- to set the speed.
When the current vehicle speed is
30 km/h or more, the speed is set to
the current vehicle speed. When the
current vehicle speed is less than
30 km/h, the speed is set to 30 km/h;
to increase the set speed: press
the RES/+ switch continuously.To
decrease the set speed: press the
SET/- switch continuously.
NOTE When the vehicle set speed is
displayed in the instrument cluster,
press the RES/+ switch to set the
displayed vehicle speed.
NOTE The vehicle speed may exceed
the set speed on a down slope.
TEMPORARILY
CANCELLING THE
SYSTEM
The system is temporarily cancelled
(stand-by status) when any of the
following operations is done while the
speed limiter is displayed:
OFF/CAN switch is pressed;
accelerator pedal is strongly
depressed.
Press the RES/+ switch to resume the
operation at the previous set speed.9205281500-12A-002
125
Page 133 of 228
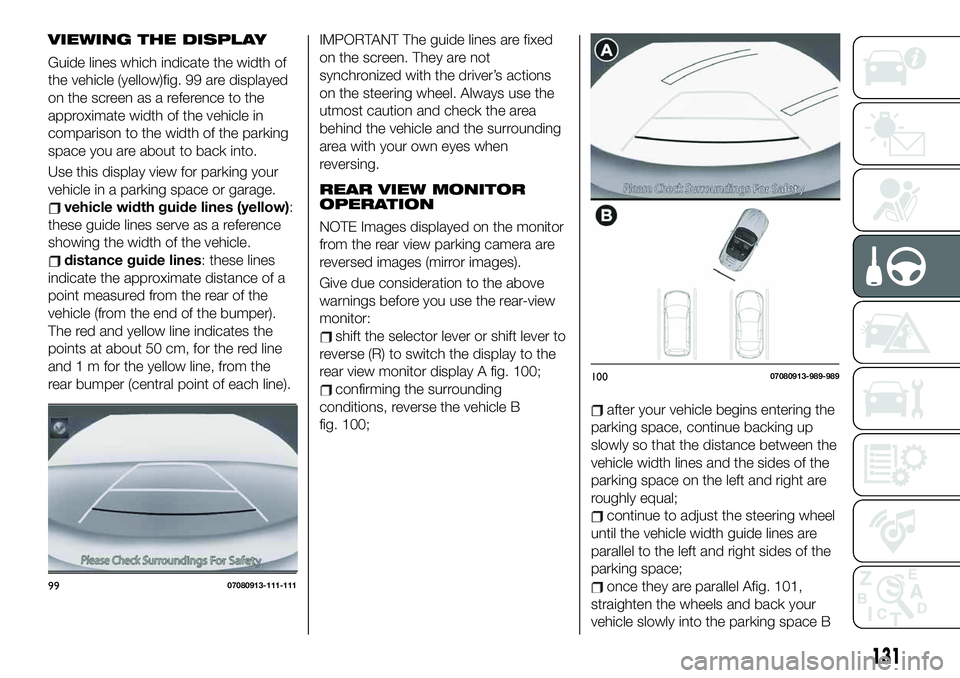
VIEWING THE DISPLAY
Guide lines which indicate the width of
the vehicle (yellow)fig. 99 are displayed
on the screen as a reference to the
approximate width of the vehicle in
comparison to the width of the parking
space you are about to back into.
Use this display view for parking your
vehicle in a parking space or garage.
vehicle width guide lines (yellow):
these guide lines serve as a reference
showing the width of the vehicle.
distance guide lines: these lines
indicate the approximate distance of a
point measured from the rear of the
vehicle (from the end of the bumper).
The red and yellow line indicates the
points at about 50 cm, for the red line
and 1 m for the yellow line, from the
rear bumper (central point of each line).
IMPORTANT The guide lines are fixed
on the screen. They are not
synchronized with the driver’s actions
on the steering wheel. Always use the
utmost caution and check the area
behind the vehicle and the surrounding
area with your own eyes when
reversing.
REAR VIEW MONITOR
OPERATION
NOTE Images displayed on the monitor
from the rear view parking camera are
reversed images (mirror images).
Give due consideration to the above
warnings before you use the rear-view
monitor:
shift the selector lever or shift lever to
reverse (R) to switch the display to the
rear view monitor display A fig. 100;
confirming the surrounding
conditions, reverse the vehicle B
fig. 100;
after your vehicle begins entering the
parking space, continue backing up
slowly so that the distance between the
vehicle width lines and the sides of the
parking space on the left and right are
roughly equal;
continue to adjust the steering wheel
until the vehicle width guide lines are
parallel to the left and right sides of the
parking space;
once they are parallel Afig. 101,
straighten the wheels and back your
vehicle slowly into the parking space B9907080913-111-111
10007080913-989-989
131
Page 134 of 228
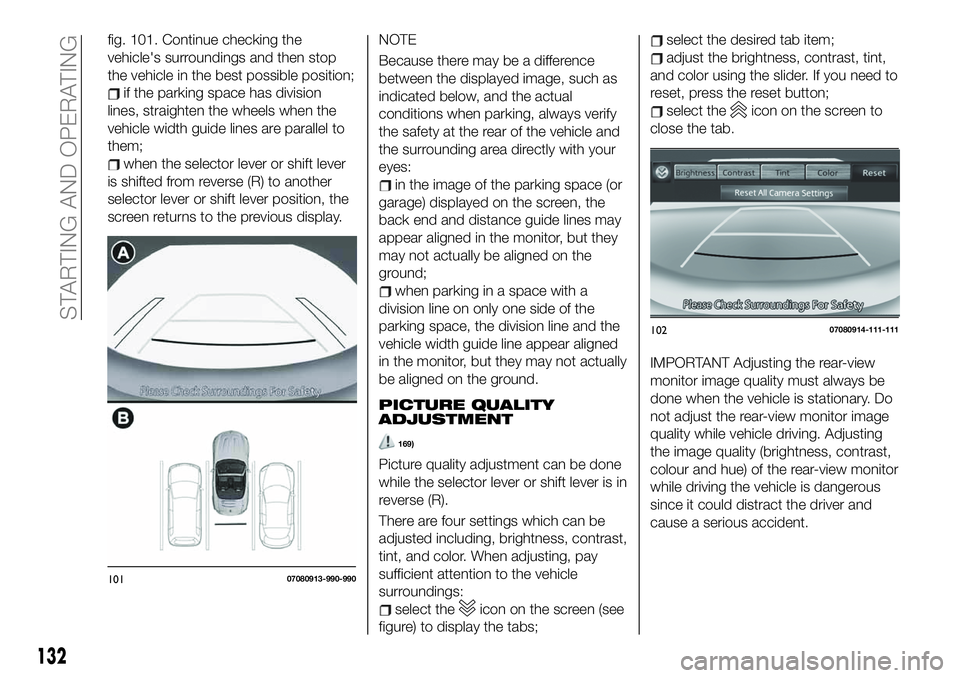
fig. 101. Continue checking the
vehicle's surroundings and then stop
the vehicle in the best possible position;
if the parking space has division
lines, straighten the wheels when the
vehicle width guide lines are parallel to
them;
when the selector lever or shift lever
is shifted from reverse (R) to another
selector lever or shift lever position, the
screen returns to the previous display.NOTE
Because there may be a difference
between the displayed image, such as
indicated below, and the actual
conditions when parking, always verify
the safety at the rear of the vehicle and
the surrounding area directly with your
eyes:
in the image of the parking space (or
garage) displayed on the screen, the
back end and distance guide lines may
appear aligned in the monitor, but they
may not actually be aligned on the
ground;
when parking in a space with a
division line on only one side of the
parking space, the division line and the
vehicle width guide line appear aligned
in the monitor, but they may not actually
be aligned on the ground.
PICTURE QUALITY
ADJUSTMENT
169)
Picture quality adjustment can be done
while the selector lever or shift lever is in
reverse (R).
There are four settings which can be
adjusted including, brightness, contrast,
tint, and color. When adjusting, pay
sufficient attention to the vehicle
surroundings:
select theicon on the screen (see
figure) to display the tabs;
select the desired tab item;
adjust the brightness, contrast, tint,
and color using the slider. If you need to
reset, press the reset button;
select theicon on the screen to
close the tab.
IMPORTANT Adjusting the rear-view
monitor image quality must always be
done when the vehicle is stationary. Do
not adjust the rear-view monitor image
quality while vehicle driving. Adjusting
the image quality (brightness, contrast,
colour and hue) of the rear-view monitor
while driving the vehicle is dangerous
since it could distract the driver and
cause a serious accident.
10107080913-990-990
10207080914-111-111
132
STARTING AND OPERATING