steering FIAT 124 SPIDER 2020 Owner handbook (in English)
[x] Cancel search | Manufacturer: FIAT, Model Year: 2020, Model line: 124 SPIDER, Model: FIAT 124 SPIDER 2020Pages: 228, PDF Size: 5.08 MB
Page 142 of 228
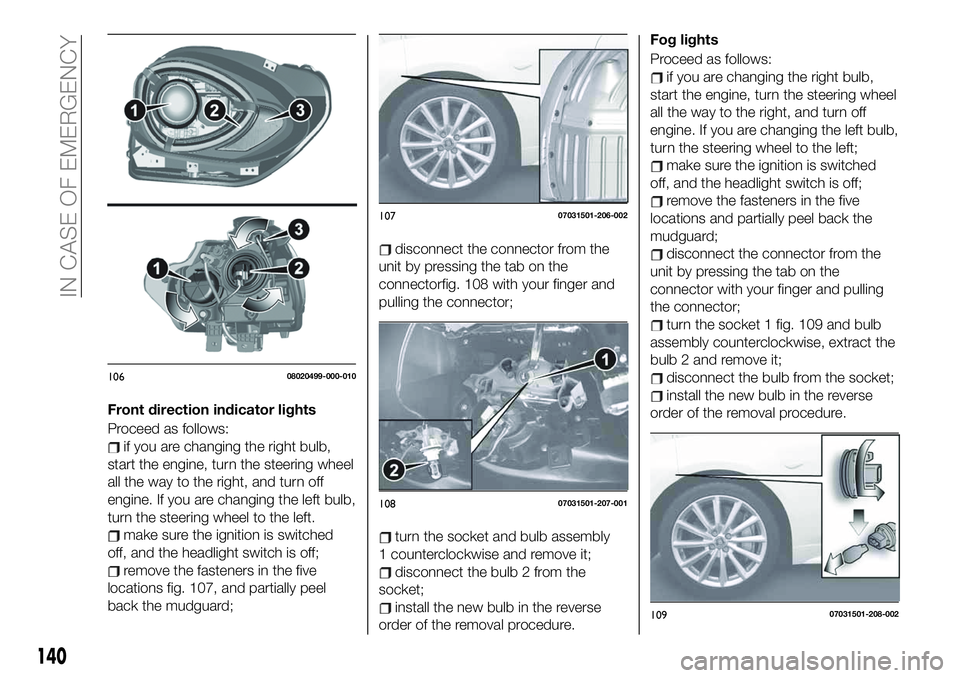
Front direction indicator lights
Proceed as follows:
if you are changing the right bulb,
start the engine, turn the steering wheel
all the way to the right, and turn off
engine. If you are changing the left bulb,
turn the steering wheel to the left.
make sure the ignition is switched
off, and the headlight switch is off;
remove the fasteners in the five
locations fig. 107, and partially peel
back the mudguard;
disconnect the connector from the
unit by pressing the tab on the
connectorfig. 108 with your finger and
pulling the connector;
turn the socket and bulb assembly
1 counterclockwise and remove it;
disconnect the bulb 2 from the
socket;
install the new bulb in the reverse
order of the removal procedure.Fog lights
Proceed as follows:
if you are changing the right bulb,
start the engine, turn the steering wheel
all the way to the right, and turn off
engine. If you are changing the left bulb,
turn the steering wheel to the left;
make sure the ignition is switched
off, and the headlight switch is off;
remove the fasteners in the five
locations and partially peel back the
mudguard;
disconnect the connector from the
unit by pressing the tab on the
connector with your finger and pulling
the connector;
turn the socket 1 fig. 109 and bulb
assembly counterclockwise, extract the
bulb 2 and remove it;
disconnect the bulb from the socket;
install the new bulb in the reverse
order of the removal procedure.
10608020499-000-010
10707031501-206-002
10807031501-207-001
10907031501-208-002
140
IN CASE OF EMERGENCY
Page 143 of 228
Brake lights / Tail lights
Go to a Fiat Dealership when the
replacement of this lights is necessary.
Side direction indicator lights
Proceed as follows:
make sure the ignition is switched
off, and the headlight switch is off;
if you are changing the right bulb,
start the engine, turn the steering wheel
all the way to the right, and turn off
engine. If you are changing the left bulb,
turn the steering wheel to the left;
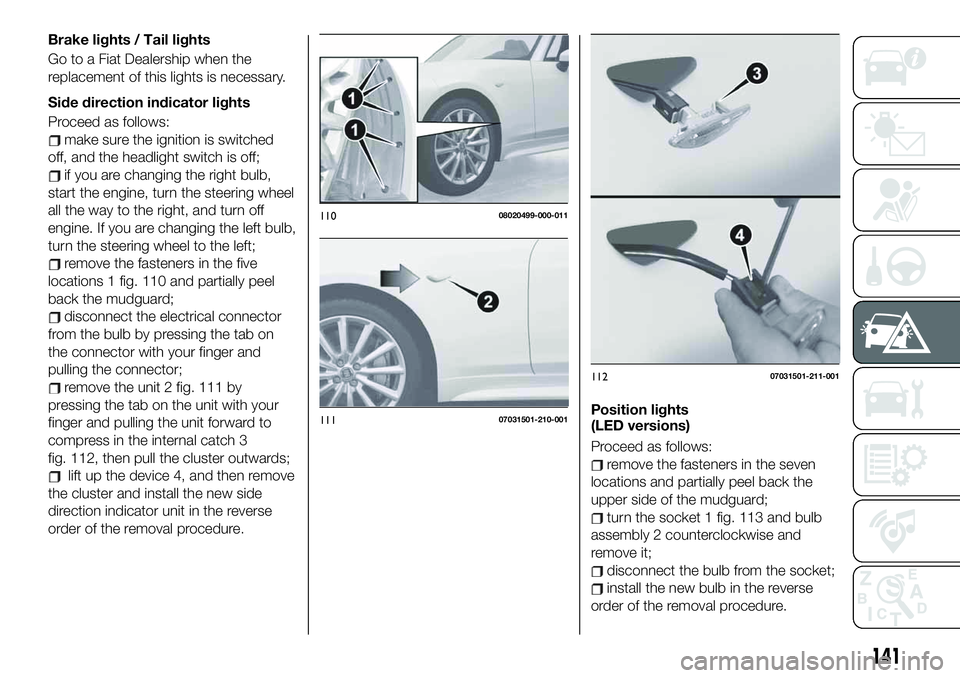
remove the fasteners in the five
locations 1 fig. 110 and partially peel
back the mudguard;
disconnect the electrical connector
from the bulb by pressing the tab on
the connector with your finger and
pulling the connector;
remove the unit 2 fig. 111 by
pressing the tab on the unit with your
finger and pulling the unit forward to
compress in the internal catch 3
fig. 112, then pull the cluster outwards;
lift up the device 4, and then remove
the cluster and install the new side
direction indicator unit in the reverse
order of the removal procedure.Position lights
(LED versions)
Proceed as follows:remove the fasteners in the seven
locations and partially peel back the
upper side of the mudguard;
turn the socket 1 fig. 113 and bulb
assembly 2 counterclockwise and
remove it;
disconnect the bulb from the socket;
install the new bulb in the reverse
order of the removal procedure.
11008020499-000-011
11107031501-210-001
11207031501-211-001
141
Page 152 of 228
150
IN CASE OF EMERGENCY
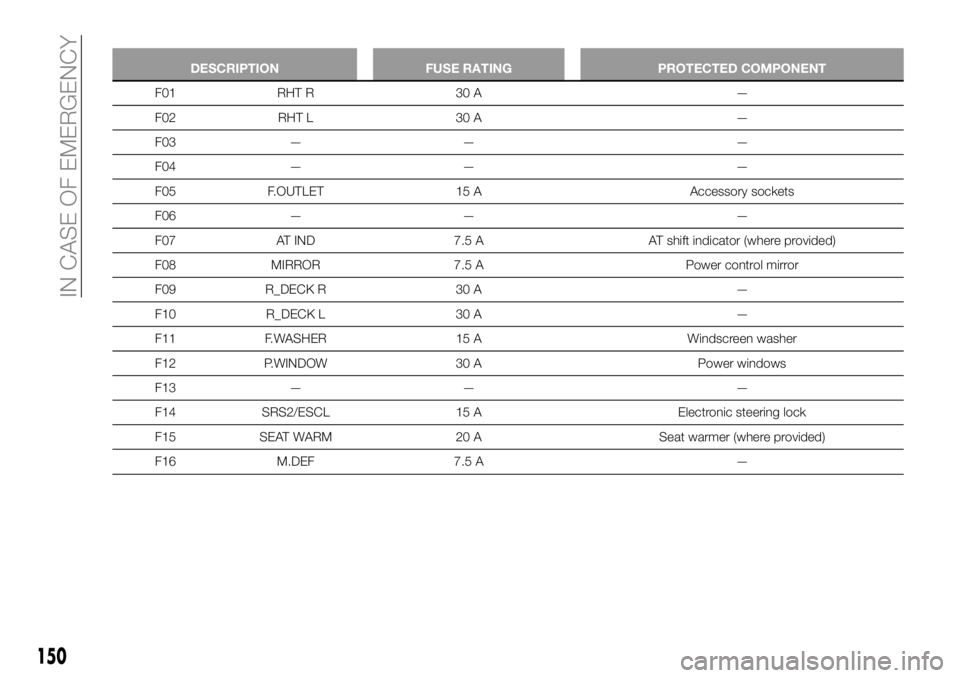
DESCRIPTION FUSE RATING PROTECTED COMPONENT
F01 RHT R 30 A —
F02 RHT L 30 A —
F03 — — —
F04 — — —
F05 F.OUTLET 15 A Accessory sockets
F06 — — —
F07 AT IND 7.5 A AT shift indicator (where provided)
F08 MIRROR 7.5 A Power control mirror
F09 R_DECK R 30 A —
F10 R_DECK L 30 A —
F11 F.WASHER 15 A Windscreen washer
F12 P.WINDOW 30 A Power windows
F13 — — —
F14 SRS2/ESCL 15 A Electronic steering lock
F15 SEAT WARM 20 A Seat warmer (where provided)
F16 M.DEF 7.5 A —
Page 153 of 228
151
WARNING
175)If the fuse blows again contact a Fiat
Dealership.
176)Never replace a fuse with another
with a higher amp rating; DANGER OF
FIRE.
177)Contact a Fiat Dealership if a safety
system (airbags, brakes), power unit
system (engine, gearbox) or steering
system general protection fuse blows.
178)Do not replace the main fuse and
multiplex slow blow fuse by yourself.
Contact a Fiat Dealership to perform the
replacement. Replacing these fuses by
yourself is dangerous because they are
high current fuses. Incorrect replacement
could cause an electrical shock or a short
circuit resulting in a fire.
179)Before replacing a fuse, make sure
that the ignition device is in OFF position
and that all the other services are switched
off and/or deactivated.
IMPORTANT
32)Never replace a fuse with metal wires
or anything else.
33)If it is necessary to wash the engine
compartment, take care not to directly hit
the junction unit and the window wiper
motors with the water jet.
Page 158 of 228
the tire inflation pressure using the tire
pressure gauge on the air compressor.
If the tire inflation pressure is lower than
the specified tire inflation pressure, turn
the air compressor on and wait until it
reaches the specified tire inflation
pressure;
the emergency flat tire repair is
completed successfully if the tire
inflation pressure does not decrease.
Carefully drive the vehicle to the nearest
Fiat Dealership and have the flat tire
replaced. Replacement with a new tire
is recommended. If the tire is to be
repaired or reused, contact a Fiat
Dealership.
IMPORTANT Before checking the tire
inflation pressure using the tire pressure
gauge, turn the air compressor switch
off.
NOTEIf an emergency flat tire repair has
been performed using the tire service
kit, FCA recommends that the tire be
replaced with a new one as soon as
possible. If the tire is to be repaired or
reused, contact a Fiat Dealership.
The wheel can be reused if the
sealant adhering to it is removed.
However, replace the valve with a new
one.
WARNING
180)Punctures on the sides of the tire may
not be repaired. Do not use the kit if the tire
was damaged as a result of being used
when underinflated.
181)Do not adhere the speed restriction
sticker to the padded area on the steering
wheel. Adhering the speed restriction
sticker to the padded area on the steering
wheel is dangerous because the air bag
may not operate (deploy) normally resulting
in serious injury. In addition, do not adhere
the sticker to areas where warning lights or
the speedometer cannot be viewed.
182)If the tire inflation pressure has
decreased below 130 kPa (1.3 kgf/cm
2or
bar, 18.9 psi), stop driving and contact a
Fiat Dealership. The repair using the
emergency at tire repair kit was not
successful. If you see a decrease in the tire
inflation pressure, stop driving. Contact a
Fiat Dealership.
183)You must always indicate that the tyre
was repaired using the kit. Give the booklet
to the technicians who will be handling the
tire that was treated using the kit.
184)Repairs are not possible in the case of
damage to the wheel rim (bad groove
distortion causing air loss). Do not remove
foreign bodies (screws or nails) from the
tire.185)The information required by the
applicable regulation is indicated on the tire
service kit package label. Compliance with
the indications on the label is an essential
condition to ensure the safety and the
effectiveness of the tire service kit. Carefully
read the label before use, avoid improper
use. Tire service kit is subject to expiration
and must be replaced periodically. The kit
should be used by adults and cannot be
used by children.
186)Do not allow children to touch the tire
sealant: ingestion of tire sealant is
dangerous. In the event tire sealant is
accidentally swallowed, drink large
amounts of water immediately and seek
medical assistance. Tire sealant that
comes into contact with the eyes and skin
is dangerous. If tire sealant enters the eyes
or contacts the skin, flush immediately with
large amounts of water and seek medical
assistance.
IMPORTANT
3)Dispose of the bottle and the sealant
liquid properly. Have them disposed of in
compliance with national and local
regulations.
156
IN CASE OF EMERGENCY
Page 163 of 228
EMERGENCY
TOWING
TOWING DESCRIPTION
Proper lifting and towing are necessary
to prevent damage to the vehicle.
Government and local laws must be
followed.
A towed vehicle usually should have its
drive wheels (rear wheels) off the
ground. If excessive damage or other
conditions prevent this, use wheel
dollies.
When towing with the rear wheels on
the ground, release the parking brake.
IMPORTANT Do not tow the vehicle
pointed backward with driving wheels
on the ground. This may cause internal
damage to the transmission.
IMPORTANT Do not tow with sling-type
equipment. This could damage your
vehicle. Use wheel-lift or flatbed
equipment.
If towing service is not available in an
emergency, the vehicle may be towed
with all four wheels on the ground using
the towing hook at the front of the
vehicle. Only tow the vehicle on paved
surfaces for short distances at low
speeds.
Follow these instructions when towing
the vehicle with all wheels on the
ground:
shift to neutral (manual transmission),
or the N position (automatic
transmission);
switch the ignition to ACC;
release the parking brake.
NOTE Remember that power assist for
the brakes and steering will not be
available when the engine is not
running.
161
Page 167 of 228
SCHEDULED SERVICING PLAN
The checks listed in the Scheduled Servicing Plan, after reaching 120,000 km/8 years, must be cyclically repeated starting from
the first interval, thus following the same intervals as before.
Thousands of miles9 182736455463728190
Thousands of kilometers15 30 45 60 75 90 105 120 135 150
Years12345678910
Check tire condition/wear and adjust pressure, if
necessary. Check quick tire repair kit recharge
condition and expiry date (where provided)
●●●●●●●●●●
Check operation of lighting system (headlights,
direction indicators, hazard warning lights, boot,
passenger compartment, glove compartment,
instrumental panel warning lights, etc.)
●●●●●●●●●●
Check and, if necessary, top up fluid levels (1)●●●●●●●●●●
Check exhaust emissions/smokiness●●●●●●●●●●
Use the diagnosis socket to check engine
management system operation, emissions and,
for versions/markets where provided, engine oil
degradation
●●●●●●●●●●
Visually inspect conditions of: exterior bodywork,
underbody protection, pipes and hoses (exhaust,
fuel system, brakes), rubber elements (gaiters,
sleeves, bushes, etc.) and fasteners in sight
●●●●●
Visually inspect conditions of steering elements
and check their operation●●●●●
(1) Always only use the liquids shown in the handbook for topping up after having checked that the system is not damaged.
165
Page 179 of 228
WARNING
217)If the tires are “unidirectional”, do not
switch tires from the right-hand side of the
vehicle to the left-hand side, and vice
versa. This type of tires can only be
switched from the front axle to the rear axle
and vice versa, keeping them on the same
side of the vehicle.
218)Travelling with partially or completely
flat tires can cause safety problems and
irreparable damages to the tire.
219)Always use tires that are in good
condition. Driving with worn tires is
dangerous. Reduced braking, steering, and
traction could result in an accident.
220)Always inflate the tires to the correct
pressure. Overinflation or underinflation of
tires is dangerous. Adverse handling or
unexpected tire failure could result in a
serious accident (see “Tires” paragraph in
“Technical specification” chapter).
221)Use only a FCA-genuine tire valve
cap. Use of a non-genuine part is
dangerous as the correct tire air pressure
cannot be maintained if the tire valve
becomes damaged. If the vehicle is driven
under this condition, the tire air pressure
will decrease which could result in a
serious accident. Do not use any part for
the tire valve cap that is not a FCA-genuine
part.
222)Replace all four tires at the same time.
Replacing just one tyre is dangerous. It
could cause poor handling and poor
braking resulting in loss of vehicle control.223)Always use tyres that are in good
condition. Driving with worn tyres is
dangerous. Reduced braking, steering, and
traction could result in an accident.
224)Always use wheels of the correct size
on your vehicle. Using a wrong-sized wheel
is dangerous. Braking and handling could
be affected, leading to loss of control and
an accident.
IMPORTANT
44)Road holding depends also on the
correct tire inflating pressure.
45)If the pressure is too low the tire
overheats and this can cause it serious
damage.
46)Keep your speed down when snow
chains are fitted; do not exceed 50 km/h
(30 mph). Avoid potholes, steps and
pavements and avoid driving for long
distances on roads not covered with snow
to prevent damaging the vehicle and the
road surface.
BODYWORK
PRESERVING THE
PAINTWORK
47) 48)
7)
Touch up abrasions and scratches
immediately to prevent the formation of
rust.
To correctly wash the vehicle, follow
these instructions:
is the vehicle is washed remove the
aerial;
if high pressure jets or cleaners are
used to wash the vehicle, keep a
distance of at least 40 cm from the
bodywork to avoid damage or
alteration. Build up of water could
cause damage to the vehicle in the long
term;
wash the bodywork using a low
pressure jet of water if possible;
wipe a sponge with a slightly soapy
solution over the bodywork, frequently
rinsing the sponge;
rinse well with water and dry with a
jet of air or a chamois leather.
Dry the less visible parts (e.g. door
frames, bonnet, headlight frames, etc.)
with special care, as water may
stagnate more easily in these areas. Do
not wash the vehicle after it has been
177
Page 200 of 228
STEERING WHEEL
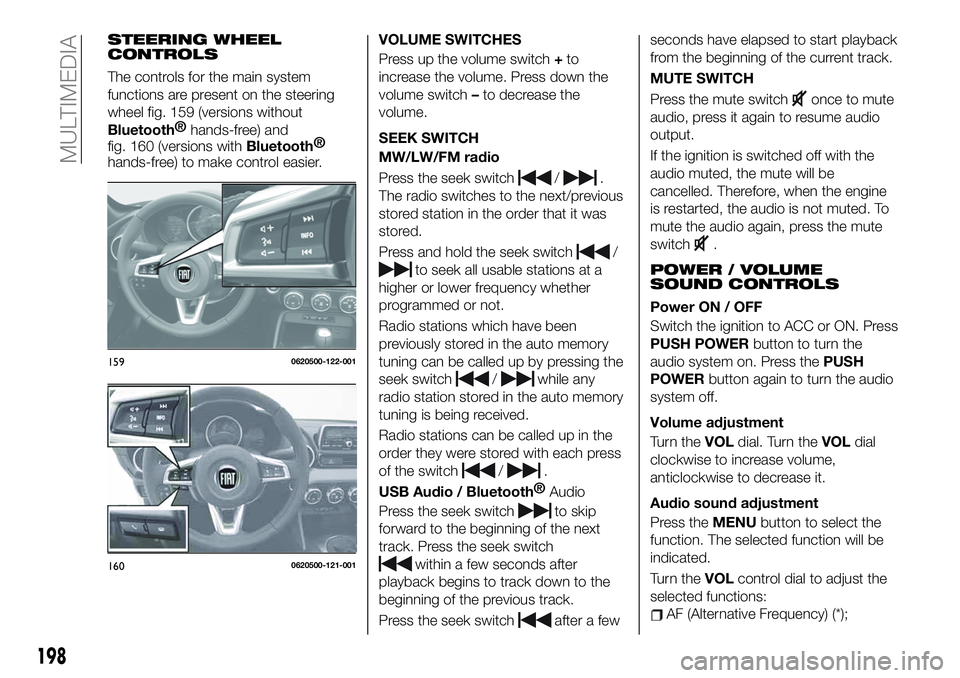
CONTROLS
The controls for the main system
functions are present on the steering
wheel fig. 159 (versions without
Bluetooth®
hands-free) and
fig. 160 (versions with
Bluetooth®
hands-free) to make control easier.VOLUME SWITCHES
Press up the volume switch+to
increase the volume. Press down the
volume switch–to decrease the
volume.
SEEK SWITCH
MW/LW/FM radio
Press the seek switch
/.
The radio switches to the next/previous
stored station in the order that it was
stored.
Press and hold the seek switch
/
to seek all usable stations at a
higher or lower frequency whether
programmed or not.
Radio stations which have been
previously stored in the auto memory
tuning can be called up by pressing the
seek switch
/while any
radio station stored in the auto memory
tuning is being received.
Radio stations can be called up in the
order they were stored with each press
of the switch
/.
USB Audio /
Bluetooth®
Audio
Press the seek switch
to skip
forward to the beginning of the next
track. Press the seek switch
within a few seconds after
playback begins to track down to the
beginning of the previous track.
Press the seek switch
after a fewseconds have elapsed to start playback
from the beginning of the current track.
MUTE SWITCH
Press the mute switch
once to mute
audio, press it again to resume audio
output.
If the ignition is switched off with the
audio muted, the mute will be
cancelled. Therefore, when the engine
is restarted, the audio is not muted. To
mute the audio again, press the mute
switch
.
POWER / VOLUME
SOUND CONTROLS
Power ON / OFF
Switch the ignition to ACC or ON. Press
PUSH POWERbutton to turn the
audio system on. Press thePUSH
POWERbutton again to turn the audio
system off.
Volume adjustment
Turn theVOLdial. Turn theVOLdial
clockwise to increase volume,
anticlockwise to decrease it.
Audio sound adjustment
Press theMENUbutton to select the
function. The selected function will be
indicated.
Turn theVOLcontrol dial to adjust the
selected functions:
AF (Alternative Frequency) (*);
1590620500-122-001
1600620500-121-001
198
MULTIMEDIA
Page 204 of 228
RADIO 7”
STEERING WHEEL
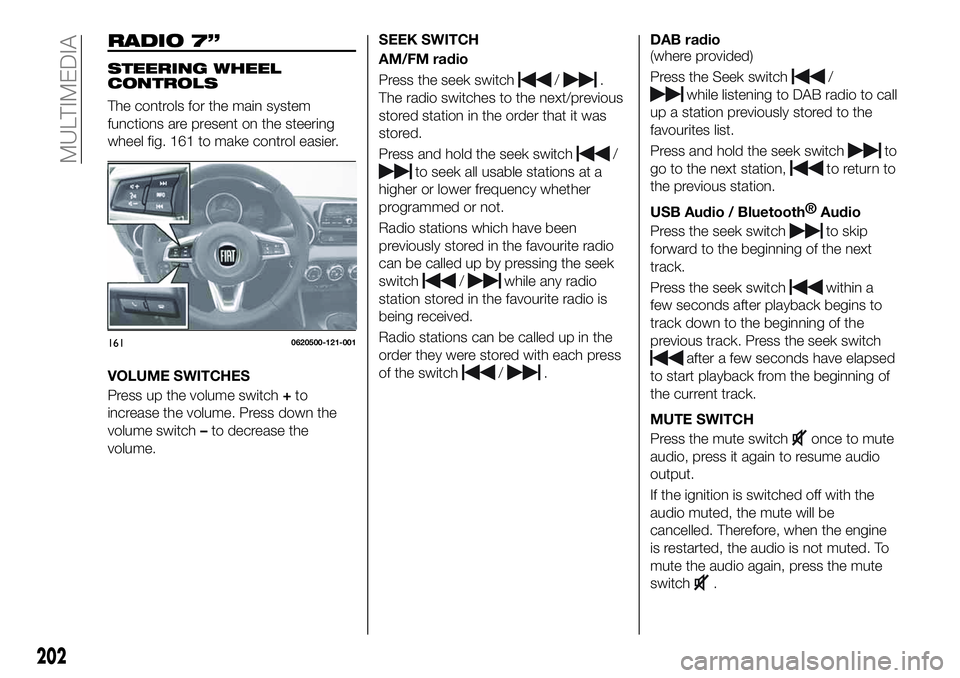
CONTROLS
The controls for the main system
functions are present on the steering
wheel fig. 161 to make control easier.
VOLUME SWITCHES
Press up the volume switch+to
increase the volume. Press down the
volume switch–to decrease the
volume.SEEK SWITCH
AM/FM radio
Press the seek switch
/.
The radio switches to the next/previous
stored station in the order that it was
stored.
Press and hold the seek switch
/
to seek all usable stations at a
higher or lower frequency whether
programmed or not.
Radio stations which have been
previously stored in the favourite radio
can be called up by pressing the seek
switch
/while any radio
station stored in the favourite radio is
being received.
Radio stations can be called up in the
order they were stored with each press
of the switch
/.DAB radio
(where provided)
Press the Seek switch
/
while listening to DAB radio to call
up a station previously stored to the
favourites list.
Press and hold the seek switch
to
go to the next station,
to return to
the previous station.
USB Audio /
Bluetooth®
Audio
Press the seek switch
to skip
forward to the beginning of the next
track.
Press the seek switch
within a
few seconds after playback begins to
track down to the beginning of the
previous track. Press the seek switch
after a few seconds have elapsed
to start playback from the beginning of
the current track.
MUTE SWITCH
Press the mute switch
once to mute
audio, press it again to resume audio
output.
If the ignition is switched off with the
audio muted, the mute will be
cancelled. Therefore, when the engine
is restarted, the audio is not muted. To
mute the audio again, press the mute
switch
.
1610620500-121-001
202
MULTIMEDIA