navigation system FIAT 124 SPIDER 2020 Owner handbook (in English)
[x] Cancel search | Manufacturer: FIAT, Model Year: 2020, Model line: 124 SPIDER, Model: FIAT 124 SPIDER 2020Pages: 228, PDF Size: 5.08 MB
Page 80 of 228
indicate when the system is not
operating properly.
IMPORTANT The TPMS malfunction
indicator is combined with the low tire
pressure telltale. When the system
detects a malfunction, the telltale will
flash for approximately one minute and
then remain continuously illuminated.
This sequence will continue upon
subsequent vehicle start-ups as long as
the malfunction exists. When the
malfunction indicator is illuminated, the
system may not be able to detect or
signal low tire pressure as intended.
TPMS malfunctions may occur for a
variety of reasons, including the
installation of replacement or alternate
tires or wheels on the vehicle that
prevent the TPMS from functioning
properly. Always check the TPMS
malfunction telltale after replacing one
or more tires or wheels on your vehicle
to ensure that the replacement or
alternate tires and wheels allow the
TPMS to continue to function properly.
IMPORTANT To avoid false readings,
the system samples for a little while
before indicating a problem. As a result
it will not instantaneously register a
rapid tire deflation or blow out.
Because this system detects slight
changes in tire conditions, the timing ofthe warning may be faster or slower in
the following cases.
the size, manufacturer, or the type of
tires is different from the specification;
the size, manufacturer, or the type of
a tire is different from the others, or the
level of tire wear is excessively different
between them;
a run-flat tire (where provided),
studless tire, snow tire, or tire chains
are used;
an emergency tire is used (tire
pressure monitoring system warning
light may flash and then continue
illuminating);
a tire is repaired using the emergency
flat tire repair kit;
the tire pressure is excessively higher
than the specified pressure, or the tire
pressure is suddenly lowered for some
reason such as a tire burst during
driving;
the vehicle speed is lower than about
15 km/h (9 mph) (including when the
vehicle is stopped), or the drive period
is shorter than 5 minutes;
the vehicle is driven on an extremely
rough road or a slippery, icy road;
hard steering and rapid
acceleration/deceleration are repeated
such as during aggressive driving on a
winding road;
load on the vehicle is applied to a tire
such as by loading heavy luggage toone side of the vehicle;
system initialization has not been
implemented with the specified tire
pressure.
System error activation
When the TPMS warning light flashes,
there may be a system malfunction.
Contact a Fiat Dealership.
A system error activation may occur in
the following cases:
when there is equipment or a device
near the vehicle using the same radio
frequency as that of the tire pressure
sensors;
when a metallic device such as a
non-genuine navigation system is
equipped near the center of the
dashboard, which may block radio
signals from the tire pressure sensor to
the receiver unit;
when using the following devices in
the vehicle that may cause radio
interference with the receiver unit;
a digital device such as a personal
computer;
a current converter device such as a
DC-AC converter;
when excess snow or ice adheres to
the vehicle, especially around the
wheels;
when the tire pressure sensor
batteries are exhausted;
78
SAFETY
Page 205 of 228
AUDIO SET
Commander switch operation
NOTE For safety reasons, some
operations are disabled while the
vehicle is being driven.
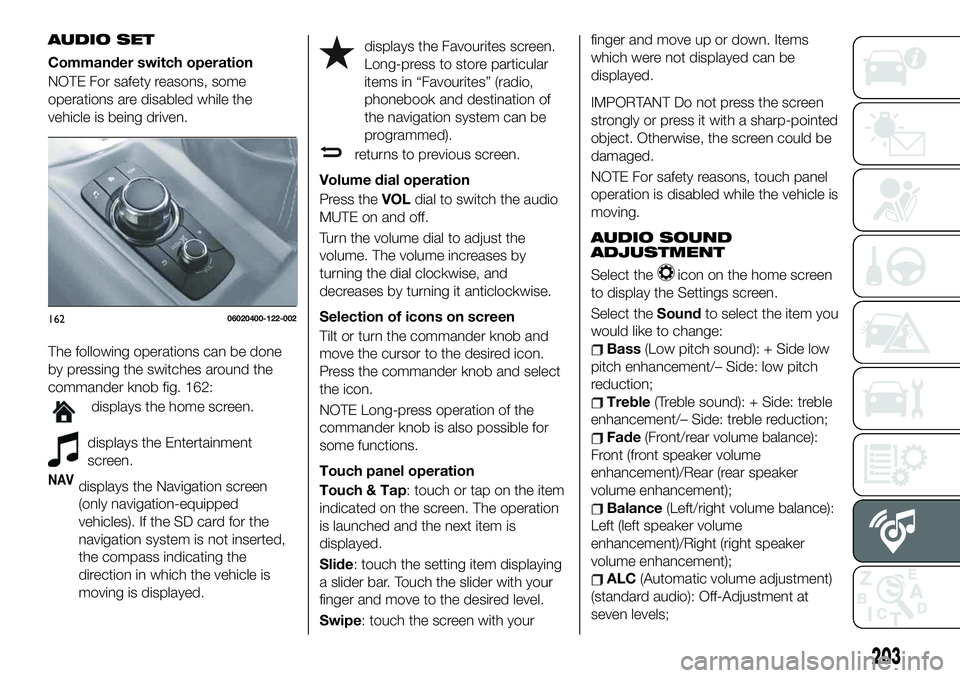
The following operations can be done
by pressing the switches around the
commander knob fig. 162:
displays the home screen.
displays the Entertainment
screen.
NAVdisplays the Navigation screen
(only navigation-equipped
vehicles). If the SD card for the
navigation system is not inserted,
the compass indicating the
direction in which the vehicle is
moving is displayed.
displays the Favourites screen.
Long-press to store particular
items in “Favourites” (radio,
phonebook and destination of
the navigation system can be
programmed).
returns to previous screen.
Volume dial operation
Press theVOLdial to switch the audio
MUTE on and off.
Turn the volume dial to adjust the
volume. The volume increases by
turning the dial clockwise, and
decreases by turning it anticlockwise.
Selection of icons on screen
Tilt or turn the commander knob and
move the cursor to the desired icon.
Press the commander knob and select
the icon.
NOTE Long-press operation of the
commander knob is also possible for
some functions.
Touch panel operation
Touch & Tap: touch or tap on the item
indicated on the screen. The operation
is launched and the next item is
displayed.
Slide: touch the setting item displaying
a slider bar. Touch the slider with your
finger and move to the desired level.
Swipe: touch the screen with yourfinger and move up or down. Items
which were not displayed can be
displayed.
IMPORTANT Do not press the screen
strongly or press it with a sharp-pointed
object. Otherwise, the screen could be
damaged.
NOTE For safety reasons, touch panel
operation is disabled while the vehicle is
moving.
AUDIO SOUND
ADJUSTMENT
Select theicon on the home screen
to display the Settings screen.
Select theSoundto select the item you
would like to change:
Bass(Low pitch sound): + Side low
pitch enhancement/– Side: low pitch
reduction;
Treble(Treble sound): + Side: treble
enhancement/– Side: treble reduction;
Fade(Front/rear volume balance):
Front (front speaker volume
enhancement)/Rear (rear speaker
volume enhancement);
Balance(Left/right volume balance):
Left (left speaker volume
enhancement)/Right (right speaker
volume enhancement);
ALC(Automatic volume adjustment)
(standard audio): Off-Adjustment at
seven levels;
16206020400-122-002
203
Page 206 of 228
Bose®
AudioPilot(Automatic
volume adjustment) (Bose®
Sound
System, where provided): On/Off;
Beep(Audio operation sound):
On/Off.
HOME SCREEN
Icons visualized on home screen are:
Applications: information such
as average fuel economy,
maintenance, and warnings can
be verified. Depending on the
grade and specification, the
screen display may differ.
Entertainment: operates audio
such as the radio. The audio
source most recently used is
displayed. An audio source
which cannot be used at that
time is skipped and the previous
audio source is displayed. To
change the audio source, select
the icon displayed at the bottom
of the screen.
Communication:Bluetooth®
related functions are available.
Navigation: Navigation screen
(where provided) is displayed. If
the SD card for the navigation
system is not inserted, the
compass indicating the direction
in which the vehicle is moving is
displayed. The compass may
not indicate the correct bearing
when the vehicle is stopped or
travelling at a slow speed.
Settings: overall setting menu
(such as display, sound,
Bluetooth®
and Language).
Depending on the grade and
specification, the screen display
may differ.
OPERATING THE RADIO
Select the iconon the home screen
to display the “Entertainment” screen.
When selecting the desired radio, the
following icons are indicated in the
lower part of the display:
displays the “Entertainment”
menu. Use to switch to a
different audio source;
displays the list of receivable RDS
radio stations (FM only);
displays the station list (AM
only). Select“Update Station
List”to display the frequencies
of up to ten radio stations on the
auto memory preset list Select
the desired frequency.
displays the Favourites list.
Long-press to store radio station
currently being aired.
you can search for receivable
radio stations. Scanning stops at
each station for about five
seconds. Select again to
continue receiving the radio
station.
you can change the radio
frequency manually. Rotate the
commander knob, slide the
screen, or touch the radio
frequency. Press
orto
change the radio frequency one
step at a time. When
oris
long-pressed, the radio frequency
changes continually. It stops when
you remove your hand from the
icon or the commander knob.
switches the TA mode on and
off.
/Automatic radio station
selection. When
long-pressed, the radio
frequency changes
continually. It stops when
you remove your hand from
the icon or the commander
knob.
204
MULTIMEDIA
Page 210 of 228
on. When hands-free is connected to
the device, the phonebook is
downloaded automatically.
Manually downloading: if the “Auto
Download Contacts” setting is off,
download the phonebook using the
following procedure:
select theicon on the home
screen to display the “Communication”
screen;
selectContactsto display the
contact list;
selectEdit Contacts;
selectImport All Contactsor
Import Selected Contactto switch to
the device operation. IfImport All
Contactsis selected, select
Download. Download will be started
from the mobile phone.
NOTE A maximum of 1000 contacts
can be registered to the phonebook.
Receiving an incoming call
When an incoming call is received, the
incoming call notification screen is
displayed. The “Incoming Call
Notifications” setting must be on.
To accept the callpress steering
wheel button on the audio control
switch or selectAnsweron the screen.
To reject the callpress the hang-up
button on the audio control switch or
selectIgnoreon the screen.
NAVIGATION
SD CARD
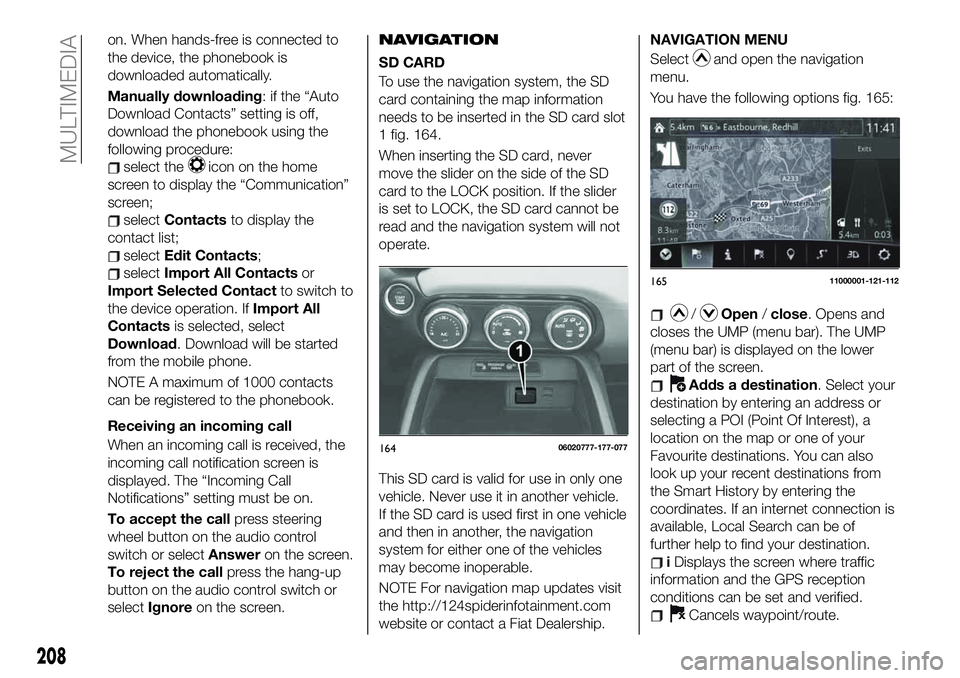
To use the navigation system, the SD
card containing the map information
needs to be inserted in the SD card slot
1 fig. 164.
When inserting the SD card, never
move the slider on the side of the SD
card to the LOCK position. If the slider
is set to LOCK, the SD card cannot be
read and the navigation system will not
operate.
This SD card is valid for use in only one
vehicle. Never use it in another vehicle.
If the SD card is used first in one vehicle
and then in another, the navigation
system for either one of the vehicles
may become inoperable.
NOTE For navigation map updates visit
the http://124spiderinfotainment.com
website or contact a Fiat Dealership.NAVIGATION MENU
Selectand open the navigation
menu.
You have the following options fig. 165:
/Open/close. Opens and
closes the UMP (menu bar). The UMP
(menu bar) is displayed on the lower
part of the screen.
Adds a destination. Select your
destination by entering an address or
selecting a POI (Point Of Interest), a
location on the map or one of your
Favourite destinations. You can also
look up your recent destinations from
the Smart History by entering the
coordinates. If an internet connection is
available, Local Search can be of
further help to find your destination.
iDisplays the screen where traffic
information and the GPS reception
conditions can be set and verified.
Cancels waypoint/route.
16511000001-121-112
208
MULTIMEDIA
16406020777-177-077
Page 211 of 228
Finds Places nearby. You can
search for Points Of Interest (POI) near
the vehicle position.
Displays the route parameters
and the route in its full length on the
map. You can also perform
route-related actions such as editing or
cancelling your route, picking route
alternatives, avoiding parts of the route,
simulating navigation or adding the
destination to your Favourites.
2D/3DChanges View mode. The
map view mode can be changed (2D
north up/2D heading up/3D).
Switches to the Settings screen
where you change navigation settings.
NOTE Some functions are not available
depending on some countries and
regions.NAVIGATING ON THE MAP
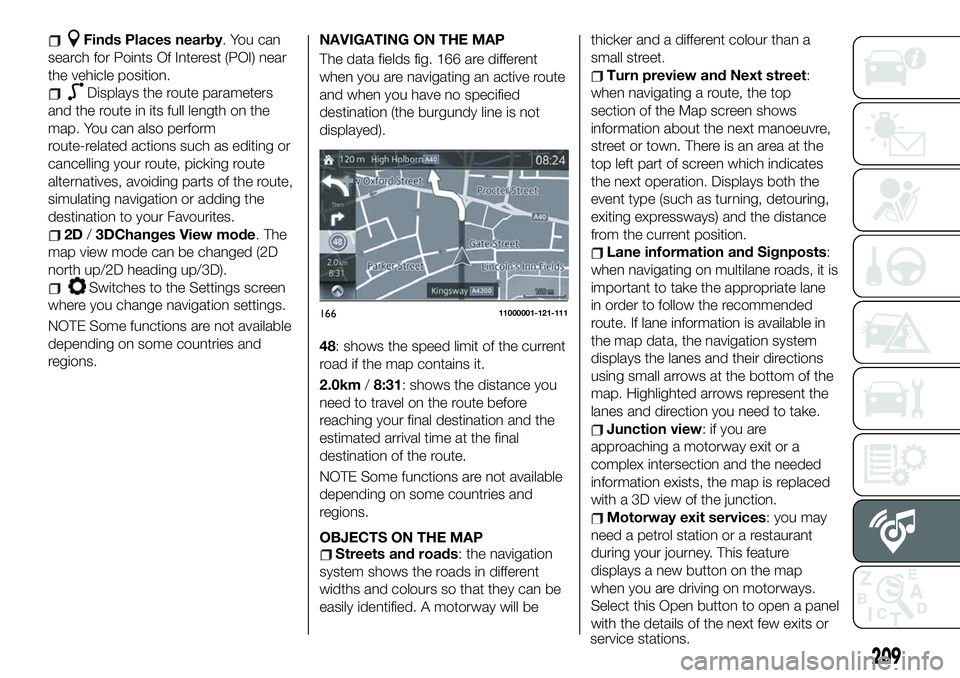
The data fields fig. 166 are different
when you are navigating an active route
and when you have no specified
destination (the burgundy line is not
displayed).
48: shows the speed limit of the current
road if the map contains it.
2.0km/8:31: shows the distance you
need to travel on the route before
reaching your final destination and the
estimated arrival time at the final
destination of the route.
NOTE Some functions are not available
depending on some countries and
regions.
OBJECTS ON THE MAP
Streets and roads: the navigation
system shows the roads in different
widths and colours so that they can be
easily identified. A motorway will bethicker and a different colour than a
small street.
Turn preview and Next street:
when navigating a route, the top
section of the Map screen shows
information about the next manoeuvre,
street or town. There is an area at the
top left part of screen which indicates
the next operation. Displays both the
event type (such as turning, detouring,
exiting expressways) and the distance
from the current position.
Lane information and Signposts:
when navigating on multilane roads, it is
important to take the appropriate lane
in order to follow the recommended
route. If lane information is available in
the map data, the navigation system
displays the lanes and their directions
using small arrows at the bottom of the
map. Highlighted arrows represent the
lanes and direction you need to take.
Junction view: if you are
approaching a motorway exit or a
complex intersection and the needed
information exists, the map is replaced
with a 3D view of the junction.
Motorway exit services: you may
need a petrol station or a restaurant
during your journey. This feature
displays a new button on the map
when you are driving on motorways.
Select this Open button to open a panel
with the details of the next few exits or
16611000001-121-111
209
service stations.
Page 212 of 228
Elements of the active route: the
navigation system shows the route in
the following way.
SELECTING THE DESTINATION OF
A ROUTE
Entering an address
To enter an address as the destination,
do as follows:
Selectafter selectingon the
MAP screen.
SelectFind Address. By default, the
navigation system proposes the country
and town where you are. If needed,
selectCountry, enter the first few
letters of the country name on the
keyboard, and select one country from
the list of results.
If needed, select a new town: select
Townand Start entering the name of
the town on the keyboard. Find the
town you need: the most likely town
name is always shown in the input field.
To accept it, select . If the desired
name does not show up, the names
that match the string appear in a list
after entering a couple of characters (to
open the list of results before it appears
automatically, select
and select
the town from the list).
Enter the street name: select
name of the town on the keyboard.Find the street you need: the most likely
street name is always shown in the
input field. To accept it, select . If the
desired name does not show up, the
names that match the string appear in a
list after entering a couple of characters
(to open the list of results before it
appears automatically, select
and
select the street from the list).
Enter the house number: select
House Numberthen enter the house
number on the keyboard (to enter
letters, selectQWE). Select to finish
entering the address. (If the entered
house number cannot be found, the
midpoint of the street is selected as the
destination.
The selected location is shown on
the map. NavigationStartif is selected,
or after 10 seconds of no user
interaction. By touching the location
displayed on the screen, you can verify
the route. Additionally, the route can be
revised by selecting other options.
Selecting the destination from the
POI
(Point Of Interest)
If the name for a POI (Point Of Interest)
is input, a search candidate list is
displayed.
Proceed as follows:
Selectafter selectingon the
MAP screen.
SelectFind Places.
SelectFilter by Name.
Using the keyboard, enter the name
of the POI (Point Of Interest). After
entering a few letters, select to open
the list of POI with names containing
the entered character sequence.
The selected location is shown on
the map. The system transitions to the
next screen by selectingNavigate To,
or it returns to the previous screen by
selecting the
can change the destination to anywhere
on the map.
Selecting the destination from your
Favourites
Proceed as follows:
Selectafter selectingon the
MAP screen.
In the Navigation menu, select
Favourites. WhenFavouritesis
selected, the screen transfers to the
Favourites screen. Select your
registered favourite.
The selected location is shown on
the map. The system transitions to the
next screen by selectingNavigate To,
or it returns to the previous screen by
selecting the
can change the destination to anywhere
on the map.
210
MULTIMEDIA
Page 213 of 228
Navigation starts ifStartis selected,
or after 10 seconds of no user
interaction. By touching the location
displayed on the screen, you can verify
the route. Additionally, the route can be
revised by selecting other options.
SELECTING A NEW DESTINATION
Proceed as follows:
SelectNew Routeto plan a new
route to the newly selected location.
The previous destination and
waypoint(s) are deleted.
SelectWaypointto add the newly
selected location as an intermediate
destination to your route. The other
destinations of the route remain intact.
Note: the new waypoint is placed
among destinations to keep the route
optimal. To decide where a waypoint to
appear, use the Edit Route feature.
SelectFinal Destinationto append
the newly selected destination at the
end of the route. The other destinations
of the route remain intact. The previous
final destination is now the last
waypoint.
SETTINGS MENU
Select
icon after selectingon the
MAP screen.
Settings menu options:
Map Settings: you can fine-tune the
appearance of the Map screen. Adjust
the map view to your needs, show orhide 3D buildings, and manage POI
(point of interest) display settings (which
POI to show on map).
Guidance Settings:a
guidance-related setting is available
during route guidance.
Warning Settings: a setting related
to warnings is available.
Route Settings.
Traffic Settings: a setting for traffic
information is available.
Connected Settings: a setting for
online service is available
NOTE Some functions are not available
depending on some countries and
regions.
MAP SETTINGS
The map is always shown on the
screen. Scroll the screen downward to
display the setting behind the lower part
of the screen:
View Mode: when this button is
selected, the map view mode can be
changed.3Ddisplays things such as
actual construction sites three
dimensionally on the map.2Dthe map
is rotated so that the direction of travel
is displayed in the upward direction/2D
Nthe map is displayed so that north is
up regardless of the direction of travel).
Viewpoint: adjust the basic zoom
and tilt levels to your needs. Three
levels are available.
Automatic Zoom: during route
guidance in any map view mode, the
function for zooming in on approaching
intersections turns on/off automatically.
Buildings: show or hide 3D town
models, 3D artistic or block
representation of all town building data
containing actual building sizes and
positions on the map.
Motorway Owerview: when
enabled, the map zooms out to show
an overview of the surrounding area if
the next route event (manoeuvre) is far
away. The system goes back to the
normal map view when you approach
the next event.
Place Markers: select which Places
to show on the map while navigating.
Too many Places make the map
crowded, so it is a good idea to show
as few as possible. You have the
following possibilities: select the
checkbox to show or hide the Place
category or Select the name of the
Place category to open the list of its
subcategories.
211
Page 224 of 228
Key battery replacement........10
Keyless Entry System...........9
Keys......................9
Lane change signals...........27
Load limiter (pretensioner)........86
Maintaining the finish.........178
Maintenance monitor...........54
Manual climate control system.....34
Manual transmission..........118
Message indicated on display.....70
Mirrors....................22
Multimedia.................195
Navigation................208
Occupant protection systems.....82
Odometer/Trip meter...........51
Outside mirrors...............22
Owner maintenance precautions . . .164
Paintwork (preserving).........177
Parking...................116
Parking brake...............117
Parking Sensor System.........126
Passenger Air Bag............102
Passenger occupant classification
system.................107
Performance...............191
Periodic checks (scheduled
servicing)................164
Power mirrors...............23
Power window lock switch.......39Power windows..............38
Prescriptions for handling the
vehicle at the end of its life.....193
Pretensioners................85
Radio 3”.................197
Radio 7”..................202
Read this carefully..............2
Rear camera (ParkView rear
backup camera)...........130
Rear fog lights...............26
Refuelling procedure..........128
Refuelling the vehicle..........128
Replacing a bulb.............136
Replacing a tire..............175
Replacing a wheel............176
Replacing exterior light bulbs.....139
Replacing fuses.............144
Rims and tires..............184
Rims and tires provided........185
SBA system (Seat Belt Alert)......85
Scheduled servicing...........163
Scheduled servicing plan.......165
Seat belt precautions...........82
Seat belt pretensioner and load
limiting systems.............85
Seat Belt Pretensioners........102
Seat belts..................82
Seat belts (fastening/unfastening)}.......................83
Seats.....................19Seats (manual adjustment).......19
Seats and fabric parts (cleaning) . . .180
Shift-lock override (automatic
gearbox)................120
Shift-lock system (automatic
gearbox)................120
Side Air Bags...............103
Snow chains...............176
Speed limiter...............125
Starting the engine.........11,116
Steering wheel...............22
Supplementary restraint system
(SRS) - Air bag............100
Symbols....................3
TCS (Traction Control System).....73
Theft deterrent system..........15
Tips, controls and general
information...............196
Tire inflation pressure..........175
Tire service kit..............152
Tires rotation (recommendations) . .176
Tool storage................152
Towing the vehicle............159
Towing trailers..............133
TPMS (Tire Pressure Monitoring
System)..................77
Turn signals.................27
Turning the engine off...........13
Vehicle security alarm..........15
INDEX