start stop button FIAT 124 SPIDER 2020 Owner handbook (in English)
[x] Cancel search | Manufacturer: FIAT, Model Year: 2020, Model line: 124 SPIDER, Model: FIAT 124 SPIDER 2020Pages: 228, PDF Size: 5.08 MB
Page 15 of 228
verify that the push button start
indication light (green) flashes;
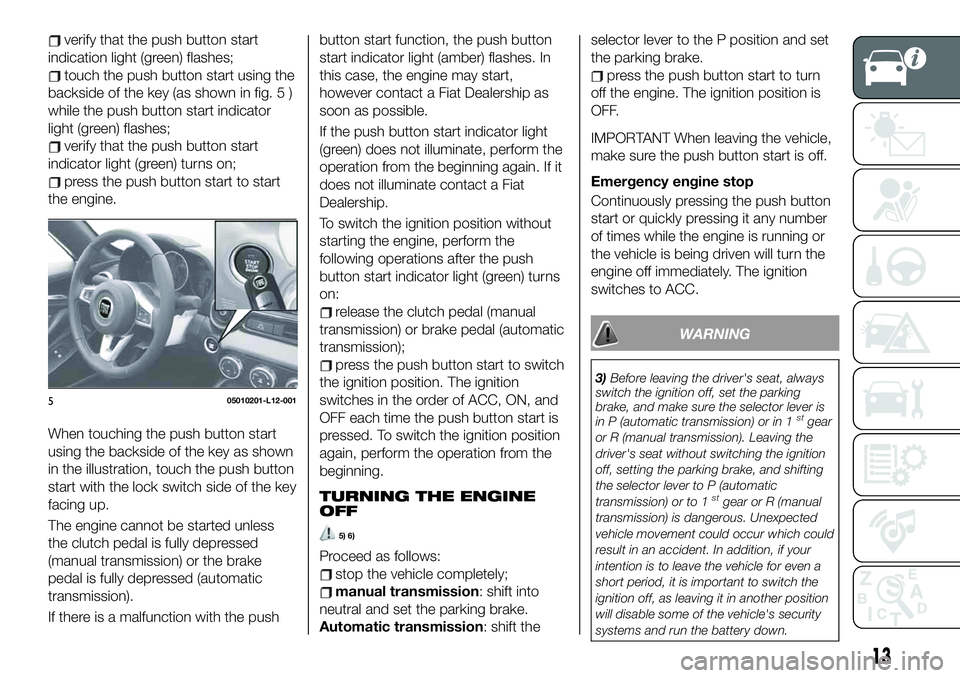
touch the push button start using the
backside of the key (as shown in fig. 5 )
while the push button start indicator
light (green) flashes;
verify that the push button start
indicator light (green) turns on;
press the push button start to start
the engine.
When touching the push button start
using the backside of the key as shown
in the illustration, touch the push button
start with the lock switch side of the key
facing up.
The engine cannot be started unless
the clutch pedal is fully depressed
(manual transmission) or the brake
pedal is fully depressed (automatic
transmission).
If there is a malfunction with the pushbutton start function, the push button
start indicator light (amber) flashes. In
this case, the engine may start,
however contact a Fiat Dealership as
soon as possible.
If the push button start indicator light
(green) does not illuminate, perform the
operation from the beginning again. If it
does not illuminate contact a Fiat
Dealership.
To switch the ignition position without
starting the engine, perform the
following operations after the push
button start indicator light (green) turns
on:
release the clutch pedal (manual
transmission) or brake pedal (automatic
transmission);
press the push button start to switch
the ignition position. The ignition
switches in the order of ACC, ON, and
OFF each time the push button start is
pressed. To switch the ignition position
again, perform the operation from the
beginning.
TURNING THE ENGINE
OFF
5) 6)
Proceed as follows:
stop the vehicle completely;
manual transmission: shift into
neutral and set the parking brake.
Automatic transmission: shift theselector lever to the P position and set
the parking brake.
press the push button start to turn
off the engine. The ignition position is
OFF.
IMPORTANT When leaving the vehicle,
make sure the push button start is off.
Emergency engine stop
Continuously pressing the push button
start or quickly pressing it any number
of times while the engine is running or
the vehicle is being driven will turn the
engine off immediately. The ignition
switches to ACC.
WARNING
3)Before leaving the driver's seat, always
switch the ignition off, set the parking
brake, and make sure the selector lever is
in P (automatic transmission) or in 1
stgear
or R (manual transmission). Leaving the
driver's seat without switching the ignition
off, setting the parking brake, and shifting
the selector lever to P (automatic
transmission) or to 1
stgear or R (manual
transmission) is dangerous. Unexpected
vehicle movement could occur which could
result in an accident. In addition, if your
intention is to leave the vehicle for even a
short period, it is important to switch the
ignition off, as leaving it in another position
will disable some of the vehicle's security
systems and run the battery down.
505010201-L12-001
13
Page 121 of 228
AUTOMATIC
TRANSMISSION
(where provided)
VARIOUS LOCKOUTS
To shift from P to R you must depress
the brake pedal and hold in the
lock-release button to shift (the ignition
must be switched ON).
To shift from R to N, from N to D (or D
to N), from D to M (or M to D) and from
M to + and - the selector lever can be
shifted freely into any position.
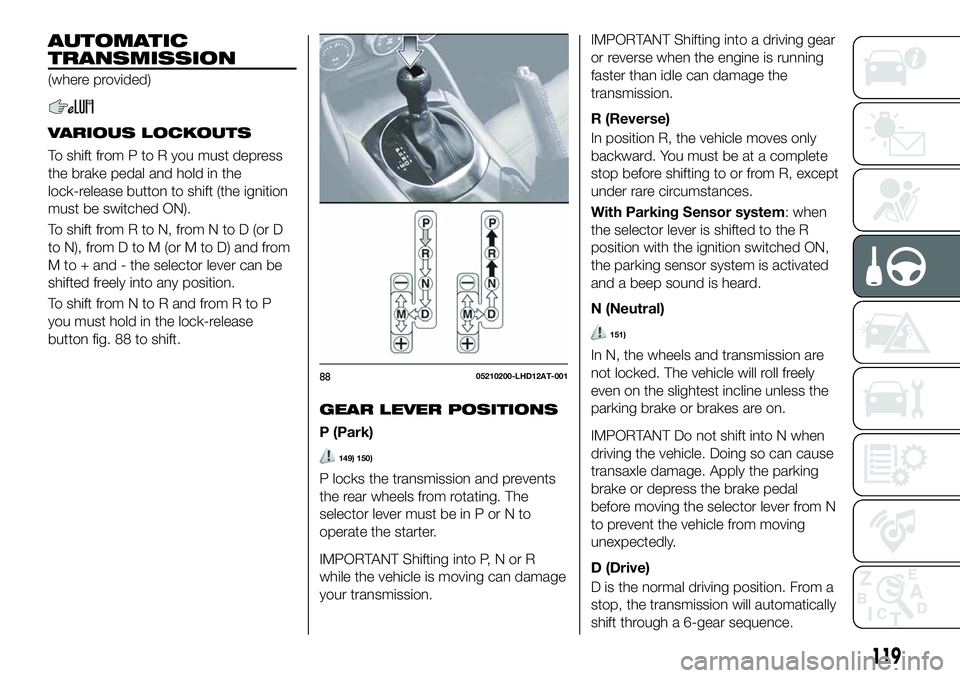
To shift from N to R and from R to P
you must hold in the lock-release
button fig. 88 to shift.
GEAR LEVER POSITIONS
P (Park)
149) 150)
P locks the transmission and prevents
the rear wheels from rotating. The
selector lever must be in P or N to
operate the starter.
IMPORTANT Shifting into P, N or R
while the vehicle is moving can damage
your transmission.IMPORTANT Shifting into a driving gear
or reverse when the engine is running
faster than idle can damage the
transmission.
R (Reverse)
In position R, the vehicle moves only
backward. You must be at a complete
stop before shifting to or from R, except
under rare circumstances.
With Parking Sensor system: when
the selector lever is shifted to the R
position with the ignition switched ON,
the parking sensor system is activated
and a beep sound is heard.
N (Neutral)
151)
In N, the wheels and transmission are
not locked. The vehicle will roll freely
even on the slightest incline unless the
parking brake or brakes are on.
IMPORTANT Do not shift into N when
driving the vehicle. Doing so can cause
transaxle damage. Apply the parking
brake or depress the brake pedal
before moving the selector lever from N
to prevent the vehicle from moving
unexpectedly.
D (Drive)
D is the normal driving position. From a
stop, the transmission will automatically
shift through a 6-gear sequence.
8805210200-LHD12AT-001
119
Page 122 of 228
M (Manual)
M is the manual shift mode position.
Gears can be shifted up or down by
operating the selector lever. Refer to
“Manual shift mode”.
SHIFT-LOCK SYSTEM
The shift-lock system prevents shifting
out of P unless the brake pedal is
depressed.
To shift from P:
depress and hold the brake pedal;
start the engine;
press and hold the lock-release
button;
move the selector lever.
When the ignition is switched to ACC or
the ignition is switched off, the selector
lever cannot be shifted from P.
The ignition cannot be switched to OFF
if the selector lever is not in P.
SHIFT-LOCK OVERRIDE
If the selector lever will not move from P
using the proper shift procedure,
continue to hold down the brake pedal.
Proceed as follows:
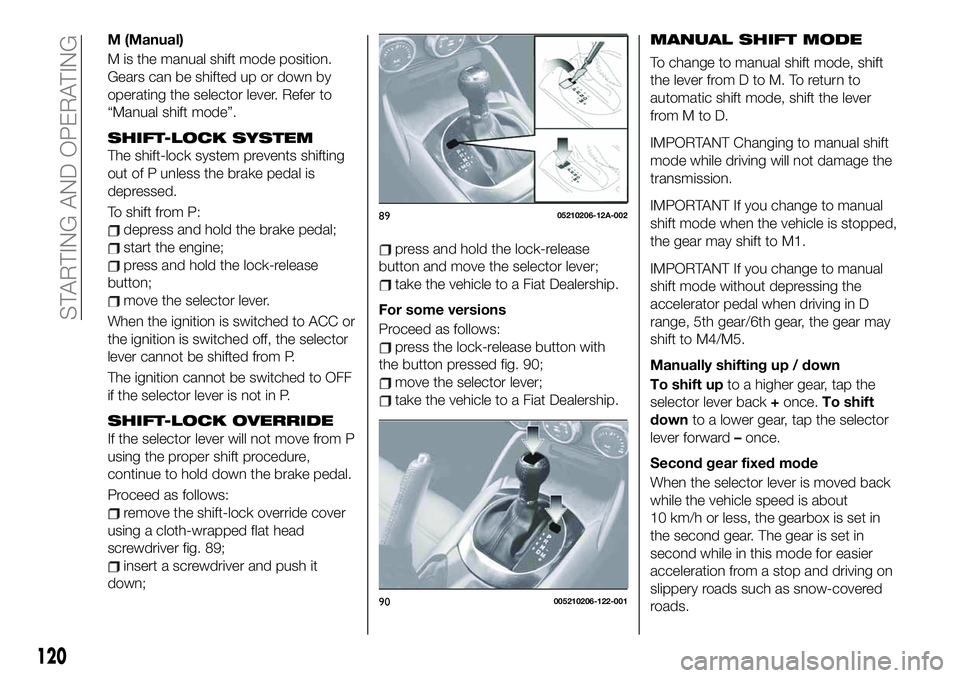
remove the shift-lock override cover
using a cloth-wrapped flat head
screwdriver fig. 89;
insert a screwdriver and push it
down;
press and hold the lock-release
button and move the selector lever;
take the vehicle to a Fiat Dealership.
For some versions
Proceed as follows:
press the lock-release button with
the button pressed fig. 90;
move the selector lever;
take the vehicle to a Fiat Dealership.
MANUAL SHIFT MODE
To change to manual shift mode, shift
the lever from D to M. To return to
automatic shift mode, shift the lever
fromMtoD.
IMPORTANT Changing to manual shift
mode while driving will not damage the
transmission.
IMPORTANT If you change to manual
shift mode when the vehicle is stopped,
the gear may shift to M1.
IMPORTANT If you change to manual
shift mode without depressing the
accelerator pedal when driving in D
range, 5th gear/6th gear, the gear may
shift to M4/M5.
Manually shifting up / down
To shift upto a higher gear, tap the
selector lever back+once.To shift
downto a lower gear, tap the selector
lever forward–once.
Second gear fixed mode
When the selector lever is moved back
while the vehicle speed is about
10 km/h or less, the gearbox is set in
the second gear. The gear is set in
second while in this mode for easier
acceleration from a stop and driving on
slippery roads such as snow-covered
roads.
8905210206-12A-002
90005210206-122-001
120
STARTING AND OPERATING
Page 134 of 228
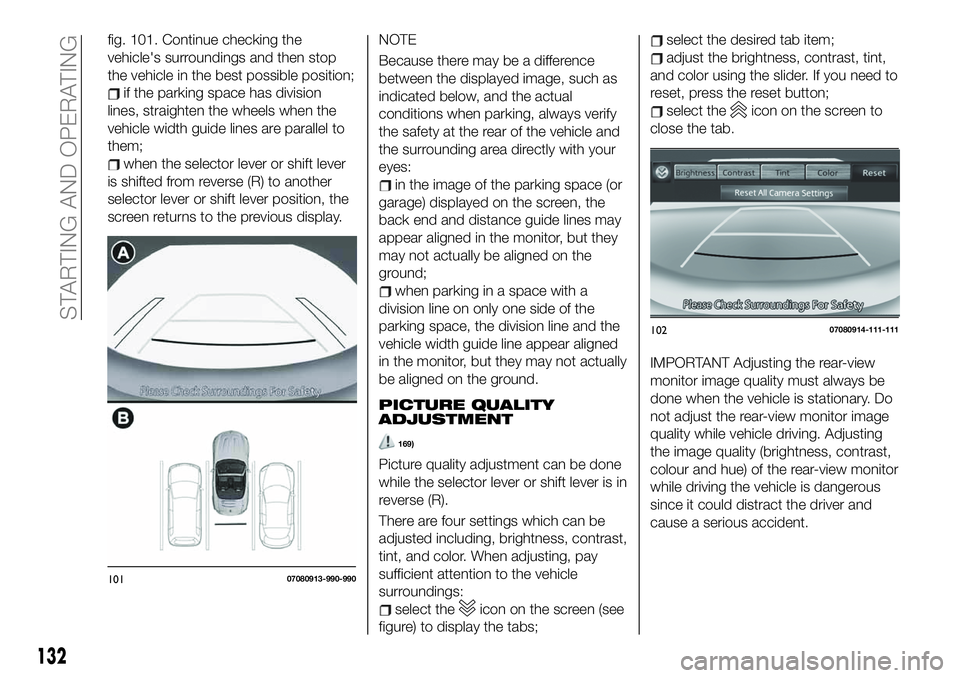
fig. 101. Continue checking the
vehicle's surroundings and then stop
the vehicle in the best possible position;
if the parking space has division
lines, straighten the wheels when the
vehicle width guide lines are parallel to
them;
when the selector lever or shift lever
is shifted from reverse (R) to another
selector lever or shift lever position, the
screen returns to the previous display.NOTE
Because there may be a difference
between the displayed image, such as
indicated below, and the actual
conditions when parking, always verify
the safety at the rear of the vehicle and
the surrounding area directly with your
eyes:
in the image of the parking space (or
garage) displayed on the screen, the
back end and distance guide lines may
appear aligned in the monitor, but they
may not actually be aligned on the
ground;
when parking in a space with a
division line on only one side of the
parking space, the division line and the
vehicle width guide line appear aligned
in the monitor, but they may not actually
be aligned on the ground.
PICTURE QUALITY
ADJUSTMENT
169)
Picture quality adjustment can be done
while the selector lever or shift lever is in
reverse (R).
There are four settings which can be
adjusted including, brightness, contrast,
tint, and color. When adjusting, pay
sufficient attention to the vehicle
surroundings:
select theicon on the screen (see
figure) to display the tabs;
select the desired tab item;
adjust the brightness, contrast, tint,
and color using the slider. If you need to
reset, press the reset button;
select theicon on the screen to
close the tab.
IMPORTANT Adjusting the rear-view
monitor image quality must always be
done when the vehicle is stationary. Do
not adjust the rear-view monitor image
quality while vehicle driving. Adjusting
the image quality (brightness, contrast,
colour and hue) of the rear-view monitor
while driving the vehicle is dangerous
since it could distract the driver and
cause a serious accident.
10107080913-990-990
10207080914-111-111
132
STARTING AND OPERATING
Page 201 of 228
REG (Regional Programme) (*);
ALC (Automatic volume adjustment);
BASS (Low pitch sound);
TREB (Treble sound);
FADE (Front/back volume balance);
BAL (Left/right volume balance);
BEEP (Audio operation sound);
BT SETUP (**);
12Hr < > 24Hr (12 Hr/24 Hr time
adjustment).
(*) With Radio Data System (RDS)
(where provided).
(**) Depending on the model, this
function may not be available.
CLOCK
Setting the time
The clock can be set at any time when
the ignition is switched to ACC or ON.
To adjust the time, press the clock
buttonFM/AMfor about 2 seconds
until a beep is heard. The clock's
current time will flash.
Time adjustment
To adjust the time, press the
hour/minute set button
/
while the clock's current time is
flashing.
The hours advance while the hour set
button
is pressed. The minutes
advance while the minute
set
button is pressed.Press the clock buttonFM/AMagain
to start the clock.
OPERATING THE RADIO
Radio ON: press a band selector
button FM/AM to turn the radio on.
Band selection: press the band
selector buttonFM/AMto switch the
bands as follows: FM1–FM2–AM
(without Radio Data System RDS) /
MW/LW (with Radio Data System RDS).
Manual tuning: select the station by
pressing the tuning button
/
lightly.
Seek tuning: press tuning button
/. The search stops when a
station is found.
Scan tuning: press and hold the scan
buttonMEDIAto automatically sample
strong stations. Scanning stops at each
station for about 5 seconds. To hold a
station, press and hold the scan button
MEDIA again during this interval.
Preset channel tuning
The 6 preset channels can be used to
store 6 AM (without Radio Data System
RDS), MW/LW (with Radio Data System
RDS) and 12 FM stations.
To set a channel first select AM
(without Radio Data System RDS),
MW/LW (with Radio Data System RDS),
FM1, or FM2. Tune to the desired
station.
Press a channel preset button for
about 2 seconds until a beep is heard.
The preset channel number or station
frequency will be displayed. The station
is now held in the memory.
Repeat this operation for the other
stations and bands you want to store.
To tune one in the memory, select AM
(without Radio Data System RDS),
MW/LW (with Radio Data System RDS),
FM1, or FM2 and then press its channel
preset button. The station frequency or
the channel number will be displayed.
AUX / USB / iPod MODE
Auxiliary jack / USB port
Audio can be heard from the vehicle's
speakers by connecting a commercially
available portable audio unit to the
auxiliary jack. A commercially-available,
non-impedance (3.5 Ø) stereo mini plug
lead is required. In addition, audio can
be played from the vehicle audio device
by connecting a USB device or an iPod
to the USB port.
How to use AUX mode
Switch the ignition to ACC or ON, press
the power/volume dial to turn the audio
system on and press theMEDIA
button of the audio unit to change to
the AUX mode.
199