tow FIAT 124 SPIDER 2021 Owner handbook (in English)
[x] Cancel search | Manufacturer: FIAT, Model Year: 2021, Model line: 124 SPIDER, Model: FIAT 124 SPIDER 2021Pages: 228, PDF Size: 5.08 MB
Page 18 of 228
warning light in the instrument
panel flashes twice per second for
20 seconds;
fully armed.
With the intrusion sensor: the
intrusion sensor function can be armed
only when the convertible top is closed.
Even with a window open, the system
can be armed, however, leaving the
windows even partially open can invite
theft, and wind blowing into the vehicle
could trigger the alarm. The intrusion
sensor function can also be cancelled.DOORS
LOCK / UNLOCK WITH
AUXILIARY KEY
7) 8) 9) 10) 11) 12) 13) 14)
Both doors and the boot lid, fuel filler
flap lock automatically when the driver's
door is locked using the auxiliary key.
They both unlock when the driver's
door is unlocked using the auxiliary key.
Turn the auxiliary key toward the front to
lock, toward the back to unlock.
MANUAL LOCK / UNLOCK
Operation from inside
Both doors and the boot lid, fuel filler
flap lock automatically when the driver's
door-lock knob is pressed. They both
unlock when the driver's door-lock
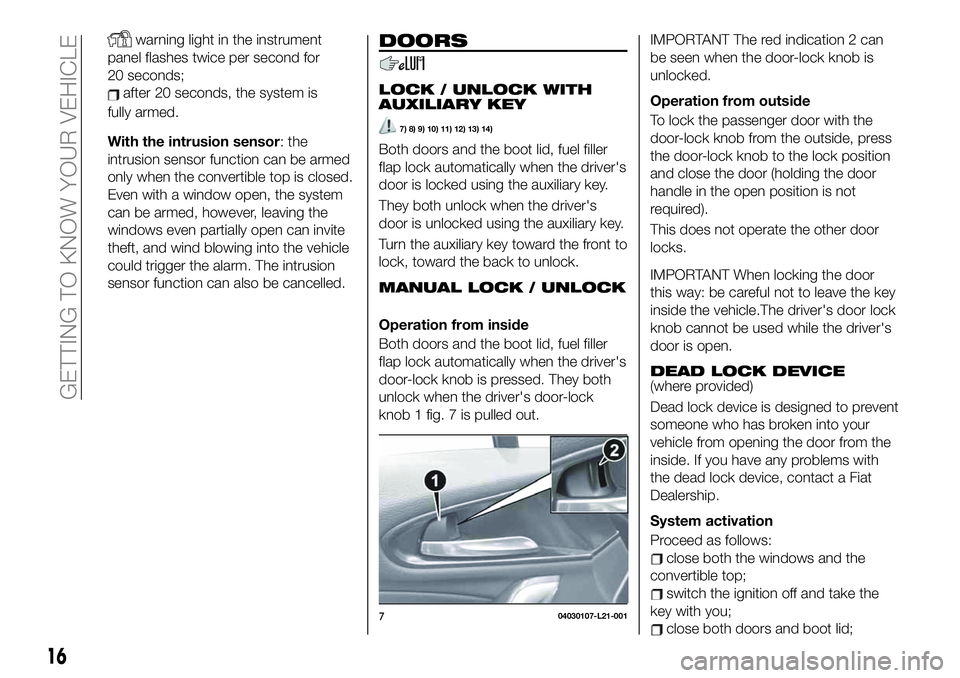
knob 1 fig. 7 is pulled out.
IMPORTANT The red indication 2 can
be seen when the door-lock knob is
unlocked.
Operation from outside
To lock the passenger door with the
door-lock knob from the outside, press
the door-lock knob to the lock position
and close the door (holding the door
handle in the open position is not
required).
This does not operate the other door
locks.
IMPORTANT When locking the door
this way: be careful not to leave the key
inside the vehicle.The driver's door lock
knob cannot be used while the driver's
door is open.
DEAD LOCK DEVICE
(where provided)
Dead lock device is designed to prevent
someone who has broken into your
vehicle from opening the door from the
inside. If you have any problems with
the dead lock device, contact a Fiat
Dealership.
System activation
Proceed as follows:
close both the windows and the
convertible top;
switch the ignition off and take the
key with you;
close both doors and boot lid;704030107-L21-001
16
GETTING TO KNOW YOUR VEHICLE
after 20 seconds, the system is
Page 27 of 228
DAYTIME RUNNING
LIGHTS (DRL)
41) 42)
Some countries require moving vehicles
to have their lights on (running lights)
during the daytime.
The running lights turn on automatically
when the vehicle starts moving.
They turn off when the parking brake is
operated or the selector lever is shifted
to the P position (versions with
automatic transmission).
HIGH BEAMS
The headlights switch between high
and low beams by moving the lever
forward or backward.
When the headlight high-beams are on,
the
warning light is turned on.
FLASH TO PASS
Can be used when the ignition is
switched ON.
To flash the headlights, pull the lever
fully towards you (the headlight switch
does not need to be on).
The
warning light in the instrument
cluster illuminates simultaneously.
The lever will return to the normal
position when released.
AUTOMATIC LIGHTING(where provided)
Light sensor
When the headlight switch is in the
AUTOposition and the ignition is
switched ON, the light sensor senses
the surrounding lightness or darkness
and automatically turns the headlights,
other exterior lights and dashboard
illumination on or off.
IMPORTANT The light sensor also
works as a rain sensor for the
auto-wiper control. Keep hands and
scrapers clear of the windshield when
the wiper lever is in the AUTO position
and the ignition is switched ON as
fingers could be pinched or the wipers
and wiper blades damaged when the
wipers activate automatically. If you are
going to clean the windshield, be sure
the wipers are turned off completely
(this is particularly important when
clearing ice and snow) when it is
particularly tempting to leave the engine
running.
COMING HOME LIGHT
SYSTEM
The coming me home light system
turns on the headlights (low beams)
when the lever is operated.System activation
When the lever is pulled with the ignition
switched to ACC or OFF, the low beam
headlights turn on.
The headlights turn off after a certain
period of time has elapsed after the
doors are closed.
The time until the headlights turn off
after all of the doors are closed can be
changed. If no operations are done for
3 minutes after the lever is pulled, the
headlights turn off.
The headlights turn off if the lever is
pulled again while the headlights are on.
FRONT FOG LIGHTS(where provided)
The front fog lights can be used when
the ignition is switched ON.
Use this switch to turn on the front fog
lights. The front fog lights will improve
visibility at night and during foggy
conditions.
Activation
Turn the headlight switch 1 fig. 19 in
orposition before activate
front fog lights.
Rotate the fog light switch 2 fig. 19 to
orposition (switch automatically
turns in
position).
25
Page 29 of 228
Versions without front fog lights
The headlights must be turned on to
turn on the rear fog light.
Activation
To turn on the rear fog light on, rotate
the fog light switch 2 to the
position
(the fog light switch returns to its
original position automatically).
The rear fog light indicator light in the
instrument cluster illuminates while the
rear fog light is on.
Deactivation
To turn the rear fog light off, do any of
the following:
rotate the fog light switch 2 to the
position again (the fog light switch
automatically returns to the
position);
rotate the fog light switch 2 to the
OFF position;
turn the headlight switch 1 to the
OFF position.
The rear fog light indicator light in the
instrument cluster goes off when the
rear fog light is turned off.
TURN SIGNALS
The ignition must be switched ON to
use the turn and lane-change signals.
Direction indicators
Move the signal lever down (for a left
turn) or up (for a right turn) to the stop
position. The signal will self-cancel after
the turn is completed.
If the indicator light continues to flash
after a turn, manually return the lever to
its original position.
The turn signal indicators (green)
in the instrument cluster flash
according to the operation of the turn
signal lever to show which signal is
working.
NOTE If an indicator light stays on
without flashing or if it flashes
abnormally, one of the turn signal bulbs
may be burned out.LANE CHANGE SIGNALS
Move the lever halfway toward the
direction of the lane change (until the
indicator flashes) and hold it there. It will
return to the off position when released.
Three-flash turn signal
After releasing the turn signal lever, the
turn signal indicator flashes three times.
The operation can be cancelled by
moving the lever in the direction
opposite to which it was operated.
Adaptive Front Lighting
System (AFS)
(where provided)
The adaptive front lighting system (AFS)
automatically adjusts the headlight
beams to the left or right in conjunction
with the operation of the steering wheel
after the headlights have been turned
on.
A system malfunction or operation
conditions are indicated by a warning.
Refer to “Warning lights on instrument
panel” paragraph in “Knowing the
instrument panel” chapter.
27
Page 33 of 228
Auto-wiper control
When the wiper lever is in theAUTO
position, the rain sensor senses the
amount of rainfall on the windshield and
turns the wipers on or off automatically
(off/intermittent/low speed/high speed).
Adjusting rain sensor sensitivity
The sensitivity of the rain sensor can be
adjusted by turning the switch on the
wiper lever.
From the center position (normal),
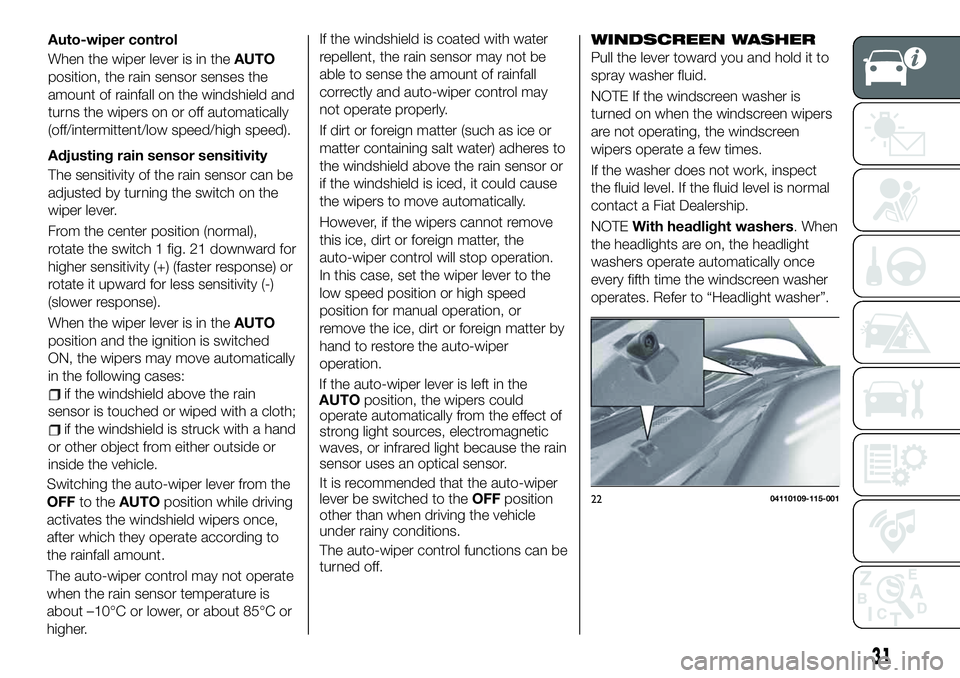
rotate the switch 1 fig. 21 downward for
higher sensitivity (+) (faster response) or
rotate it upward for less sensitivity (-)
(slower response).
When the wiper lever is in theAUTO
position and the ignition is switched
ON, the wipers may move automatically
in the following cases:
if the windshield above the rain
sensor is touched or wiped with a cloth;
if the windshield is struck with a hand
or other object from either outside or
inside the vehicle.
Switching the auto-wiper lever from the
OFFto theAUTOposition while driving
activates the windshield wipers once,
after which they operate according to
the rainfall amount.
The auto-wiper control may not operate
when the rain sensor temperature is
about –10°C or lower, or about 85°C or
higher.If the windshield is coated with water
repellent, the rain sensor may not be
able to sense the amount of rainfall
correctly and auto-wiper control may
not operate properly.
If dirt or foreign matter (such as ice or
matter containing salt water) adheres to
the windshield above the rain sensor or
if the windshield is iced, it could cause
the wipers to move automatically.
However, if the wipers cannot remove
this ice, dirt or foreign matter, the
auto-wiper control will stop operation.
In this case, set the wiper lever to the
low speed position or high speed
position for manual operation, or
remove the ice, dirt or foreign matter by
hand to restore the auto-wiper
operation.
WINDSCREEN WASHER
Pull the lever toward you and hold it to
spray washer fluid.
NOTE If the windscreen washer is
turned on when the windscreen wipers
are not operating, the windscreen
wipers operate a few times.
If the washer does not work, inspect
the fluid level. If the fluid level is normal
contact a Fiat Dealership.
NOTEWith headlight washers. When
the headlights are on, the headlight
washers operate automatically once
every fifth time the windscreen washer
operates. Refer to “Headlight washer”.
2204110109-115-001
31
If the auto-wiper lever is left in the
AUTOposition, the wipers could
operate automatically from the effect of
strong light sources, electromagnetic
waves, or infrared light because the rain
sensor uses an optical sensor.
It is recommended that the auto-wiper
lever be switched to theOFFposition
other than when driving the vehicle
under rainy conditions.
The auto-wiper control functions can be
turned off.
Page 46 of 228
CONVERTIBLE TOP
(SOFT TOP)
LOWERING THE
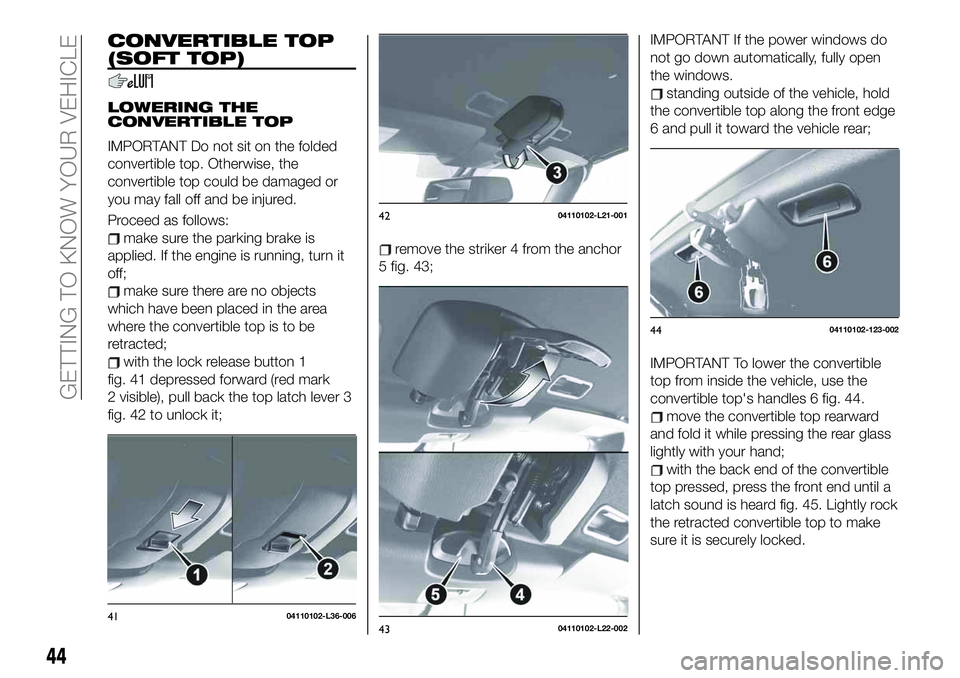
CONVERTIBLE TOP
IMPORTANT Do not sit on the folded
convertible top. Otherwise, the
convertible top could be damaged or
you may fall off and be injured.
Proceed as follows:
make sure the parking brake is
applied. If the engine is running, turn it
off;
make sure there are no objects
which have been placed in the area
where the convertible top is to be
retracted;
with the lock release button 1
fig. 41 depressed forward (red mark
2 visible), pull back the top latch lever 3
fig. 42 to unlock it;
remove the striker 4 from the anchor
5 fig. 43;
IMPORTANT If the power windows do
not go down automatically, fully open
the windows.
standing outside of the vehicle, hold
the convertible top along the front edge
6 and pull it toward the vehicle rear;
IMPORTANT To lower the convertible
top from inside the vehicle, use the
convertible top's handles 6 fig. 44.
move the convertible top rearward
and fold it while pressing the rear glass
lightly with your hand;
with the back end of the convertible
top pressed, press the front end until a
latch sound is heard fig. 45. Lightly rock
the retracted convertible top to make
sure it is securely locked.
4104110102-L36-006
4204110102-L21-001
4304110102-L22-002
4404110102-123-002
44
GETTING TO KNOW YOUR VEHICLE
Page 47 of 228
RAISING THE
CONVERTIBLE TOP
Proceed as follows:
make sure the parking brake is
applied. If the engine is running, turn it
off;
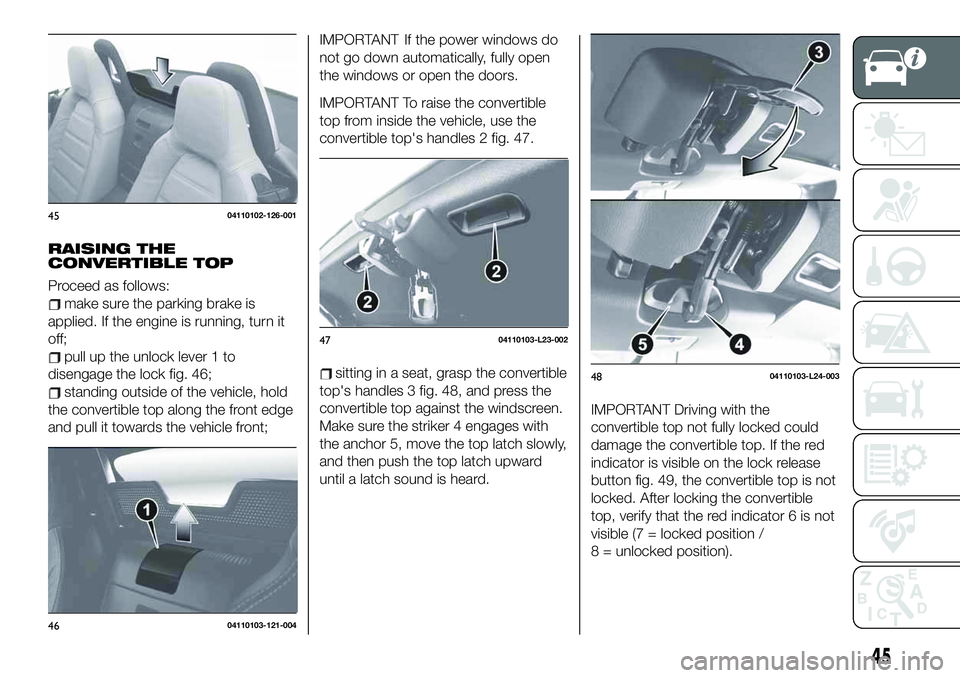
pull up the unlock lever 1 to
disengage the lock fig. 46;
standing outside of the vehicle, hold
the convertible top along the front edge
and pull it towards the vehicle front;
IMPORTANTIf the power windows do
not go down automatically, fully open
the windows or open the doors.
IMPORTANT To raise the convertible
top from inside the vehicle, use the
convertible top's handles 2 fig. 47.
sitting in a seat, grasp the convertible
top's handles 3 fig. 48, and press the
convertible top against the windscreen.
Make sure the striker 4 engages with
the anchor 5, move the top latch slowly,
and then push the top latch upward
until a latch sound is heard.
IMPORTANT Driving with the
convertible top not fully locked could
damage the convertible top. If the red
indicator is visible on the lock release
button fig. 49, the convertible top is not
locked. After locking the convertible
top, verify that the red indicator 6 is not
visible (7 = locked position /
8 = unlocked position).
4504110102-126-001
4604110103-121-004
4704110103-L23-002
4804110103-L24-003
45
Page 83 of 228
IMPORTANT Hill Launch Assist does
not operate if the parking brake is
applied, the vehicle has not stopped
completely, or the clutch pedal is
released.
IMPORTANT While Hill Launch Assist is
operating, the brake pedal may feel stiff
and vibrate, however, this does not
indicate a malfunction.
IMPORTANT Hill Launch Assist does
not operate while the TCS/DSC
indicator light is illuminated. Refer to
“Warning lights and messages”
paragraph in “Knowing the instrument
panel” chapter.
IMPORTANT Hill Launch Assist (HLA)
does not turn off even if the DSC OFF
switch is pressed to turn off the
TCS/DSC.
IMPORTANT For vehicles with an
automatic transmission although the Hill
Launch Assist does not operate during
idling stop, the vehicle roll prevention
function operates to prevent vehicle roll.
WARNING
79)The presence of the TPMS does not
permit the driver to neglect regular checks
of the tire pressure, including for the spare
wheel, and correct maintenance: the
system is not used to signal a possible fault
to a tire. Tire pressure must be checked
with tires rested and cold. Should it
become necessary for whatever reason to
check pressure with warm tires, do not
reduce pressure even though it is higher
than the prescribed value. Repeat the
check when the tires are cold.
80)Replacing the normal tires with winter
tires and vice versa requires an inspection
of the TPMS, which should be carried out
only by a Fiat Dealership.
81)Changes in outside temperature may
cause tire pressures to vary. The system
may temporarily indicate insufficient
pressure. In this case check the tire
inflation pressure with the tires cold and, if
necessary top up the inflation pressure.82)Do not rely completely on HLA. HLA is
an auxiliary device for accelerating from a
stop on a slope. The system only operates
for about two seconds and therefore,
relying only on the system, when
accelerating from a stop is dangerous
because the vehicle may move (roll)
unexpectedly and cause an accident. The
vehicle could roll depending on the
vehicle's load or if it is towing something. In
addition, for vehicles with a manual
transmission, the vehicle could still roll
depending on how the clutch pedal or the
accelerator pedal is operated. Always
confirm the safety around the vehicle
before starting to drive the vehicle.
81
Page 117 of 228
STARTING AND OPERATING
Let’s get to the "heart" of the vehicle:
seeing how you can exploit all of its
potential to the full.
We’ll look at how to drive it safely in any
situation, so that it can be a welcome
companion, with our comfort and our
wallets in mind.STARTING THE ENGINE.......116
PARKING.................116
PARKING BRAKE............117
MANUAL TRANSMISSION......118
AUTOMATIC TRANSMISSION. . . .119
CRUISE CONTROL...........122
SPEED LIMITER.............125
PARKING SENSOR SYSTEM.....126
REFUELLING THE VEHICLE.....128
REAR CAMERA (PARKVIEW REAR
BACKUP CAMERA)...........130
TOWING TRAILERS..........133
115
Page 118 of 228
STARTING THE
ENGINE
140) 141) 142)
24)
Before starting the engine, adjust the
seat, the interior rear view mirrors, the
door mirrors and fasten the seat belt
correctly.
Never press the accelerator pedal for
starting the engine.
For starting procedure see “Starting the
engine” in “Getting to know your
vehicle” chapter.
STOPPING THE ENGINE
Proceed as follows:
park the car in a position that is not
dangerous for oncoming traffic; engage
a gear (versions with manual
transmission) or position the gear lever
to P (Parking) (versions with automatic
transmission);
turn the ignition device to STOP with
the engine idling.
WARNING
140)It is dangerous to run the engine in
enclosed areas. The engine takes in
oxygen and releases carbon dioxide,
carbon monoxide and other toxic gases.
141)The brake servo is not active until the
engine is started, so you would need to
apply much more force than usual to the
brake pedal.
142)Do not start the engine by pushing,
towing or driving downhill. These
manoeuvres may damage the catalytic
converter.
IMPORTANT
24)A quick burst on the accelerator before
turning off the engine serves absolutely no
practical purpose; it wastes fuel and is
damaging for the engine.
PARKING
Keep away the key when leaving the
vehicle and take it with you.
When parking and leaving the vehicle,
proceed as follows:
engage a gear (first gear if facing
uphill or reverse if facing downhill) and
leave the wheels turned;
stop the engine and engage the
handbrake.
Block the wheels with a wedge or a
stone if the car is parked on a steep
slope.
On versions equipped with automatic
transmission, before releasing the brake
pedal, wait for letter P to be displayed.
IMPORTANT NEVER leave the vehicle
with the gearbox in neutral (or, on
versions equipped with automatic
transmission, before placing the gear
lever at P).
116
STARTING AND OPERATING
Page 119 of 228
PARKING BRAKE
143) 144) 145)
IMPORTANT Driving with the parking
brake on will cause excessive wear of
the brake parts.
Setting the parking brake
Depress the brake pedal and then firmly
pull the parking brake lever fully
upwards with sufficient force to hold the
vehicle in a stationary position.
Releasing the parking brake
Depress the brake pedal and pull the
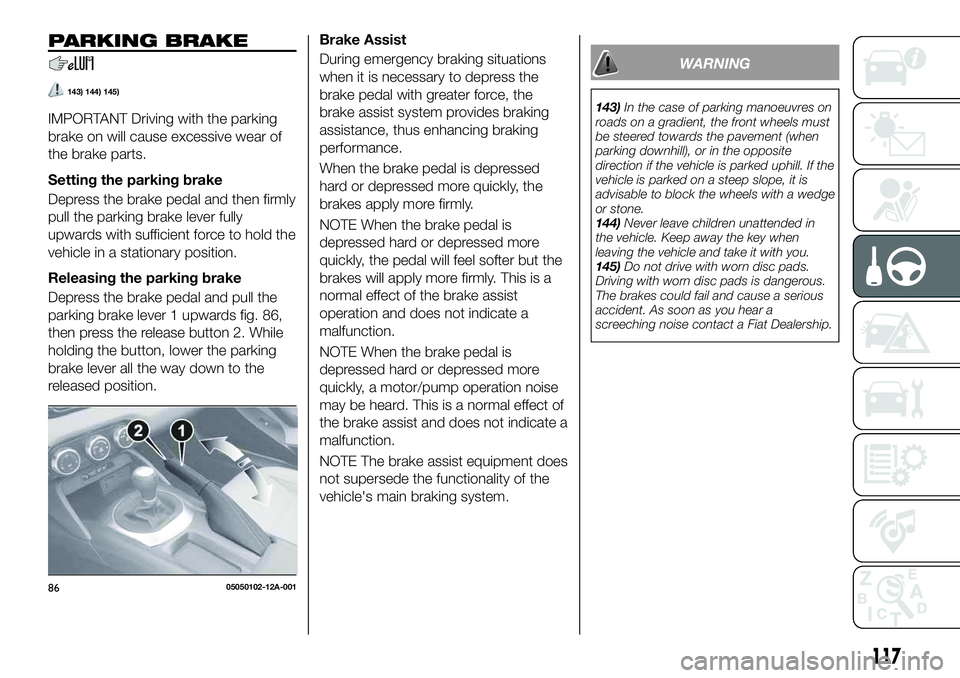
parking brake lever 1 upwards fig. 86,
then press the release button 2. While
holding the button, lower the parking
brake lever all the way down to the
released position.Brake Assist
During emergency braking situations
when it is necessary to depress the
brake pedal with greater force, the
brake assist system provides braking
assistance, thus enhancing braking
performance.
When the brake pedal is depressed
hard or depressed more quickly, the
brakes apply more firmly.
NOTE When the brake pedal is
depressed hard or depressed more
quickly, the pedal will feel softer but the
brakes will apply more firmly. This is a
normal effect of the brake assist
operation and does not indicate a
malfunction.
NOTE When the brake pedal is
depressed hard or depressed more
quickly, a motor/pump operation noise
may be heard. This is a normal effect of
the brake assist and does not indicate a
malfunction.
NOTE The brake assist equipment does
not supersede the functionality of the
vehicle's main braking system.
WARNING
143)In the case of parking manoeuvres on
roads on a gradient, the front wheels must
be steered towards the pavement (when
parking downhill), or in the opposite
direction if the vehicle is parked uphill. If the
vehicle is parked on a steep slope, it is
advisable to block the wheels with a wedge
or stone.
144)Never leave children unattended in
the vehicle. Keep away the key when
leaving the vehicle and take it with you.
145)Do not drive with worn disc pads.
Driving with worn disc pads is dangerous.
The brakes could fail and cause a serious
accident. As soon as you hear a
screeching noise contact a Fiat Dealership.
8605050102-12A-001
117