check engine FIAT 124 SPIDER ABARTH 2017 2.G User Guide
[x] Cancel search | Manufacturer: FIAT, Model Year: 2017, Model line: 124 SPIDER ABARTH, Model: FIAT 124 SPIDER ABARTH 2017 2.GPages: 292, PDF Size: 121.25 MB
Page 105 of 292
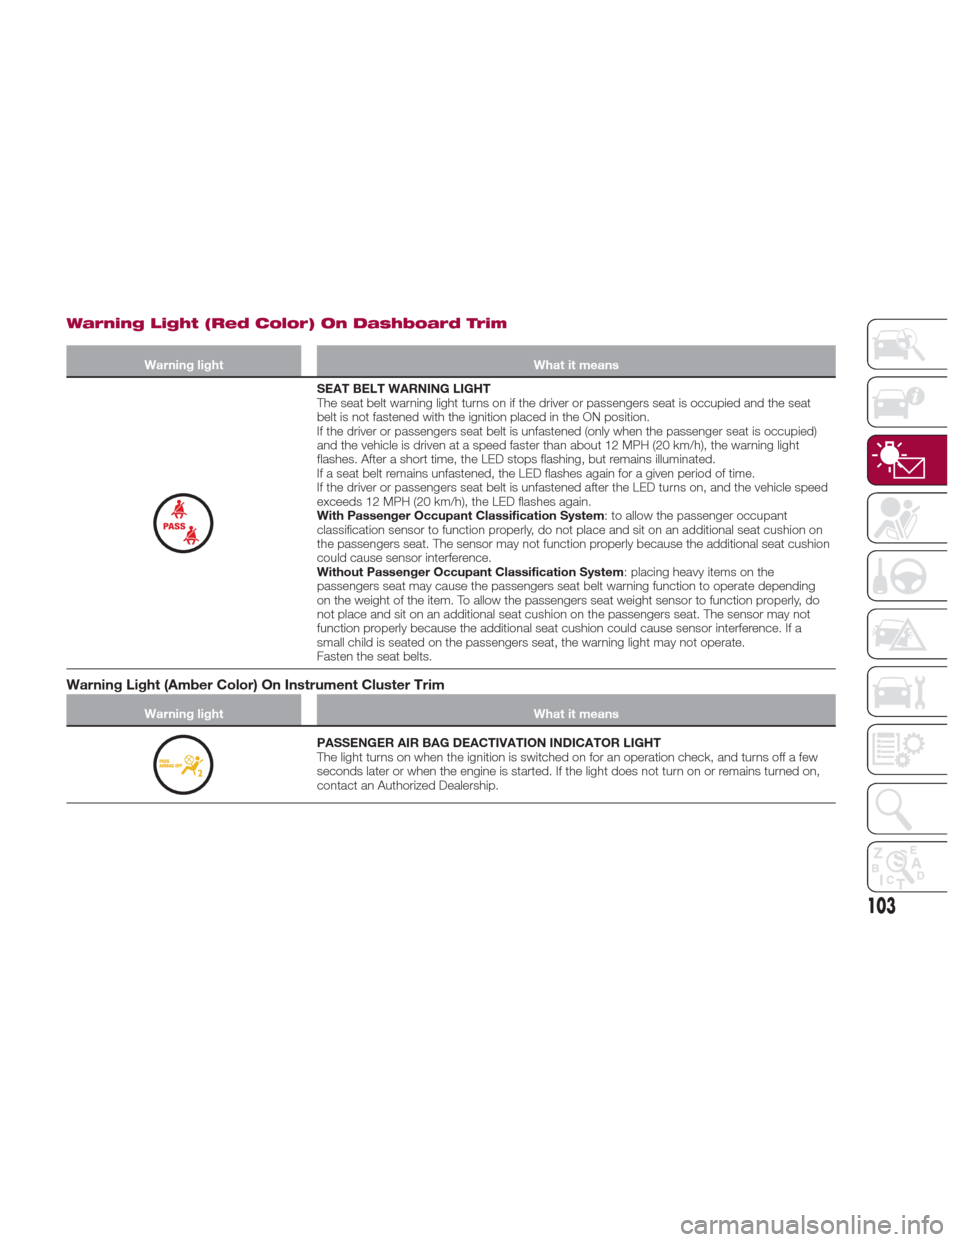
Warning Light (Red Color) On Dashboard Trim
Warning lightWhat it means
SEAT BELT WARNING LIGHT
The seat belt warning light turns on if the driver or passengers seat is occupied and the seat
belt is not fastened with the ignition placed in the ON position.
If the driver or passengers seat belt is unfastened (only when the passenger seat is occupied)
and the vehicle is driven at a speed faster than about 12 MPH (20 km/h), the warning light
flashes. After a short time, the LED stops flashing, but remains illuminated.
If a seat belt remains unfastened, the LED flashes again for a given period of time.
If the driver or passengers seat belt is unfastened after the LED turns on, and the vehicle speed
exceeds 12 MPH (20 km/h), the LED flashes again.
With Passenger Occupant Classification System: to allow the passenger occupant
classification sensor to function properly, do not place and sit on an additional seat cushion on
the passengers seat. The sensor may not function properly because the additional seat cushion
could cause sensor interference.
Without Passenger Occupant Classification System : placing heavy items on the
passengers seat may cause the passengers seat belt warning function to operate depending
on the weight of the item. To allow the passengers seat weight sensor to function properly, do
not place and sit on an additional seat cushion on the passengers seat. The sensor may not
function properly because the additional seat cushion could cause sensor interference. If a
small child is seated on the passengers seat, the warning light may not operate.
Fasten the seat belts.
Warning Light (Amber Color) On Instrument Cluster Trim
Warning light What it means
PASSENGER AIR BAG DEACTIVATION INDICATOR LIGHT
The light turns on when the ignition is switched on for an operation check, and turns off a few
seconds later or when the engine is started. If the light does not turn on or remains turned on,
contact an Authorized Dealership.
103
Page 115 of 292
Note:
When DSC is on and you attempt
to free the vehicle when it is stuck, or
drive it out of freshly fallen snow, the
TCS (part of the DSC system) will
activate. Depressing the accelerator
will not increase engine power and
freeing the vehicle may be difficult.
When this happens, turn off the
TCS/DSC.
If the TCS/DSC is off when the
engine is turned off, it automatically
activates when the ignition is placed in
the ON mode.
If the switch is pressed and held for
10 seconds or more, the switch
malfunction detection function
operates and the DSC system
activates automatically. The indicator
light turns off while the DSC system is
operative.
Warning!
Dynamic Stability Control (DSC) cannot
prevent the natural laws of physics from
acting on the vehicle, nor can it increase
the traction afforded by prevailing road
conditions. DSC cannot prevent accidents,
including those resulting from excessive
speed in turns, driving on very slippery
surfaces, or hydroplaning. DSC also
cannot prevent accidents resulting from
loss of vehicle control due to inappropriate
driver input for the conditions. Only a safe,
attentive, and skillful driver can prevent
accidents. The capabilities of an DSC
equipped vehicle must never be exploited
in a reckless or dangerous manner which
could jeopardize the user’s safety or the
safety of others.
Vehicle modifications, or failure to
properly maintain your vehicle, may change
the handling characteristics of your vehicle,
and may negatively affect the performance
of the DSC system. Changes to the
steering system, suspension, braking
system, tire type and size or wheel size
may adversely affect DSC performance.
Improperly inflated and unevenly worn tires
may also degrade DSC performance. Any
vehicle modification or poor vehicle
maintenance that reduces the effectiveness
of the DSC system can increase the risk of
loss of vehicle control, vehicle rollover,
personal injury and death.
AUXILIARY DRIVING
SYSTEMS
Blind Spot Monitoring
(BSM) System
The Blind Spot Monitoring (BSM)
system is designed to assist the driver
in checking the area to the rear of the
vehicle on both sides during lane
changes by alerting the driver to the
presence of vehicles approaching from
the rear in an adjacent lane.
The system detects vehicles
approaching from the rear while
traveling in the forward direction at a
speed of 18 mph (30 km/h) or faster
and turns on the warning lights
equipped on the door mirrors
depending on the conditions.
If the turn signal lever is operated to
signal a lane change in the direction in
which the warning light is illuminated,
the system warns the driver of a vehicle
in the detection area by flashing the
warning light and activating a beep
sound.
113
Page 155 of 292
The gear selector must be in PARK (P)
or NEUTRAL (N) to operate the starter.
The transmission gear selector has
PARK (P), REVERSE (R), NEUTRAL (N),
DRIVE (D), and MANUAL (M)(+/–) shift
positions.
The transmission may be shifted freely
from REVERSE (R), to NEUTRAL (N), to
DRIVE (D), to MANUAL (M)(+/–).Note:
Even if you intend to use the automatic
transmission functions as a traditional
automatic, you should also be aware
that you can inadvertently shift into
manual shift mode and an inappropriate
gear may be retained as the vehicle
speed increases. If you notice the
engine speed going higher or hear the
engine racing, confirm you have not
accidentally slipped into manual shift
mode (refer to “Manual Shift Mode”
paragraph in this section).
Shift Position Indication
The gear selector position (PRNDM) is
illuminated when the ignition is placed
in the ON mode.
Note:
If one of the following actions is
performed, the gear selector position is
displayed for five minutes even if the
ignition is placed in a mode other than
ON.
The ignition is placed in the OFF
mode.
The driver's door is opened.
Gear Position Indication
In MANUAL (M) shift mode, the “M” of
the shift position indication illuminates
and the number of the selected gear is
displayed.
Gear Selector Positions
Park (P)
PARK (P) locks the transmission and
prevents the driveshaft from rotating.
Warning!
Never use the PARK position as a
substitute for the park brake. Always apply
the park brake fully when parked to guard
against vehicle movement and possible
injury or damage.
Your vehicle could move and injure you
and others if it is not in PARK. Check by
trying to move the gear selector out of
PARK with the brake pedal released. Make
sure the transmission is in PARK before
leaving the vehicle.
It is dangerous to shift out of PARK or
NEUTRAL if the engine speed is higher
than idle speed. If your foot is not firmly
pressing the brake pedal, the vehicle could
accelerate quickly forward or in reverse.
You could lose control of the vehicle and hit
someone or something. Only shift into gear
when the engine is idling normally and your
foot is firmly pressing the brake pedal.
Unintended movement of a vehicle
could injure those in or near the vehicle. As
with all vehicles, you should never exit a
vehicle while the engine is running. Before
exiting a vehicle, always apply the park
brake, shift the transmission into PARK,
and turn the ignition OFF. When the ignition
is in the OFF mode, the transmission is
GUID-05210200LHD12AT001Gear Selector And Pattern
153
Page 167 of 292
When Warning Alert Is Activated
The system notifies the driver of an obstacle by activating the audible alert.
BeepHow To Check
The audible alert is not heard. The
system may have a malfunction. Contact an authorized dealer as soon as
possible.
When the engine switch is turned ON or if the parking
sensor detects a problem while driving, the intermittent sound of the buzzer is heard one-four time s(*).Remove any foreign material from the sensor area. If the system does not recover,
contact an authorized dealer as soon as possible.
( * ) The number of times the buzzer activates changes depending on the malfunction location.
165
Page 180 of 292
Warning!
An improperly attached, damaged, folded,
or stacked floor mat, or damaged floor mat
fasteners may cause your floor mat to
interfere with the accelerator, brake, or
clutch pedals and cause a loss of vehicle
control. To prevent SERIOUS INJURY or
DEATH:
ALWAYS securely attachyour floor
mat using the floor mat fasteners. DO NOT
install your floor mat upside down or turn
your floor mat over. Lightly pull to confirm
mat is secured using the floor mat
fasteners on a regular basis.
ALWAYS REMOVE THE EXISTING
FLOOR MAT FROM THE VEHICLE
before installing any other floor mat.
NEVER install or stack an additional floor
mat on top of an existing floor mat.
ONLY install floor mats designed to fit
your vehicle. NEVER install a floor mat that
cannot be properly attached and secured
to your vehicle. If a floor mat needs to be
replaced, only use a FCA approved floor
mat for the specific make, model, and year
of your vehicle.
ONLY use the driver’s side floor mat on
the driver’s side floor area. To check for
interference, with the vehicle properly parked
with the engine off, fully depress the
accelerator, the brake, and the clutch pedal
(if present) to check for interference. If your
floor mat interferes with the operation of any
pedal, or is not secure to the floor, remove
the floor mat from the vehicle and place the
floor mat in your trunk.
ONLY use the passenger’s side floor
mat on the passenger’s side floor area.
ALWAYS make sure objects cannot fall
or slide into the driver’s side floor area
when the vehicle is moving. Objects can
become trapped under accelerator, brake,
or clutch pedals and could cause a loss of
vehicle control.
NEVER place any objects under the
floor mat (e.g., towels, keys, etc.). These
objects could change the position of the
floor mat and may cause interference with
the accelerator, brake, or clutch pedals.
If the vehicle carpet has been removed
and re-installed, always properly attach
carpet to the floor and check the floor mat
fasteners are secure to the vehicle carpet.
Fully depress each pedal to check for
interference with the accelerator, brake, or
clutch pedals then re-install the floor mats.
It is recommended to only use mild
soap and water to clean your floor mats.
After cleaning, always check your floor mat
has been properly installed and is secured
to your vehicle using the floor mat
fasteners by lightly pulling mat.
Rocking The Vehicle
Note: Too much rocking may cause
engine overheating, transmission failure,
and tire damage.
If you must rock the vehicle to free it
from snow, sand or mud, depress the
accelerator slightly and slowly move the
gear selector from 1 (D) to R.
Warning!
Fast spinning tires can be dangerous.
Forces generated by excessive wheel
speeds may cause damage, or even
failure, of the axle and tires. A tire could
explode and injure someone. Do not spin
your vehicle's wheels faster than 30 mph
(48 km/h) or for longer than 30 seconds
continuously without stopping when you
are stuck and do not let anyone near a
spinning wheel, no matter what the speed.
Caution!
When “rocking” a stuck vehicle by
shifting between DRIVE and REVERSE, do
not spin the wheels faster than 15 mph
(24 km/h), or drivetrain damage may result.
Revving the engine or spinning the
wheels too fast may lead to transmission
overheating and failure. It can also damage
the tires. Do not spin the wheels above
30 mph (48 km/h) while in gear (no
transmission shifting occurring).
Winter Driving
Carry emergency gear, including tire
chains, window scraper, flares, a small
shovel, jumper leads, and a small bag
of sand or salt.
178
STARTING AND OPERATING
Page 181 of 292
Contact an Authorized Dealer to check
the following:
Have the proper ratio of antifreeze in
the radiator.
Inspect the battery and its leads.
Cold reduces battery capacity.
Use an engine oil appropriate for the
lowest ambient temperatures that the
vehicle will be driven in.
Inspect the ignition system for
damage and loose connections.
Use winter windshield washer fluid
that will not freeze.
Note:
Remove snow before driving. Snow
left on the windshield is dangerous as
it could obstruct vision.
Drive slowly. Braking performance
can be adversely affected if snow or
ice adheres to the brake components.
If this situation occurs, drive the vehicle
slowly, releasing the accelerator pedal
and lightly applying the brakes several
times until the brake performance
returns to normal.
Do not open or close the soft top when
the temperature is 41 °F (5 °C) or less.
The material of the soft top could be
damaged by freezing.
Do not apply excessive force to a
window scraper when removing ice or
frozen snow on the mirror glass and
windshield. Never use warm or hot water for
removing snow or ice from windows
and mirrors as it could result in the
glass cracking.
Snow Tires
If your vehicle is equipped with the tire
pressure monitoring system (vehicle
with run-flat tires), the system may not
function correctly when using tires with
steel wire reinforcement in the
sidewalls.
Use Snow Tires on all Four Wheels
:
Do not exceed the maximum
permissible speed for your snow tires or
legal speed limits.
When snow tires are used, select the
specified size and pressure.
Tire Chains
Check local regulations before using tire
chains.
If your vehicle is equipped with the
TPMS system, the system may not
function correctly when using tire
chains.
Install the chains on the rear tires only.
Do not use chains on the front tires.
Note:
Chains may affect handling.
Do not go faster than 30 mph
(50 km/h) or the chain manufacturer's
recommended limit, whichever is lower.
Drive carefully and avoid bumps,
holes, and sharp turns.
Avoid locked-wheel braking.
Do not use chains on roads that are
free of snow or ice. The tires and
chains could be damaged.
Chains may scratch or chip
aluminium wheels.
Warning!
Using tires of different size and type (M+S,
Snow) between front and rear axles can
cause unpredictable handling. You could
lose control and have a collision.
179
Page 182 of 292
Caution!
To avoid damage to your vehicle or tires,
observe the following precautions:
Because of restricted traction device
clearance between tires and other
suspension components, it is important
that only traction devices in good condition
are used. Broken devices can cause
serious damage. Stop the vehicle
immediately if noise occurs that could
indicate device breakage. Remove the
damaged parts of the device before further
use.
Install device as tightly as possible and
then retighten after driving about ½ mile
(0.8 km).
Do not exceed 30 mph (48 km/h).
Drive cautiously and avoid severe turns
and large bumps, especially with a loaded
vehicle.
Do not drive for a prolonged period on
dry pavement.
Observe the traction device
manufacturer’s instructions on the method
of installation, operating speed, and
conditions for use. Always use the
suggested operating speed of the device
manufacturer’s if it is less than 30 mph
(48 km/h).
Do not use traction devices on a
compact spare tire.
Driving In Flooded Area
Note: Do not drive the vehicle on
flooded roads as it could cause short
circuit of electrical/electronic parts, or
water enters the engine and causes it
to lock up (hydro-lock) and stall. If the
vehicle has been immersed in water
contact your Authorized Dealer.
Although your vehicle is capable of
driving through shallow standing water,
consider the following Cautions and
Warnings before doing so.
Warning!
Driving through standing water limits
your vehicle’s traction capabilities. Do not
exceed 5 mph (8 km/h) when driving
through standing water.
Driving through standing water limits
your vehicle’s braking capabilities, which
increases stopping distances. Therefore,
after driving through standing water, drive
slowly and lightly press on the brake pedal
several times to dry the brakes.
Failure to follow these warnings may
result in injuries that are serious or fatal to
you, your passengers, and others around
you.
Caution!
Always check the depth of the standing
water before driving through it. Never drive
through standing water that is deeper than
the bottom of the tire rims mounted on the
vehicle.
Determine the condition of the road or
the path that is under water and if there are
any obstacles in the way before driving
through the standing water.
Do not exceed 5 mph (8 km/h) when
driving through standing water. This will
minimize wave effects.
Driving through standing water may
cause damage to your vehicle’s drivetrain
components. Always inspect your vehicle’s
fluids (i.e., engine oil, transmission, axle,
etc.) for signs of contamination (i.e., fluid
that is milky or foamy in appearance) after
driving through standing water. Do not
continue to operate the vehicle if any fluid
appears contaminated, as this may result
in further damage. Such damage is not
covered by the New Vehicle Limited
Warranty.
Getting water inside your vehicle’s
engine can cause it to lock up and stall out,
and cause serious internal damage to the
engine. Such damage is not covered by
the New Vehicle Limited Warranty.
180
STARTING AND OPERATING
Page 226 of 292
At least monthly perform inspection
of:
Tire inflation pressures
At least twice a year (for example,
every spring and fall) perform
inspection of:
Engine coolant
Engine oil
As explained in the “Introduction”
paragraph, several procedures can be
done only by a qualified service
technician with special tools.
For details, read the separate Warranty
Booklet provided with the vehicle. If you
are unsure about any servicing or
maintenance procedure, have it done
by an Authorized Dealer.
There are strict environmental laws
regarding the disposal of waste oil and
fluids. Please dispose of your waste
properly and with due regard to the
environment.
We recommend that you entrust the oil
and fluid changes of your vehicle to an
Authorized Dealer.
Periodic Checks
Every 620 miles (1,000 km) or before
long trips check and, if necessary, top
off:
Engine coolant level.
Brake fluid level.
Windshield washer fluid level.
Tire inflation pressure and condition.
Operation of lighting system
(headlights, direction indicators, hazard
warning lights, etc.).
Operation of windshield
washer/wiper system and
positioning/wear of windshield wiper
blades.
Every 1860 miles (3,000 km) check
and top off the engine oil level if
required.
Heavy-Duty Use Of The
Vehicle
If the vehicle is used under one of the
following conditions:
Dusty roads.
Short, repeated trips less than 4.4 -
5 miles (7-8km)atsub -zero outside
temperatures.
Engine idling for long periods of time
or driving long distances at low speeds
or long periods of inactivity.
The following checks must be carried
out more often than indicated in the
Scheduled Servicing Plan:
Check front disc brake pad condition
and wear.
Check cleanliness of underhood area
and all door and trunk locks, cleanliness
and lubrication of linkage.
Visually inspect conditions of the:
engine, transmission, lines and hoses (exhaust/fuel system/brakes) and
rubber elements (hoses/belts/etc.).
Check battery charge and battery
fluid level.
Visually inspect conditions of the
accessory drive belts.
Check and, if necessary, change
engine oil and replace oil filter.
Check and, if necessary, replace
cabin air filter.
Check and, if necessary, replace air
cleaner.
Severe Duty All Models
Change Engine Oil at 4,000 miles
(6,500 km) if the vehicle is operated in a
dusty and off road environment or is
operated predominately at idle or only
very low engine RPM’s. This type of
vehicle use is considered Severe Duty.
224
SERVICING AND MAINTENANCE
Page 227 of 292
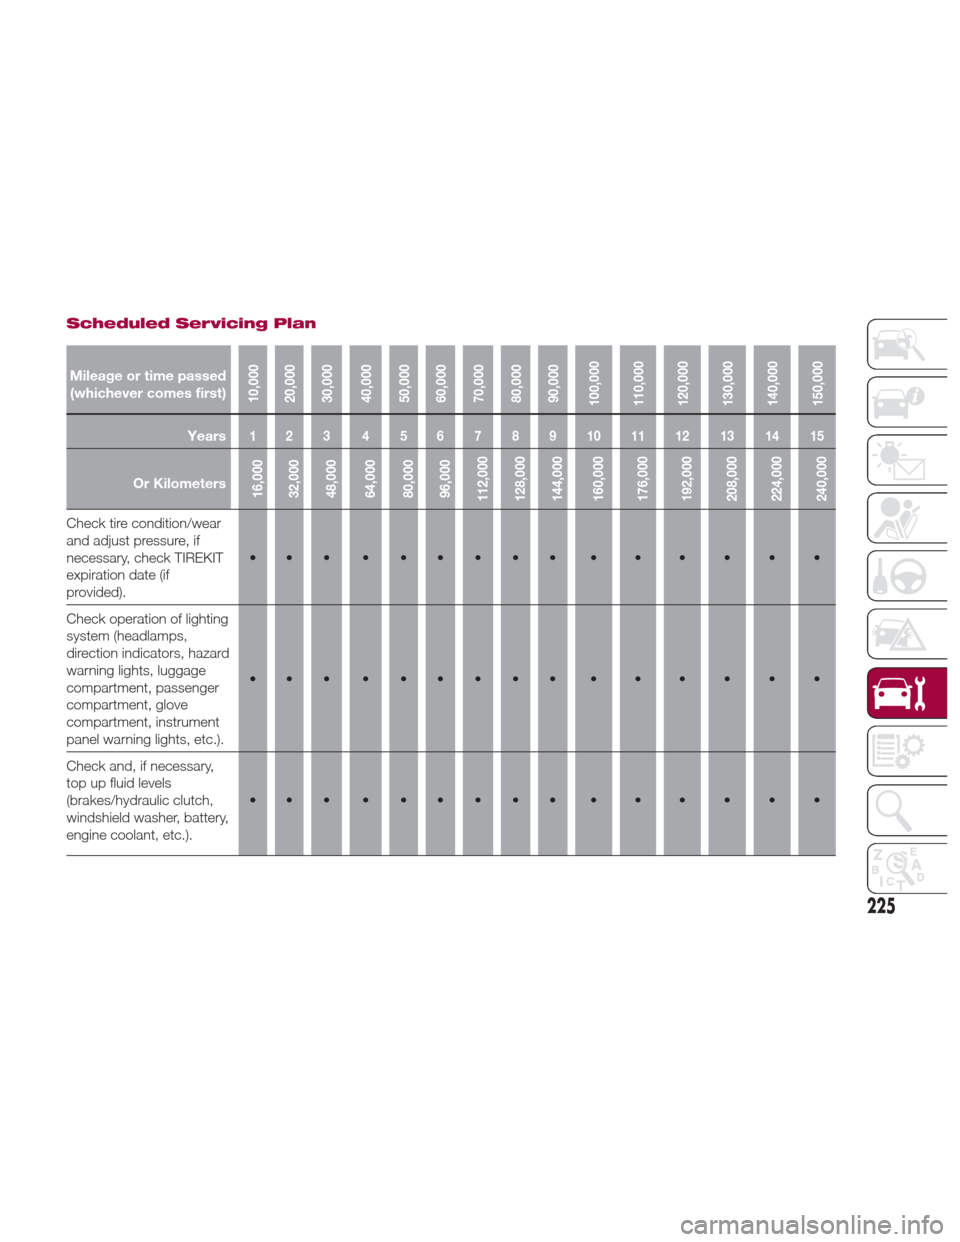
Scheduled Servicing Plan
Mileage or time passed(whichever comes first)
10,000
20,000
30,000
40,000
50,000
60,000
70,000
80,000
90,000
100,000
110,000
120,000
130,000
140,000
150,000
Years123 456789101112131415
Or Kilometers16,000
32,000
48,000
64,000
80,000
96,000
112,000
128,000
144,000
160,000
176,000
192,000
208,000
224,000
240,000
Check tire condition/wear
and adjust pressure, if
necessary, check TIREKIT
expiration date (if
provided). •••••••••••••••
Check operation of lighting
system (headlamps,
direction indicators, hazard
warning lights, luggage
compartment, passenger
compartment, glove
compartment, instrument
panel warning lights, etc.). •••••••••••••••
Check and, if necessary,
top up fluid levels
(brakes/hydraulic clutch,
windshield washer, battery,
engine coolant, etc.). •••••••••••••••
225
Page 228 of 292
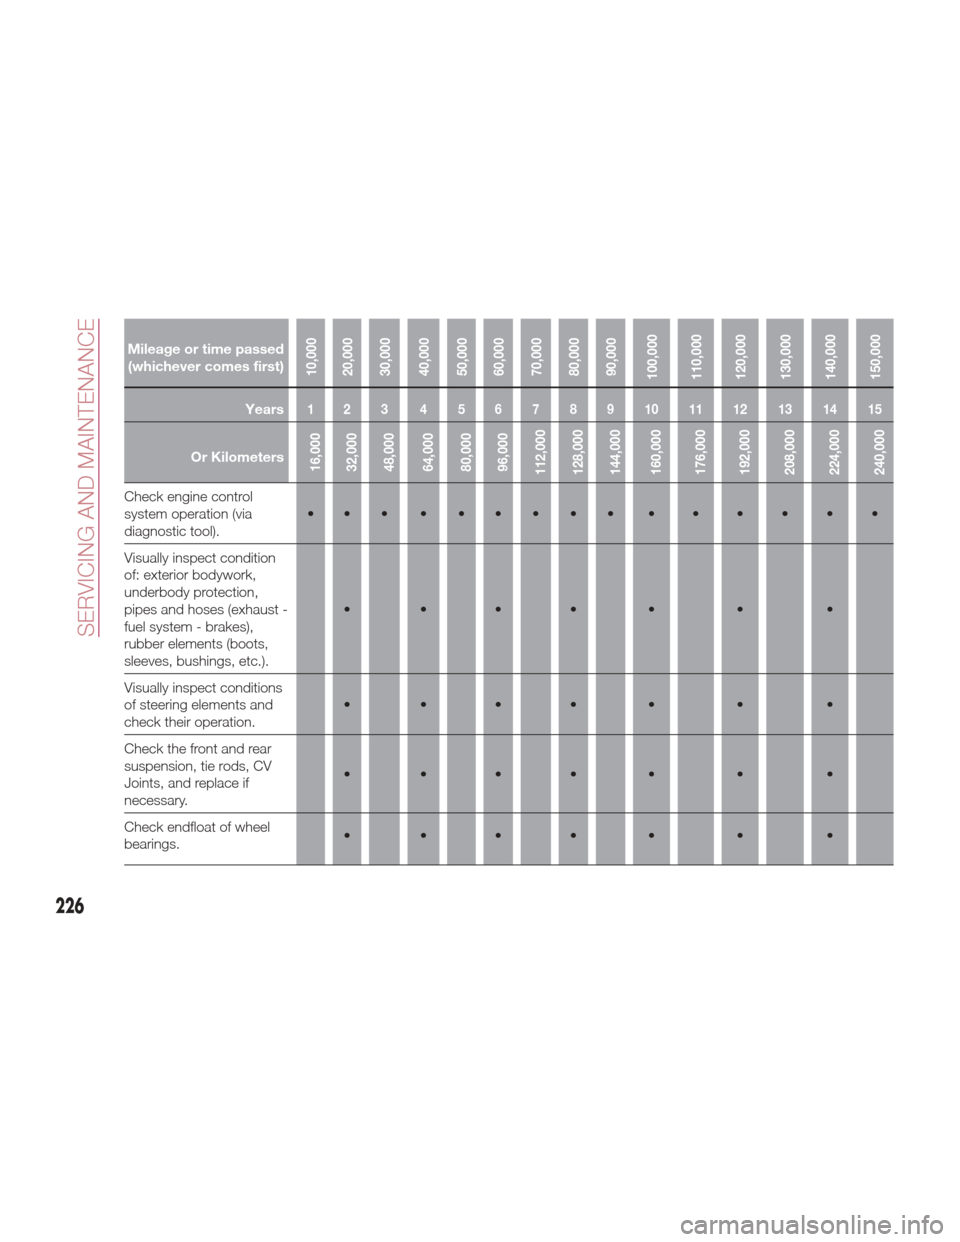
Mileage or time passed(whichever comes first)
10,000
20,000
30,000
40,000
50,000
60,000
70,000
80,000
90,000
100,000
110,000
120,000
130,000
140,000
150,000
Years123 456789101112131415
Or Kilometers16,000
32,000
48,000
64,000
80,000
96,000
112,000
128,000
144,000
160,000
176,000
192,000
208,000
224,000
240,000
Check engine control
system operation (via
diagnostic tool). •••••••••••••••
Visually inspect condition
of: exterior bodywork,
underbody protection,
pipes and hoses (exhaust -
fuel system - brakes),
rubber elements (boots,
sleeves, bushings, etc.). •••• • • •
Visually inspect conditions
of steering elements and
check their operation. •••• • • •
Check the front and rear
suspension, tie rods, CV
Joints, and replace if
necessary. •••• • • •
Check endfloat of wheel
bearings. •••• • • •
226
SERVICING AND MAINTENANCE