fuel type FIAT 127 1973 1.G Workshop Manual
[x] Cancel search | Manufacturer: FIAT, Model Year: 1973, Model line: 127, Model: FIAT 127 1973 1.GPages: 34, PDF Size: 6.87 MB
Page 4 of 34

Fiat 127 Internet Fan Club (http://fiat127.okruhy.cz) Fiat 127 - 1050
4/34
2. Specifications
Capacities (1049 cc models )
Engine oil (including filter change)
L, C and CL ... ... ... ... ... ... ... ... … 5.5 pints (3.1 litres)
Sport ... ... ... ... ... ... ... ... ... 7.7 pi nts (4.4 litres)
Coolant ... ... ... ... ... ... ... ... … 9.7 pints (5.5 litres)
Fuel ... ... ... ... ... ... ... ... … 6.7 gallons (30 .5 litres) including 6.2 pints
(3.5 litres) reserve
Transmission oil ... … ... ... ... ... ... ... . 4.2 pints (2.4 l itres)
1049 cc OHC engine
General
Type number ... ... ... ... ... ... ... ... … 127 A 000 (C, L and CL);
127 A1.000 (Sport)
Bore ... ... ... ... ... ... ... ... … 2.992 in (76 mm)
Stroke ... ... ... ... ... ... ... ... ... 2.276 in (57.8 mm)
Capacity ... ... ... ... ... ... ... ... … 64 cu in (1049 cc)
Compression ratio ... ... ... ... ... … 9,3 : 1 (C, L and CL);
9,8 : 1 (Sport)
Maximum horsepower (DIN) ... ... ... ... 50 HP a t 5600 rpm (C, L and CL);
70 HP at 5600 rpm (Sport)
Valve mechanism C, L and CL Sport
Inlet :
Opens ... ... ... ... ... ... ... ... ... 2° B TDC 6° BTDC
Closes ... ... ... ... ... ... ... ... ... 42° ABDC 46°ABDC
Exhaust :
Opens ... ... ... ... ... ... ... ... ... 42° BBDC 47° BBDC
Closes ... ... ... ... ... ... ... … … 2° ATDC 7° ATDC
Valve clearances (cold) :
For checking valve timing:
Inlet ... ... ... ... ... ... ... ... 0.02 8 in (0.70 mm) 0.032 in (0.80 mm)
Exhaust ... ... ... ... ... ... ... 0.028 in (0.70 mm) 0.032 in (0.80 mm)
Adjustment for running (engine cold) :
Inlet ... ... ... ... ... ... ... ... 0.01 2 in (0.30 mm) 0.016 in (0.40 mm)
Exhaust ... ... ... ... ... ... ... 0.016 i n (0 40 mm) 0.020 in (0.50 mm)
Cylinder block and connecting rods inches mm
Cylinder bore diameter * 2.992 to 2.994 76.00 to 7 6.05
* Cylinder bores are graded and have a variation of 0.0004 inch (0.01 mm) between each grade
Main bearing housing bore diameter 2.044 to 2.045 51.921 to 51.934
Width of centre main bearing cap between
thrust washers 1.088 to 1.091 27.64 to 27.70
Connecting rod big-end diameter 1.85 to 1.8560 47. 130 to 47.142
Connecting rod small-end diameter 0.8638 to 0.8646 21.94 to 21.96
Big-end bearing shell thickness 0.0606 to 0.8646 1. 539 to 1.55
Page 7 of 34

Fiat 127 Internet Fan Club (http://fiat127.okruhy.cz) Fiat 127 - 1050
7/34
Camshaft bearing bore diameter in head:
Valve gear end 1.1807 to 1.1817 29.990 to 30.015
Centre 1.0648 to 1.0657 27.045 to 27.070
Flywheel end 0.9860 to 0.9870 25.045 to 25.070
Camshaft journals fit clearance 0.0012 to 0.0028 0. 030 to 0.070
Cam lift (C, L and CL) 0.3425 8.700
Cam lift (Sport):
Inlet 0.3622 9.200
Exhaust 0.3642 9.250
Standard tappet bore diameter 1.4567 to 1.4577 37.0 00 to 37.025
Standard tappet outside diameter 1.4557 to 1.4565 36.975 to 36.995
Tappet fit clearance 0.0002 to 0.0020 0.005 to 0.05 0
Shim thickness 0.1279; 0.1299; then
0.0039 steps to 0.1850
3.2b; 3.30; then
0.10 steps to 4.70
Auxiliary shaft inches mm
Diameter of bush bores in crankcase:
Front 1.6339 to 1.6350 41.500 to 41.530
Rear 1.5733 to 1.5745 39.962 to 39.992
Fitted bush internal diameter:
Front 1.5143 to 1.5151 38.464 to 38.484
Rear 1.4553 to 1.4561 36.964 to 36.984
Diameter of shaft journals:
Front 1.5115 to 1.5125 38.393 to 38.418
Rear 1.4525 to 1.4535 36.893 to 36.918
Bush fit There must always be an interference fit
Shaft/bush fit clearance (front and rear) 0.0018 to 0.0036 0.046 to 0.091
Lubrication system
Oil pump Four lobe rotor type
Pump drive Through auxiliary shaft
Oil pressure relief valve Incorporated in pu mp
Pump rotors endfloat 0.0018 to 0.0047 0.045 to 0.120
Outer rotor to body clearance 0.0006 to 0.002 2 0.016 to 0.055
Inner to outer rotor clearance 0.0010 to 0.00 39 0.025 to 0.100
Oil pressure at 212°F (100°C) 50 to 70 Ibf/in
2 (3.5 to 5 kgf/cm2)
Cooling system
Radiator fan thermal switch
Cuts in . 194° to 201°F (90° to 94°C)
Cuts out 185° to 192°F (85° to 89°C)
Engine coolant thermostat
Starts to open 176° to 183°F (80° to 84°C)
Fully open 205°F (96°C)
Impellor vanes to pump body fit clearance 0.0315 to 0.0512 in (0.8 to 1.3 mm)
Radiator cap relief pressure 11.4 Ibf/in
2 (0.8 kgf/cm2)
Fuel system
Weber 32 ICEV 16/150 carburettor (C, L and CL model s)
Venturi diameter 0.8465 in (21.5 mm)
Main jet . 0.0453 in (1.15 mm)
Page 8 of 34

Fiat 127 Internet Fan Club (http://fiat127.okruhy.cz) Fiat 127 - 1050
8/34
Air correction jet 0.0728 in (1.85 mm)
Slow running jet 0.0177 in (0.45 mm)
Emulsion tube type F74
Accelerator pump jet 0.0157 in (0.40 mm)
Needle valve seat 0.0591 in (1.50 mm)
Accelerator pump output (10 strokes) 2 to 3 cm
3
Cold starting device Automatic choke
Float level 1.4016 to 1.4213 in (35.6 to 36. 1 mm)
CO level 2.5%
Solex C32 TDI/4 carburettor (C, L and CL models)
Venturi diameter 0.8465 in (21.5 mm)
Main jet 0.0453 in (1.15 mm)
Air correction jet 0.0768 in (1.95 mm)
Slow running jet 0.0177 in (0.45 mm)
Emulsion tube type 71
Accelerator pump jet 0.0177 in (0.45 mm)
Needle valve seat 0.0630 in (1.60 mm)
Accelerator pump output I10 strokes) 3 to 5 cm
3
Cold starting device Automatic choke
Float level 0.8661 to 0.9449 in (22.0 to 24. 0 mm)
CO level 2.5%
Weber 34 DMTR 47/250 carburettor (Sport models) Primary venturi Secondary venturi
Venturi diameter 0.8661 in (22.0 mm) 0.9449 in (24.0 mm)
Main jet 0.0421 in (1.07 mm) 0.0500 in (1. 27 mm)
Air correction jet 0.0728 in (1.85 mm) 0.086 6 in (2.20 mm)
Slow running jet 0.0177 in (0.45 mm) 0.0276 in (0. 70 mm)
Slow running air bleed 0.0413 in (1.05 mm) 0.027 6 in (0.70 mm)
Accelerator pump jet 0.0157 in (0.40 mm) ---
Needle valve seat 0.0689 in (1.75 mm)
Accelerator pump output (10 strokes) 8.55 cm
3
Cold starting device Manually operated strangler ch oke
Float level 0.2657 to 0.2854 in (6.75 to 7.25 mm)
Fuel pump
Output 75 litres/hr (16.5 gal/hr)
Actuating lever stroke (C, L and CL) 2.4 to 2.6 mm (0.0949 to 0.1024 in)
Actuating lever stroke (Sport) 2.4 to 2.9 mm (0.09 49 to 0.1142 in)
Delivery pressure at 4000 engine rpm 0.17 kgf/cm2 (2.55 Ibf/in2)
and fuel temp 30°C (86°F)
lgnition system
Distributor
Type and code Magneti Marelli S155HX
Automatic centrifugal advance 25° ± 2° at 4500 rpm
Condenser capacity (50 to 1000 Hz) 0.20 to 0.25 µF
Clutch
Lining outer diameter 181.5 mm (7.146 in)
Lining inner diameter 127.0 mm (5.0 in)
Page 31 of 34

Fiat 127 Internet Fan Club (http://fiat127.okruhy.cz) Fiat 127 - 1050
31/34
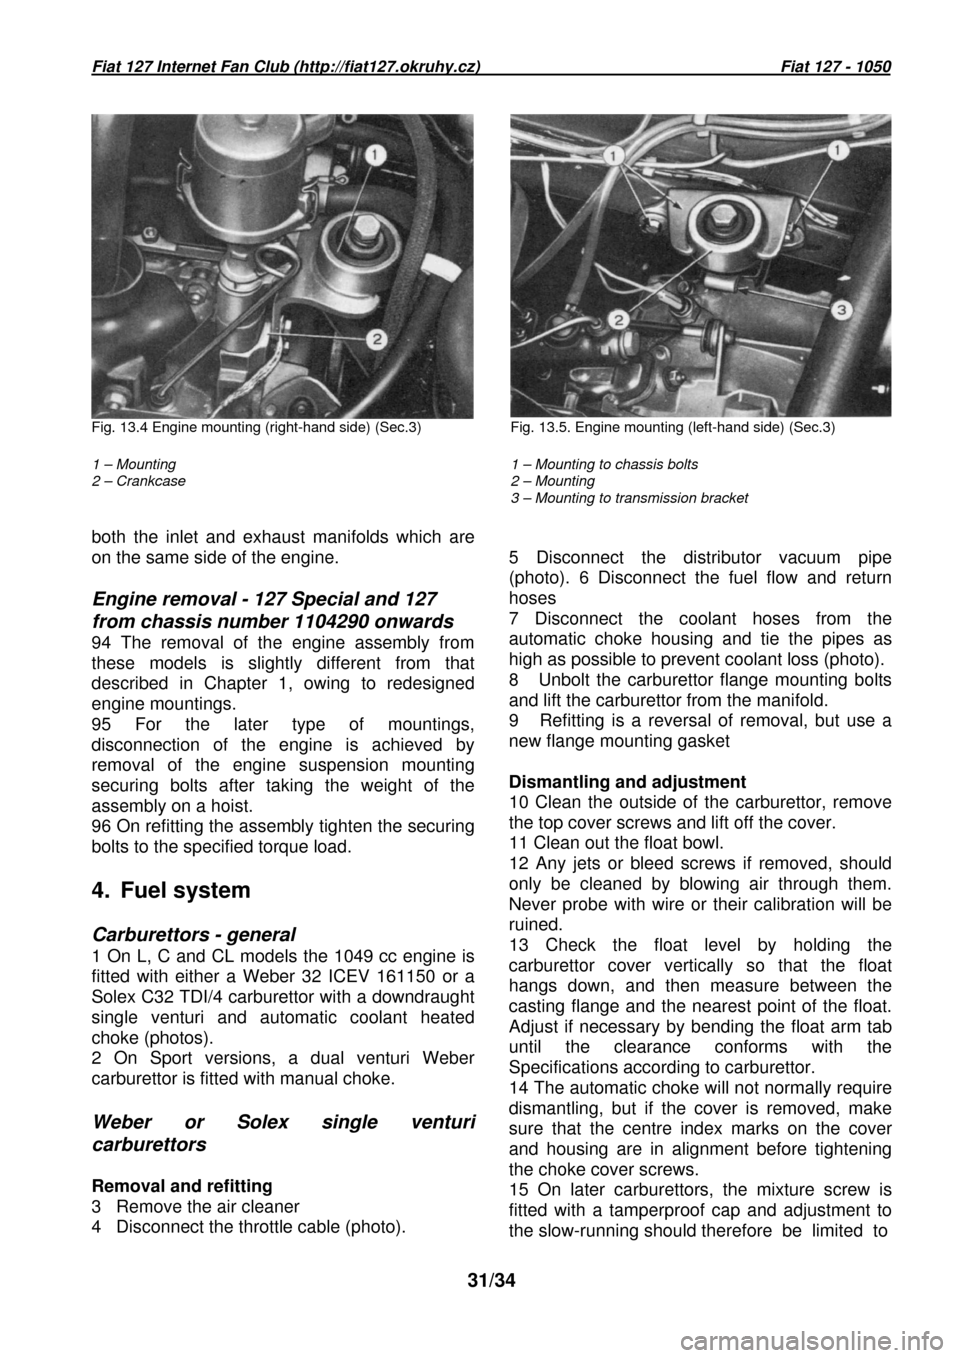
Fig. 13.4 Engine mounting (right-hand side) (Sec.3) Fig. 13.5. Engine mounting (left-hand side) (Sec.3)
1 – Mounting
2 – Crankcase
1 – Mounting to chassis bolts
2 – Mounting
3 – Mounting to transmission bracket
both the inlet and exhaust manifolds which are
on the same side of the engine.
Engine removal - 127 Special and 127
from chassis number 1104290 onwards
94 The removal of the engine assembly from
these models is slightly different from that
described in Chapter 1, owing to redesigned
engine mountings.
95 For the later type of mountings,
disconnection of the engine is achieved by
removal of the engine suspension mounting
securing bolts after taking the weight of the
assembly on a hoist.
96 On refitting the assembly tighten the securing
bolts to the specified torque load.
4. Fuel system
Carburettors - general
1 On L, C and CL models the 1049 cc engine is
fitted with either a Weber 32 ICEV 161150 or a
Solex C32 TDI/4 carburettor with a downdraught
single venturi and automatic coolant heated
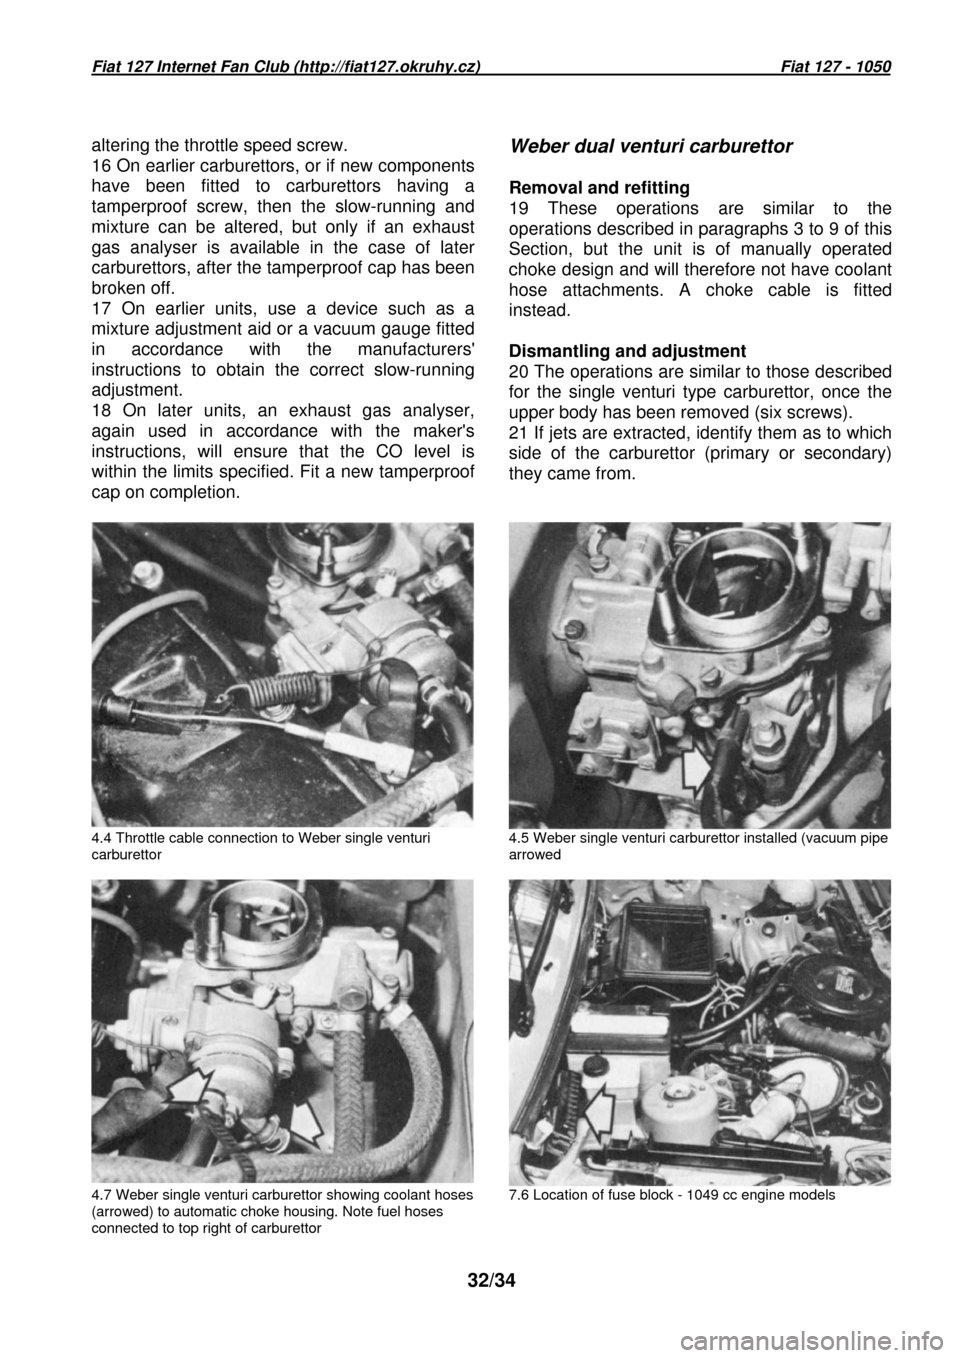
choke (photos).
2 On Sport versions, a dual venturi Weber
carburettor is fitted with manual choke.
Weber or Solex single venturi
carburettors
Removal and refitting
3 Remove the air cleaner
4 Disconnect the throttle cable (photo).
5 Disconnect the distributor vacuum pipe
(photo). 6 Disconnect the fuel flow and return
hoses 7 Disconnect the coolant hoses from the
automatic choke housing and tie the pipes as
high as possible to prevent coolant loss (photo).
8 Unbolt the carburettor flange mounting bolts
and lift the carburettor from the manifold.
9 Refitting is a reversal of removal, but use a
new flange mounting gasket
Dismantling and adjustment
10 Clean the outside of the carburettor, remove
the top cover screws and lift off the cover.
11 Clean out the float bowl.
12 Any jets or bleed screws if removed, should
only be cleaned by blowing air through them.
Never probe with wire or their calibration will be
ruined.
13 Check the float level by holding the
carburettor cover vertically so that the float
hangs down, and then measure between the
casting flange and the nearest point of the float.
Adjust if necessary by bending the float arm tab
until the clearance conforms with the
Specifications according to carburettor.
14 The automatic choke will not normally require
dismantling, but if the cover is removed, make
sure that the centre index marks on the cover
and housing are in alignment before tightening
the choke cover screws.
15 On later carburettors, the mixture screw is
fitted with a tamperproof cap and adjustment to
the slow-running should therefore be limited to
Page 32 of 34

Fiat 127 Internet Fan Club (http://fiat127.okruhy.cz) Fiat 127 - 1050
32/34
altering the throttle speed screw.
16 On earlier carburettors, or if new components
have been fitted to carburettors having a
tamperproof screw, then the slow-running and
mixture can be altered, but only if an exhaust
gas analyser is available in the case of later
carburettors, after the tamperproof cap has been
broken off.
17 On earlier units, use a device such as a
mixture adjustment aid or a vacuum gauge fitted
in accordance with the manufacturers'
instructions to obtain the correct slow-running
adjustment.
18 On later units, an exhaust gas analyser,
again used in accordance with the maker's
instructions, will ensure that the CO level is
within the limits specified. Fit a new tamperproof
cap on completion.
Weber dual venturi carburettor
Removal and refitting
19 These operations are similar to the
operations described in paragraphs 3 to 9 of this
Section, but the unit is of manually operated
choke design and will therefore not have coolant
hose attachments. A choke cable is fitted
instead.
Dismantling and adjustment
20 The operations are similar to those described
for the single venturi type carburettor, once the
upper body has been removed (six screws).
21 If jets are extracted, identify them as to which
side of the carburettor (primary or secondary)
they came from.
4.4 Throttle cable connection to Weber single ventu ri
carburettor 4.5 Weber single venturi carburettor installed (va
cuum pipe
arrowed
4.7 Weber single venturi carburettor showing coolan t hoses
(arrowed) to automatic choke housing. Note fuel hos es
connected to top right of carburettor 7.6 Location of fuse block - 1049 cc engine models
Page 33 of 34

Fiat 127 Internet Fan Club (http://fiat127.okruhy.cz) Fiat 127 - 1050
33/34
is an economical proposition if the original one
has seen service to a high mileage. Very often a
generous allowance is made for the old unit.
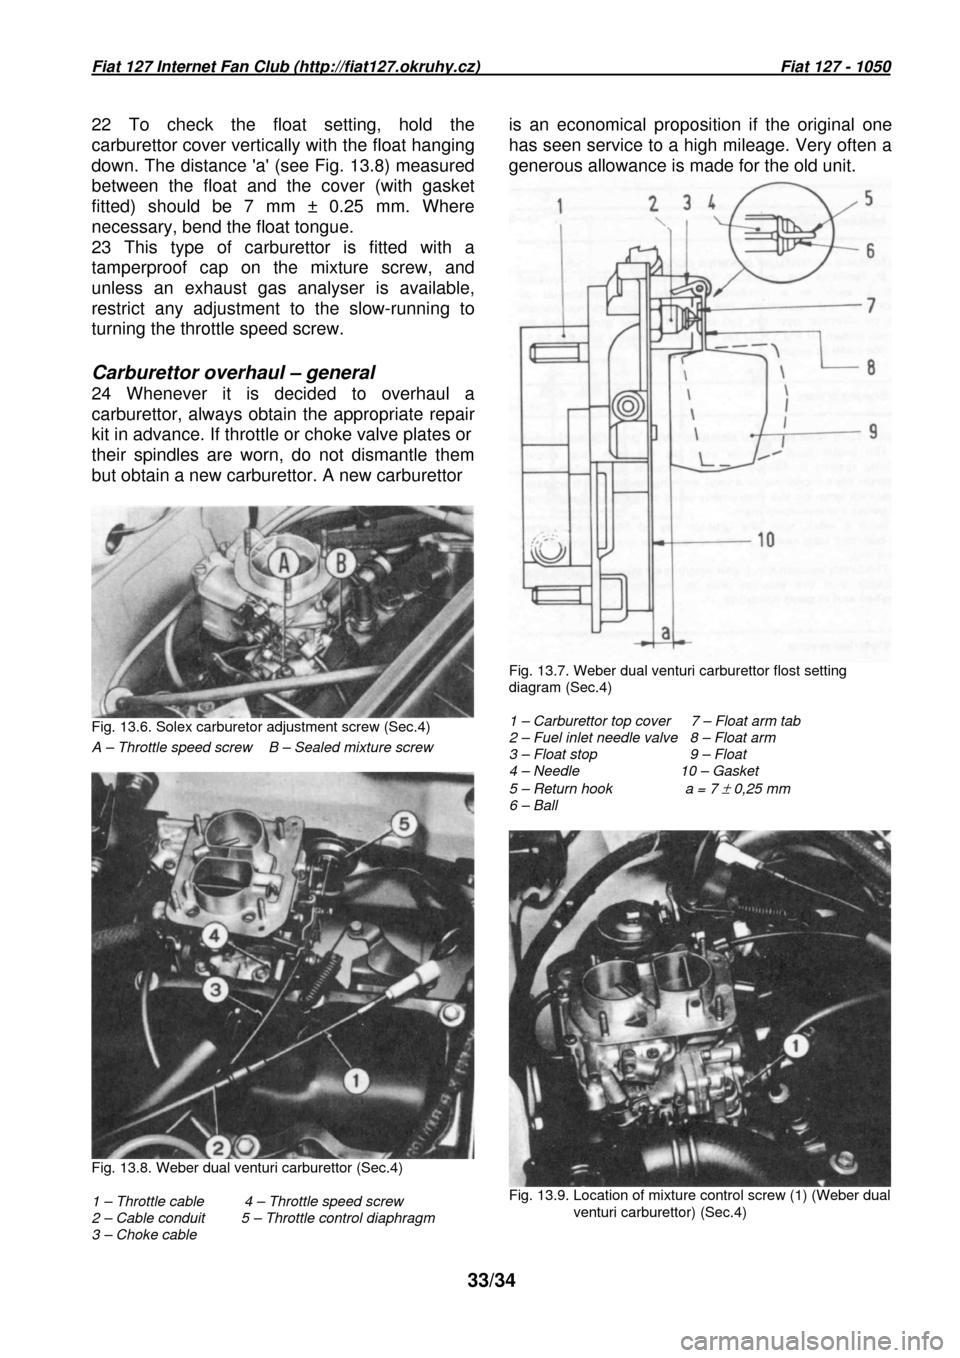
22 To check the float setting, hold the
carburettor cover vertically with the float hanging
down. The distance 'a' (see Fig. 13.8) measured
between the float and the cover (with gasket
fitted) should be 7 mm ± 0.25 mm. Where
necessary, bend the float tongue.
23 This type of carburettor is fitted with a
tamperproof cap on the mixture screw, and
unless an exhaust gas analyser is available,
restrict any adjustment to the slow-running to
turning the throttle speed screw.
Carburettor overhaul – general
24 Whenever it is decided to overhaul a
carburettor, always obtain the appropriate repair
kit in advance. If throttle or choke valve plates o r
their spindles are worn, do not dismantle them
but obtain a new carburettor. A new carburettor
Fig. 13.6. Solex carburetor adjustment screw (Sec.4)
Fig. 13.7. Weber dual venturi carburettor flost setting
diagram (Sec.4)
1 – Carburettor top cover 7 – Float arm tab
2 – Fuel inlet needle valve 8 – Float arm
3 – Float stop 9 – Float
4 – Needle 10 – Gasket
5 – Return hook a = 7
± 0,25 mm
6 – Ball
A – Throttle speed screw B – Sealed mixture scre w
Fig. 13.8. Weber dual venturi carburettor (Sec.4)
1 – Throttle cable 4 – Throttle speed scre w
2 – Cable conduit 5 – Throttle control diap hragm
3 – Choke cable
Fig. 13.9. Location of mixture control screw (1) (W eber dual
venturi carburettor) (Sec.4)