hood open FIAT 127 1982 3.G Workshop Manual
[x] Cancel search | Manufacturer: FIAT, Model Year: 1982, Model line: 127, Model: FIAT 127 1982 3.GPages: 34, PDF Size: 6.87 MB
Page 24 of 34

Fiat 127 Internet Fan Club (http://fiat127.okruhy.cz) Fiat 127 - 1050
24/34
progressively until the bearing halves meet.
53 Oil the camshaft seal and carefully fit it with
its carrier and a new gasket to the cylinder head
(photo).
54 Position the drivebelt guard backplate over
the camshaft seal carrier and fit the three bolts
and washers (photo). 55 Tighten the three bolts
retaining the backplate and seal carrier. Torque
load the four camshaft bearing securing nuts to
the specified setting.
56 Fit the camshaft toothed driving pulley with its
bolt and washer. Leave the final tightening until
the drivebelt is fitted (photo).
57 Check the valve clearances; the camshaft
can be turned by a spanner on the pulley
retaining bolt. Readjust any clearance if
necessary, as described later in this Section.
58 Owing to the small clearance between a
piston at TDC and the open valves during
exhaust/inlet overlap, it is imperative to get the
crankshaft and camshaft in their correct related
positions before turning the engine after fitting
the cylinder head. If this relationship is out then
serious damage could be done to the valves or
pistons by turning the crankshaft, as the pistons
will impinge on the valve heads. To avoid this
the following sequence should be observed. Set
the crankshaft as described in paragraph 59,
and the camshaft (before assembling the
cylinder head to the block) also as described in
paragraph 59. Fit the head to the block taking
care not to disturb the set positions and, finally,
fit the toothed drivebelt. Then the crankshaft can
be turned with no likelihood of damage.
59 Set the crankshaft by using a spanner on the
pulley retaining nut and aligning the mark on the
pulley with the long pointer on the timing
indicator bracket. Then set the camshaft by
aligning the hole in the camshaft pulley with the
cast ridge on the top of the camshaft seal carrier
just behind the toothed pulley (photo).
60 Fit a new cylinder head gasket with the word
ALTO upwards (photo). Do not use grease or
any other jointing compound. 61 Taking care not
to disturb the crankshaft or camshaft lower the
cylinder head onto the block (photo).
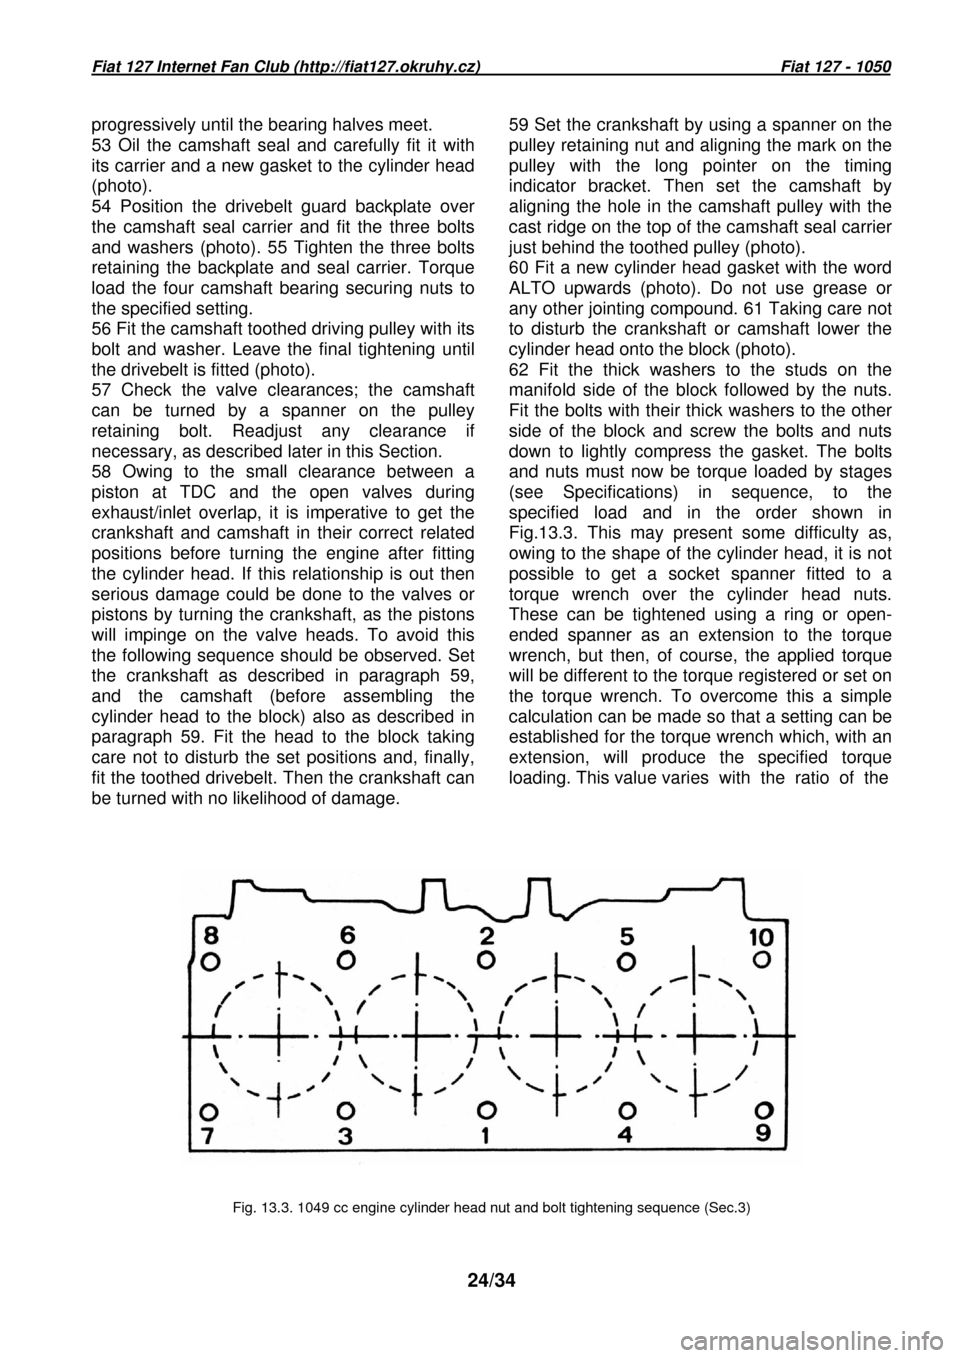
62 Fit the thick washers to the studs on the
manifold side of the block followed by the nuts.
Fit the bolts with their thick washers to the other
side of the block and screw the bolts and nuts
down to lightly compress the gasket. The bolts
and nuts must now be torque loaded by stages
(see Specifications) in sequence, to the
specified load and in the order shown in
Fig.13.3. This may present some difficulty as,
owing to the shape of the cylinder head, it is not
possible to get a socket spanner fitted to a
torque wrench over the cylinder head nuts.
These can be tightened using a ring or open-
ended spanner as an extension to the torque
wrench, but then, of course, the applied torque
will be different to the torque registered or set o n
the torque wrench. To overcome this a simple
calculation can be made so that a setting can be
established for the torque wrench which, with an
extension, will produce the specified torque
loading. This value varies with the ratio of t he
Fig. 13.3. 1049 cc engine cylinder head nut and bol t tightening sequence (Sec.3)