Flywheel FIAT 500 1957 1.G User Guide
[x] Cancel search | Manufacturer: FIAT, Model Year: 1957, Model line: 500, Model: FIAT 500 1957 1.GPages: 128, PDF Size: 9.01 MB
Page 52 of 128
CHAPTER 5
THE CLUTCH
5:1
5:2
5:3
5:4Description
Removal and installation
Dismantling and inspection of clutch cover
Assembly and adjustment
5:1 Description
New 500, 500D sedan and early station wagon:
The clutch is a single plate dry disc type operating on
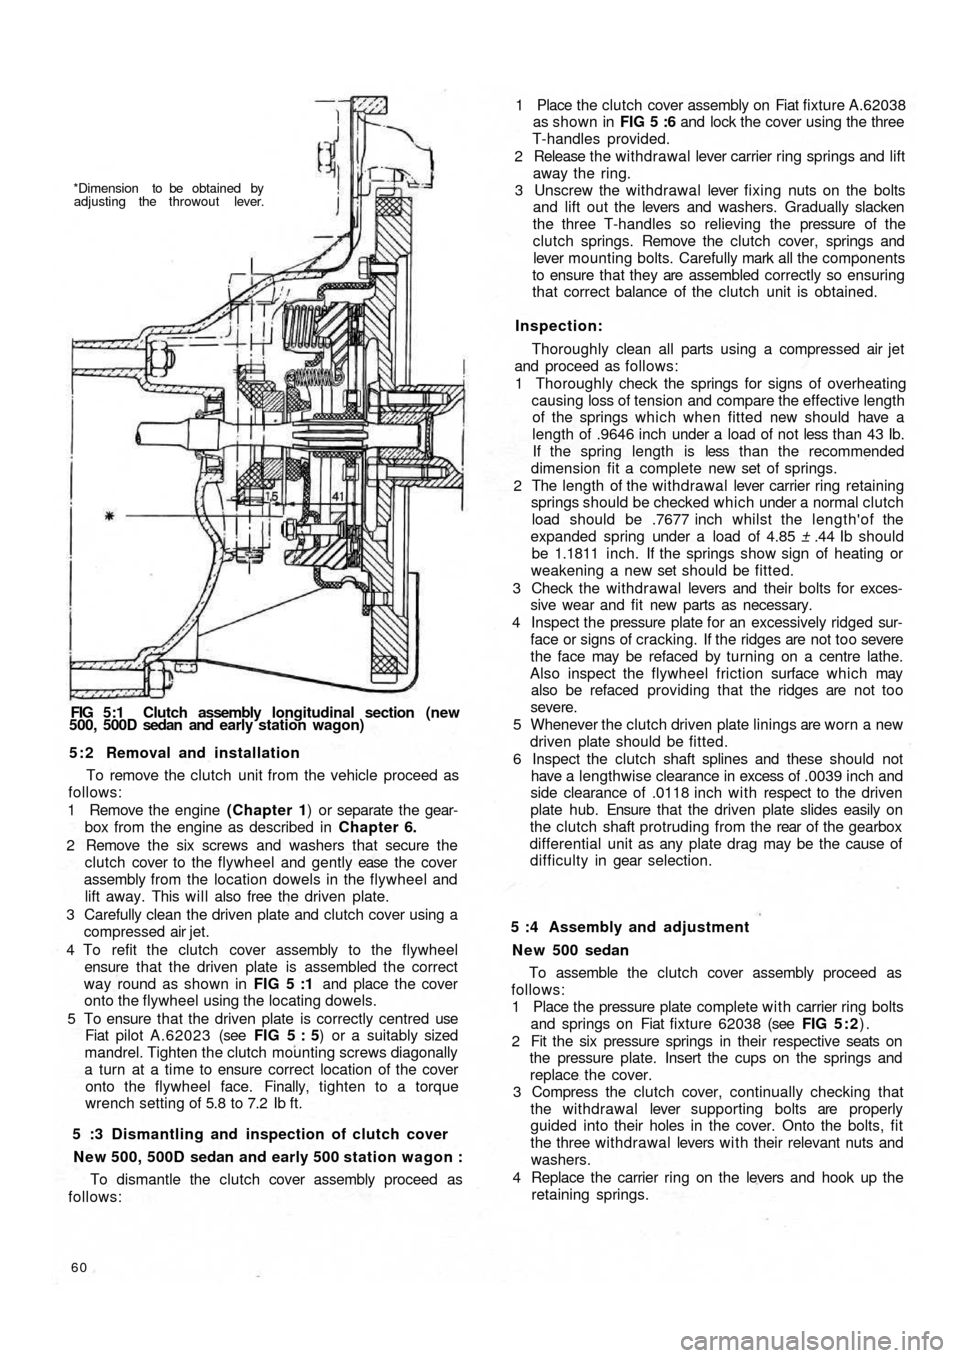
the inner face of the flywheel. FIG 5 :1 shows a longitudi-
nal cross section of the clutch as it is assembled in the
power unit.
A sheet metal clutch cover is attached to the flywheel
by means of six screws and this encloses a clutch driven
plate, the pressure plate and six springs. Three withdrawal
levers are fitted so that the inner ends are attached to a
carrier ring through which three springs hold the levers in
place and the carrier ring in contact with the pressure plate,
(see FIG 5 : 1) . Release of the driven plate is obtained
through a throw-out ring fitted with a central carbon
thrust ring which acts on the withdrawal levers carrier
ring. This is controlled by the clutch pedal through suitable
linkage to the control fork.
When the clutch pedal is operated, the throw-out ring,
together with the carbon thrust ring is pushed towards the
flywheel and this exerts a pressure on the w i t h d rawal
levers carrier ring and the lever inner tips. The lever outer
tips lift the pressure plate so disengaging the clutch.
F50059
Each of the three withdrawal levers is mounted on a bolt
together with an adjustment nut which is inserted in the
pressure plate. The levers are kept in their location by a
guide which is formed in the pressure plate.
500 F and L sedans and late station wagon:
A single plate dry type clutch is fitted with a diaphragm
pressure spring. This design of clutch differs from the con-
ventional clutch because the pressure coil springs and
throw-out mechanism components are replaced by a
single diaphragm spring.
The new system offers certain advantages which are as
follows:
1 The load on the clutch pedal does not increase as the
clutch disc lining wears but remains constant through-
out the life of the clutch.
2 Due to the special shape and location of the diaphragm
spring, which offers a constant force on the pressure
plate throughout the clutch life, the clutch does not slip
even though the driven plate linings may be worn. 5:5
5:6
5:7
5:8Installation of clutch on flywheel
Pilot bushing
Withdrawal mechanism
Fault diagnosis
Page 53 of 128
*Dimension to be obtained by
adjusting the throwout lever.
FIG 5:1 Clutch assembly longitudinal section (new
500, 500D sedan and early station wagon)
5 : 2 Removal and installation
To remove the clutch unit from the vehicle proceed as
follows:
1 Remove the engine (Chapter 1) or separate the gear-
box from the engine as described in Chapter 6.
2 Remove the six screws and washers that secure the
clutch cover to the flywheel and gently ease the cover
assembly from the location dowels in the flywheel and
lift away. This will also free the driven plate.
3 Carefully clean the driven plate and clutch cover using a
compressed air jet.
4 To refit the clutch cover assembly to the flywheel
ensure that the driven plate is assembled the correct
way round as shown in FIG 5 :1 and place the cover
onto the flywheel using the locating dowels.
5 To ensure that the driven plate is correctly centred use
Fiat pilot A.62023 (see FIG 5 : 5) or a suitably sized
mandrel. Tighten the clutch mounting screws diagonally
a turn at a time to ensure correct location of the cover
onto the flywheel face. Finally, tighten to a torque
wrench setting of 5.8 to 7.2 Ib ft.
5 :3 Dismantling and inspection of clutch cover
New 500, 500D sedan and early 500 station wagon :
To dismantle the clutch cover assembly proceed as
follows:
60
To assemble the clutch cover assembly proceed as
follows:
1 Place the pressure plate complete with carrier ring bolts
and springs on Fiat fixture 62038 (see FIG 5 : 2).
2 Fit the six pressure springs in their respective seats on
the pressure plate. Insert the cups on the springs and
replace the cover.
3 Compress the clutch cover, continually checking that
the withdrawal lever supporting bolts are properly
guided into their holes in the cover. Onto the bolts, fit
the three withdrawal levers w i t h their relevant nuts and
washers.
4 Replace the carrier ring on the levers and hook up the
retaining springs. 5 :4 Assembly and adjustment
N e w 500 sedan1 Place the clutch cover assembly on Fiat fixture A.62038
as shown in FIG 5 :6 and lock the cover using the three
T-handles provided.
2 Release the w i thdrawal lever carrier ring springs and lift
away the ring.
3 Unscrew the withdrawal lever fixing nuts on the bolts
and lift out the levers and washers. Gradually slacken
the three T-handles so relieving the pressure of the
clutch springs. Remove the clutch cover, springs and
lever mounting bolts. Carefully mark all the components
to ensure that they are assembled correctly so ensuring
that correct balance of the clutch unit is obtained.
Inspection:
Thoroughly clean all parts using a compressed air jet
and proceed as follows:
1 Thoroughly check the springs for signs of overheating
causing loss of tension and compare the effective length
of the springs which when fitted new should have a
length of .9646 inch under a load of not less than 43 Ib.
If the spring length is less t h a n t h e recommended
dimension fit a complete new set of springs.
2 The length of the withdrawal lever carrier ring retaining
springs should be checked which under a normal clutch
load should be .7677 inch whilst the length'of the
expanded spring under a load of 4.85 ± .44 Ib should
be 1.1811 inch. If the springs show sign of heating or
weakening a new set should be fitted.
3 Check the withdrawa l levers and their bolts for exces-
sive wear and fit new parts as necessary.
4 Inspect the pressure plate for an excessively ridged sur-
face or signs of cracking. If the ridges are not too severe
the face may be refaced by turning on a centre lathe.
Also inspect the flywheel friction surface which may
also be refaced providing that the ridges are not too
severe.
5 Whenever the clutch driven plate linings are worn a new
driven plate should be fitted.
6 Inspect the clutch shaft splines and these should not
have a lengthwise clearance in excess of .0039 inch and
side clearance of .0118 inch w i t h respect to the driven
plate hub. Ensure that the driven plate slides easily on
the clutch shaft protruding from the rear of the gearbox
differential unit as any plate drag may be the cause of
d i f f i c u l t y in gear selection.
Page 55 of 128
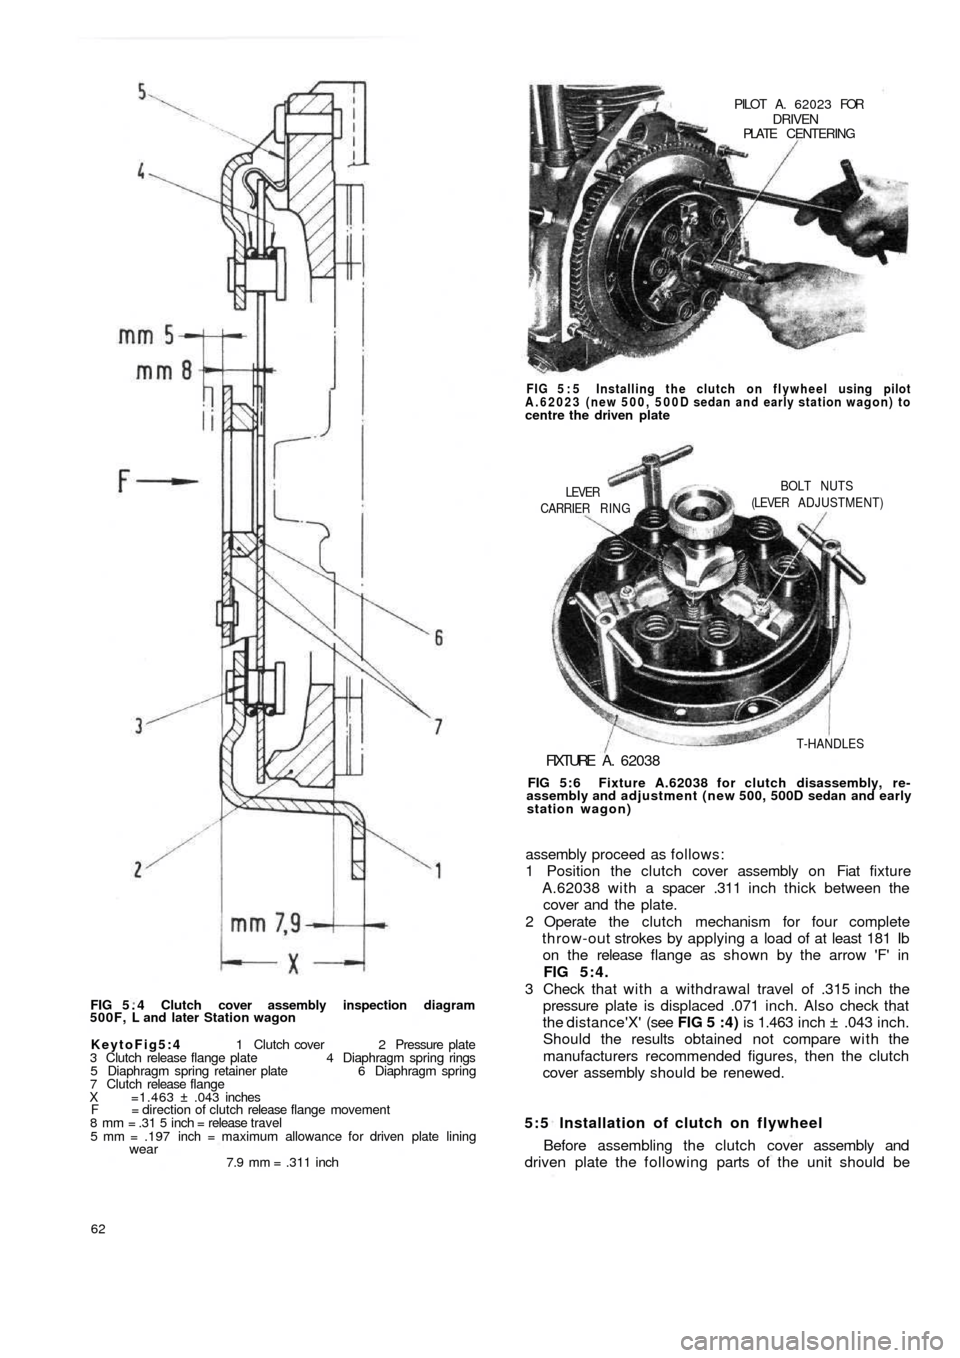
FIG 5 . 4 Clutch cover assembly inspection diagram
500F, L and later Station wagon
KeytoFig5:4 1 Clutch cover 2 Pressure plate
3 Clutch release flange plate 4 Diaphragm spring rings
5 Diaphragm spring retainer plate 6 Diaphragm spring
7 Clutch release flange
X =1.463 ± .043 inches
F = direction of clutch release flange movement
8 mm = .31 5 inch = release travel
5 mm = .197 inch = maximum allowance for driven plate lining
wear7.9 mm = .311 inch
62
5:5 Installation of clutch on flywheel
Before assembling the clutch cover assembly and
driven plate the following parts of the unit should be assembly proceed as follows:
1 Position the clutch cover assembly on Fiat fixture
A.62038 with a spacer .311 inch thick between the
cover and the plate.
2 Operate the clutch mechanism for four complete
throw-out strokes by applying a load of at least 181 Ib
on the release flange as shown by the arrow 'F' in
FIG 5:4.
3 Check that w i t h a withdrawal travel of .315 inch the
pressure plate is displaced .071 inch. Also check that
the distance'X' (see FIG 5 :4) is 1.463 inch ± .043 inch.
Should the results obtained not compare w i t h the
manufacturers recommended figures, then the clutch
cover assembly should be renewed.
FIG 5:6 Fixture A.62038 for clutch disassembly, re-
assembly and adjustment (new 500, 500D sedan and early
station wagon)
FIXTURE A . 62038
T-HANDLES CARRIER RING
LEVERBOLT NUTS
(LEVER ADJUSTMENT) FIG 5 : 5 Installing the clutch on flywheel using pilot
A.62023 (new 500, 500D sedan and early station wagon) to
centre the driven platePILOT A. 62023 FOR
DRIVENPLATE CENTERING
Page 56 of 128
lubricated using Fiat Jota 3 grease.
1 Pressure plate—boss outer faces.
2 Clutch cover—withdrawal lever fulcrum.
3 Withdrawal lever stopnuts—contact face.
4 Withdrawal lever carrier ring — lever contact face.
5 Crankcase end pilot bushing lubricated with Fiat KG.15
grease.
6 Lubricate contact faces of driven plate and clutch shaft.
To install the clutch assembly proceed as follows:
1 Ensure t h a t there is no grease or oil on the faces of the
driven plate or flywheel face and position with the
raised part of the hub towards the transmission unit.
2 Locate Fiat tool A.70085 (diaphragm clutch) or
A . 6 2 0 2 3 (coil spring clutch) or a suitably sized drift,
through the driven plate hub and position in crankshaft
pilot bushing. Gradually tighten the clutch unit
mounting screws working diagonally and finally tighten
to a torque wrench setting of 5.8 to 7.2 Ib ft.
5 : 6 Pilot bushing
Whenever the clutch unit is being renewed or over-
hauled it is essential that the crankshaft pilot bush is
checked for excessive wear or damage. Also check that
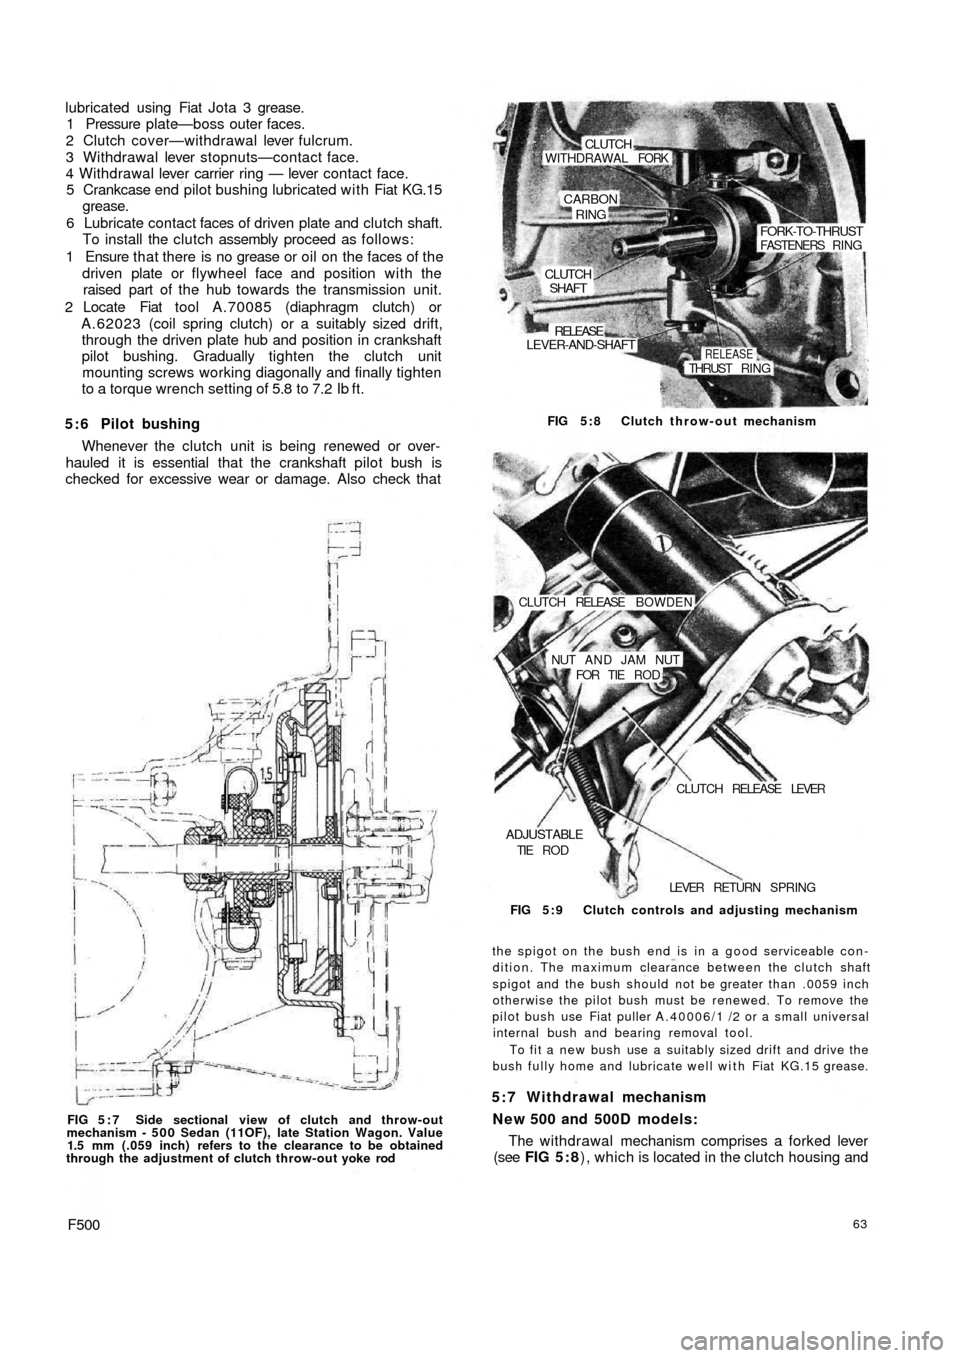
FIG 5 : 7 Side sectional view of clutch and throw-out
mechanism - 5 0 0 Sedan (11OF), late Station Wagon. Value
1.5 mm (.059 inch) refers to the clearance to be obtained
through the adjustment of clutch throw-out yoke rod
F50063
The withdrawal mechanism comprises a forked lever
(see FIG 5 : 8), which is located in the clutch housing and 5:7 Withdrawal mechanism
New 500 and 500D models:
the spigot on the bush end is in a good serviceable con-
dition. The maximum clearance between the clutch shaft
spigot and the bush should not be greater than .0059 inch
otherwise the pilot bush must be renewed. To remove the
pilot bush use Fiat puller A.40006/1 /2 or a small universal
internal bush and bearing removal tool.
To fit a new bush use a suitably sized drift and drive the
bush fully home and lubricate well with Fiat KG.15 grease. FIG 5 : 9 Clutch controls and adjusting mechanism LEVER RETURN SPRING
ADJUSTABLETIE R O DCLUTCH RELEASE LEVER NUT A N D JAM NUT
FOR TIE R O D CLUTCH RELEASE BOWDEN FIG 5:8 Clutch throw-out mechanism
CLUTCHSHAFT
LEVER-AND-SHAFT
RELEASE
RELEASETHRUST RING
FORK-TO-THRUSTFASTENERS RING
CARBON
RING
WITHDRAWAL FORKCLUTCH
Page 57 of 128
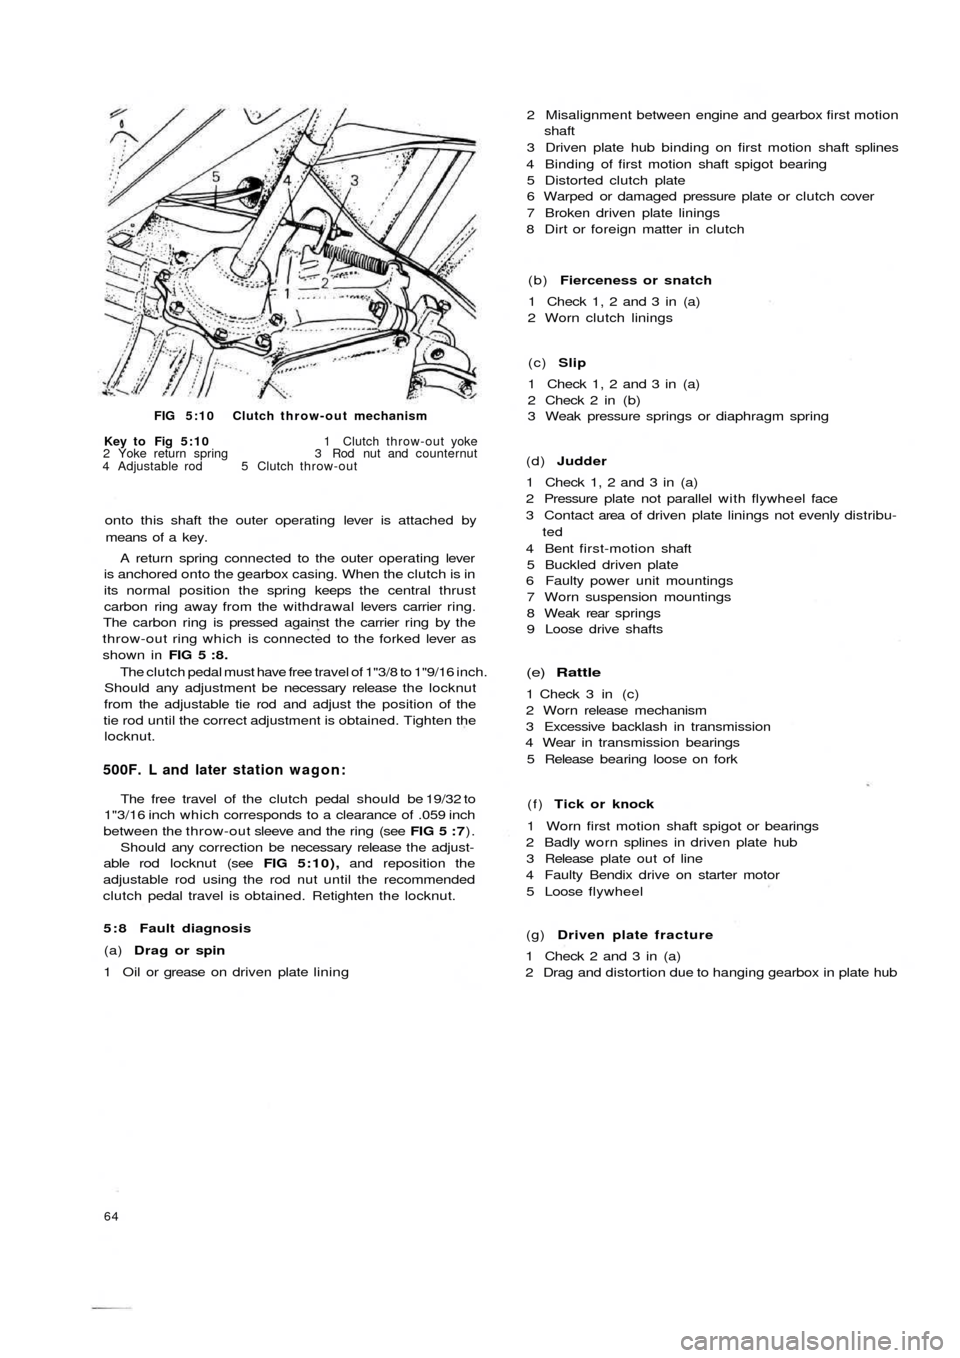
FIG 5:10 Clutch throw-out mechanism
Key to Fig 5:10 1 Clutch throw-out yoke
2 Yoke return spring 3 Rod nut and counternut
4 Adjustable rod 5 Clutch throw-out
onto this shaft the outer operating lever is attached by
means of a key.
A return spring connected to the outer operating lever
is anchored onto the gearbox casing. When the clutch is in
its normal position the spring keeps the central thrust
carbon ring away from the withdrawal levers carrier ring.
The carbon ring is pressed against the carrier ring by the
throw-out ring which is connected to the forked lever as
shown in FIG 5 : 8 .
The clutch pedal must have free travel of 1"3/8 to 1"9/16 inch.
Should any adjustment be necessary release the locknut
from the adjustable tie rod and adjust the position of the
tie rod until the correct adjustment is obtained. Tighten the
locknut.
500F. L and later station wagon:
The free travel of the clutch pedal should be 19/32 to
1"3/16 inch which corresponds to a clearance of .059 inch
between the throw-out sleeve and the ring (see FIG 5 : 7).
Should any correction be necessary release the adjust-
able rod locknut (see FIG 5:10), and reposition the
adjustable rod using the rod nut until the recommended
clutch pedal travel is obtained. Retighten the locknut.
5 : 8 Fault diagnosis
(a) Drag or spin
1 Oil or grease on driven plate lining
64
(g) Driven plate fracture
1 Check 2 and 3 in (a)
2 Drag and distortion due to hanging gearbox in plate hub (f) Tick or knock
1 Worn first motion shaft spigot or bearings
2 Badly worn splines in driven plate hub
3 Release plate out of line
4 Faulty Bendix drive on starter motor
5 Loose flywheel
(e) Rattle
1 Check 3 in (c)
2 Worn release mechanism
3 Excessive backlash in transmission
4 Wear in transmission bearings
5 Release bearing loose on fork (d) Judder
1 Check 1, 2 and 3 in (a)
2 Pressure plate not parallel with flywheel face
3 Contact area of driven plate linings not evenly distribu-
ted
4 Bent first-motion shaft
5 Buckled driven plate
6 Faulty power unit mountings
7 Worn suspension mountings
8 Weak rear springs
9 Loose drive shafts (c) Slip
1 Check 1, 2 and 3 in (a)
2 Check 2 in (b)
3 Weak pressure springs or diaphragm spring (b) Fierceness or snatch
1 Check 1, 2 and 3 in (a)
2 Worn clutch linings 2 Misalignment between engine and gearbox first motion
shaft
3 Driven plate hub binding on first motion shaft splines
4 Binding of first motion shaft spigot bearing
5 Distorted clutch plate
6 Warped or damaged pressure plate or clutch cover
7 Broken driven plate linings
8 Dirt or foreign matter in clutch
Page 58 of 128
CHAPTER 6
GEARBOX AND DIFFERENTIAL UNIT
6:1
6:2
6:3
6:4
6:5
6:6Description
Removal of gearbox/differential unit
Dismantling — gearbox
Reassembly — gearbox
Dismantling — differential and final drive
Reassembly— differential and final drive6:7
6:8
6:9
6:10
6:11
6:12Final drive gear set adjustment
Replacement of gearbox/differential unit
Swing axle shafts and slip joints
Gear shift control mechanism
Modifications
Fault diagnosis
6 :1 Description
The gearbox and differential unit are housed in an
aluminium alloy casing made up of t w o parts which split
at the differential centre line. The output drive is trans-
mitted by means of t w o half axle drive shafts coupled
through wheel shafts and slip joints to the rear wheels (see
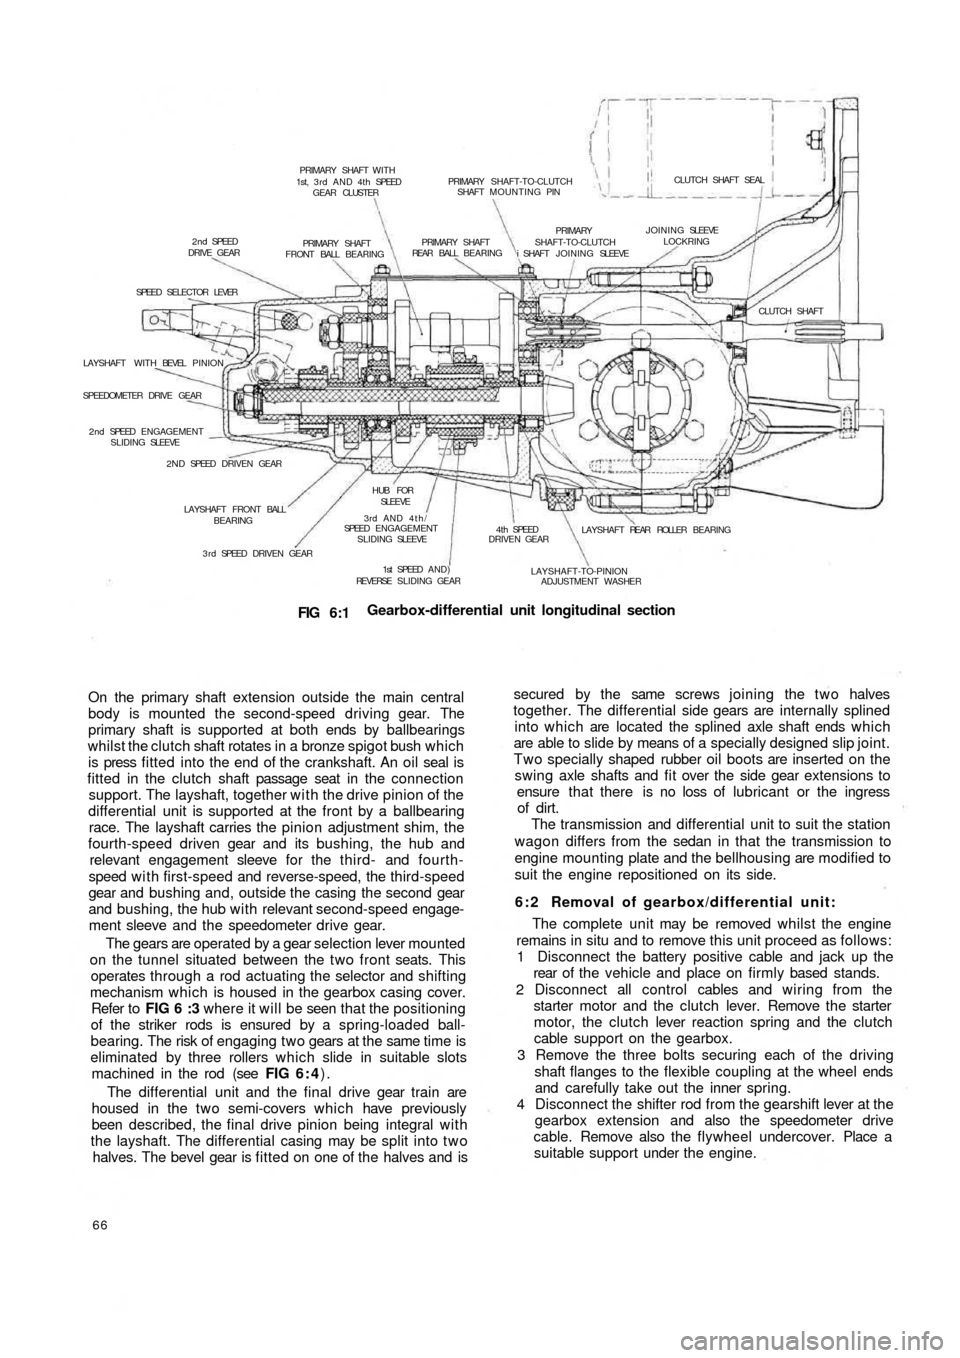
FIG 6 : 1)
The gearbox provides four forward-speeds and a reverse,
the fourth-speed being considered as an overdrive. All
gears except first and reverse gears, which are straight
toothed sliding gears, are in constant mesh and have heli-
cal teeth. No synchromesh is provided, gear engagement
being completed by sliding shifter sleeves of the dog
clutch type. The first-speed gear slides on the outside of
the third and fourth shifter sleeve, whilst the reverse gear
train moves on a fixed shaft. The clutch shaft is integral
with the third, top and combined and first and second gear
pinions, whilst the second gear pinion is splined at the
front end. An internal splined
coupling sleeve joins the
clutch shaft and the input shaft and transmits the power
from the engine to the gearbox. The mainshaft and
differential drive pinion are combined together and besides
carrying the constant mesh gears and the sliding first gear
pinion, it also has attached the sliding sleeves and hubs.
F50065 The speedometer drive pinion is located at the front end.
The gearbox/differential casing is attached to the engine
by six studs which locate in the crankcase. The front of the
unit rests upon the rubber mounted support which is
secured to the body floor.
The complete unit comprises three detachable parts
made up as follows:
1 The support for the connection of the gearbox to the
engine which also acts as part of the differential front
end and clutch/flywheel housing at rear.
2 A central body which is divided into two compartments.
The front compartment contains first, third, fourth and
reverse gears w i t h the primary shaft, layshaft and reverse
shaft as well as the necessary gear selection striker rods
and forks. The rear of this compartment also forms a half
cover for the differential unit.
3 The gearbox casing cover, which contains the second-
speed gears together with the relative fork, gear
selection rod and speedometer drive gears.
The central part of the casing is provided with a top
inspection cover. The primary shaft is coupled to the clutch
shaft through an internally splined sleeve and t w o pins
which are retained by rings. The primary shaft together
with the first, third and fourth driving gears form a cluster.
Page 59 of 128
PRIMARY SHAFT-TO-CLUTCH
SHAFT MOUNTING PINCLUTCH SHAFT SEAL PRIMARY SHAFT WITH
1st, 3 r d A N D 4 t h SPEED
GEAR CLUSTER
2 n d SPEED
DRIVE GEARPRIMARY SHAFT
FRONT BALL BEARINGPRIMARY SHAFT
REAR BALL BEARING
PRIMARY
SHAFT-TO-CLUTCH
i SHAFT JOINING SLEEVEJOINING SLEEVELOCKRING
SPEED SELECTOR LEVER
CLUTCH SHAFT
LAYSHAFT WITH BEVEL PINION
SPEEDOMETER DRIVE GEAR
2 n d SPEED ENGAGEMENT
SLIDING SLEEVE
2 N D SPEED DRIVEN GEAR
LAYSHAFT FRONT BALL
BEARING
3 r d SPEED DRIVEN GEARHUB FOR
SLEEVE
3rd AND 4th/
SPEED ENGAGEMENT
SLIDING SLEEVE4 t h SPEED
DRIVEN GEARLAYSHAFT REAR ROLLER BEARING
LAYSHAFT-TO-PINION
ADJUSTMENT WASHER 1st SPEED AND)
REVERSE SLIDING GEAR
FIG 6:1Gearbox-differential unit longitudinal section
On the primary shaft extension outside the main central
body is mounted the second-speed driving gear. The
primary shaft is supported at both ends by ballbearings
whilst the clutch shaft rotates in a bronze spigot bush which
is press fitted into the end of the crankshaft. An oil seal is
fitted in the clutch shaft passage seat in the c o n n e c t i o n
support. The layshaft, together with the drive pinion of the
differential unit is supported at the front by a ballbearing
race. The layshaft carries the pinion adjustment shim, the
fourth-speed driven gear and its bushing, the hub and
relevant engagement sleeve for the t h i r d - and fourth-
speed w i t h first-speed and reverse-speed, the third-speed
gear and bushing and, outside the casing the second gear
and bushing, the hub with relevant second-speed engage-
ment sleeve and the speedometer drive gear.
The gears are operated by a gear selection lever mounted
on the tunnel situated between the two front seats. This
operates through a rod actuating the selector and shifting
mechanism which is housed in the gearbox casing cover.
Refer to FIG 6 :3 where it will be seen th a t the positioning
of the striker rods is ensured by a spring-loaded ball-
bearing. The risk of engaging two gears at the same time is
eliminated by three rollers which slide in suitable slots
machined in the rod (see FIG 6 : 4).
The differential unit and the final drive gear train are
housed in the t w o semi-covers which
have previously
been described, the final drive pinion being integral with
the layshaft. The differential casing may be split into t w o
halves. The bevel gear is fitted on one of the halves and is
66
secured by the same screws joining the two halves
together. The differential side gears are internally splined
into which are located the splined axle shaft ends which
are able to slide by means of a specially designed slip joint.
Two specially shaped rubber oil boots are inserted on the
swing axle shafts and fit over the side gear extensions to
ensure that there is no loss of lubricant or the ingress
of dirt.
The transmission and differential unit to suit the station
wagon differs from the sedan in that the transmission to
engine mounting plate and the bellhousing are modified to
suit the engine repositioned on its side.
6 : 2 Removal of gearbox/differential unit:
The complete unit may be removed whilst the engine
remains in situ and to remove this unit proceed as follows:
1 Disconnect the battery positive cable and jack up the
rear of t h e vehicle and place on firmly based stands.
2 Disconnect all control cables and wiring from the
starter motor and the clutch lever. Remove the starter
motor, the clutch lever reaction spring and the clutch
cable support on the gearbox.
3 Remove the three bolts securing each of the driving
shaft flanges to the flexible coupling at the wheel ends
and carefully take out the inner spring.
4 Disconnect the shifter rod from the gearshift lever at the
gearbox extension and also the
speedometer drive
cable. Remove also the flywheel undercover. Place a
suitable support under the engine.
Page 60 of 128
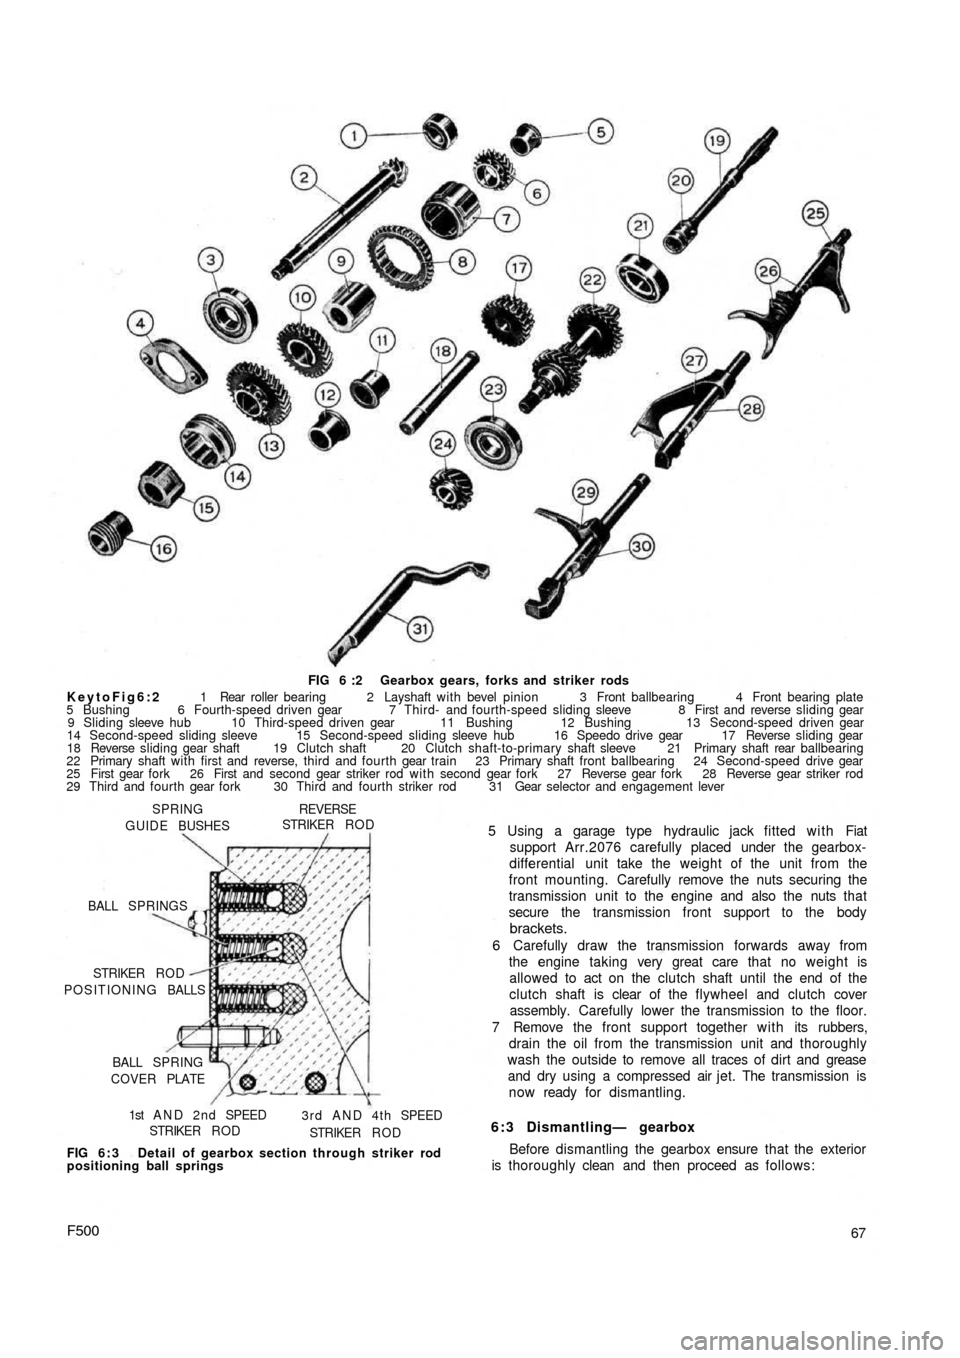
FIG 6 :2 Gearbox gears, forks and striker rods
KeytoFig6:2 1 Rear roller bearing 2 Layshaft with bevel pinion 3 Front ballbearing 4 Front bearing plate
5 Bushing 6 Fourth-speed driven gear 7 Third- and fourth-speed sliding sleeve 8 First and reverse sliding gear
9 Sliding sleeve hub 10 Third-speed driven gear 11 Bushing 12 Bushing 13 Second-speed driven gear
14 Second-speed sliding sleeve 15 Second-speed sliding sleeve hub 16 Speedo drive gear 17 Reverse sliding gear
18 Reverse sliding gear shaft 19 Clutch shaft 20 Clutch shaft-to-primary shaft sleeve 21 Primary shaft rear ballbearing
22 Primary shaft with first and reverse, third and fourth gear train 23 Primary shaft front ballbearing 24 Second-speed drive gear
25 First gear fork 26 First and second gear striker rod with second gear fork 27 Reverse gear fork 28 Reverse gear striker rod
29 Third and fourth gear fork 30 Third and fourth striker rod 31 Gear selector and engagement lever
SPRING
GUIDE BUSHES
REVERSESTRIKER R O D
BALL SPRINGS
POSITIONING BALLS STRIKER R O D
BALL SPRING
COVER PLATE
1st A N D 2 n d SPEED
STRIKER R O D3 r d A N D 4 t h SPEED
STRIKER R O D
FIG 6 : 3 Detail of gearbox section through striker rod
positioning ball springs
F50067 5 Using a garage type hydraulic jack fitted with Fiat
support Arr.2076 carefully placed under the gearbox-
differential unit take the weight of the unit from the
front mounting. Carefully remove the nuts securing the
transmission unit to the engine and also the nuts that
secure the transmission front support to the body
brackets.
6 Carefully draw the transmission forwards away from
the engine taking very great care that no weight is
allowed to act on the clutch shaft until the end of the
clutch shaft is clear of the flywheel and clutch cover
assembly. Carefully lower the transmission to the floor.
7 Remove the front support together with its rubbers,
drain the oil from the transmission unit and thoroughly
wash the outside to remove all traces of dirt and grease
and dry using a compressed air jet. The transmission is
now ready for dismantling.
6:3 Dismantling— gearbox
Before dismantling the gearbox ensure that the exterior
is thoroughly clean and then proceed as follows:
Page 66 of 128
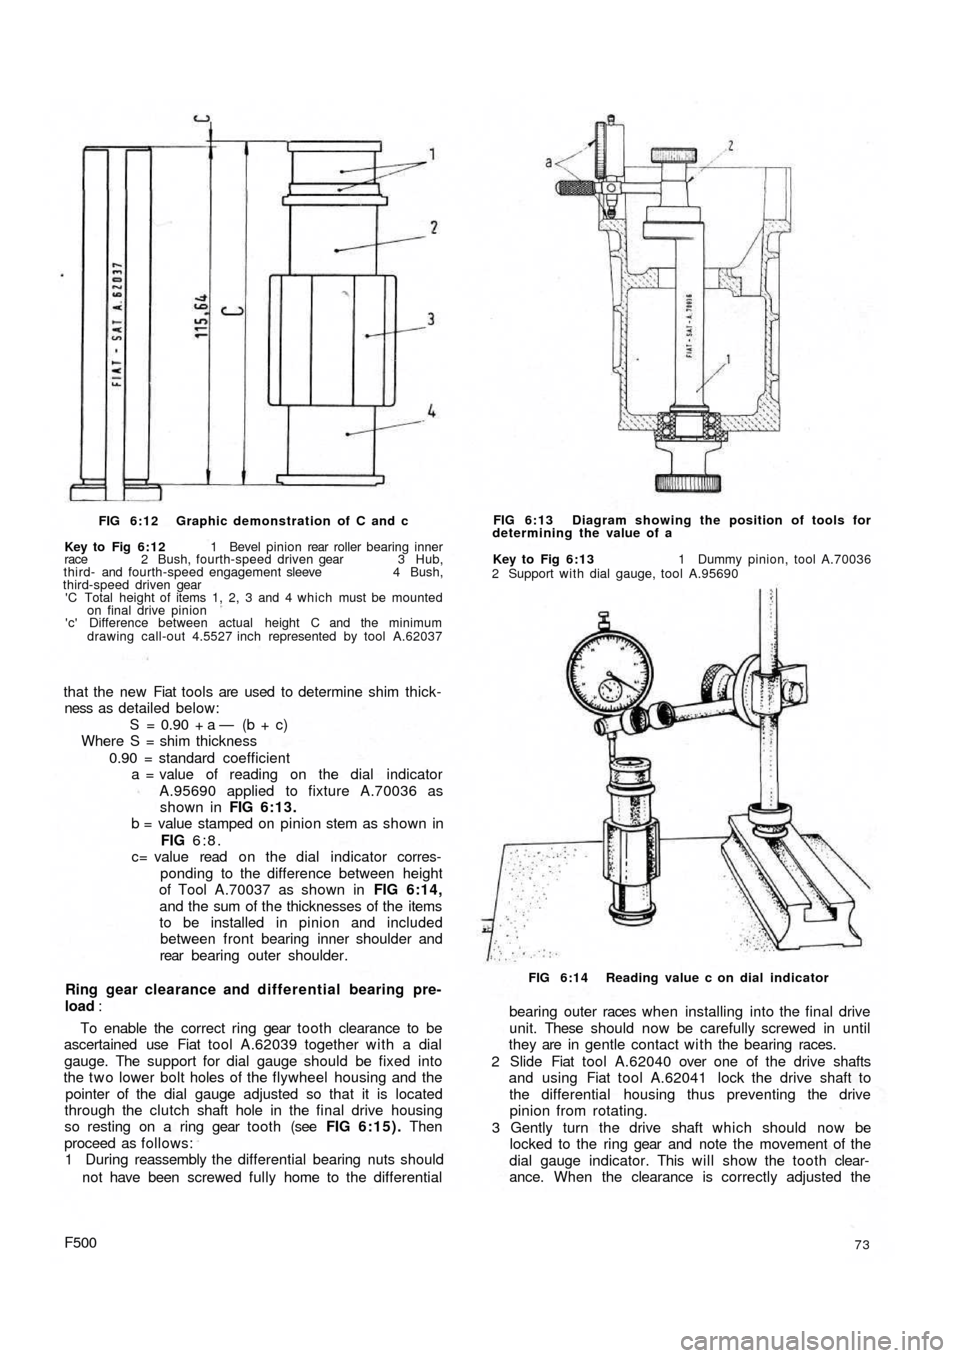
FIG 6:12 Graphic demonstration of C and c
Key to Fig 6:12 1 Bevel pinion rear roller bearing inner
race 2 Bush, fourth-speed driven gear 3 Hub,
third- and fourth-speed engagement sleeve 4 Bush,
third-speed driven gear
'C Total height of items 1, 2, 3 and 4 which must be mounted
on final drive pinion
'c' Difference between actual height C and the minimum
drawing call-out 4.5527 inch represented by tool A.62037
that the new Fiat tools are used to determine shim thick-
ness as detailed below:
S = 0.90 + a — (b + c)
Where S = shim thickness
0.90 = standard coefficient
a = value of reading on the dial indicator
A.95690 applied to fixture A.70036 as
shown in FIG 6:13.
b = value stamped on pinion stem as shown in
FIG 6:8.
c= value read o n the dial indicator corres-
ponding to the difference between height
of Tool A.70037 as shown in FIG 6:14,
and the sum of the thicknesses of the items
to be installed in pinion and included
between front bearing inner shoulder and
rear bearing outer shoulder.
Ring gear clearance and differential bearing pre-
load :
To enable the correct ring gear tooth clearance to be
ascertained use Fiat tool A.62039 together with a dial
gauge. The support for dial gauge should be fixed into
the t w o lower bolt holes of the flywheel housing and the
pointer of the dial gauge adjusted so that it is located
through the clutch shaft hole in the final drive housing
so resting on a ring gear tooth (see FIG 6:15). Then
proceed as follows:
1 During reassembly the differential bearing nuts should
not have been screwed fully home to the differential
F50073
bearing outer races w h e n installing into the f i n a l drive
unit. These should now be carefully screwed in until
they are in gentle contact with the bearing races.
2 Slide Fiat tool A.62040 over one of the drive shafts
and using Fiat tool A.62041 lock the drive shaft to
the differential housing thus preventing the drive
pinion from rotating.
3 Gently turn the drive shaft which should now be
locked to the ring gear and note the movement of the
dial gauge indicator. This will show the tooth clear-
ance. When the clearance is correctly adjusted the
FIG 6:14 Reading value c on dial indicator Key to Fig 6:13 1 Dummy pinion, tool A.70036
2 Support with dial gauge, tool A.95690 FIG 6:13 Diagram showing the position of tools for
determining the value of a
Page 67 of 128
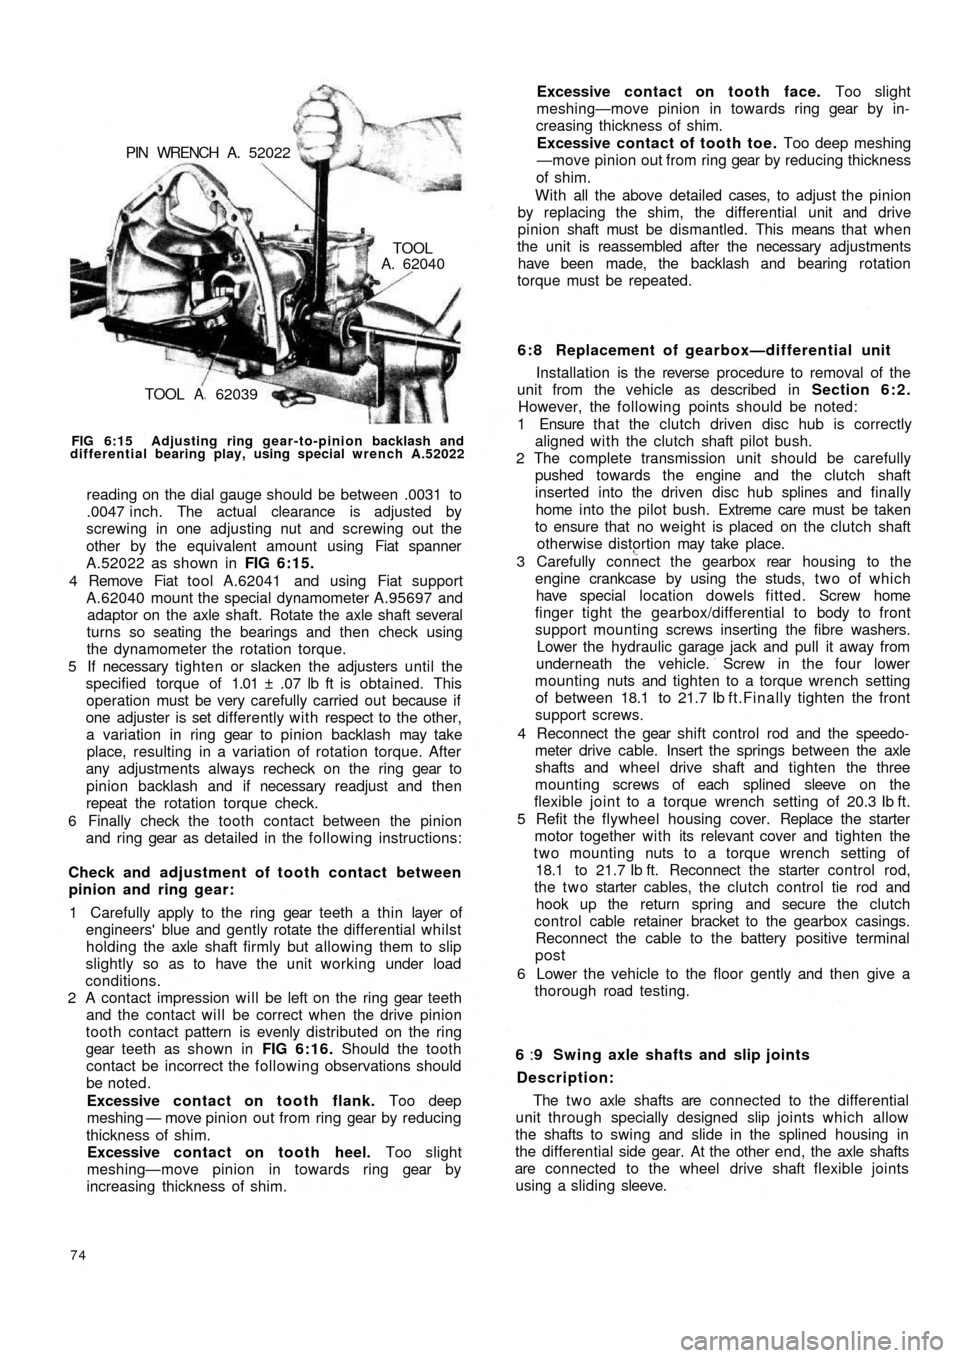
TOOL A 62039
TOOLA. 62040 PIN WRENCH A. 52022
FIG 6:15 Adjusting ring gear-to-pinion backlash and
differential bearing play, using special wrench A.52022
reading on the dial gauge should be between .0031 to
.0047 inch. The actual clearance is adjusted by
screwing in one adjusting nut and screwing out the
other by the equivalent amount using Fiat spanner
A.52022 as shown in FIG 6:15.
4 Remove Fiat tool A.62041 and using Fiat support
A.62040 mount the special dynamometer A.95697 and
adaptor on the axle shaft. Rotate the axle shaft several
turns so seating the bearings and then check using
the dynamometer the rotation torque.
5 If necessary tighten or slacken the adjusters until the
specified torque of 1.01 ± .07 lb ft is obtained. This
operation must be very carefully carried out because if
one adjuster is set differently with respect to the other,
a variation in ring gear to pinion backlash may take
place, resulting in a variation of rotation torque. After
any adjustments always recheck on the ring gear to
pinion backlash and if necessary readjust and then
repeat the rotation torque check.
6 Finally check the tooth contact between the pinion
and ring gear as detailed in the following instructions:
Check and adjustment of tooth contact between
pinion and ring gear:
1 Carefully apply to the ring gear teeth a thin layer of
engineers' blue and gently rotate the differential whilst
holding the axle shaft firmly but allowing them to slip
slightly so as to have the unit working under load
conditions.
2 A contact impression will be left on the ring gear teeth
and the contact will be correct when the drive pinion
tooth contact pattern is evenly distributed on the ring
gear teeth as shown in FIG 6:16. Should the tooth
contact be incorrect the following observations should
be noted.
Excessive contact on tooth flank. Too deep
meshing — move pinion out from ring gear by reducing
thickness of shim.
Excessive contact on tooth heel. Too slight
meshing—move pinion in towards ring gear by
increasing thickness of shim.
74
6 : 8 Replacement of gearbox—differential unit
Installation is the reverse procedure to removal of the
unit from the vehicle as described in Section 6:2.
However, the following points should be noted:
1 Ensure that the clutch driven disc hub is correctly
aligned with the clutch shaft pilot bush.
2 The complete transmission unit should be carefully
pushed towards the engine and the clutch shaft
inserted into the driven disc hub splines and finally
home into the pilot bush. Extreme care must be taken
to ensure that no weight is placed on the clutch shaft
otherwise distortion may take place.
3 Carefully connect the gearbox rear housing to the
engine crankcase by using the studs, t w o of which
have special location dowels fitted. Screw home
finger tight the gearbox/differential to body to front
support mounting screws inserting the fibre washers.
Lower the hydraulic garage jack and pull it away from
underneath the vehicle. Screw in the four lower
mounting nuts and tighten to a torque wrench setting
of between 18.1 to 21.7 Ib f t.Finally tighten the front
support screws.
4 Reconnect the gear shift control rod and the speedo-
meter drive cable. Insert the springs between the axle
shafts and wheel drive shaft and tighten the
three
mounting screws of each splined sleeve on the
flexible joint to a torque wrench setting of 20.3 Ib ft.
5 Refit the flywheel housing cover. Replace the starter
motor together with its relevant cover and tighten the
two mounting nuts to a torque wrench setting of
18.1 to 21.7 Ib ft. Reconnect the starter control rod,
the t w o starter cables, the clutch control tie rod and
hook up the return spring and secure the clutch
control cable retainer bracket to the gearbox casings.
Reconnect the cable to the battery positive terminal
post
6 Lower the vehicle to the floor gently and then give a
thorough road testing.
6 :9 Swing axle shafts and slip joints
Description:
The t w o axle shafts are connected to the differential
unit through specially designed slip joints which allow
the shafts to swing and slide in the splined housing in
the differential side gear. At the other end, the axle shafts
are connected to the wheel drive shaft flexible joints
using a sliding sleeve. Excessive contact on tooth face. Too slight
meshing—move pinion in towards ring gear by in-
creasing thickness of shim.
Excessive contact of tooth toe. Too deep meshing
—move pinion out from ring gear by reducing thickness
of shim.
With all the above detailed cases, to adjust the pinion
by replacing the shim, the differential unit and drive
pinion shaft must be dismantled. This means that when
the unit is reassembled after the necessary adjustments
have been made, the backlash and bearing rotation
torque must be repeated.