piston rings FIAT 500 1958 1.G Workshop Manual
[x] Cancel search | Manufacturer: FIAT, Model Year: 1958, Model line: 500, Model: FIAT 500 1958 1.GPages: 128, PDF Size: 9.01 MB
Page 2 of 128
CHAPTER 1
THE ENGINE
1 :1
1 :2
1 :3
1 :4
1 :5
1 :6
1 :7
1 :8
1:9
1 :10
1 :11Description
Engine removal (sedan—all versions)
Engine removal (station wagon)
Engine disassembly (sedan—all versions)
Engine disassembly (station wagon)
Cylinder head removal, servicing and
replacement
Timing gear overhaul
Crankcase and cylinders
Piston assembly
Connecting rods
Crankshaft and main bearings
1 :1 Description
The 'New 500' two-cylinder aircooled engine operates
on the four-stroke 'Otto Cycle' and is fitted directly to
the transmission unit which incorporates the rear drive
assembly as shown in FIG 1 :1 and FIG 1 :2.
With the power unit fitted at the rear several advantages
are obtained including better load distribution to the
wheels when the vehicle is loaded, elimination of propeller
shaft reducing the size of centre tunnel and better use of
available space.
The cylinder block comprises t w o cast iron cylinder
barrels w i t h cooling fins. The bottom of the cylinders fit
into machined seats in the aluminium crankcase.
The aluminium crankcase carries eight studs on which
are located the t w o cylinder barrels w i t h the aluminium
cylinder head on the top.
A two bush crankshaft of special cast iron is fitted into
the lower half of the crankcase. The crankshaft is
F5009 provided with a counterweight and is hollow to allow for
lubrication.
The steel connecting rods have thin wall bearing halves
on the big-end, and bronze bushes in the small-end. The
offset piston pin is of steel and retained in the piston by
two circlips.
Light alloy pistons are used and are of the taper-oval-
shaped type with a maximum diameter at the base of the
skirt, along an axis perpendicular to the piston pin. Pistons
are fitted with four rings as follows, one compression at
the top, two standard oil scraper rings and one side slotted
oil scraper ring.
The one-piece aluminium cylinder head is finned to
provide a larger cooling surface and carries the inlet and
exhaust manifolds.
The inlet passages merge into a single centralized
flange onto which is mounted the carburetter. The exhaust
passages run almost parallel to the axis of the engine. 1 :12
1 :13
1 :14
1 :15
1 :16
1 :17
1 :18
1 :19
1 :20
1 :21
1 :22Flywheel and starter ring gear
The oil pump
Lubrication, oil filter, relief valve
Valve timing
Valve stem to rocker clearance
Engine assembly (sedan—all versions)
Engine assembly (station wagon)
Power plant mounting
Adjustment of generator and fan belt drive
Modifications
Fault diagnosis
Page 11 of 128
INTAKEEXHAUSTINTAKEEXHAUST
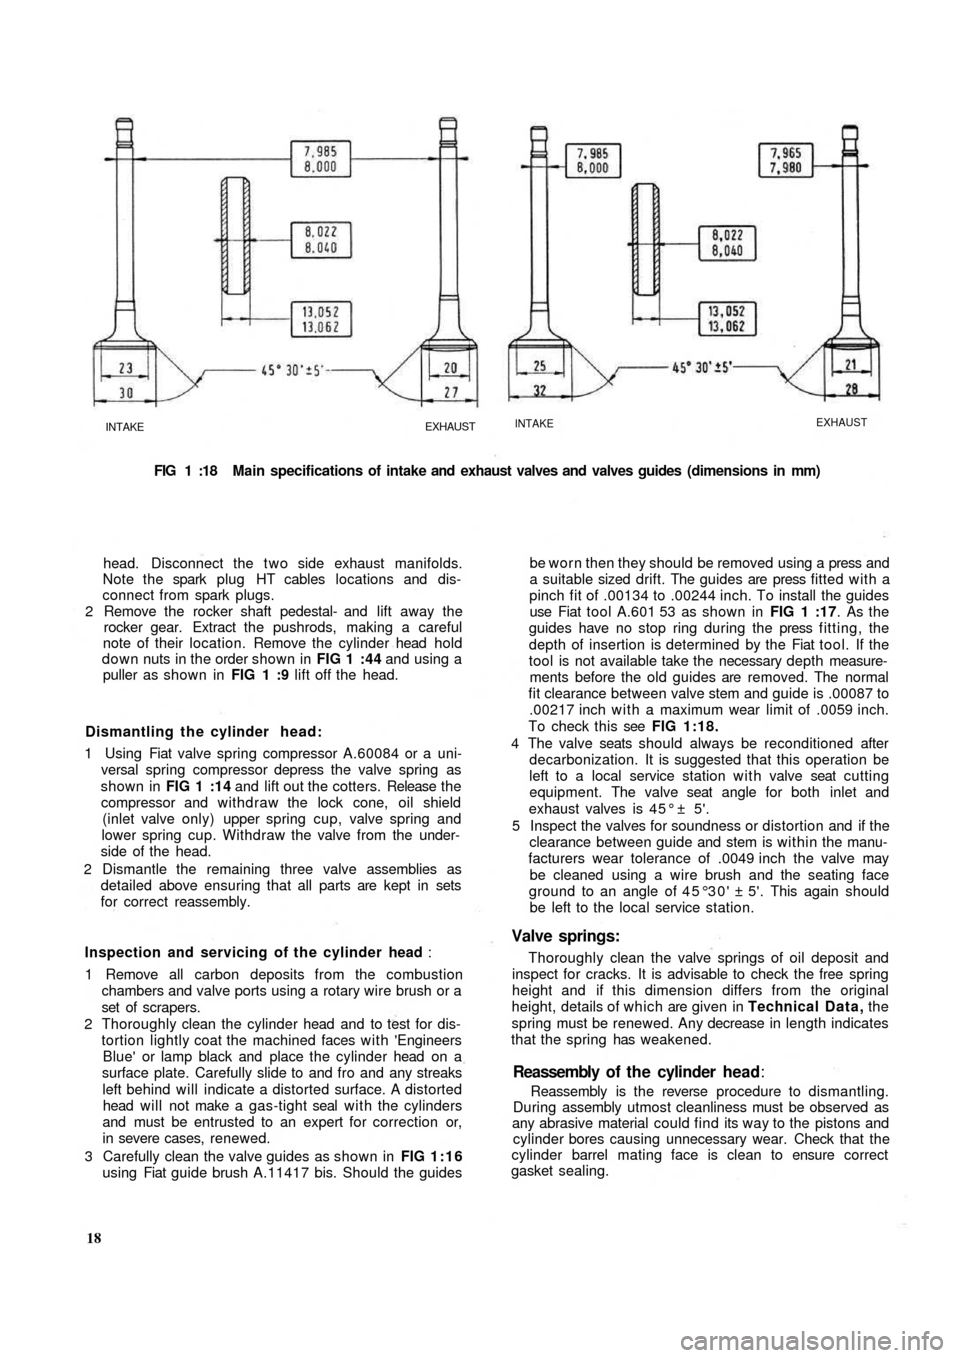
FIG 1 :18 Main specifications of intake and exhaust valves and valves guides (dimensions in mm)
head. Disconnect the t w o side exhaust manifolds.
Note the spark plug HT cables locations and dis-
connect from spark plugs.
2 Remove the rocker shaft pedestal- and lift away the
rocker gear. Extract the pushrods, making a careful
note of their location. Remove the cylinder head hold
down nuts in the order shown in FIG 1 :44 and using a
puller as shown in FIG 1 :9 lift off the head.
Dismantling the cylinder head:
1 Using Fiat valve spring compressor A.60084 or a uni-
versal spring compressor depress the valve spring as
shown in FIG 1 :14 and lift out the cotters. Release t h e
compressor and withdraw the lock cone, oil shield
(inlet valve only) upper spring cup, valve spring and
lower spring cup. Withdraw the valve from the under-
side of the head.
2 Dismantle the remaining three valve assemblies as
detailed above ensuring that all parts are kept in sets
for correct reassembly.
Inspection and servicing of the cylinder head :
1 Remove all carbon deposits from the combustion
chambers and valve ports using a rotary wire brush or a
set of scrapers.
2 Thoroughly clean the cylinder head and to test for dis-
tortion lightly coat the machined faces with 'Engineers
Blue' or lamp
black and place the cylinder head on a
surface plate. Carefully slide to and fro and any streaks
left behind will indicate a distorted surface. A distorted
head will not make a gas-tight seal with the cylinders
and must be entrusted to an expert for correction or,
in severe cases, renewed.
3 Carefully clean the valve guides as shown in FIG 1:16
using Fiat guide brush A.11417 bis. Should the guides
18Reassembly is the reverse procedure to dismantling.
During assembly utmost cleanliness must be observed as
any abrasive material could find its way to the pistons and
cylinder bores causing unnecessary wear. Check that the
cylinder barrel mating face is clean to ensure correct
gasket sealing.Reassembly of t h e cylinder head:
be worn then they should be removed using a press and
a suitable sized drift. The guides are press fitted with a
pinch fit of .00134 to .00244 inch. To install the guides
use Fiat tool A.601 53 as shown in FIG 1 :17. As the
guides have no stop ring during the press fitting, the
depth of insertion is determined by the Fiat tool. If the
tool is not available take the necessary depth measure-
ments before the old guides are removed. The normal
fit clearance between valve stem and guide is .00087 to
.00217 inch with a maximum wear limit of .0059 inch.
To check this see FIG 1:18.
4 The valve seats should always be reconditioned after
decarbonization. It is suggested that this operation be
left to a local service station with valve seat cutting
equipment. The valve seat angle for both inlet and
exhaust valves is 4 5 ° ± 5'.
5 Inspect the valves for soundness or distortion and if the
clearance between guide and stem is within the manu-
facturers wear tolerance of .0049 inch the valve may
be cleaned using a wire brush and the seating face
ground to an angle of 45°30' ± 5'. This again should
be left to the local service station.
Valve springs:
Thoroughly clean the valve springs of oil deposit and
inspect for cracks. It is advisable to check the free spring
height and if this dimension differs from the original
height, details of which are given in Technical Data, the
spring must be renewed. Any decrease in length indicates
that the spring has weakened.
Page 13 of 128
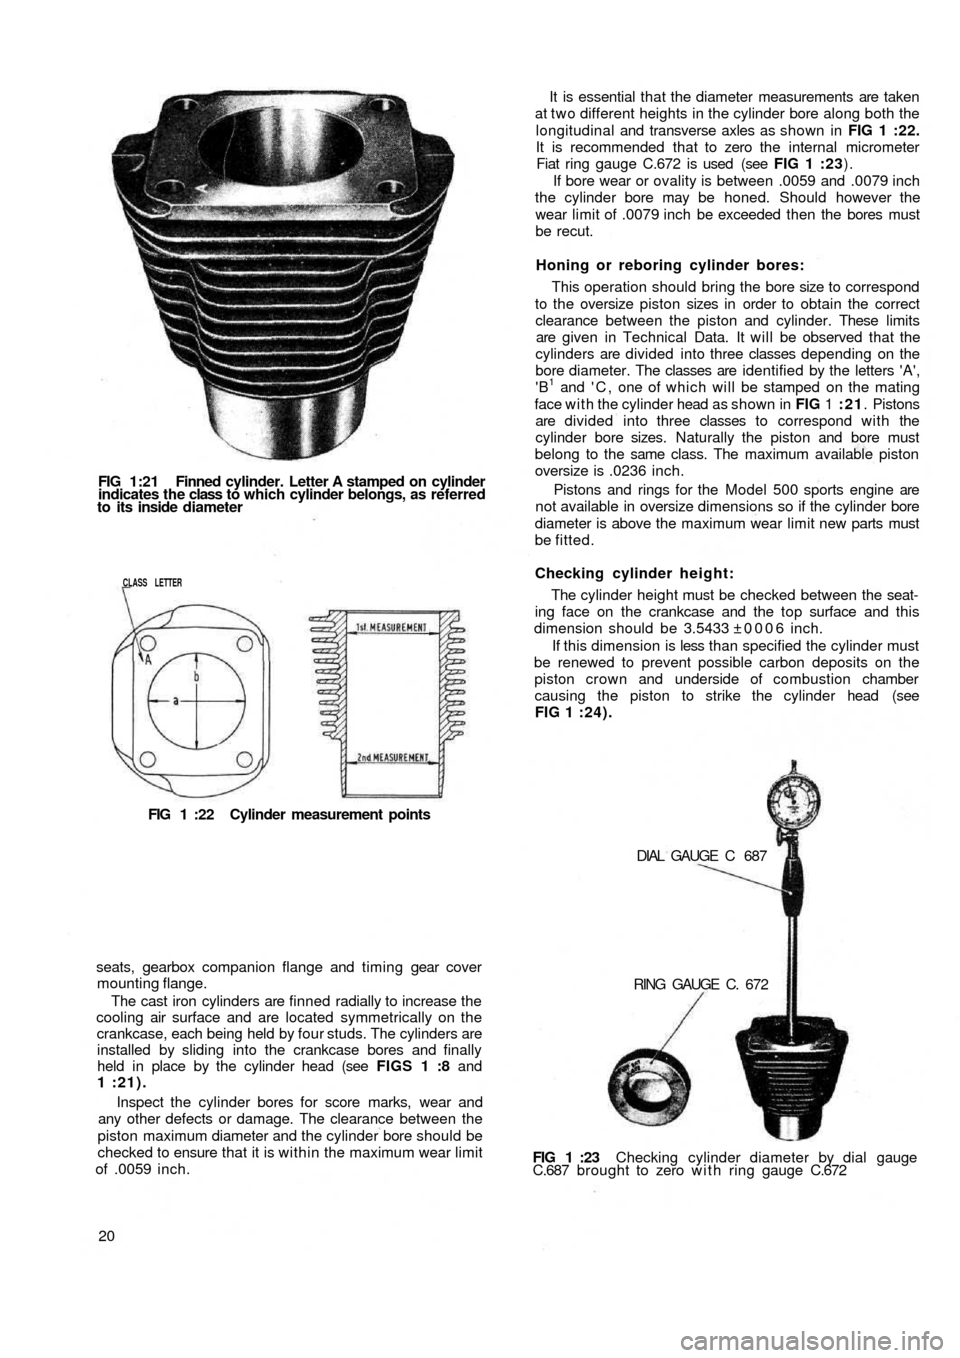
FIG 1:21 Finned cylinder. Letter A stamped on cylinder
indicates the class to which cylinder belongs, as referred
to its inside diameter
CLASS LETTER
FIG 1 :22 Cylinder measurement points
seats, gearbox companion flange and timing gear cover
mounting flange.
The cast iron cylinders are finned radially to increase the
cooling air surface and are located symmetrically on the
crankcase, each being held by four studs. The cylinders are
installed by sliding into the crankcase bores and finally
held in place by the cylinder head (see FIGS 1 :8 and
1 :21).
Inspect the cylinder bores for score marks, wear and
any other defects or damage. The clearance between the
piston maximum diameter and the cylinder bore should be
checked to ensure that it is within the maximum wear limit
of .0059 inch.
20FIG 1 :23 Checking cylinder diameter by dial gauge
C.687 brought to zero w i t h ring gauge C.672 DIAL GAUGE C 687
RING GAUGE C. 672 The cylinder height must be checked between the seat-
ing face on the crankcase and the top surface and this
dimension should be 3.5433 ±0006 inch.
If this dimension is less than specified the cylinder must
be renewed to prevent possible carbon deposits on the
piston crown and underside of combustion chamber
causing the piston to strike the cylinder head (see
FIG 1 :24). Checking cylinder height: This operation should bring the bore size to correspond
to the oversize piston sizes in order to obtain the correct
clearance between the piston and cylinder. These
limits
are given in Technical Data. It will be observed that the
cylinders are divided into three classes depending on the
bore diameter. The classes are identified by the letters 'A',
'B
1 and ' C , one of which will be stamped on the mating
face with the cylinder head as shown in FIG 1 :21. Pistons
are divided into three classes to correspond with the
cylinder bore sizes. Naturally the piston and bore must
belong to the same class. The maximum available piston
oversize is .0236 inch.
Pistons and rings for the Model 500 sports engine are
not available in oversize dimensions so if the cylinder bore
diameter is above the maximum wear limit new parts must
be fitted.Honing or reboring cylinder bores: It is essential that the diameter measurements are taken
at t w o different heights in the cylinder bore along both the
longitudinal and transverse axles as shown in FIG 1 :22.
It is recommended that to zero the internal micrometer
Fiat ring gauge C.672 is used (see FIG 1 :23).
If bore wear or ovality is between .0059 and .0079 inch
the cylinder bore may be honed. Should however the
wear limit of .0079 inch be exceeded then the bores must
be recut.
Page 14 of 128
Insert a .0079 ± .00197 inch thick oil paper gasket
between the crankcase and cylinder bottom face and a
.0236 to .0275 inch thick graphitized asbestos gasket
between the cylinder and cylinder head. The compression
of the gaskets on assembly will eliminate any very small
differences between the t w o mating surfaces.
Inspection of tappet seats:
The tappet seats should be checked for scoring and
correct clearance which must not exceed .00315 inch.
Should the clearance be greater than the maximum
specified the seating may be reamed to oversize dimen-
sions as detailed in Technical Data. Tappets are avail-
able in .00197 and .00394 inch diameter oversize.
1 :9 Piston assembly
Inspection:
Before inspection the pistons must be thoroughly
cleaned and the ring grooves and piston head decarbo-
nized. Check for deep score marks and signs of distortion
or fracture especially around the skirt and piston pin areas.
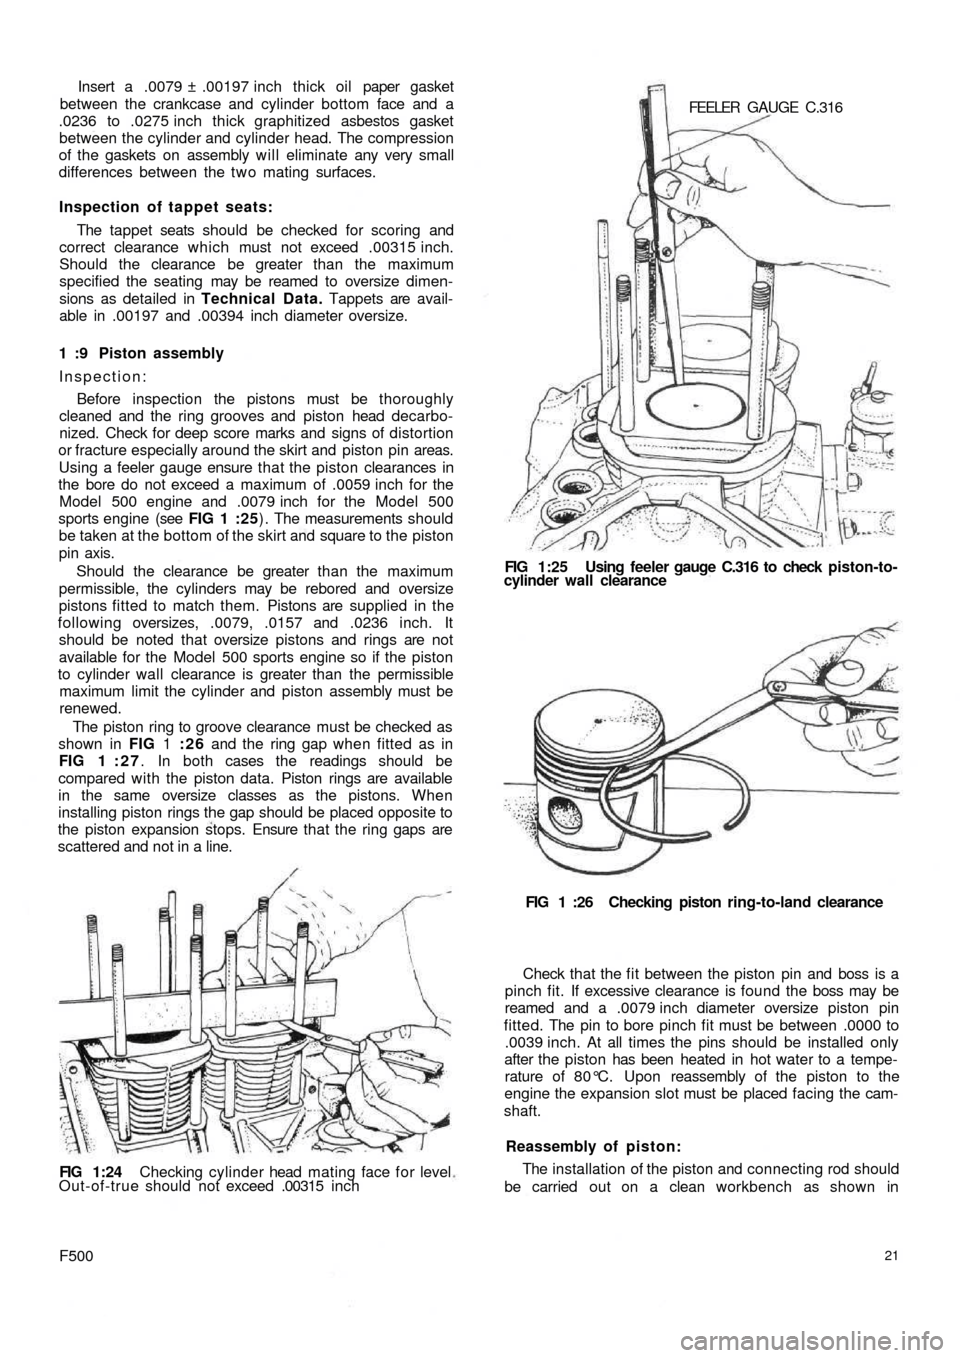
Using a feeler gauge ensure that the piston clearances in
the bore do not exceed a maximum of .0059 inch for the
Model 500 engine and .0079 inch for the Model 500
sports engine (see FIG 1 :25) . The measurements should
be taken at the bottom of the skirt and square to the piston
pin axis.
Should the clearance be greater than the maximum
permissible, the cylinders may be rebored and oversize
pistons fitted to m
atch them. Pistons are supplied in the
following oversizes, .0079, .0157 and .0236 inch. It
should be noted that oversize pistons and rings are not
available for the Model 500 sports engine so if the piston
to cylinder wall clearance is greater than the permissible
maximum limit the cylinder and piston assembly must be
renewed.
The piston ring to groove clearance must be checked as
shown in FIG 1 :26 and the ring gap when fitted as in
FIG 1 : 2 7. In both cases the readings should be
compared with the piston data. Piston rings are available
in the same oversize classes as the pistons. When
installing piston rings the gap should be placed opposite to
the piston expansion stops. Ensure that the ring gaps are
scattered and not in a line.
FIG 1:24 Checking cylinder head mating face f o r level
Out-of-true should not exceed .00315 i n c h
F50021
The installation of the piston and connecting rod should
be carried out on a clean workbench as shown in Reassembly of piston: Check that the f i t between the piston pin and boss is a
pinch fit. If excessive clearance is found the boss may be
reamed and a .0079 inch diameter oversize piston pin
fitted. The pin to bore pinch fit must be between .0000 to
.0039 inch. At all times the pins should be installed only
after the piston has been heated in hot water to a tempe-
rature of 80°C. Upon reassembly of the piston to the
engine the expansion slot must be placed facing the cam-
shaft.FIG 1 :26 Checking piston ring-to-land clearance FEELER GAUGE C.316
FIG 1:25 Using feeler gauge C.316 to check piston-to-
cylinder wall clearance
Page 15 of 128
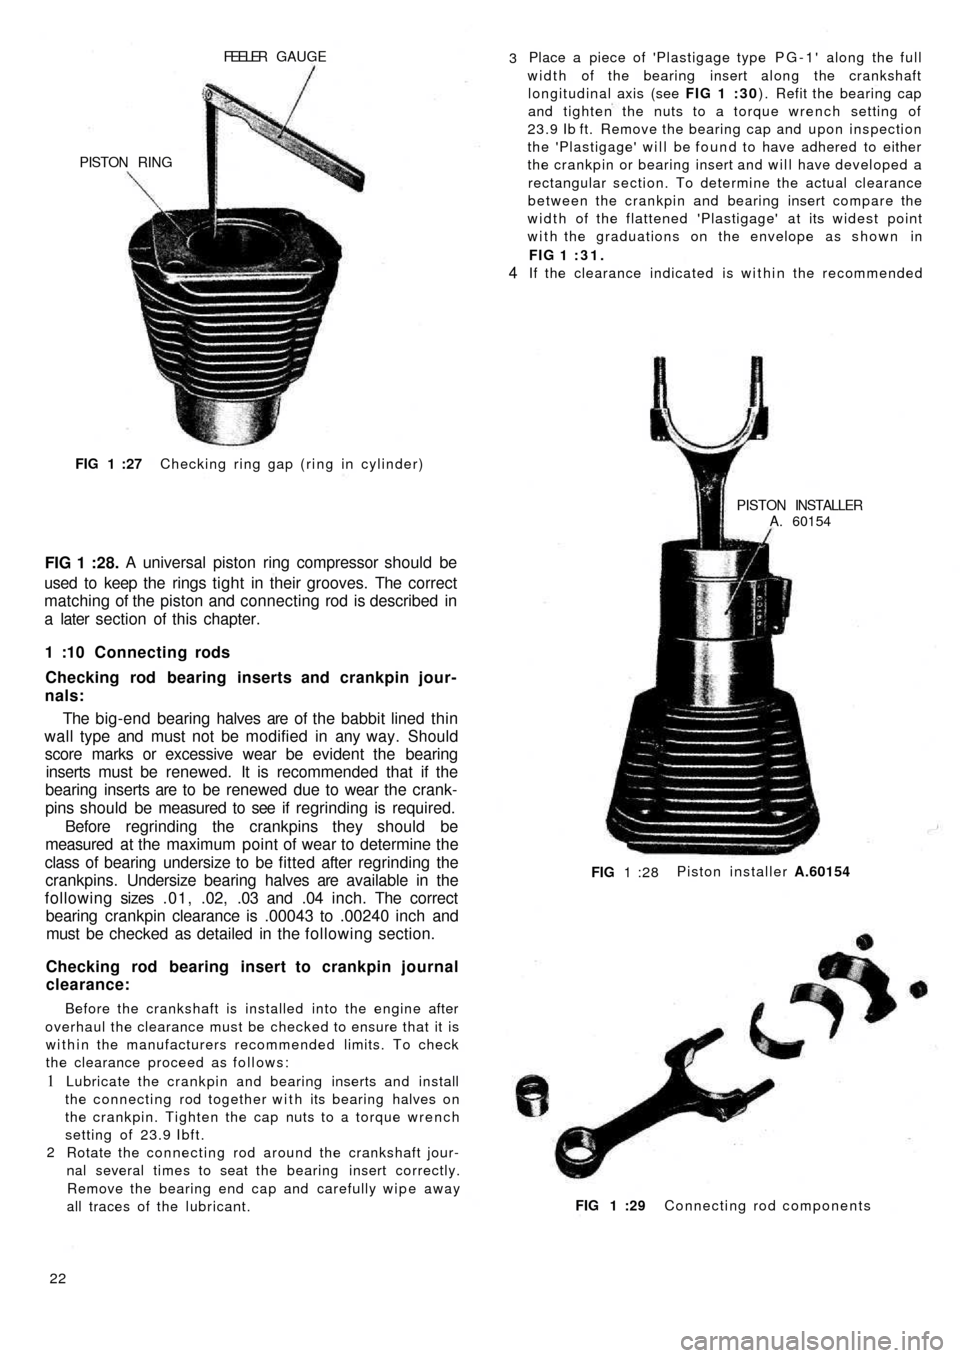
FEELER GAUGE
Checking ring gap (ring in cylinder) FIG 1 :27
FIG 1 :28.A universal piston ring compressor should be
used to keep the rings t i g h t in their grooves. The correct
matching of the piston and connecting rod is described in
a later section of this chapter.
1 :10 Connecting rods
Checking rod bearing inserts and crankpin jour-
nals:
The big-end bearing halves are of the babbit lined thin
wall type and must not be modified in any way. Should
score marks or excessive wear be evident the bearing
inserts must be renewed. It is recommended that if the
bearing inserts are to be renewed due to wear the crank-
pins should be measured to see if regrinding is required.
Before regrinding the crankpins they should be
measured at the maximum point of wear to determine the
class of bearing undersize to be fitted after regrinding the
crankpins. Undersize bearing halves are available in the
f o l l o w i n g sizes .01, .02, .03 and .04 inch. The correct
bearing crankpin clearance is .00043 to .00240 inch and
must be checked as detailed in the following section.
Checking rod bearing insert to crankpin journal
clearance:
Before the crankshaft is installed into the engine after
overhaul the clearance must be checked to ensure that it is
within the manufacturers recommended limits. To check
the clearance proceed as follows:
1
2Lubricate the crankpin and bearing inserts and install
the connecting rod together with its bearing halves on
the crankpin. Tighten the cap nuts to a torque wrench
setting of 23.9 Ibft.
Rotate the connecting rod around the crankshaft jour-
nal several times to seat the bearing insert correctly.
Remove the bearing end cap and carefully wipe away
all traces of the lubricant.
22FIG 1 :29 Connecting rod components Piston installer A.60154
FIG 1 :28PISTON INSTALLER
A. 60154 If the clearance indicated is within the recommended FIG 1 :31.
4
Place a piece of 'Plastigage type PG-1' along the full
width of the bearing insert along the crankshaft
longitudinal axis (see FIG 1 :30) . Refit the bearing cap
and tighten the nuts to a torque wrench setting of
23.9 Ib ft. Remove the bearing cap and upon inspection
the 'Plastigage' will be found to have adhered to either
the crankpin or bearing insert and will have developed a
rectangular section. To determine the actual clearance
between the crankpin and bearing insert compare the
width of the flattened 'Plastigage' at its widest point
with the graduations on the envelope as shown in 3
PISTON RING
Page 17 of 128
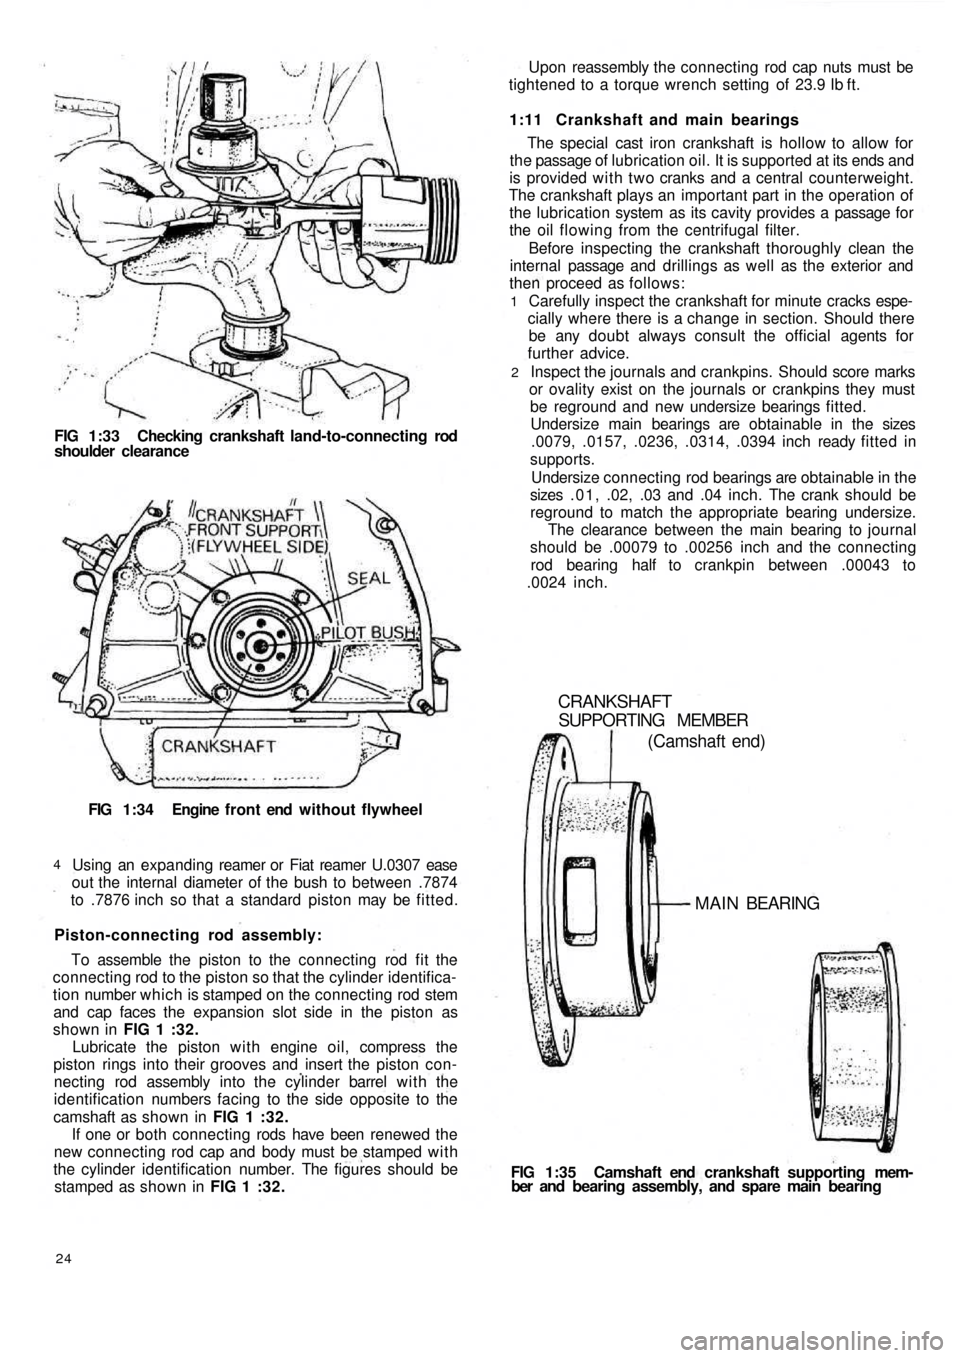
FIG 1:33 Checking crankshaft land-to-connecting rod
shoulder clearance
FIG 1:34 Engine f r o n t end without flywheel
Using an expanding reamer or Fiat reamer U.0307 ease
out the internal diameter of the bush to between .7874
to .7876 inch so that a standard piston may be fitted.
4
Piston-connecting rod assembly:
To assemble the piston to the connecting rod fit the
connecting rod to the piston so that the cylinder identifica-
tion number which is stamped on the connecting rod stem
and cap faces the expansion slot side in the piston as
shown in FIG 1 :32.
Lubricate the piston with engine oil, compress the
piston rings into their grooves and insert the piston con-
necting rod assembly into the cylinder barrel w i t h the
identification numbers facing to the side opposite to the
camshaft as shown in FIG 1 :32.
If one or both connecting rods have been renewed the
new connecting rod cap and body must be stamped w i t h
the cylinder identification number. The figures should be
stamped as shown in FIG 1 :32.
24
FIG 1:35 Camshaft end crankshaft supporting mem-
ber and bearing assembly, and spare main bearing
CRANKSHAFT
SUPPORTING MEMBER
(Camshaft end)
MAIN BEARING
Carefully inspect the crankshaft for minute cracks espe-
cially where there is a change in section. Should there
be any doubt always consult the official agents for
further advice.
Inspect the journals and crankpins. Should score marks
or ovality exist on the journals or crankpins they must
be reground and new undersize bearings fitted.
Undersize main bearings are obtainable in the sizes
.0079, .0157, .0236, .0314, .0394 inch ready fitted in
supports.
Undersize connecting rod bearings are obtainable in the
sizes .01, .02, .03 and .04 inch. The crank should be
reground to match the appropriate bearing undersize.
The clearance between the main bearing to journal
should be .00079 to .00256 inch and the connecting
rod bearing half to crankpin between .00043 to
.0024 inch.
2 1
The special cast iron crankshaft is hollow to allow for
the passage of lubrication oil. It is supported at its ends and
is provided with two cranks and a central counterweight.
The crankshaft plays an important part in the operation of
the lubrication system as its cavity provides a passage for
the oil flowing from the centrifugal filter.
Before inspecting the crankshaft thoroughly clean the
internal passage and drillings as well as the exterior and
then proceed as follows: 1:11 Crankshaft and main bearings Upon reassembly the connecting rod cap nuts must be
tightened to a torque wrench setting of 23.9 Ib ft.
Page 24 of 128
sections of the air conveyor securing with seven
screws, seven toothed washers and five nuts.
22 Slide the fuel pump control rod into its seating,
assemble the insulator between oil wetted graphite
gaskets and fit the pump to the crankcase using nuts
and toothed washers.
23 Fit the air conveyor cover complete with the accelera-
tor control relay lever and rod. Secure using eight
mounting screws, eight toothed washers, eight plain
washers and eight nuts. Fit the fuel line retaining clip
which is secured by one of the air conveyor upper
screws. Install the generator and fan drive pulley
having first placed four adjusting rings between the
pulley halves and the thrust ring on the outside.
Secure the pulley to generator shaft using three
screws and three toothed washers. Fit the generator
fan drive belt.
24 Refit the carburetter having first positioned the
bakelite heat shield between the t w o oil moistened
graphite gaskets. Secure the carburetter using t w o
copper washers and t w o self-locking nuts. Fit the
exhaust silencer and secure to the exhaust manifolds
with nuts and spring washers. Place the t w o graphite
gaskets between the manifold joints. Fit both exhaust
silencer upper mounting brackets and secure them
on the top side to the brackets already in place w i t h
nuts and toothed washers on the bottom side w i t h
screws and toothed washers.
25 Carefully position the distributor at a 10 deg advance
setting and secure w i t h a
nut, plain washer and
spring washer. Fit the fuel pump to carburetter line
complete w i t h mounting bracket rubber lining and
secure the line with two clamps. If difficulty is
experienced in positioning the fuel line into the pump
or carburetter funnels it is suggested that the line
ends should be heated in hot water and thoroughly
dried before installing.
26 Install the air cleaner elbow and rubber hose assembly
on the top of the carburetter using a graphite gasket
in between and secure w i t h nuts, plain washers and
spring washers. Carefully position the air cleaner, line
and hose assembly and connect it to the elbow.
Secure the cleaner to air conveyor cover using screws
and toothed washers.
27 Fit the spark plug cables complete with the rubber
grommet for cable mounting bracket on engine
cowling and connect the cables to the distributor
and spark plugs. Fit the oil pressure gauge sender
unit together w i t h its sealing washer.
28 Install the cylinder head cover and oil breather pipe
assembly w i t h a cork gasket inserted between.
Secure w i t h self-locking nuts and fibre washers.
Connect the accelerator control relay lever rod to the
carburetter and secure with the clip.
29 Fill the oil pan with the correct grade and quantity of
oil, insert the dipstick and the engine is ready for
refitting.
1:18 Engine assembly (station wagon)
Reassembly of this engine is straightforward as it is
the reverse procedure to dismantling. It is recommended
that Sections 1 :5 and 1 :17 are studied as the assembly
technique is similar for both the horizontal and vertical
F50031 cylinder engines. The following points should however
be noted:
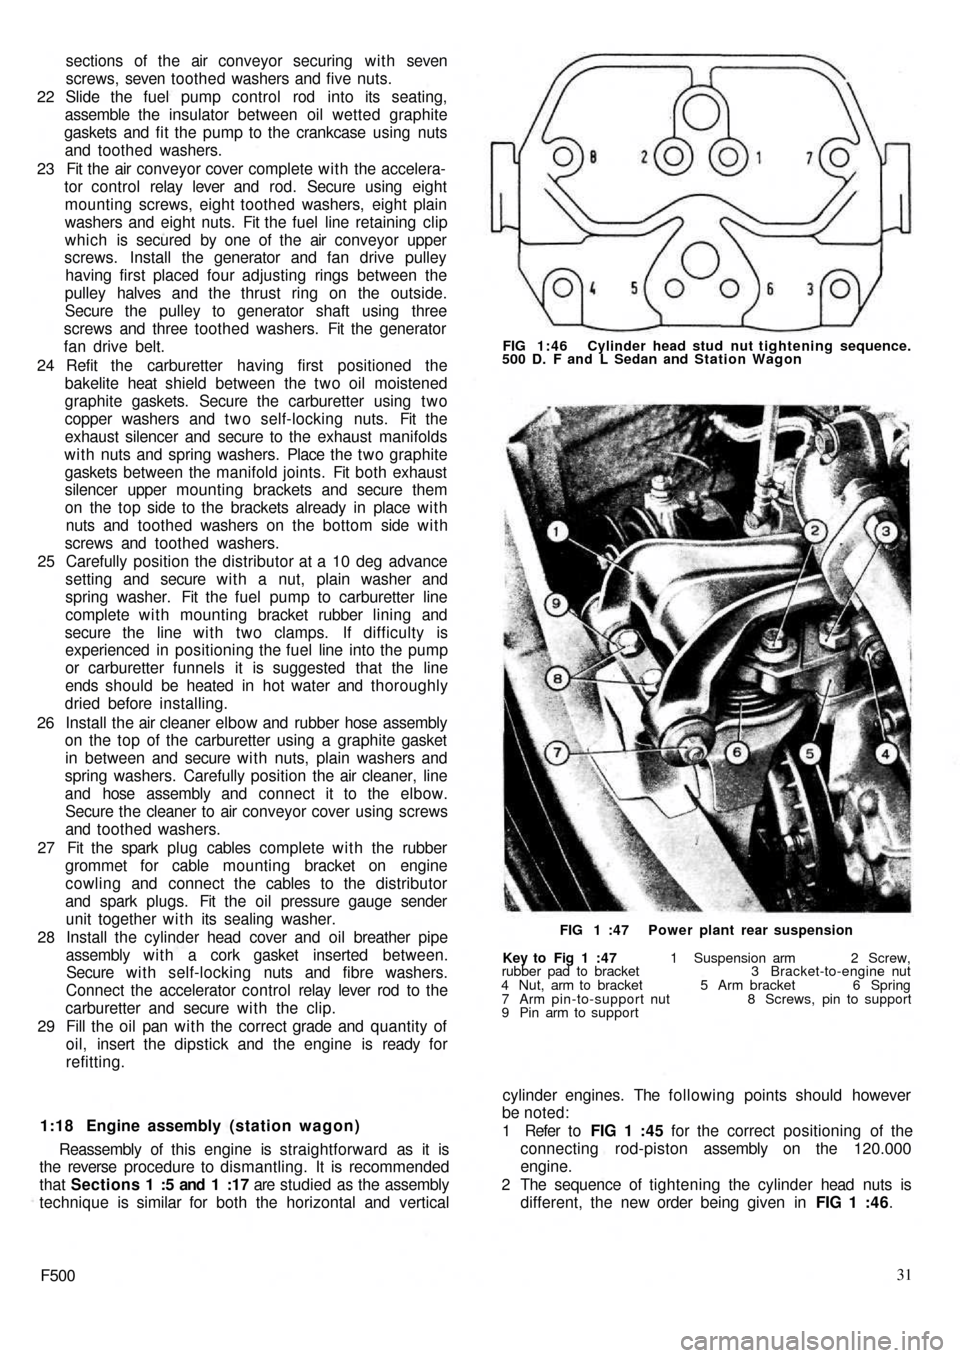
1 Refer to FIG 1 :45 for the correct positioning of the
connecting rod-piston assembly on the 120.000
engine.
2 The sequence of tightening the cylinder head nuts is
different, the new order being given in FIG 1 :46.
Key to Fig 1 :47 1 Suspension arm 2 Screw,
rubber pad to bracket 3 Bracket-to-engine nut
4 Nut, arm to bracket 5 Arm bracket 6 Spring
7 Arm pin-to-support nut 8 Screws, pin to support
9 Pin arm to supportFIG 1 :47 Power plant rear suspension FIG 1:46 Cylinder head stud nut tightening sequence.
500 D. F and L Sedan and Station Wagon
Page 26 of 128
4 Mixture too weak
5 Water in fuel system
6 Petrol tank vent blocked
7 Incorrect valve clearance
(c) Engine idles badly
1 Check 1 and 6 in (b)
2 Air leak at manifold joints
3 Slow-running jet blocked or out of adjustment
4 Air leak in carburetter
5 Over-rich mixture
6 Worn piston rings
7 Worn valve stems or guides
8 Weak exhaust valve springs
(d) Engine misfires
1 Check 1, 2, 3, 4, 5, 8, 10, 13, 14, 1 5, 16, 17 in (a);
2, 3, 4 and 7 in (b)
2 Weak or broken valve springs
(e) Engine overheats
1 Generator and fan drive belt too loose
2 Shutter or thermostat seized in closed position
(f) Compression low
1 Check 14 and 15 in (a), 6 and 7 in (c) and 2 in (d)
2 Worn piston ring grooves
3 Scored or worn cylinder bores
(g) Engine lacks power
1 Check 3, 10, 1 1 , 13, 14, 15, 16 and 17 in (a), 2, 3, 4
and 7 in (b) 6 and 7 in (c) and 2 in (d). Also check (e)
and (f)
2 Leaking joint washers
3 Fouled sparking plugs
4 Automatic centrifugal advance not operating
(h) Burnt valves or seats
1 Check 14 and 15 in (a), 7 in (b) and 2 in (d). Alsocheck (e)
2 Excessive carbon around valve seat and head
(j) Sticking valves
1 Check 2 in (d)
2 Bent valve stem
3 Scored valve stem or guide
4 Incorrect valve clearance
(k) Excessive cylinder wear
1 Check 11 in (a) and see Chapter 4
2 Lack of oil
3 Dirty oil
4 Piston rings gummed up or broken
5 Badly fitting piston rings
6 Connecting rods bent
(l) Excessive oil consumption
1 Check 6 and 7 in (c) and check (k)
2 Ring gaps too wide
3 Oil return holes in piston choked with carbon
4 Scored cylinders
5 Oil level too high
6 External oil leaks
7 Ineffective valve stem oil seals
(m) Crankshaft and connecting rod bearing failure
1 Check 2 in (k)
2 Restricted oilways
3 Worn journals or crank pins
4 Loose bearing caps
5 Extremely low oil pressure
6 Bent connecting rod
(n) High fuel consumption (see Chapter 2)
(o) Engine vibration
1 Loose generator bolts
2 Blower blade assembly out-of-balance
3 Incorrect clearance for rear engine mounting rubber
F50033
Page 85 of 128
1
2
6
3
8
11
13
17
19
22
25
27
29
31
33
36
35 323430 28
26
24232120 ,1816 15 14 12 10 .9 .15 4
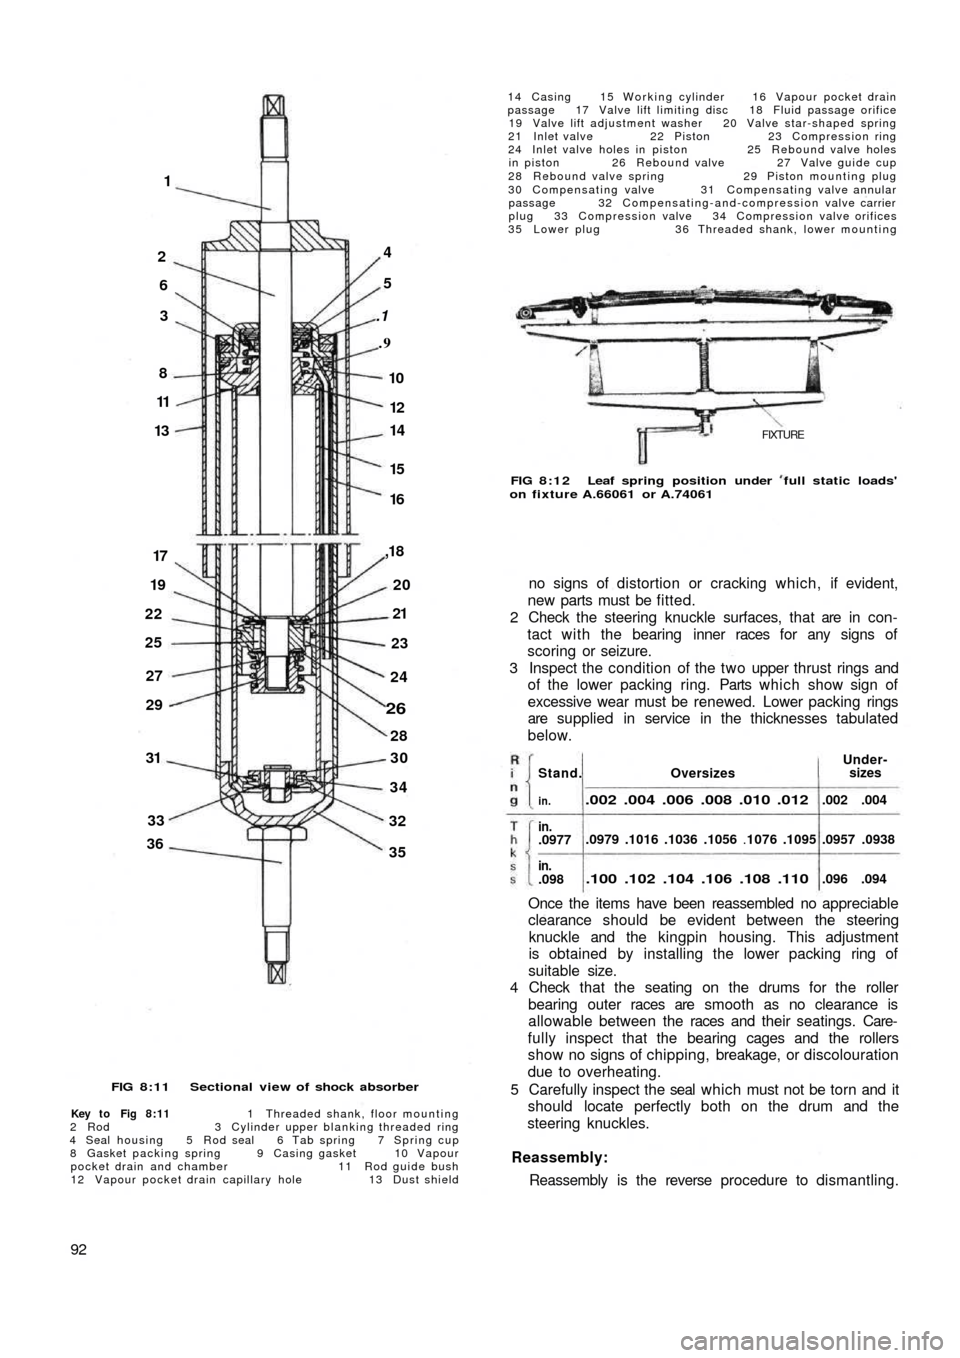
FIG 8:11 Sectional view of shock absorber
Key to Fig 8:11 1 Threaded shank, floor mounting
2 R o d 3 Cylinder upper blanking threaded ring
4 Seal housing 5 Rod seal 6 Tab spring 7 Spring cup
8 Gasket packing spring 9 Casing gasket 10 Vapour
pocket drain and chamber 11 Rod guide bush
12 Vapour pocket drain capillary hole 13 Dust shield
92
14 Casing 15 Working cylinder 16 Vapour pocket drain
passage 17 Valve lift limiting disc 18 Fluid passage orifice
19 Valve lift adjustment washer 20 Valve star-shaped spring
21 Inlet valve 22 Piston 23 Compression ring
24 Inlet valve holes in piston 25 Rebound valve holes
in piston 26 Rebound valve 27 Valve guide cup
28 Rebound valve spring 29 Piston mounting plug
30 Compensating valve 31 Compensating valve annular
passage 32 Compensating-and-compression valve carrier
plug 33 Compression valve 34 Compression valve orifices
35 Lower plug 36 Threaded shank, lower mounting
FIXTURE
FIG 8:12 Leaf spring position under full static loads'
on fixture A.66061 or A.74061
no signs of distortion or cracking which, if evident,
new parts must be fitted.
2 Check the steering knuckle surfaces, that are in con-
tact with the bearing inner races for any signs of
scoring or seizure.
3 Inspect the condition of the two upper thrust rings and
of the lower packing ring. Parts which show sign of
excessive wear must be renewed. Lower packing rings
are supplied in service in the thicknesses tabulated
below.
Once the items have been reassembled no appreciable
clearance should be evident between the steering
knuckle and the kingpin housing. This adjustment
is obtained by installing the lower packing ring of
suitable size.
4 Check that the seating on the drums for the roller
bearing outer races are smooth as no clearance is
allowable between the races and their seatings. Care-
fully inspect that the bearing cages and the rollers
show no signs of chipping, breakage, or discolouration
due to overheating.
5 Carefully inspect the seal which must not be torn and it
should locate perfectly both on the drum and the
steering knuckles.
Reassembly:
Reassembly is the reverse procedure to dismantling.
OversizesUnder-
sizes
.002 .004 .006 .008 .010 .012
.0979 .1016 .1036 .1056 .1076 .1095
.100 .102 .104 .106 .108 .110
.002 .004
.0957 .0938
.096 .094
Stand.
in.
in..0977
in..098
Page 86 of 128
8 : 7 Hydraulic damper:
Description:
The front and rear shock absorbers are of the telescopic
double acting type. Their dampening action takes place
directly on the suspension without the use of any
intermediate linkage. The shock absorber comprises a
cylindrical body formed by to coaxial tubes 14 and 15
(see FIG 8:11), the inner tube acting as the working
cylinder and the outer one as a casing. The fluid reservoir
being located between the two sections. A third outer
cylinder 13 shields the rod 2 from any road dirt.
On the top the cylinder body is enclosed by a bush 1 1 ,
oil seals 5 and 9 and a housing 4. The rod 2 slides through
the seals 5, the upper end is fixed into the vehicle body
floor and its lower end carries the piston 22 on which
rebound 26 and inlet valves 21 are arranged.
The bottom of the shock absorber is closed by a plug
35 with a threaded shank 36 for the shock absorber to be
mounted onto the suspension unit. The cylinder 15 and
carrier plug 32 is mounted with a compensation valve
30 and a compression valve 33. The piston is provided
with two rows of orifices. The internal row is blanked
underneath by the rebound valve which operates
downwards. The external row is blanked by the inlet
valve which opens upwards. Hydraulic shock absorbers
fitted since March 1959 are provided w i t h a vapour
pocket bleeder from the cylinder exterior. The bleeder
device comprises a capillary
hole 12 interconnecting the
inner cylinder 15 with the upper chamber 10 and also a
passage tube 16 from the upper chamber to the fluid
reservoir. Any vapour pockets in the pressure cylinder
are excluded past the capillary hole 12 into the chamber
10 from which they flow downwards during shock
absorber operation through the passage 16 in a light
fluid stream and up to the top of the reservoir with the
reservoir fluid.
Dismantling and inspection:
Normally during service if a shock absorber becomes
weak in operation then a new unit should be fitted.
Should however, it be necessary for the original unit to
be overhauled proceed as follows:
1 Thoroughly clean the outer casing in petrol and blow
dry using a compressed air jet.
2 Firmly clamp the lower shank of the shock absorber
in a vice and telescope upwards the outer casing and
using Fiat wrench A.56024 unscrew the upper
threaded ring 3 (see FIG 8:11).
3 Remove the shock absorber from the vice and carefully
remove the inner cylinder 15 using a screwdriver
inserted in the cylinder bottom chamfer and remove
the lower plug 32 which carries the compression and
compensation valves.
4 Push the rod i n t o the cylinder 15 and clamp the upper
shank in a vice. Unscrew the plug 29, and carefully
remove the piston 22 together with the inlet and
rebound valves. Withdraw the rod 2 from the cylinder
15 and remove the seal gasket, the housing, and
threaded ring. Thoroughly wash all parts in petrol and
carefully blow dry using a c
ompressed air jet. The
following parts should be inspected as follows.
Check that the inlet, rebound and compensation valve
discs are not deformed or show signs of cracking.
F50093 Inspect the surfaces of the piston, the seal ring and the
compression valve to ensure that they are smooth and
hydraulic fluid tight. Check that the rebound and
compression valve springs and upper seal gasket
springs are not broken or weak. Carefully inspect the
t w o seal gaskets for damage or wear and it is recom-
mended that they are renewed upon reassembly.
Check that the rod and the cylinders show no sign of
deformation and that the air pocket evacuating
passage is not blocked. Also check that the capillary
hole 12 is not blocked. Any parts which show signs
of wear or damage must be renewed.
Reassembly:
Reassembly of the shock absorber is the reverse
procedure to dismantling. Special care must be taken
when refilling the shock absorber w i t h Fiat SA1 oil
otherwise its operating characteristics will be altered.
The hydraulic fluid capacity for the front shock
absorbers is .112 imperial quarts.
The hydraulic capacity for the rear shock absorbers is
.088 imperial quarts. Only Fiat—SA1 oil must be
used.
To insert the components into the shock absorber
body proceed as follows:
1 Mount the piston on the rod, and insert the piston and
rod assembly into the cylinder 15 (see FIG 8:11).
2 Push the piston against the bush 11 and then very
carefully pour the correct amount of hydraulic fluid
up to about j inch from the edge.
3 Press f i t t h e plug 32 and pour the remaining fluid into
the casing 14.
4 Insert the cylinder 15 into the casing 14 and tighten
the upper threaded ring 3.
8 :8 Front suspension assembly and installation
1 Attach Fiat fixture A.66061 to the springs as shown
in FIG 8:12 and load it using the centre screw on the
fixture until the index 'Nuova 500' appears below
the crossbeam lower edge. It is in this position the
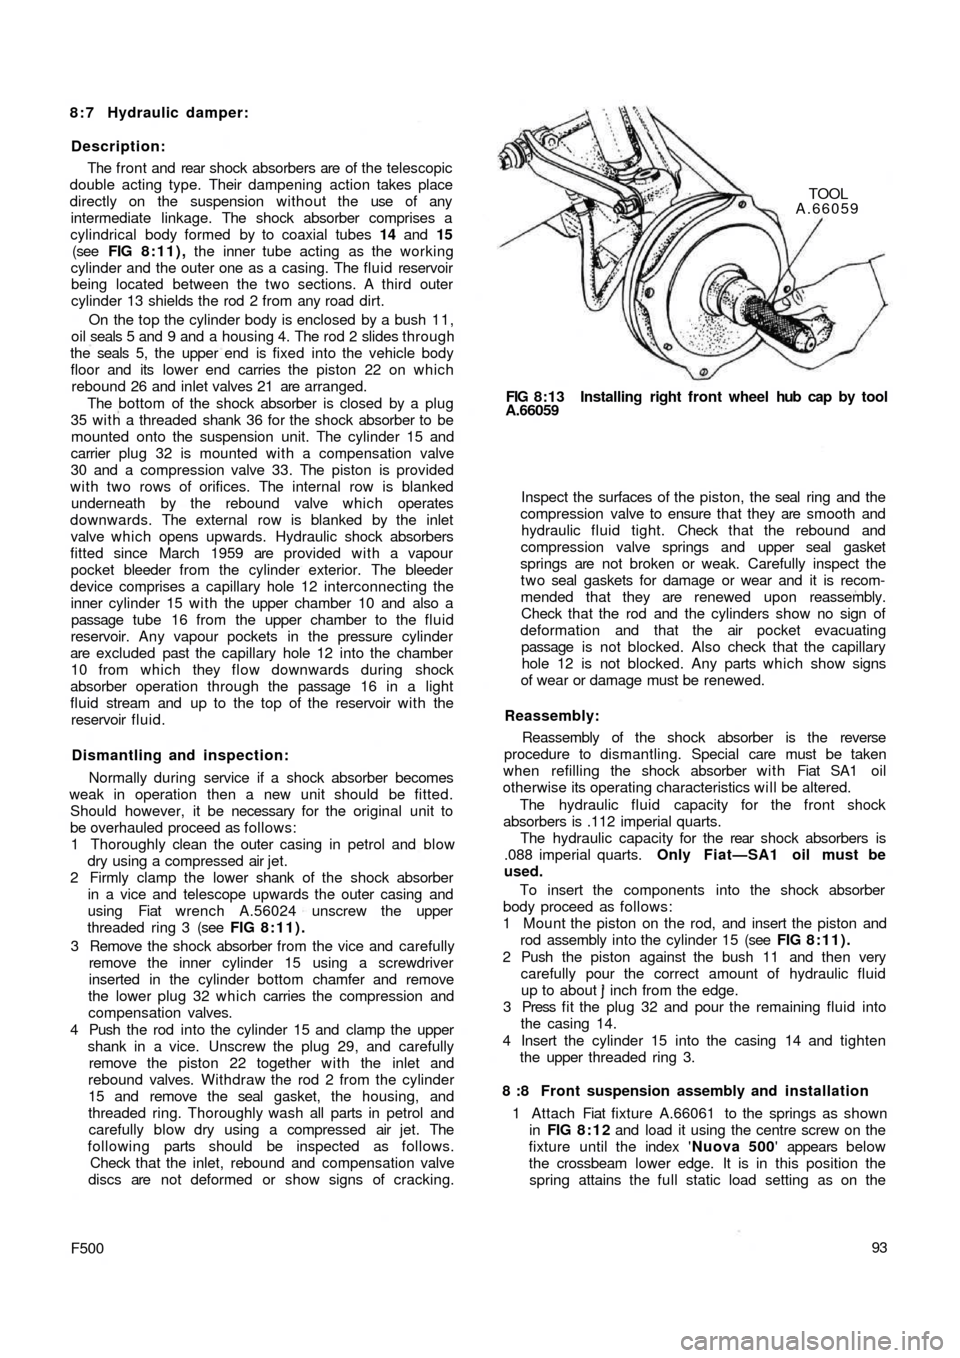
spring attains the full static load setting as on the FIG 8:13 Installing right front wheel hub cap by tool
A.66059TOOL
A.66059