weight FIAT 500 1961 1.G User Guide
[x] Cancel search | Manufacturer: FIAT, Model Year: 1961, Model line: 500, Model: FIAT 500 1961 1.GPages: 128, PDF Size: 9.01 MB
Page 60 of 128

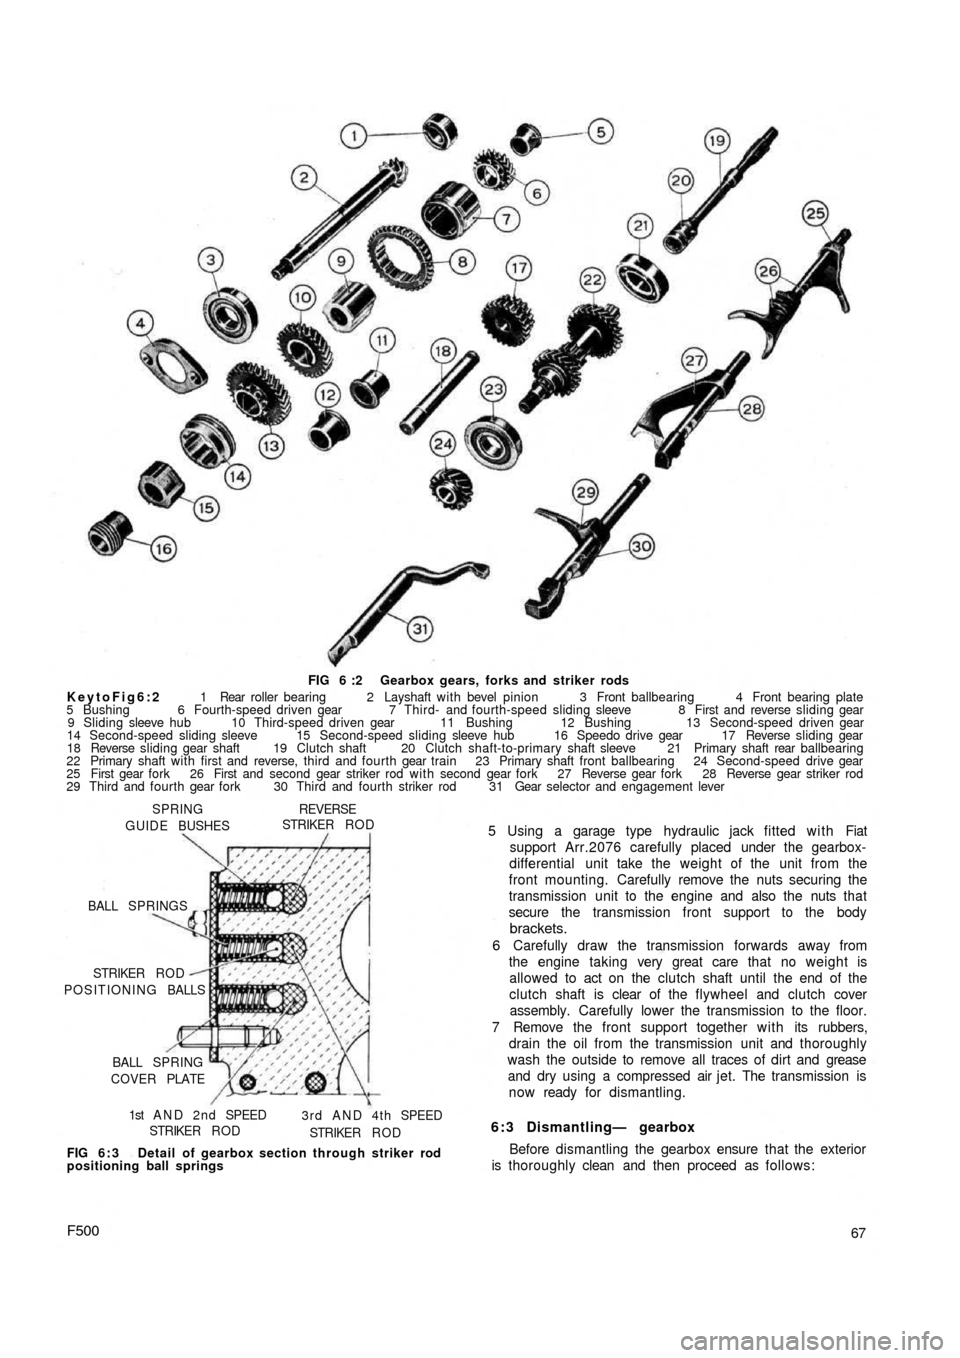
FIG 6 :2 Gearbox gears, forks and striker rods
KeytoFig6:2 1 Rear roller bearing 2 Layshaft with bevel pinion 3 Front ballbearing 4 Front bearing plate
5 Bushing 6 Fourth-speed driven gear 7 Third- and fourth-speed sliding sleeve 8 First and reverse sliding gear
9 Sliding sleeve hub 10 Third-speed driven gear 11 Bushing 12 Bushing 13 Second-speed driven gear
14 Second-speed sliding sleeve 15 Second-speed sliding sleeve hub 16 Speedo drive gear 17 Reverse sliding gear
18 Reverse sliding gear shaft 19 Clutch shaft 20 Clutch shaft-to-primary shaft sleeve 21 Primary shaft rear ballbearing
22 Primary shaft with first and reverse, third and fourth gear train 23 Primary shaft front ballbearing 24 Second-speed drive gear
25 First gear fork 26 First and second gear striker rod with second gear fork 27 Reverse gear fork 28 Reverse gear striker rod
29 Third and fourth gear fork 30 Third and fourth striker rod 31 Gear selector and engagement lever
SPRING
GUIDE BUSHES
REVERSESTRIKER R O D
BALL SPRINGS
POSITIONING BALLS STRIKER R O D
BALL SPRING
COVER PLATE
1st A N D 2 n d SPEED
STRIKER R O D3 r d A N D 4 t h SPEED
STRIKER R O D
FIG 6 : 3 Detail of gearbox section through striker rod
positioning ball springs
F50067 5 Using a garage type hydraulic jack fitted with Fiat
support Arr.2076 carefully placed under the gearbox-
differential unit take the weight of the unit from the
front mounting. Carefully remove the nuts securing the
transmission unit to the engine and also the nuts that
secure the transmission front support to the body
brackets.
6 Carefully draw the transmission forwards away from
the engine taking very great care that no weight is
allowed to act on the clutch shaft until the end of the
clutch shaft is clear of the flywheel and clutch cover
assembly. Carefully lower the transmission to the floor.
7 Remove the front support together with its rubbers,
drain the oil from the transmission unit and thoroughly
wash the outside to remove all traces of dirt and grease
and dry using a compressed air jet. The transmission is
now ready for dismantling.
6:3 Dismantling— gearbox
Before dismantling the gearbox ensure that the exterior
is thoroughly clean and then proceed as follows:
Page 67 of 128

TOOL A 62039
TOOLA. 62040 PIN WRENCH A. 52022
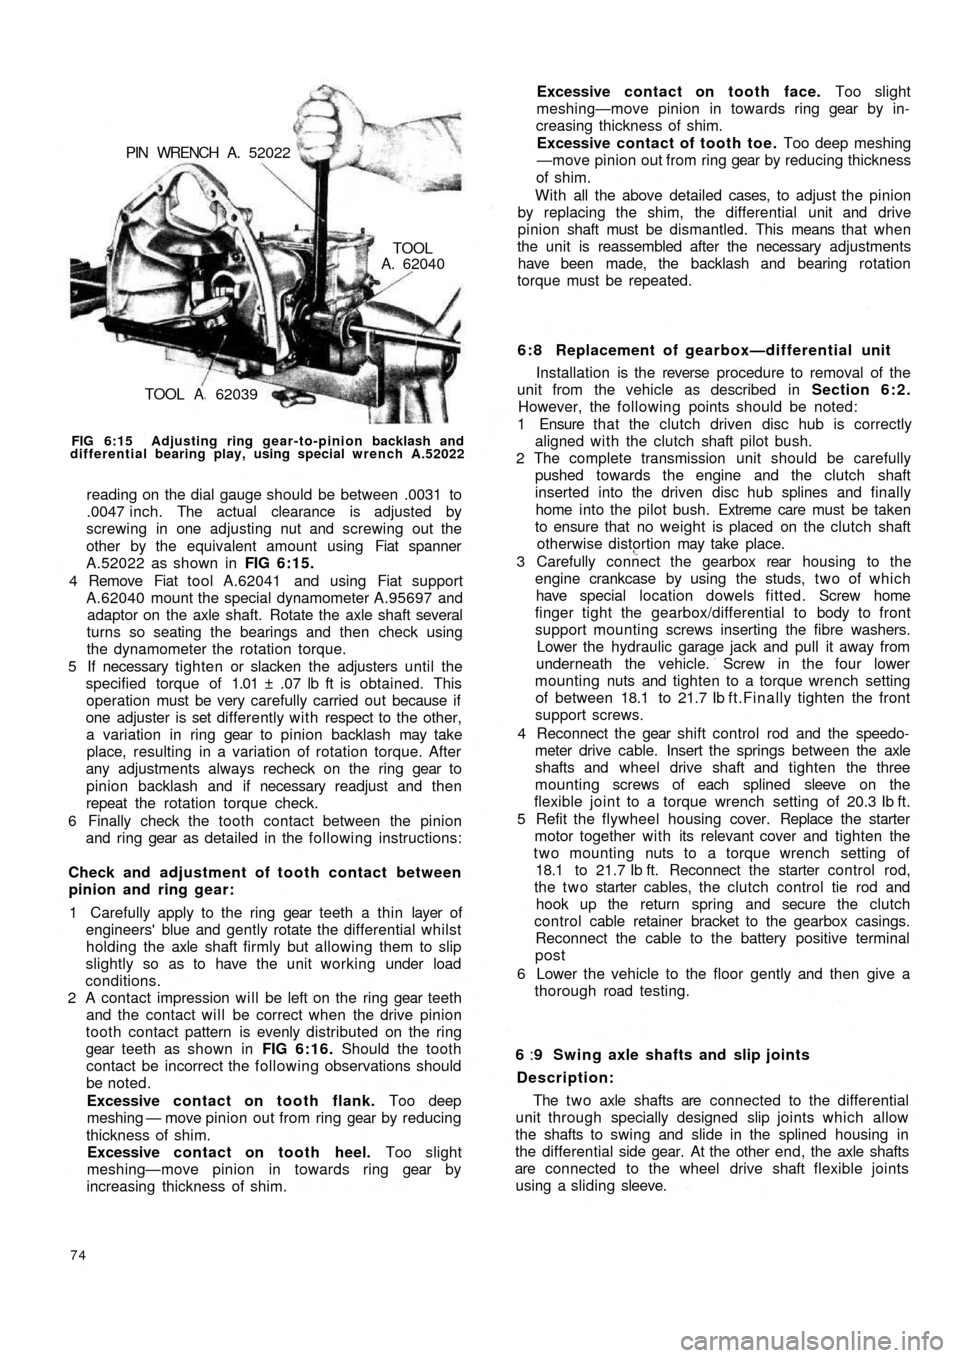
FIG 6:15 Adjusting ring gear-to-pinion backlash and
differential bearing play, using special wrench A.52022
reading on the dial gauge should be between .0031 to
.0047 inch. The actual clearance is adjusted by
screwing in one adjusting nut and screwing out the
other by the equivalent amount using Fiat spanner
A.52022 as shown in FIG 6:15.
4 Remove Fiat tool A.62041 and using Fiat support
A.62040 mount the special dynamometer A.95697 and
adaptor on the axle shaft. Rotate the axle shaft several
turns so seating the bearings and then check using
the dynamometer the rotation torque.
5 If necessary tighten or slacken the adjusters until the
specified torque of 1.01 ± .07 lb ft is obtained. This
operation must be very carefully carried out because if
one adjuster is set differently with respect to the other,
a variation in ring gear to pinion backlash may take
place, resulting in a variation of rotation torque. After
any adjustments always recheck on the ring gear to
pinion backlash and if necessary readjust and then
repeat the rotation torque check.
6 Finally check the tooth contact between the pinion
and ring gear as detailed in the following instructions:
Check and adjustment of tooth contact between
pinion and ring gear:
1 Carefully apply to the ring gear teeth a thin layer of
engineers' blue and gently rotate the differential whilst
holding the axle shaft firmly but allowing them to slip
slightly so as to have the unit working under load
conditions.
2 A contact impression will be left on the ring gear teeth
and the contact will be correct when the drive pinion
tooth contact pattern is evenly distributed on the ring
gear teeth as shown in FIG 6:16. Should the tooth
contact be incorrect the following observations should
be noted.
Excessive contact on tooth flank. Too deep
meshing — move pinion out from ring gear by reducing
thickness of shim.
Excessive contact on tooth heel. Too slight
meshing—move pinion in towards ring gear by
increasing thickness of shim.
74
6 : 8 Replacement of gearbox—differential unit
Installation is the reverse procedure to removal of the
unit from the vehicle as described in Section 6:2.
However, the following points should be noted:
1 Ensure that the clutch driven disc hub is correctly
aligned with the clutch shaft pilot bush.
2 The complete transmission unit should be carefully
pushed towards the engine and the clutch shaft
inserted into the driven disc hub splines and finally
home into the pilot bush. Extreme care must be taken
to ensure that no weight is placed on the clutch shaft
otherwise distortion may take place.
3 Carefully connect the gearbox rear housing to the
engine crankcase by using the studs, t w o of which
have special location dowels fitted. Screw home
finger tight the gearbox/differential to body to front
support mounting screws inserting the fibre washers.
Lower the hydraulic garage jack and pull it away from
underneath the vehicle. Screw in the four lower
mounting nuts and tighten to a torque wrench setting
of between 18.1 to 21.7 Ib f t.Finally tighten the front
support screws.
4 Reconnect the gear shift control rod and the speedo-
meter drive cable. Insert the springs between the axle
shafts and wheel drive shaft and tighten the
three
mounting screws of each splined sleeve on the
flexible joint to a torque wrench setting of 20.3 Ib ft.
5 Refit the flywheel housing cover. Replace the starter
motor together with its relevant cover and tighten the
two mounting nuts to a torque wrench setting of
18.1 to 21.7 Ib ft. Reconnect the starter control rod,
the t w o starter cables, the clutch control tie rod and
hook up the return spring and secure the clutch
control cable retainer bracket to the gearbox casings.
Reconnect the cable to the battery positive terminal
post
6 Lower the vehicle to the floor gently and then give a
thorough road testing.
6 :9 Swing axle shafts and slip joints
Description:
The t w o axle shafts are connected to the differential
unit through specially designed slip joints which allow
the shafts to swing and slide in the splined housing in
the differential side gear. At the other end, the axle shafts
are connected to the wheel drive shaft flexible joints
using a sliding sleeve. Excessive contact on tooth face. Too slight
meshing—move pinion in towards ring gear by in-
creasing thickness of shim.
Excessive contact of tooth toe. Too deep meshing
—move pinion out from ring gear by reducing thickness
of shim.
With all the above detailed cases, to adjust the pinion
by replacing the shim, the differential unit and drive
pinion shaft must be dismantled. This means that when
the unit is reassembled after the necessary adjustments
have been made, the backlash and bearing rotation
torque must be repeated.