Front wheel bearings FIAT 500 1962 1.G Workshop Manual
[x] Cancel search | Manufacturer: FIAT, Model Year: 1962, Model line: 500, Model: FIAT 500 1962 1.GPages: 128, PDF Size: 9.01 MB
Page 18 of 128
After the crankshaft has been reground it is important
that all traces of swarf are removed by constant washing
and then drying with a non-fluffy rag.
The clearance between the main bearings and journals
must be checked before installing the crankshaft in the
engine. It should also serve as a recheck after the
crankshaft has been reground.
Measure the maximum main bearing internal
diameter and the minimum journal diameter using
accurate measuring equipment. The clearance must not
exceed .0039 inch otherwise the journals must be
reground and undersize bearings fitted.
Undersize bearings w i t h .0394 inch stock on the
internal diameter are also supplied unmounted. They
must be press fitted in the supports, the recommended
interference fit being .00039 to .00197 inch. After
pressing the bearing into the support, a hole is drilled in
the bearing in line with the location dowel hole in the
support. The hole is finished with a suitable expanding
reamer, such as Fiat U.0334, and the dowel pressed i n ,
noting that the hollow dowel fits in the flywheel end
support.
The next stage is to heat the assembly in an oven or
oil bath for a period of one hour at 150°C (302°F).
When the assembly has cooled to room temperature,
the bearing is reamed in a lathe to match the crankshaft
journal size.
3
Crankshaft oil seals:
Two inner spring rubber oil seals are located, one in a
special seat in the timing gear cover and the other in the
flywheel end of the crankshaft support and provide oil
tightness. These seals are shown in FIGS 1 :3 and 1 :34.
Whenever the engine is dismantled for overhaul these
seals should be carefully inspected for correct seating and
that the inner seal surface is not worn and that the contact
area is perfect both on the crankshaft and on the fan and
generator drive pulley hub.
Clutch shaft pilot bushing:
A self-lubricating bronze bush is fitted in the end of the
crankshaft as shown in FIG 1 :34 and provides a bearing
for the clutch shaft. Should the bush be worn use Fiat
puller A.40006/1 /2 to remove the worn bush. A new bush
should be fitted using a suitably sized drift.
1:12 Flywheel and starter ring gear
The flywheel should be inspected for wear at the clutch
driven plate contact area. It should be flat and have a
smooth finish.
The ring gear teeth should be cheeked for damage
which if evident, the ring gear must be replaced. To facili-
tate the fitting of a new ring gear on the flywheel, the new
ring gear should be heated in an oil bath to a temperature
of 80°C (176°F). Using a press gently ease the
expanded
ring gear over the flywheel and press fully home.
1:13 The oil pump
Sedan :
A helical-spur gear type oil pump is driven by the cam-
shaft through a front dog drive coupling. The gears are
F50025 To remove the pump from the engine proceed as
follows:Pump removal and reassembly:
Remove the engine rear central support from the timing
gear casing. Remove the filter cover pulley and lift
away the drive belt.
Release the hollow screw attaching the slinger and the
mounting flange of the filter on the crankshaft. Also
release the nuts fixing the timing gear cover to the
crankcase.
Remove the timing gear cover together with the oil
pump assembly and the pressure relief valve.
Lift out the oil pump suction scoop with the filter
screen attached from the sump.
Reassembly of the pump to the engine is the reverse
procedure to dismantling. 1
2
3
4
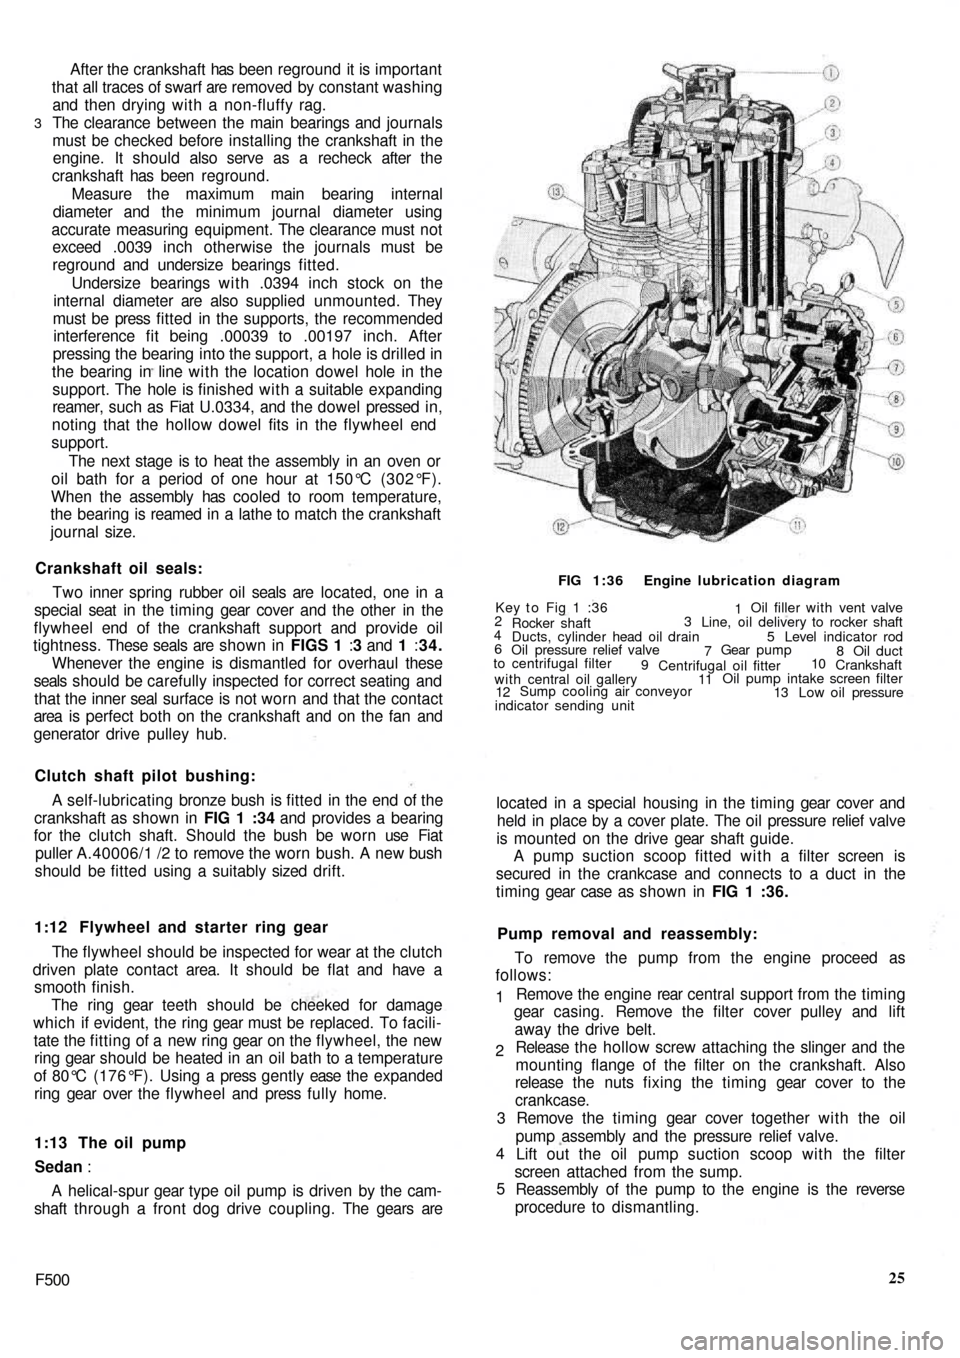
5 located in a special housing in the timing gear cover and
held in place by a cover plate. The oil pressure relief valve
is mounted on the drive gear shaft guide.
A pump suction scoop fitted with a filter screen is
secured in the crankcase and connects to a duct in the
timing gear case as s h o w n in FIG 1 :36.
2
4
6Key t o Fig 1 :36
Rocker shaft
Ducts, cylinder head oil drain
Oil pressure relief valve
to centrifugal filter
9
with central oil gallery
12Sump cooling air conveyor
indicator sending unitOil filler with vent valve
Line, oil delivery to rocker shaft
Level indicator rod 31
5
7Gear pump
8 Oil duct
Centrifugal oil fitter
1110
Crankshaft
Oil pump intake screen filter
13 Low oil pressure FIG 1:36 Engine lubrication diagram
Page 25 of 128
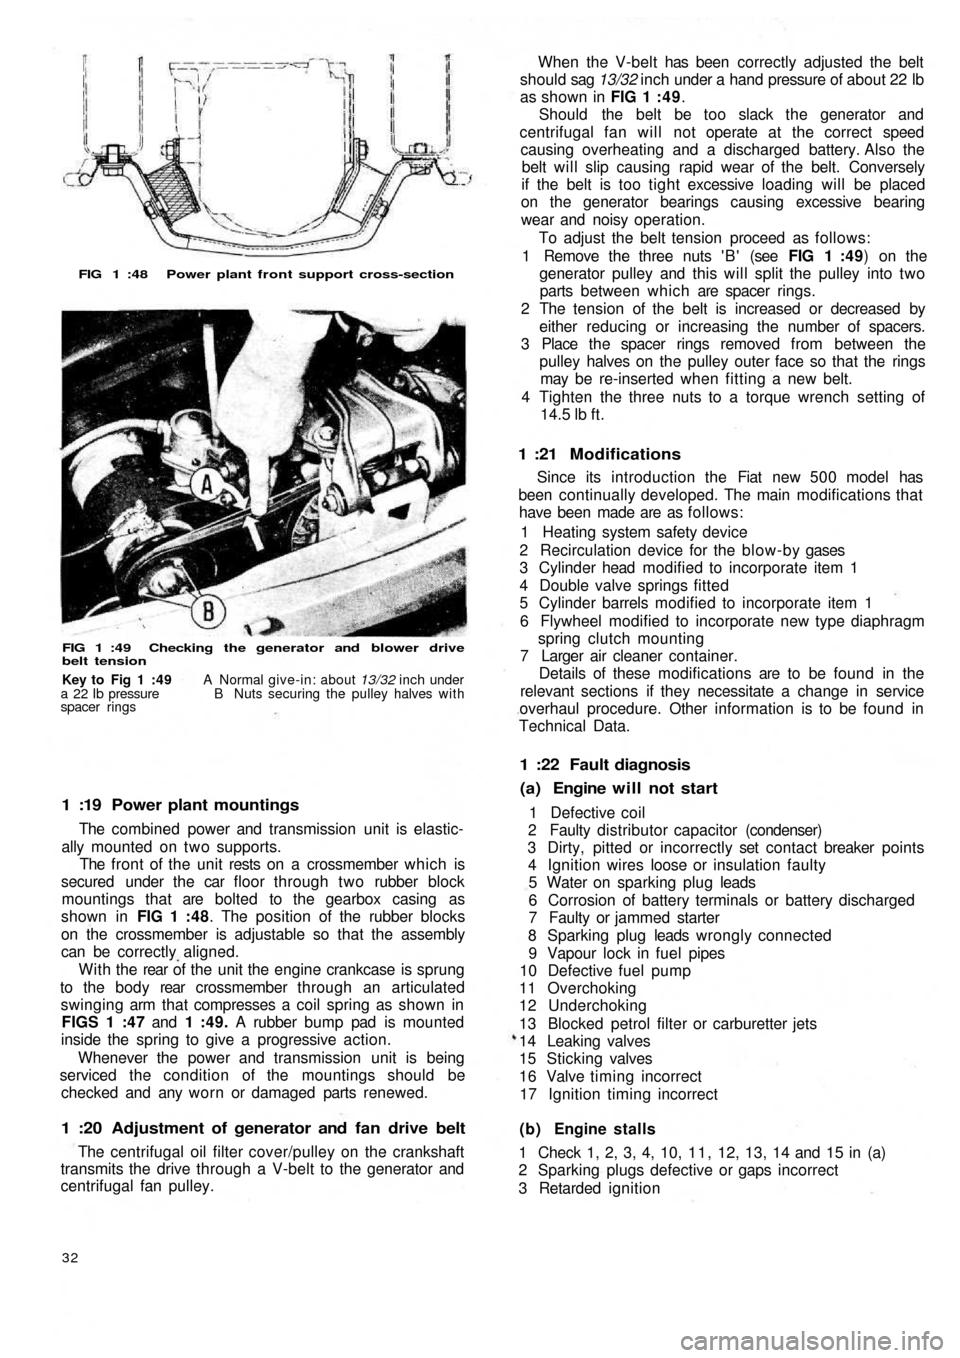
FIG 1 :48 Power plant front support cross-section
FIG 1 :49 Checking the generator and blower drive
belt tension
1 :19 Power plant mountings
The combined power and transmission unit is elastic-
ally mounted on two supports.
The front of the unit rests on a crossmember which is
secured under the car floor through two rubber block
mountings that are bolted to the gearbox casing as
shown in FIG 1 :48. The position of the rubber blocks
on the crossmember is adjustable so that the assembly
can be correctly aligned.
W i t h t h e rear of the unit the engine crankcase is sprung
to the b o d y rear crossmember through an articulated
swinging arm that compresses a coil spring as shown in
FIGS 1 :47 and 1 :49. A rubber bump pad is mounted
inside the spring to give a progressive action.
Whenever the power and transmission unit is being
serviced the condition of the mountings should be
checked and any worn or damaged parts renewed.
1 :20 Adjustment of generator and fan drive belt
The centrifugal oil filter cover/pulley on the crankshaft
transmits the drive through a V-belt to the generator and
centrifugal fan pulley.
32
(b) Engine stalls
1 Check 1, 2, 3, 4, 10, 1 1 , 12, 13, 14 and 15 in (a)
2 Sparking plugs defective or gaps incorrect
3 Retarded ignition 1 Defective coil
2 Faulty distributor capacitor (condenser)
3 Dirty, pitted or incorrectly set contact breaker points
4 Ignition wires loose or insulation faulty
5 Water on sparking plug leads
6 Corrosion of battery terminals or battery discharged
7 Faulty or jammed starter
8 Sparking plug leads wrongly connected
9 Vapour lock in fuel pipes
10 Defective fuel pump
11 Overchoking
12 Underchoking
13 Blocked petrol filter or carburetter jets
14 Leaking valves
15 Sticking valves
16 Valve timing incorrect
17 Ignition timing incorrect
(a) Engine will not start 1 :22 Fault diagnosis
Since its introduction the Fiat new 5 0 0 model has
been continually developed. The main modifications that
have been made are as follows:
1 Heating system safety device
2 Recirculation device for the blow-by gases
3 Cylinder head modified to incorporate item 1
4 Double valve springs fitted
5 Cylinder barrels modified to incorporate item 1
6 Flywheel modified to incorporate new type diaphragm
spring clutch mounting
7 Larger air cleaner container.
Details of these modifications are to be found in the
relevant sections if they necessitate a change in service
overhaul procedure. Other information is to be found in
Technical Data.
1 :21 Modifications
When the V-belt has been correctly adjusted the belt
should sag 13/32 inch under a hand pressure of about 22 lb
as shown in FIG 1 : 4 9.
Should the belt be too slack the generator and
centrifugal fan will not operate at the correct speed
causing overheating and a discharged battery. Also the
belt will slip causing rapid wear of the belt. Conversely
if the belt is too tight excessive loading will be placed
on the generator bearings causing excessive bearing
wear and noisy operation.
To adjust the belt tension proceed as follows:
1 Remove the three nuts ' B ' (see FIG 1 :49) on the
generator pulley and this will split the pulley into two
parts between which are spacer rings.
2 The tension of the belt is increased or decreased by
either reducing or increasing the number of spacers.
3 Place the spacer rings removed from between the
pulley halves on the pulley outer face so that the rings
may be re-inserted when fitting a new belt.
4 Tighten the three nuts to a torque wrench setting of
14.5
lb ft.
Key to Fig 1 :49 A Normal give-in: about 13/32 inch under
a 22 Ib pressure B Nuts securing the pulley halves with
spacer rings
Page 59 of 128
PRIMARY SHAFT-TO-CLUTCH
SHAFT MOUNTING PINCLUTCH SHAFT SEAL PRIMARY SHAFT WITH
1st, 3 r d A N D 4 t h SPEED
GEAR CLUSTER
2 n d SPEED
DRIVE GEARPRIMARY SHAFT
FRONT BALL BEARINGPRIMARY SHAFT
REAR BALL BEARING
PRIMARY
SHAFT-TO-CLUTCH
i SHAFT JOINING SLEEVEJOINING SLEEVELOCKRING
SPEED SELECTOR LEVER
CLUTCH SHAFT
LAYSHAFT WITH BEVEL PINION
SPEEDOMETER DRIVE GEAR
2 n d SPEED ENGAGEMENT
SLIDING SLEEVE
2 N D SPEED DRIVEN GEAR
LAYSHAFT FRONT BALL
BEARING
3 r d SPEED DRIVEN GEARHUB FOR
SLEEVE
3rd AND 4th/
SPEED ENGAGEMENT
SLIDING SLEEVE4 t h SPEED
DRIVEN GEARLAYSHAFT REAR ROLLER BEARING
LAYSHAFT-TO-PINION
ADJUSTMENT WASHER 1st SPEED AND)
REVERSE SLIDING GEAR
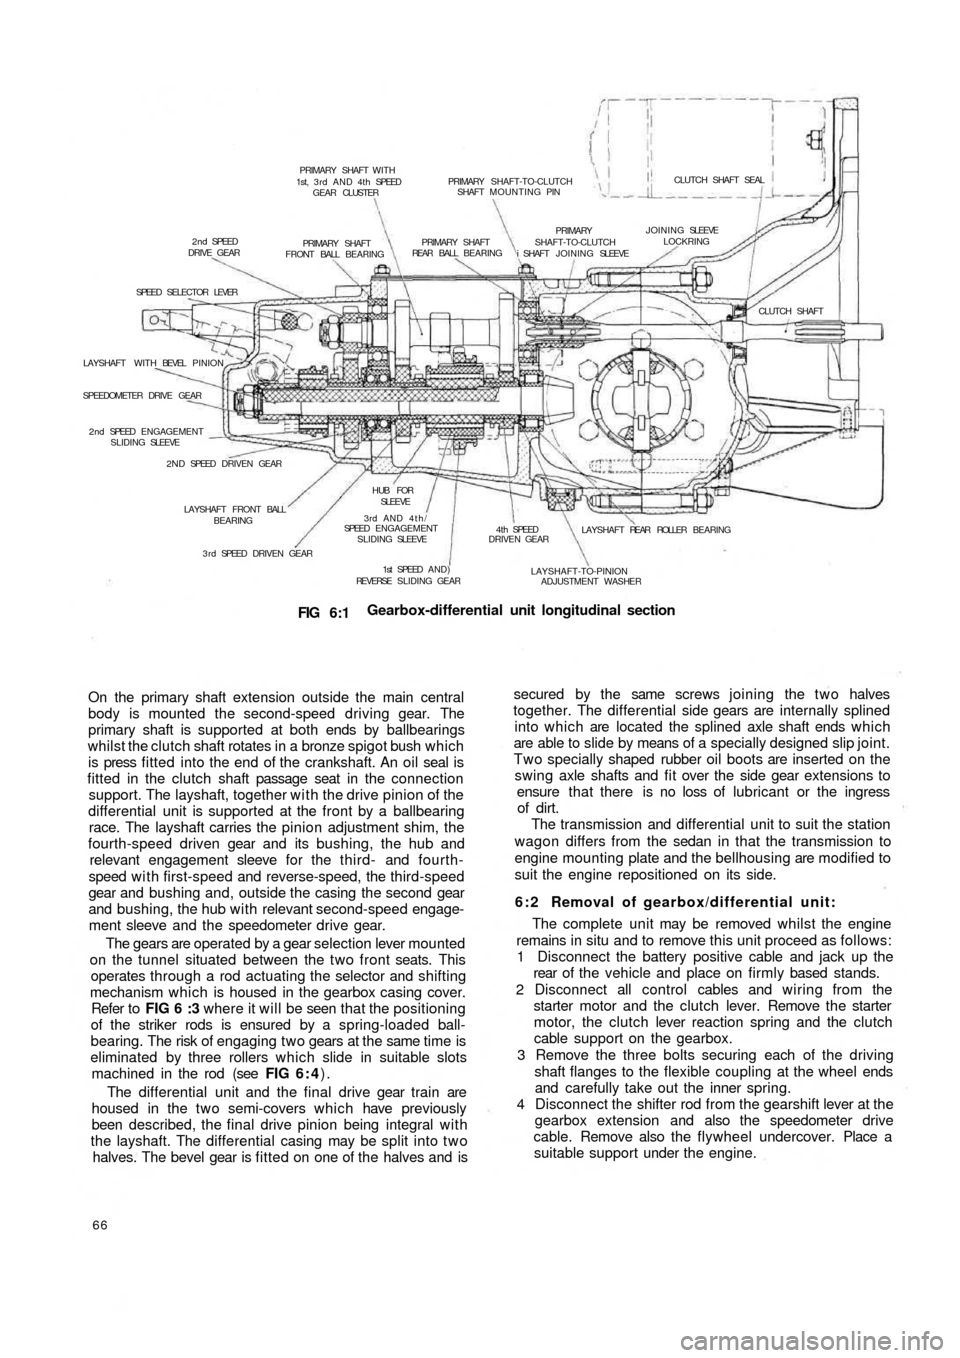
FIG 6:1Gearbox-differential unit longitudinal section
On the primary shaft extension outside the main central
body is mounted the second-speed driving gear. The
primary shaft is supported at both ends by ballbearings
whilst the clutch shaft rotates in a bronze spigot bush which
is press fitted into the end of the crankshaft. An oil seal is
fitted in the clutch shaft passage seat in the c o n n e c t i o n
support. The layshaft, together with the drive pinion of the
differential unit is supported at the front by a ballbearing
race. The layshaft carries the pinion adjustment shim, the
fourth-speed driven gear and its bushing, the hub and
relevant engagement sleeve for the t h i r d - and fourth-
speed w i t h first-speed and reverse-speed, the third-speed
gear and bushing and, outside the casing the second gear
and bushing, the hub with relevant second-speed engage-
ment sleeve and the speedometer drive gear.
The gears are operated by a gear selection lever mounted
on the tunnel situated between the two front seats. This
operates through a rod actuating the selector and shifting
mechanism which is housed in the gearbox casing cover.
Refer to FIG 6 :3 where it will be seen th a t the positioning
of the striker rods is ensured by a spring-loaded ball-
bearing. The risk of engaging two gears at the same time is
eliminated by three rollers which slide in suitable slots
machined in the rod (see FIG 6 : 4).
The differential unit and the final drive gear train are
housed in the t w o semi-covers which
have previously
been described, the final drive pinion being integral with
the layshaft. The differential casing may be split into t w o
halves. The bevel gear is fitted on one of the halves and is
66
secured by the same screws joining the two halves
together. The differential side gears are internally splined
into which are located the splined axle shaft ends which
are able to slide by means of a specially designed slip joint.
Two specially shaped rubber oil boots are inserted on the
swing axle shafts and fit over the side gear extensions to
ensure that there is no loss of lubricant or the ingress
of dirt.
The transmission and differential unit to suit the station
wagon differs from the sedan in that the transmission to
engine mounting plate and the bellhousing are modified to
suit the engine repositioned on its side.
6 : 2 Removal of gearbox/differential unit:
The complete unit may be removed whilst the engine
remains in situ and to remove this unit proceed as follows:
1 Disconnect the battery positive cable and jack up the
rear of t h e vehicle and place on firmly based stands.
2 Disconnect all control cables and wiring from the
starter motor and the clutch lever. Remove the starter
motor, the clutch lever reaction spring and the clutch
cable support on the gearbox.
3 Remove the three bolts securing each of the driving
shaft flanges to the flexible coupling at the wheel ends
and carefully take out the inner spring.
4 Disconnect the shifter rod from the gearshift lever at the
gearbox extension and also the
speedometer drive
cable. Remove also the flywheel undercover. Place a
suitable support under the engine.
Page 62 of 128
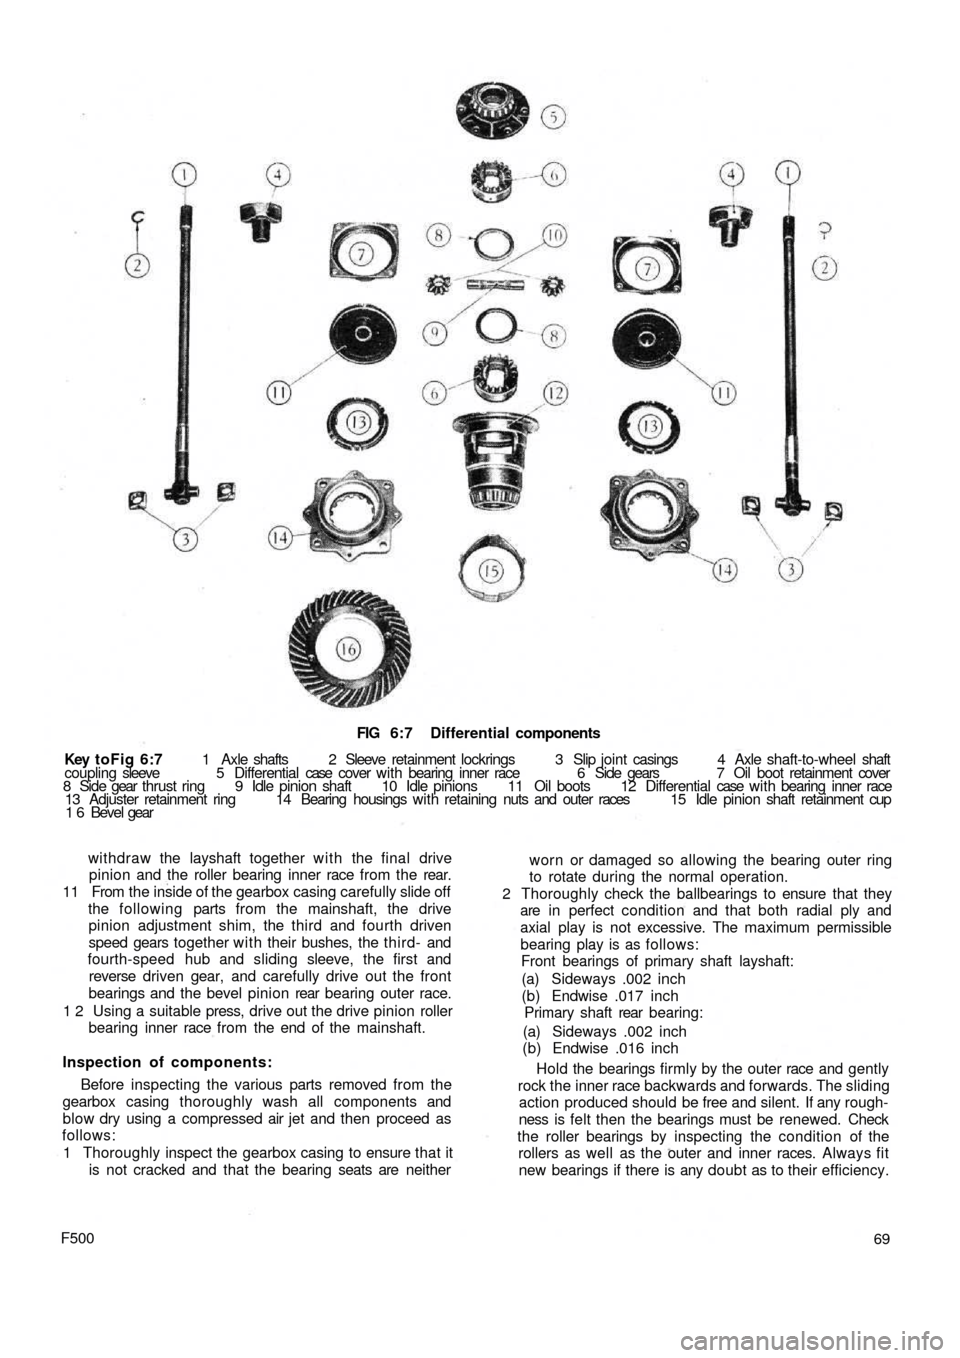
FIG 6:7 Differential components
Key toFig 6:7 1 Axle shafts 2 Sleeve retainment lockrings 3 Slip joint casings 4 Axle shaft-to-wheel shaft
coupling sleeve 5 Differential case cover w i t h bearing inner race 6 Side gears 7 Oil boot retainment cover
8 Side gear thrust ring 9 Idle pinion shaft 10 Idle pinions 11 Oil boots 12 Differential case w i t h bearing inner race
13 Adjuster retainment ring 14 Bearing housings with retaining nuts and outer races 15 Idle pinion shaft retainment cup
1 6 Bevel gear
withdraw the layshaft together w i t h the final drive
pinion and the roller bearing inner race from the rear.
11 From the inside of the gearbox casing carefully slide off
the following parts from the mainshaft, the drive
pinion adjustment shim, the third and fourth driven
speed gears together with their bushes, the t hird- and
fourth-speed hub and sliding sleeve, the first and
reverse driven gear, and carefully drive out the front
bearings and the bevel pinion rear bearing outer race.
1 2 Using a suitable press, drive out the drive pinion roller
bearing inner race from the end of the mainshaft.
Inspection of components:
Before inspecting the various parts removed from the
gearbox casing thoroughly wash all components and
blow dry using a compressed air jet and then proceed as
follows:
1 Thoroughly inspect the gearbox casing to ensure that it
is not cracked and that the bearing seats are neither
F50069 worn or damaged so allowing the bearing outer ring
to rotate during the normal operation.
2 Thoroughly check the ballbearings to ensure that they
are in perfect condition and that both radial ply and
axial play is not excessive. The maximum permissible
bearing play is as follows:
Front bearings of primary shaft layshaft:
(a) Sideways .002 inch
(b) Endwise .017 inch
Primary shaft rear bearing:
(a) Sideways .002 inch
(b) Endwise .016 inch
Hold the bearings firmly by the outer race and gently
rock the inner race backwards and forwards. The sliding
action produced should be free and silent. If any rough-
ness is felt then the bearings must be renewed. Check
the roller bearings by inspecting the condition of the
rollers as well as the outer and inner races. Always fit
new bearings if there is any doubt as to their efficiency.
Page 64 of 128
of wear, distorting or unevenness of the surfaces as this
part is very heavily pressed when the vehicle is negotia-
ting a corner. If the clearance to the idle pinions exceeds
.0059 inch the shaft must be renewed.
2 Inspect the ring gear and pinion seat, the side gears.and
the idle pinions for correct meshing. This will be shown
up by white marks on the sides of the gear teeth. Check
that none of the teeth are broken, chipped or exces-
sively worn and if any part is suspect then it must be
renewed not forgetting that the ring gear and pinion
come as a matched pair.
3 Inspect the condition of the ball and roller bearings, the
rollers and balls and working faces must not show signs
of pitting wear or cracking and if any part is suspect then
the race must be renewed.
4 Check that there is not any undue wear on the faces of
the thrust rings. Any slight indentations may be evened
out using a fine oil stone but if the damage is excessive
then new rings or oversize rings must befitted as neces-
sary. Thrust rings are supplied as service spares in the
following thicknesses.
Standard .0394 inch
Oversize .0512-.0591 inch
6:6 Reassembly—differential unit
To reassemble the differential case proceed as follows:
1 Press onto the differential half housing which carries
the ring gear one differential bearing inner race ensuring
that it is pushed fully home onto its seating. Install the
thrust ring and side gear (see FIG 6 : 7).
2 From t h e inside of the case insert the axle shaft com-
plete with pivot and runners that form the slip joint.
Also install the idle pinions and carrier shaft. Position
the ring gear onto the housing half and install the
differential pinion shaft retainer ring.
3 Press the other differential bearing inner race onto its
seating on the left differential housing half and replace
the left axle shaft complete with slip joint.
4 J o i n the t w o case halves together and tighten the
retaining screws and also the retaining screws of the
ring gear to a torque wrench setting of 23.1 Ib ft. Secure
all screws by bending up the lockplates.
5 Press t h e differential bearing outer races into their
seatings in the bearing housings and also f i t the o i l seals.
Also install the bearing housings over the driving shafts
together with the adjuster rings.
6 Install the differential unit assembly into the final drive
housing front half and bolt the rear
half onto it. Tighten
the six mounting nuts to a torque wrench setting of
27.5 Ib ft. Finally place the bearing housings in their
seats and tighten the mounting nuts to a torque wrench
setting of 13 lb ft.
It should be noted that after the gearbox has been over-
hauled the complete differential unit should only be in-
stalled after the drive pinion depth adjustments has been
carried out.
6 : 7 Final drive gear set adjustment
The installation and adjustment of the final drive gear
set requires special care otherwise the unit may have to be
dismantled again for further adjustment. So as to establish
the correct mesh of the t w o gears, their relative position is
accurately set during initial assembly at the factory.
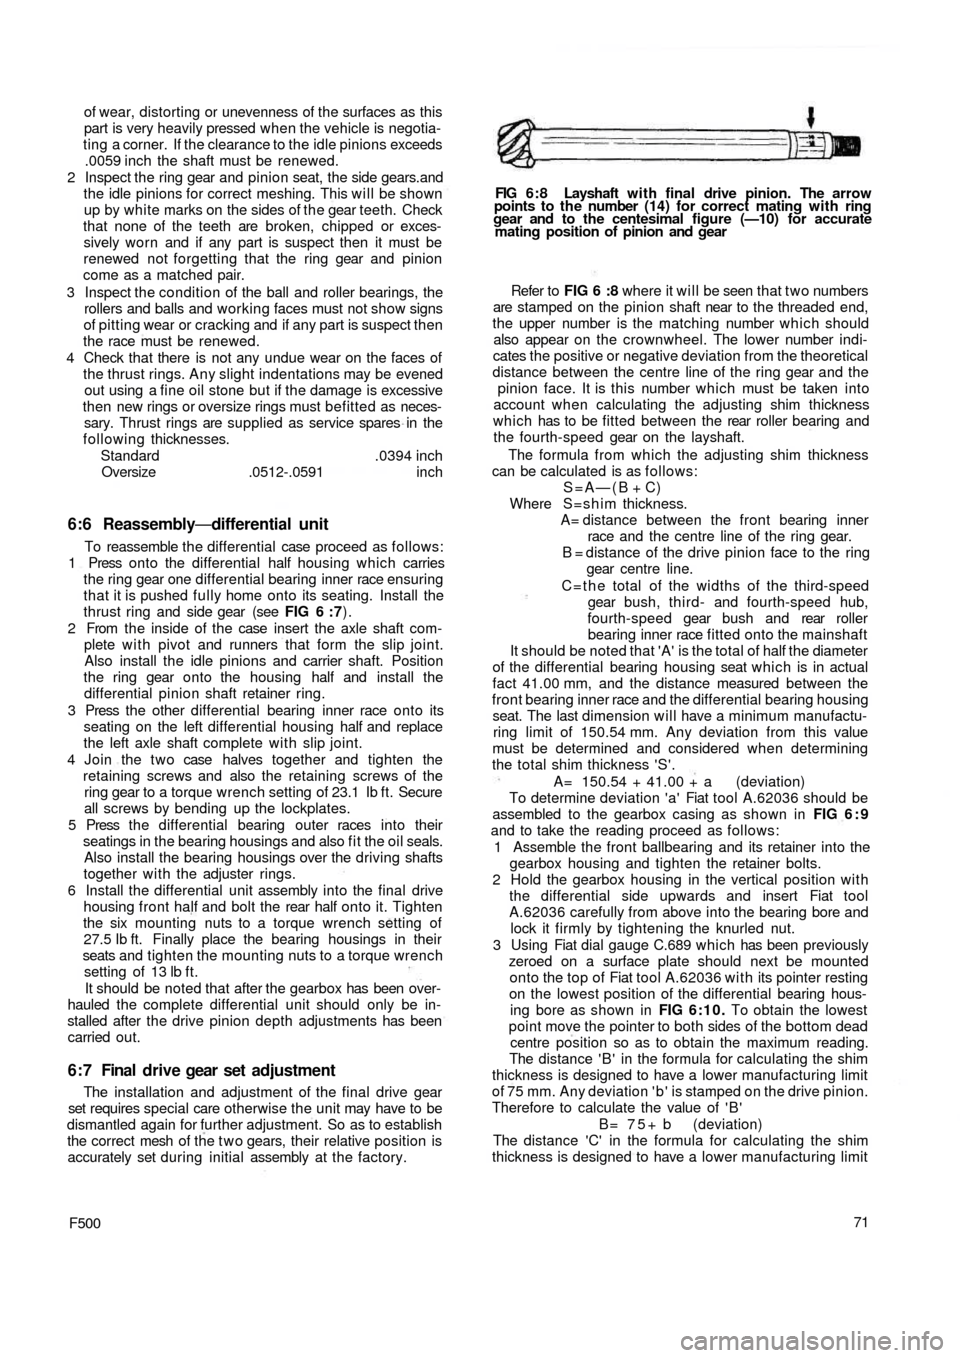
F50071 Refer to FIG 6 :8 where it will be seen that t w o numbers
are stamped on the pinion shaft near to the threaded end,
the upper number is the matching number which should
also appear on the crownwheel. The lower number indi-
cates the positive or negative deviation from the theoretical
distance between the centre line of the ring gear and the
pinion face. It is this number which must be taken into
account when calculating the adjusting shim thickness
which has to be fitted between the rear roller bearing and
the fourth-speed gear on the layshaft.
The formula from which the adjusting shim thickness
can be calculated is as follows:
S=A—(B + C)
Where S=shim thickness.
A= distance between the front bearing inner
race and the centre line of the ring gear.
B = distance of the drive pinion face to the ring
gear centre line.
C = t h e total of the widths of the third-speed
gear bush, third- and fourth-speed hub,
fourth-speed gear bush and rear roller
bearing inner race fitted onto the mainshaft
It should be noted that 'A' is the total of half the diameter
of the differential bearing housing seat which is in actual
fact 41.00 mm, and the distance measured between the
front bearing inner race and the differential bearing housing
seat. The last
dimension will have a minimum manufactu-
ring limit of 150.54 mm. Any deviation from this value
must be determined and considered when determining
the total shim thickness 'S'.
A= 150.54 + 41.00 + a (deviation)
To determine deviation 'a' Fiat tool A.62036 should be
assembled to the gearbox casing as shown in FIG 6 : 9
and to take the reading proceed as follows:
1 Assemble the front ballbearing and its retainer into the
gearbox housing and tighten the retainer bolts.
2 Hold the gearbox housing in the vertical position with
the differential side upwards and insert Fiat tool
A.62036 carefully from above into the bearing bore and
lock it firmly by tightening the knurled nut.
3 Using Fiat dial gauge C.689 which has been previously
zeroed on a surface plate should next be mounted
onto the t o p of Fiat tool A.62036 with its pointer resting
on the lowest position of the differential bearing hous-
ing bore as shown in FIG 6:10. To obtain the lowest
point move the pointer to both sides of the bottom dead
centre position so as to obtain the maximum reading.
The distance ' B ' in the formula for calculating the shim
thickness is designed to have a lower manufacturing limit
of 75 mm. Any deviation ' b ' is stamped on the drive pinion.
Therefore to calculate the value of ' B '
B = 7 5 + b (deviation)
The distance 'C' in the formula for calculating the shim
thickness is designed to have a lower manufacturing limit
FIG 6 : 8 Layshaft w i t h final drive pinion. The arrow
points to the number (14) for correct mating with ring
gear and to the centesimal figure (—10) for accurate
mating position of pinion and gear
Page 67 of 128
TOOL A 62039
TOOLA. 62040 PIN WRENCH A. 52022
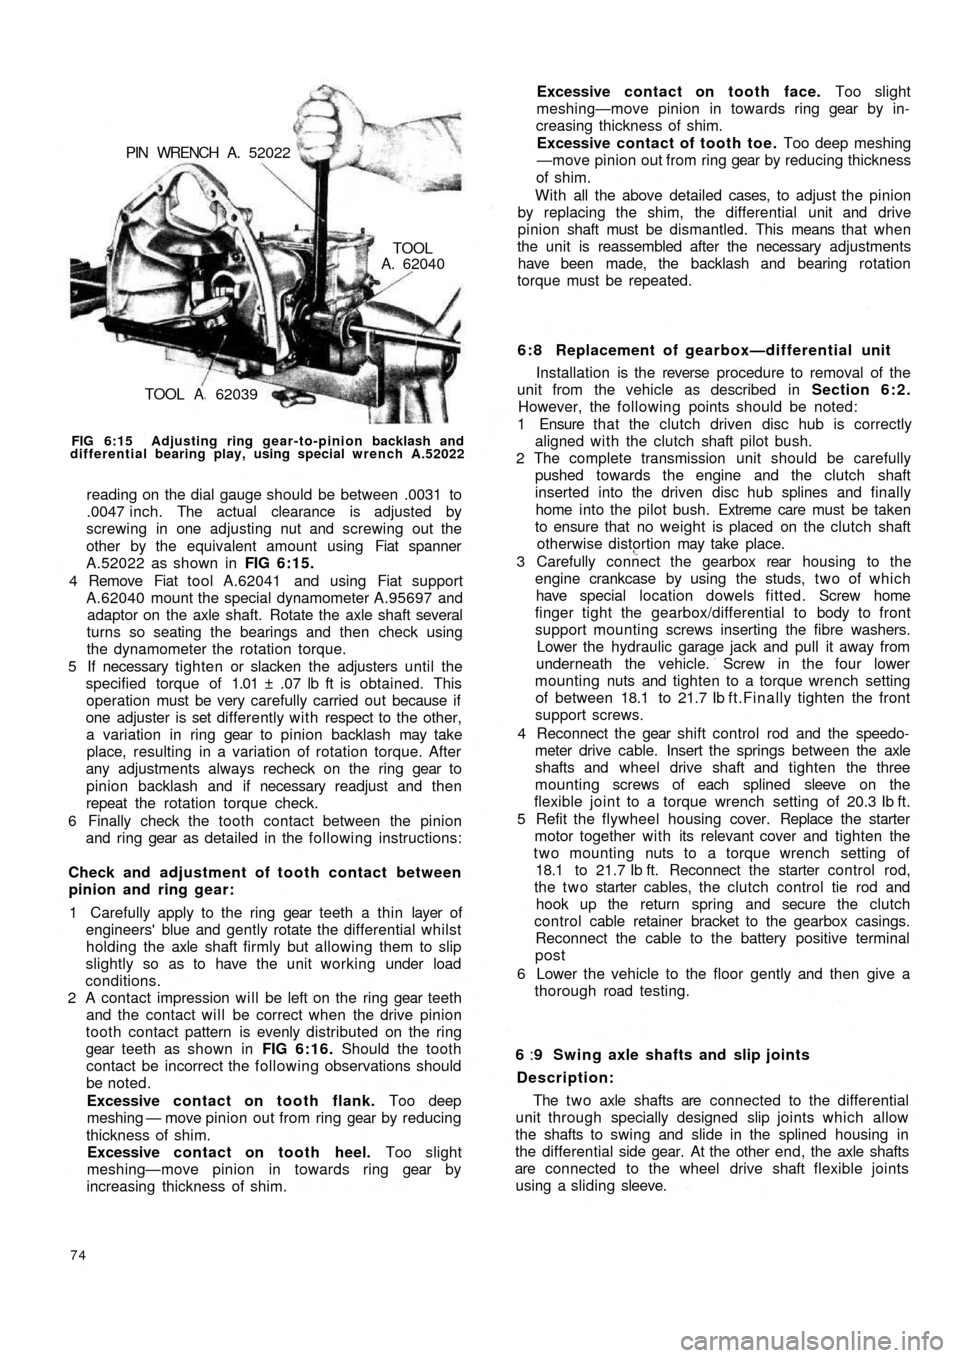
FIG 6:15 Adjusting ring gear-to-pinion backlash and
differential bearing play, using special wrench A.52022
reading on the dial gauge should be between .0031 to
.0047 inch. The actual clearance is adjusted by
screwing in one adjusting nut and screwing out the
other by the equivalent amount using Fiat spanner
A.52022 as shown in FIG 6:15.
4 Remove Fiat tool A.62041 and using Fiat support
A.62040 mount the special dynamometer A.95697 and
adaptor on the axle shaft. Rotate the axle shaft several
turns so seating the bearings and then check using
the dynamometer the rotation torque.
5 If necessary tighten or slacken the adjusters until the
specified torque of 1.01 ± .07 lb ft is obtained. This
operation must be very carefully carried out because if
one adjuster is set differently with respect to the other,
a variation in ring gear to pinion backlash may take
place, resulting in a variation of rotation torque. After
any adjustments always recheck on the ring gear to
pinion backlash and if necessary readjust and then
repeat the rotation torque check.
6 Finally check the tooth contact between the pinion
and ring gear as detailed in the following instructions:
Check and adjustment of tooth contact between
pinion and ring gear:
1 Carefully apply to the ring gear teeth a thin layer of
engineers' blue and gently rotate the differential whilst
holding the axle shaft firmly but allowing them to slip
slightly so as to have the unit working under load
conditions.
2 A contact impression will be left on the ring gear teeth
and the contact will be correct when the drive pinion
tooth contact pattern is evenly distributed on the ring
gear teeth as shown in FIG 6:16. Should the tooth
contact be incorrect the following observations should
be noted.
Excessive contact on tooth flank. Too deep
meshing — move pinion out from ring gear by reducing
thickness of shim.
Excessive contact on tooth heel. Too slight
meshing—move pinion in towards ring gear by
increasing thickness of shim.
74
6 : 8 Replacement of gearbox—differential unit
Installation is the reverse procedure to removal of the
unit from the vehicle as described in Section 6:2.
However, the following points should be noted:
1 Ensure that the clutch driven disc hub is correctly
aligned with the clutch shaft pilot bush.
2 The complete transmission unit should be carefully
pushed towards the engine and the clutch shaft
inserted into the driven disc hub splines and finally
home into the pilot bush. Extreme care must be taken
to ensure that no weight is placed on the clutch shaft
otherwise distortion may take place.
3 Carefully connect the gearbox rear housing to the
engine crankcase by using the studs, t w o of which
have special location dowels fitted. Screw home
finger tight the gearbox/differential to body to front
support mounting screws inserting the fibre washers.
Lower the hydraulic garage jack and pull it away from
underneath the vehicle. Screw in the four lower
mounting nuts and tighten to a torque wrench setting
of between 18.1 to 21.7 Ib f t.Finally tighten the front
support screws.
4 Reconnect the gear shift control rod and the speedo-
meter drive cable. Insert the springs between the axle
shafts and wheel drive shaft and tighten the
three
mounting screws of each splined sleeve on the
flexible joint to a torque wrench setting of 20.3 Ib ft.
5 Refit the flywheel housing cover. Replace the starter
motor together with its relevant cover and tighten the
two mounting nuts to a torque wrench setting of
18.1 to 21.7 Ib ft. Reconnect the starter control rod,
the t w o starter cables, the clutch control tie rod and
hook up the return spring and secure the clutch
control cable retainer bracket to the gearbox casings.
Reconnect the cable to the battery positive terminal
post
6 Lower the vehicle to the floor gently and then give a
thorough road testing.
6 :9 Swing axle shafts and slip joints
Description:
The t w o axle shafts are connected to the differential
unit through specially designed slip joints which allow
the shafts to swing and slide in the splined housing in
the differential side gear. At the other end, the axle shafts
are connected to the wheel drive shaft flexible joints
using a sliding sleeve. Excessive contact on tooth face. Too slight
meshing—move pinion in towards ring gear by in-
creasing thickness of shim.
Excessive contact of tooth toe. Too deep meshing
—move pinion out from ring gear by reducing thickness
of shim.
With all the above detailed cases, to adjust the pinion
by replacing the shim, the differential unit and drive
pinion shaft must be dismantled. This means that when
the unit is reassembled after the necessary adjustments
have been made, the backlash and bearing rotation
torque must be repeated.
Page 73 of 128
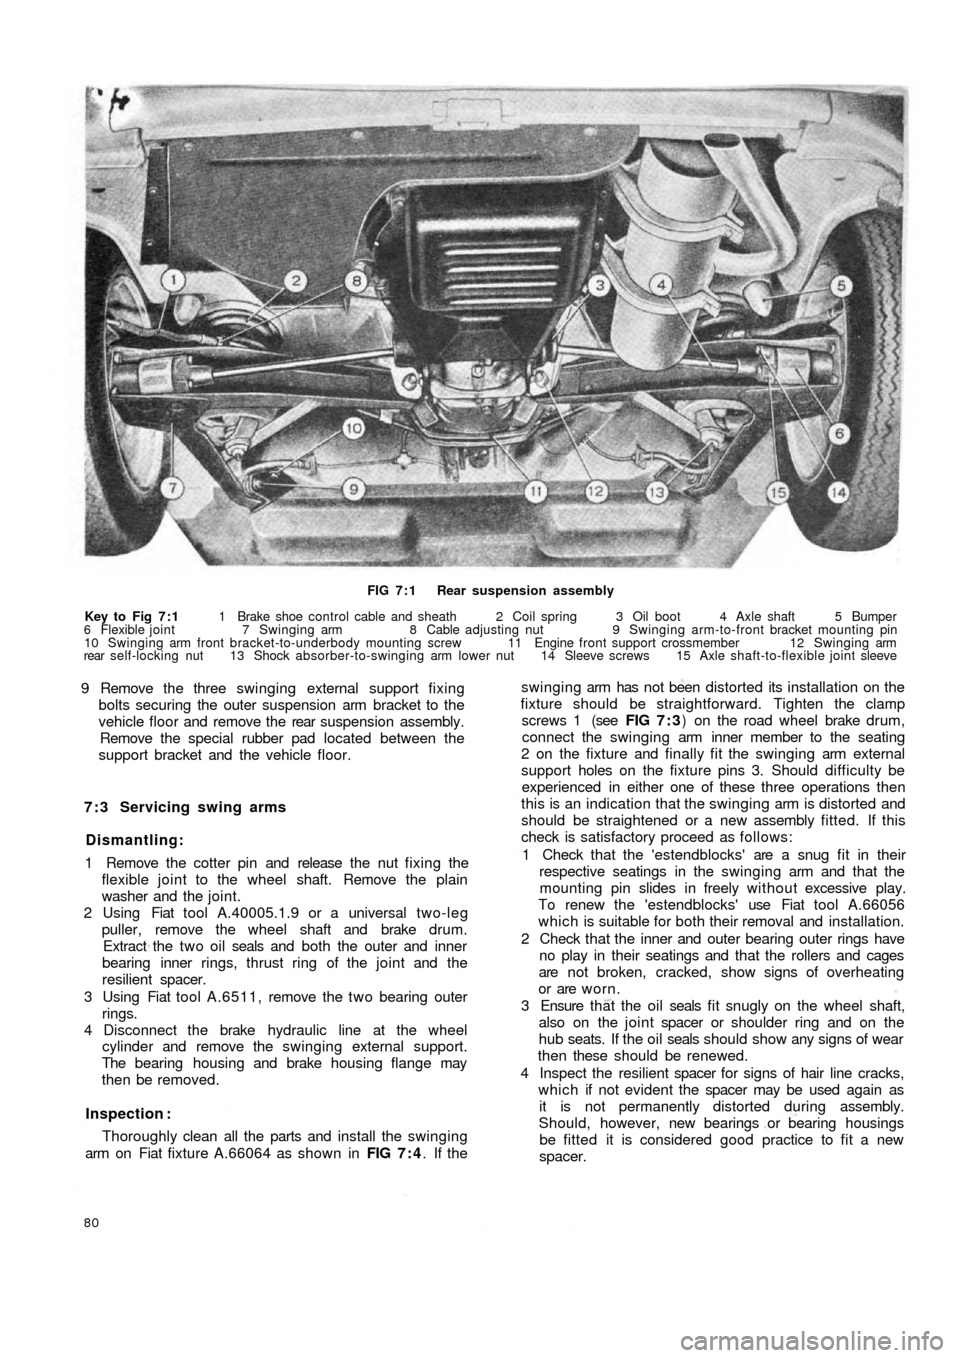
FIG 7 : 1 Rear suspension assembly
Key to Fig 7 : 1 1 Brake shoe control cable and sheath 2 Coil spring 3 Oil boot 4 Axle shaft 5 Bumper
6 Flexible joint 7 Swinging arm 8 Cable adjusting nut 9 Swinging arm-to-front bracket mounting pin
10 Swinging arm front bracket-to-underbody mounting screw 11 Engine front support crossmember 12 Swinging arm
rear self-locking nut 13 Shock absorber-to-swinging arm lower nut 14 Sleeve screws 15 Axle shaft-to-flexible joint sleeve
9 Remove the three swinging external support fixing
bolts securing the outer suspension arm bracket to the
vehicle floor and remove the rear suspension assembly.
Remove the special rubber pad located between the
support bracket and the vehicle floor.
7 : 3 Servicing swing arms
Dismantling:
1 Remove the cotter pin and release the nut fixing the
flexible joint to the wheel shaft. Remove the plain
washer and the joint.
2 Using Fiat tool A.40005.1.9 or a universal two-leg
puller, remove the wheel shaft and brake drum.
Extract the t w o oil seals and both the outer and inner
bearing inner rings, thrust ring of the joint and the
resilient spacer.
3 Using Fiat tool A.6511, remove the t w o bearing outer
rings.
4 Disconnect the brake hydraulic line at the wheel
cylinder and remove the swinging external support.
The bearing housing and brake housing flange may
then be removed.
Inspection :
Thoroughly clean all the parts and install the swinging
arm on Fiat fixture A.66064 as shown in FIG 7 : 4. If the
80
swinging arm has not been distorted its installation on the
fixture should be straightforward. Tighten the clamp
screws 1 (see FIG 7 : 3) on the road wheel brake drum,
connect the swinging arm inner member to the seating
2 on the fixture and finally fit the swinging arm external
support holes on the fixture pins 3. Should difficulty be
experienced in either one of these three operations then
this is an indication that the swinging arm is distorted and
should be straightened or a new assembly fitted. If this
check is satisfactory proceed as follows:
1 Check that the 'estendblocks' are a snug fit in their
respective seatings in the swinging arm and that the
mounting pin slides in freely w it h ou t excessive play.
To renew the 'estendblocks' use Fiat tool A.66056
which is suitable for both their removal and installation.
2 Check that the inner and outer bearing outer rings have
no play in their seatings and that the rollers and cages
are not broken, cracked, show signs of overheating
or are worn.
3 Ensure t h a t the o i l seals f i t snugly on the wheel shaft,
also on the joint spacer or shoulder ring and on the
hub seats. If the oil seals should show any signs of wear
then these should be renewed.
4 Inspect the resilient spacer for signs of hair line cracks,
which if not evident the spacer may be used again as
it is not permanently distorted during assembly.
Should, however, new bearings or bearing housings
be fitted it is considered good practice to fit a new
spacer.
Page 79 of 128
A tolerance of —10'.+ 15' is permitted providing
that the value is the same for both rear wheels. It is
important that both rear wheels are set to the same
angle otherwise uneven tyre wear and adverse handl-
ing conditions will result. When the wheel is parallel to
the centre line of the vehicle the pin of bracket
C.696/3 will be .216 inch apart from the pin of the
front suspension swinging arm.
7 Release the swinging arm outer support to body
mounting screws and position arm in such a way as to
obtain the condition as described in Number 6 above.
After the adjustment has been completed tighten
the outer support mounting screws to a torque wrench
setting of 28.9 to 36.2 Ib/ft. Also tighten the two
swinging arm pin nuts C (see FIG 7 : 7) to a torque
wrench setting of 43.4 to 50.6 Ib/ft. Take off the gauge
C.696 w i t h bracket and support C.696/3, and repeat
the check and adjustment operations on the other
wheel. Care must be taken to ensure that bracket
C.696/3 is reversed from the position previously used.
New 500 type 500D, 110F and 110L sedan and
station wagon:
After the rear suspension has been replaced, check
and, if necessary adjust the rear wheel geometry.
1 Inflate the tyres to the normal operating pressures.
2 Lower the car body so that the rear wheels are set at
90 deg. to the floor. This condition is obtained when
the lowermost portion of the sump is 6.61 inches from
the floor level for the new 500D model or the centre
rear bracket for jacking up the rear of t h e vehicle
8.9 inches from the floor level for the 500 Station
Wagon.
3 With the vehicle set to the above conditions check the
wheel geometry. The wheel plane must converge w i t h
the centre line of the vehicle by an angle of 0 deg. 10'
(—10', +15') toeing in at the front.
4 The wheel plane must be 22.343 ± .059 inches from
the centre line of the vehicle for the 500D model.
Whereas for the 500 Station Wagon the distance must
be 22.264 ± .059 inches.
5 To adjust the rear wheel toe-in adjust the positions of
the mounting screws A and B as shown in FIG 7:7.
86
7:7 Modifications
The new 500 Sedan (110F) and late 500 Station
Wagon are fitted with modified wheels side flexible
joints and rear control arm as shown in FIG 7:13.
Together w i t h these modifications a new design rear
coil spring has been fitted details of which are given in
Technical Data.
7 : 8 Fault diagnosis
(a) Irregular or abnormal tyre wear
1 Incorrect tyre pressure
2 Wheels out of balance
3 Wheels off centre
4 Misadjusted brakes
5 Weak or broken coil springs
6 Excessive load
7 Incorrect wheel alignment
(b) Sag on one wheel
1 Incorrect tyre pressure
2 Weak or broken coil spring
3 Wear of shock absorber causing poor dampening
action
(c) Squeaks, thumps or rattles
1 Wheels out of balance
2 Wheels off centre
3 Misadjusted brakes
4 Weak or broken coil springs or spring seats dislodged
5 Wear of shock absorbers causing poor dampening
action
6 Worn rubber bushings in control arms
7 Poor lubrication of wheel bearings
(d) Pull to one side
1 Incorrect tyre pressure
2 Misadjusted brakes
3 Distorted suspension arm
Page 89 of 128
to the body and proceed as follows:
1 If the camber angle requires to be increased (see FIG
8:16) add the same number of shims S on both
screws D and E.
2 If the camber angle requires to be reduced (see FIG
8:16) remove the same number of shims from both
screws D and E.
The addition or removal of shims at the t w o points D
and E permits camber adjustment to be made without
any disturbing of the castor angle.
8:10 Modifications
Checking and adjusting castor and camber angles:
When checking the castor and camber angle the
static loading should be such that the distance between
the semi-elliptic spring mountings G (see FIG 8:16)
and the floor level to be approximately 6.81 inches, also a
distance between the lowermost portion of the sump and
the floor level of approximately 6.14 inch for the Model
500D. For the 500 Station Wagon version the distance
between centre rear bracket for jacking-up the vehicle
and the floor level should be approximately 8.90 inches.
All other front wheel alignment specifications are the
same as for the remaining 500 saloon models.
8:11 Fault diagnosis
(a) Wheel bounce
1 Tyre casing faulty
2 Uneven tyre pressures
3 Wheels out of balance
4 Semi-elliptic mounting spring worn5 Weak or seized shock absorber
6 Wheel rim or tyre misaligned
(b) Suspension noise
1 Lack of lubrication
2 Noisy or inoperative shock absorbers
3 Worn or loose wheel bearings
(c) Pull to one side
1 Low or uneven tyre pressures
2 Incorrect front wheel alignment
3 Suspension arms distorted
4 Inoperative shock absorbers
5 Brakes binding
(d) Excessive t y r e wear
1 Incorrect tyre rotation during servicing periods
2 Incorrect camber angle
3 Incorrect toe-in
4 Incorrect tyre inflation
5 Excessive play at wheel bearings
6 Wheel wobble
7 Stiff suspension arms
8 Brakes out of adjustment
(e) Wheel wobble
1 Uneven tyre pressures
2 Loose or worn wheel bearings
3 Inoperative shock absorbers
4 Loose steering knuckle or kingpin housing
5 Incorrect front wheel alignment
6 Control arm rubber bushings, or kingpin housing and
semi-elliptic spring 'estendblock' worn
96
Page 95 of 128
normal straight-ahead position with the spokes
horizontal. Check that the wheels are in the straight-
ahead position.
2 Load the vehicle to static load conditions or with four
average size passengers.
3 Move the vehicle forwards for a distance of approxi-
mately six yards so that the suspension may settle
correctly.
4 The toe-in measurements should be taken at the same
point of the wheel rim. Measure at A (see FIG 9 : 8)
then back up the car to bring points A to the position B
and remeasure. The value obtained at A should be
equal to or greater than B within .0079 inch.
5 As previously described the steering rods are adjust-
able in length. Loosen the clamps and screw in or out
the adjusting sleeves and before tightening the clamp
ensure that the sleeve slot registers w i t h the clamp
joint. With the clamp fully tightened there should
always be a gap between the joint faces.
6 If the steering gear has been re-installed the correct
front wheel toe-in must be set. Then the relay lever pin
nut must be tightened to a torque wrench setting of 78
to 85 Ib/ft.
9 : 8 Fault diagnosis
(a) Front wheel shimmy
1 Incorrect tyre pressure
2 Incorrect front wheel alignment
3 Loose front wheel bearings
4 Wheels out of balance
5 Loose steering linkage connections
6 Loose steering gear or relay lever support at body
mountings
7 Incorrect fitting of steering worm to worm sector
(b) Hard steering
1 Incorrect tyre pressure
2 Incorrect front wheel alignment
3 Incorrect adjustment of steering worm to worm sector
(c) Hard turning when stationary
1 Incorrect tyre pressure
2 Incorrect adjustment of steering worm to worm sector
102
(d) Pull to one side
1 Incorrect tyre pressure
2 Incorrect front wheel alignment
3 Incorrect front wheel bearing adjustment
4 Distorted kingpin housing or swinging arms
5 Unequal brake adjustment
6 Semi-elliptic spring weak or broken
(e) Rattles
1 Loose steering linkage connections
2 Loose steering gear or relay lever support at body
mountings
3 Semi-elliptic spring weak or broken
4 Lack of lubrication
( f ) Loose steering
1 Incorrect front wheel bearing adjustment
2 Loose steering linkage connections
3 Loose steering gear mountings
4 Incorrect adjustment of steering worm to worm sector
(g) Jerky steering
1 Incorrect front wheel alignment
2 Incorrect front wheel bearing adjustment
3 Wheels out of balance
4 Loose steering linkage connections
5 Loose or incorrect fitting of worm to sector
(h) Side-to-side wander
1 Incorrect tyre pressure
2 Incorrect front wheel alignment
3 Loose steering linkage connections
4 Loose steering gear or relay lever support at body
mountings
5 Incorrect fitting of steering worm to worm sector
6 Distorted kingpin housing or swinging arm
7 Semi-elliptic spring weak or broken
(i) Tyre squeal on turns
1 Incorrect tyre pressure
2 Incorrect wheel alignment
3 Distorted kingpin housing or swinging arms