dimensions FIAT 500 1966 1.G Workshop Manual
[x] Cancel search | Manufacturer: FIAT, Model Year: 1966, Model line: 500, Model: FIAT 500 1966 1.GPages: 128, PDF Size: 9.01 MB
Page 11 of 128

INTAKEEXHAUSTINTAKEEXHAUST
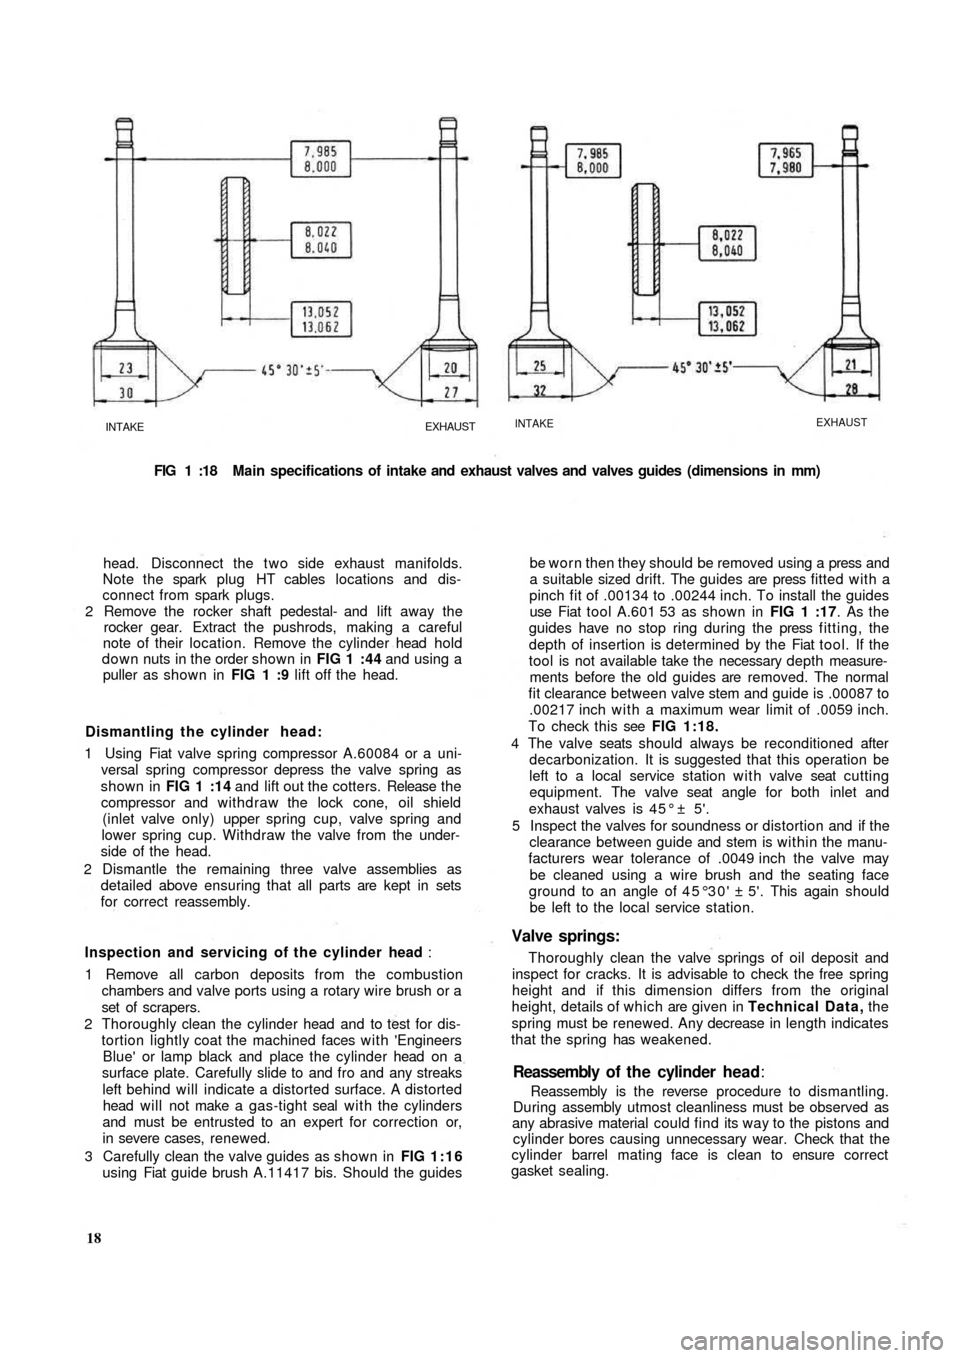
FIG 1 :18 Main specifications of intake and exhaust valves and valves guides (dimensions in mm)
head. Disconnect the t w o side exhaust manifolds.
Note the spark plug HT cables locations and dis-
connect from spark plugs.
2 Remove the rocker shaft pedestal- and lift away the
rocker gear. Extract the pushrods, making a careful
note of their location. Remove the cylinder head hold
down nuts in the order shown in FIG 1 :44 and using a
puller as shown in FIG 1 :9 lift off the head.
Dismantling the cylinder head:
1 Using Fiat valve spring compressor A.60084 or a uni-
versal spring compressor depress the valve spring as
shown in FIG 1 :14 and lift out the cotters. Release t h e
compressor and withdraw the lock cone, oil shield
(inlet valve only) upper spring cup, valve spring and
lower spring cup. Withdraw the valve from the under-
side of the head.
2 Dismantle the remaining three valve assemblies as
detailed above ensuring that all parts are kept in sets
for correct reassembly.
Inspection and servicing of the cylinder head :
1 Remove all carbon deposits from the combustion
chambers and valve ports using a rotary wire brush or a
set of scrapers.
2 Thoroughly clean the cylinder head and to test for dis-
tortion lightly coat the machined faces with 'Engineers
Blue' or lamp
black and place the cylinder head on a
surface plate. Carefully slide to and fro and any streaks
left behind will indicate a distorted surface. A distorted
head will not make a gas-tight seal with the cylinders
and must be entrusted to an expert for correction or,
in severe cases, renewed.
3 Carefully clean the valve guides as shown in FIG 1:16
using Fiat guide brush A.11417 bis. Should the guides
18Reassembly is the reverse procedure to dismantling.
During assembly utmost cleanliness must be observed as
any abrasive material could find its way to the pistons and
cylinder bores causing unnecessary wear. Check that the
cylinder barrel mating face is clean to ensure correct
gasket sealing.Reassembly of t h e cylinder head:
be worn then they should be removed using a press and
a suitable sized drift. The guides are press fitted with a
pinch fit of .00134 to .00244 inch. To install the guides
use Fiat tool A.601 53 as shown in FIG 1 :17. As the
guides have no stop ring during the press fitting, the
depth of insertion is determined by the Fiat tool. If the
tool is not available take the necessary depth measure-
ments before the old guides are removed. The normal
fit clearance between valve stem and guide is .00087 to
.00217 inch with a maximum wear limit of .0059 inch.
To check this see FIG 1:18.
4 The valve seats should always be reconditioned after
decarbonization. It is suggested that this operation be
left to a local service station with valve seat cutting
equipment. The valve seat angle for both inlet and
exhaust valves is 4 5 ° ± 5'.
5 Inspect the valves for soundness or distortion and if the
clearance between guide and stem is within the manu-
facturers wear tolerance of .0049 inch the valve may
be cleaned using a wire brush and the seating face
ground to an angle of 45°30' ± 5'. This again should
be left to the local service station.
Valve springs:
Thoroughly clean the valve springs of oil deposit and
inspect for cracks. It is advisable to check the free spring
height and if this dimension differs from the original
height, details of which are given in Technical Data, the
spring must be renewed. Any decrease in length indicates
that the spring has weakened.
Page 13 of 128

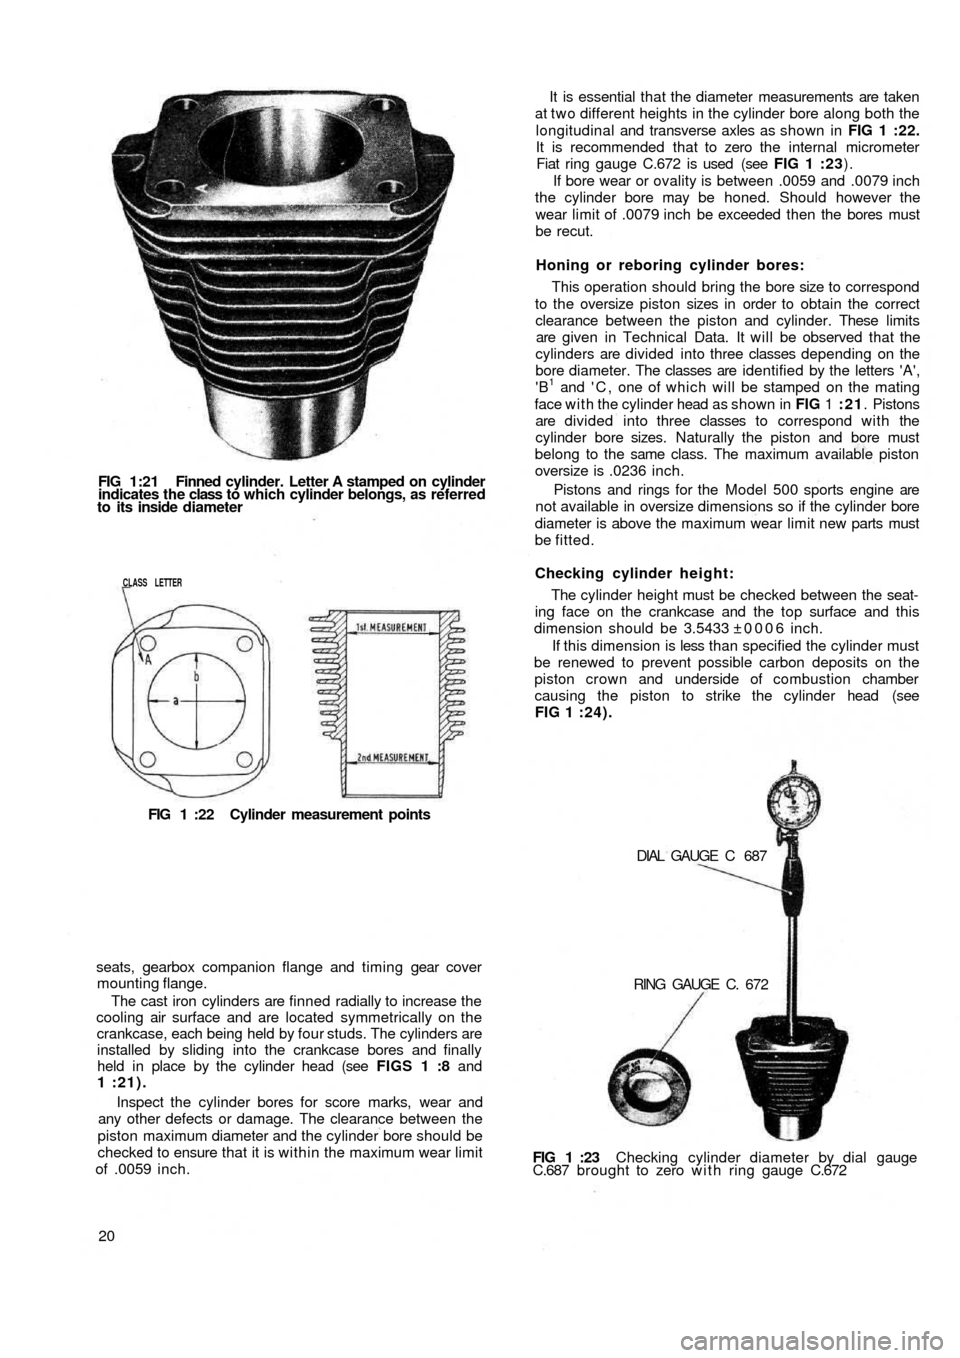
FIG 1:21 Finned cylinder. Letter A stamped on cylinder
indicates the class to which cylinder belongs, as referred
to its inside diameter
CLASS LETTER
FIG 1 :22 Cylinder measurement points
seats, gearbox companion flange and timing gear cover
mounting flange.
The cast iron cylinders are finned radially to increase the
cooling air surface and are located symmetrically on the
crankcase, each being held by four studs. The cylinders are
installed by sliding into the crankcase bores and finally
held in place by the cylinder head (see FIGS 1 :8 and
1 :21).
Inspect the cylinder bores for score marks, wear and
any other defects or damage. The clearance between the
piston maximum diameter and the cylinder bore should be
checked to ensure that it is within the maximum wear limit
of .0059 inch.
20FIG 1 :23 Checking cylinder diameter by dial gauge
C.687 brought to zero w i t h ring gauge C.672 DIAL GAUGE C 687
RING GAUGE C. 672 The cylinder height must be checked between the seat-
ing face on the crankcase and the top surface and this
dimension should be 3.5433 ±0006 inch.
If this dimension is less than specified the cylinder must
be renewed to prevent possible carbon deposits on the
piston crown and underside of combustion chamber
causing the piston to strike the cylinder head (see
FIG 1 :24). Checking cylinder height: This operation should bring the bore size to correspond
to the oversize piston sizes in order to obtain the correct
clearance between the piston and cylinder. These
limits
are given in Technical Data. It will be observed that the
cylinders are divided into three classes depending on the
bore diameter. The classes are identified by the letters 'A',
'B
1 and ' C , one of which will be stamped on the mating
face with the cylinder head as shown in FIG 1 :21. Pistons
are divided into three classes to correspond with the
cylinder bore sizes. Naturally the piston and bore must
belong to the same class. The maximum available piston
oversize is .0236 inch.
Pistons and rings for the Model 500 sports engine are
not available in oversize dimensions so if the cylinder bore
diameter is above the maximum wear limit new parts must
be fitted.Honing or reboring cylinder bores: It is essential that the diameter measurements are taken
at t w o different heights in the cylinder bore along both the
longitudinal and transverse axles as shown in FIG 1 :22.
It is recommended that to zero the internal micrometer
Fiat ring gauge C.672 is used (see FIG 1 :23).
If bore wear or ovality is between .0059 and .0079 inch
the cylinder bore may be honed. Should however the
wear limit of .0079 inch be exceeded then the bores must
be recut.
Page 34 of 128

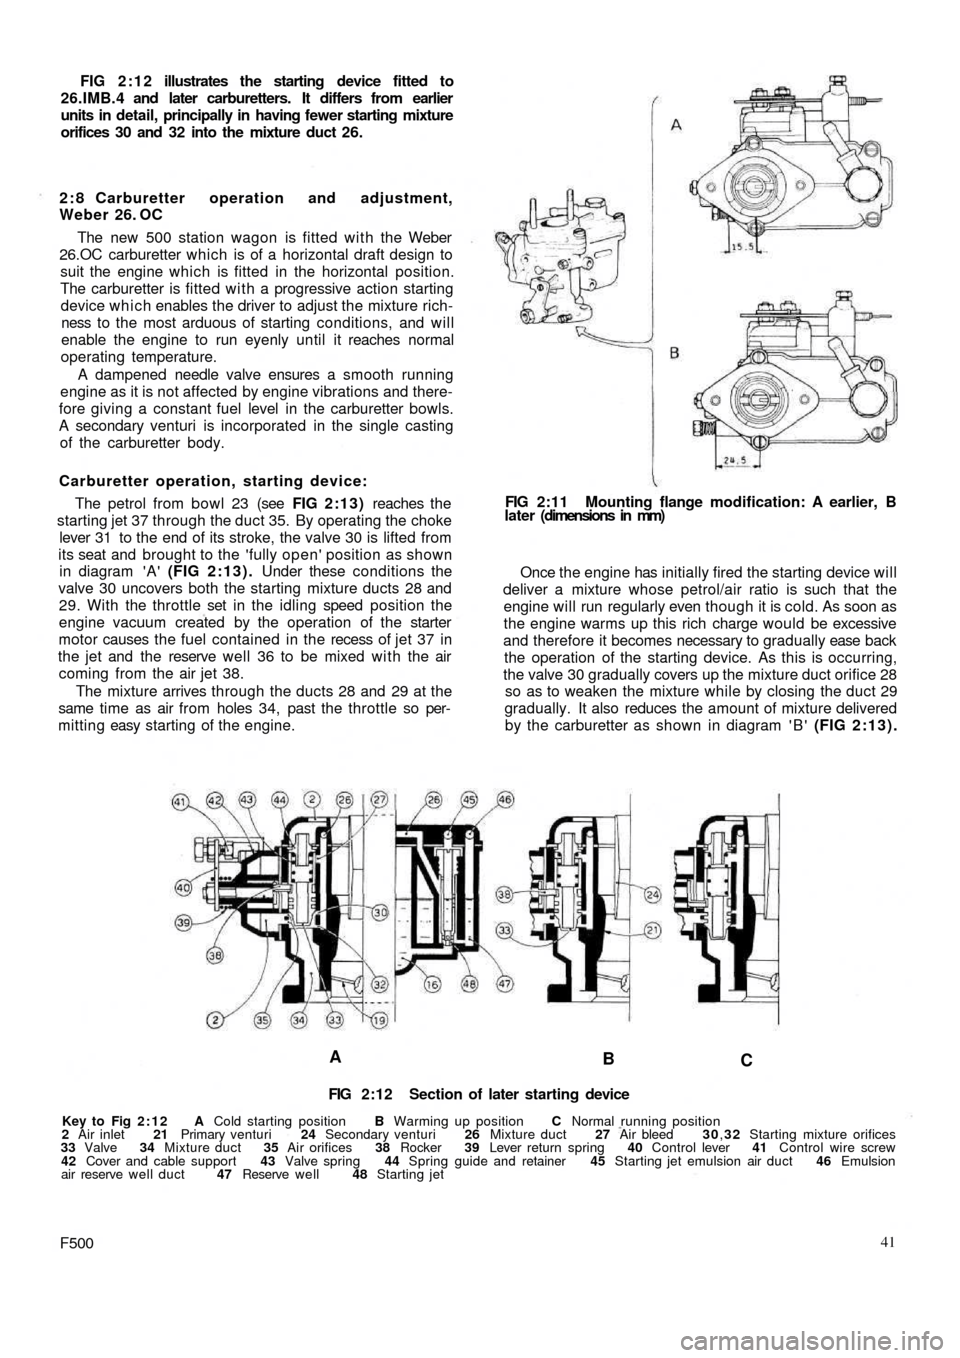
FIG 2:12 illustrates the starting device fitted to
26.IMB.4 and later carburetters. It differs from earlier
units in detail, principally in having fewer starting mixture
orifices 30 and 32 into the mixture duct 26.
2 : 8 Carburetter operation and adjustment,
Weber 26. OC
The new 500 station wagon is fitted with the Weber
26.OC carburetter which is of a horizontal draft design to
suit the engine which is fitted in the horizontal position.
The carburetter is fitted with a progressive action starting
device which enables the driver to adjust the mixture rich-
ness to the most arduous of starting conditions, and will
enable the engine to run eyenly until it reaches normal
operating temperature.
A dampened needle valve ensures a smooth running
engine as it is not affected by engine vibrations and there-
fore giving a constant fuel level in the carburetter bowls.
A secondary venturi is incorporated in the single casting
of the carburetter body.
Carburetter operation, starting device:
The petrol from bowl 23 (see FIG 2:13) reaches the
starting jet 37 through the duct 35. By operating the choke
lever 31 to the end of its stroke, the valve 30 is lifted from
its seat and brought to the 'fully open' position as shown
in diagram 'A' (FIG 2:13). Under these conditions the
valve 30 uncovers both the starting mixture ducts 28 and
29. With the throttle set in the idling speed position the
engine vacuum created by the operation of the starter
motor causes the fuel contained in the recess of j e t 37 in
the jet and the reserve
well 36 to be mixed with the air
coming from the air jet 38.
The mixture arrives through the ducts 28 and 29 at the
same time as air from holes 34, past the throttle so per-
mitting easy starting of the engine.
A
B
C
FIG 2:12 Section of later starting device
Key to Fig 2:12 A Cold starting position B Warming up position C Normal running position
2 Air inlet 21 Primary venturi 24 Secondary venturi 26 Mixture duct 27 Air bleed 30,32 Starting mixture orifices
33 Valve 34 Mixture duct 35 Air orifices 38 Rocker 39 Lever return spring 40 Control lever 41 Control wire screw
42 Cover and cable support 43 Valve spring 44 Spring guide and retainer 45 Starting jet emulsion air duct 46 Emulsion
air reserve well duct 47 Reserve well 48 Starting jet
F50041 Once the engine has initially fired the starting device will
deliver a mixture whose petrol/air ratio is such that the
engine will run regularly even though it is cold. As soon as
the engine warms up this rich charge would be excessive
and therefore it becomes necessary to gradually ease back
the operation of the starting device. As this is occurring,
the valve 30 gradually covers up the mixture duct orifice 28
so as to weaken the mixture while by closing the duct 29
gradually. It also reduces the amount of mixture delivered
by the carburetter as shown in diagram ' B ' (FIG 2:13). FIG 2:11 Mounting flange modification: A earlier, B
later (dimensions in mm)