service indicator FIAT 500 1966 1.G Workshop Manual
[x] Cancel search | Manufacturer: FIAT, Model Year: 1966, Model line: 500, Model: FIAT 500 1966 1.GPages: 128, PDF Size: 9.01 MB
Page 19 of 128

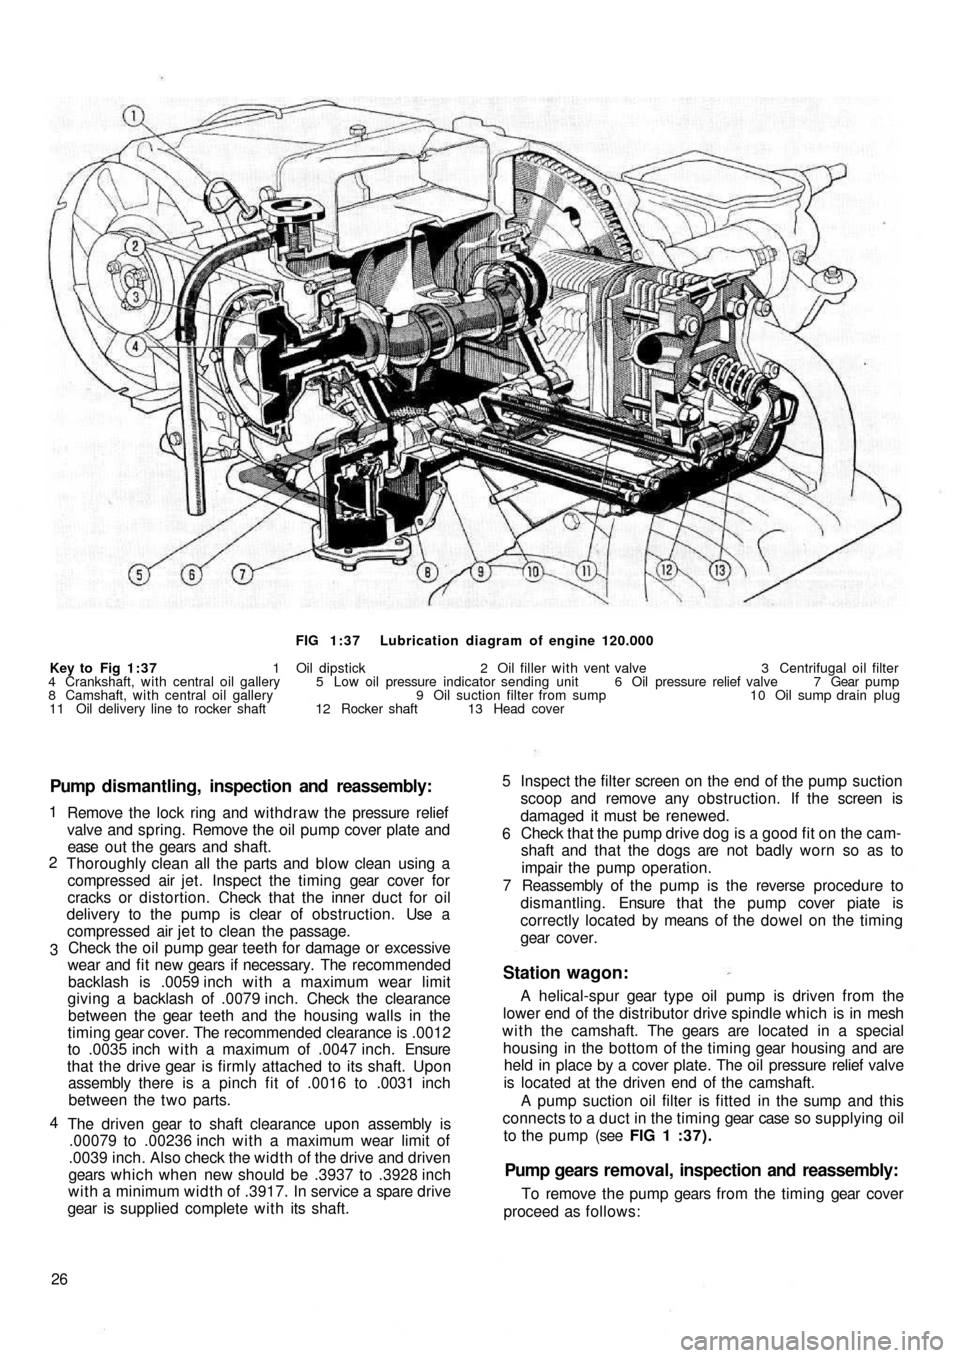
FIG 1:37 Lubrication diagram of engine 120.000
Key to Fig 1:37 1 Oil dipstick 2 Oil filler with vent valve 3 Centrifugal oil filter
4 Crankshaft, with central oil gallery 5 Low oil pressure indicator sending unit 6 Oil pressure relief valve 7 Gear pump
8 Camshaft, with central oil gallery 9 Oil suction filter from sump 10 Oil sump drain plug
11 Oil delivery line to rocker shaft 12 Rocker shaft 13 Head cover
Pump dismantling, inspection and reassembly:
Remove the lock ring and withdraw the pressure relief
valve and spring. Remove the oil pump cover plate and
ease o u t t h e gears and shaft.
Thoroughly clean all the parts and blow clean using a
compressed air jet. Inspect the timing gear cover for
cracks or distortion. Check that the inner duct for oil
delivery to the pump is clear of obstruction. Use a
compressed air jet to clean the passage.
Check the oil pump gear teeth for damage or excessive
wear and fit new gears if necessary. The recommended
backlash is .0059 inch w i t h a maximum wear limit
giving a backlash of .0079 inch. Check the clearance
between the gear teeth and the housing walls in the
timing gear cover. The recommended clearance is .0012
to .0035 inch w i t h a maximum of .0047 inch. Ensure
that the drive gear is firmly attached to its shaft. Upon
assembly there is a pinch fit of .0016 to .0031 inch
between the t w o parts.
The driven gear to shaft clearance upon assembly is
.00079 to .00236 inch with a maximum wear limit of
.0039 inch. Also check the width of the drive and driven
gears which when new should be .3937 to .3928 inch
with a minimum width of .3917. In service a spare drive
gear is supplied complete with its shaft.
26 4 3 2 1
Station wagon:
A helical-spur gear type oil pump is driven from the
lower end of the distributor drive spindle which is in mesh
w i t h the camshaft. The gears are located in a special
housing in the bottom of the timing gear housing and are
held in place by a cover plate. The oil pressure relief valve
is located at the driven end of the camshaft.
A pump suction oil filter is fitted in the sump and this
connects to a duct in the timing gear case so supplying oil
to the pump (see FIG 1 : 3 7 ) .
Pump gears removal, inspection and reassembly:
To remove the pump gears from the timing gear cover
proceed as follows:Inspect the filter screen on the end of the pump suction
scoop and remove any obstruction. If the screen is
damaged it must be renewed.
Check that the pump drive dog is a good fit on the cam-
shaft and that the dogs are not badly worn so as to
impair the pump operation.
Reassembly of the pump is the reverse procedure to
dismantling. Ensure that the pump cover piate is
correctly located by means of the dowel on the timing
gear cover. 5
6
7
Page 21 of 128

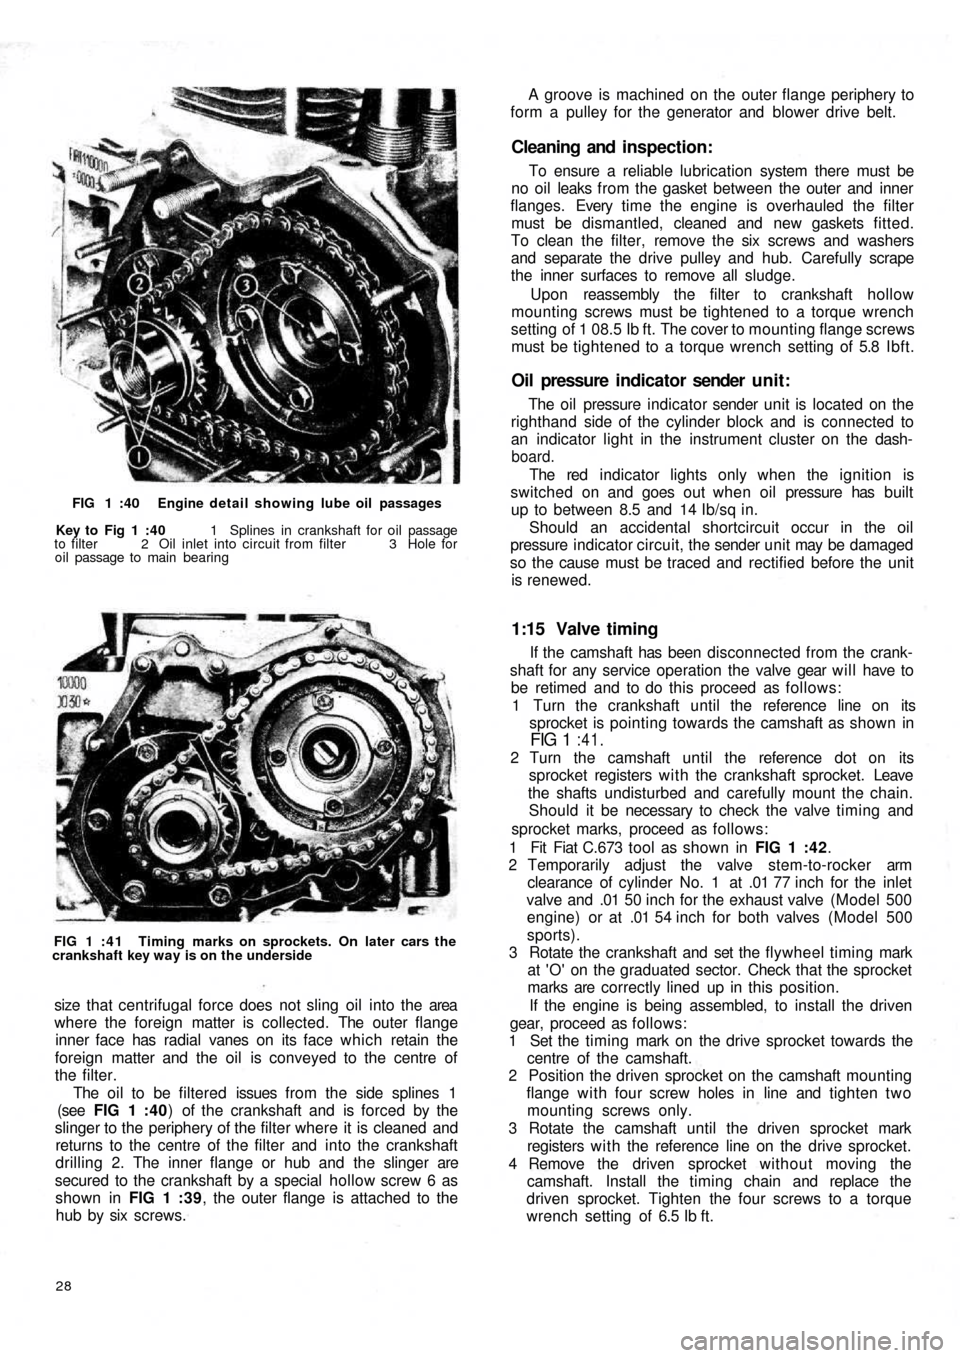
FIG 1 :40 Engine detail showing lube oil passages
Key to Fig 1 :40 1 Splines in crankshaft for oil passage
to filter 2 Oil inlet into circuit from filter 3 Hole for
oil passage to main bearing
FIG 1 : 4 1 Timing marks on sprockets. On later cars the
crankshaft key way is on the underside
size that centrifugal force does not sling oil into the area
where the foreign matter is collected. The outer flange
inner face has radial vanes on its face which retain the
foreign matter and the oil is conveyed to the centre of
the filter.
The oil to be filtered issues from the side splines 1
(see FIG 1 :40) of the crankshaft and is forced by the
slinger to the periphery of the filter where it is cleaned and
returns to the centre of the filter and into the crankshaft
drilling 2. The inner flange or hub and the slinger are
secured to the crankshaft by a special hollow screw 6 as
shown in FIG 1 :39, the outer flange is attached to the
hub by six screws.
28
If the camshaft has been disconnected from the crank-
shaft for any service operation the valve gear will have to
be retimed and to do this proceed as follows:
1 Turn the crankshaft until the reference line on its
sprocket is pointing towards the camshaft as shown in
FIG 1 :41.
2 Turn the camshaft until the reference dot on its
sprocket registers w i t h the crankshaft sprocket. Leave
the shafts undisturbed and carefully mount the chain.
Should it be necessary to check the valve timing and
sprocket marks, proceed as follows:
1 Fit Fiat C.673 tool as shown in FIG 1 :42.
2 Temporarily adjust the valve stem-to-rocker arm
clearance of cylinder No. 1 at .01 77 inch for the inlet
valve and .01 50 inch for the exhaust valve (Model 500
engine) or at .01 54 inch for both valves (Model 500
sports).
3 Rotate the crankshaft and set the flywheel timing mark
at 'O' on the graduated sector. Check that the sprocket
marks are correctly lined up in this position.
If the engine is being assembled, to install the driven
gear, proceed as follows:
1 Set the timing mark on the drive sprocket towards the
centre of the camshaft.
2 Position the driven sprocket on the camshaft mounting
flange with four screw holes in line and tighten two
mounting screws only.
3 Rotate the camshaft until the driven sprocket mark
registers w i t h the reference line on the drive sprocket.
4 Remove the driven sprocket without moving the
camshaft. Install the timing chain and replace the
driven sprocket. Tighten the four screws to a torque
wrench setting of 6.5 Ib ft.
1:15 Valve timing
The oil pressure indicator sender unit is located on the
righthand side of the cylinder block and is connected to
an indicator light in the instrument cluster on the dash-
board.
The red indicator lights only when the ignition is
switched on and goes out when o i l pressure has built
up to between 8.5 and 14 Ib/sq in.
Should an accidental shortcircuit occur in the oil
pressure indicator circuit, the sender unit may be damaged
so the cause must be traced and rectified before the unit
is renewed.
Oil pressure indicator sender unit:
To ensure a reliable lubrication system there must be
no oil leaks from the gasket between the outer and inner
flanges. Every t i m e t h e engine is overhauled the filter
must be dismantled, cleaned and new gaskets fitted.
To clean the filter, remove the six screws and washers
and separate the drive pulley and hub. Carefully scrape
the inner surfaces to remove all sludge.
Upon reassembly the filter to crankshaft hollow
mounting screws must be tightened to a torque wrench
setting of 1 08.5 Ib ft. The cover to mounting flange screws
must be tightened to a torque wrench setting of 5.8 Ibft.
Cleaning and inspection:
A groove is machined on the outer flange periphery to
form a pulley for the generator and blower drive belt.
Page 114 of 128

parking position the trouble will be found in the sliding
sector which fails to open the switch D (see FIG
11 :16) . Check by removing the four motor cover
mounting screws and uncover the sliding sector. If
possible suitably bend the sector to bring it against
into contact with the rod tip of switch D.
3 If the automatic parking of the blades does not occur
when the switch lever is fully depressed to the parking
position but the motor stops when the switch is
operated the cause of the trouble is that the switch D
is not closing and consequently no current is flowing
between the terminals C and INT. This will probably
be due to dirt lodged between the movable contact
and the fixed contacts of switch D. Thoroughly wash
the components with petrol and if necessary reface
the contacts using a very fine file.
4 Should the motor unit be noisy in operation although
still operating reliably the noise is probably due to the
reduction gear operation, whereby the pinion and
worm are excessively worn or a tooth chipped. The
motor unit must be renewed as motor unit parts are
not available in service.
5 If the switch lever is pushed upwards to the 'on'
position or depressed downwards to the Parking
position and the wiper is still inoperative thoroughly
check all terminal connections for tightness and
cables for damage which if all appear to be correct the
failure of the wiper to operate indicates an internal
fault of the motor unit which
should be repaired or
renewed as necessary.
Removal and refitting the motor:
Remove the wiper arms and the electrical connections
to the motor. Dismantling is a straightforward operation
providing that as all items are removed so they are
inspected and a note made of their locations. However,
reassembly requires more care and the following
procedure should be adopted.
1 Mount the wiper unit onto the body by fully tightening
the nuts fixing the pivots onto which the arms are
fitted. Ensure t h a t the rubber sealing bushes between
the pivots and body are correctly assembled to prevent
water ingress. Slightly lubricate with glycerine.
2 Secure the mounting bracket lower edge to the body
by means of the special square bracket. It is important
not to distort the mounting bracket and ease of
assembly is ensured by elongated holes in the square
bracket. By suitable adjustment the linkages will not
be subjected to distortion or abnormal stresses during
operation.
3 Fit the motor unit to the mounting bracket tightening
the screws and reassemble the main link to the pivot
lever. Ensure t h a t the l o c k i n g of the fastener on the
pivot lever is secure so that it does not become loose
during operation.
4 Remake all the electrical connections and run the
motor for a short time whilst checking all the switch
positions including the automatic parking. It is at this
position that the wiper blades and arms are assembled
to the wiper mechanism.
5 Onto the pivots, install the shims, snap ring, wiper arm,
plain washer and lockwasher. Fully tighten the nuts
with the wiper arms in the parked position.
F500
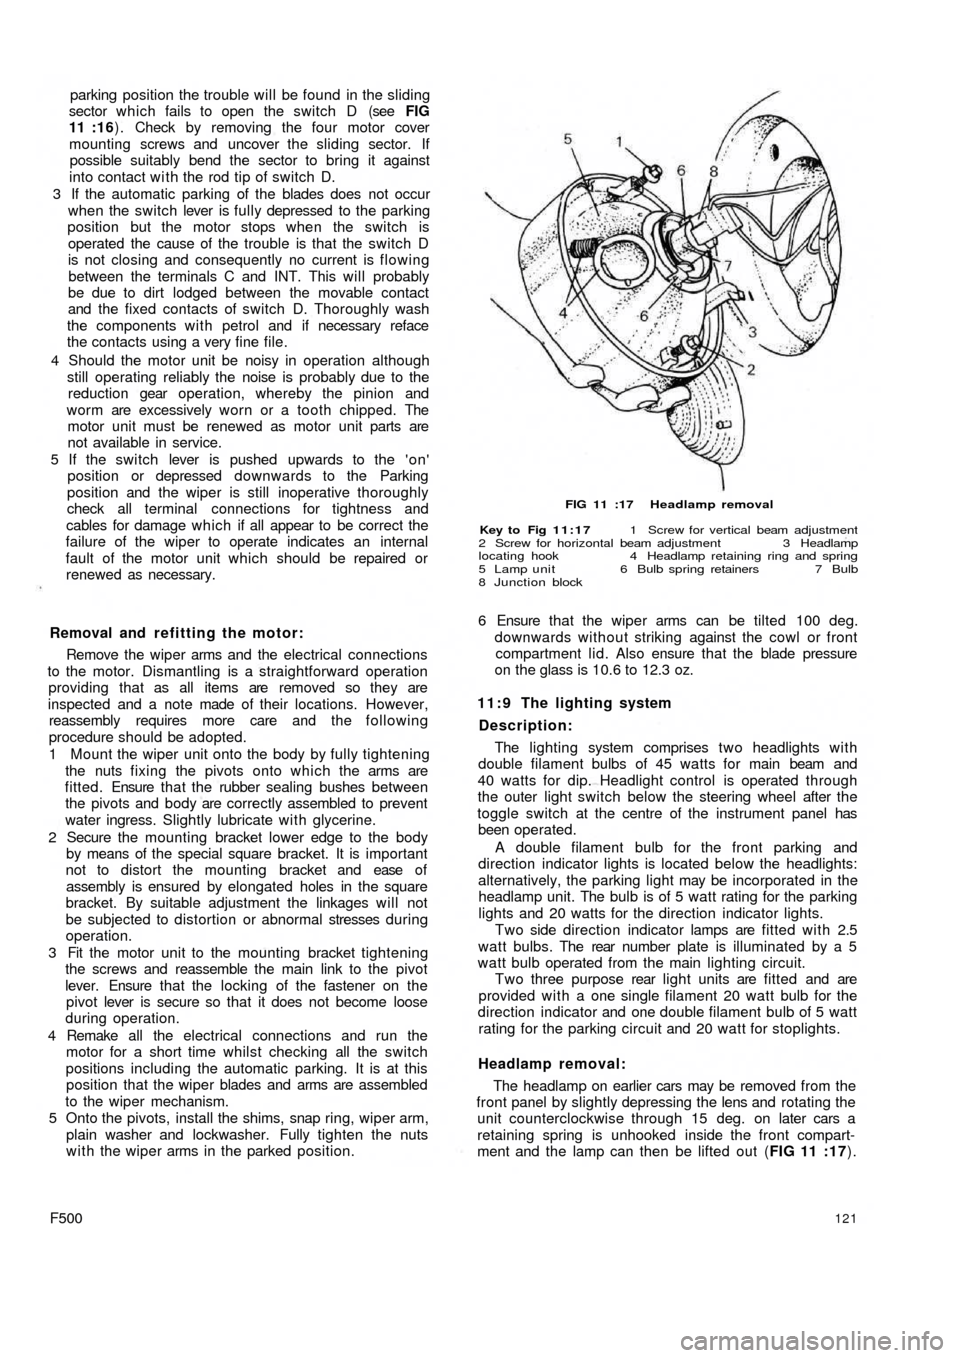
FIG 11 :17 Headlamp removal
Key to Fig 11:17 1 Screw for vertical beam adjustment
2 Screw for horizontal beam adjustment 3 Headlamp
locating hook 4 Headlamp retaining ring and spring
5 Lamp unit 6 Bulb spring retainers 7 Bulb
8 Junction block
6 Ensure that the wiper arms can be tilted 100 deg.
downwards without striking against the cowl or front
compartment lid. Also ensure that the blade pressure
on the glass is 10.6 to 12.3 oz.
1 1 : 9 The lighting system
Description:
The lighting system comprises t w o headlights with
double filament bulbs of 45 watts for main beam and
40 watts for dip. Headlight control is operated through
the outer light switch below the steering wheel after the
toggle switch at the centre of the instrument panel has
been operated.
A double filament bulb for the front parking and
direction indicator lights is located below the headlights:
alternatively, the parking light may be incorporated in the
headlamp unit. The bulb is of 5 watt rating for the parking
lights and 20 watts for the direction indicator lights.
Two side direction indicator lamps are fitted with 2.5
w a t t b u l b s . The rear number plate is illuminated by a 5
watt bulb operated from the main lighting circuit.
Two three purpose rear light units are fitted and are
provided with a one single filament 20 watt bulb for the
direction indicator and one double filament bulb of 5 watt
rating for the parking circuit and 20 watt for stoplights.
Headlamp removal:
The headlamp on earlier cars may be removed from the
front panel by slightly depressing the lens and rotating the
unit counterclockwise through 15 deg. on later cars a
retaining spring is unhooked inside the front compart-
ment and the lamp can then be lifted out (FIG 11 :17).
121
Page 115 of 128

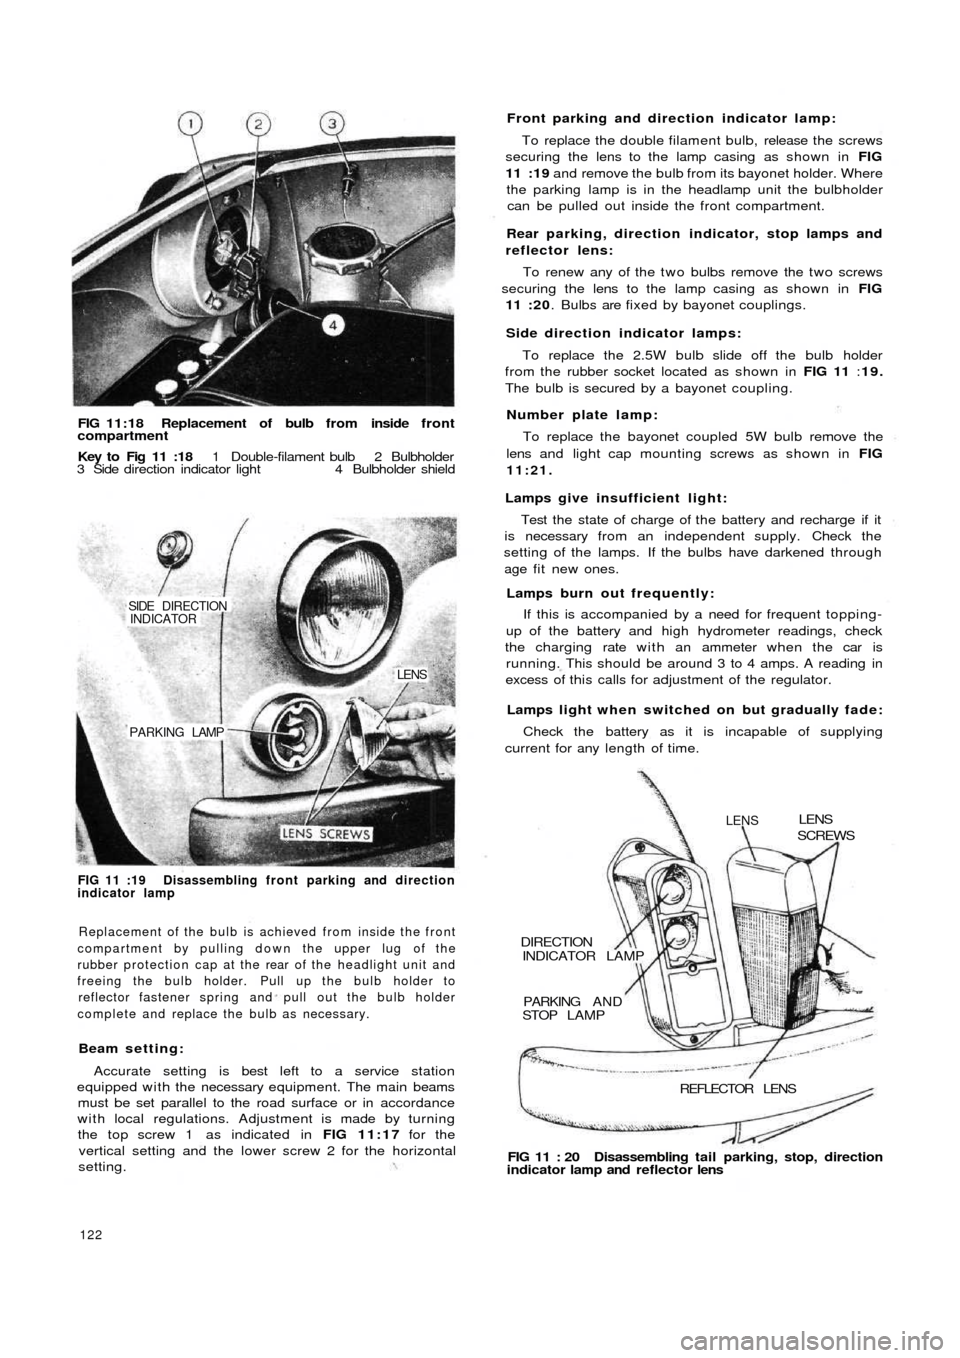
FIG 11:18 Replacement of bulb from inside f r o n tcompartment
Key to Fig 11 :18 1 Double-filament bulb 2 Bulbholder
3 Side direction indicator light 4 Bulbholder shield
PARKING LAMP
LENS
SIDE DIRECTIONINDICATOR
FIG 11 :19 Disassembling front parking and direction
indicator lamp
Replacement of the bulb is achieved from inside the front
compartment by pulling down the upper lug of the
rubber protection cap at the rear of t h e headlight unit and
freeing the bulb holder. Pull up the bulb holder to
reflector fastener spring and pull out the bulb holder
complete and replace the bulb as necessary.
Beam setting:
Accurate setting is best left to a service station
equipped with the necessary equipment. The main beams
must be set parallel to the road surface or in accordance
with local regulations. Adjustment is made by turning
the top screw 1 as indicated in FIG 11:17 for the
vertical setting and the lower screw 2 for the horizontal
setting.
122
FIG 11 : 20 Disassembling tail parking, stop, direction
indicator lamp and reflector lens REFLECTOR LENS PARKING A N D
STOP LAMP INDICATOR LAMP
DIRECTION
LENSLENS
SCREWS
Lamps light when switched on but gradually fade:
Check the battery as it is incapable of supplying
current for any length of time. Front parking and direction indicator lamp:
To replace the double filament bulb, release the screws
securing the lens to the lamp casing as shown in FIG
11 :19 and remove the bulb from its bayonet holder. Where
the parking lamp is in the headlamp unit the bulbholder
can be pulled out inside the front compartment.
Rear parking, direction indicator, stop lamps and
reflector lens:
To renew any of the t w o bulbs remove the t w o screws
securing the lens to the lamp casing as shown in FIG
11 : 2 0. Bulbs are fixed by bayonet couplings.
Side direction indicator lamps:
To replace the 2.5W bulb slide off the bulb holder
from the rubber socket located as shown in FIG 11 :19.
The bulb is secured by a bayonet coupling.
Number plate lamp:
To replace the bayonet coupled 5W bulb remove the
lens and light cap mounting screws as shown in FIG
11:21.
Lamps give insufficient light:
Test the state of charge of the battery and recharge if it
is necessary from an independent supply. Check the
setting of the lamps. If the bulbs have darkened through
age fit new ones.
Lamps burn out frequently:
If this is accompanied by a need for frequent topping-
up of the battery and high hydrometer readings, check
the charging rate with an ammeter when the car is
running. This should be around 3 to 4 amps. A reading in
excess of this calls for adjustment of the regulator.