Timing FIAT 500 1967 1.G User Guide
[x] Cancel search | Manufacturer: FIAT, Model Year: 1967, Model line: 500, Model: FIAT 500 1967 1.GPages: 128, PDF Size: 9.01 MB
Page 21 of 128
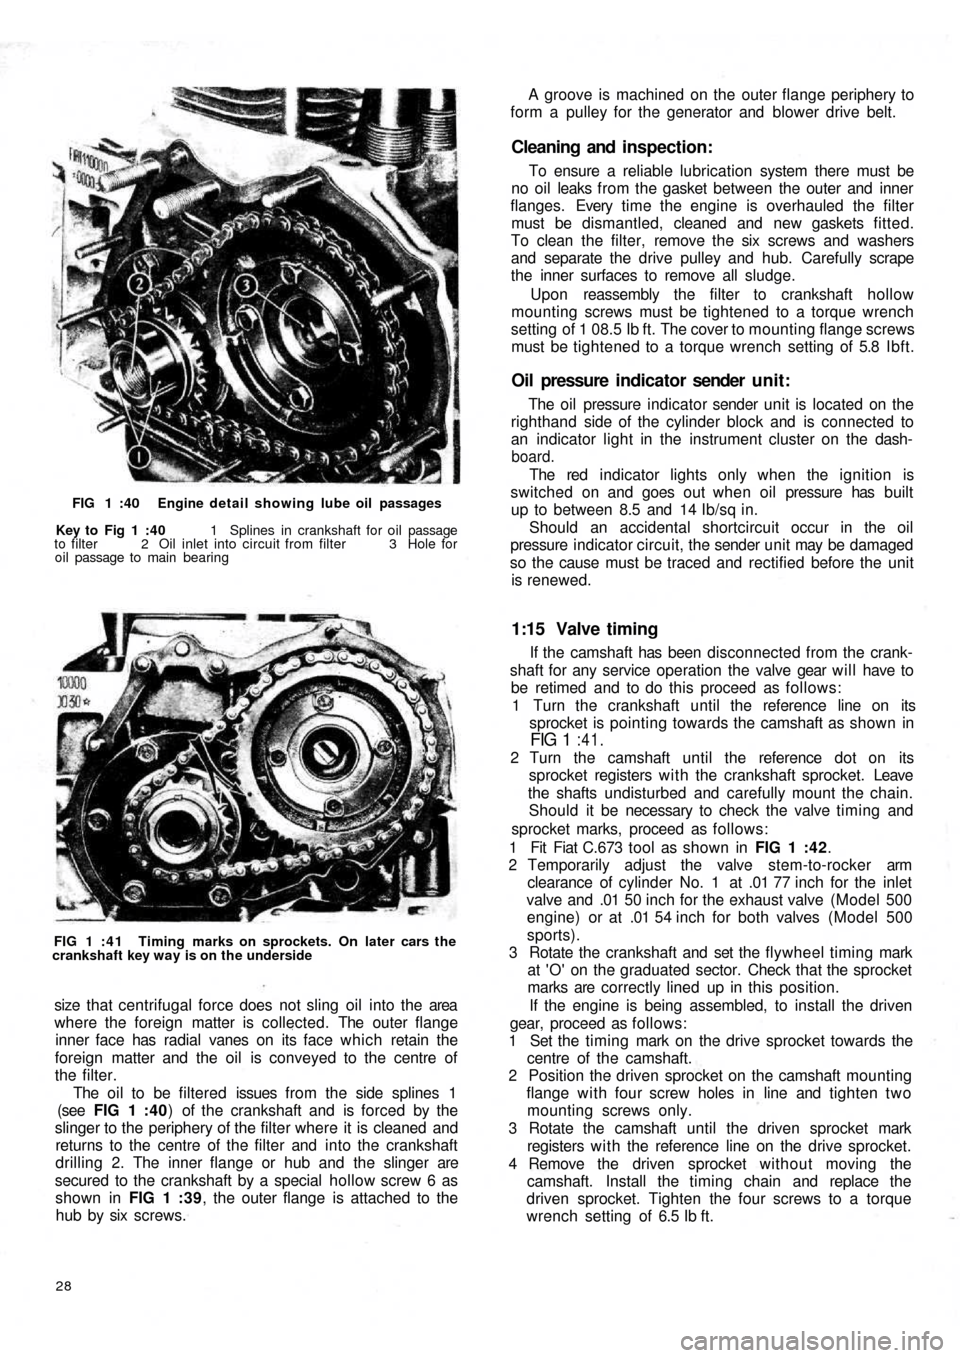
FIG 1 :40 Engine detail showing lube oil passages
Key to Fig 1 :40 1 Splines in crankshaft for oil passage
to filter 2 Oil inlet into circuit from filter 3 Hole for
oil passage to main bearing
FIG 1 : 4 1 Timing marks on sprockets. On later cars the
crankshaft key way is on the underside
size that centrifugal force does not sling oil into the area
where the foreign matter is collected. The outer flange
inner face has radial vanes on its face which retain the
foreign matter and the oil is conveyed to the centre of
the filter.
The oil to be filtered issues from the side splines 1
(see FIG 1 :40) of the crankshaft and is forced by the
slinger to the periphery of the filter where it is cleaned and
returns to the centre of the filter and into the crankshaft
drilling 2. The inner flange or hub and the slinger are
secured to the crankshaft by a special hollow screw 6 as
shown in FIG 1 :39, the outer flange is attached to the
hub by six screws.
28
If the camshaft has been disconnected from the crank-
shaft for any service operation the valve gear will have to
be retimed and to do this proceed as follows:
1 Turn the crankshaft until the reference line on its
sprocket is pointing towards the camshaft as shown in
FIG 1 :41.
2 Turn the camshaft until the reference dot on its
sprocket registers w i t h the crankshaft sprocket. Leave
the shafts undisturbed and carefully mount the chain.
Should it be necessary to check the valve timing and
sprocket marks, proceed as follows:
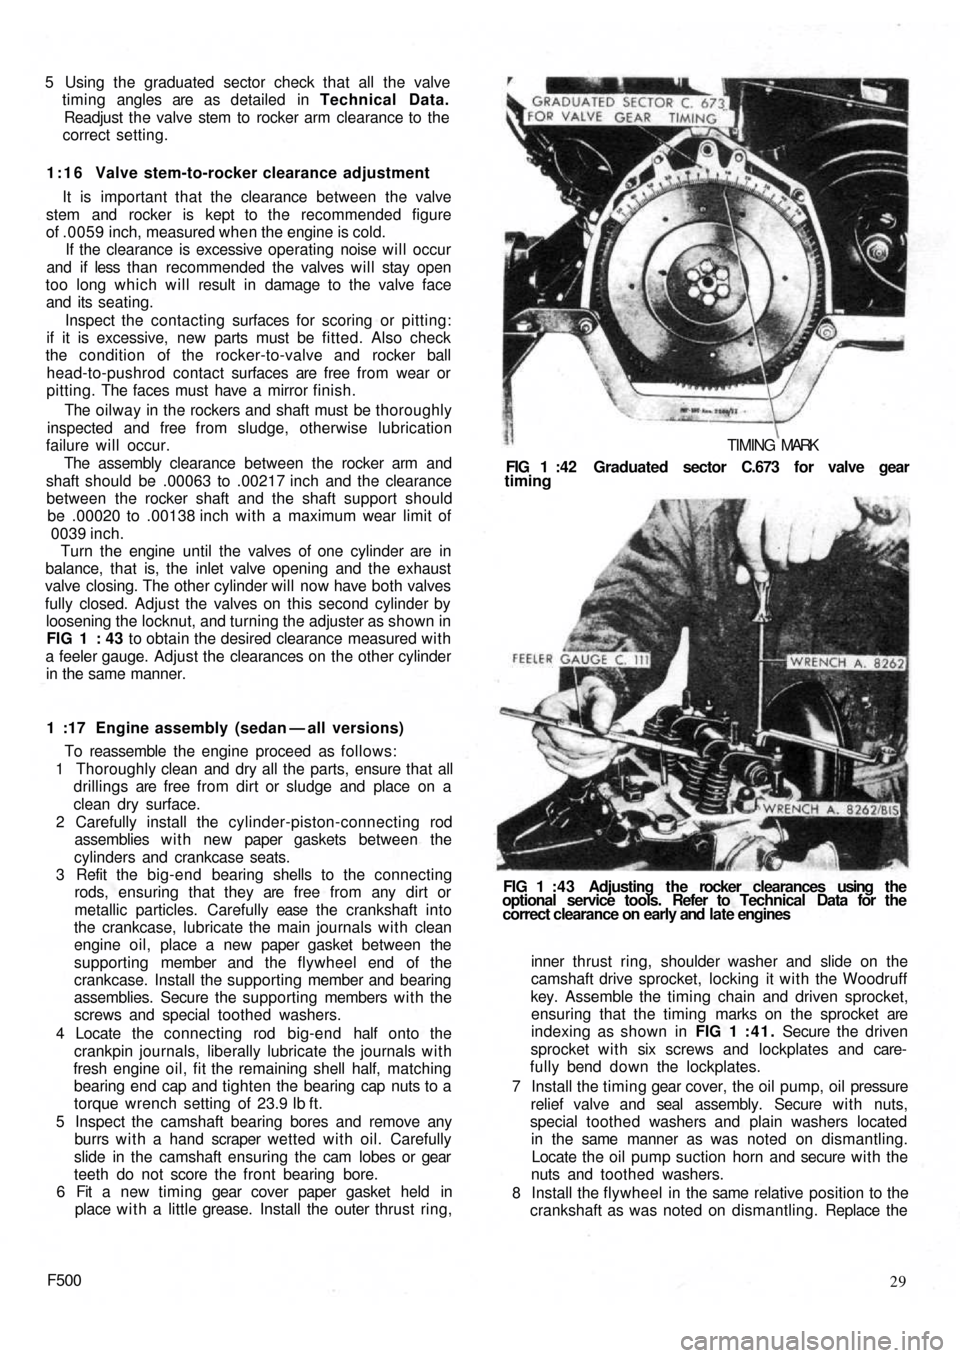
1 Fit Fiat C.673 tool as shown in FIG 1 :42.
2 Temporarily adjust the valve stem-to-rocker arm
clearance of cylinder No. 1 at .01 77 inch for the inlet
valve and .01 50 inch for the exhaust valve (Model 500
engine) or at .01 54 inch for both valves (Model 500
sports).
3 Rotate the crankshaft and set the flywheel timing mark
at 'O' on the graduated sector. Check that the sprocket
marks are correctly lined up in this position.
If the engine is being assembled, to install the driven
gear, proceed as follows:
1 Set the timing mark on the drive sprocket towards the
centre of the camshaft.
2 Position the driven sprocket on the camshaft mounting
flange with four screw holes in line and tighten two
mounting screws only.
3 Rotate the camshaft until the driven sprocket mark
registers w i t h the reference line on the drive sprocket.
4 Remove the driven sprocket without moving the
camshaft. Install the timing chain and replace the
driven sprocket. Tighten the four screws to a torque
wrench setting of 6.5 Ib ft.
1:15 Valve timing
The oil pressure indicator sender unit is located on the
righthand side of the cylinder block and is connected to
an indicator light in the instrument cluster on the dash-
board.
The red indicator lights only when the ignition is
switched on and goes out when o i l pressure has built
up to between 8.5 and 14 Ib/sq in.
Should an accidental shortcircuit occur in the oil
pressure indicator circuit, the sender unit may be damaged
so the cause must be traced and rectified before the unit
is renewed.
Oil pressure indicator sender unit:
To ensure a reliable lubrication system there must be
no oil leaks from the gasket between the outer and inner
flanges. Every t i m e t h e engine is overhauled the filter
must be dismantled, cleaned and new gaskets fitted.
To clean the filter, remove the six screws and washers
and separate the drive pulley and hub. Carefully scrape
the inner surfaces to remove all sludge.
Upon reassembly the filter to crankshaft hollow
mounting screws must be tightened to a torque wrench
setting of 1 08.5 Ib ft. The cover to mounting flange screws
must be tightened to a torque wrench setting of 5.8 Ibft.
Cleaning and inspection:
A groove is machined on the outer flange periphery to
form a pulley for the generator and blower drive belt.
Page 22 of 128
5 Using the graduated sector check that all the valve
timing angles are as detailed in Technical Data.
Readjust the valve stem to rocker arm clearance to the
correct setting.
1:16 Valve stem-to-rocker clearance adjustment
It is important that the clearance between the valve
stem and rocker is kept to the recommended figure
of .0059 inch, measured when the engine is cold.
If the clearance is excessive operating noise will occur
and if less than recommended the valves will stay open
too long which will result in damage to the valve face
and its seating.
Inspect the contacting surfaces for scoring or pitting:
if it is excessive, new parts must be fitted. Also check
the condition of the rocker-to-valve and rocker ball
head-to-pushrod contact surfaces are free from wear or
pitting. The faces must have a mirror finish.
The oilway in the rockers and shaft must be thoroughly
inspected and free from sludge, otherwise lubrication
failure will occur.
The assembly clearance between the rocker arm and
shaft should be .00063 to .00217 inch and the clearance
between the rocker shaft and the shaft support should
be .00020 to .00138 inch with a maximum wear limit of
0039 inch.
Turn the engine until the valves of one cylinder are in
balance, that is, the inlet valve opening and the exhaust
valve closing. The other cylinder will now have both valves
fully closed. Adjust the valves on this second cylinder by
loosening the locknut, and turning the
adjuster as shown in
FIG 1 : 43 to obtain the desired clearance measured with
a feeler gauge. Adjust the clearances on the other cylinder
in the same manner.
1 :17 Engine assembly (sedan — all versions)
To reassemble the engine proceed as follows:
1 Thoroughly clean and dry all the parts, ensure that all
drillings are free from dirt or sludge and place on a
clean dry surface.
2 Carefully install the cylinder-piston-connecting rod
assemblies w i t h new paper gaskets between the
cylinders and crankcase seats.
3 Refit the big-end bearing shells to the connecting
rods, ensuring that they are free from any dirt or
metallic particles. Carefully ease t h e crankshaft into
the crankcase, lubricate the main journals with clean
engine oil, place a new paper gasket between the
supporting member and the flywheel end of the
crankcase. Install the supporting member and bearing
assemblies. Secure the supporting members with the
screws and special toothed washers.
4 Locate the connecting rod big-end half onto the
crankpin journals, liberally lubricate the journals with
fresh engine oil, fit the remaining shell half, matching
bearing end cap and tighten the bearing cap nuts to a
torque wrench setting of 23.9 Ib ft.
5 Inspect the camshaft bearing bores and remove any
burrs w i t h a hand scraper wetted with oil. Carefully
slide in the camshaft ensuring the cam lobes or gear
teeth do not score the front bearing bore.
6 Fit a new timing gear cover paper gasket held in
place w i t h a little grease. Install the outer thrust ring,
F50029 inner thrust ring, shoulder washer and slide on the
camshaft drive sprocket, locking it with the Woodruff
key. Assemble the timing chain and driven sprocket,
ensuring that the timing marks on the sprocket are
indexing as shown in FIG 1 :41. Secure the driven
sprocket with six screws and lockplates and care-
fully bend down the lockplates.
7 Install the timing gear cover, the oil pump, oil pressure
relief valve and seal assembly. Secure w i t h nuts,
special toothed washers and plain washers located
in the same manner as was noted on dismantling.
Locate the oil pump suction horn and secure with the
nuts and toothed washers.
8 Install the flywheel in the same relative position to the
crankshaft as was noted on dismantling. Replace the FIG 1 : 4 3 Adjusting the rocker clearances using the
optional service tools. Refer to Technical Data for the
correct clearance on early and late engines FIG 1 :42 Graduated sector C.673 for valve gear
timing
TIMING MARK
Page 23 of 128
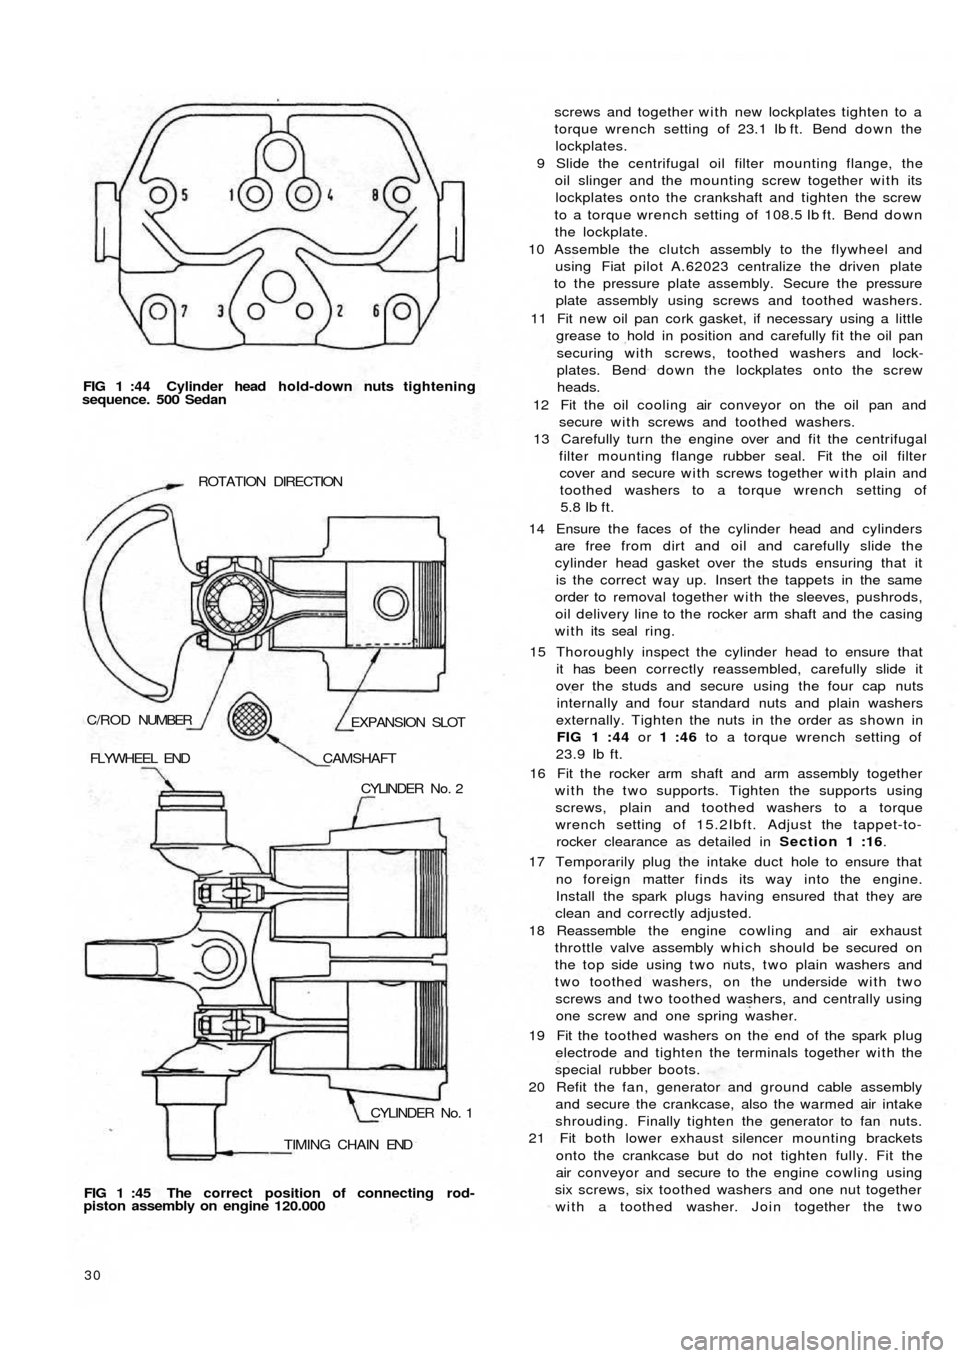
FIG 1 :44 Cylinder head h o ld-down nuts tightening
sequence. 500 Sedan
TIMING CHAIN ENDCYLINDER No. 1 CYLINDER No. 2 FLYWHEEL END
CAMSHAFT
EXPANSION SLOT C/ROD NUMBERROTATION DIRECTION
FIG 1 :45 The correct position of connecting rod-
piston assembly on engine 120.000
30
screws and together with new lockplates tighten to a
torque wrench setting of 23.1 Ib ft. Bend down the
lockplates.
9 Slide the centrifugal oil filter mounting flange, the
oil slinger and the mounting screw together with its
lockplates onto the crankshaft and tighten the screw
to a torque wrench setting of 108.5 Ib ft. Bend down
the lockplate.
10 Assemble the clutch assembly to the flywheel and
using Fiat pilot A.62023 centralize the driven plate
to the pressure plate assembly. Secure the pressure
plate assembly using screws and toothed washers.
11 Fit new oil pan cork gasket, if necessary using a little
grease to hold in position and carefully fit the oil pan
securing with screws, toothed washers and lock-
plates. Bend down the lockplates onto the screw
heads.
12 Fit the oil cooling air conveyor on the oil pan and
secure with screws and toothed washers.
13 Carefully turn the engine over and fit the centrifugal
filter mounting flange rubber seal. Fit the oil filter
cover and secure with screws together with plain and
toothed washers to a torque wrench setting of
5.8
Ib ft.
14 Ensure t h e faces of the cylinder head and cylinders
are free from dirt and oil and carefully slide the
cylinder head gasket over the studs ensuring that it
is the correct way up. Insert the tappets in the same
order to removal together with the sleeves, pushrods,
oil delivery line to the rocker arm shaft and the casing
with its seal ring.
15 Thoroughly inspect the cylinder head to ensure that
it has been correctly reassembled, carefully slide it
over the studs and secure using the four cap nuts
internally and four standard nuts and plain washers
externally. Tighten the nuts in the order as shown in
FIG 1 :44 or 1 :46 to a torque wrench setting of
23.9 Ib ft.
16 Fit the rocker arm shaft and arm assembly together
with the two supports. Tighten the supports using
screws, plain and toothed washers to a torque
wrench setting of 15.2Ibft. Adjust the tappet-to-
rocker clearance as detailed in Section 1 :16.
17 Temporarily plug the intake duct hole to ensure that
no foreign matter finds its way into the engine.
Install the spark plugs having ensured that they are
clean and correctly adjusted.
18 Reassemble the engine cowling and air
exhaust
throttle valve assembly which should be secured on
the top side using t w o nuts, t w o plain washers and
two toothed washers, on the underside with two
screws and t w o toothed washers, and centrally using
one screw and one spring washer.
19 Fit the toothed washers on the end of the spark plug
electrode and tighten the terminals together with the
special rubber boots.
20 Refit the fan, generator and ground cable assembly
and secure the crankcase, also the warmed air intake
shrouding. Finally tighten the generator to fan nuts.
21 Fit both lower exhaust silencer mounting brackets
onto the crankcase but do not tighten fully. Fit the
air conveyor and secure to the engine cowling using
six screws, six toothed washers and one nut together
with a toothed washer. Join together the t w o
Page 25 of 128
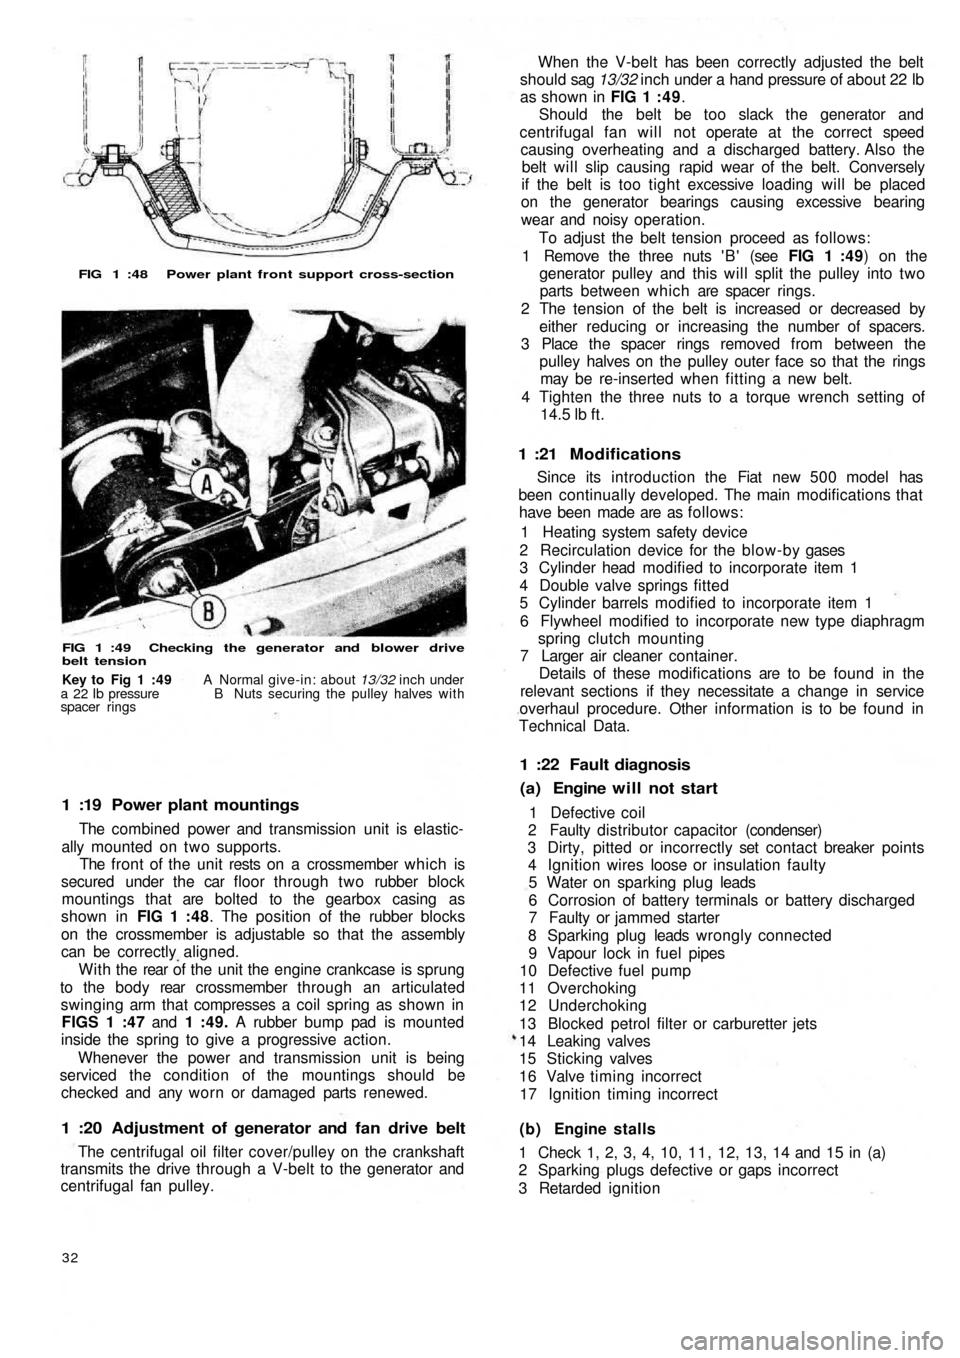
FIG 1 :48 Power plant front support cross-section
FIG 1 :49 Checking the generator and blower drive
belt tension
1 :19 Power plant mountings
The combined power and transmission unit is elastic-
ally mounted on two supports.
The front of the unit rests on a crossmember which is
secured under the car floor through two rubber block
mountings that are bolted to the gearbox casing as
shown in FIG 1 :48. The position of the rubber blocks
on the crossmember is adjustable so that the assembly
can be correctly aligned.
W i t h t h e rear of the unit the engine crankcase is sprung
to the b o d y rear crossmember through an articulated
swinging arm that compresses a coil spring as shown in
FIGS 1 :47 and 1 :49. A rubber bump pad is mounted
inside the spring to give a progressive action.
Whenever the power and transmission unit is being
serviced the condition of the mountings should be
checked and any worn or damaged parts renewed.
1 :20 Adjustment of generator and fan drive belt
The centrifugal oil filter cover/pulley on the crankshaft
transmits the drive through a V-belt to the generator and
centrifugal fan pulley.
32
(b) Engine stalls
1 Check 1, 2, 3, 4, 10, 1 1 , 12, 13, 14 and 15 in (a)
2 Sparking plugs defective or gaps incorrect
3 Retarded ignition 1 Defective coil
2 Faulty distributor capacitor (condenser)
3 Dirty, pitted or incorrectly set contact breaker points
4 Ignition wires loose or insulation faulty
5 Water on sparking plug leads
6 Corrosion of battery terminals or battery discharged
7 Faulty or jammed starter
8 Sparking plug leads wrongly connected
9 Vapour lock in fuel pipes
10 Defective fuel pump
11 Overchoking
12 Underchoking
13 Blocked petrol filter or carburetter jets
14 Leaking valves
15 Sticking valves
16 Valve timing incorrect
17 Ignition timing incorrect
(a) Engine will not start 1 :22 Fault diagnosis
Since its introduction the Fiat new 5 0 0 model has
been continually developed. The main modifications that
have been made are as follows:
1 Heating system safety device
2 Recirculation device for the blow-by gases
3 Cylinder head modified to incorporate item 1
4 Double valve springs fitted
5 Cylinder barrels modified to incorporate item 1
6 Flywheel modified to incorporate new type diaphragm
spring clutch mounting
7 Larger air cleaner container.
Details of these modifications are to be found in the
relevant sections if they necessitate a change in service
overhaul procedure. Other information is to be found in
Technical Data.
1 :21 Modifications
When the V-belt has been correctly adjusted the belt
should sag 13/32 inch under a hand pressure of about 22 lb
as shown in FIG 1 : 4 9.
Should the belt be too slack the generator and
centrifugal fan will not operate at the correct speed
causing overheating and a discharged battery. Also the
belt will slip causing rapid wear of the belt. Conversely
if the belt is too tight excessive loading will be placed
on the generator bearings causing excessive bearing
wear and noisy operation.
To adjust the belt tension proceed as follows:
1 Remove the three nuts ' B ' (see FIG 1 :49) on the
generator pulley and this will split the pulley into two
parts between which are spacer rings.
2 The tension of the belt is increased or decreased by
either reducing or increasing the number of spacers.
3 Place the spacer rings removed from between the
pulley halves on the pulley outer face so that the rings
may be re-inserted when fitting a new belt.
4 Tighten the three nuts to a torque wrench setting of
14.5
lb ft.
Key to Fig 1 :49 A Normal give-in: about 13/32 inch under
a 22 Ib pressure B Nuts securing the pulley halves with
spacer rings
Page 40 of 128
3:1
3:2
3:3
3:4
3:5Description
Operation
Routine maintenance
Ignition faults
Removing and dismantling distributor (sedan
and sports)
CHAPTER 3
THE IGNITION SYSTEM
3:6
3:7
3:8
3:9
3:10
Removing and dismantling
(station wagon)
Timing the ignition
Sparking plugs
The distributor drive spindle
Fault diagnosisdistributor
3 :1 Description
The ignition system fitted to all the models covered by
this manual consists of an ignition coil, ignition distributor
fitted with contact breaker points, a centrifugal automatic
advance system, condenser, low- and high-tension
wiring, spark plugs and a power supply provided by a
generator and battery. The wiring diagram is shown in
FIG 3 : 1
1 The low-tension circuit which is sometimes called the
primary circuit includes the power supply, contact
breaker points, condenser and ignition coil primary
winding.
2 The high-tension circuit which is sometimes called the
secondary circuit includes the ignition coil secondary
winding, distributor rotor, distributor cap with terminals
and the central brush, high-tension cables and the spark
plugs.
3 : 2 Operation
The contact breaker unit in the distributor interrupts
the primary circuit by the points opening. The sudden stop
in the flow of current in the primary winding, does not cause
arcing at the contact breaker points because it discharges
into the condenser connected in parallel w i t h the contact
F50047
breaker points. With the sudden collapse of the primary
circuit, the intensity of the magnetic field drops causing
an induced high-tension current in the ignition coil
secondary winding. The high EMF is distributed to the
sparking plugs by the ignition distributor rotor.
The automatic advance mechanism comprises a plate
carrying t w o weights which are symmetrically pivoted on
the plate at one end. Also attached to the weights at
opposite ends to the pivots is the cam carrier shaft with
special tension return springs. Under the action of centri-
fugal force as the rotational speed increases, the weights
move outwards causing the cam carrier shaft to move
angularly compared to the distributor drive shaft thus
causing advancement of the ignition timing.
The contact breaker assembly comprises the cam on the
drive shaft and t w o contact points, one of which is
stationary while the other is under the influence of the
cam, the action of which is transmitted by a rubbing block.
The cam has t w o lobes to control the opening and closing
of contact points. The stationary contact point is mounted
on an adjustable support to enable the contact breaker
point gap to be adjusted.
The HT current reaches the distributor cap central
terminal, from the ignition coil and is distributed to each
of the spark plugs at the correct time by the rotor arm.
Page 42 of 128
a n 0—20 v o ltmeter. If the circuit is in order the meter
should read approximately 12-volts.
3 Battery to fuse box terminal 30. Connect the volt-
meter between the terminal 30 and earth. No reading
indicates a faulty cable or loose connection.
4 Fuse box. Connect the voltmeter between the other
auxiliary terminal 30 and earth. No reading indicates a
broken or loose connection.
5 Fuse box auxiliary terminal 30 to terminal
number 30 on ignition switch. Connect the meter
between terminal number 30 on the ignition switch
and earth. No reading indicates a damaged cable or
loose connection.
6 Ignition switch. Connect the meter between termi-
nal 15/54 and earth. Switch onto the ignition position,
when no reading indicates a fault in the switch.
7 Ignition switch to low-tension cable connection
on the coil (blue cable). Connect the meter
between ignition coil terminal (blue cable) and earth.
No reading indicates a damaged cable or loose con-
nection.
8 Ignition coil. Disconnect the black low-tension cable
connecting the coil to the distributor side terminal at
the coil and connect the meter between this terminal
and earth. No reading indicates a fault in the primary
winding of the coil and a replacement coil must be
fitted. If the reading is correct remake the connections
to the coil.
9 Ignition coil to distributor. Disconnect the thin
black low-tension cable at the side of the distributor
and connect the meter between the end of this cable
and earth. No reading indicates a damaged cable or
loose connections.
10 Contact breaker and capacitor. Connect the
meter across the contact breaker points. No reading
indicates a faulty capacitor.
Capacitor:
The best method of testing a capacitor (condenser) is
by substitution. Disconnect the original capacitor and
connect a new one between the low-tension terminal on
the side of the distributor and earth.
If a new capacitor is needed, fit a new one complete
w i t h bracket, but if necessary unsolder the original bracket
and solder it onto the new capacitor using as little heat as
possible. Capacitor capacity is .15-.20 microfarads.
3 : 5 Removing and dismantling distributor (sedan
and sports)
To remove the distributor proceed as follows:
1 Rotate the engine slowly until the distributor rotor arm
is opposite the brass segment in the distributor cap
connected to No. 1 plug lead. This will provide a datum
for replacement.
2 Disconnect the cable from the low-tension terminal on
the side of the distributor body. Mark position of distri-
butor on support. Release the distributor retaining nut
and washer from the underside of the top flange of the
distributor support and carefully lift away the dis-
tributor.
3 Pull off the rotor arm. Remove the insulated terminal
assembly from the side of distributor body. Release the
contact breaker carrier plate retaining screws and con-
denser flange screw from the outside of the distributor
F50049 body. Carefully lift out the contact breaker plate
assembly.
4 Before further dismantling note the relative positions of
the driving dog and the rotor arm driving slot at the top
of the distributor cam spindle. The driving dog is offset
and can only engage its driving spindle in one position.
Then when the cam assembly is fitted to the centrifugal
weights during reassembly the timing is not 180 deg.
out.
5 Take out the cam lubrication felt pad recessed in the
rotor arm housing on the end of the cam spindle.
Remove the retaining screw, carefully disengage the
springs and lift out the cam spindle. It should be noted
that there is a small retaining ball and spring located in a
drilling nearly at the top of the drive shaft spindle.
Carefully lift away the weights.
6 Thoroughly clean all parts and inspect for excessive
wear. The distributor cap must not be cracked or show
signs of tracking. The cap terminals, rotor and contact
breaker points can be cleaned with a very fine file.
Emerypaper must not be used. If the clearance between
the rotor and distributor cap segments exceeds .0118
inch both the rotor and distributor cap must be replaced.
Inspect the contact breaker arm rubbing block for exces-
sive wear and also the points for wear so that if the gap
exceeds the last setting limit of .0209 inch and adjust-
ment through the stationary contact carrier screw is no
longer possible (see FIG 3 : 2) , the contact breaker set
must be renewed.
If the distributor drive shaft side or vertical movement is
excessive the distributor must be renewed.
Weak centri-
fugal weight springs or damaged weights must be
renewed using original Fiat spares otherwise the auto-
matic ignition advance characteristics could be altered.
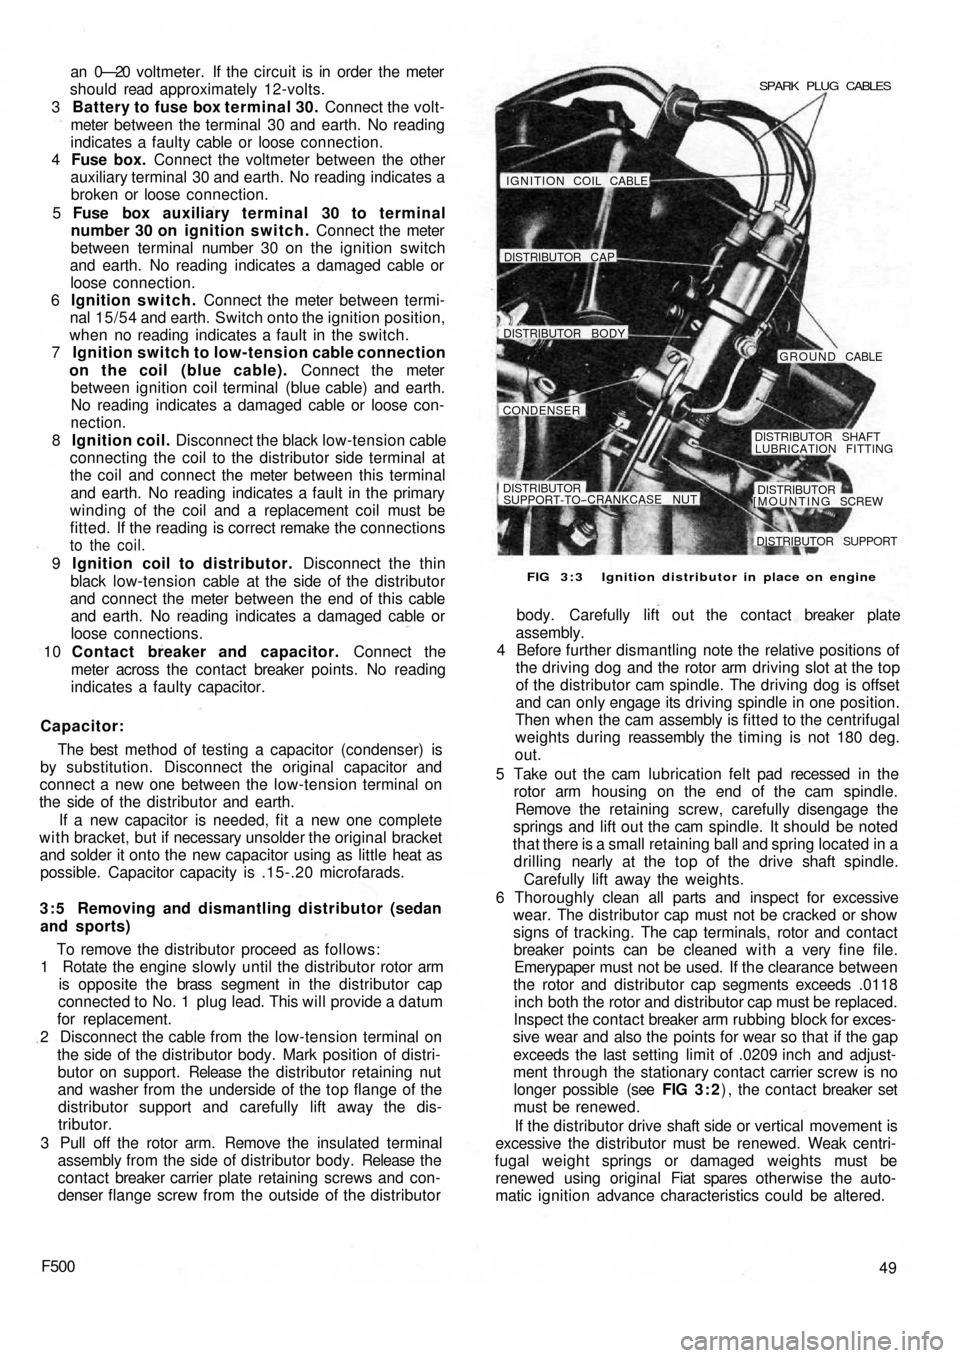
FIG 3 : 3 Ignition distributor in place on engine SPARK PLUG CABLES
IGNITION COIL CABLE!
DISTRIBUTOR CAP
DISTRIBUTOR BODY
GROUND CABLE
CONDENSER
DISTRIBUTOR SHAFT
LUBRICATION FITTING
DISTRIBUTORSUPPORT-TO--CRANKCASE NUT
[MOUNTING SCREWDISTRIBUTOR
DISTRIBUTOR SUPPORT
Page 43 of 128
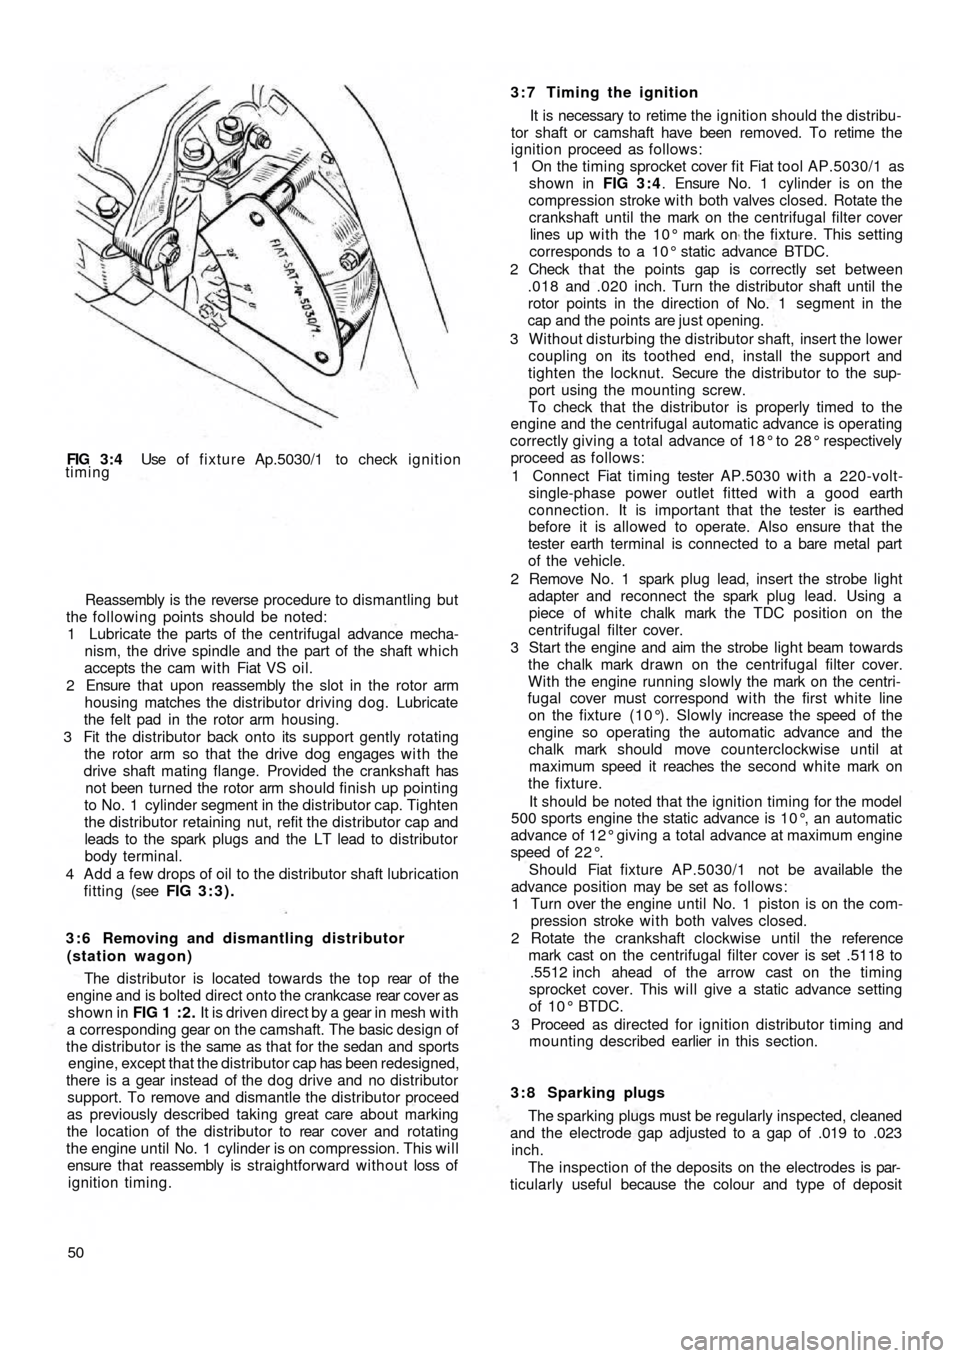
FIG 3 : 4 Use of fixture Ap.5030/1 to check ignition
timing
Reassembly is the reverse procedure to dismantling but
the following points should be noted:
1 Lubricate the parts of the centrifugal advance mecha-
nism, the drive spindle and the part of the shaft which
accepts the cam w i t h Fiat VS oil.
2 Ensure that upon reassembly the slot in the rotor arm
housing matches the distributor driving dog. Lubricate
the felt pad in the rotor arm housing.
3 Fit the distributor back onto its support gently rotating
the rotor arm so that the drive dog engages w i t h the
drive shaft mating flange. Provided the crankshaft has
not been turned the rotor arm should finish up pointing
to No. 1 cylinder segment in the distributor cap. Tighten
the distributor retaining nut, refit the distributor cap and
leads to the spark plugs and the LT lead to distributor
body terminal.
4 Add a few drops of oil to the distributor shaft lubrication
fitting (see FIG 3:3).
3 : 6 Removing and dismantling distributor
(station wagon)
The distributor is located towards the top rear of t h e
engine and is bolted direct onto the crankcase rear cover as
shown in FIG 1 : 2 . It is driven direct by a gear in mesh w i t h
a corresponding gear on the camshaft. The basic design of
the distributor is the same as that for the sedan and sports
engine, except that the distributor cap has been redesigned,
there is a gear instead of the dog
drive and no distributor
support. To remove and dismantle the distributor proceed
as previously described taking great care about marking
the location of the distributor to rear cover and rotating
the engine until No. 1 cylinder is on compression. This will
ensure that reassembly is straightforward without loss of
ignition timing.
503:7 Timing the ignition
It is necessary to retime the ignition should the distribu-
tor shaft or camshaft have been removed. To retime the
ignition proceed as follows:
1 On the timing sprocket cover fit Fiat tool AP.5030/1 as
shown in FIG 3 : 4. Ensure No. 1 cylinder is on the
compression stroke with both valves closed. Rotate the
crankshaft until the mark on the centrifugal filter cover
lines up w i t h the 10° mark on the fixture. This setting
corresponds to a 10° static advance BTDC.
2 Check t h a t the points gap is correctly set between
.018 and .020 inch. Turn the distributor shaft until the
rotor points in the direction of No. 1 segment in the
cap and the points are just opening.
3 Without disturbing the distributor shaft, insert the lower
coupling on its toothed end, install the support and
tighten the locknut. Secure the distributor to the sup-
port using the mounting screw.
To check that the distributor is properly timed to the
engine and the centrifugal automatic advance is operating
correctly giving a
total advance of 18° to 28° respectively
proceed as follows:
1 Connect Fiat timing tester AP.5030 with a 220-volt-
single-phase power outlet fitted with a good earth
connection. It is important that the tester is earthed
before it is allowed to operate. Also ensure that the
tester earth terminal is connected to a bare metal part
of the vehicle.
2 Remove No. 1 spark plug lead, insert the strobe light
adapter and reconnect the spark plug lead. Using a
piece of white chalk mark the TDC position on the
centrifugal filter cover.
3 Start the engine and aim the strobe light beam towards
the chalk mark drawn on the centrifugal filter cover.
With the engine running slowly the mark on the centri-
fugal cover must correspond wi th the first white line
on the fixture (10°). Slowly increase the speed of the
engine so operating the automatic advance and the
chalk mark should move counterclockwise until at
maximum speed it reaches the second white mark on
the fixture.
It should be noted that the ignition timing for the model
500 sports engine the static advance is 10°, an automatic
advance of 12° giving a total advance at maximum engine
speed of 2 2 ° .
Should Fiat fixture AP.5030/1 not be available the
advance position may be set as follows:
1 Turn over the
engine until No. 1 piston is on the com-
pression stroke w i t h both valves closed.
2 Rotate the crankshaft clockwise until the reference
mark cast on the centrifugal filter cover is set .5118 to
.5512 inch ahead of the arrow cast on the timing
sprocket cover. This will give a static advance setting
of 10° BTDC.
3 Proceed as directed for ignition distributor timing and
mounting described earlier in this section.
3 : 8 Sparking plugs
The sparking plugs must be regularly inspected, cleaned
and the electrode gap adjusted to a gap of .019 to .023
inch.
The inspection of the deposits on the electrodes is par-
ticularly useful because the colour and type of deposit
Page 44 of 128
indicates the condition inside the combustion chamber
and may be used as a guide to engine tuning.
Before the spark plugs are removed b l o w away any
loose dirt from the plug recesses using a compressed air
jet or tyre pump. Store the plugs in the order of removal
ready for inspection.
Examine the gaskets and if they are about half their
thickness they may be used again otherwise they must be
replaced.
Inspect the electrode end of the plugs and note the
type and colour of the deposit. Normally it should be
powdery and range from b r o w n to a greyish tan in colour.
There will also be slight wear of the electrodes and the
general effect described is one which comes from mixed
periods of high-speed and low-speed driving. Cleaning
and resetting the gap is all that will be necessary.
If the deposits are white or yellowish they indicate long
periods of constant-speed driving or much low-speed
city driving. Again, the treatment is straightforward.
Dry, black, fluffy deposits are usually the result of
running with too rich a mixture. Incomplete combustion
of the petrol air charge may also be a cause and this might
be traced to a defect in the ignition system or excessive
idling.
Overheated sparking plugs have a white blistered look
about the centre electrode and the side electrode may be
badly eroded. This may be caused by poor cooling, wrong
ignition timing or sustained high speeds under heavy load.
To clean the sparking plugs effectively they should be
cleaned using an abrasive blasting machine and tested
under pressure once the electrodes have been reset. File
these until they are clean, bright and the faces parallel and
set the gap to .019 to .023 inch. Do not try to bend the
centre electrode.
Before replacing the plugs use a wire brush to clean the
threads taking care that the electrodes are not touched.
Thoroughly clean the spark plug in petrol, and dry using a
compressed air jet or a tyre pump. If difficulty is found in
screwing the plugs into the cylinder head by hand run a
tap d o w n the threads to clear away any carbon. If a tap is
not available use an old sparking plug with crosscuts d o w nthe threads. Finally tighten the plugs to a torque wrench
setting of 18 to 21 Ib ft.
Sparking plug leads:
The spark plug leads and the lead from the coil to the
distributor cap must be regularly checked for cracking of
the insulation and also correct seating in the distributor
cap and coil top. It is recommended that silicone grease is
smeared around the sockets before the leads are replaced
to ensure no moisture may enter causing difficult starting.
3 : 9 The distributor driving spindle (sedan and
sports engine)
If for any reason, the driving spindle has been removed
from its housing in the crankcase, it must be correctly
meshed w i t h the camshaft gear otherwise it
will be impos-
sible to set the ignition timing.
3:10 Fault diagnosis
(a) Engine w i l l not fire
1 Battery discharged
2 Distributor contact points dirty, pitted or maladjusted
3 Distributor cap dirty, cracked or tracking
4 Carbon brush inside distributor cap not touching rotor
5 Faulty cable or loose connection in low-tension circuit
6 Distributor rotor arm cracked
7 Faulty coil
8 Broken contact breaker spring
9 Contact points stuck open
(b) Engine misfires
1 Check 2, 3, 4, and 7 in (a)
2 Weak contact breaker spring
3 High-tension plug and coil leads cracked or perished
4 Sparking plug(s) loose
5 Sparking plug insulation cracked
6 Sparking plug gap incorrectly set
7 Ignition timing too far advanced