fuel cap FIAT 500 1967 1.G Workshop Manual
[x] Cancel search | Manufacturer: FIAT, Model Year: 1967, Model line: 500, Model: FIAT 500 1967 1.GPages: 128, PDF Size: 9.01 MB
Page 8 of 128
6 Release the ignition distributor support retaining nut
and lift away the distributor together w i t h its support.
7 Remove all the mounting bolts of the engine cooling
cowling and lift away the assembly. Release the t w o
carburetter retaining nuts and carefully remove the
carburetter together with its drip tray.
8 Lift away the valve rocker assembly having first
released the t w o retaining nuts together with the plain
washers and lock washers. Carefully lift out the valve
rocker pushrods noting their relevant positions.
9 Slacken the four central cylinder head cap nuts and
the four conventional nuts in the order, shown in
FIG 1 :44 or 1 :46. Lift the cylinder head from the
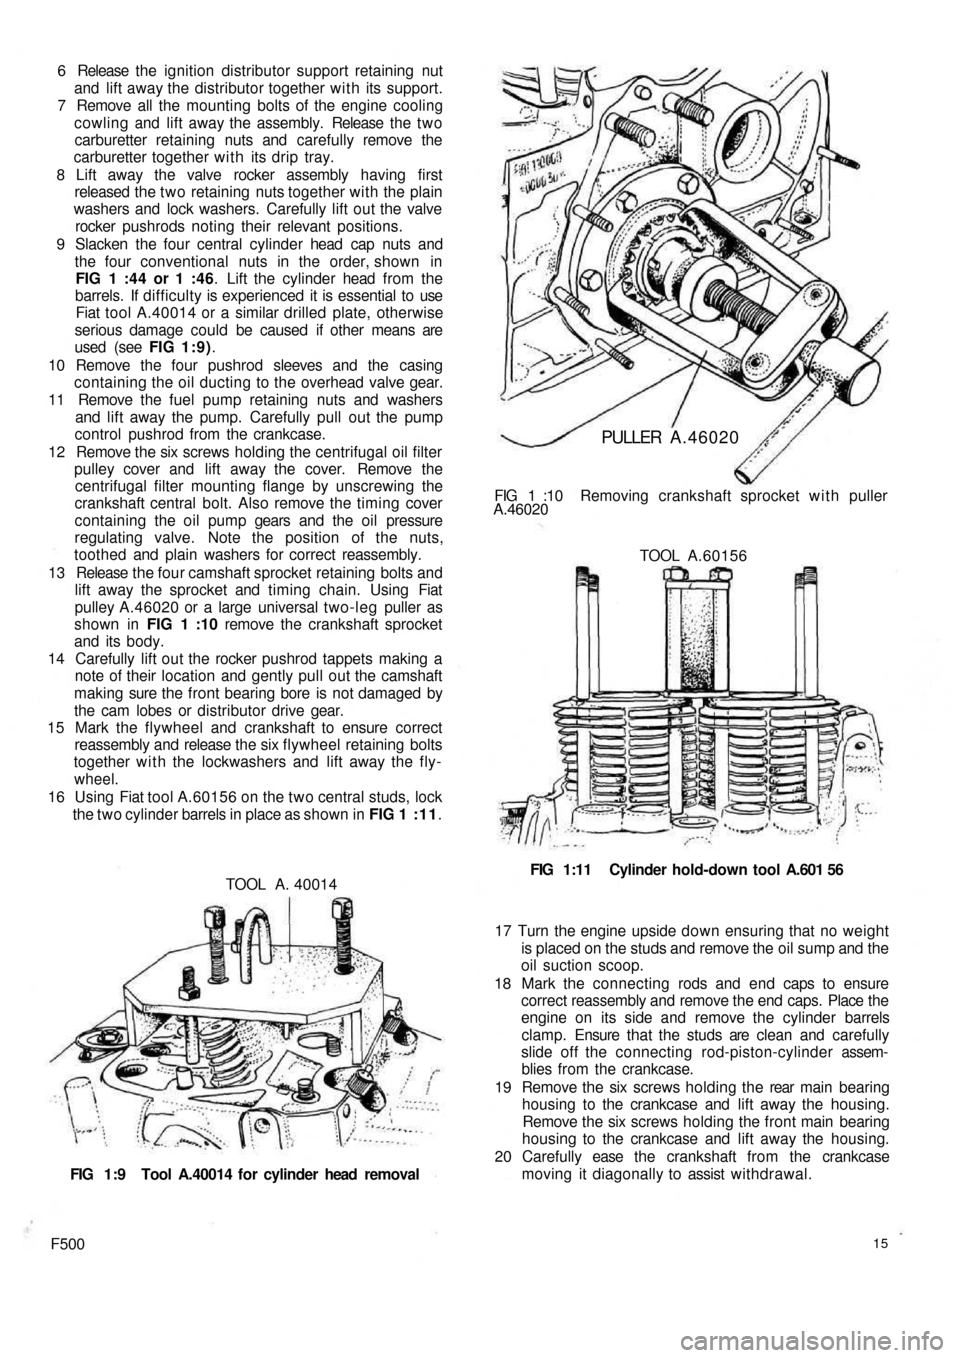
barrels. If difficulty is experienced it is essential to use
Fiat tool A.40014 or a similar drilled plate, otherwise
serious damage could be caused if other means are
used (see FIG 1:9).
10 Remove the four pushrod sleeves and the casing
containing the oil ducting to the overhead valve gear.
11 Remove the fuel pump retaining nuts and washers
and lift away the pump. Carefully pull out the pump
control pushrod from the crankcase.
12 Remove the six screws holding the centrifugal oil filter
pulley cover and lift away the cover. Remove the
centrifugal filter mounting flange by unscrewing the
crankshaft central bolt. Also remove the timing cover
containing the oil pump gears and the oil pressure
regulating valve. Note the position of the nuts,
toothed and plain
washers for correct reassembly.
13 Release t h e four camshaft sprocket retaining bolts and
lift away the sprocket and timing chain. Using Fiat
pulley A.46020 or a large universal two-leg puller as
shown in FIG 1 :10 remove the crankshaft sprocket
and its body.
14 Carefully lift out the rocker pushrod tappets making a
note of their location and gently pull out the camshaft
making sure the front bearing bore is not damaged by
the cam lobes or distributor drive gear.
15 Mark the flywheel and crankshaft to ensure correct
reassembly and release the six f l y w h e e l retaining bolts
together w i t h the lockwashers and lift away the fly-
wheel.
16 Using Fiat tool A.60156 on the two central studs, lock
the two cylinder barrels in place as shown in FIG 1 : 1 1.
TOOL A. 40014
FIG 1:9 Tool A.40014 for cylinder head removal
F50015
17 Turn the engine upside down ensuring that no weight
is placed on the studs and remove the oil sump and the
oil suction scoop.
18 Mark the connecting rods and end caps to ensure
correct reassembly and remove the end caps. Place the
engine on its side and remove the cylinder barrels
clamp. Ensure that the studs are clean and carefully
slide off the connecting rod-piston-cylinder assem-
blies from the crankcase.
19 Remove the six screws holding the rear main bearing
housing to the crankcase and lift away the housing.
Remove the six screws holding the front main bearing
housing to the crankcase and lift away the housing.
20 Carefully ease the crankshaft from the crankcase
moving it diagonally to assist withdrawal. FIG 1:11 Cylinder hold-down tool A.601 56 TOOL A.60156 FIG 1 :10 Removing crankshaft sprocket w i t h puller
A.46020
PULLER A.46020
Page 9 of 128
STUD REMOVAL
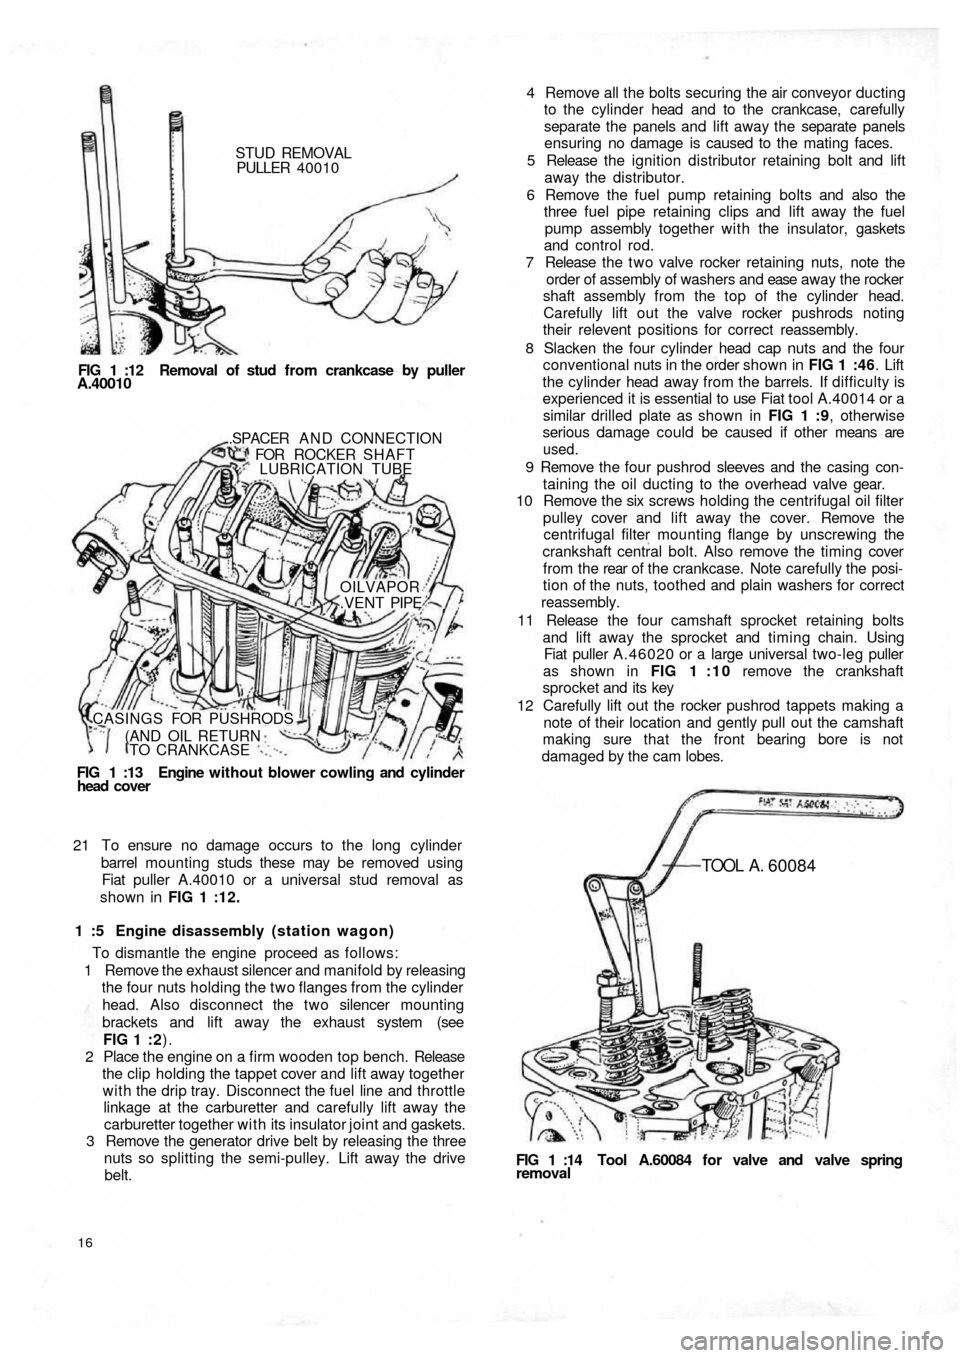
PULLER 40010
FIG 1 :12 Removal of stud from crankcase by puller
A.40010
FIG 1 :13 Engine without blower cowling and cylinder
head cover.SPACER A N D CONNECTION
FOR ROCKER SHAFT
LUBRICATION TUBE
OILVAPOR
.VENT PIPE
CASINGS FOR PUSHRODS
(AND OIL RETURN
TO CRANKCASE
21 To ensure no damage occurs to the long cylinder
barrel mounting studs these may be removed using
Fiat puller A.40010 or a universal stud removal as
shown in FIG 1 :12.
1 :5 Engine disassembly (station wagon)
To dismantle the engine proceed as follows:
1 Remove the exhaust silencer and manifold by releasing
the four nuts holding the two flanges from the cylinder
head. Also disconnect the two silencer mounting
brackets and lift away the exhaust system (see
FIG 1 : 2).
2 Place the engine on a firm wooden top bench. Release
the clip holding the tappet cover and lift away together
with the drip tray. Disconnect the fuel line and throttle
linkage at the carburetter and carefully lift away the
carburetter together with its insulator joint and gaskets.
3 Remove the generator drive belt by releasing the three
nuts so splitting the semi-pulley. Lift away the drive
belt.
16
FIG 1 :14 Tool A.60084 for valve and valve springremoval
TOOL A . 60084
4 Remove all the bolts securing the air conveyor ducting
to the cylinder head and to the crankcase, carefully
separate the panels and lift away the separate panels
ensuring no damage is caused to the mating faces.
5 Release the ignition distributor retaining bolt and lift
away the distributor.
6 Remove the fuel pump retaining bolts and also the
three fuel pipe retaining clips and lift away the fuel
pump assembly together with the insulator, gaskets
and control rod.
7 Release the t w o valve rocker retaining nuts, note the
order of assembly of washers and ease away the rocker
shaft assembly from the top of the cylinder head.
Carefully lift out the valve rocker pushrods noting
their relevent positions for correct reassembly.
8 Slacken the four cylinder head cap nuts and the four
conventional nuts in the order shown in FIG 1 :46. Lift
the cylinder head away from the barrels. If difficulty is
experienced it is essential to use Fiat tool A.40014 or a
similar drilled plate as shown in FIG 1 :9, otherwise
serious damage could be caused if other means are
used.
9 Remove the four pushrod sleeves and the casing con-
taining the oil ducting to the overhead valve gear.
10 Remove the six screws holding the centrifugal oil filter
pulley cover and lift away the cover. Remove the
centrifugal filter mounting flange by unscrewing the
crankshaft central bolt. Also remove the timing cover
f r o m t h e rear of t h e crankcase. Note carefully the posi-
tion of the nuts, toothed and plain washers for correct
reassembly.
11 Release the four camshaft sprocket retaining bolts
and lift away the sprocket and timing chain. Using
Fiat puller A.46020 or a large universal two-leg puller
as shown in FIG 1 : 1 0 remove the crankshaft
sprocket and its key
12 Carefully lift out the rocker pushrod tappets making a
note of their location and gently pull out the camshaft
making sure that the front bearing bore is not
damaged by the cam lobes.
Page 25 of 128
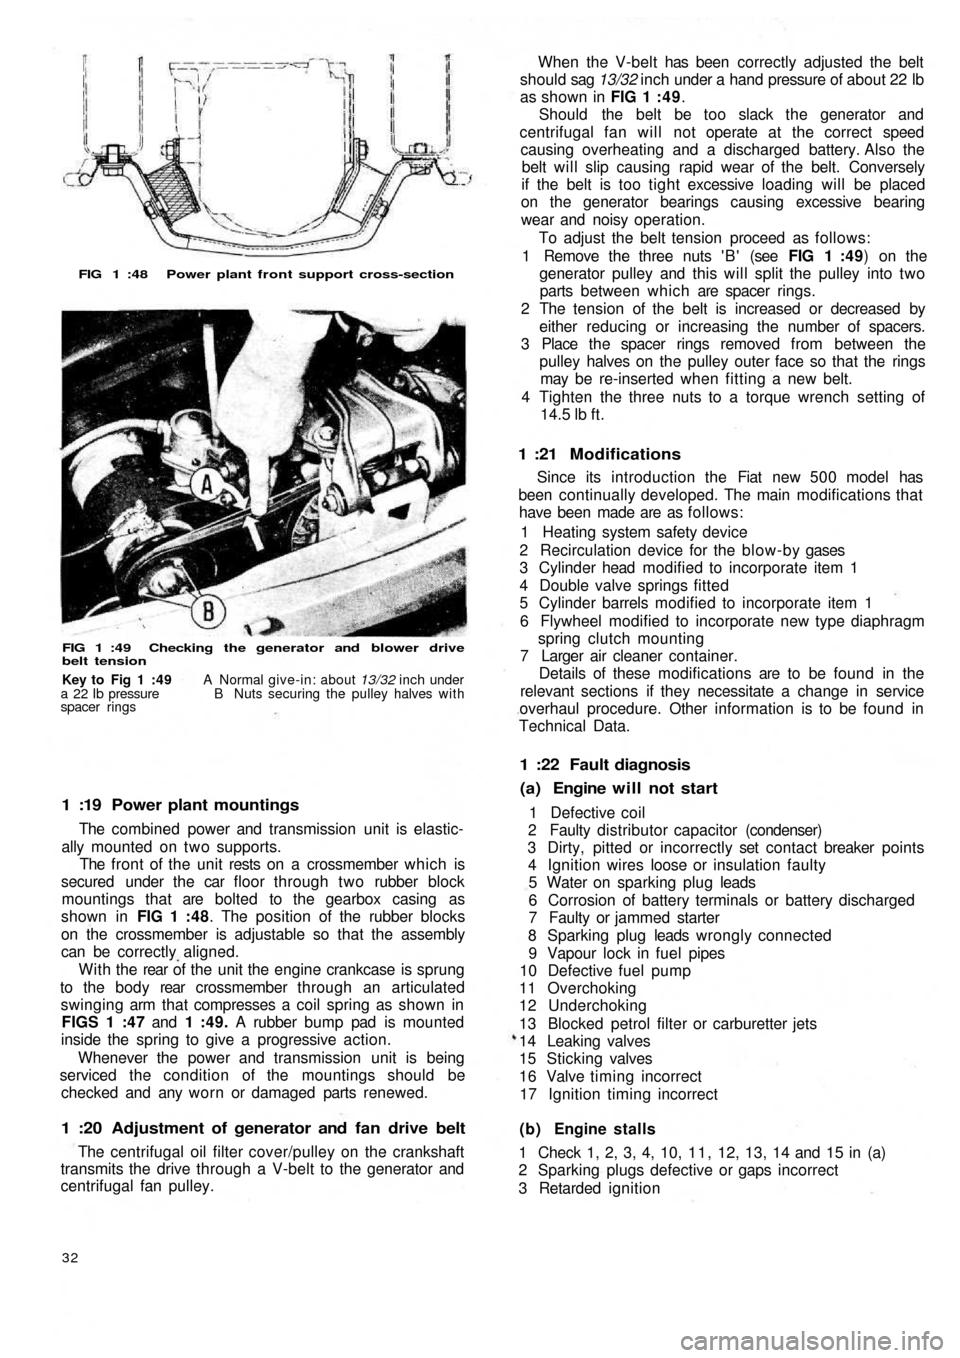
FIG 1 :48 Power plant front support cross-section
FIG 1 :49 Checking the generator and blower drive
belt tension
1 :19 Power plant mountings
The combined power and transmission unit is elastic-
ally mounted on two supports.
The front of the unit rests on a crossmember which is
secured under the car floor through two rubber block
mountings that are bolted to the gearbox casing as
shown in FIG 1 :48. The position of the rubber blocks
on the crossmember is adjustable so that the assembly
can be correctly aligned.
W i t h t h e rear of the unit the engine crankcase is sprung
to the b o d y rear crossmember through an articulated
swinging arm that compresses a coil spring as shown in
FIGS 1 :47 and 1 :49. A rubber bump pad is mounted
inside the spring to give a progressive action.
Whenever the power and transmission unit is being
serviced the condition of the mountings should be
checked and any worn or damaged parts renewed.
1 :20 Adjustment of generator and fan drive belt
The centrifugal oil filter cover/pulley on the crankshaft
transmits the drive through a V-belt to the generator and
centrifugal fan pulley.
32
(b) Engine stalls
1 Check 1, 2, 3, 4, 10, 1 1 , 12, 13, 14 and 15 in (a)
2 Sparking plugs defective or gaps incorrect
3 Retarded ignition 1 Defective coil
2 Faulty distributor capacitor (condenser)
3 Dirty, pitted or incorrectly set contact breaker points
4 Ignition wires loose or insulation faulty
5 Water on sparking plug leads
6 Corrosion of battery terminals or battery discharged
7 Faulty or jammed starter
8 Sparking plug leads wrongly connected
9 Vapour lock in fuel pipes
10 Defective fuel pump
11 Overchoking
12 Underchoking
13 Blocked petrol filter or carburetter jets
14 Leaking valves
15 Sticking valves
16 Valve timing incorrect
17 Ignition timing incorrect
(a) Engine will not start 1 :22 Fault diagnosis
Since its introduction the Fiat new 5 0 0 model has
been continually developed. The main modifications that
have been made are as follows:
1 Heating system safety device
2 Recirculation device for the blow-by gases
3 Cylinder head modified to incorporate item 1
4 Double valve springs fitted
5 Cylinder barrels modified to incorporate item 1
6 Flywheel modified to incorporate new type diaphragm
spring clutch mounting
7 Larger air cleaner container.
Details of these modifications are to be found in the
relevant sections if they necessitate a change in service
overhaul procedure. Other information is to be found in
Technical Data.
1 :21 Modifications
When the V-belt has been correctly adjusted the belt
should sag 13/32 inch under a hand pressure of about 22 lb
as shown in FIG 1 : 4 9.
Should the belt be too slack the generator and
centrifugal fan will not operate at the correct speed
causing overheating and a discharged battery. Also the
belt will slip causing rapid wear of the belt. Conversely
if the belt is too tight excessive loading will be placed
on the generator bearings causing excessive bearing
wear and noisy operation.
To adjust the belt tension proceed as follows:
1 Remove the three nuts ' B ' (see FIG 1 :49) on the
generator pulley and this will split the pulley into two
parts between which are spacer rings.
2 The tension of the belt is increased or decreased by
either reducing or increasing the number of spacers.
3 Place the spacer rings removed from between the
pulley halves on the pulley outer face so that the rings
may be re-inserted when fitting a new belt.
4 Tighten the three nuts to a torque wrench setting of
14.5
lb ft.
Key to Fig 1 :49 A Normal give-in: about 13/32 inch under
a 22 Ib pressure B Nuts securing the pulley halves with
spacer rings
Page 26 of 128
4 Mixture too weak
5 Water in fuel system
6 Petrol tank vent blocked
7 Incorrect valve clearance
(c) Engine idles badly
1 Check 1 and 6 in (b)
2 Air leak at manifold joints
3 Slow-running jet blocked or out of adjustment
4 Air leak in carburetter
5 Over-rich mixture
6 Worn piston rings
7 Worn valve stems or guides
8 Weak exhaust valve springs
(d) Engine misfires
1 Check 1, 2, 3, 4, 5, 8, 10, 13, 14, 1 5, 16, 17 in (a);
2, 3, 4 and 7 in (b)
2 Weak or broken valve springs
(e) Engine overheats
1 Generator and fan drive belt too loose
2 Shutter or thermostat seized in closed position
(f) Compression low
1 Check 14 and 15 in (a), 6 and 7 in (c) and 2 in (d)
2 Worn piston ring grooves
3 Scored or worn cylinder bores
(g) Engine lacks power
1 Check 3, 10, 1 1 , 13, 14, 15, 16 and 17 in (a), 2, 3, 4
and 7 in (b) 6 and 7 in (c) and 2 in (d). Also check (e)
and (f)
2 Leaking joint washers
3 Fouled sparking plugs
4 Automatic centrifugal advance not operating
(h) Burnt valves or seats
1 Check 14 and 15 in (a), 7 in (b) and 2 in (d). Alsocheck (e)
2 Excessive carbon around valve seat and head
(j) Sticking valves
1 Check 2 in (d)
2 Bent valve stem
3 Scored valve stem or guide
4 Incorrect valve clearance
(k) Excessive cylinder wear
1 Check 11 in (a) and see Chapter 4
2 Lack of oil
3 Dirty oil
4 Piston rings gummed up or broken
5 Badly fitting piston rings
6 Connecting rods bent
(l) Excessive oil consumption
1 Check 6 and 7 in (c) and check (k)
2 Ring gaps too wide
3 Oil return holes in piston choked with carbon
4 Scored cylinders
5 Oil level too high
6 External oil leaks
7 Ineffective valve stem oil seals
(m) Crankshaft and connecting rod bearing failure
1 Check 2 in (k)
2 Restricted oilways
3 Worn journals or crank pins
4 Loose bearing caps
5 Extremely low oil pressure
6 Bent connecting rod
(n) High fuel consumption (see Chapter 2)
(o) Engine vibration
1 Loose generator bolts
2 Blower blade assembly out-of-balance
3 Incorrect clearance for rear engine mounting rubber
F50033
Page 38 of 128
Air cleaner—station wagon:
A pleated paper air cleaner element is housed in a
special air intake chamber connected to the front of the
engine air cooling cowling (see FIG 4 : 2) . This chamber
will be seen located towards the rear of t h e power unit
compartment. Remove the retaining wing nut, lift off the
lid and the element can be withdrawn by lifting upwards.
2:10 Blow-by-gases recirculation device
Engine 110 F.000
All the oil vapours and blow-by-gases that are formed
in the engine crankcase are drawn to the cylinder head
cover recess 1 (see FIG 2:18). From here they travel into
the pipe 5 via a breather valve 2 which is firmly attached to
the oil filler cap 3 and the strainer 4 located in the filler
neck. The oil vapours and gases are then d r a w n back into
the duct 9 from the pipe 5 which connects the air cleaner
6 to the carburetter 7. This ensures a complete closed cir-
cuit circulation.
Engine 120.000:
From engine No. 288156 the oil vapours and blow-by-
gases instead of being exhausted to the atmosphere are
conveyed to the air cleaner and from here they are drawn
back into the combustion chambers. To ensure that an
excessive of oil vapour does not pass along the piping
with the blow-by-gases a diaphragm is fitted in the duct
in front of the breather valve 2 (see FIG 2 :18), the dia-
phragm comprising a filter gauze 11 and moveable parti-
tion 10.
It should be noted that the oil vapour strainer 4 (see
FIG 2:18) and the flame trap 8 can easily be removed
from their seating for cleaning or renewal.
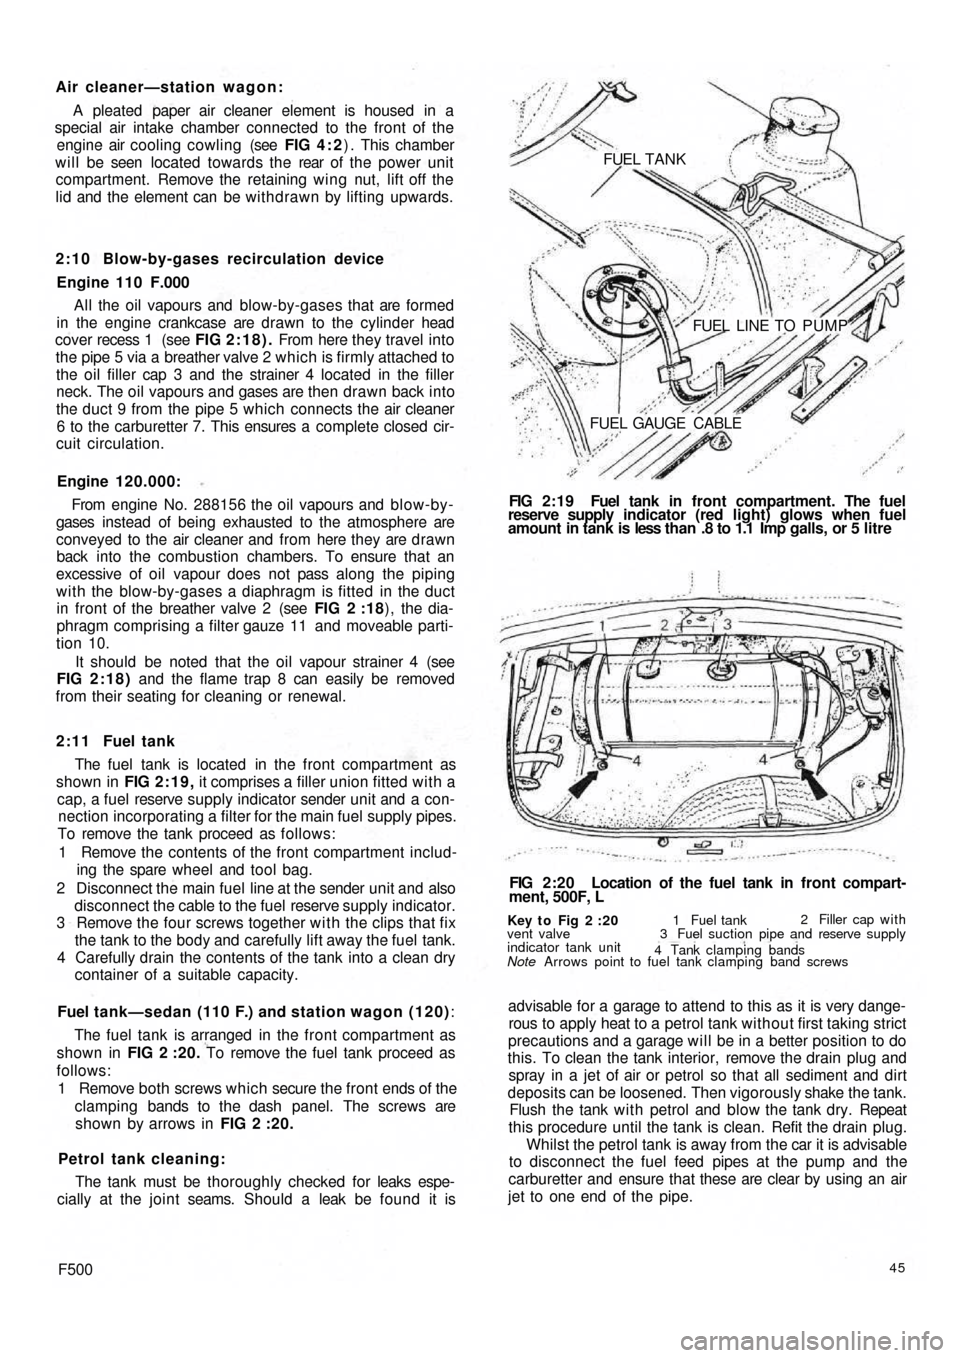
2 : 1 1 Fuel tank
The fuel tank is located in the front compartment as
shown in FIG 2:19, it comprises a filler union fitted with a
cap, a fuel reserve supply indicator sender unit and a con-
nection incorporating a filter for the main fuel supply pipes.
To remove the tank proceed as follows:
1 Remove the contents of the front compartment includ-
ing the spare wheel and tool bag.
2 Disconnect the main fuel line at the sender unit and also
disconnect the cable to the fuel reserve supply indicator.
3 Remove the four screws together w i t h the clips that fix
the tank to the body and carefully lift away the fuel tank.
4 Carefully drain the contents of the tank into a clean dry
container of a suitable capacity.
Fuel tank—sedan (110 F.) and station wagon (120):
The fuel tank is arranged in the front compartment as
shown in FIG 2 :20. To remove the fuel tank proceed as
follows:
1 Remove both screws which secure the front ends of the
clamping bands to the dash panel. The screws are
shown by arrows in FIG 2 :20.
Petrol tank cleaning:
The tank must be thoroughly checked for leaks espe-
cially at the joint seams. Should a leak be found it is
F50045
advisable for a garage to attend to this as it is very dange-
rous to apply heat to a petrol tank without first taking strict
precautions and a garage will be in a better position to do
this. To clean the tank interior, remove the drain plug and
spray in a jet of air or petrol so that all sediment and dirt
deposits can be loosened. Then vigorously shake the tank.
Flush the tank w i t h petrol and blow the tank dry. Repeat
this procedure until the tank is clean. Refit the drain plug.
Whilst the petrol tank is away from the car it is advisable
to disconnect the fuel feed pipes at the pump and the
carburetter and ensure that these are clear by using an air
jet to one end of the pipe.
Key t o Fig 2 :20
Note Arrows point to fuel tank clamping band screws vent valve
indicator tank unit1 Fuel tank2 Filler cap with
3 Fuel suction pipe and reserve supply
4 Tank clamping bands
FIG 2:20 Location of the fuel tank in front compart-
ment, 500F, L FIG 2:19 Fuel tank in front compartment. The fuel
reserve supply indicator (red light) glows when fuel
amount in tank is less than .8 to 1.1 Imp galls, or 5 litre FUEL TANK
FUEL LINE TO PUMP
FUEL GAUGE CABLE
Page 102 of 128
10:9 Brake fluid reservoir
The reservoir is located in the front compartment to the
side of the fuel tank as shown in FIG 10:9. Should it be
necessary to detach the fluid outlet line from the reservoir
the outlet hole must be blanked off using a tapered
wooden peg of suitable length so that the cap may be
replaced to prevent the ingress of foreign matter into
the reservoir and the absorbtion of moisture, oil or petrol
vapours which would alter the properties of the hydraulic
fluid.
A special filter is fitted into the top of the reservoir
through which all fluid used for topping-up the reservoir
must pass to ensure utmost inner cleanliness of the
hydraulic system.
10:10 Bleeding the system
This is not a routine maintenance operation and is only
necessary if air has entered the hydraulic system because
parts have been dismantled or because the f l u i d level in
the reservoir has dropped so low that air has been drawn
into the main feed pipe to the master cylinders.
1 Fill the reservoir w i t h Fiat 'Blue Label' hydraulic fluid.
During the bleeding operation fluid will be used and
constant topping-up of the supply reservoir will be
needed. If this is not done it is possible for air to enter
the master cylinder main feed pipe which will nullify
the operation and necessitate a fresh start.
2 Attach a length of rubber or plastic tubing to the
bleeder screw on the rear wheel cylinder furthermost
from the master cylinder. Immerse the free end of the
tube in a small volume of hydraulic brake fluid in a
clean jar.
3 Open the bleed screw one turn and get a second
operator to press down slowly on the brake pedal. After
a full stroke let the pedal return without assistance,
pause a moment and repeat the d o w n stroke. At first
there will be air bubbles issuing from the bleed tube,
but when fluid alone is ejected, hold the pedal firmly
down on the floor panel and tighten the bleed screw.
Repeat this operation on the other rear brake and then
repeat the operation on the two front brakes.
4 On completion, top-up the fluid in the reservoir to the
correct level. Discard all dirty fluid. If fluid is perfectly
clean, let it stand for twenty four hours to become
clear of air bubbles before using it again.
10:11 Hand parking brake
Normally with the new 500 Sedan model automatic
brake adjusting device, adjustment of the rear brakes
will take up excessive handbrake travel.
If there is excessive travel on the handbrake of the
Sedan model at any time, or in the case of Station Wagon
model even after the rear brakes have been manually
adjusted, suspect worn brake shoe linings or stretched
handbrake cables. Examine the linings and fit replace-
ment shoes if necessary. Check the action of the hand
parking brake again and if there is still too much travel
before the brakes are applied it is permissible to take up as
follows:
1 It is essential to ensure that the rear shoes are correctly
adjusted as described in Section 10:2.
2 Apply the hand parking brake lever until the pawl
engages with the ratchet at the second notch.
F500
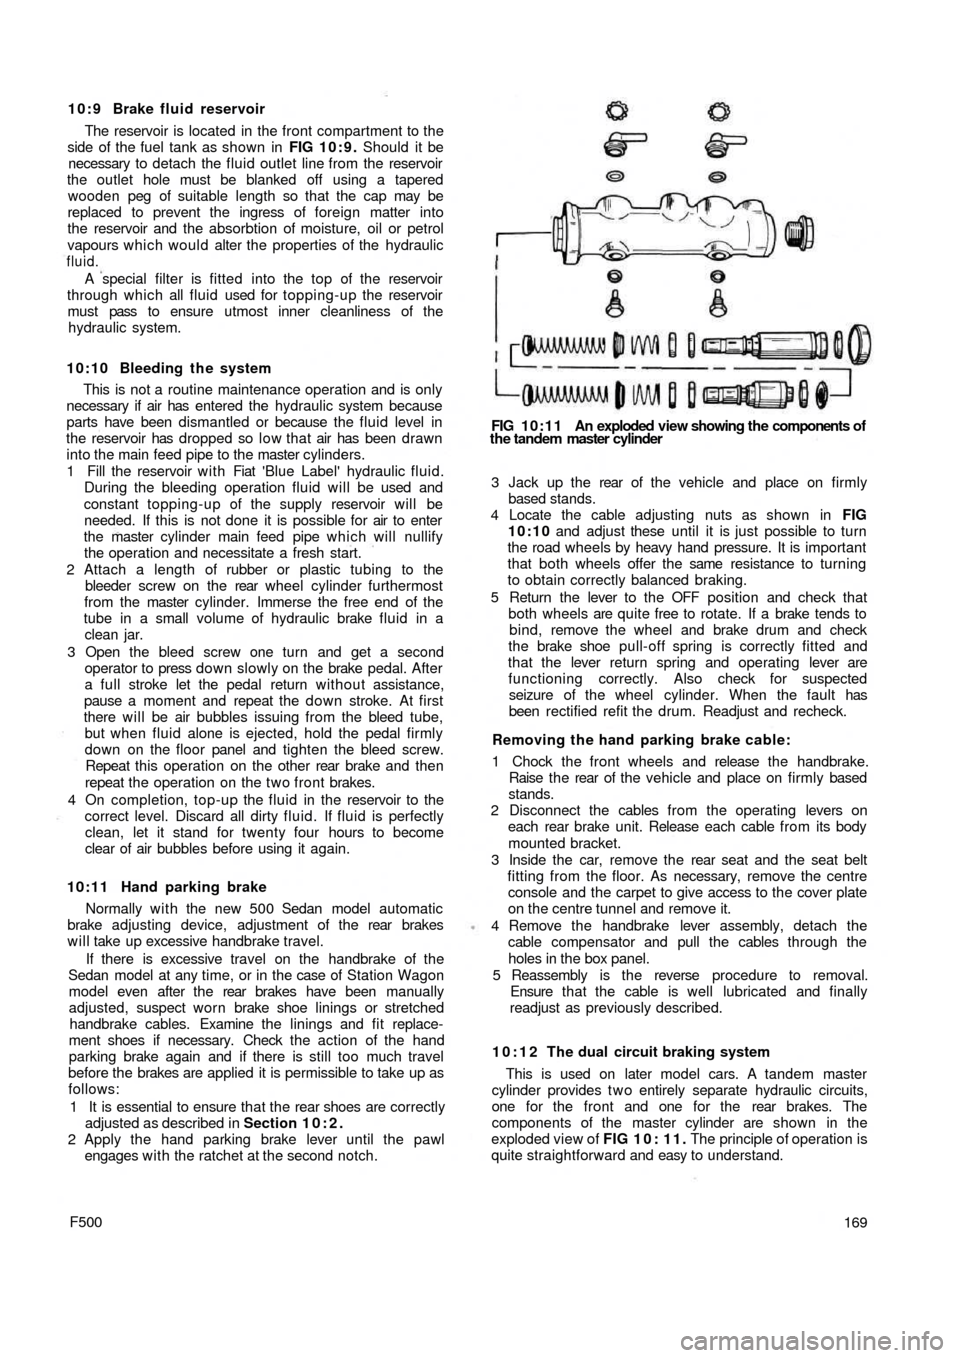
FIG 10:11 An exploded view showing the components of
the tandem master cylinder
3 Jack up the rear of t h e vehicle and place on firmly
based stands.
4 Locate the cable adjusting nuts as shown in FIG
10:10 and adjust these until it is just possible to turn
the road wheels by heavy hand pressure. It is important
that both wheels offer the same resistance to turning
to obtain correctly balanced braking.
5 Return the lever to the OFF position and check that
both wheels are quite free to rotate. If a brake tends to
bind, remove the wheel and brake drum and check
the brake shoe pull-off spring is correctly fitted and
that the lever return spring and operating lever are
functioning correctly. Also check for suspected
seizure of the wheel cylinder. When the fault has
been rectified refit the drum. Readjust and recheck.
Removing the hand parking brake cable:
1 Chock the front wheels and release the handbrake.
Raise t h e rear of the vehicle and place on firmly based
stands.
2 Disconnect the cables from the operating levers on
each rear brake unit. Release each cable from its body
mounted bracket.
3 Inside the car, remove the rear seat and the seat belt
fitting from the floor. As necessary, remove the centre
console and the carpet to give access to the cover plate
on the centre tunnel and remove it.
4 Remove the handbrake lever assembly, detach the
cable compensator and pull the cables through the
holes in the box panel.
5 Reassembly is the reverse procedure to removal.
Ensure t h a t the cable is well lubricated and finally
readjust as previously described.
10:12 The dual circuit braking system
This is used on later model cars. A tandem master
cylinder provides t w o entirely separate hydraulic circuits,
one for the front and one for the rear brakes. The
components of the master cylinder are shown in the
exploded view of FIG 1 0 : 1 1 . The principle of operation is
quite straightforward and easy to understand.
169
Page 116 of 128
Lamp brilliance varies w i t h the speed of t h e car:
Check the condition of the battery. Examine the battery
connections. Make sure they are tight and renew faulty
cables.
11:10 Panel and warning lights:
All the gauges are clustered in a single instrument
mounted on the dashboard above the steering column.
Incorporated in this cluster is the parking light pilot light,
generator charge indicator, fuel reserve supply indicator,
low oil pressure indicator, and the speedometer w i t h
mileage recorder.
The parking lamp indicator glows green when the
ignition lock switch key is in either position 1 or 2 once
the toggle switch on the instrument panel has been
operated.
The generator charge indicator shows red only when
the ignition is turned on. It should be extinguished when
the generator output is sufficient for battery charge
(12.6 ± 0.2 volts) with the engine running at a speed
of 1100 rev/min and the headlights switched off.
The fuel reserve supply indicator shows red only when
the ignition is turned on and the amount of fuel in the
petrol tank has dropped to approximately .8 to 1.1
Imp. gallons.
The low oil pressure indicator shows red only when the
ignition is turned on and should be extinguished when
the oil pressure reaches 7.1 to 21.3 Ib/sq in, and opens
the sending unit contacts. Once the engine is at normal
operating temperature but at a speed below 1000 rev/
min the indicator might light up even the pressure is under
control and with normal operation.
All the bulbs fitted to the above described units are of
the tubular 2.5W type and to renew a bulb extract the
bulb holder from the rear of t h e instrument cluster and
release the bulb which is attached by a normal bayonet
coupling.
Fuel reserve supply indicator sender u n i t:
The fuel reserve supply indicator should be checked for
correct indication by allowing the fuel tank to empty and
then inserting .8 to 1.1 Imp. gallons at which stage the
light should extinguish. Any failure to do so should be
checked as follows:
1 Ensure that the indicator bulb operates correctly.
2 Check for complete circuit between the sender unit and
the indicator bulb.
3 If the sender unit float bracket is distorted the bulb
will
indicate a reserve supply of fuel greater or smaller than
specified. The bracket should be adjusted to give
correct indication of fuel level.
4 The sender unit could have been inadvertantly
damaged in which case the unit must be renewed.
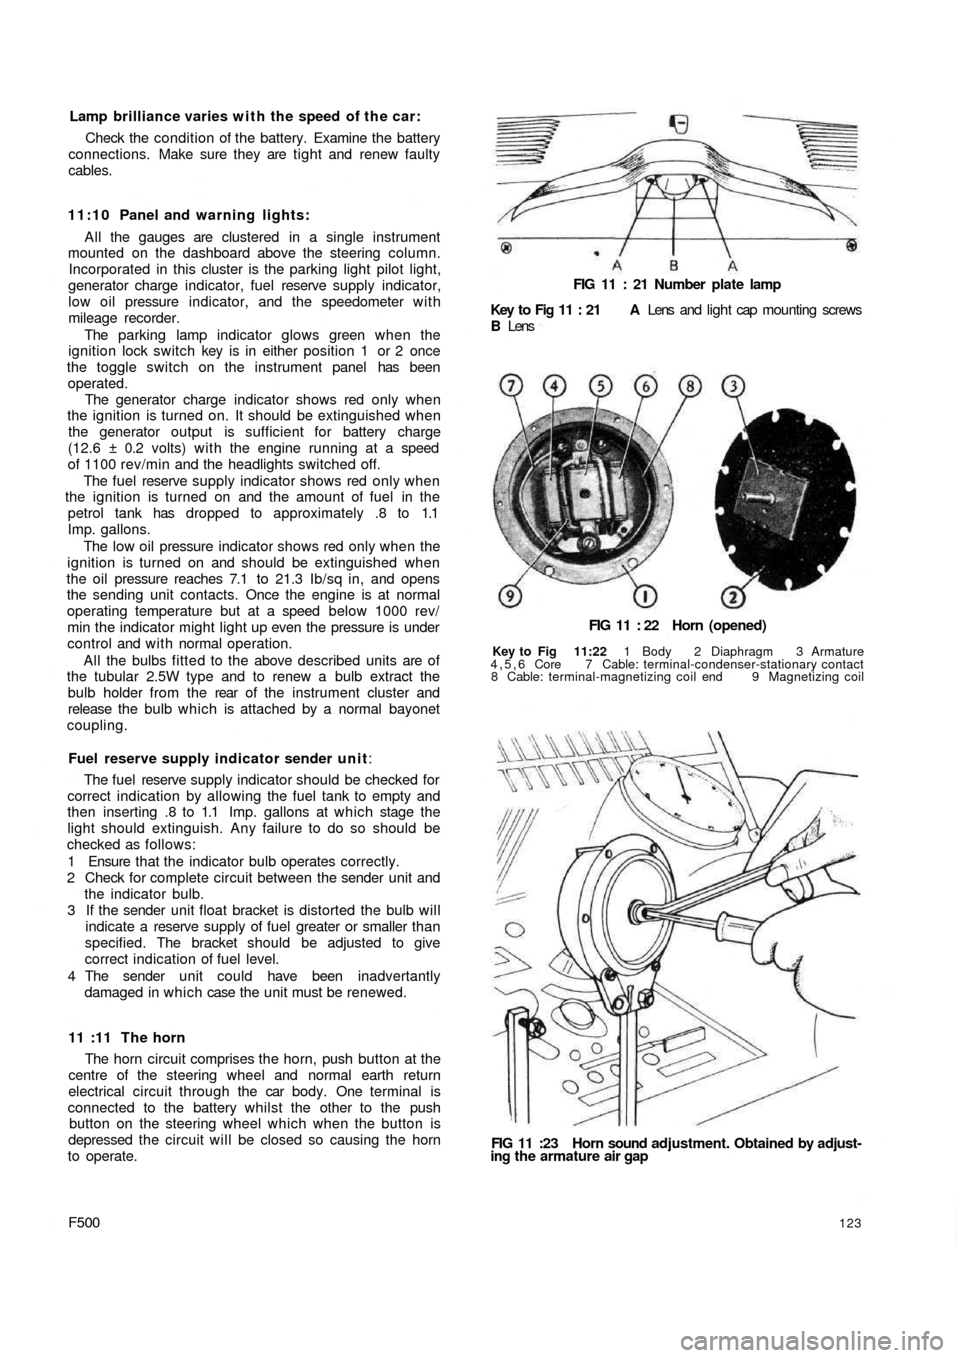
11 :11 The horn
The horn circuit comprises the horn, push button at the
centre of the steering wheel and normal earth return
electrical circuit through the car body. One terminal is
connected to the battery whilst the other to the push
button on the steering wheel which when the button is
depressed the circuit will be closed so causing the horn
to operate.
F500
FIG 11 : 21 Number plate lamp
Key to Fig 11 : 21 A Lens and light cap mounting screws
B Lens
FIG 11 : 22 Horn (opened)
Key to Fig 11:22 1 Body 2 Diaphragm 3 Armature
4,5,6 Core 7 Cable: terminal-condenser-stationary contact
8 Cable: terminal-magnetizing coil end 9 Magnetizing coil
FIG 11 :23 Horn sound adjustment. Obtained by adjust-
ing the armature air gap
123