four wheel drive FIAT 500 1968 1.G User Guide
[x] Cancel search | Manufacturer: FIAT, Model Year: 1968, Model line: 500, Model: FIAT 500 1968 1.GPages: 128, PDF Size: 9.01 MB
Page 64 of 128

of wear, distorting or unevenness of the surfaces as this
part is very heavily pressed when the vehicle is negotia-
ting a corner. If the clearance to the idle pinions exceeds
.0059 inch the shaft must be renewed.
2 Inspect the ring gear and pinion seat, the side gears.and
the idle pinions for correct meshing. This will be shown
up by white marks on the sides of the gear teeth. Check
that none of the teeth are broken, chipped or exces-
sively worn and if any part is suspect then it must be
renewed not forgetting that the ring gear and pinion
come as a matched pair.
3 Inspect the condition of the ball and roller bearings, the
rollers and balls and working faces must not show signs
of pitting wear or cracking and if any part is suspect then
the race must be renewed.
4 Check that there is not any undue wear on the faces of
the thrust rings. Any slight indentations may be evened
out using a fine oil stone but if the damage is excessive
then new rings or oversize rings must befitted as neces-
sary. Thrust rings are supplied as service spares in the
following thicknesses.
Standard .0394 inch
Oversize .0512-.0591 inch
6:6 Reassembly—differential unit
To reassemble the differential case proceed as follows:
1 Press onto the differential half housing which carries
the ring gear one differential bearing inner race ensuring
that it is pushed fully home onto its seating. Install the
thrust ring and side gear (see FIG 6 : 7).
2 From t h e inside of the case insert the axle shaft com-
plete with pivot and runners that form the slip joint.
Also install the idle pinions and carrier shaft. Position
the ring gear onto the housing half and install the
differential pinion shaft retainer ring.
3 Press the other differential bearing inner race onto its
seating on the left differential housing half and replace
the left axle shaft complete with slip joint.
4 J o i n the t w o case halves together and tighten the
retaining screws and also the retaining screws of the
ring gear to a torque wrench setting of 23.1 Ib ft. Secure
all screws by bending up the lockplates.
5 Press t h e differential bearing outer races into their
seatings in the bearing housings and also f i t the o i l seals.
Also install the bearing housings over the driving shafts
together with the adjuster rings.
6 Install the differential unit assembly into the final drive
housing front half and bolt the rear
half onto it. Tighten
the six mounting nuts to a torque wrench setting of
27.5 Ib ft. Finally place the bearing housings in their
seats and tighten the mounting nuts to a torque wrench
setting of 13 lb ft.
It should be noted that after the gearbox has been over-
hauled the complete differential unit should only be in-
stalled after the drive pinion depth adjustments has been
carried out.
6 : 7 Final drive gear set adjustment
The installation and adjustment of the final drive gear
set requires special care otherwise the unit may have to be
dismantled again for further adjustment. So as to establish
the correct mesh of the t w o gears, their relative position is
accurately set during initial assembly at the factory.
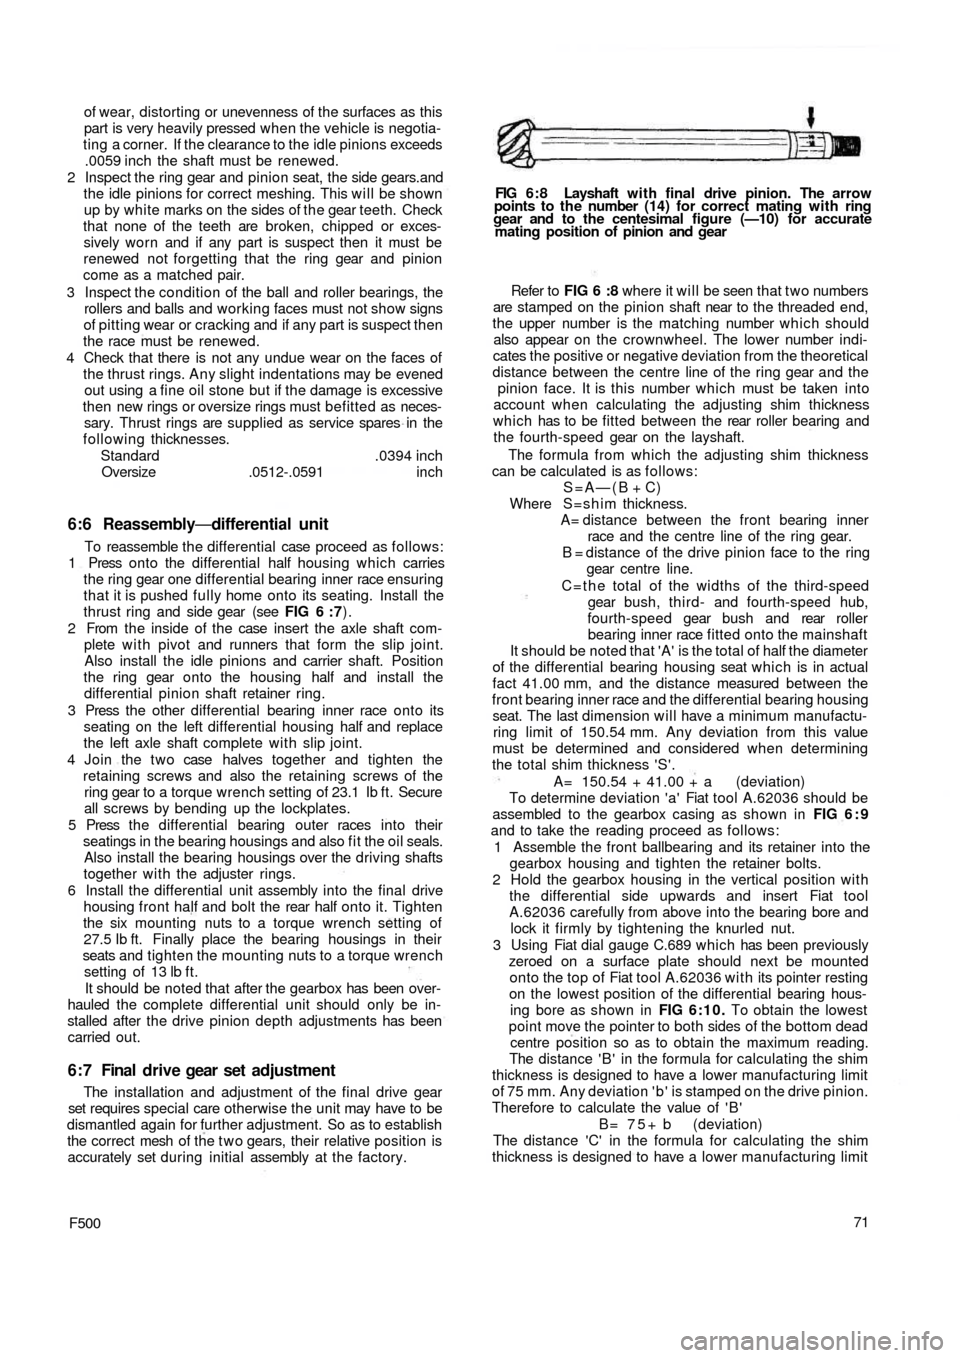
F50071 Refer to FIG 6 :8 where it will be seen that t w o numbers
are stamped on the pinion shaft near to the threaded end,
the upper number is the matching number which should
also appear on the crownwheel. The lower number indi-
cates the positive or negative deviation from the theoretical
distance between the centre line of the ring gear and the
pinion face. It is this number which must be taken into
account when calculating the adjusting shim thickness
which has to be fitted between the rear roller bearing and
the fourth-speed gear on the layshaft.
The formula from which the adjusting shim thickness
can be calculated is as follows:
S=A—(B + C)
Where S=shim thickness.
A= distance between the front bearing inner
race and the centre line of the ring gear.
B = distance of the drive pinion face to the ring
gear centre line.
C = t h e total of the widths of the third-speed
gear bush, third- and fourth-speed hub,
fourth-speed gear bush and rear roller
bearing inner race fitted onto the mainshaft
It should be noted that 'A' is the total of half the diameter
of the differential bearing housing seat which is in actual
fact 41.00 mm, and the distance measured between the
front bearing inner race and the differential bearing housing
seat. The last
dimension will have a minimum manufactu-
ring limit of 150.54 mm. Any deviation from this value
must be determined and considered when determining
the total shim thickness 'S'.
A= 150.54 + 41.00 + a (deviation)
To determine deviation 'a' Fiat tool A.62036 should be
assembled to the gearbox casing as shown in FIG 6 : 9
and to take the reading proceed as follows:
1 Assemble the front ballbearing and its retainer into the
gearbox housing and tighten the retainer bolts.
2 Hold the gearbox housing in the vertical position with
the differential side upwards and insert Fiat tool
A.62036 carefully from above into the bearing bore and
lock it firmly by tightening the knurled nut.
3 Using Fiat dial gauge C.689 which has been previously
zeroed on a surface plate should next be mounted
onto the t o p of Fiat tool A.62036 with its pointer resting
on the lowest position of the differential bearing hous-
ing bore as shown in FIG 6:10. To obtain the lowest
point move the pointer to both sides of the bottom dead
centre position so as to obtain the maximum reading.
The distance ' B ' in the formula for calculating the shim
thickness is designed to have a lower manufacturing limit
of 75 mm. Any deviation ' b ' is stamped on the drive pinion.
Therefore to calculate the value of ' B '
B = 7 5 + b (deviation)
The distance 'C' in the formula for calculating the shim
thickness is designed to have a lower manufacturing limit
FIG 6 : 8 Layshaft w i t h final drive pinion. The arrow
points to the number (14) for correct mating with ring
gear and to the centesimal figure (—10) for accurate
mating position of pinion and gear
Page 66 of 128

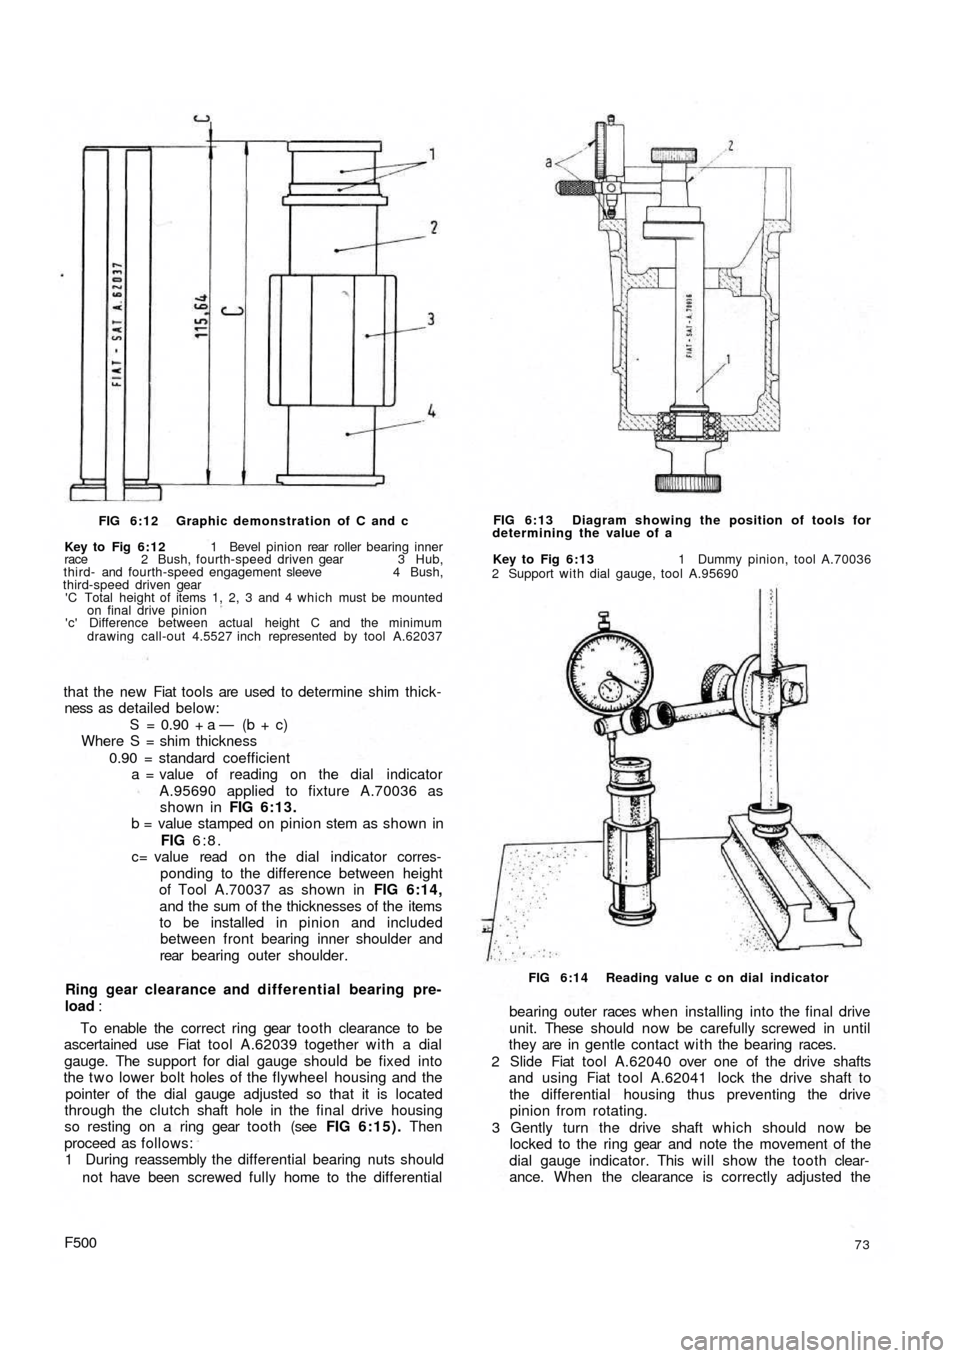
FIG 6:12 Graphic demonstration of C and c
Key to Fig 6:12 1 Bevel pinion rear roller bearing inner
race 2 Bush, fourth-speed driven gear 3 Hub,
third- and fourth-speed engagement sleeve 4 Bush,
third-speed driven gear
'C Total height of items 1, 2, 3 and 4 which must be mounted
on final drive pinion
'c' Difference between actual height C and the minimum
drawing call-out 4.5527 inch represented by tool A.62037
that the new Fiat tools are used to determine shim thick-
ness as detailed below:
S = 0.90 + a — (b + c)
Where S = shim thickness
0.90 = standard coefficient
a = value of reading on the dial indicator
A.95690 applied to fixture A.70036 as
shown in FIG 6:13.
b = value stamped on pinion stem as shown in
FIG 6:8.
c= value read o n the dial indicator corres-
ponding to the difference between height
of Tool A.70037 as shown in FIG 6:14,
and the sum of the thicknesses of the items
to be installed in pinion and included
between front bearing inner shoulder and
rear bearing outer shoulder.
Ring gear clearance and differential bearing pre-
load :
To enable the correct ring gear tooth clearance to be
ascertained use Fiat tool A.62039 together with a dial
gauge. The support for dial gauge should be fixed into
the t w o lower bolt holes of the flywheel housing and the
pointer of the dial gauge adjusted so that it is located
through the clutch shaft hole in the final drive housing
so resting on a ring gear tooth (see FIG 6:15). Then
proceed as follows:
1 During reassembly the differential bearing nuts should
not have been screwed fully home to the differential
F50073
bearing outer races w h e n installing into the f i n a l drive
unit. These should now be carefully screwed in until
they are in gentle contact with the bearing races.
2 Slide Fiat tool A.62040 over one of the drive shafts
and using Fiat tool A.62041 lock the drive shaft to
the differential housing thus preventing the drive
pinion from rotating.
3 Gently turn the drive shaft which should now be
locked to the ring gear and note the movement of the
dial gauge indicator. This will show the tooth clear-
ance. When the clearance is correctly adjusted the
FIG 6:14 Reading value c on dial indicator Key to Fig 6:13 1 Dummy pinion, tool A.70036
2 Support with dial gauge, tool A.95690 FIG 6:13 Diagram showing the position of tools for
determining the value of a
Page 67 of 128

TOOL A 62039
TOOLA. 62040 PIN WRENCH A. 52022
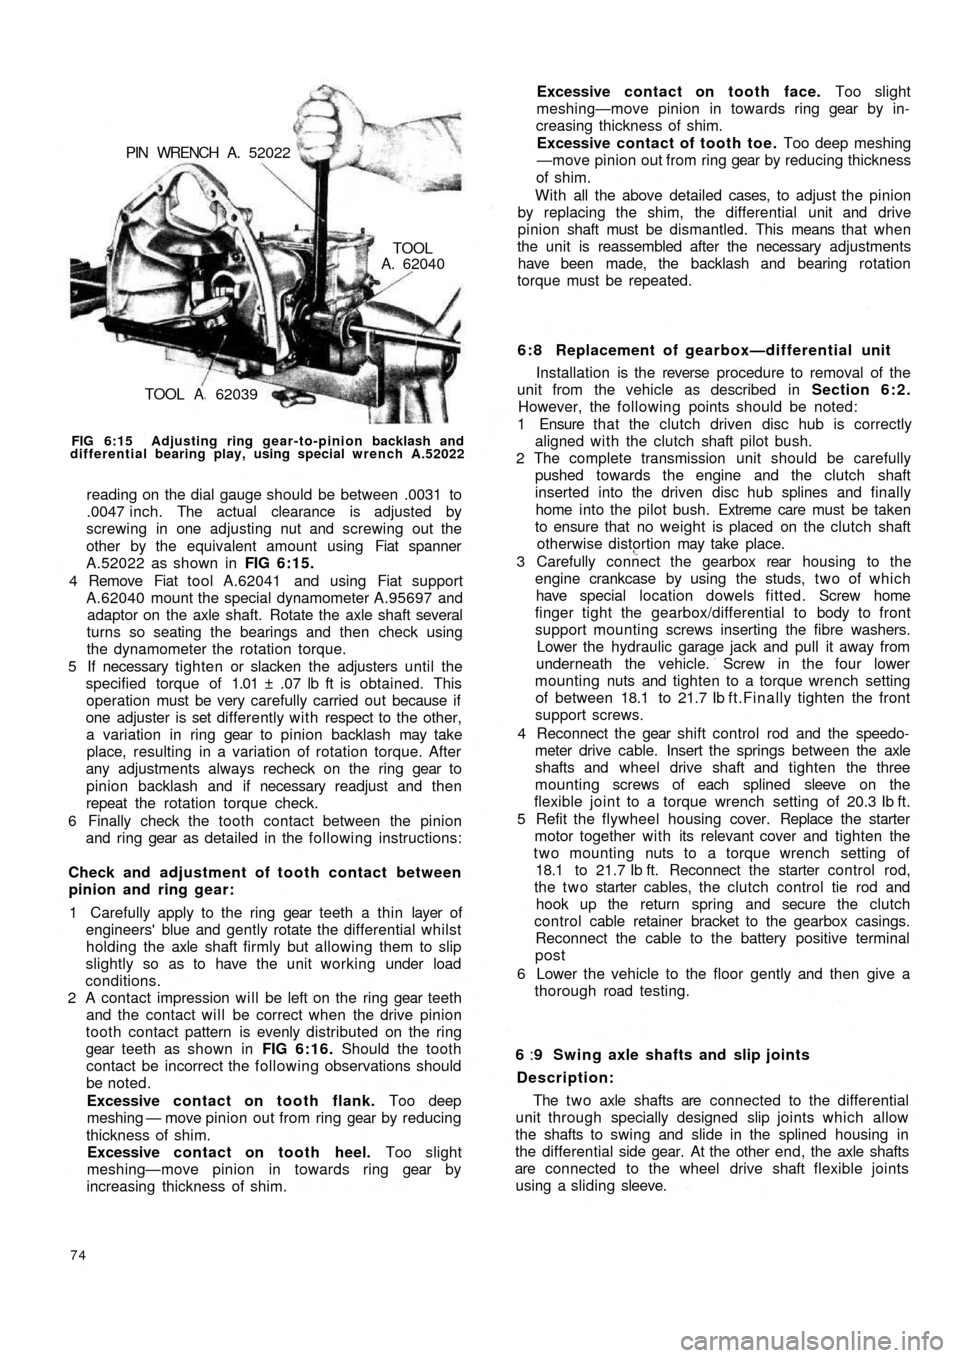
FIG 6:15 Adjusting ring gear-to-pinion backlash and
differential bearing play, using special wrench A.52022
reading on the dial gauge should be between .0031 to
.0047 inch. The actual clearance is adjusted by
screwing in one adjusting nut and screwing out the
other by the equivalent amount using Fiat spanner
A.52022 as shown in FIG 6:15.
4 Remove Fiat tool A.62041 and using Fiat support
A.62040 mount the special dynamometer A.95697 and
adaptor on the axle shaft. Rotate the axle shaft several
turns so seating the bearings and then check using
the dynamometer the rotation torque.
5 If necessary tighten or slacken the adjusters until the
specified torque of 1.01 ± .07 lb ft is obtained. This
operation must be very carefully carried out because if
one adjuster is set differently with respect to the other,
a variation in ring gear to pinion backlash may take
place, resulting in a variation of rotation torque. After
any adjustments always recheck on the ring gear to
pinion backlash and if necessary readjust and then
repeat the rotation torque check.
6 Finally check the tooth contact between the pinion
and ring gear as detailed in the following instructions:
Check and adjustment of tooth contact between
pinion and ring gear:
1 Carefully apply to the ring gear teeth a thin layer of
engineers' blue and gently rotate the differential whilst
holding the axle shaft firmly but allowing them to slip
slightly so as to have the unit working under load
conditions.
2 A contact impression will be left on the ring gear teeth
and the contact will be correct when the drive pinion
tooth contact pattern is evenly distributed on the ring
gear teeth as shown in FIG 6:16. Should the tooth
contact be incorrect the following observations should
be noted.
Excessive contact on tooth flank. Too deep
meshing — move pinion out from ring gear by reducing
thickness of shim.
Excessive contact on tooth heel. Too slight
meshing—move pinion in towards ring gear by
increasing thickness of shim.
74
6 : 8 Replacement of gearbox—differential unit
Installation is the reverse procedure to removal of the
unit from the vehicle as described in Section 6:2.
However, the following points should be noted:
1 Ensure that the clutch driven disc hub is correctly
aligned with the clutch shaft pilot bush.
2 The complete transmission unit should be carefully
pushed towards the engine and the clutch shaft
inserted into the driven disc hub splines and finally
home into the pilot bush. Extreme care must be taken
to ensure that no weight is placed on the clutch shaft
otherwise distortion may take place.
3 Carefully connect the gearbox rear housing to the
engine crankcase by using the studs, t w o of which
have special location dowels fitted. Screw home
finger tight the gearbox/differential to body to front
support mounting screws inserting the fibre washers.
Lower the hydraulic garage jack and pull it away from
underneath the vehicle. Screw in the four lower
mounting nuts and tighten to a torque wrench setting
of between 18.1 to 21.7 Ib f t.Finally tighten the front
support screws.
4 Reconnect the gear shift control rod and the speedo-
meter drive cable. Insert the springs between the axle
shafts and wheel drive shaft and tighten the
three
mounting screws of each splined sleeve on the
flexible joint to a torque wrench setting of 20.3 Ib ft.
5 Refit the flywheel housing cover. Replace the starter
motor together with its relevant cover and tighten the
two mounting nuts to a torque wrench setting of
18.1 to 21.7 Ib ft. Reconnect the starter control rod,
the t w o starter cables, the clutch control tie rod and
hook up the return spring and secure the clutch
control cable retainer bracket to the gearbox casings.
Reconnect the cable to the battery positive terminal
post
6 Lower the vehicle to the floor gently and then give a
thorough road testing.
6 :9 Swing axle shafts and slip joints
Description:
The t w o axle shafts are connected to the differential
unit through specially designed slip joints which allow
the shafts to swing and slide in the splined housing in
the differential side gear. At the other end, the axle shafts
are connected to the wheel drive shaft flexible joints
using a sliding sleeve. Excessive contact on tooth face. Too slight
meshing—move pinion in towards ring gear by in-
creasing thickness of shim.
Excessive contact of tooth toe. Too deep meshing
—move pinion out from ring gear by reducing thickness
of shim.
With all the above detailed cases, to adjust the pinion
by replacing the shim, the differential unit and drive
pinion shaft must be dismantled. This means that when
the unit is reassembled after the necessary adjustments
have been made, the backlash and bearing rotation
torque must be repeated.
Page 108 of 128

switch contacts. The starter motor rotates driving the
engine through the pinion and ring gear. As soon as the
engine fires the starter hand lever must be released which
will open the starter switch contacts so stopping the
starter motor and the pinion will return under the action
of a spring to a neutral position.
Tests for a starter which does not operate:
Check the condition of the battery and particularly
the connections to the terminals and to earth. If the
battery is charged, switch on the lights and operate the
starter hand lever control. If the lights go dim but the
starter does not operate it shows that current is reaching
the starter motor. The probability is that the pinion of the
starter shaft is jammed in mesh due to dirty pinion splines
or a broken spring. To release the pinion engage a low
gear with the ignition switched off and rock the vehicle
backwards and forwards which should allow the pinion
to be disengaged from the flywheel ring gear. If it proves
impossible to free a jammed pinion the starter motor must
be removed for examination and repair.
If the lamps do not go dim, check the starter switch and
also check the connection between the battery and the
starter switch to ensure that they are tight and making
good electrical connection. If the starter motor still does
not work it should be removed from the power unit for
inspection.
Removing the starter:
To remove the starter motor from the power unit
proceed as follows:
1 Disconnect the positive terminal from the
battery post.
2 Release the hand lever control cable from the starter
motor engagement lever.
3 Disconnect the battery cable terminal from the starter
motor switch.
4 Remove the retaining nuts and washers holding the
starter motor to body to the transmission bellhousing
and gently ease backwards and lift away the starter
motor.
Examining the commutator and brush gear :
Refer to FIG 11:5 and remove the coverband 5. Hold
back each spring in turn and pull gently on the flexible
connection to the brush. If the brush does not move
freely remove it from its holder and polish the sides using
a fine file. Mark the brushes so that they will be replaced
in their original positions. If the brushes are so worn that
they no longer bear onto the commutator, or the brush
connector has become exposed on the running face, the
brushes must be renewed.
If the commutator is blackened it should be cleaned by
turning it against a petrol-moistened cloth. With the
brushes and commutator overhauled hold the body of the
starter motor in a vice and connect it with thick cables to a
12 volt battery. One cable should go to the starter
switch terminal and the other to the body of the starter.
The starter should run at high speed. If it does not, it
must be dismantled for further examination and testing.
F500115 Dismantling the starter:
To dismantle the starter proceed as follows:
1 Remove the coverband 5 (see FIG 11:5) and hold
back the brush springs and take out the brushes.
2 Remove the starter switch by releasing the t w o
mounting screws and lift away the switch.
3 Remove the commutator end head 16, slide off the
armature assembly from the drive unit and from the
pole shoes.
4 Release the engagement lever pin 6 and spring 7 from
the lever operating bracket on the drive end head. Lift
away the lever and withdraw the pinion assembly
complete which is shown in FIG 11:5.
Servicing the brushes
Test the brush springs with a balance, the correct
tension is 2.5 to 2.9 Ib. according to the wear of the
brushes. Fit a new spring if the tension is low.
The life of the brushes depends on the type of service
in which the vehicle is being used. In normal circum-
stances even when the starter is being used frequently,
the brushes should last more than 18,000 miles. If the
wear is found to be abnormal it will probably be found
that the commutator is either damaged or excessively
w o r n . Only Fiat replacement brushes must be used.
Testing the field coils:
Use a 12 volt bulb in one lead of a 12 volt battery.
Connect one lead to the brush connection joint to the coil
field and the other to the field coil current supply lead.
If the bulb does not light there is a break in the f i e l d coil
windings. This is not a complete test as it is still possible
for a coil to be earthed. Check this by moving the lead
from the brush connection and holding it on a clean
metal
surface on the yoke or body. If the bulb lights it shows
that the field coils are earthed.
The only sure way of curing faulty field coils is to take
the starter motor to a service station.
Examining the armature:
The armature shaft may be bent due to the starter
being operated whilst the engine is operating. Do not try
to straighten a bent shaft or machine the armature core to
obtain the correct clearance.
If the commutator is damaged or any wires or segments
have lifted from it, the assembly will have to be renewed.
Starter bearings:
Bearing bushes are of the porous bronzed type and
must not be reamed after fitting. Worn bearings should
be withdrawn by screwing a tap into them and pulling
on the tap. New bushes must be immersed in engine oil
for approximately twenty four hours before fitting. Press
them into place using a suitably sized drift which has a
spigot the length of the bearing and the diameter of the
starter shaft. When this is withdrawn after fitting, the
bore of the bush should be correct to size.
The pinion drive:
This unit is shown in FIG 11:5. The chief sources of
trouble are a dirty unit or a broken starting engagement