jack points FIAT 500 1970 1.G Workshop Manual
[x] Cancel search | Manufacturer: FIAT, Model Year: 1970, Model line: 500, Model: FIAT 500 1970 1.GPages: 128, PDF Size: 9.01 MB
Page 67 of 128

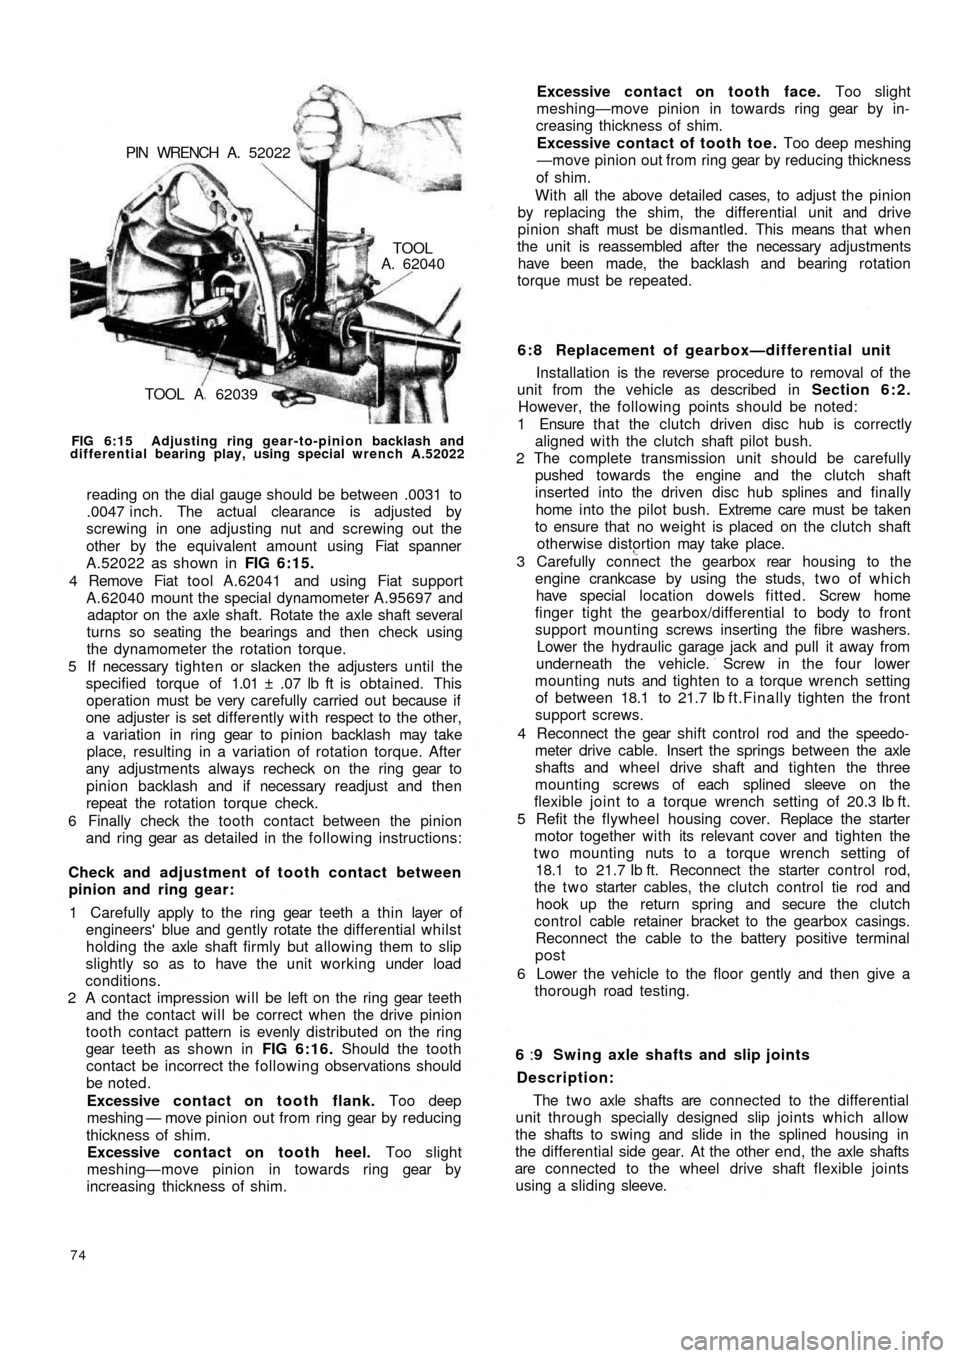
TOOL A 62039
TOOLA. 62040 PIN WRENCH A. 52022
FIG 6:15 Adjusting ring gear-to-pinion backlash and
differential bearing play, using special wrench A.52022
reading on the dial gauge should be between .0031 to
.0047 inch. The actual clearance is adjusted by
screwing in one adjusting nut and screwing out the
other by the equivalent amount using Fiat spanner
A.52022 as shown in FIG 6:15.
4 Remove Fiat tool A.62041 and using Fiat support
A.62040 mount the special dynamometer A.95697 and
adaptor on the axle shaft. Rotate the axle shaft several
turns so seating the bearings and then check using
the dynamometer the rotation torque.
5 If necessary tighten or slacken the adjusters until the
specified torque of 1.01 ± .07 lb ft is obtained. This
operation must be very carefully carried out because if
one adjuster is set differently with respect to the other,
a variation in ring gear to pinion backlash may take
place, resulting in a variation of rotation torque. After
any adjustments always recheck on the ring gear to
pinion backlash and if necessary readjust and then
repeat the rotation torque check.
6 Finally check the tooth contact between the pinion
and ring gear as detailed in the following instructions:
Check and adjustment of tooth contact between
pinion and ring gear:
1 Carefully apply to the ring gear teeth a thin layer of
engineers' blue and gently rotate the differential whilst
holding the axle shaft firmly but allowing them to slip
slightly so as to have the unit working under load
conditions.
2 A contact impression will be left on the ring gear teeth
and the contact will be correct when the drive pinion
tooth contact pattern is evenly distributed on the ring
gear teeth as shown in FIG 6:16. Should the tooth
contact be incorrect the following observations should
be noted.
Excessive contact on tooth flank. Too deep
meshing — move pinion out from ring gear by reducing
thickness of shim.
Excessive contact on tooth heel. Too slight
meshing—move pinion in towards ring gear by
increasing thickness of shim.
74
6 : 8 Replacement of gearbox—differential unit
Installation is the reverse procedure to removal of the
unit from the vehicle as described in Section 6:2.
However, the following points should be noted:
1 Ensure that the clutch driven disc hub is correctly
aligned with the clutch shaft pilot bush.
2 The complete transmission unit should be carefully
pushed towards the engine and the clutch shaft
inserted into the driven disc hub splines and finally
home into the pilot bush. Extreme care must be taken
to ensure that no weight is placed on the clutch shaft
otherwise distortion may take place.
3 Carefully connect the gearbox rear housing to the
engine crankcase by using the studs, t w o of which
have special location dowels fitted. Screw home
finger tight the gearbox/differential to body to front
support mounting screws inserting the fibre washers.
Lower the hydraulic garage jack and pull it away from
underneath the vehicle. Screw in the four lower
mounting nuts and tighten to a torque wrench setting
of between 18.1 to 21.7 Ib f t.Finally tighten the front
support screws.
4 Reconnect the gear shift control rod and the speedo-
meter drive cable. Insert the springs between the axle
shafts and wheel drive shaft and tighten the
three
mounting screws of each splined sleeve on the
flexible joint to a torque wrench setting of 20.3 Ib ft.
5 Refit the flywheel housing cover. Replace the starter
motor together with its relevant cover and tighten the
two mounting nuts to a torque wrench setting of
18.1 to 21.7 Ib ft. Reconnect the starter control rod,
the t w o starter cables, the clutch control tie rod and
hook up the return spring and secure the clutch
control cable retainer bracket to the gearbox casings.
Reconnect the cable to the battery positive terminal
post
6 Lower the vehicle to the floor gently and then give a
thorough road testing.
6 :9 Swing axle shafts and slip joints
Description:
The t w o axle shafts are connected to the differential
unit through specially designed slip joints which allow
the shafts to swing and slide in the splined housing in
the differential side gear. At the other end, the axle shafts
are connected to the wheel drive shaft flexible joints
using a sliding sleeve. Excessive contact on tooth face. Too slight
meshing—move pinion in towards ring gear by in-
creasing thickness of shim.
Excessive contact of tooth toe. Too deep meshing
—move pinion out from ring gear by reducing thickness
of shim.
With all the above detailed cases, to adjust the pinion
by replacing the shim, the differential unit and drive
pinion shaft must be dismantled. This means that when
the unit is reassembled after the necessary adjustments
have been made, the backlash and bearing rotation
torque must be repeated.
Page 76 of 128

high bearing preload. To reset remove the wheel shaft
and fit a new resilient spacer. Repeat the rotation
torque test.
Swinging arm adjustment:
To adjust the swinging arm use Fiat fixture A.66064 as
shown in FIG 7 : 3 and proceed as follows:
1 At points A and B as indicated in FIG 7 : 4 between the
'estendblock' and the swinging arm to body front
mounting bracket fit three shims on each side. To
ensure that the shims are correctly centred use Fiat
alignment bar A.66057.
2 Whilst removing the alignment bar, carefully slip in the
mounting pin and screw on the nut. Once the rear
wheel geometry adjustment has been completed this
nut should be tightened to a torque wrench setting
of 43.4 to 50.6 Ib ft.
3 At points C and D (see FIG 7 : 4) , insert the number of
shims required to fill in the gap between the 'estend-
block' and the two fixture shoulders. Having deter-
mined the number of shims required both at locations
C and D, these must later be fitted between the
'estendblock' and the shoulders on the swinging arm
to body mounting bracket.
7 : 4 Coil springs
The coil springs should be thoroughly cleaned and all
traces of rust removed. Inspect the spring coils for hair
line cracks, which if evident, a new pair of springs must
be fitted to ensure correct vehicle height and stability.
Check the free
height and the height under loading of
the coil springs and these must correspond to the figures
quoted in Technical Data.
7:5 Installation of rear suspension assembly
To replace the rear suspension assembly proceed as
follows:
1 Insert the swinging arm inner end in the mounting
bracket which is welded onto the body floor. Place
between the 'estendblock' and bracket the number of
adjustment shims as previously determined using Fiat
fixture A.66064 as shown in FIG 7 : 4. Insert the Fiat
alignment bar A.66057 through 'estendblock' and
shims, aligning them with the holes in the mounting
bracket. Firmly hold the entire assembly using a garage
hydraulic jack if necessary, and carefully remove the
alignment bar and at the same time ease in t h e
mounting pin. Secure the nut which once the rear
wheels geometry has been checked must be tightened
to a torque wrench setting of 43.4 to 50.6 Ib/ft.
2 Screw in finger tight the three swinging arm external
bracket to body floor mounting screws together w i t h
the plain and spring washers. The screws will have to
be tightened to a torque wrench setting of 28.9 to
36.2 Ib/ft once the rear wheel geometry has been
adjusted.
3 Carefully insert the coil spring, lower insulator ring
onto the swinging arm, insert the spring on the shock
absorber which should be previously secured to the
arm and position the spring onto its seat on the arm.
Place the upper insulator ring onto the spring, raise the
suspension assembly using a garage hydraulic jack and
insert the spring onto its seating under the body floor.
F50083 4 Ensure that the shock absorber to floor rubber ring has
been correctly fitted and extend the shock absorber
until its upper mounting pin protrudes into the vehicle
through the hump in the floor panel. Secure the shock
absorber by its mounting nut and lockwasher having
first inserted the rubber ring and plain washer.
5 Refit the rear wheel housing in place, reconnect the
brake line to the connection on body floor and remove
the plug from the output hole in the brake fluid
reservoir. Bleed the hydraulic brake system as
described in Chapter 10.
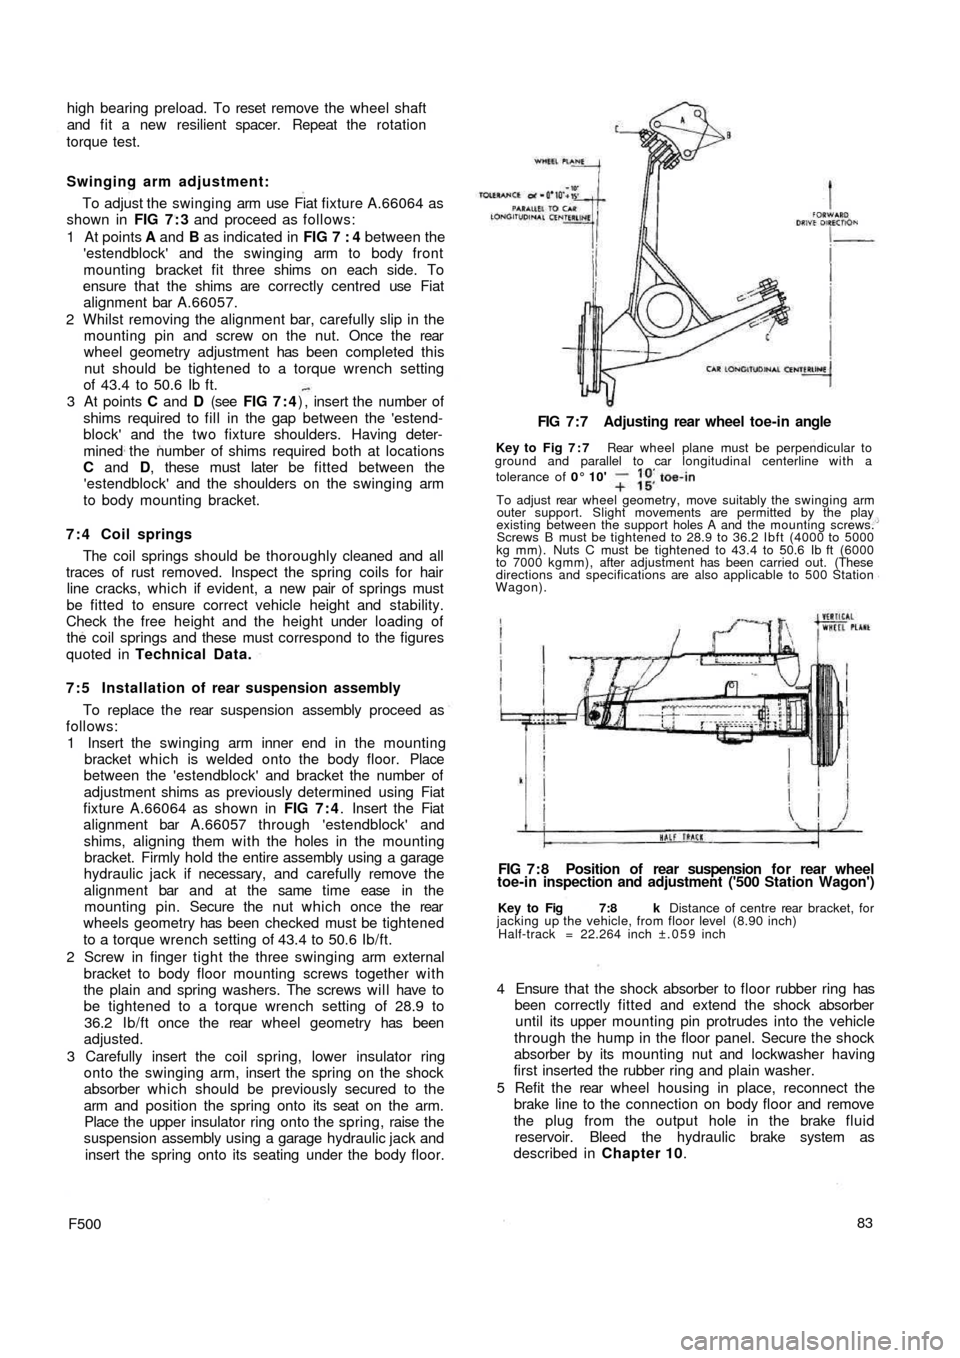
Key to Fig 7:8 k Distance of centre rear bracket, for
jacking up the vehicle, from floor level (8.90 inch)
Half-track = 22.264 inch ±.059 inch
FIG 7 : 8 Position of rear suspension f o r rear wheel
toe-in inspection and adjustment ('500 Station Wagon') FIG 7 : 7 Adjusting rear wheel toe-in angle
Key to Fig 7 : 7 Rear wheel plane must be perpendicular to
ground and parallel to car longitudinal centerline with a
tolerance of 0° 10'
To adjust rear wheel geometry, move suitably the swinging arm
outer support. Slight movements are permitted by the play
existing between the support holes A and the mounting screws.
Screws B must be tightened to 28.9 to 36.2 Ibft (4000 to 5000
kg mm). Nuts C must be tightened to 43.4 to 50.6 Ib ft (6000
to 7000 kgmm), after adjustment has been carried out. (These
directions and specifications are also applicable to 500 Station
Wagon).
Page 88 of 128

VERTICAL LINE DB
S
EB
OIL SUMPF
GF
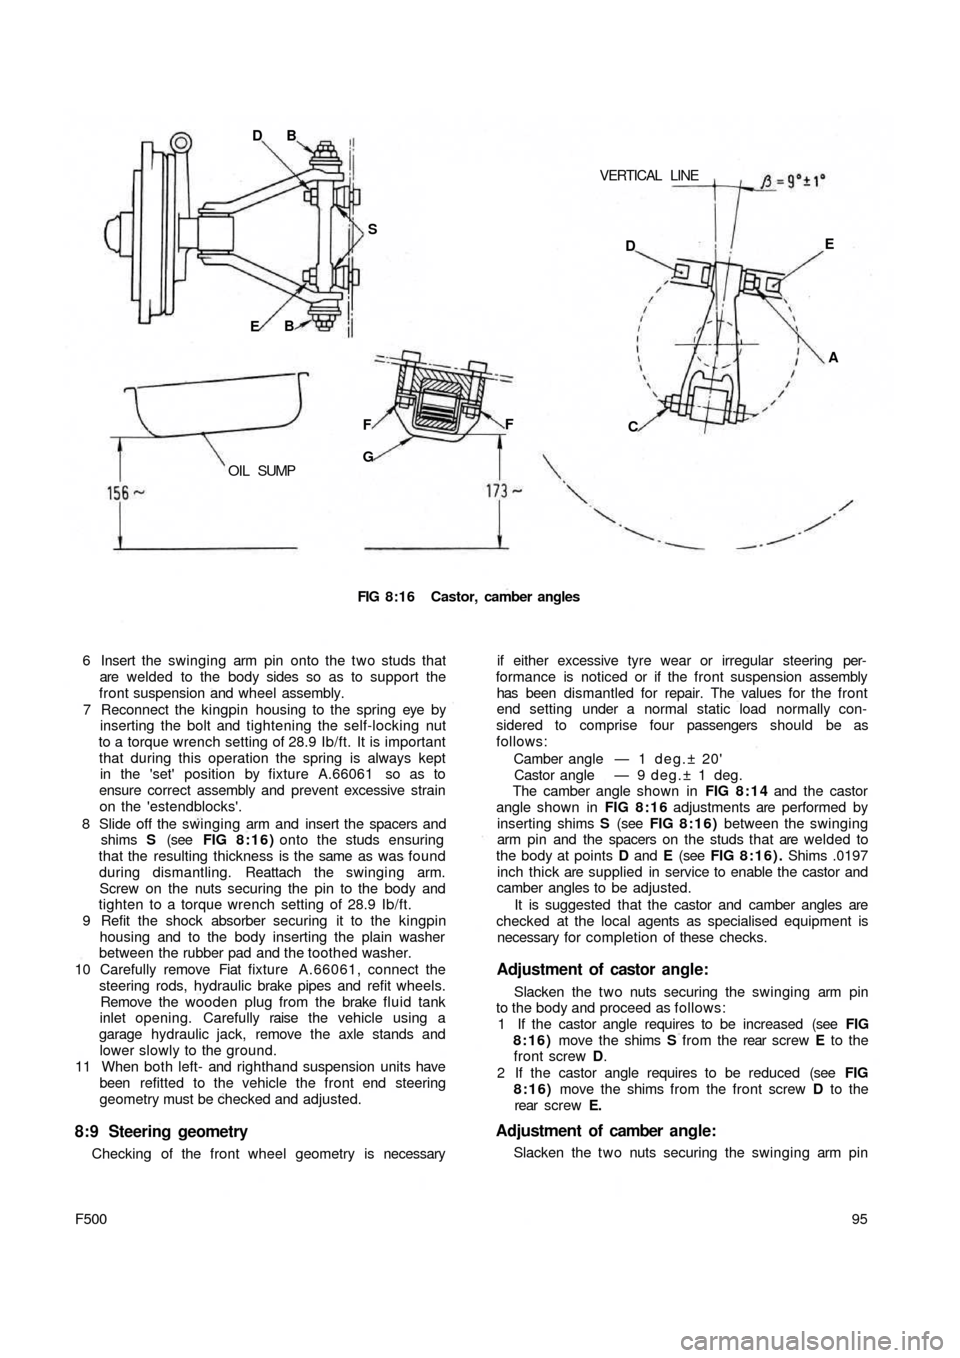
FIG 8:16 Castor, camber angles
6 Insert the swinging arm pin onto the two studs that
are welded to the body sides so as to support the
front suspension and wheel assembly.
7 Reconnect the kingpin housing to the spring eye by
inserting the bolt and tightening the self-locking nut
to a torque wrench setting of 28.9 Ib/ft. It is important
that during this operation the spring is always kept
in the 'set' position by fixture A.66061 so as to
ensure correct assembly and prevent excessive strain
on the 'estendblocks'.
8 Slide off the swinging arm and insert the spacers and
shims S (see FIG 8:16) onto the studs ensuring
that the resulting thickness is the same as was found
during dismantling. Reattach the swinging arm.
Screw on the nuts securing the pin to the body and
tighten to a torque wrench setting of 28.9 Ib/ft.
9 Refit the shock absorber securing it to the kingpin
housing and to the body inserting the plain washer
between the rubber pad and the toothed washer.
10 Carefully remove Fiat fixture A.66061, connect the
steering rods, hydraulic brake pipes and refit wheels.
Remove the wooden plug from the brake fluid tank
inlet opening. Carefully raise the vehicle using a
garage hydraulic jack, remove the axle stands and
lower slowly to the ground.
11 When both left- and righthand suspension units have
been refitted to the vehicle the front end steering
geometry must be checked and adjusted.
8:9 Steering geometry
Checking of the front wheel geometry is necessary
95
F500
if either excessive tyre wear or irregular steering per-
formance is noticed or if the front suspension assembly
has been dismantled for repair. The values for the front
end setting under a normal static load normally con-
sidered to comprise four passengers should be as
follows:
Camber angle — 1 d e g . ± 20'
Castor angle — 9 deg.± 1 deg.
The camber angle shown in FIG 8:14 and the castor
angle shown in FIG 8 : 1 6 adjustments are performed by
inserting shims S (see FIG 8 : 1 6 ) between the swinging
arm pin and the spacers on the studs that are welded to
the body at points D and E (see FIG 8:16). Shims .0197
inch thick are supplied in service to enable the castor and
camber angles to be adjusted.
It is suggested that the castor and camber angles are
checked at the local agents as specialised equipment is
necessary for completion of these checks.
Adjustment of castor angle:
Slacken the t w o nuts securing the swinging arm pin
to the body and proceed as follows:
1 If the castor angle requires to be increased (see FIG
8:16) move the shims S from the rear screw E to the
front screw D.
2 If the castor angle requires to be reduced (see FIG
8:16) move the shims from the front screw D to the
rear screw E.
Adjustment of camber angle:
Slacken the t w o nuts securing the swinging arm pin DE
A
C
Page 89 of 128

to the body and proceed as follows:
1 If the camber angle requires to be increased (see FIG
8:16) add the same number of shims S on both
screws D and E.
2 If the camber angle requires to be reduced (see FIG
8:16) remove the same number of shims from both
screws D and E.
The addition or removal of shims at the t w o points D
and E permits camber adjustment to be made without
any disturbing of the castor angle.
8:10 Modifications
Checking and adjusting castor and camber angles:
When checking the castor and camber angle the
static loading should be such that the distance between
the semi-elliptic spring mountings G (see FIG 8:16)
and the floor level to be approximately 6.81 inches, also a
distance between the lowermost portion of the sump and
the floor level of approximately 6.14 inch for the Model
500D. For the 500 Station Wagon version the distance
between centre rear bracket for jacking-up the vehicle
and the floor level should be approximately 8.90 inches.
All other front wheel alignment specifications are the
same as for the remaining 500 saloon models.
8:11 Fault diagnosis
(a) Wheel bounce
1 Tyre casing faulty
2 Uneven tyre pressures
3 Wheels out of balance
4 Semi-elliptic mounting spring worn5 Weak or seized shock absorber
6 Wheel rim or tyre misaligned
(b) Suspension noise
1 Lack of lubrication
2 Noisy or inoperative shock absorbers
3 Worn or loose wheel bearings
(c) Pull to one side
1 Low or uneven tyre pressures
2 Incorrect front wheel alignment
3 Suspension arms distorted
4 Inoperative shock absorbers
5 Brakes binding
(d) Excessive t y r e wear
1 Incorrect tyre rotation during servicing periods
2 Incorrect camber angle
3 Incorrect toe-in
4 Incorrect tyre inflation
5 Excessive play at wheel bearings
6 Wheel wobble
7 Stiff suspension arms
8 Brakes out of adjustment
(e) Wheel wobble
1 Uneven tyre pressures
2 Loose or worn wheel bearings
3 Inoperative shock absorbers
4 Loose steering knuckle or kingpin housing
5 Incorrect front wheel alignment
6 Control arm rubber bushings, or kingpin housing and
semi-elliptic spring 'estendblock' worn
96