recommended oil FIAT 500 1972 1.G User Guide
[x] Cancel search | Manufacturer: FIAT, Model Year: 1972, Model line: 500, Model: FIAT 500 1972 1.GPages: 128, PDF Size: 9.01 MB
Page 97 of 128

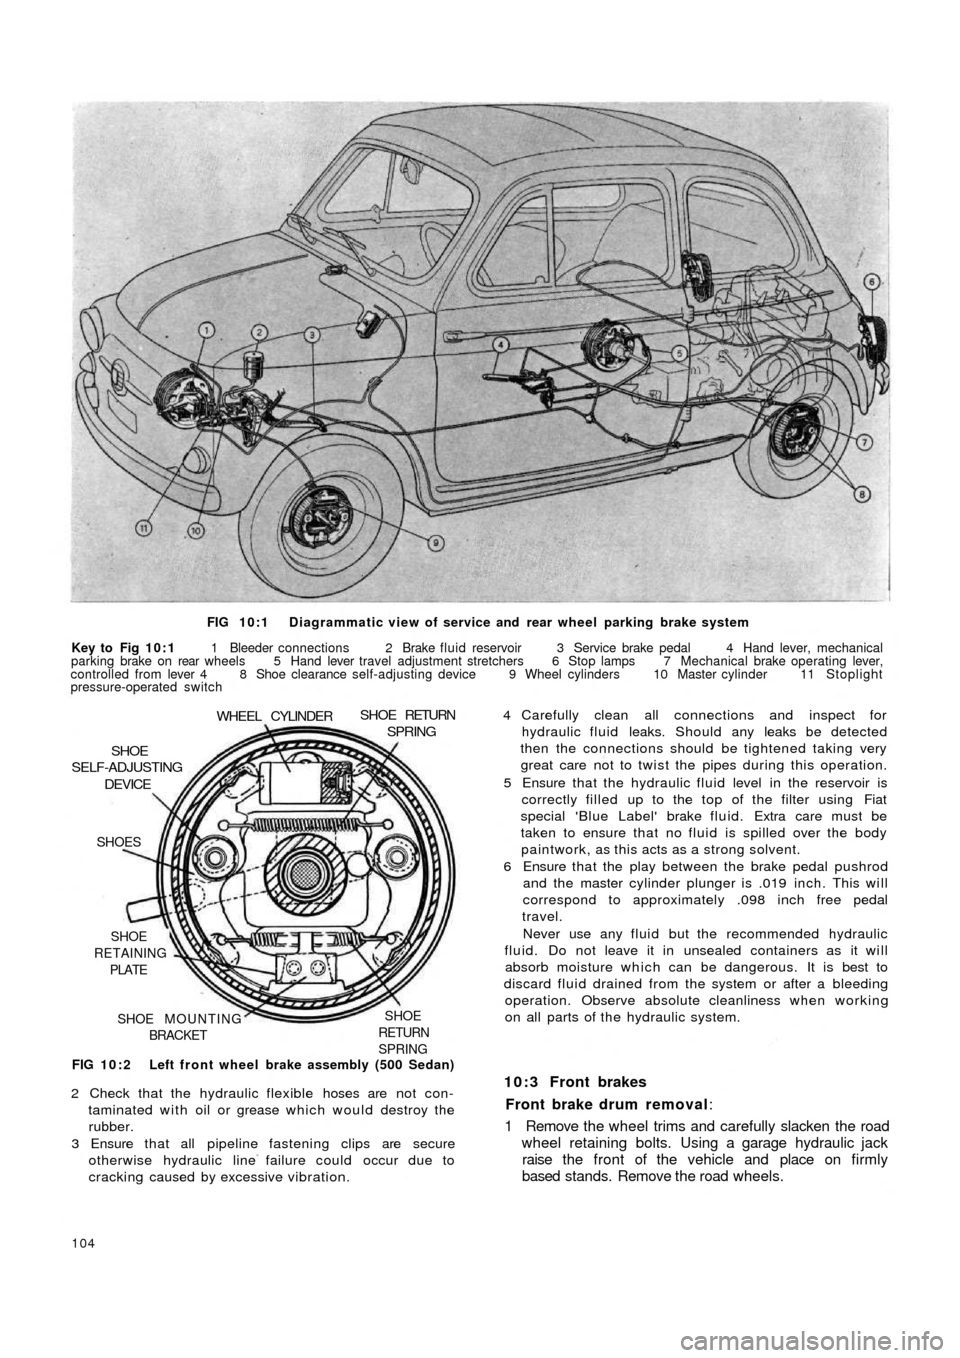
FIG 10:1 Diagrammatic view of service and rear wheel parking brake system
Key to Fig 10:1 1 Bleeder connections 2 Brake fluid reservoir 3 Service brake pedal 4 Hand lever, mechanical
parking brake on rear wheels 5 Hand lever travel adjustment stretchers 6 Stop lamps 7 Mechanical brake operating lever,
controlled from lever 4 8 Shoe clearance self-adjusting device 9 Wheel cylinders 10 Master cylinder 11 Stoplight
pressure-operated switch
FIG 10:2 Left front wheel brake assembly (500 Sedan)
SHOE
RETURN
SPRINGSHOE MOUNTING
BRACKET SHOE
RETAINING
PLATE SHOES
DEVICESHOE
SELF-ADJUSTING
WHEEL CYLINDERSHOE RETURNSPRING
2 Check that the hydraulic flexible hoses are not con-
taminated with oil or grease which would destroy the
rubber.
3 Ensure that all pipeline fastening clips are secure
otherwise hydraulic line failure could occur due to
cracking caused by excessive vibration.
104
4 Carefully clean all connections and inspect for
hydraulic fluid leaks. Should any leaks be detected
then the connections should be tightened taking very
great care not to twist the pipes during this operation.
5 Ensure that the hydraulic fluid level in the reservoir is
correctly filled up to the top of the filter using Fiat
special 'Blue Label' brake fluid. Extra care must be
taken to ensure that no fluid is spilled over the body
paintwork, as this acts as a strong solvent.
6 Ensure that the play between the brake pedal pushrod
and the master cylinder plunger is .019 inch. This will
correspond to approximately .098 inch free pedal
travel.
Never use any fluid but the recommended hydraulic
fluid. Do not leave it in unsealed containers as it will
absorb moisture which can be dangerous. It is best to
discard fluid drained from the system or after a bleeding
operation. Observe absolute cleanliness when working
on all parts of the hydraulic system.
10:3 Front brakes
Front brake drum removal:
1 Remove the wheel trims and carefully slacken the road
wheel retaining bolts. Using a garage hydraulic jack
raise the front of the vehicle and place on firmly
based stands. Remove the road wheels.
Page 117 of 128

Before removing an apparently faulty horn check the
wiring and connections. Check that the mounting bolts
are tight and that the horn does not foul any adjacent part.
Removal and installation:
This is a straightforward operation and the only
precaution to be taken is to ensure that the rubber gasket
bonded to the horn body does not become detached. If
the horn is renewed, before installing the new horn bond
the rubber gasket to the new unit with adhesive in
the same position as was on the original horn unit fitted.
Should the horn fail to operate the following points
should be noted.
1 Damaged horn.
2 Broken connection between battery and horn.
3 Broken connection between horn and push button on
steering wheel
4 Damaged push button mechanism.
5 Directional signal and outer lighting changeover
switch blade contact failing to make contact with the
steering wheel hub ring contact.
6 Current lead displaced from the horn blade contact on
the directional signal and outer lighting switch.
7 Distorted or broken diaphragm in horn.
8 Connections or inner windings
broken or burnt.
9 Electro-magnet contact points dirty or excessively
worn.The contacts may be adjusted by the adjusting screw
after the points have been cleaned and refaced.
To adjust the tone of the horn use a ring spanner and
screwdriver as shown in FIG 11 :23.
It is recommended that if the horn unit operation is
unreliable a new unit should be fitted rather than the
original one repaired.
11:12 Lighting and flasher switch
Description:
The two switches provide a directional signal switch
which automatically returns to the rest position once a
turn has been negotiated and the steering wheel is
brought back to the straight-ahead position. The change
over switch controls the outer lights and the headlights
flasher. The complete unit is located under the steering
wheel on the steering column.
Switch unit removal:
1 Carefully pry off the horn push button at the steering
wheel centre using a fine blade screwdriver.
2 Disconnect the positive terminal of the battery.
3 Disconnect the plug in contact in the steering wheel
hub.
4 Unscrew the steering wheel retaining nut from the
inner column and remove the steering wheel from the
shaft.
5 Slacken the bolts securing the steering column support
to the body
6 Remove the plug in contacts from the switch unit
ensuring that their correct location is noted for re-
assembly.7 Remove the switch unit from the steering column.
124
Switch unit installation:
This is the reverse procedure to dismantling. It is
advisable after installation to check that the steering
wheel when in the straight-ahead position and the
directional signal switch lever in neutral, the reference
index on the outer face of the directional signal switch
drum is in line with the index on the steering wheel hub.
This will ensure correct sequence of operation.
11:13 Fault diagnosis
(a) Battery discharged
1 Lighting circuit shorted
2 Terminals loose or dirty
3 Generator not charging
4 Regulator or cut-out units not working properly
5 Battery internally defective
(b) Insufficient charging current
1 Loose or corroded battery terminals
2 Generator driving belt slipping
(c) Battery will not hold a charge
1 Low electrolyte level
2 Battery plates sulphated
3 Electrolyte leakage from cracked casing or top sealing
compound
4 Plate separators ineffective
(d) Battery overcharged
1 Voltage regulator needs adjusting
(e) Generator output low or nil
1 Belt broken or slipping
2 Regulator unit out of adjustment
3 Worn bearings, loose pole pieces
4 Commutator worn, burned or shorted
5 Armature shaft bent or worn
6 Insulation proud between commutator segments
7 Brushes sticking, springs weak or broken
8 Field coil wires shorted, broken or burned
( f ) Starter motor lacks power or will not operate
1 Battery discharged, loose cable connections
2 Starter pinion jammed in mesh with flywheel gear
3 Starter switch faulty
4 Brushes worn or sticking, heads detached or shorting
5 Commutator dirty or worn
6 Starter shaft bent
7 Engine abnormally stiff
(g) Starter motor inoperative
1 Check 1 in (f)
2 Armature or field coils faulty
Page 120 of 128

CHAPTER 12
THE BODYWORK
12:1
12:2
12:3
12:4
12:5
12:6
12:7Bodywork finish
Interior and chrome cleaning
Door trim and accessories
Door handles and locks
Removing regulator and door glass
Removing windshield glass
Removing rear side windows12:8
12:9
12:10
12:11
12:12
12:13
12:14Removing rear window glass
Front compartment lid
Engine compartment lid
Folding top
Sun roof
Seats
Interior heater
12:1 Bodywork finish
Large scale repairs to body panels are best left to
expert panel beaters. Even small dents can be tricky, as too
much hammering will stretch the metal and make things
worse instead of better. Filling minor dents and scratches
is probably the best method of restoring the surface. The
touching up of paintwork is well within the powers of
most car owners, particularly as self-spraying cans of
paint in the correct colours are now readily available. It
must be remembered, however, that paint changes colour
w i t h age and it is better to spray a whole wing rather than
try to touch up a small area.
Before spraying it is essential to remove all traces of
wax polish with white spirit. More drastic treatment is
required if silicone polishes have been applied. Use a
primer surfacer or paste stopper according to the amount
of filling required, and when it is dry, rub it down with
400 grade Wet or Dry paper until the surface is smooth
and flush with the surrounding area. Spend time on
getting the best finish as this will control the final effect.
Apply the retouching paint, keeping it wet in the centre
and light and dry round the edges. After a few hours of
drying, use a cutting compound to remove the dry spray
and finish with liquid polish.
F500127
12:2 Interior and chrome cleaning
The cloth upholstery of the seating and the rear
compartment lining must be regularly cleaned to ensure
long life and preserve its attractive appearance. Any dust
or dirt that is blown into the car will settle on the uphol-
stery and will tend to wear the cloth causing an unsightly
appearance. It is recommended that the dust is wiped off
using either a vacuum cleaner or a stiff brush. To remove
ordinary soiling of the upholstery cloth proceed as
follows:
1 Using luke warm water and a neutral soap and a piece
of clean cloth wipe over the upholstery in the direction
of the nap.
2 Repeat the operation using a clean damp cloth and
warm water but no soap.
3 Allow the upholstery cloth to dry, use a stiff brush
against the direction of the upholstery nap to restore
its original fluffy look.
To obtain best results, any stains must be removed as
soon as possible otherwise as time passes they will
become more difficult, if not impossible to remove.
Certain stains require specific solvents and the instruc-
tions must be strictly adhered to.