remove FIAT 500 2016 2.G Service Manual
[x] Cancel search | Manufacturer: FIAT, Model Year: 2016, Model line: 500, Model: FIAT 500 2016 2.GPages: 442, PDF Size: 3.1 MB
Page 318 of 442

If the tire inflates to the recommended pressure or is at
least 26 psi (1.8 Bar) pressure within 15 minutes:
1. Push the Power Button (4) to turn off the Tire ServiceKit.
2. Remove the Speed Limit sticker from the top of the Sealant Bottle (1) and place the sticker on the instru-
ment panel.
3. Immediately disconnect the Sealant Hose (6) from the valve stem, reinstall the cap on the fitting at the end of
the hose, and place the Tire Service Kit in the vehicle
storage location. Quickly proceed to (D) “Drive Ve-
hicle.”CAUTION!
•The metal end fitting from Power Plug (8) may get
hot after use, so it should be handled carefully.
• Failure to reinstall the cap on the fitting at the end
of the Sealant Hose (6) can result in sealant con-
tacting your skin, clothing, and the vehicle’s inte-
rior. It can also result in sealant contacting internal
Tire Service Kit components which may cause
permanent damage to the kit.
(D) Drive Vehicle:
Immediately after injecting sealant and inflating the tire,
drive the vehicle 5 miles (8 km) or 10 minutes to ensure
distribution of the Tire Service Kit Sealant within the tire.
Do not exceed 55 mph (90 km/h).
316 WHAT TO DO IN EMERGENCIES
Page 320 of 442
2. Disconnect the Tire Service Kit from the valve stem,reinstall the cap on the valve stem and unplug from 12
Volt outlet.
3. Place the Tire Service Kit in its proper storage area in the vehicle.
4. Have the tire inspected and repaired or replaced at the earliest opportunity at an authorized dealer or tire
service center.
5. Remove the Speed Limit sticker from the instrument panel after the tire has been repaired.
6.
Replace the Sealant Bottle (1) and Sealant Hose (6)
assembly at your authorized dealer as soon as possible.
Refer to (F) “Sealant Bottle and Hose Replacement”.
NOTE: When having the tire serviced, advise the autho-
rized dealer or service center that the tire has been sealed
using the Tire Service Kit.
(F) Sealant Bottle And Hose Replacement:
1. Uncoil the Sealant Hose (6) (clear in color).
2. Locate the round Sealant Bottle release button in the recessed area under the sealant bottle.
3. Push the Sealant Bottle release button. The Sealant Bottle (1) will pop up. Remove the bottle and dispose
of it accordingly.
4. Clean any remaining sealant from the Tire Service Kit housing.
5. Position the new Sealant Bottle (1) in the housing so that the Sealant Hose (6) aligns with the hose slot in
the front of the housing. Push the bottle into the
housing. An audible click will be heard indicating the
bottle is locked into place.
318 WHAT TO DO IN EMERGENCIES
Page 321 of 442
6. Verify that the cap is installed on the fitting at the endof the Sealant Hose (6) and return the hose to its
storage area (located on the bottom of the air pump).
7. Return the Tire Service Kit to its storage location in the vehicle.
WHEEL AND TIRE TORQUE SPECIFICATIONS
Proper lug nut/bolt torque is very important to ensure
that the wheel is properly mounted to the vehicle. Any
time a wheel has been removed and reinstalled on the
vehicle the lug nuts/bolts should be torqued using a
properly calibrated torque wrench.
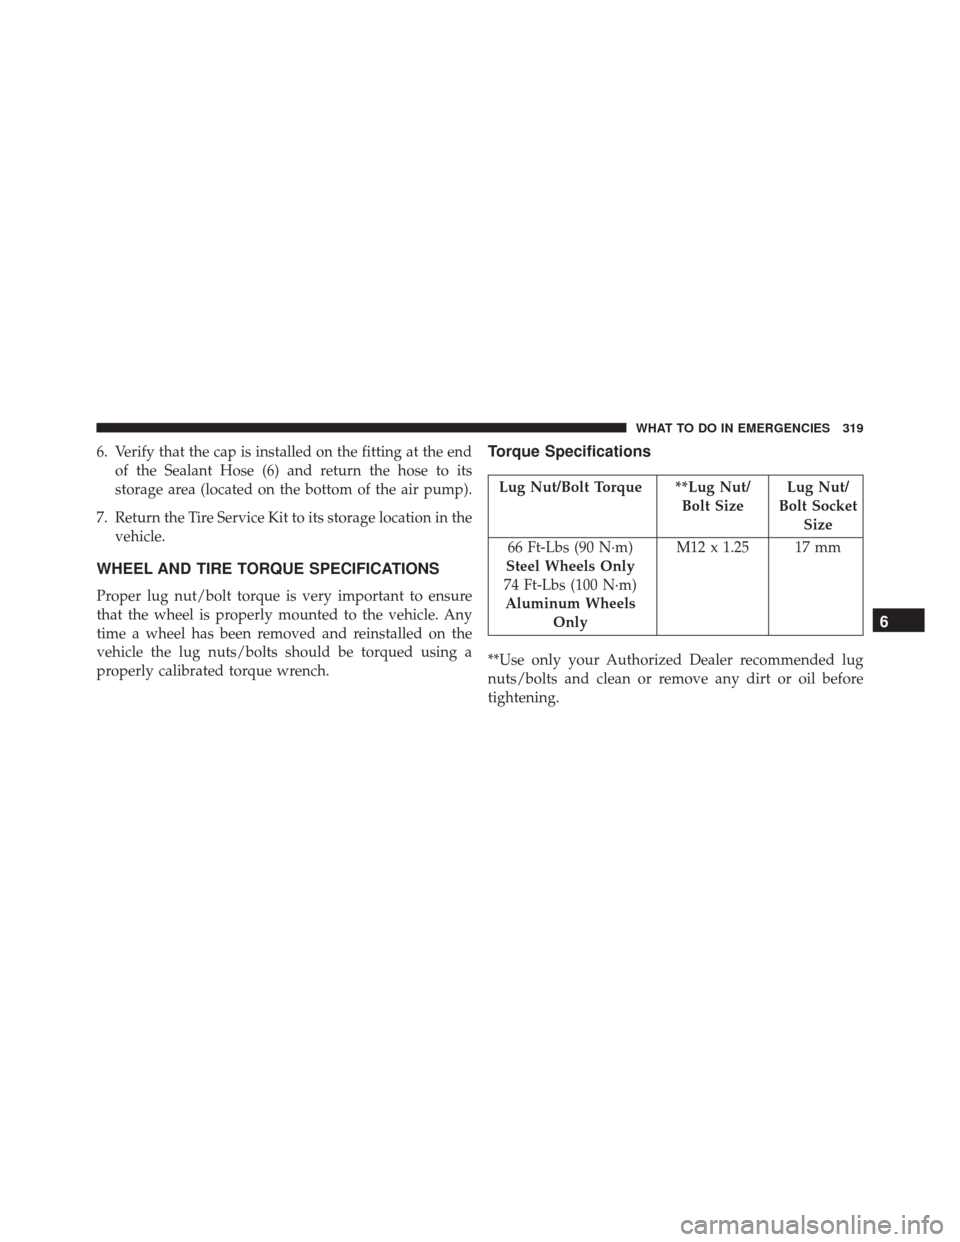
Torque Specifications
Lug Nut/Bolt Torque **Lug Nut/ Bolt SizeLug Nut/
Bolt Socket Size
66 Ft-Lbs (90 N·m)
Steel Wheels Only
74 Ft-Lbs (100 N·m) Aluminum Wheels Only M12 x 1.25 17 mm
**Use only your Authorized Dealer recommended lug
nuts/bolts and clean or remove any dirt or oil before
tightening.
6
WHAT TO DO IN EMERGENCIES 319
Page 322 of 442
Inspect the wheel mounting surface prior to mounting
the tire and remove any corrosion or loose particles.
Tighten the lug nuts/bolts in a star pattern until each
nut/bolt has been tightened twice.After 25 miles (40 km) check the lug nut/bolt torque to be
sure that all the lug nuts/bolts are properly seated
against the wheel.
Wheel Mounting Surface
Torque Patterns
320 WHAT TO DO IN EMERGENCIES
Page 324 of 442

Jack Location
The jack and jack wrench tool are stowed in a bag under
the front driver ’s seat.
Spare Tire Removal
The spare tire is stowed to the underbody below the
cargo area.
1. Remove the plug located in the rear cargo area.
Jack And Jack-Handle Location
Winch Access Plug
322 WHAT TO DO IN EMERGENCIES
Page 329 of 442
CAUTION!
Do not attempt to raise the vehicle by jacking on
locations other than those indicated in the Jacking
Instructions for this vehicle.
1. Remove the scissors jack and tool bag from under the driver’s seat.
2. Remove center cap.
NOTE:Before using the swivel wrench to remove the
wheel bolts be sure to remove the center cap of the wheel
by inserting the angled tab end of the swivel wrench into
the notched part of the center cap.
Center Cap Removal
6
WHAT TO DO IN EMERGENCIES 327
Page 330 of 442

3. Loosen, but do not remove, the wheel bolts by turningthem to the left one turn while the wheel is still on the
ground.
NOTE: •There are front and rear jacking locations on each
side of the body (as indicated by the triangular lift
point symbol on the sill molding)
• Do not raise the vehicle until you are sure the jack is
securely engaged.
Front Jacking Location
328 WHAT TO DO IN EMERGENCIES
Page 331 of 442

4. Turn the jack screw to the left until the jack can beplaced under the jacking location. Once the jack is
positioned, turn the jack screw to the right until the
jack head is properly engaged with the lift area closest
to the wheel to be changed.WARNING!
Raising the vehicle higher than necessary can make
the vehicle less stable. It could slip off the jack and
hurt someone near it. Raise the vehicle only enough
to remove the tire.
Rear Jacking LocationJack Location
6
WHAT TO DO IN EMERGENCIES 329
Page 332 of 442
5. Using the swivel wrench, raise the vehicle by turningthe jack screw to the right. Raise the vehicle only until
the tire just clears the surface and enough clearance is
obtained to install the spare tire. Minimum tire lift
provides maximum stability.
6. Remove the wheel bolts and pull the wheel off the hub. For vehicles equipped with aluminum wheels,
the center caps must be removed to remove the wheel
bolts. For vehicles equipped with steel wheels the
wheel covers must be removed to remove the wheel
bolts.
WARNING!
To avoid the risk of forcing the vehicle off the jack,
do not fully tighten the wheel bolts until the vehicle
has been lowered. Failure to follow this warning may
result in serious injury.
CAUTION!
Be sure to mount the spare tire with the valve stem
facing outward. The vehicle could be damaged if the
spare tire is mounted incorrectly.
WARNING!
To avoid possible personal injury, handle the wheel
covers with care to avoid contact with any sharp
edges.
7. Install the spare wheel and hand start the wheel bolts. Lightly tighten the bolts. To avoid the risk of forcing
the vehicle off the jack, do not tighten the bolts fully
until the vehicle has been lowered.
330 WHAT TO DO IN EMERGENCIES
Page 337 of 442
WARNING!
•Take care to avoid the radiator cooling fan when-
ever the hood is raised. It can start anytime the
ignition switch is ON. You can be injured by
moving fan blades.
• Remove any metal jewelry such as rings, watch
bands and bracelets that could make an inadvertent
electrical contact. You could be seriously injured.
• Batteries contain sulfuric acid that can burn your
skin or eyes and generate hydrogen gas which is
flammable and explosive. Keep open flames or
sparks away from the battery.
1. Set the parking brake, shift the automatic transmission into PARK and turn the ignition to LOCK.
2. Turn off the heater, radio, and all unnecessary electri- cal accessories.
Battery Posts
1 — Positive (+) Post (Covered With Protective Cap)
2 — Negative (-) Post
6
WHAT TO DO IN EMERGENCIES 335