maintenance schedule FIAT 500 2019 Owner handbook (in English)
[x] Cancel search | Manufacturer: FIAT, Model Year: 2019, Model line: 500, Model: FIAT 500 2019Pages: 228, PDF Size: 6.01 MB
Page 4 of 228
READ THIS CAREFULLY
REFUELLING
Petrol engines: only refuel with unleaded petrol with octane rating (RON) not less than 95 in compliance with the European specification
EN228. Using these mixtures may cause misfiring and driving issues, as well as damage fundamental components of the supply system.
LPG engines: refuel only with LPG for motor vehicles conforming to the European specification EN589. The use of other products or
mixtures may damage the engine beyond repair and consequently invalidate the warranty, due to the damage caused.
For further details on the use of the correct fuel see the "Refuelling the vehicle" paragraph in the "Starting and driving" chapter.
STARTING THE ENGINE
Make sure that the handbrake is engaged and place the gear lever in neutral. Fully press the clutch pedal, without pressing the accelerator,
then turn the ignition key to MAR and wait for thewarning light to turn off; turn the ignition key to AVV and release it as soon as the
engine starts.
Versions with Dualogic gearbox: make sure that the handbrake is engaged and that the gear lever is in P (Parking) or N (Neutral), fully
depress the brake pedal, then turn the ignition key to AVV and release it as soon as the engine is started.
PARKING ON FLAMMABLE MATERIAL
The catalytic converter develops high temperatures during operation. Do not park the car on grass, dry leaves, pine needles or other
flammable material: fire hazard.
RESPECTING THE ENVIRONMENT
The vehicle is fitted with a system that carries out a continuous diagnosis of the emission-related components in order to help protect the
environment.
ELECTRICAL ACCESSORIES
If, after buying the vehicle, you decide to add electrical accessories (with the risk of gradually draining the battery), contact a Fiat Dealership.
They can calculate the overall electrical requirement and check that the vehicle's electric system can support the required load.
SCHEDULED SERVICING
Correct maintenance of the car is essential for ensuring that it maintains its performance and its safety features, its environmental friendliness
and low running costs for a long time to come.
Page 45 of 228
TRIP B ACTIVATION / DATA
SET TIME
SET DATE
AUTOCLOSE
UNITS OF MEASUREMENT
LANGUAGE
WARNING VOLUME
BUTTON VOLUME
SEAT BELT BEEP
SERVICE
AIRBAG / PASSENGER AIRBAG
DAYTIME RUNNING LIGHTS
TYRE RESET
RADIO REPETITION (for markets/
versions, where provided)
SEE PHONE (for markets/versions,
where provided)
SEE NAVIGATION (for markets/
versions, where provided)
EXIT MENU
Set Time (Setting the clock)
Using this function, it is possible to set
the clock through two submenus:
“Time” and “Format”.
To adjust, proceed as follows:
briefly press the MENU button,
the display will show the two submenus
“Time” and “Mode”;
press the+or–button to move
between the two submenus;
once you have selected a submenu,
briefly press the MENU button
;
if you select the “Time” submenu,
briefly press the MENU button
to
display the "hours";
press the+or–button to adjust;
briefly press the MENU button
to display the "minutes";
press the+or–button to adjust.
NOTE Each press of the+or–buttons
will increase or decrease by one unit.
Hold down the button to increase/
decrease the setting rapidly and
automatically. Complete the adjustment
with single presses of the button when
you approach the desired value.
If you select the "Format" submenu,
briefly press the MENU button
to
show the display mode;
press+or–to select “24h” or
“12h”. When you have made the
required settings, briefly press the
MENU button
to go back to the
submenu screen or hold the button
down to go back to the main menu
screen without saving.
hold the MENU buttonor SAVE
for colour displays down again to
return to the standard screen or to the
main menu according to where you
are in the menu.Set date (Setting the date)
This function may be used to update
the date (year/month/day).
To adjust, proceed as follows:
briefly press the MENU button
to display the "year";
press the+or–button to adjust;
briefly press the MENU button
to display the "month";
press the+or–button to adjust;
briefly press the MENU button
to display the "day";
press the+or–button to adjust;
NOTE Each press of the+or–buttons
will increase or decrease by one unit.
Hold down the button to increase/
decrease the setting rapidly and
automatically. Complete the adjustment
with single presses of the button when
you approach the desired value.
press the MENU button
,orSAVE
for colour displays, briefly to return to
the menu screen or hold the button
down to return to the standard screen
without storing.
Service (scheduled servicing)
This function allows you to display the
information about km/mileage intervals
or, for versions/markets, where
provided, time intervals for car
maintenance.
43
Page 46 of 228
To consult the information, proceed as
follows:
press the MENU button: the
display shows when servicing is due in
km/mi or days (where provided)
according to the previous setting (see
paragraph "Units of measurement");
press the MENU buttonto
return to the menu screen; press the
button again to return to the standard
screen.
IMPORTANT The "Scheduled Servicing
Plan" includes car maintenance at
fixed intervals (refer to the "Maintenance
and care" chapter).
This is displayed automatically, with
ignition key at MAR-ON, 2000 km (or
equivalent value in miles) before
servicing or, where provided, 30 days
before servicing. It is also displayed
each time the key is turned to MAR-ON
or, for versions/markets, where
provided, every 200 km (or equivalent
value in miles). Below this threshold
servicing indications are more frequent.The display will be in km or miles
according to the unit of measurement
set. When the next scheduled servicing
is approaching, the word “Service”
will appear on the display, followed by
the number of kilometres/miles or
days (where provided) left, when the
key is turned to MAR. Go to a Fiat
Dealership, where the "Service
Schedule" operations will be performed
and the message will be reset.
Airbag/Passenger airbag
(Activation/deactivation of
passenger side front airbag and
side bag for pelvis, chest and
shoulder protection) - for versions/
markets, where provided
This function is used to activate/
deactivate the front passenger airbag.
Proceed as follows:
press the MENUbutton and,
after the displaying of the message
“Bag pass: Off) (to deactivate) or the
message (Passenger Bag: On” (to
activate) through the pressing of the+
and–buttons, press the MENU
button again;
a confirmation request message will
appear on the display;
press the+or–buttons to select
“Yes” (to confirm enable/disable) or
“No” (to abort);
briefly press the MENU button,
a message confirming the selection
will be displayed and you will return to
the menu screen or, pressing the button
for longer, you will return to the
standard screen without saving.
Tyre reset (iTPMS reset)
(For versions/markets, where provided)
With this function it is possible to reset
the iTPMS (see paragraph “iTPMS”).
To carry out the Reset procedure
proceed as follows:
briefly press the MENU button,
the display will show “Reset”;
press the+or–button to select
(“Yes” or “No”);
briefly press the MENU button,
the display will show “Confirm”;
press button+or–to select ("Yes"
to reset or "No" to exit the video page).
A message confirming the successful
Reset will be displayed;
press the MENU buttonagain
to return to the standard screen or
to the main menu according to where
you are in the menu.
44
KNOWING THE INSTRUMENT PANEL
Page 110 of 228
SUGGESTIONS FOR
DRIVING
SAVING FUEL
Below are some suggestions which
may help you save fuel and thus lower
the amount of harmful emissions
released into the atmosphere.
Vehicle maintenance
Checks and operations should be
carried out in accordance with
the "Scheduled Servicing Plan" (see the
"Maintenance and care" chapter).
Tyres
Check the tyre pressures at least once
every four weeks: if the pressure is
too low, consumption levels increase as
resistance to rolling is higher.
Unnecessary loads
Do not travel with an overloaded
luggage compartment. The weight of
the vehicle and its arrangement greatly
affect fuel consumption and stability.Roof rack/ski rack
Remove the roof rack or the ski rack
from the roof when they are not used.
These accessories lower aerodynamic
penetration and adversely affect
consumption levels. When transporting
particularly large objects, use a trailer
if possible.
Electric devices
Use electrical devices only for the
amount of time needed. The heated
rear window, windscreen wipers and
heater fan require a considerable
amount of energy; increasing
the current uptake increases fuel
consumption (by up to +25% in an
urban cycle).
Climate control module
Using the climate control system will
increase consumption: use standard
ventilation when the temperature
outside permits.
Devices for aerodynamic control
The use of non-certified devices for
aerodynamic control may adversely
affect air drag and consumption levels.DRIVING STYLE
Start
Do not warm up the engine at low or
high revs when the car is stationary;
this causes the engine to warm up
more slowly, thereby increasing fuel
consumption and emissions. It is
therefore advisable to move off
immediately, slowly, avoiding high
speeds: in this way the engine will
warm up more quickly.
Unnecessary actions
Avoid revving up when starting at traffic
lights or before stopping the engine.
The latter action, as well as double-
declutching, is unnecessary and causes
increased fuel consumption and
pollution.
Gear selection
Use a high gear when traffic and road
conditions allow it. Using a low gear for
faster acceleration will increase fuel
consumption. In the same way,
improper use of a high gear increases
consumption, emissions and engine
wear.
108
STARTING AND DRIVING
Page 140 of 228
SERVICING AND CARE
Correct maintenance permits the
performance of the vehicle to be
maintained over time, as well as limited
running costs and safeguarding the
efficiency of the safety systems.
This chapter explains how.SCHEDULED SERVICING ...............139
CHECKING LEVELS........................145
BATTERY ........................................149
BRAKES .........................................150
REPLACING THE
WINDSCREEN/REAR WINDOW
WIPER BLADES ..............................150
WHEELS AND TYRES.....................152
BODYWORK ...................................152
INTERIOR .......................................154
138
SERVICING AND CARE
Page 142 of 228
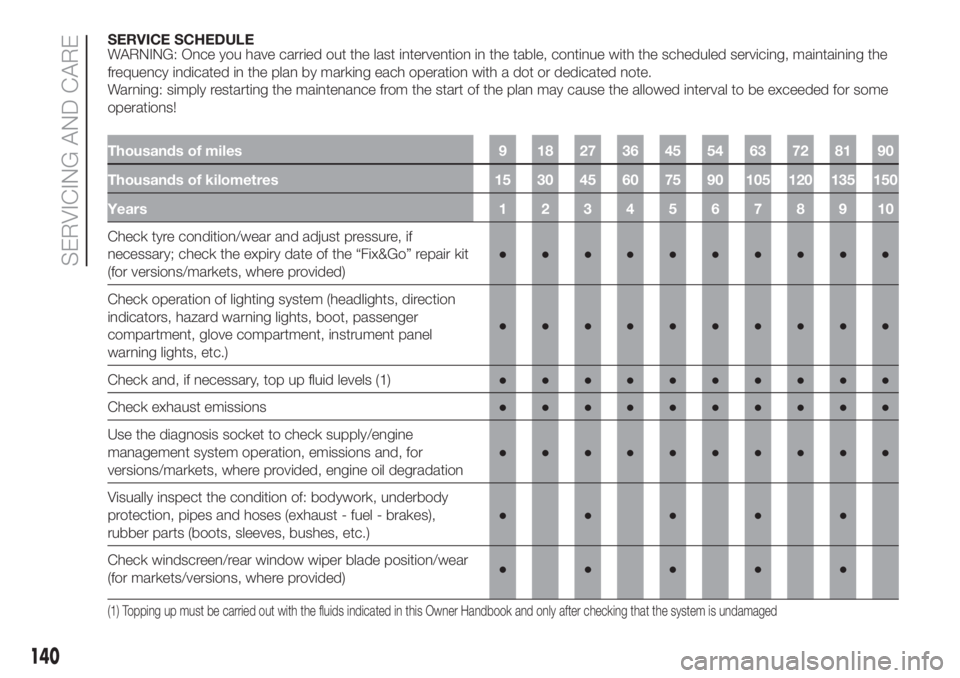
SERVICE SCHEDULE
WARNING: Once you have carried out the last intervention in the table, continue with the scheduled servicing, maintaining the
frequency indicated in the plan by marking each operation with a dot or dedicated note.
Warning: simply restarting the maintenance from the start of the plan may cause the allowed interval to be exceeded for some
operations!
Thousands of miles 9 18 27 36 45 54 63 72 81 90
Thousands of kilometres 15 30 45 60 75 90 105 120 135 150
Years12345678910
Check tyre condition/wear and adjust pressure, if
necessary; check the expiry date of the “Fix&Go” repair kit
(for versions/markets, where provided)●●●●●●●●●●
Check operation of lighting system (headlights, direction
indicators, hazard warning lights, boot, passenger
compartment, glove compartment, instrument panel
warning lights, etc.)●●●●●●●●●●
Check and, if necessary, top up fluid levels (1)●●●●●●●●●●
Check exhaust emissions●●●●●●●●●●
Use the diagnosis socket to check supply/engine
management system operation, emissions and, for
versions/markets, where provided, engine oil degradation●●●●●●●●●●
Visually inspect the condition of: bodywork, underbody
protection, pipes and hoses (exhaust - fuel - brakes),
rubber parts (boots, sleeves, bushes, etc.)●●●●●
Check windscreen/rear window wiper blade position/wear
(for markets/versions, where provided)●●●●●
(1) Topping up must be carried out with the fluids indicated in this Owner Handbook and only after checking that the system is undamaged
140
SERVICING AND CARE
Page 151 of 228
BATTERY
The car is fitted with a low-maintenance
battery: no electrolyte top-ups with
distilled water are needed in standard
conditions of use.
INSPECTING THE
CHARGE AND THE
ELECTROLYTE LEVEL
The operations must be carried out as
described in this Owner Handbook only
by specialised personnel. Topping
must be carried out by specialised
personnel at a Fiat Dealership.
180) 181)
REPLACING THE
BATTERY
If required, replace the battery with a
genuine spare part with the same
specifications.
If a battery with different specifications
is fitted, the service intervals given in
the "Service Schedule" will no longer be
valid.
Follow the battery manufacturer's
instructions for maintenance.
182) 183) 184)
64)
5)
CAR INACTIVITY (CARS
EQUIPPED WITH
START&STOP SYSTEM)
In the event of vehicle inactivity (or if the
battery is replaced), special attention
must be paid to the disconnection
of the battery power supply.
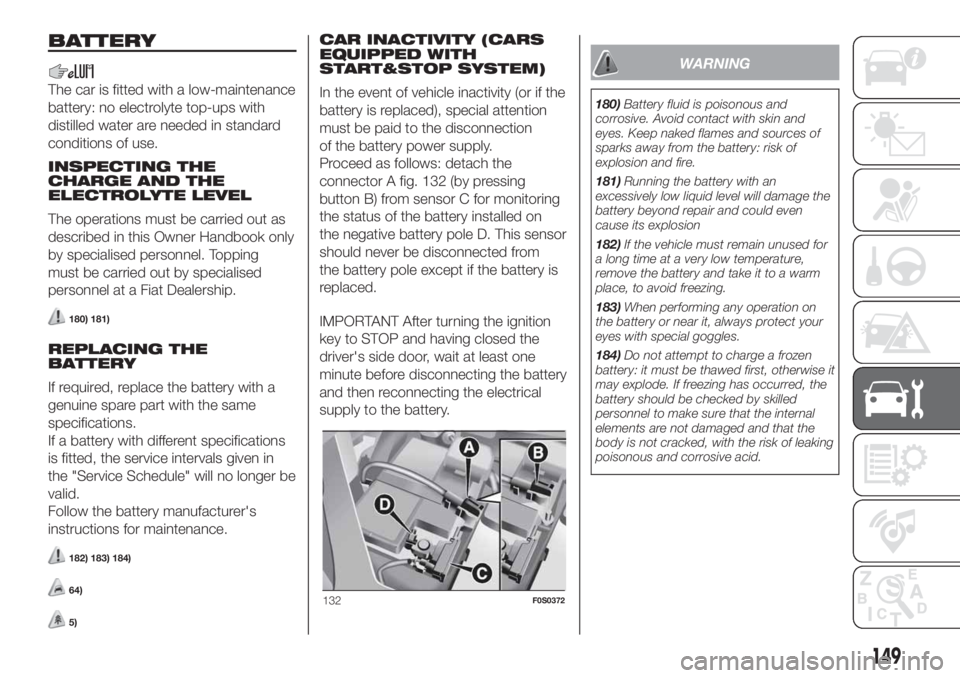
Proceed as follows: detach the
connector A fig. 132 (by pressing
button B) from sensor C for monitoring
the status of the battery installed on
the negative battery pole D. This sensor
should never be disconnected from
the battery pole except if the battery is
replaced.
IMPORTANT After turning the ignition
key to STOP and having closed the
driver's side door, wait at least one
minute before disconnecting the battery
and then reconnecting the electrical
supply to the battery.
WARNING
180)Battery fluid is poisonous and
corrosive. Avoid contact with skin and
eyes. Keep naked flames and sources of
sparks away from the battery: risk of
explosion and fire.
181)Running the battery with an
excessively low liquid level will damage the
battery beyond repair and could even
cause its explosion
182)If the vehicle must remain unused for
a long time at a very low temperature,
remove the battery and take it to a warm
place, to avoid freezing.
183)When performing any operation on
the battery or near it, always protect your
eyes with special goggles.
184)Do not attempt to charge a frozen
battery: it must be thawed first, otherwise it
may explode. If freezing has occurred, the
battery should be checked by skilled
personnel to make sure that the internal
elements are not damaged and that the
body is not cracked, with the risk of leaking
poisonous and corrosive acid.
132F0S0372
149