radio controls FIAT 500 2019 Owner handbook (in English)
[x] Cancel search | Manufacturer: FIAT, Model Year: 2019, Model line: 500, Model: FIAT 500 2019Pages: 228, PDF Size: 6.01 MB
Page 175 of 228
MULTIMEDIA
This chapter describes the main
functions of theUconnect™Radio,
Uconnect™5" LIVE,Uconnect™5"
Nav LIVE,Uconnect™7” HD LIVE and
Uconnect™7” HD NAV LIVE
infotainment systems that can be fitted
on the vehicle.TIPS, CONTROLS AND GENERAL
INFORMATION ................................174
USB SOURCE.................................175
UCONNECT™ RADIO.....................176
UCONNECT™ 5 RADIO LIVE/ NAV
LIVE ................................................183
UCONNECT™ 7 HD LIVE/ NAV
LIVE ................................................196
MOPAR® CONNECT ......................211
OFFICIAL TYPE APPROVALS .........212
173
Page 176 of 228
TIPS, CONTROLS
AND GENERAL
INFORMATION
Road safety
Learn how to use the various system
functions before setting off.
Read the instructions for the system
carefully before setting off.
Reception conditions
Reception conditions change
constantly while driving. Reception may
be interfered with by the presence of
mountains, buildings or bridges,
especially when you are far away from
the broadcaster.
IMPORTANT The volume may be
increased when receiving traffic
bulletins.
Care and maintenance
Observe the following precautions to
ensure the system is fully operational:
the display is sensitive to scratching,
liquids and detergents. Avoid hitting
the display with pointed or hard objects
that could damage its surface. Do not
press on the display when cleaning it.
never use alcohol, petrols and
derivatives to clean the display lens.
Prevent any liquid from entering the
system: this could damage it beyond
repair.Anti-theft protection
The system is equipped with an
anti-theft protection system based on
the exchange of information with the
electronic control unit (Body Computer)
on the vehicle.
This guarantees maximum safety and
prevents the secret code from being
entered after the power supply has
been disconnected.
If the check has a positive outcome, the
system will start to operate, whereas if
the comparison codes are not the
same or if the electronic control unit
(Body Computer) is replaced, the
system will ask the user to enter the
secret code according to the procedure
described in the paragraph below.
Entering the secret code
When the system is switched on, if the
code is requested, the display will
show “Please enter Anti-Theft Code”
followed by the screen showing a
keypad to enter the secret code.
The secret code is made up of four
digits from 0 to 9.
If an incorrect code is entered, the
system displays “Incorrect Code” to
notify the user of the need to enter the
correct code.After the 3 available attempts to enter
the code, the system displays
“Incorrect Code. Radio locked. Wait for
30 minutes”. After the text has
disappeared it is possible to start the
code entering procedure again.
Vehicle radio passport
This document certifies ownership of
the system. The vehicle radio passport
shows the system model, serial number
and secret code.
WARNING Keep the vehicle radio
passport in a safe place so that you
can give the information to the relevant
authorities if the system is stolen.
In case of loss of the car radio
passport, contact the Fiat Dealership,
taking an ID document and the car
ownership documents.
Important notes
In the event of an anomaly, the system
should only be checked and repaired at
a Fiat Dealership.
If the temperature is particularly low, the
display may take a while to reach
optimum brightness.
If the car is stopped for a while and the
external temperature is very high, the
system may go into “thermal
protection” mode, suspending
operation until the temperature in the
passenger compartment returns to
acceptable levels.
174
MULTIMEDIA
Page 178 of 228
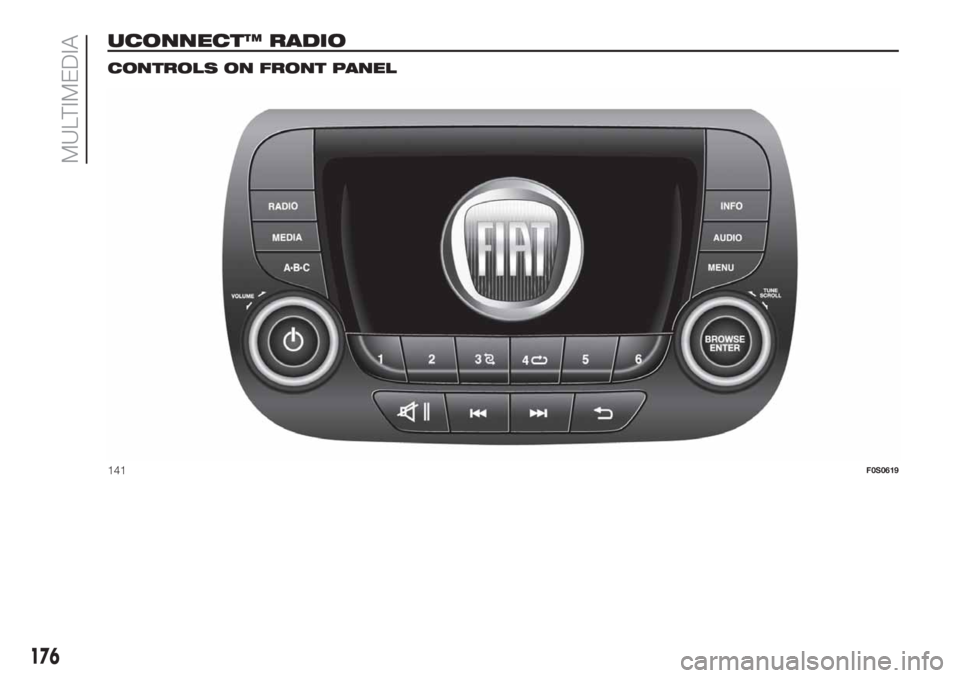
UCONNECT™ RADIO.
CONTROLS ON FRONT PANEL
141F0S0619
176
MULTIMEDIA
Page 183 of 228
SWITCHING THE SYSTEM
ON/OFF
The system is switched on/off by
pressing the
button/knob.
Turn the button/knob clockwise to
increase the radio volume or
anticlockwise to decrease it.
RADIO (TUNER) MODE
The system is equipped with the
following tuners: AM, FM.
Radio mode selection
Press the RADIO button on the front
panel to activate radio mode.
Selecting a frequency band
The different tuning modes can be
selected by pressing the RADIO button
on the front panel.
Displayed information
After the desired radio station is
selected on the display, the following
information is shown (INFO mode
activated):
In the upper part:the preset station,
the time and the other active radio
settings are highlighted (e.g.: TA).
In the central part:the name of the
current station, the frequency and
the radio text information (if any) are
highlighted.FM station list
Press the BROWSE ENTER button/
knob to display the complete list of the
FM stations that can be received.
AM/FM radio station storage
The preset stations are available in all
system modes and are selected by
touching one of the presetting buttons
1-2-3-4-5-6on the front panel.
If you are tuned to a radio station that
you wish to store, hold down the button
on the display which corresponds to
the desired preset until an acoustic
confirmation signal is emitted.
AM/FM radio station selection
To search for the desired radio station,
press the
orbuttons, use
the wheel on the steering wheel
controls
or, alternatively, turn the
"BROWSE/ENTER" knob.
Previous/next radio station search
Briefly press the
orbutton
or use the wheel on the steering wheel
controls
: when the button is
released, the previous or next radio
station is displayed.Previous/next radio station fast
search
Hold down the
orbutton to
start the fast search: when the button is
released, the first tunable radio is
played.
MEDIA MODE
This paragraph describes the ways of
interacting with USB operation.
Audio source selection
Press the MEDIA button to select the
USB audio source.
Change track (next/previous)
Briefly press the
button or turn the
BROWSE ENTER button/knob
clockwise to play the next song. Briefly
press the
button or turn the
BROWSE ENTER button/knob
anticlockwise to return to the beginning
of the song, or return to the beginning
of the previous song if the current song
has been playing for less than 3
seconds.
Fast forward/rewind through tracks
Press and hold down the
button
to fast forward the selected track or
keep the
button pressed to fast
rewind the track.
181
Page 185 of 228
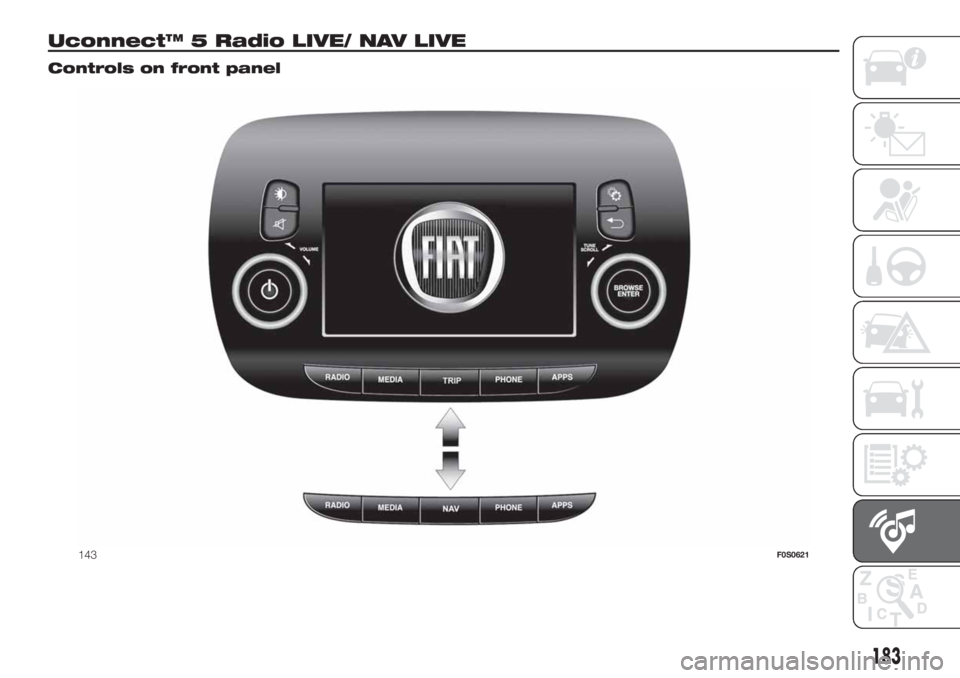
Uconnect™ 5 Radio LIVE/ NAV LIVE.
Controls on front panel
143F0S0621
183
Page 188 of 228
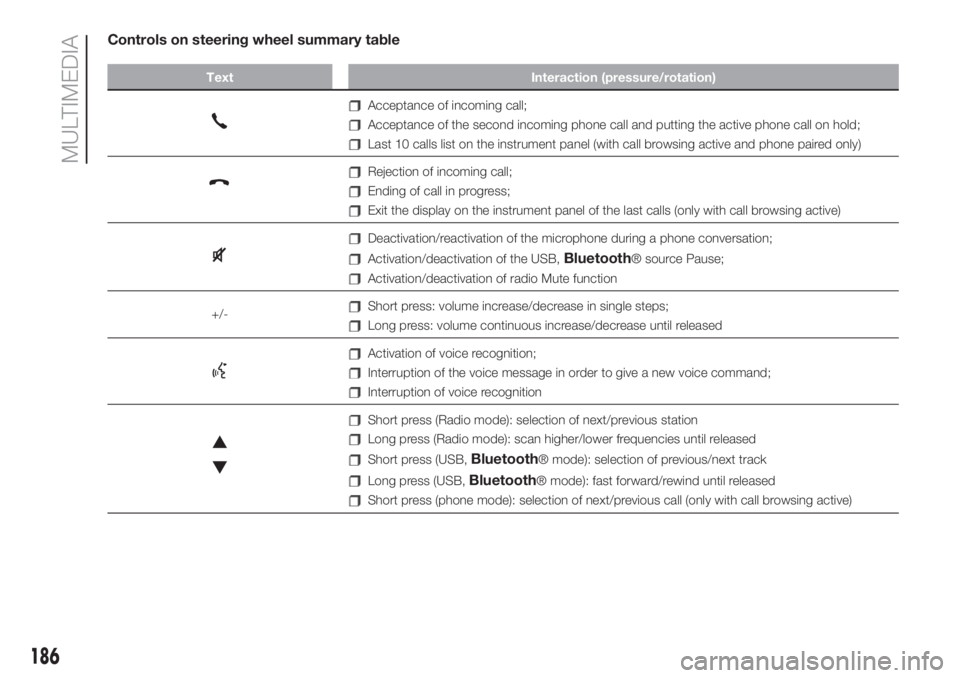
Controls on steering wheel summary table
Text Interaction (pressure/rotation)
Acceptance of incoming call;
Acceptance of the second incoming phone call and putting the active phone call on hold;
Last 10 calls list on the instrument panel (with call browsing active and phone paired only)
Rejection of incoming call;
Ending of call in progress;
Exit the display on the instrument panel of the last calls (only with call browsing active)
Deactivation/reactivation of the microphone during a phone conversation;
Activation/deactivation of the USB,Bluetooth® source Pause;
Activation/deactivation of radio Mute function
+/-
Short press: volume increase/decrease in single steps;
Long press: volume continuous increase/decrease until released
Activation of voice recognition;
Interruption of the voice message in order to give a new voice command;
Interruption of voice recognition
Short press (Radio mode): selection of next/previous station
Long press (Radio mode): scan higher/lower frequencies until released
Short press (USB,Bluetooth® mode): selection of previous/next track
Long press (USB,Bluetooth® mode): fast forward/rewind until released
Short press (phone mode): selection of next/previous call (only with call browsing active)
186
MULTIMEDIA
Page 197 of 228
Voice commands
NOTE For languages not supported by
the system, voice controls are not
available. To use the voice commands,
press the
button on the steering
wheel (”Voice” button) and say out loud
the command you want to activate.
Global
The following voice commands can be
given after pressing the
button on
the steering wheel:
Help
Cancel
Repeat
Voice Prompts
Phone
The following voice commands can be
given after pressing the
button on
the steering wheel and saying "Go
to telephone":
Call
Dial
Re-dial
Call back
Recent calls
Calls made
Missed calls
Calls received
PhoneBook
Search
Show SMS
Radio
The following voice commands can be
given after pressing the
button on
the steering wheel:
Tune to XXX FM
Tune to XXX AM
Tune to Radio XXX
Tune to DAB channel
Media
The following voice commands can be
given after pressing the
button on
the steering wheel:
Play song...
Play album…
Play artist…
Play genre…
Play playlist…
Play podcast…
Play audiobook…
Select the source
View
Navigation (Uconnect™ 5" Nav LIVE
only)
The following voice commands can be
given after pressing the
button on
the steering wheel:
Drive Home
2D view
3D vision
Clear route
Add Favourite
Repeat instruction
195
Page 202 of 228
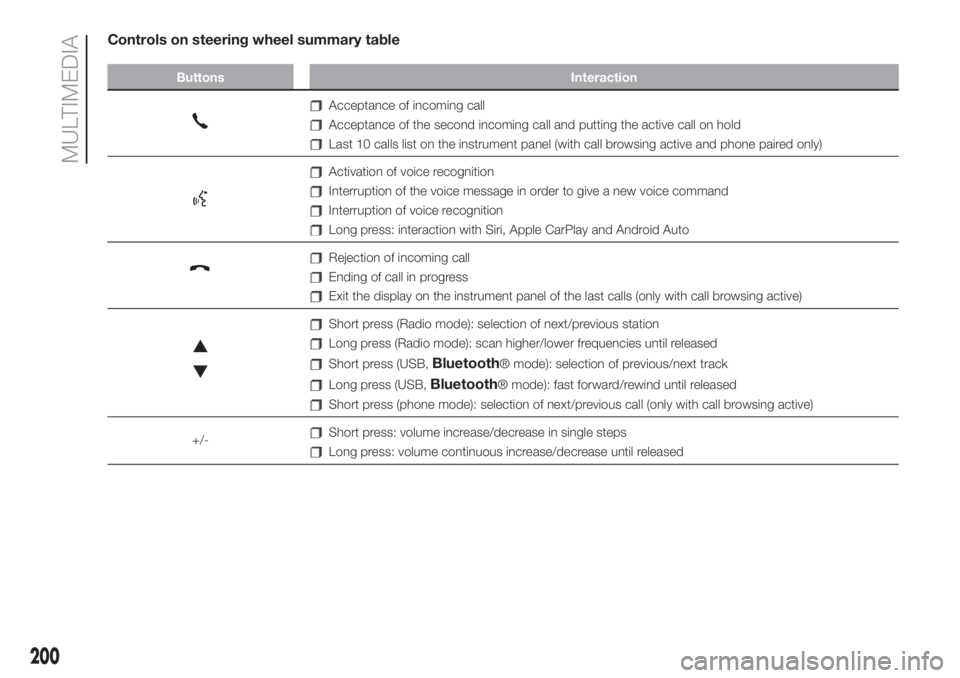
Controls on steering wheel summary table
Buttons Interaction
Acceptance of incoming call
Acceptance of the second incoming call and putting the active call on hold
Last 10 calls list on the instrument panel (with call browsing active and phone paired only)
Activation of voice recognition
Interruption of the voice message in order to give a new voice command
Interruption of voice recognition
Long press: interaction with Siri, Apple CarPlay and Android Auto
Rejection of incoming call
Ending of call in progress
Exit the display on the instrument panel of the last calls (only with call browsing active)
Short press (Radio mode): selection of next/previous station
Long press (Radio mode): scan higher/lower frequencies until released
Short press (USB,Bluetooth® mode): selection of previous/next track
Long press (USB,Bluetooth® mode): fast forward/rewind until released
Short press (phone mode): selection of next/previous call (only with call browsing active)
+/-
Short press: volume increase/decrease in single steps
Long press: volume continuous increase/decrease until released
200
MULTIMEDIA
Page 209 of 228
To check the compatibility of your
smartphone, see the indications on the
websites: https://www.android.com/
intl/it_it/auto/ and http://
www.apple.com/it/ios/carplay/.
If the smartphone is connected
correctly to the car via the USB port,
the Apple CarPlay or Android Auto icon
will be displayed in place of the
button in the main menu.
Android Auto – app configuration
Before use, download the Android Auto
application to your smartphone from
Google Play Store.
The application is compatible with
Android 5.0 (Lollipop) and later
versions.
To use Android Auto, the smartphone
must be connected to the car with a
USB cable.
On the first connection, you will have to
perform the setup procedure that
appears on the smartphone. You can
only perform this procedure with the
vehicle stationary.
Apple CarPlay – app configuration
Apple CarPlay is compatible with the
iPhone 5 or more recent models, with
the iOS 7.1 operating system or later
versions.Before using Apple CarPlay, enable Siri
from Settings > General > Siri on the
smartphone.
To use Apple CarPlay, the smartphone
must be connected to the car with a
USB cable.
NOTE Enabling Apple CarPlay/Android
Auto or some functions could require
interaction on the smartphone. If
necessary, complete the step on your
device (smartphone).
Interaction
After the setup procedure, on
connecting your smartphone to the
car's USB port, the application will run
automatically on theUconnect™
system.
You can interact with Apple CarPlay
and Android Auto using the steering
wheel controls (long press of the
button), using the SCROLL TUNE
button/knob to select and confirm
or using theUconnect™system
touchscreen.
Navigation
With the Apple CarPlay and Android
Auto applications, the user can choose
to use the navigation system on their
smartphone.If the system's "Nav" mode is already
on, when a device is connected to
the vehicle with a navigation session in
progress, a warning pop-up will appear
on theUconnect™system display.
The pop-up allows the user to choose
between using the system navigation
and using navigation controlled by
the smartphone.
The user can choose to change their
selection at any time by accessing the
navigation system that they want to use
and setting a new destination.
Setting “AutoShow smartphone
display on connection"
Through theUconnect™system
settings, the user can decide to view
the smartphone screen on the
Uconnect™system display as soon
as the smartphone is connected via the
USB port. When this function is set,
each time a connection is made via
USB, the Apple CarPlay or Android
Auto apps will run automatically on the
radio screen.
The"AutoShow smartphone display
on connection"item can be found in
the "Display" submenu.
The function is enabled by default.
NOTES
Bluetooth® is disabled while Apple
CarPlay is being used
207
Page 210 of 228
Bluetooth® remains on while
Android Auto is being used
The data connection will depend on
the tariff plan of the smarphone
This information may be subject to
changes that depend on the
smartphone's operating system.
Exiting from the Apple CarPlay and
Android Auto apps
With the CarPlay app enabled, you can
still access the contents of the
Uconnect™system by using the
controls available and viewable on its
display. To return to theUconnect™
system contents with the Android Auto
app enabled, select the last item on
the Android Auto system bar and select
“Back to Uconnect".
To end the Apple CarPlay or Android
Auto session, physically disconnect the
smartphone from the USB port.
SETTINGS
Press the “Settings” button on the
display to show the main “Settings”
menu.
NOTE
The menu items displayed vary
according to the versions.
The menu includes the following items:
Language;
Display;
Units;
Voice commands;
Time and Date;
Safety / Driving Assistance (for
versions/markets, where provided);
Lights;
Doors & Locks;
Engine Off Options;
Audio;
Phone;
Radio Setup;
Restore default settings;
Clear personal data.
NAVIGATION (Uconnect™
7" HD Nav LIVE only)
Press the "Nav" button to show the
navigation map on the display.
NOTE: The navigation system volume
can only be adjusted during navigation
when the system provides voice
indications.
Navigation main menu
In the navigation view, tap the "Main
menu" button to open the menu:
Select the "Search" button to search
for an address, a place or a point of
interest, then plan a route to the
location.
Select the "Current trip" button to
delete or edit the planned route.
Select the "My places" button to
create a collection of useful or preferred
addresses. The following items are
always available in "My places": “Home”
and “Recent destinations”.
Select the "Parking" button to
search for car parks.
Select the "Weather" or "Speed
Camera Warning" button to receive
information on the weather or warnings
about speed camera locations.
NOTE The "Weather" and "Speed
Camera Warnings" functions are only
active if TomTom Services are activated.
Otherwise, the button will appear
greyed out (and the function will not be
available).
Select the "Petrol Station" button to
search for petrol stations.
Select the "TomTom Services"
button to view the activation state of
the following services (subscription
needed): “Traffic”, “Speed cameras”,
“Weather”, “Online search”.
Select this button to open the
"Settings" menu;
208
MULTIMEDIA