sensor FIAT 500 2020 Owner handbook (in English)
[x] Cancel search | Manufacturer: FIAT, Model Year: 2020, Model line: 500, Model: FIAT 500 2020Pages: 228, PDF Size: 6.01 MB
Page 19 of 228
DOOR MIRRORS
15)
Manual adjustment
The door mirror can be adjusted from
outside by exerting a slight pressure on
the four sides of the glass.
Electric adjustment
Proceed as follows:
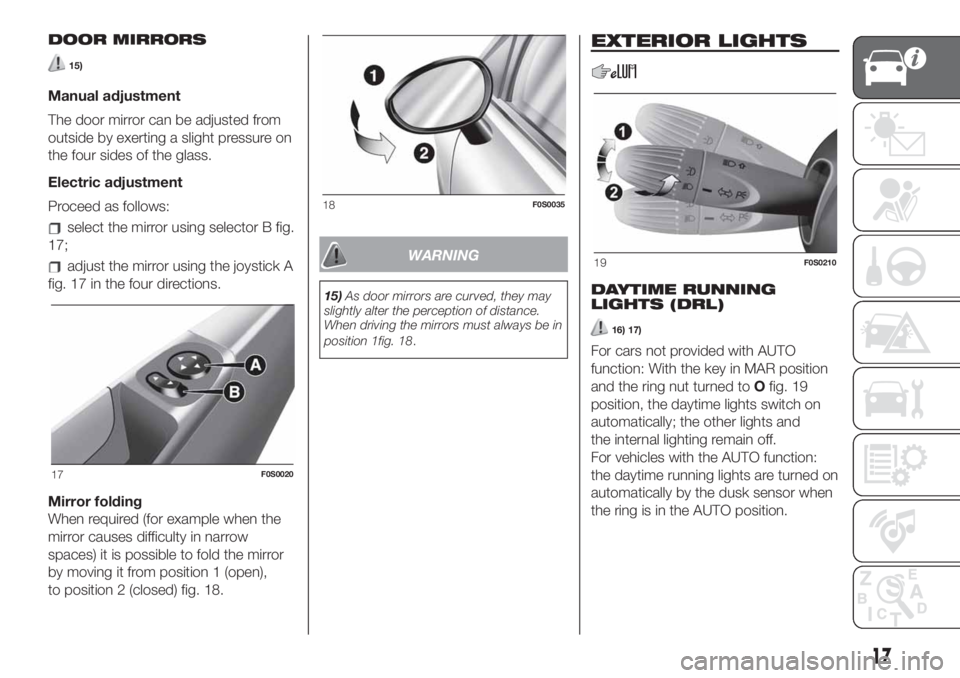
select the mirror using selector B fig.
17;
adjust the mirror using the joystick A
fig. 17 in the four directions.
Mirror folding
When required (for example when the
mirror causes difficulty in narrow
spaces) it is possible to fold the mirror
by moving it from position 1 (open),
to position 2 (closed) fig. 18.WARNING
15)As door mirrors are curved, they may
slightly alter the perception of distance.
When driving the mirrors must always be in
position 1fig. 18.
EXTERIOR LIGHTS
DAYTIME RUNNING
LIGHTS (DRL)
16) 17)
For cars not provided with AUTO
function: With the key in MAR position
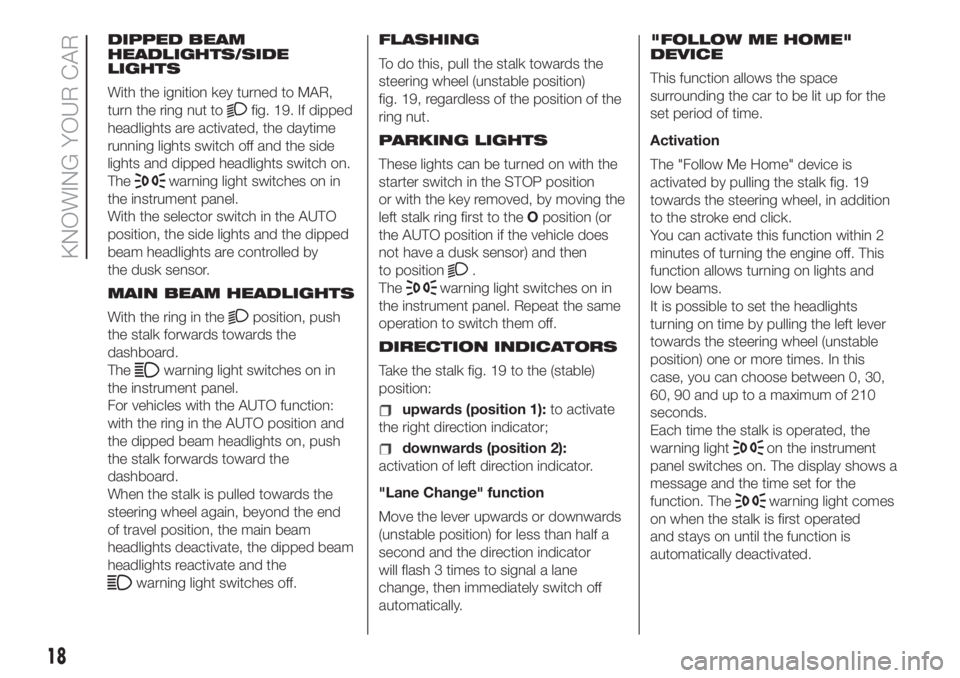
and the ring nut turned toOfig. 19
position, the daytime lights switch on
automatically; the other lights and
the internal lighting remain off.
For vehicles with the AUTO function:
the daytime running lights are turned on
automatically by the dusk sensor when
the ring is in the AUTO position.
17F0S0020
18F0S0035
19F0S0210
17
Page 20 of 228
DIPPED BEAM
HEADLIGHTS/SIDE
LIGHTS
With the ignition key turned to MAR,
turn the ring nut to
fig. 19. If dipped
headlights are activated, the daytime
running lights switch off and the side
lights and dipped headlights switch on.
The
warning light switches on in
the instrument panel.
With the selector switch in the AUTO
position, the side lights and the dipped
beam headlights are controlled by
the dusk sensor.
MAIN BEAM HEADLIGHTS
With the ring in the
position, push
the stalk forwards towards the
dashboard.
The
warning light switches on in
the instrument panel.
For vehicles with the AUTO function:
with the ring in the AUTO position and
the dipped beam headlights on, push
the stalk forwards toward the
dashboard.
When the stalk is pulled towards the
steering wheel again, beyond the end
of travel position, the main beam
headlights deactivate, the dipped beam
headlights reactivate and the
warning light switches off.FLASHING
To do this, pull the stalk towards the
steering wheel (unstable position)
fig. 19, regardless of the position of the
ring nut.
PARKING LIGHTS
These lights can be turned on with the
starter switch in the STOP position
or with the key removed, by moving the
left stalk ring first to theOposition (or
the AUTO position if the vehicle does
not have a dusk sensor) and then
to position
.
The
warning light switches on in
the instrument panel. Repeat the same
operation to switch them off.
DIRECTION INDICATORS
Take the stalk fig. 19 to the (stable)
position:
upwards (position 1):to activate
the right direction indicator;
downwards (position 2):
activation of left direction indicator.
"Lane Change" function
Move the lever upwards or downwards
(unstable position) for less than half a
second and the direction indicator
will flash 3 times to signal a lane
change, then immediately switch off
automatically."FOLLOW ME HOME"
DEVICE
This function allows the space
surrounding the car to be lit up for the
set period of time.
Activation
The "Follow Me Home" device is
activated by pulling the stalk fig. 19
towards the steering wheel, in addition
to the stroke end click.
You can activate this function within 2
minutes of turning the engine off. This
function allows turning on lights and
low beams.
It is possible to set the headlights
turning on time by pulling the left lever
towards the steering wheel (unstable
position) one or more times. In this
case, you can choose between 0, 30,
60, 90 and up to a maximum of 210
seconds.
Each time the stalk is operated, the
warning lighton the instrument
panel switches on. The display shows a
message and the time set for the
function. The
warning light comes
on when the stalk is first operated
and stays on until the function is
automatically deactivated.
18
KNOWING YOUR CAR
Page 23 of 228
“Smart washing” function
Pull the stalk towards the steering
wheel (unstable position) to operate the
windscreen washer.
Keep the lever pulled to activate both
the windscreen washer jet and the
windscreen wiper with a single
movement; the latter turns on
automatically if you keep the lever
pulled for more than half a second.
The operation of the windscreen wiper
terminates several strokes after the
stalk is released; a final cleaning stroke
several seconds later completes the
wiping operation.
REAR WINDOW WIPER /
WASHER
8)
This operates only with the ignition key
turned to MAR.
Rear Window Wiper
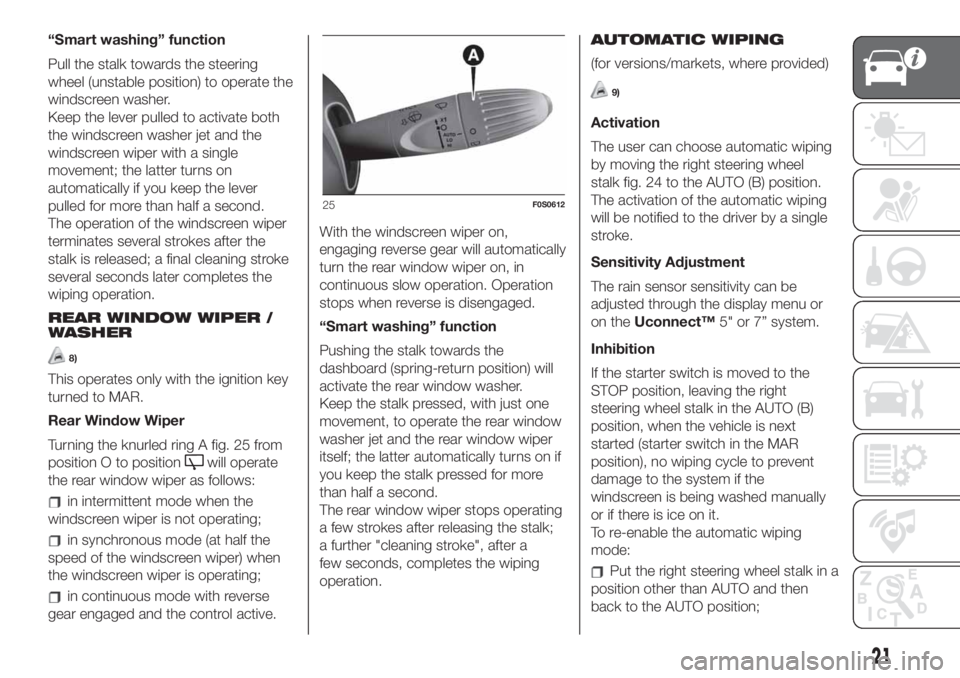
Turning the knurled ring A fig. 25 from
position O to position
will operate
the rear window wiper as follows:
in intermittent mode when the
windscreen wiper is not operating;
in synchronous mode (at half the
speed of the windscreen wiper) when
the windscreen wiper is operating;
in continuous mode with reverse
gear engaged and the control active.With the windscreen wiper on,
engaging reverse gear will automatically
turn the rear window wiper on, in
continuous slow operation. Operation
stops when reverse is disengaged.
“Smart washing” function
Pushing the stalk towards the
dashboard (spring-return position) will
activate the rear window washer.
Keep the stalk pressed, with just one
movement, to operate the rear window
washer jet and the rear window wiper
itself; the latter automatically turns on if
you keep the stalk pressed for more
than half a second.
The rear window wiper stops operating
a few strokes after releasing the stalk;
a further "cleaning stroke", after a
few seconds, completes the wiping
operation.AUTOMATIC WIPING
(for versions/markets, where provided)
9)
Activation
The user can choose automatic wiping
by moving the right steering wheel
stalk fig. 24 to the AUTO (B) position.
The activation of the automatic wiping
will be notified to the driver by a single
stroke.
Sensitivity Adjustment
The rain sensor sensitivity can be
adjusted through the display menu or
on theUconnect™5" or 7” system.
Inhibition
If the starter switch is moved to the
STOP position, leaving the right
steering wheel stalk in the AUTO (B)
position, when the vehicle is next
started (starter switch in the MAR
position), no wiping cycle to prevent
damage to the system if the
windscreen is being washed manually
or if there is ice on it.
To re-enable the automatic wiping
mode:
Put the right steering wheel stalk in a
position other than AUTO and then
back to the AUTO position;
25F0S0612
21
Page 24 of 228
exceed the speed of 5 km/h when
the sensor detects rain.
Deactivation
The user can disable automatic wiping
by moving the right steering wheel
stalk to a position other than AUTO.
WARNING
18)If the window needs to be cleaned,
make sure the device is deactivated or the
key is on STOP.
19)Driving with worn windscreen/rear
window wiper blades is a serious hazard,
because visibility is reduced in bad
weather.
WARNING
5)Never use the windscreen wipers to
remove layers of snow or ice from the
windscreen. In such conditions, the wiper
may be subjected to excessive stress
and the motor cut-out switch, which
prevents operation for a few seconds, may
intervene. If operation is not restored,
contact a Fiat Dealership.
6)Do not operate the windscreen wiper
with the blades lifted from the windscreen.
7)Do not activate the rain sensor or the
rear window wiper when washing the car in
an automatic car wash.8)Do not use the rear window wiper to
remove layers of snow or ice. In these
conditions, the rear window wiper may be
subjected to excessive stress and the
motor protection, which prevents operation
for a few seconds, may intervene. If
operation is not restored, contact a Fiat
Dealership.
9)Make sure the device is switched off if
there is ice on the windscreen.
22
KNOWING YOUR CAR
Page 57 of 228
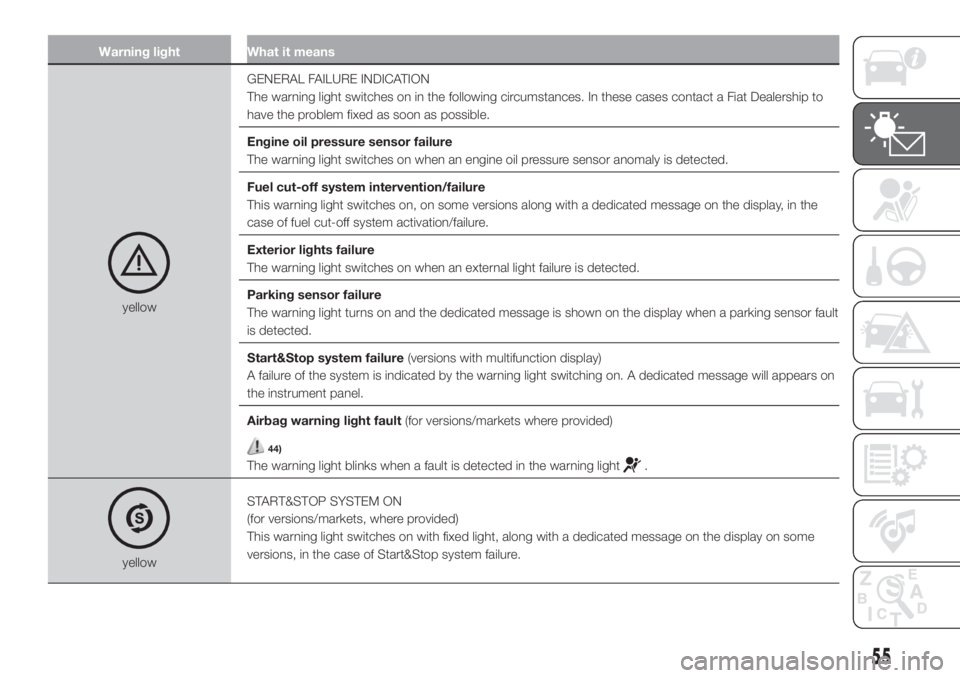
Warning light What it means
yellowGENERAL FAILURE INDICATION
The warning light switches on in the following circumstances. In these cases contact a Fiat Dealership to
have the problem fixed as soon as possible.
Engine oil pressure sensor failure
The warning light switches on when an engine oil pressure sensor anomaly is detected.
Fuel cut-off system intervention/failure
This warning light switches on, on some versions along with a dedicated message on the display, in the
case of fuel cut-off system activation/failure.
Exterior lights failure
The warning light switches on when an external light failure is detected.
Parking sensor failure
The warning light turns on and the dedicated message is shown on the display when a parking sensor fault
is detected.
Start&Stop system failure(versions with multifunction display)
A failure of the system is indicated by the warning light switching on. A dedicated message will appears on
the instrument panel.
Airbag warning light fault(for versions/markets where provided)
44)
The warning light blinks when a fault is detected in the warning light.
yellowSTART&STOP SYSTEM ON
(for versions/markets, where provided)
This warning light switches on with fixed light, along with a dedicated message on the display on some
versions, in the case of Start&Stop system failure.
55
Page 62 of 228
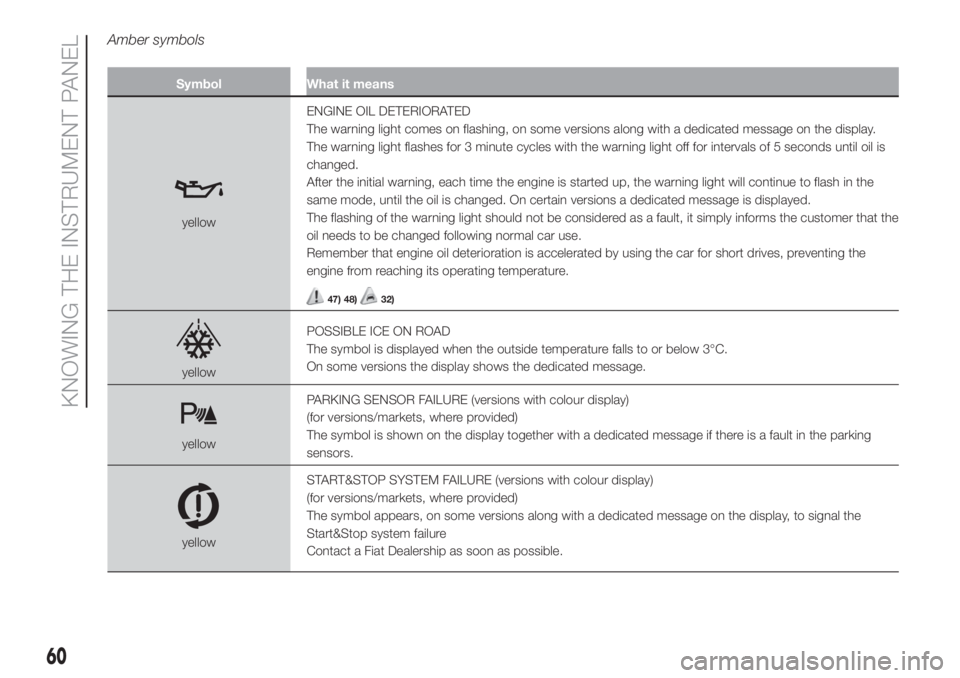
Amber symbols
Symbol What it means
yellowENGINE OIL DETERIORATED
The warning light comes on flashing, on some versions along with a dedicated message on the display.
The warning light flashes for 3 minute cycles with the warning light off for intervals of 5 seconds until oil is
changed.
After the initial warning, each time the engine is started up, the warning light will continue to flash in the
same mode, until the oil is changed. On certain versions a dedicated message is displayed.
The flashing of the warning light should not be considered as a fault, it simply informs the customer that the
oil needs to be changed following normal car use.
Remember that engine oil deterioration is accelerated by using the car for short drives, preventing the
engine from reaching its operating temperature.
47) 48)32)
yellowPOSSIBLE ICE ON ROAD
The symbol is displayed when the outside temperature falls to or below 3°C.
On some versions the display shows the dedicated message.
yellowPARKING SENSOR FAILURE (versions with colour display)
(for versions/markets, where provided)
The symbol is shown on the display together with a dedicated message if there is a fault in the parking
sensors.
yellowSTART&STOP SYSTEM FAILURE (versions with colour display)
(for versions/markets, where provided)
The symbol appears, on some versions along with a dedicated message on the display, to signal the
Start&Stop system failure
Contact a Fiat Dealership as soon as possible.
60
KNOWING THE INSTRUMENT PANEL
Page 64 of 228
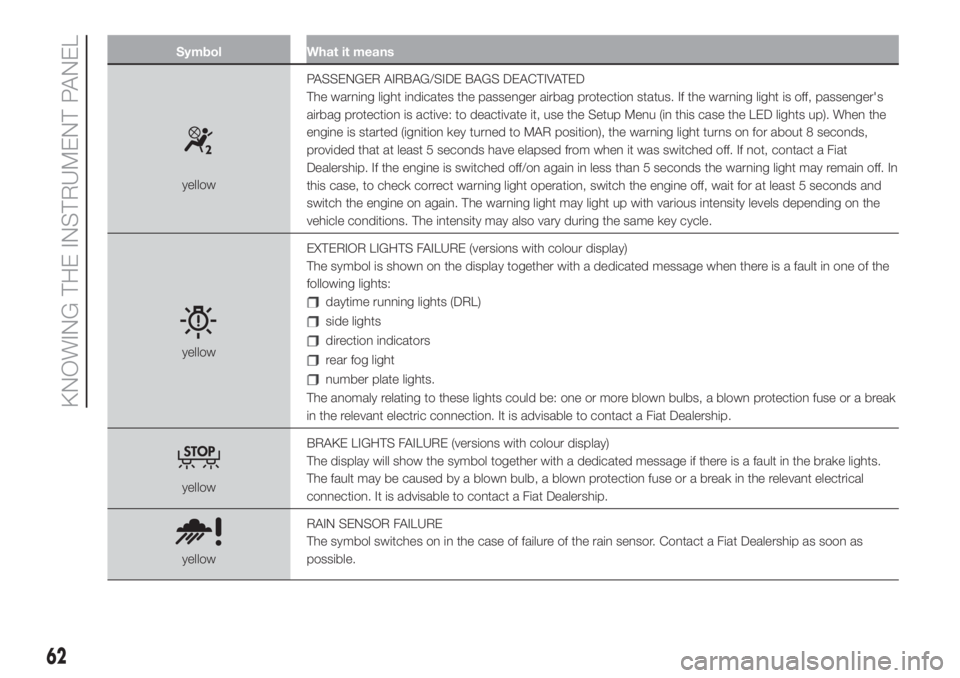
Symbol What it means
yellowPASSENGER AIRBAG/SIDE BAGS DEACTIVATED
The warning light indicates the passenger airbag protection status. If the warning light is off, passenger's
airbag protection is active: to deactivate it, use the Setup Menu (in this case the LED lights up). When the
engine is started (ignition key turned to MAR position), the warning light turns on for about 8 seconds,
provided that at least 5 seconds have elapsed from when it was switched off. If not, contact a Fiat
Dealership. If the engine is switched off/on again in less than 5 seconds the warning light may remain off. In
this case, to check correct warning light operation, switch the engine off, wait for at least 5 seconds and
switch the engine on again. The warning light may light up with various intensity levels depending on the
vehicle conditions. The intensity may also vary during the same key cycle.
yellowEXTERIOR LIGHTS FAILURE (versions with colour display)
The symbol is shown on the display together with a dedicated message when there is a fault in one of the
following lights:
daytime running lights (DRL)
side lights
direction indicators
rear fog light
number plate lights.
The anomaly relating to these lights could be: one or more blown bulbs, a blown protection fuse or a break
in the relevant electric connection. It is advisable to contact a Fiat Dealership.
yellowBRAKE LIGHTS FAILURE (versions with colour display)
The display will show the symbol together with a dedicated message if there is a fault in the brake lights.
The fault may be caused by a blown bulb, a blown protection fuse or a break in the relevant electrical
connection. It is advisable to contact a Fiat Dealership.
yellowRAIN SENSOR FAILURE
The symbol switches on in the case of failure of the rain sensor. Contact a Fiat Dealership as soon as
possible.
62
KNOWING THE INSTRUMENT PANEL
Page 65 of 228
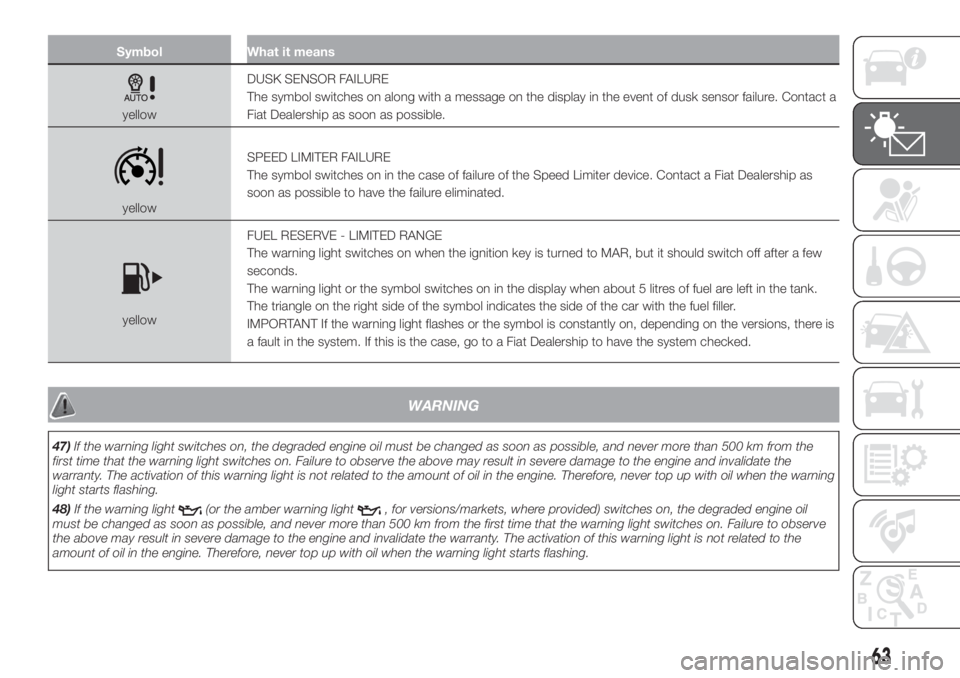
Symbol What it means
yellowDUSK SENSOR FAILURE
The symbol switches on along with a message on the display in the event of dusk sensor failure. Contact a
Fiat Dealership as soon as possible.
yellowSPEED LIMITER FAILURE
The symbol switches on in the case of failure of the Speed Limiter device. Contact a Fiat Dealership as
soon as possible to have the failure eliminated.
yellowFUEL RESERVE - LIMITED RANGE
The warning light switches on when the ignition key is turned to MAR, but it should switch off after a few
seconds.
The warning light or the symbol switches on in the display when about 5 litres of fuel are left in the tank.
The triangle on the right side of the symbol indicates the side of the car with the fuel filler.
IMPORTANT If the warning light flashes or the symbol is constantly on, depending on the versions, there is
a fault in the system. If this is the case, go to a Fiat Dealership to have the system checked.
WARNING
47)If the warning light switches on, the degraded engine oil must be changed as soon as possible, and never more than 500 km from the
first time that the warning light switches on. Failure to observe the above may result in severe damage to the engine and invalidate the
warranty. The activation of this warning light is not related to the amount of oil in the engine. Therefore, never top up with oil when the warning
light starts flashing.
48)If the warning light
(or the amber warning light, for versions/markets, where provided) switches on, the degraded engine oil
must be changed as soon as possible, and never more than 500 km from the first time that the warning light switches on. Failure to observe
the above may result in severe damage to the engine and invalidate the warranty. The activation of this warning light is not related to the
amount of oil in the engine. Therefore, never top up with oil when the warning light starts flashing.
63
Page 74 of 228
DRIVING
ASSISTANCE
SYSTEMS
iTPMS System (indirect
Tyre Pressure
Monitoring System)
77) 78) 79) 80) 81) 82)
DESCRIPTION
The vehicle can be equipped with the
iTPMS (indirect Tyre Pressure
Monitoring System) which monitors the
tyre inflation status thanks to wheel
speed sensors.
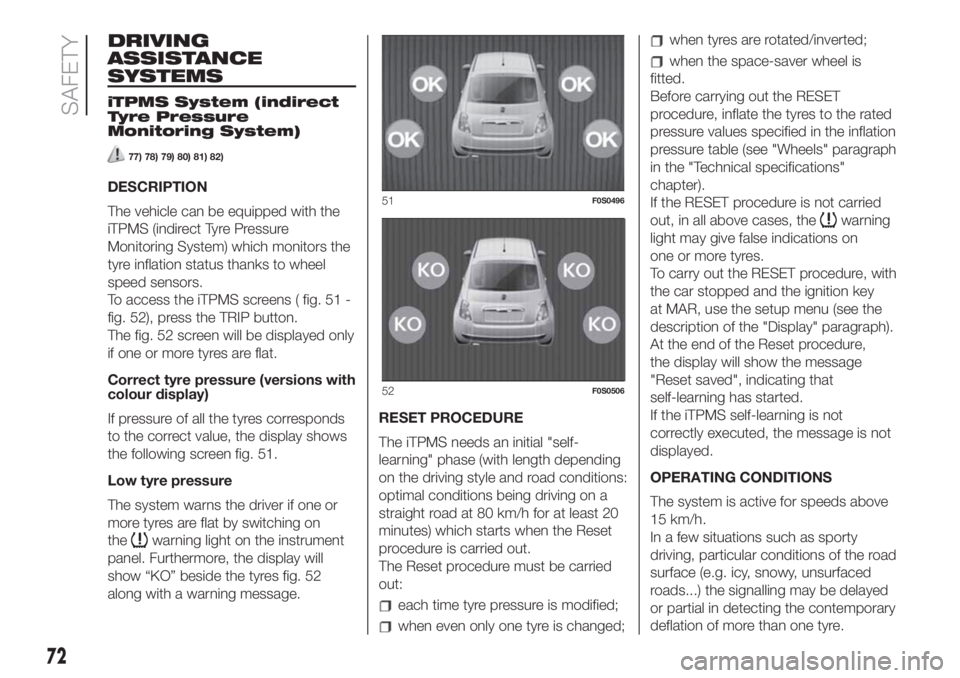
To access the iTPMS screens ( fig. 51 -
fig. 52), press the TRIP button.
The fig. 52 screen will be displayed only
if one or more tyres are flat.
Correct tyre pressure (versions with
colour display)
If pressure of all the tyres corresponds
to the correct value, the display shows
the following screen fig. 51.
Low tyre pressure
The system warns the driver if one or
more tyres are flat by switching on
the
warning light on the instrument
panel. Furthermore, the display will
show “KO” beside the tyres fig. 52
along with a warning message.RESET PROCEDURE
The iTPMS needs an initial "self-
learning" phase (with length depending
on the driving style and road conditions:
optimal conditions being driving on a
straight road at 80 km/h for at least 20
minutes) which starts when the Reset
procedure is carried out.
The Reset procedure must be carried
out:
each time tyre pressure is modified;
when even only one tyre is changed;
when tyres are rotated/inverted;
when the space-saver wheel is
fitted.
Before carrying out the RESET
procedure, inflate the tyres to the rated
pressure values specified in the inflation
pressure table (see "Wheels" paragraph
in the "Technical specifications"
chapter).
If the RESET procedure is not carried
out, in all above cases, the
warning
light may give false indications on
one or more tyres.
To carry out the RESET procedure, with
the car stopped and the ignition key
at MAR, use the setup menu (see the
description of the "Display" paragraph).
At the end of the Reset procedure,
the display will show the message
"Reset saved", indicating that
self-learning has started.
If the iTPMS self-learning is not
correctly executed, the message is not
displayed.
OPERATING CONDITIONS
The system is active for speeds above
15 km/h.
In a few situations such as sporty
driving, particular conditions of the road
surface (e.g. icy, snowy, unsurfaced
roads...) the signalling may be delayed
or partial in detecting the contemporary
deflation of more than one tyre.
51F0S0496
52F0S0506
72
SAFETY
Page 98 of 228
STARTING AND DRIVING
Let’s get to the "heart" of the vehicle:
seeing how you can exploit all of its
potential to the full.
We’ll look at how to drive it safely in any
situation, so that it can be a welcome
companion, with our comfort and
our wallets in mind.STARTING THE ENGINE ................. 97
PARKING THE VEHICLE ................. 98
MANUAL TRANSMISSION .............. 99
DUALOGIC TRANSMISSION...........100
DUALDRIVE ELECTRIC POWER
STEERING ......................................101
START&STOP SYSTEM ..................102
SPEED LIMITER ..............................103
ELECTRONIC CRUISE CONTROL ..105
PARKING SENSORS.......................106
SUGGESTIONS FOR DRIVING........108
REFUELLING THE VEHICLE ...........109
TOWING TRAILERS ........................112
96
STARTING AND DRIVING