ignition FIAT 500 2020 Owner handbook (in English)
[x] Cancel search | Manufacturer: FIAT, Model Year: 2020, Model line: 500, Model: FIAT 500 2020Pages: 228, PDF Size: 6.01 MB
Page 23 of 228
“Smart washing” function
Pull the stalk towards the steering
wheel (unstable position) to operate the
windscreen washer.
Keep the lever pulled to activate both
the windscreen washer jet and the
windscreen wiper with a single
movement; the latter turns on
automatically if you keep the lever
pulled for more than half a second.
The operation of the windscreen wiper
terminates several strokes after the
stalk is released; a final cleaning stroke
several seconds later completes the
wiping operation.
REAR WINDOW WIPER /
WASHER
8)
This operates only with the ignition key
turned to MAR.
Rear Window Wiper
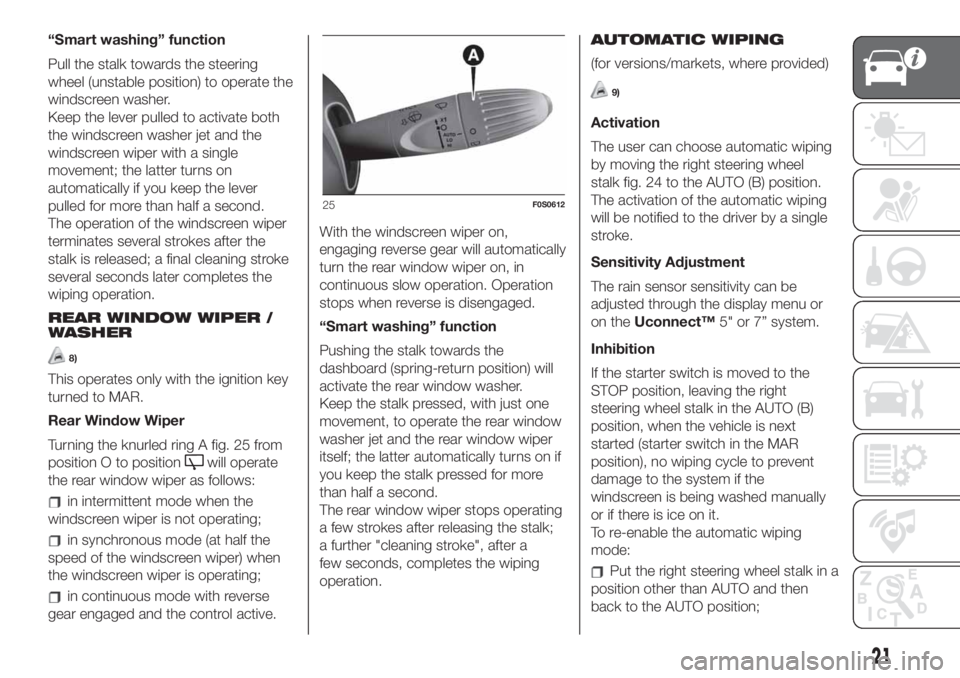
Turning the knurled ring A fig. 25 from
position O to position
will operate
the rear window wiper as follows:
in intermittent mode when the
windscreen wiper is not operating;
in synchronous mode (at half the
speed of the windscreen wiper) when
the windscreen wiper is operating;
in continuous mode with reverse
gear engaged and the control active.With the windscreen wiper on,
engaging reverse gear will automatically
turn the rear window wiper on, in
continuous slow operation. Operation
stops when reverse is disengaged.
“Smart washing” function
Pushing the stalk towards the
dashboard (spring-return position) will
activate the rear window washer.
Keep the stalk pressed, with just one
movement, to operate the rear window
washer jet and the rear window wiper
itself; the latter automatically turns on if
you keep the stalk pressed for more
than half a second.
The rear window wiper stops operating
a few strokes after releasing the stalk;
a further "cleaning stroke", after a
few seconds, completes the wiping
operation.AUTOMATIC WIPING
(for versions/markets, where provided)
9)
Activation
The user can choose automatic wiping
by moving the right steering wheel
stalk fig. 24 to the AUTO (B) position.
The activation of the automatic wiping
will be notified to the driver by a single
stroke.
Sensitivity Adjustment
The rain sensor sensitivity can be
adjusted through the display menu or
on theUconnect™5" or 7” system.
Inhibition
If the starter switch is moved to the
STOP position, leaving the right
steering wheel stalk in the AUTO (B)
position, when the vehicle is next
started (starter switch in the MAR
position), no wiping cycle to prevent
damage to the system if the
windscreen is being washed manually
or if there is ice on it.
To re-enable the automatic wiping
mode:
Put the right steering wheel stalk in a
position other than AUTO and then
back to the AUTO position;
25F0S0612
21
Page 29 of 228
WARNING
10)Never use R12 or R134a coolant,
which is not compatible with climate
control system components.
ELECTRIC WINDOWS
20) 21)
These operate when the ignition key is
turned to MAR and for about two
minutes after turning the key to STOP
or removing it.
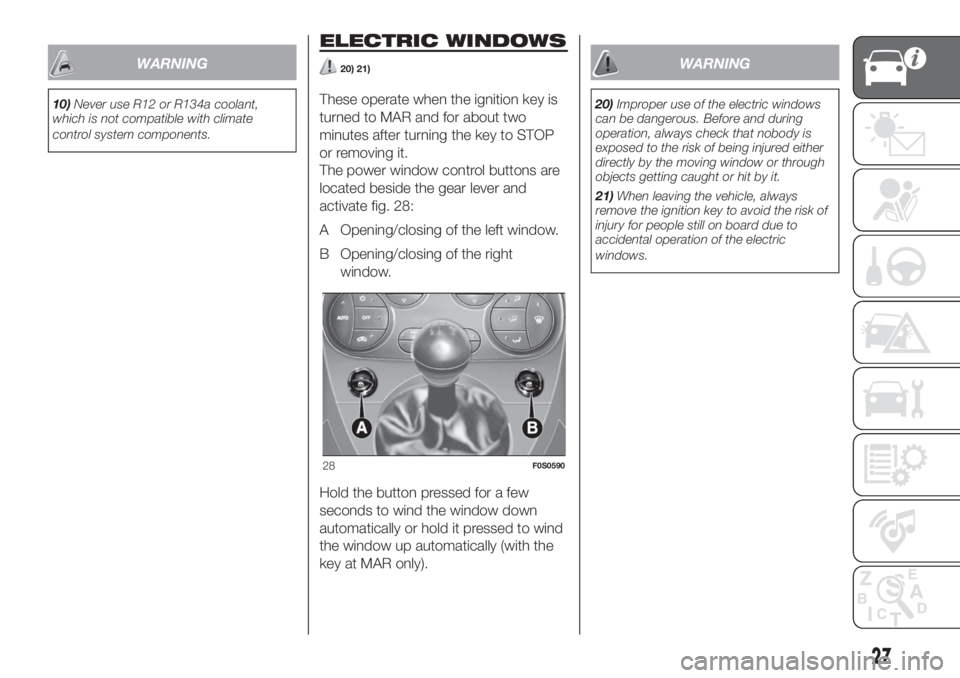
The power window control buttons are
located beside the gear lever and
activate fig. 28:
A Opening/closing of the left window.
B Opening/closing of the right
window.
Hold the button pressed for a few
seconds to wind the window down
automatically or hold it pressed to wind
the window up automatically (with the
key at MAR only).
WARNING
20)Improper use of the electric windows
can be dangerous. Before and during
operation, always check that nobody is
exposed to the risk of being injured either
directly by the moving window or through
objects getting caught or hit by it.
21)When leaving the vehicle, always
remove the ignition key to avoid the risk of
injury for people still on board due to
accidental operation of the electric
windows.
28F0S0590
27
Page 31 of 228
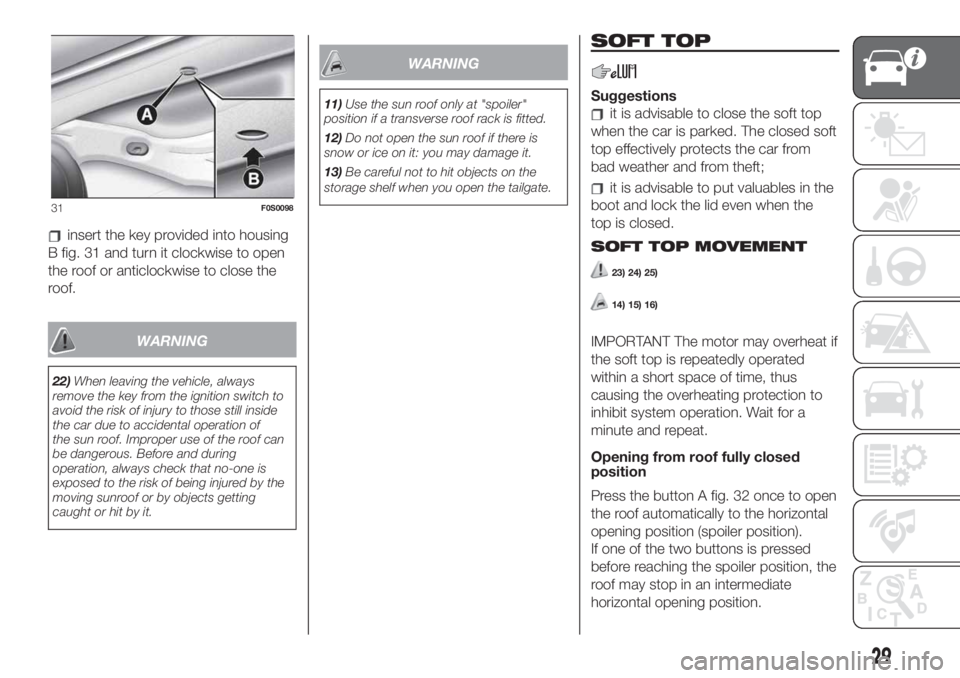
insert the key provided into housing
B fig. 31 and turn it clockwise to open
the roof or anticlockwise to close the
roof.
WARNING
22)When leaving the vehicle, always
remove the key from the ignition switch to
avoid the risk of injury to those still inside
the car due to accidental operation of
the sun roof. Improper use of the roof can
be dangerous. Before and during
operation, always check that no-one is
exposed to the risk of being injured by the
moving sunroof or by objects getting
caught or hit by it.
WARNING
11)Use the sun roof only at "spoiler"
position if a transverse roof rack is fitted.
12)Do not open the sun roof if there is
snow or ice on it: you may damage it.
13)Be careful not to hit objects on the
storage shelf when you open the tailgate.
SOFT TOP
Suggestions
it is advisable to close the soft top
when the car is parked. The closed soft
top effectively protects the car from
bad weather and from theft;
it is advisable to put valuables in the
boot and lock the lid even when the
top is closed.
SOFT TOP MOVEMENT
23) 24) 25)
14) 15) 16)
IMPORTANT The motor may overheat if
the soft top is repeatedly operated
within a short space of time, thus
causing the overheating protection to
inhibit system operation. Wait for a
minute and repeat.
Opening from roof fully closed
position
Press the button A fig. 32 once to open
the roof automatically to the horizontal
opening position (spoiler position).
If one of the two buttons is pressed
before reaching the spoiler position, the
roof may stop in an intermediate
horizontal opening position.
31F0S0098
29
Page 34 of 228
When the procedure is terminated, the
soft top will automatically carry out a
complete opening and closing cycle (up
to 25 cm from the completely closed
position) to inform the driver that
correct operation has been restored.
WIND STOP
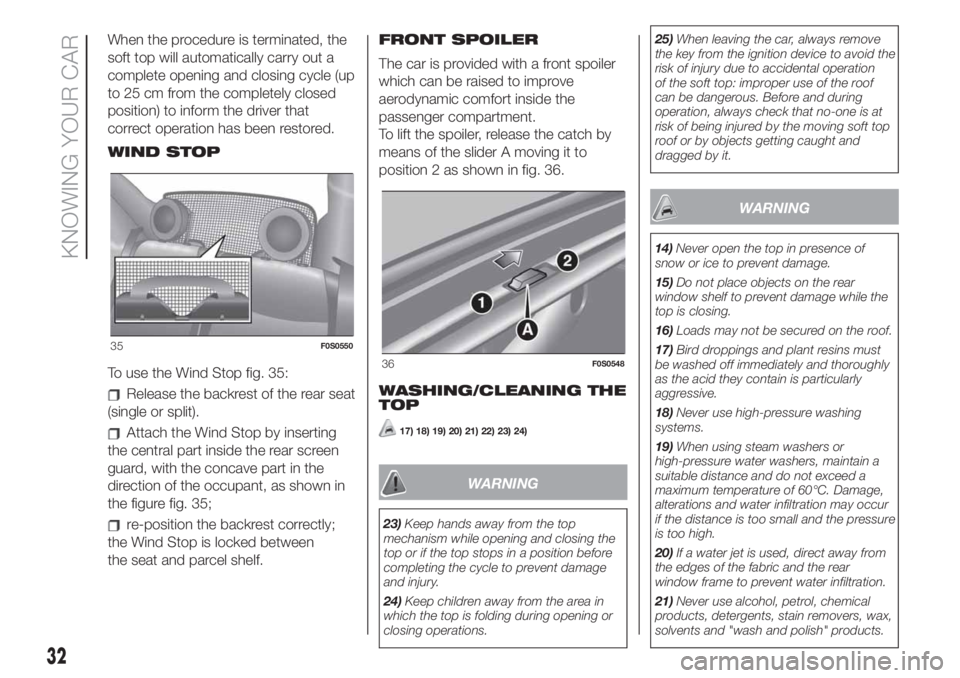
To use the Wind Stop fig. 35:
Release the backrest of the rear seat
(single or split).
Attach the Wind Stop by inserting
the central part inside the rear screen
guard, with the concave part in the
direction of the occupant, as shown in
the figure fig. 35;
re-position the backrest correctly;
the Wind Stop is locked between
the seat and parcel shelf.FRONT SPOILER
The car is provided with a front spoiler
which can be raised to improve
aerodynamic comfort inside the
passenger compartment.
To lift the spoiler, release the catch by
means of the slider A moving it to
position 2 as shown in fig. 36.
WASHING/CLEANING THE
TOP
17) 18) 19) 20) 21) 22) 23) 24)
WARNING
23)Keep hands away from the top
mechanism while opening and closing the
top or if the top stops in a position before
completing the cycle to prevent damage
and injury.
24)Keep children away from the area in
which the top is folding during opening or
closing operations.25)When leaving the car, always remove
the key from the ignition device to avoid the
risk of injury due to accidental operation
of the soft top: improper use of the roof
can be dangerous. Before and during
operation, always check that no-one is at
risk of being injured by the moving soft top
roof or by objects getting caught and
dragged by it.
WARNING
14)Never open the top in presence of
snow or ice to prevent damage.
15)Do not place objects on the rear
window shelf to prevent damage while the
top is closing.
16)Loads may not be secured on the roof.
17)Bird droppings and plant resins must
be washed off immediately and thoroughly
as the acid they contain is particularly
aggressive.
18)Never use high-pressure washing
systems.
19)When using steam washers or
high-pressure water washers, maintain a
suitable distance and do not exceed a
maximum temperature of 60°C. Damage,
alterations and water infiltration may occur
if the distance is too small and the pressure
is too high.
20)If a water jet is used, direct away from
the edges of the fabric and the rear
window frame to prevent water infiltration.
21)Never use alcohol, petrol, chemical
products, detergents, stain removers, wax,
solvents and "wash and polish" products.
35F0S0550
36F0S0548
32
KNOWING YOUR CAR
Page 35 of 228
22)Rinse immediately to remove soap to
prevent stains and halos. Repeat the
operation if needed.
23)Rinse immediately, and repeat this
operation if necessary. If you choose to
waterproof the soft top, strictly follow the
instructions on the package of the
waterproofing product you have selected in
order to obtain optimal results.
24)The rubber seals on the soft top must
be cleaned exclusively with water. If you
notice that this trim is dry or is sticking,
apply talcum powder or products
specifically for rubber trim (silicone spray).LUGGAGE
COMPARTMENT
26) 27) 28)
ELECTRIC HANDLE
(SOFT TOUCH)
The tailgate can be opened at any time
if the doors are unlocked.
To open it, enable the handle, opening
one of the front doors or unlocking
the doors with the remote control or
using the key without remote control.
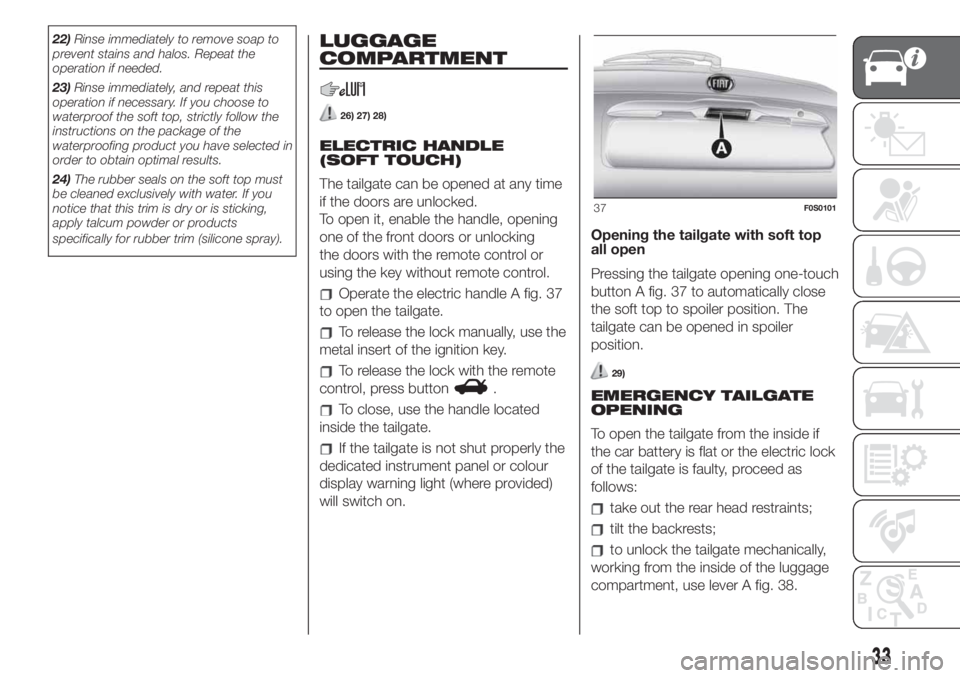
Operate the electric handle A fig. 37
to open the tailgate.
To release the lock manually, use the
metal insert of the ignition key.
To release the lock with the remote
control, press button
.
To close, use the handle located
inside the tailgate.
If the tailgate is not shut properly the
dedicated instrument panel or colour
display warning light (where provided)
will switch on.Opening the tailgate with soft top
all open
Pressing the tailgate opening one-touch
button A fig. 37 to automatically close
the soft top to spoiler position. The
tailgate can be opened in spoiler
position.
29)
EMERGENCY TAILGATE
OPENING
To open the tailgate from the inside if
the car battery is flat or the electric lock
of the tailgate is faulty, proceed as
follows:
take out the rear head restraints;
tilt the backrests;
to unlock the tailgate mechanically,
working from the inside of the luggage
compartment, use lever A fig. 38.
37F0S0101
33
Page 39 of 228
IMPORTANT If the ignition key is turned
to MAR, all the device LEDs will stay
on for approximately 4 seconds (check
function).
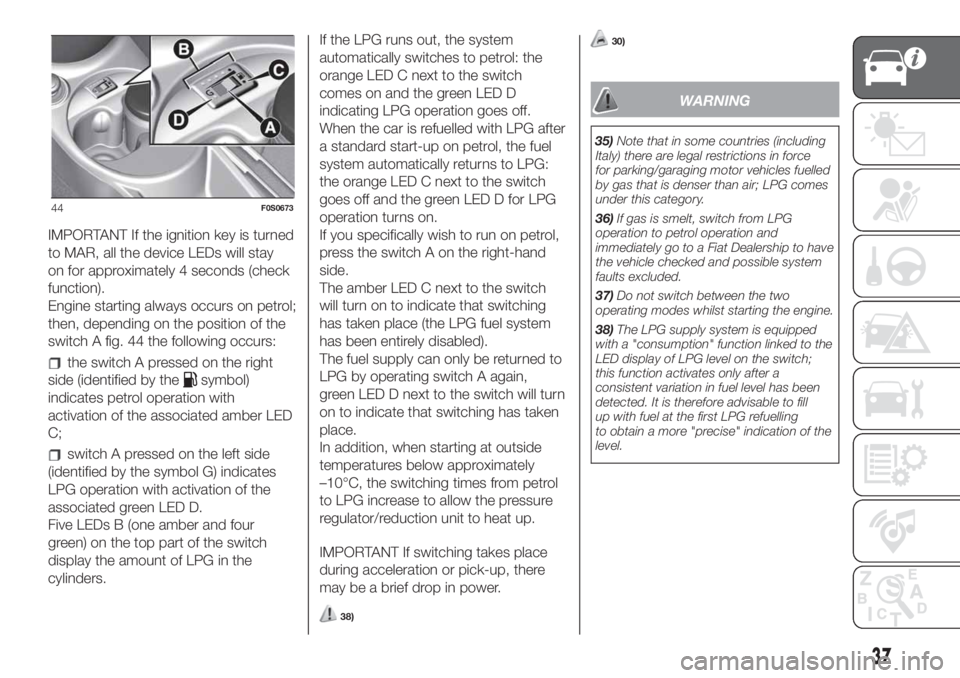
Engine starting always occurs on petrol;
then, depending on the position of the
switch A fig. 44 the following occurs:
the switch A pressed on the right
side (identified by the
symbol)
indicates petrol operation with
activation of the associated amber LED
C;
switch A pressed on the left side
(identified by the symbol G) indicates
LPG operation with activation of the
associated green LED D.
Five LEDs B (one amber and four
green) on the top part of the switch
display the amount of LPG in the
cylinders.If the LPG runs out, the system
automatically switches to petrol: the
orange LED C next to the switch
comes on and the green LED D
indicating LPG operation goes off.
When the car is refuelled with LPG after
a standard start-up on petrol, the fuel
system automatically returns to LPG:
the orange LED C next to the switch
goes off and the green LED D for LPG
operation turns on.
If you specifically wish to run on petrol,
press the switch A on the right-hand
side.
The amber LED C next to the switch
will turn on to indicate that switching
has taken place (the LPG fuel system
has been entirely disabled).
The fuel supply can only be returned to
LPG by operating switch A again,
green LED D next to the switch will turn
on to indicate that switching has taken
place.
In addition, when starting at outside
temperatures below approximately
–10°C, the switching times from petrol
to LPG increase to allow the pressure
regulator/reduction unit to heat up.
IMPORTANT If switching takes place
during acceleration or pick-up, there
may be a brief drop in power.
38)
30)
WARNING
35)Note that in some countries (including
Italy) there are legal restrictions in force
for parking/garaging motor vehicles fuelled
by gas that is denser than air; LPG comes
under this category.
36)If gas is smelt, switch from LPG
operation to petrol operation and
immediately go to a Fiat Dealership to have
the vehicle checked and possible system
faults excluded.
37)Do not switch between the two
operating modes whilst starting the engine.
38)The LPG supply system is equipped
with a "consumption" function linked to the
LED display of LPG level on the switch;
this function activates only after a
consistent variation in fuel level has been
detected. It is therefore advisable to fill
up with fuel at the first LPG refuelling
to obtain a more "precise" indication of the
level.
44F0S0673
37
Page 46 of 228
To consult the information, proceed as
follows:
press the MENU button: the
display shows when servicing is due in
km/mi or days (where provided)
according to the previous setting (see
paragraph "Units of measurement");
press the MENU buttonto
return to the menu screen; press the
button again to return to the standard
screen.
IMPORTANT The "Scheduled Servicing
Plan" includes car maintenance at
fixed intervals (refer to the "Maintenance
and care" chapter).
This is displayed automatically, with
ignition key at MAR-ON, 2000 km (or
equivalent value in miles) before
servicing or, where provided, 30 days
before servicing. It is also displayed
each time the key is turned to MAR-ON
or, for versions/markets, where
provided, every 200 km (or equivalent
value in miles). Below this threshold
servicing indications are more frequent.The display will be in km or miles
according to the unit of measurement
set. When the next scheduled servicing
is approaching, the word “Service”
will appear on the display, followed by
the number of kilometres/miles or
days (where provided) left, when the
key is turned to MAR. Go to a Fiat
Dealership, where the "Service
Schedule" operations will be performed
and the message will be reset.
Airbag/Passenger airbag
(Activation/deactivation of
passenger side front airbag and
side bag for pelvis, chest and
shoulder protection) - for versions/
markets, where provided
This function is used to activate/
deactivate the front passenger airbag.
Proceed as follows:
press the MENUbutton and,
after the displaying of the message
“Bag pass: Off) (to deactivate) or the
message (Passenger Bag: On” (to
activate) through the pressing of the+
and–buttons, press the MENU
button again;
a confirmation request message will
appear on the display;
press the+or–buttons to select
“Yes” (to confirm enable/disable) or
“No” (to abort);
briefly press the MENU button,
a message confirming the selection
will be displayed and you will return to
the menu screen or, pressing the button
for longer, you will return to the
standard screen without saving.
Tyre reset (iTPMS reset)
(For versions/markets, where provided)
With this function it is possible to reset
the iTPMS (see paragraph “iTPMS”).
To carry out the Reset procedure
proceed as follows:
briefly press the MENU button,
the display will show “Reset”;
press the+or–button to select
(“Yes” or “No”);
briefly press the MENU button,
the display will show “Confirm”;
press button+or–to select ("Yes"
to reset or "No" to exit the video page).
A message confirming the successful
Reset will be displayed;
press the MENU buttonagain
to return to the standard screen or
to the main menu according to where
you are in the menu.
44
KNOWING THE INSTRUMENT PANEL
Page 47 of 228
HEADLIGHT ALIGNMENT
With the ignition key at MAR and
dipped beam headlights on, press the –
button to adjust the headlights
upwards and the button to adjust the
headlights downwards.TRIP COMPUTER
GENERAL INFORMATION
The Trip computer is used to display
information on car operation when the
ignition key is turned to MAR.
This function allows you to define two
separate trips, called “Trip A” and
“Trip B”, for monitoring the car's
"complete mission" (journey) in a
reciprocally independent manner and,
for versions/markets where provided,
"Instant info" and "Best average
consumption".
Both Trip A and Trip B can be zeroed
(reset - start of a new journey).
“Trip A”can be used to display the
values relating to:
Range (for versions/markets, where
provided)
Distance travelled A
Average consumption A
Instant consumption (for versions/
markets, where provided)
Average speed A
Travel time A (driving time)
“Trip B”may be used to display the
figures relating to:
Distance travelled B
Average consumption B
Average speed B
Travel time B (driving time)
NOTE The “Trip B” function may be
excluded. "Range" and "Instant
consumption" values cannot be reset.
“Best average consumption": in ECO
mode, displays a screen summarising
the best average consumption (where
provided).
The
icon indicates the best
performance. This information can be
reset by resetting Trip A.
45
Page 49 of 228
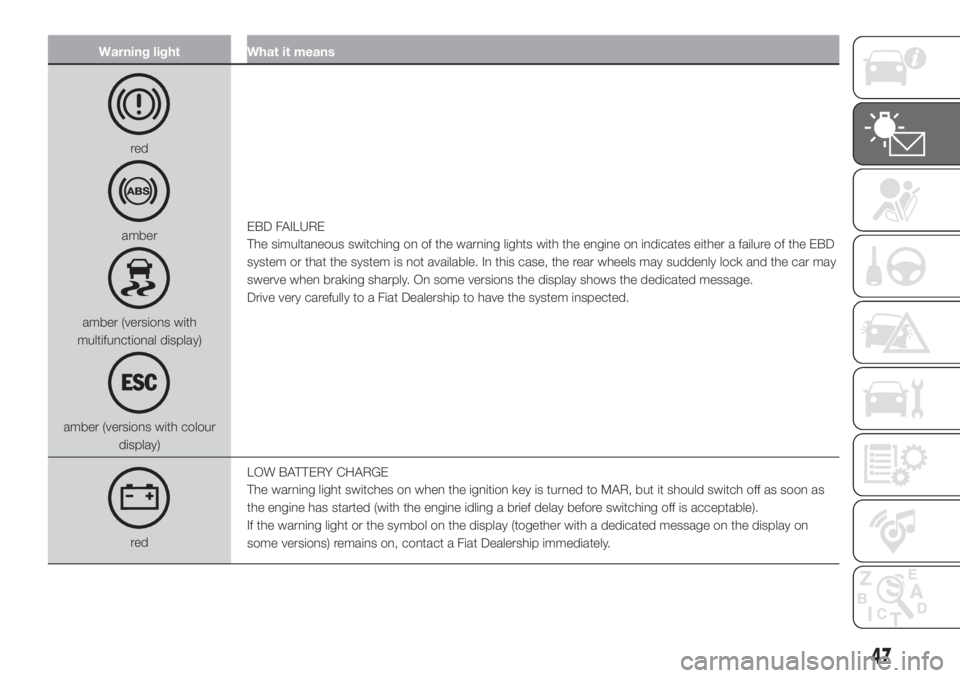
Warning light What it means
red
amber
amber (versions with
multifunctional display)
amber (versions with colour
display)EBD FAILURE
The simultaneous switching on of the warning lights with the engine on indicates either a failure of the EBD
system or that the system is not available. In this case, the rear wheels may suddenly lock and the car may
swerve when braking sharply. On some versions the display shows the dedicated message.
Drive very carefully to a Fiat Dealership to have the system inspected.
redLOW BATTERY CHARGE
The warning light switches on when the ignition key is turned to MAR, but it should switch off as soon as
the engine has started (with the engine idling a brief delay before switching off is acceptable).
If the warning light or the symbol on the display (together with a dedicated message on the display on
some versions) remains on, contact a Fiat Dealership immediately.
47
Page 50 of 228
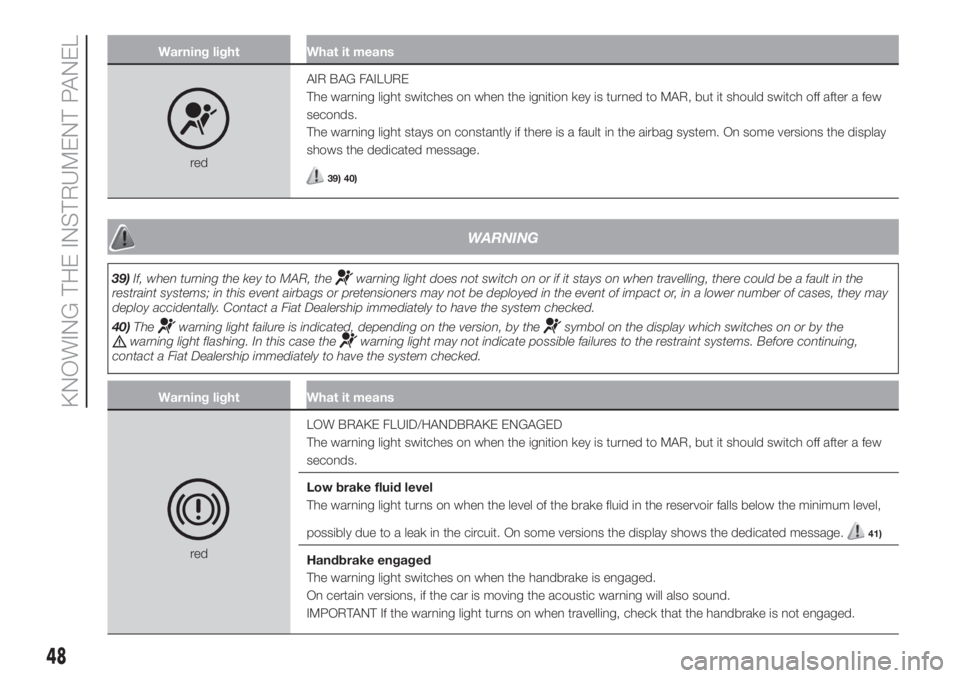
Warning light What it means
redAIR BAG FAILURE
The warning light switches on when the ignition key is turned to MAR, but it should switch off after a few
seconds.
The warning light stays on constantly if there is a fault in the airbag system. On some versions the display
shows the dedicated message.39) 40)
WARNING
39)If, when turning the key to MAR, thewarning light does not switch on or if it stays on when travelling, there could be a fault in the
restraint systems; in this event airbags or pretensioners may not be deployed in the event of impact or, in a lower number of cases, they may
deploy accidentally. Contact a Fiat Dealership immediately to have the system checked.
40)The
warning light failure is indicated, depending on the version, by thesymbol on the display which switches on or by thewarning light flashing. In this case thewarning light may not indicate possible failures to the restraint systems. Before continuing,
contact a Fiat Dealership immediately to have the system checked.
Warning light What it means
redLOW BRAKE FLUID/HANDBRAKE ENGAGED
The warning light switches on when the ignition key is turned to MAR, but it should switch off after a few
seconds.
Low brake fluid level
The warning light turns on when the level of the brake fluid in the reservoir falls below the minimum level,
possibly due to a leak in the circuit. On some versions the display shows the dedicated message.
41)
Handbrake engaged
The warning light switches on when the handbrake is engaged.
On certain versions, if the car is moving the acoustic warning will also sound.
IMPORTANT If the warning light turns on when travelling, check that the handbrake is not engaged.
48
KNOWING THE INSTRUMENT PANEL