light FIAT 500 2020 Owner handbook (in English)
[x] Cancel search | Manufacturer: FIAT, Model Year: 2020, Model line: 500, Model: FIAT 500 2020Pages: 228, PDF Size: 6.01 MB
Page 22 of 228
INTERIOR LIGHTS
FRONT CEILING LIGHT
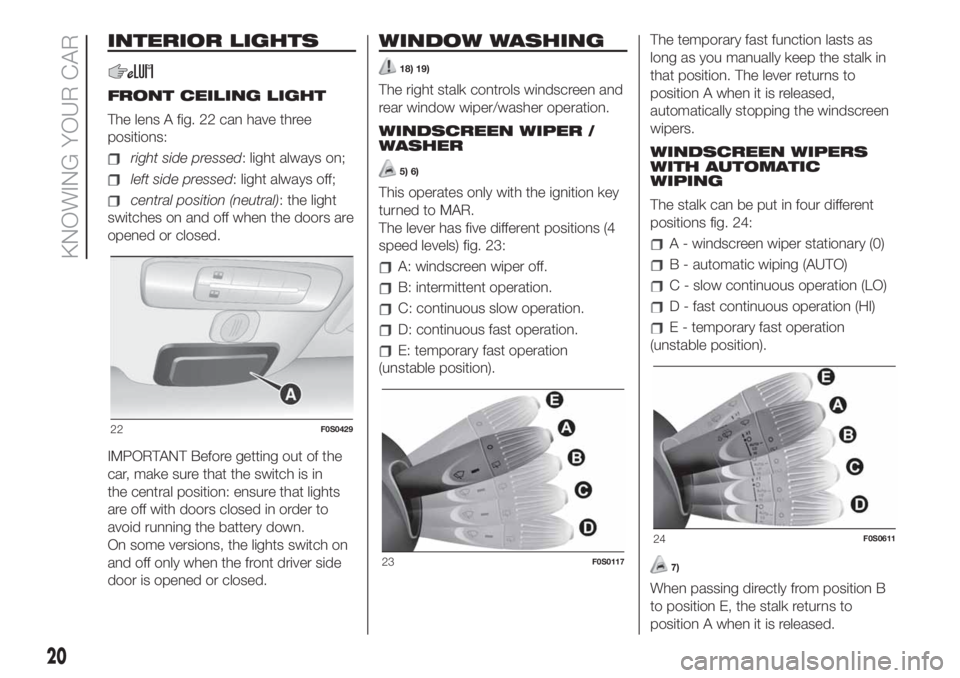
The lens A fig. 22 can have three
positions:
right side pressed: light always on;
left side pressed: light always off;
central position (neutral): the light
switches on and off when the doors are
opened or closed.
IMPORTANT Before getting out of the
car, make sure that the switch is in
the central position: ensure that lights
are off with doors closed in order to
avoid running the battery down.
On some versions, the lights switch on
and off only when the front driver side
door is opened or closed.
WINDOW WASHING
18) 19)
The right stalk controls windscreen and
rear window wiper/washer operation.
WINDSCREEN WIPER /
WASHER
5) 6)
This operates only with the ignition key
turned to MAR.
The lever has five different positions (4
speed levels) fig. 23:
A: windscreen wiper off.
B: intermittent operation.
C: continuous slow operation.
D: continuous fast operation.
E: temporary fast operation
(unstable position).The temporary fast function lasts as
long as you manually keep the stalk in
that position. The lever returns to
position A when it is released,
automatically stopping the windscreen
wipers.
WINDSCREEN WIPERS
WITH AUTOMATIC
WIPING
The stalk can be put in four different
positions fig. 24:
A - windscreen wiper stationary (0)
B - automatic wiping (AUTO)
C - slow continuous operation (LO)
D - fast continuous operation (HI)
E - temporary fast operation
(unstable position).
7)
When passing directly from position B
to position E, the stalk returns to
position A when it is released.
22F0S0429
23F0S0117
24F0S0611
20
KNOWING YOUR CAR
Page 28 of 228
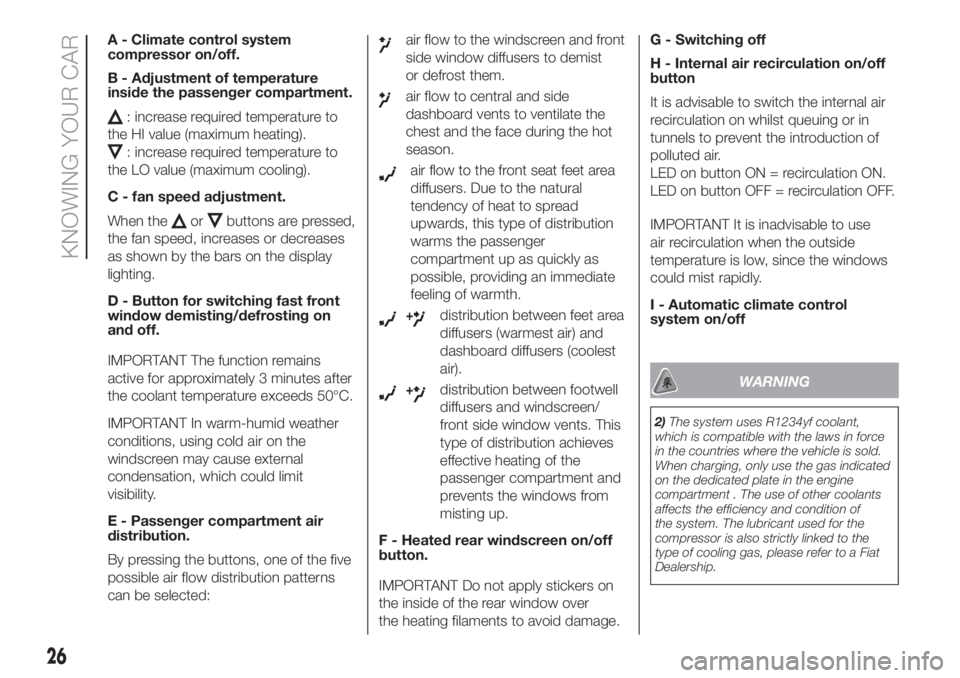
A - Climate control system
compressor on/off.
B - Adjustment of temperature
inside the passenger compartment.
: increase required temperature to
the HI value (maximum heating).
: increase required temperature to
the LO value (maximum cooling).
C - fan speed adjustment.
When the
orbuttons are pressed,
the fan speed, increases or decreases
as shown by the bars on the display
lighting.
D - Button for switching fast front
window demisting/defrosting on
and off.
IMPORTANT The function remains
active for approximately 3 minutes after
the coolant temperature exceeds 50°C.
IMPORTANT In warm-humid weather
conditions, using cold air on the
windscreen may cause external
condensation, which could limit
visibility.
E - Passenger compartment air
distribution.
By pressing the buttons, one of the five
possible air flow distribution patterns
can be selected:
air flow to the windscreen and front
side window diffusers to demist
or defrost them.
air flow to central and side
dashboard vents to ventilate the
chest and the face during the hot
season.
air flow to the front seat feet area
diffusers. Due to the natural
tendency of heat to spread
upwards, this type of distribution
warms the passenger
compartment up as quickly as
possible, providing an immediate
feeling of warmth.
+distribution between feet area
diffusers (warmest air) and
dashboard diffusers (coolest
air).
+distribution between footwell
diffusers and windscreen/
front side window vents. This
type of distribution achieves
effective heating of the
passenger compartment and
prevents the windows from
misting up.
F - Heated rear windscreen on/off
button.
IMPORTANT Do not apply stickers on
the inside of the rear window over
the heating filaments to avoid damage.G - Switching off
H - Internal air recirculation on/off
button
It is advisable to switch the internal air
recirculation on whilst queuing or in
tunnels to prevent the introduction of
polluted air.
LED on button ON = recirculation ON.
LED on button OFF = recirculation OFF.
IMPORTANT It is inadvisable to use
air recirculation when the outside
temperature is low, since the windows
could mist rapidly.
I - Automatic climate control
system on/offWARNING
2)The system uses R1234yf coolant,
which is compatible with the laws in force
in the countries where the vehicle is sold.
When charging, only use the gas indicated
on the dedicated plate in the engine
compartment . The use of other coolants
affects the efficiency and condition of
the system. The lubricant used for the
compressor is also strictly linked to the
type of cooling gas, please refer to a Fiat
Dealership.
26
KNOWING YOUR CAR
Page 30 of 228
ROOF
FIXED GLASS SUNROOF
(for versions/markets, where provided)
The roof comprises a wide fixed glass
panel and a manually-operated sun
blind. The blind can be used in the "all
closed" or "all open" positions.
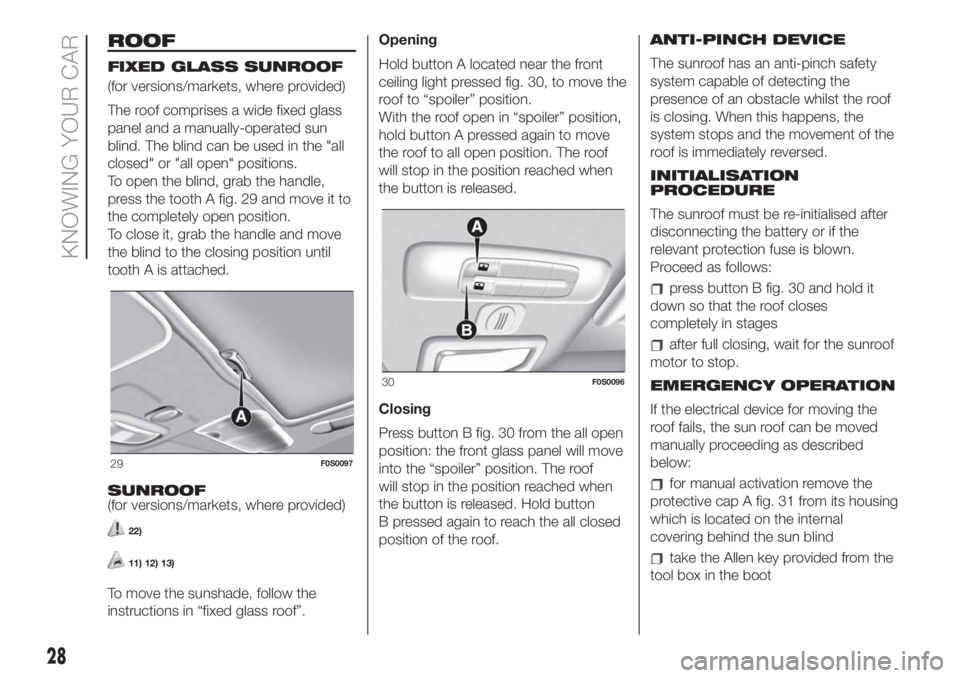
To open the blind, grab the handle,
press the tooth A fig. 29 and move it to
the completely open position.
To close it, grab the handle and move
the blind to the closing position until
tooth A is attached.
SUNROOF
(for versions/markets, where provided)
22)
11) 12) 13)
To move the sunshade, follow the
instructions in “fixed glass roof”.Opening
Hold button A located near the front
ceiling light pressed fig. 30, to move the
roof to “spoiler” position.
With the roof open in “spoiler” position,
hold button A pressed again to move
the roof to all open position. The roof
will stop in the position reached when
the button is released.
Closing
Press button B fig. 30 from the all open
position: the front glass panel will move
into the “spoiler” position. The roof
will stop in the position reached when
the button is released. Hold button
B pressed again to reach the all closed
position of the roof.ANTI-PINCH DEVICE
The sunroof has an anti-pinch safety
system capable of detecting the
presence of an obstacle whilst the roof
is closing. When this happens, the
system stops and the movement of the
roof is immediately reversed.
INITIALISATION
PROCEDURE
The sunroof must be re-initialised after
disconnecting the battery or if the
relevant protection fuse is blown.
Proceed as follows:
press button B fig. 30 and hold it
down so that the roof closes
completely in stages
after full closing, wait for the sunroof
motor to stop.
EMERGENCY OPERATION
If the electrical device for moving the
roof fails, the sun roof can be moved
manually proceeding as described
below:
for manual activation remove the
protective cap A fig. 31 from its housing
which is located on the internal
covering behind the sun blind
take the Allen key provided from the
tool box in the boot
29F0S0097
30F0S0096
28
KNOWING YOUR CAR
Page 33 of 228
Initial condition: from intermediate
position to top all closed
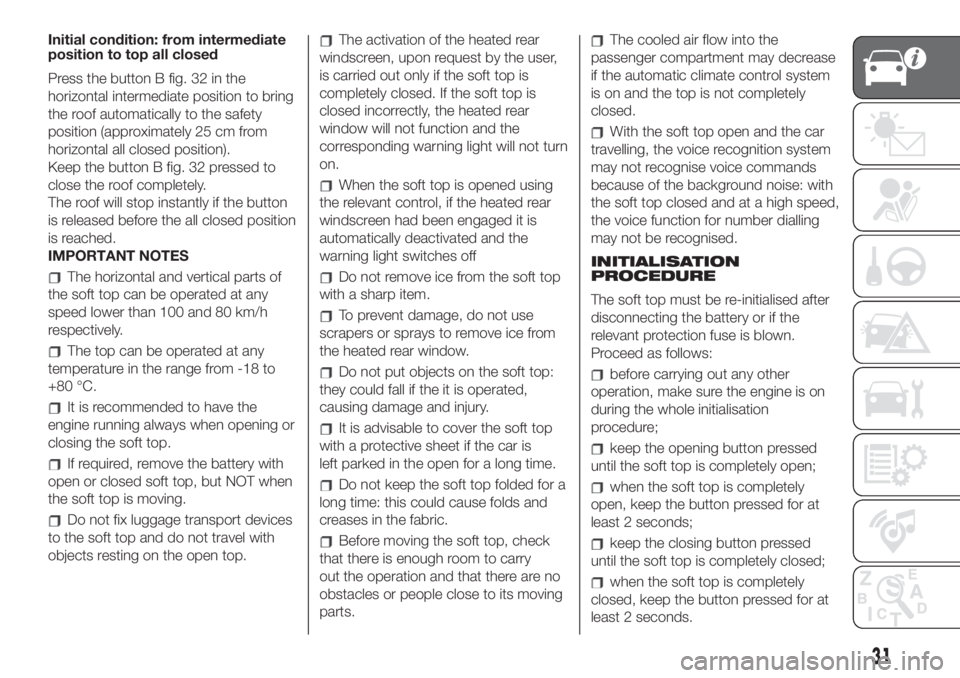
Press the button B fig. 32 in the
horizontal intermediate position to bring
the roof automatically to the safety
position (approximately 25 cm from
horizontal all closed position).
Keep the button B fig. 32 pressed to
close the roof completely.
The roof will stop instantly if the button
is released before the all closed position
is reached.
IMPORTANT NOTES
The horizontal and vertical parts of
the soft top can be operated at any
speed lower than 100 and 80 km/h
respectively.
The top can be operated at any
temperature in the range from -18 to
+80 °C.
It is recommended to have the
engine running always when opening or
closing the soft top.
If required, remove the battery with
open or closed soft top, but NOT when
the soft top is moving.
Do not fix luggage transport devices
to the soft top and do not travel with
objects resting on the open top.
The activation of the heated rear
windscreen, upon request by the user,
is carried out only if the soft top is
completely closed. If the soft top is
closed incorrectly, the heated rear
window will not function and the
corresponding warning light will not turn
on.
When the soft top is opened using
the relevant control, if the heated rear
windscreen had been engaged it is
automatically deactivated and the
warning light switches off
Do not remove ice from the soft top
with a sharp item.
To prevent damage, do not use
scrapers or sprays to remove ice from
the heated rear window.
Do not put objects on the soft top:
they could fall if the it is operated,
causing damage and injury.
It is advisable to cover the soft top
with a protective sheet if the car is
left parked in the open for a long time.
Do not keep the soft top folded for a
long time: this could cause folds and
creases in the fabric.
Before moving the soft top, check
that there is enough room to carry
out the operation and that there are no
obstacles or people close to its moving
parts.
The cooled air flow into the
passenger compartment may decrease
if the automatic climate control system
is on and the top is not completely
closed.
With the soft top open and the car
travelling, the voice recognition system
may not recognise voice commands
because of the background noise: with
the soft top closed and at a high speed,
the voice function for number dialling
may not be recognised.
INITIALISATION
PROCEDURE
The soft top must be re-initialised after
disconnecting the battery or if the
relevant protection fuse is blown.
Proceed as follows:
before carrying out any other
operation, make sure the engine is on
during the whole initialisation
procedure;
keep the opening button pressed
until the soft top is completely open;
when the soft top is completely
open, keep the button pressed for at
least 2 seconds;
keep the closing button pressed
until the soft top is completely closed;
when the soft top is completely
closed, keep the button pressed for at
least 2 seconds.
31
Page 35 of 228
22)Rinse immediately to remove soap to
prevent stains and halos. Repeat the
operation if needed.
23)Rinse immediately, and repeat this
operation if necessary. If you choose to
waterproof the soft top, strictly follow the
instructions on the package of the
waterproofing product you have selected in
order to obtain optimal results.
24)The rubber seals on the soft top must
be cleaned exclusively with water. If you
notice that this trim is dry or is sticking,
apply talcum powder or products
specifically for rubber trim (silicone spray).LUGGAGE
COMPARTMENT
26) 27) 28)
ELECTRIC HANDLE
(SOFT TOUCH)
The tailgate can be opened at any time
if the doors are unlocked.
To open it, enable the handle, opening
one of the front doors or unlocking
the doors with the remote control or
using the key without remote control.
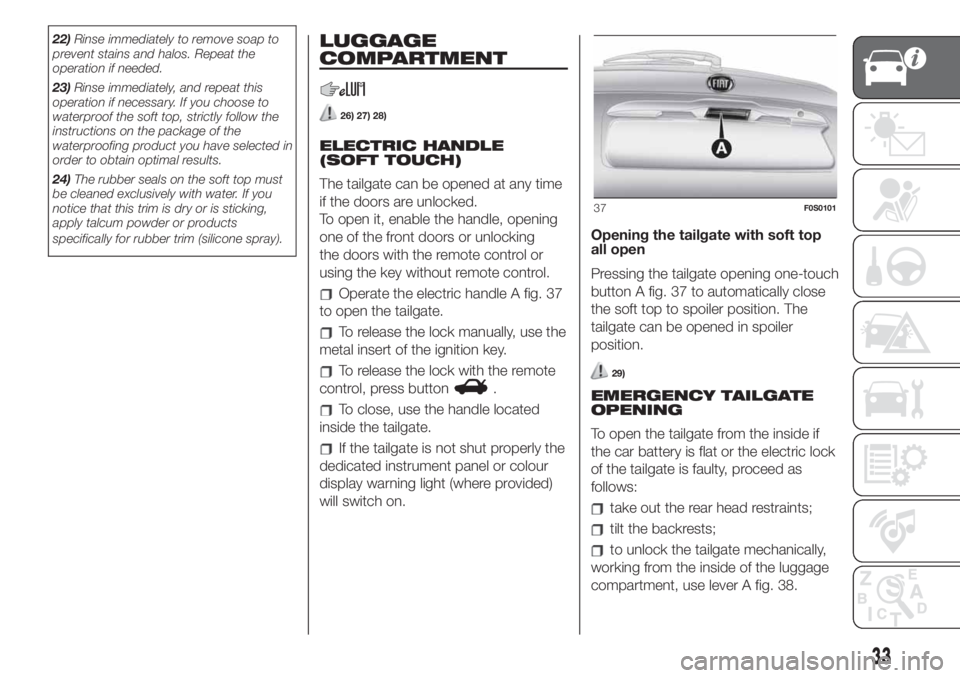
Operate the electric handle A fig. 37
to open the tailgate.
To release the lock manually, use the
metal insert of the ignition key.
To release the lock with the remote
control, press button
.
To close, use the handle located
inside the tailgate.
If the tailgate is not shut properly the
dedicated instrument panel or colour
display warning light (where provided)
will switch on.Opening the tailgate with soft top
all open
Pressing the tailgate opening one-touch
button A fig. 37 to automatically close
the soft top to spoiler position. The
tailgate can be opened in spoiler
position.
29)
EMERGENCY TAILGATE
OPENING
To open the tailgate from the inside if
the car battery is flat or the electric lock
of the tailgate is faulty, proceed as
follows:
take out the rear head restraints;
tilt the backrests;
to unlock the tailgate mechanically,
working from the inside of the luggage
compartment, use lever A fig. 38.
37F0S0101
33
Page 41 of 228
KNOWING THE INSTRUMENT PANEL
This section of the handbook gives you
all the information you need to
understand, interpret and use the
instrument panel correctly.CONTROL PANEL AND
ON-BOARD INSTRUMENTS ........... 40
DISPLAY ......................................... 42
TRIP COMPUTER ........................... 45
WARNING LIGHTS AND
MESSAGES .................................... 46
-Red warning lights............................ 46
-Amber warning lights......................... 52
-Green warning lights......................... 57
-Blue warning lights............................ 58
-Red symbols.................................... 59
-Amber symbols................................ 60
39
Page 44 of 228
DISPLAY
MULTIFUNCTION
DISPLAY “STANDARD”
SCREEN
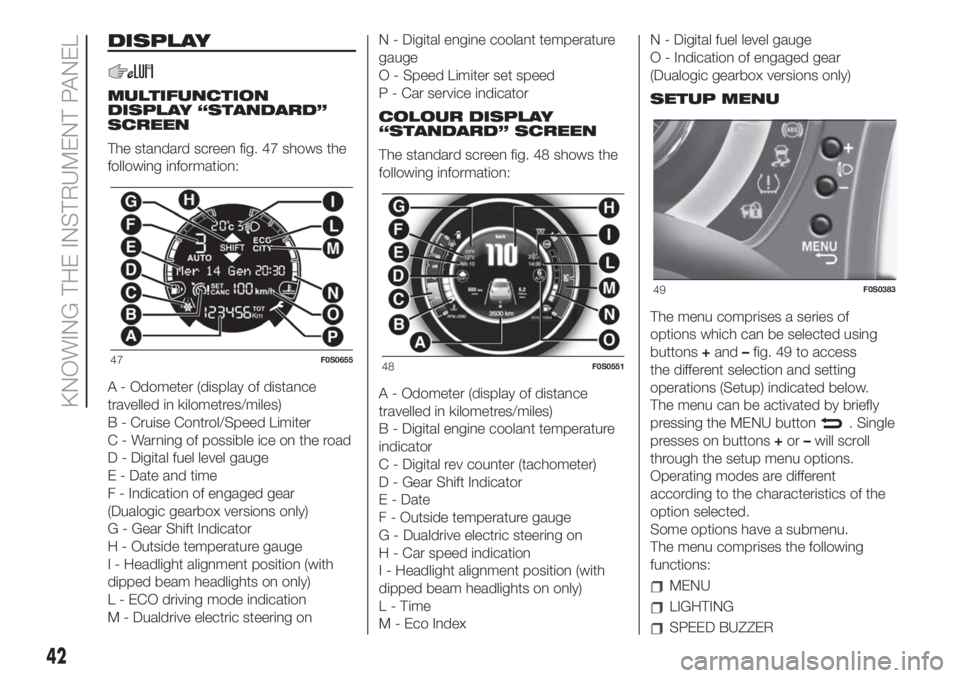
The standard screen fig. 47 shows the
following information:
A - Odometer (display of distance
travelled in kilometres/miles)
B - Cruise Control/Speed Limiter
C - Warning of possible ice on the road
D - Digital fuel level gauge
E - Date and time
F - Indication of engaged gear
(Dualogic gearbox versions only)
G - Gear Shift Indicator
H - Outside temperature gauge
I - Headlight alignment position (with
dipped beam headlights on only)
L - ECO driving mode indication
M - Dualdrive electric steering onN - Digital engine coolant temperature
gauge
O - Speed Limiter set speed
P - Car service indicator
COLOUR DISPLAY
“STANDARD” SCREEN
The standard screen fig. 48 shows the
following information:
A - Odometer (display of distance
travelled in kilometres/miles)
B - Digital engine coolant temperature
indicator
C - Digital rev counter (tachometer)
D - Gear Shift Indicator
E - Date
F - Outside temperature gauge
G - Dualdrive electric steering on
H - Car speed indication
I - Headlight alignment position (with
dipped beam headlights on only)
L-Time
M - Eco IndexN - Digital fuel level gauge
O - Indication of engaged gear
(Dualogic gearbox versions only)
SETUP MENU
The menu comprises a series of
options which can be selected using
buttons+and–fig. 49 to access
the different selection and setting
operations (Setup) indicated below.
The menu can be activated by briefly
pressing the MENU button
. Single
presses on buttons+or–will scroll
through the setup menu options.
Operating modes are different
according to the characteristics of the
option selected.
Some options have a submenu.
The menu comprises the following
functions:
MENU
LIGHTING
SPEED BUZZER
47F0S065548F0S0551
49F0S0383
42
KNOWING THE INSTRUMENT PANEL
Page 45 of 228
TRIP B ACTIVATION / DATA
SET TIME
SET DATE
AUTOCLOSE
UNITS OF MEASUREMENT
LANGUAGE
WARNING VOLUME
BUTTON VOLUME
SEAT BELT BEEP
SERVICE
AIRBAG / PASSENGER AIRBAG
DAYTIME RUNNING LIGHTS
TYRE RESET
RADIO REPETITION (for markets/
versions, where provided)
SEE PHONE (for markets/versions,
where provided)
SEE NAVIGATION (for markets/
versions, where provided)
EXIT MENU
Set Time (Setting the clock)
Using this function, it is possible to set
the clock through two submenus:
“Time” and “Format”.
To adjust, proceed as follows:
briefly press the MENU button,
the display will show the two submenus
“Time” and “Mode”;
press the+or–button to move
between the two submenus;
once you have selected a submenu,
briefly press the MENU button
;
if you select the “Time” submenu,
briefly press the MENU button
to
display the "hours";
press the+or–button to adjust;
briefly press the MENU button
to display the "minutes";
press the+or–button to adjust.
NOTE Each press of the+or–buttons
will increase or decrease by one unit.
Hold down the button to increase/
decrease the setting rapidly and
automatically. Complete the adjustment
with single presses of the button when
you approach the desired value.
If you select the "Format" submenu,
briefly press the MENU button
to
show the display mode;
press+or–to select “24h” or
“12h”. When you have made the
required settings, briefly press the
MENU button
to go back to the
submenu screen or hold the button
down to go back to the main menu
screen without saving.
hold the MENU buttonor SAVE
for colour displays down again to
return to the standard screen or to the
main menu according to where you
are in the menu.Set date (Setting the date)
This function may be used to update
the date (year/month/day).
To adjust, proceed as follows:
briefly press the MENU button
to display the "year";
press the+or–button to adjust;
briefly press the MENU button
to display the "month";
press the+or–button to adjust;
briefly press the MENU button
to display the "day";
press the+or–button to adjust;
NOTE Each press of the+or–buttons
will increase or decrease by one unit.
Hold down the button to increase/
decrease the setting rapidly and
automatically. Complete the adjustment
with single presses of the button when
you approach the desired value.
press the MENU button
,orSAVE
for colour displays, briefly to return to
the menu screen or hold the button
down to return to the standard screen
without storing.
Service (scheduled servicing)
This function allows you to display the
information about km/mileage intervals
or, for versions/markets, where
provided, time intervals for car
maintenance.
43
Page 47 of 228
HEADLIGHT ALIGNMENT
With the ignition key at MAR and
dipped beam headlights on, press the –
button to adjust the headlights
upwards and the button to adjust the
headlights downwards.TRIP COMPUTER
GENERAL INFORMATION
The Trip computer is used to display
information on car operation when the
ignition key is turned to MAR.
This function allows you to define two
separate trips, called “Trip A” and
“Trip B”, for monitoring the car's
"complete mission" (journey) in a
reciprocally independent manner and,
for versions/markets where provided,
"Instant info" and "Best average
consumption".
Both Trip A and Trip B can be zeroed
(reset - start of a new journey).
“Trip A”can be used to display the
values relating to:
Range (for versions/markets, where
provided)
Distance travelled A
Average consumption A
Instant consumption (for versions/
markets, where provided)
Average speed A
Travel time A (driving time)
“Trip B”may be used to display the
figures relating to:
Distance travelled B
Average consumption B
Average speed B
Travel time B (driving time)
NOTE The “Trip B” function may be
excluded. "Range" and "Instant
consumption" values cannot be reset.
“Best average consumption": in ECO
mode, displays a screen summarising
the best average consumption (where
provided).
The
icon indicates the best
performance. This information can be
reset by resetting Trip A.
45
Page 48 of 228
WARNING LIGHTS AND MESSAGES
IMPORTANT NOTES
IMPORTANT Warning lights are accompanied by a specific message and/or sound when applicable. These indications are
indicative and precautionary and as such must not be considered as exhaustive and/or alternative to the information contained
in the Owner Handbook, which you are advised to read carefully in all cases. In the event of a failure indication, always refer
to the contents of this chapter.
IMPORTANT Failure indications displayed are divided into two categories: very serious and less serious failures. Serious faults
are indicated by a repeated and prolonged warning "cycle". Less serious faults are indicated by a warning "cycle" with a shorter
duration. The display cycle of both categories can be interrupted by pressing the MENU button
. The instrument panel
warning light will stay on until the cause of the malfunction is eliminated.
WARNING LIGHTS ON INSTRUMENT PANEL
Red warning lights
Warning light What it means
redSEAT BELTS REMINDER
The warning light switches on constantly with the vehicle stationary and the driver's side or passenger side
seat belt (when the passenger is present) not fastened.
The warning light will flash and a buzzer will sound if the car is in motion and the front seat belts are not
correctly fastened.
For permanent deactivation of the acoustic signal (buzzer) of the S.B.R. (Seat Belt Reminder) system
contact a Fiat Dealership. The system can be reactivated at any time using the Setup Menu.
46
KNOWING THE INSTRUMENT PANEL