tow FIAT 500 2020 Owner handbook (in English)
[x] Cancel search | Manufacturer: FIAT, Model Year: 2020, Model line: 500, Model: FIAT 500 2020Pages: 228, PDF Size: 6.01 MB
Page 136 of 228
JUMP STARTING
If the battery is flat, a jump starting can
be performed using the battery and
the cables of another car, or using an
auxiliary battery. In all cases, the battery
used must have a capacity equal to or
a little higher than the flat one.
Jump starting may be dangerous if
carried out incorrectly: carefully follow
the procedures described below.
IMPORTANT NOTES
After turning the ignition key to STOP
and having closed the driver's side
door, wait at least one minute before
disconnecting the battery and then
reconnecting the electrical supply to the
battery.
Do not use an auxiliary battery or any
other source of external supply with
a voltage above 12 V: the battery, the
starter, the alternator and the electrical
system of the car could be damaged.
Do not attempt jump starting if the
battery is frozen. The battery could
break and explode!JUMP STARTING166) 167) 168)
56) 57) 58)
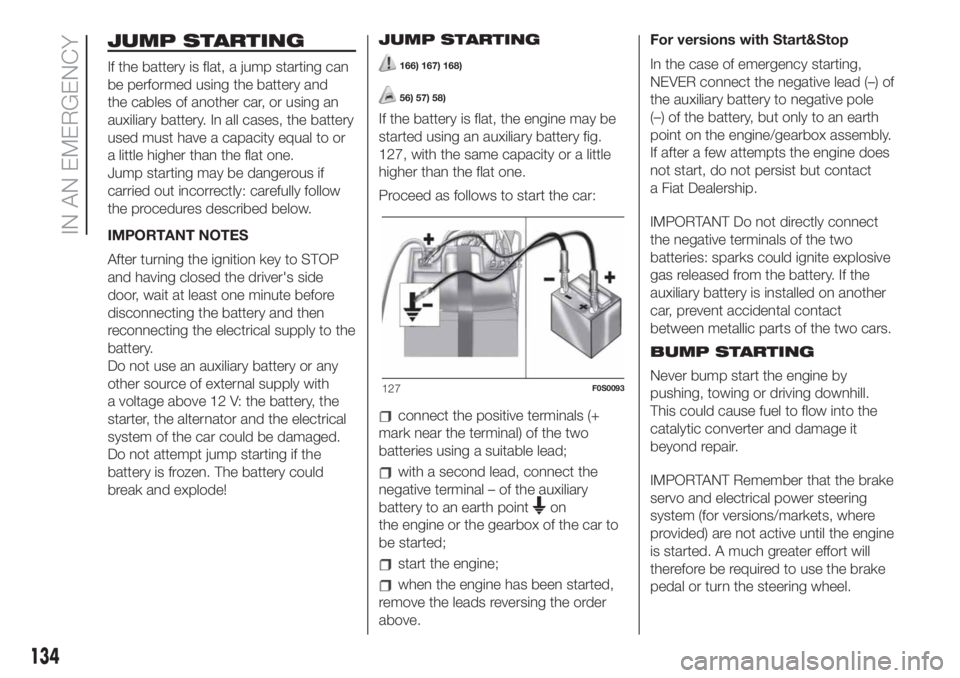
If the battery is flat, the engine may be
started using an auxiliary battery fig.
127, with the same capacity or a little
higher than the flat one.
Proceed as follows to start the car:
connect the positive terminals (+
mark near the terminal) of the two
batteries using a suitable lead;
with a second lead, connect the
negative terminal – of the auxiliary
battery to an earth point
on
the engine or the gearbox of the car to
be started;
start the engine;
when the engine has been started,
remove the leads reversing the order
above.For versions with Start&Stop
In the case of emergency starting,
NEVER connect the negative lead (–) of
the auxiliary battery to negative pole
(–) of the battery, but only to an earth
point on the engine/gearbox assembly.
If after a few attempts the engine does
not start, do not persist but contact
a Fiat Dealership.
IMPORTANT Do not directly connect
the negative terminals of the two
batteries: sparks could ignite explosive
gas released from the battery. If the
auxiliary battery is installed on another
car, prevent accidental contact
between metallic parts of the two cars.
BUMP STARTING
Never bump start the engine by
pushing, towing or driving downhill.
This could cause fuel to flow into the
catalytic converter and damage it
beyond repair.
IMPORTANT Remember that the brake
servo and electrical power steering
system (for versions/markets, where
provided) are not active until the engine
is started. A much greater effort will
therefore be required to use the brake
pedal or turn the steering wheel.
127F0S0093
134
IN AN EMERGENCY
Page 137 of 228
WARNING
166)This starting procedure must be
performed by expert personnel because
incorrect actions could cause electrical
discharge of considerable intensity.
Furthermore, battery fluid is poisonous and
corrosive: avoid contact with skin and
eyes. Keep naked flames and lighted
cigarettes away from the battery and do
not cause sparks.
167)Remove any metal objects (e.g. rings,
watches, bracelets), that might cause an
accidental electrical contact and cause
serious injury.
168)Do not attempt to charge a frozen
battery: it must be thawed first, otherwise it
may explode. If freezing has occurred, the
battery should be checked by skilled
personnel to make sure that the internal
elements are not damaged and that the
body is not cracked, with the risk of leaking
poisonous and corrosive acid.
WARNING
56)Never use a fast battery-charger to
start the engine as this could damage the
electronic systems of your vehicle,
particularly the ignition and engine fuel
supply control units.57)Do not connect the cable to the
negative terminal (–) of the flat battery. The
following spark could lead to battery
explosion and cause serious harm. Only
use the specific earth point; do not use any
other exposed metallic part.
58)Never bump start the engine by
pushing, towing or coasting downhill. This
could cause fuel to flow into the catalytic
converter and damage it beyond repair.
FUEL CUT-OFF
SYSTEM
169)
This intervenes in the case of an impact
causing:
the fuel supply cut-off with the
engine consequently switching off
the automatic unlocking of the doors
turning on of the lights inside the
vehicle;
The intervention of the system is
indicated by a message shown on the
display.
IMPORTANT Carefully check the car for
fuel leaks, for instance in the engine
compartment, under the car or near the
tank area. After a collision, turn the
ignition key to STOP position to prevent
the battery from running down.
To restore the correct operation of the
vehicle, proceed as follows:
turn the ignition key to the MAR-ON
position
activate the right direction indicator
deactivate the right direction
indicator
activate the left direction indicator
deactivate the left direction indicator
135
Page 138 of 228
activate the right direction indicator
deactivate the right direction
indicator
activate the left direction indicator
deactivate the left direction indicator
turn the ignition key to the STOP
position
turn the ignition key to the MAR
position;
LPG versions: in the event of an
impact, petrol supply is immediately
cut-off, the LPG safety valves are
closed and the injection is interrupted,
switching off the engine.
WARNING
169)If, after an impact, you smell fuel or
notice leaks from the fuel system, do
not reactivate the system to avoid the risk
of fire.
TOWING THE
VEHICLE
170) 171) 172) 173)
The tow hook, which is supplied with
the vehicle, is housed in the tool box,
under the carpet in the luggage
compartment.
ATTACHING THE TOW
HOOK
Front
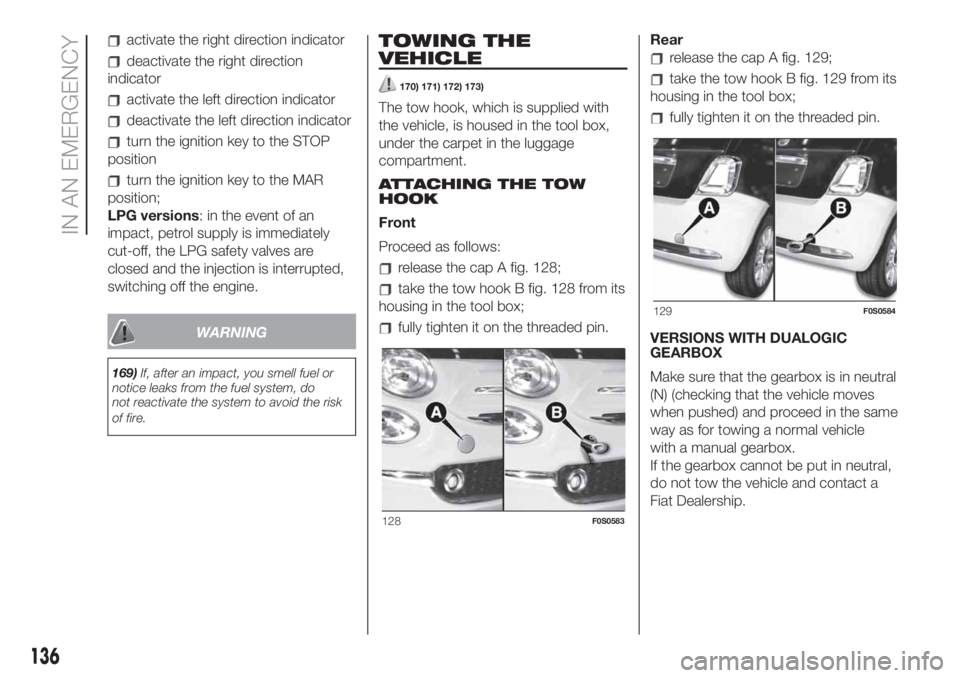
Proceed as follows:
release the cap A fig. 128;
take the tow hook B fig. 128 from its
housing in the tool box;
fully tighten it on the threaded pin.Rear
release the cap A fig. 129;
take the tow hook B fig. 129 from its
housing in the tool box;
fully tighten it on the threaded pin.
VERSIONS WITH DUALOGIC
GEARBOX
Make sure that the gearbox is in neutral
(N) (checking that the vehicle moves
when pushed) and proceed in the same
way as for towing a normal vehicle
with a manual gearbox.
If the gearbox cannot be put in neutral,
do not tow the vehicle and contact a
Fiat Dealership.
128F0S0583
129F0S0584
136
IN AN EMERGENCY
Page 139 of 228
WARNING
170)Before towing, turn the key to MAR
and then to STOP without extracting it.
If the key is removed, the steering lock will
come on automatically and it will be
impossible to steer the wheels.
171)Before tightening the ring clean the
threaded housing thoroughly. Make sure
that the ring is fully fastened in the housing
before towing the car.
172)The (front/rear) tow hook must be
used exclusively for roadside assistance
operations. You are allowed to tow the
vehicle for short distances using an
appropriate device in accordance with the
highway code (a rigid bar), to move the
vehicle on the road in readiness for towing
or transport via a tow truck. The tow hook
MUST NOT be used to tow vehicles off
the road or where there are obstacles
and/or for towing operations using cables
or other non-rigid devices. In compliance
with the above conditions, towing must
take place with the two vehicles (one
towing, the other towed) aligned as much
as possible along the same centre line.173)Whilst towing, remember that as the
assistance of the brake servo and the
electric power assisted steering is
not available, greater force needs to be
exerted on the brake pedal and more effort
is required on the steering wheel. Do not
use flexible cables when towing and avoid
jerky movements. Make sure not to
damage parts in contact with the car while
towing. When towing the vehicle, you
must comply with all specific traffic
regulations and adopt an appropriate
driving behaviour. Do not start the engine
while towing the vehicle.
137
Page 141 of 228
SCHEDULED
SERVICING
Correct servicing is crucial for
guaranteeing a long life for the car
under the best conditions.
For this reason, Fiat has planned a
series of checks and services at fixed
distance and/or time intervals, as
described in the Service Schedule.
To keep the car’s efficiency in tip-top
condition, in the following Scheduled
Service plan pages a few additional
checks are listed that should be carried
out more frequently with respect to
the normal coupon redemption
schedule.
Scheduled Servicing is offered by all
Fiat Dealerships according to fixed time
or kilometres/miles intervals. If, during
each operation, in addition to the ones
scheduled, the need arises for further
replacements or repairs, these may
be carried out with the owner's explicit
agreement only. If your car is used
frequently for towing, the interval
between one scheduled servicing
operation and the next should
be reduced.IMPORTANT NOTES
Scheduled Servicing interventions are
set out by the Manufacturer. Failure
to have them carried out may invalidate
the warranty.
We advise sharing any doubts
regarding the car’s proper operation
with your Fiat Dealership, before waiting
for the next coupon redemption.
139
Page 146 of 228
REGULAR CHECKS
Every 1,000 km or before long
journeys, check and, if necessary, top
up:
engine coolant level;
brake fluid level;
windscreen washer fluid level;
tyre inflation pressure and condition;
operation of lighting system
(headlights, direction indicators, hazard
warning lights, etc.);
operation of windscreen washer/
wiper system and positioning/wear of
rear window wiper blades.
Every 3,000 km check and top up if
required: engine oil level.
You are advised to use PETRONAS
LUBRICANTS products, which have
been designed and produced
specifically for Fiat cars (see table
“Capacities” in the “Technical
specifications” section).DEMANDING USE OF THE
CAR
If the vehicle is mainly used in one of
the following particularly harsh
conditions:
towing a trailer or caravan;
dusty roads;
short, repeated journeys (less than
7-8 Km) at sub-zero outdoor
temperatures;
engine often idling or driving long
distances at low speeds or long periods
of inactivity;
perform the following inspections more
frequently than shown on the
Scheduled Servicing Plan:
check front disc brake pad condition
and wear;
check cleanliness of bonnet and
luggage compartment locks,
cleanliness and lubrication of linkage;
visually inspect conditions of:
engine, gearbox, transmission, pipes
and hoses (exhaust/fuel system/brakes)
and rubber elements (gaiters/sleeves/
bushes, etc.);
check battery charge and battery
fluid level (electrolyte);
visually inspect conditions of the
accessory drive belts;
check and, if necessary, change
engine oil and replace oil filter;
check and, if necessary, replace
pollen filter;
check and, if necessary, replace air
cleaner.
144
SERVICING AND CARE
Page 166 of 228
WEIGHTS
Versions 1.2 8V 69 HP1.2 8V 69 HP
LPG0.9 TwinAir 85 HP(°)
Unladen weight (with all fluids, fuel tank filled
to 90% and without optional equipment) (kg):960 / 975(*)980 / 995(*)980 980 1000
Payload including the driver (kg)
(**)400 / 385(*)380 / 365(*)380 390 385
Maximum permitted loads (kg)
(***)
- front axle: 770 770 770 830 830
– rear axle: 640 640 640 640 640
- total: 1360 1360 1360 1370 1385
Towable loads (kg)
– braked trailer:
(****) (****) (****)800 800
– non-braked trailer:
(****) (****) (****)400 400
Maximum load on the ball (braked trailer)
(kg):
(****) (****) (****)60 60
(°) For versions/markets, where provided
(*) Versions with Dualogic transmission
(**) If special equipment is fitted (sunroof, etc.) the unladen car weight increases, thus reducing the specified payload in relation to the maximum permitted loads.
(***) Loads not to be exceeded. The user should carry goods in the luggage compartment and/on load carrying platform within the maximum permitted loads.
(****) IMPORTANT A trailer cannot be towed so there are no provisions for fitting a tow hook.
164
TECHNICAL DATA
Page 195 of 228
tap the screen to open the Main
menu;
tap "Navigate to" or "Drive to";
tap “Address”. You can change the
country or state setting by tapping
the flag before you select a city;
enter the town or city name, or the
postcode. Towns with similar names
are shown in the list while you type;
enter the street name. Streets with
similar names are shown in the list while
you type. When the correct street
name appears in the list, tap the name
to select the destination;
enter the house number, then tap
“Done”;
if in the Advanced settings menu the
“Show location preview” option is
active, your position is shown on the
map. Tap “Select” to continue or tap
“Back” to enter another address;
when the new route is shown, tap
“Done”. For more information about the
route, tap on “Details”. To change
your route, for example, to travel via a
particular location or to select a new
destination, tap “Change route”;
You are guided to your destination,
using spoken instructions and
on-screen directions.NOTE: The navigation system volume
can only be adjusted during navigation
when the system provides voice
indications.
Updating the map
Two modes for downloading a map
update are available:
Most recent maps guarantee: if a
new map is available for your system
within 90 days of initial use, you can
download it once free of charge.
Map update: you can purchase a
new version of the map installed on the
system.
To check availability or purchase a map,
make sure that you have prepared a
USB device and installed TomTom
HOME on your computer.
Preparing a USB device
To update the map, use a USB device
that meets the following requirements.
Ideally, the USB device should be
empty.
The USB device must have at least
8 GB of memory free.
The USB device must use a FAT-32
file system.
The USB device must not be
blocked and must allow files to be
saved.NOTE: the use of a memory stick is
recommended, while the use of mass
storage devices, such as mobile
phones or multimedia players, is not
recommended.
To prepare a USB device, proceed as
follows:
Select “Navigation updates” in the
“Settings” menu. You are asked
whether you wish to prepare a USB
device for downloading updates.
Select Yes.
Insert the USB device.
NOTE If the system continues to ask
you to insert the USB device, check
that the device meets the requirements
indicated previously, then retry.
The system starts to prepare the USB
device.
When the USB device is ready, the
following message is displayed.
Remove the USB device and connect it
to the computer. The new map can
now be downloaded to the USB
device.
TomTom HOME installation
To install TomTom HOME and create a
MyTomTom account, proceed as
follows:
193
Page 212 of 228
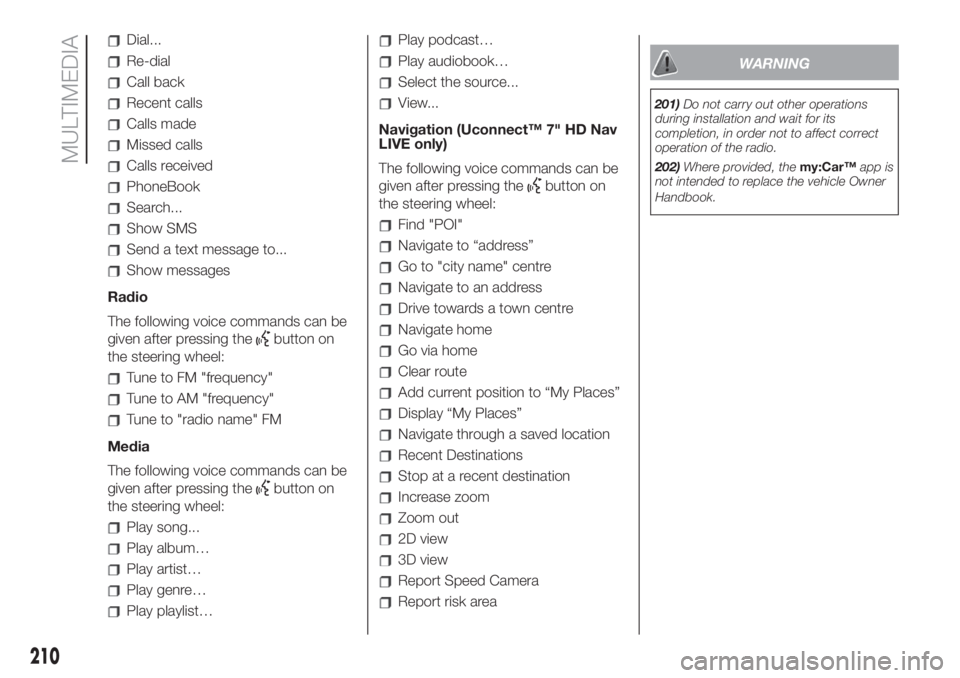
Dial...
Re-dial
Call back
Recent calls
Calls made
Missed calls
Calls received
PhoneBook
Search...
Show SMS
Send a text message to...
Show messages
Radio
The following voice commands can be
given after pressing the
button on
the steering wheel:
Tune to FM "frequency"
Tune to AM "frequency"
Tune to "radio name" FM
Media
The following voice commands can be
given after pressing the
button on
the steering wheel:
Play song...
Play album…
Play artist…
Play genre…
Play playlist…
Play podcast…
Play audiobook…
Select the source...
View...
Navigation (Uconnect™ 7" HD Nav
LIVE only)
The following voice commands can be
given after pressing the
button on
the steering wheel:
Find "POI"
Navigate to “address”
Go to "city name" centre
Navigate to an address
Drive towards a town centre
Navigate home
Go via home
Clear route
Add current position to “My Places”
Display “My Places”
Navigate through a saved location
Recent Destinations
Stop at a recent destination
Increase zoom
Zoom out
2D view
3D view
Report Speed Camera
Report risk area
WARNING
201)Do not carry out other operations
during installation and wait for its
completion, in order not to affect correct
operation of the radio.
202)Where provided, themy:Car™app is
not intended to replace the vehicle Owner
Handbook.
210
MULTIMEDIA
Page 224 of 228
Parking sensors....................106
Performance (top speed)...........170
Pre-tensioners......................75
Rear fog lights......................19
Rear view mirrors....................16
Rear window washer (jets)..........151
Rear window wiper / washer.........21
Refuelling..........................165
Refuelling the vehicle...............109
Regular checks....................144
Replacing a wheel..................127
Replacing an exterior bulb..........117
Replacing the windscreen/rear
window wiper blades............150
Rims and tyres.....................158
Saving fuel........................108
SBR system........................75
Scheduled Servicing...............139
Seat belts...........................74
Seats...............................13
Service schedule...................140
Side airbags........................92
Side bag............................92
Snow chains.......................161
Snow tyres........................161
Soft top.............................29
Spark plugs (type)..................157
Speed Limiter......................103
Start&Stop system.................102Starting the engine..................97
Steering lock........................12
Steering wheel......................16
Suggestions for driving.............108
Sunroof.............................28
Supplementary Restraint System
(SRS) - Airbag....................89
Symbols.............................3
Technical specifications............156
Towing the car.....................136
Towing trailers.....................112
Trip computer.......................45
Tyres (inflation pressure)............160
Uconnect™
tips, controls and general
information.....................174
USB source....................175
Uconnect™ 5”
APPS mode...................189
Bluetooth® source.............187
controls on front panel..........183
controls on the steering
wheel..........................185
eco:Drive™....................191
Media mode...................187
my:Car........................192
navigation......................192
phone mode...................188
Settings.......................192switching the system on/off.....187
Uconnect™ LIVE services......190
voice commands...............195
Uconnect™ 7” HD
Android Auto...................206
Apple CarPlay..................206
Bluetooth® source.............202
controls on front panel..........196
controls on the steering
wheel..........................199
Media mode...................201
navigation......................208
phone mode...................203
Settings.......................208
switching the system on/off.....201
trip computer..................203
Uconnect™ LIVE services......205
USB source....................203
voice commands...............209
Uconnect™ Radio.................176
Controls on front panel.........176
Controls on the steering
wheel
..........................179
Media mode...................181
Radio mode....................181
Settings.......................182
System on/off..................181
Version with LPG system............35
INDEX