warning lights FIAT 500 2020 Owner handbook (in English)
[x] Cancel search | Manufacturer: FIAT, Model Year: 2020, Model line: 500, Model: FIAT 500 2020Pages: 228, PDF Size: 6.01 MB
Page 132 of 228
place the inner part of the hub cap
on the wheel rim;
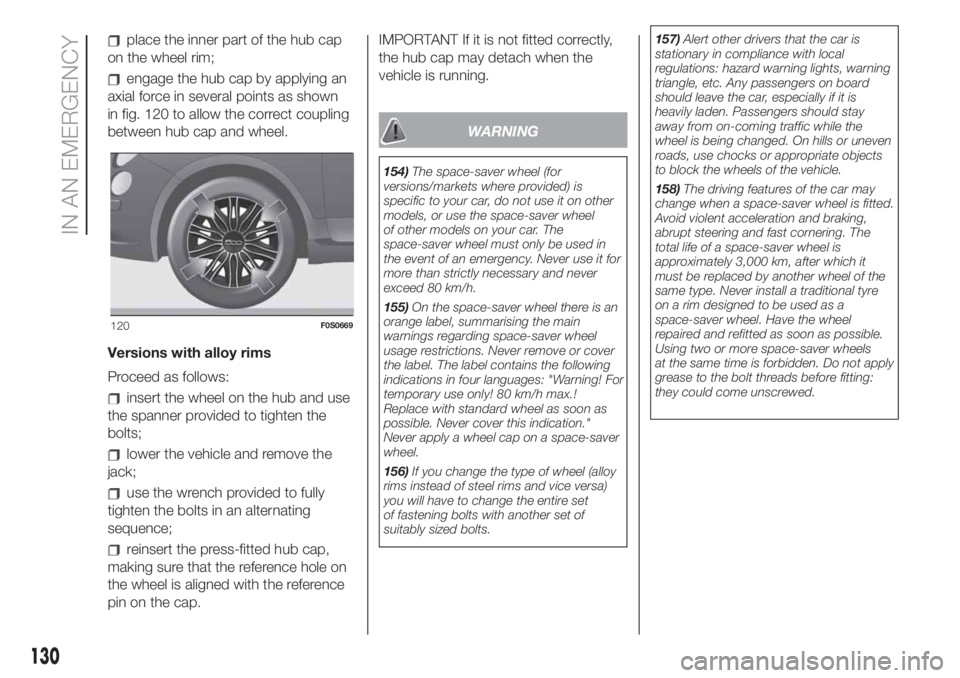
engage the hub cap by applying an
axial force in several points as shown
in fig. 120 to allow the correct coupling
between hub cap and wheel.
Versions with alloy rims
Proceed as follows:
insert the wheel on the hub and use
the spanner provided to tighten the
bolts;
lower the vehicle and remove the
jack;
use the wrench provided to fully
tighten the bolts in an alternating
sequence;
reinsert the press-fitted hub cap,
making sure that the reference hole on
the wheel is aligned with the reference
pin on the cap.IMPORTANT If it is not fitted correctly,
the hub cap may detach when the
vehicle is running.
WARNING
154)The space-saver wheel (for
versions/markets where provided) is
specific to your car, do not use it on other
models, or use the space-saver wheel
of other models on your car. The
space-saver wheel must only be used in
the event of an emergency. Never use it for
more than strictly necessary and never
exceed 80 km/h.
155)On the space-saver wheel there is an
orange label, summarising the main
warnings regarding space-saver wheel
usage restrictions. Never remove or cover
the label. The label contains the following
indications in four languages: "Warning! For
temporary use only! 80 km/h max.!
Replace with standard wheel as soon as
possible. Never cover this indication."
Never apply a wheel cap on a space-saver
wheel.
156)If you change the type of wheel (alloy
rims instead of steel rims and vice versa)
you will have to change the entire set
of fastening bolts with another set of
suitably sized bolts.157)Alert other drivers that the car is
stationary in compliance with local
regulations: hazard warning lights, warning
triangle, etc. Any passengers on board
should leave the car, especially if it is
heavily laden. Passengers should stay
away from on-coming traffic while the
wheel is being changed. On hills or uneven
roads, use chocks or appropriate objects
to block the wheels of the vehicle.
158)The driving features of the car may
change when a space-saver wheel is fitted.
Avoid violent acceleration and braking,
abrupt steering and fast cornering. The
total life of a space-saver wheel is
approximately 3,000 km, after which it
must be replaced by another wheel of the
same type. Never install a traditional tyre
on a rim designed to be used as a
space-saver wheel. Have the wheel
repaired and refitted as soon as possible.
Using two or more space-saver wheels
at the same time is forbidden. Do not apply
grease to the bolt threads before fitting:
they could come unscrewed.
120F0S0669
130
IN AN EMERGENCY
Page 134 of 228
REPAIR PROCEDURE
Proceed as follows:
stop the car in a position that is not
dangerous for oncoming traffic where
you can carry out the procedure safely.
The ground must be flat and sufficiently
compact;
stop the engine, engage the hazard
warning lights and the parking brake;
wear the reflective safety jacket
before getting out of the car (anyway
comply with the laws in force in the
country you are driving in);
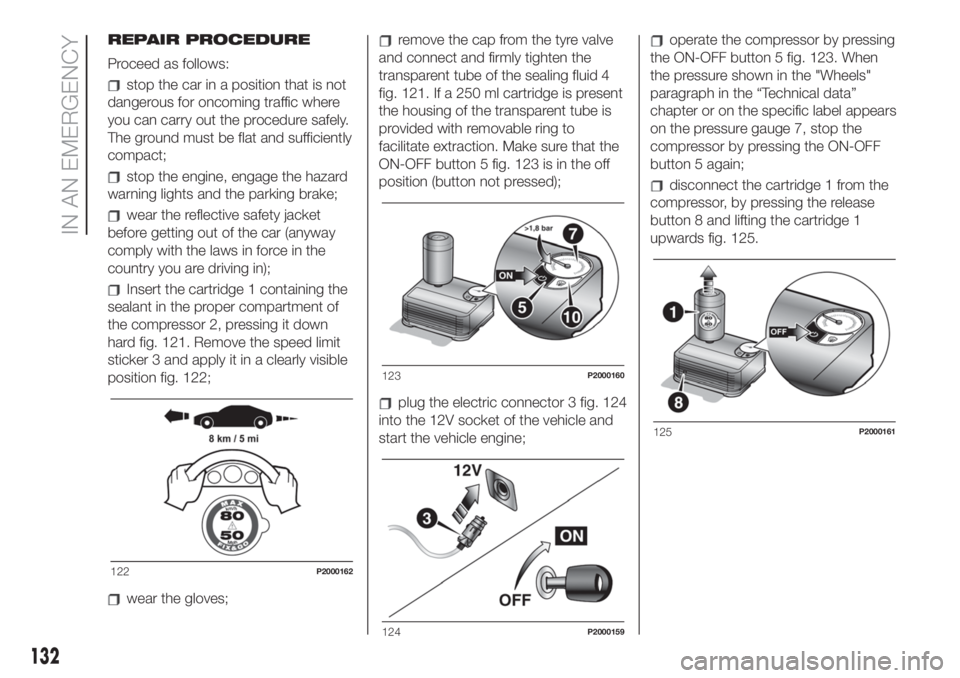
Insert the cartridge 1 containing the
sealant in the proper compartment of
the compressor 2, pressing it down
hard fig. 121. Remove the speed limit
sticker 3 and apply it in a clearly visible
position fig. 122;
wear the gloves;
remove the cap from the tyre valve
and connect and firmly tighten the
transparent tube of the sealing fluid 4
fig. 121. If a 250 ml cartridge is present
the housing of the transparent tube is
provided with removable ring to
facilitate extraction. Make sure that the
ON-OFF button 5 fig. 123 is in the off
position (button not pressed);
plug the electric connector 3 fig. 124
into the 12V socket of the vehicle and
start the vehicle engine;
operate the compressor by pressing
the ON-OFF button 5 fig. 123. When
the pressure shown in the "Wheels"
paragraph in the “Technical data”
chapter or on the specific label appears
on the pressure gauge 7, stop the
compressor by pressing the ON-OFF
button 5 again;
disconnect the cartridge 1 from the
compressor, by pressing the release
button 8 and lifting the cartridge 1
upwards fig. 125.
122P2000162
123P2000160
124P2000159
125P2000161
132
IN AN EMERGENCY
Page 137 of 228
WARNING
166)This starting procedure must be
performed by expert personnel because
incorrect actions could cause electrical
discharge of considerable intensity.
Furthermore, battery fluid is poisonous and
corrosive: avoid contact with skin and
eyes. Keep naked flames and lighted
cigarettes away from the battery and do
not cause sparks.
167)Remove any metal objects (e.g. rings,
watches, bracelets), that might cause an
accidental electrical contact and cause
serious injury.
168)Do not attempt to charge a frozen
battery: it must be thawed first, otherwise it
may explode. If freezing has occurred, the
battery should be checked by skilled
personnel to make sure that the internal
elements are not damaged and that the
body is not cracked, with the risk of leaking
poisonous and corrosive acid.
WARNING
56)Never use a fast battery-charger to
start the engine as this could damage the
electronic systems of your vehicle,
particularly the ignition and engine fuel
supply control units.57)Do not connect the cable to the
negative terminal (–) of the flat battery. The
following spark could lead to battery
explosion and cause serious harm. Only
use the specific earth point; do not use any
other exposed metallic part.
58)Never bump start the engine by
pushing, towing or coasting downhill. This
could cause fuel to flow into the catalytic
converter and damage it beyond repair.
FUEL CUT-OFF
SYSTEM
169)
This intervenes in the case of an impact
causing:
the fuel supply cut-off with the
engine consequently switching off
the automatic unlocking of the doors
turning on of the lights inside the
vehicle;
The intervention of the system is
indicated by a message shown on the
display.
IMPORTANT Carefully check the car for
fuel leaks, for instance in the engine
compartment, under the car or near the
tank area. After a collision, turn the
ignition key to STOP position to prevent
the battery from running down.
To restore the correct operation of the
vehicle, proceed as follows:
turn the ignition key to the MAR-ON
position
activate the right direction indicator
deactivate the right direction
indicator
activate the left direction indicator
deactivate the left direction indicator
135
Page 142 of 228
SERVICE SCHEDULE
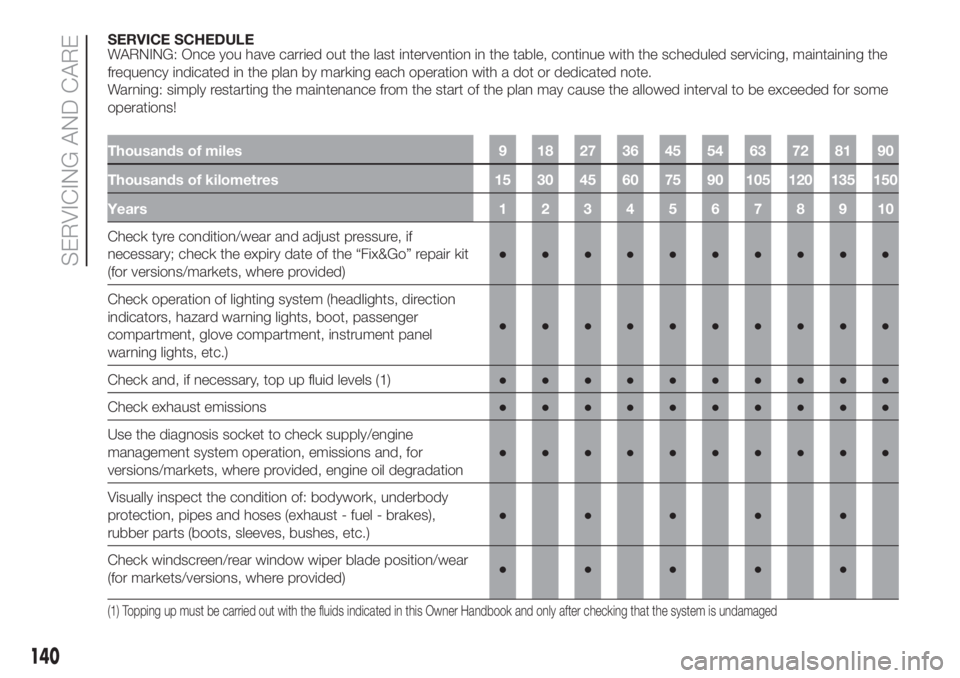
WARNING: Once you have carried out the last intervention in the table, continue with the scheduled servicing, maintaining the
frequency indicated in the plan by marking each operation with a dot or dedicated note.
Warning: simply restarting the maintenance from the start of the plan may cause the allowed interval to be exceeded for some
operations!
Thousands of miles 9 18 27 36 45 54 63 72 81 90
Thousands of kilometres 15 30 45 60 75 90 105 120 135 150
Years12345678910
Check tyre condition/wear and adjust pressure, if
necessary; check the expiry date of the “Fix&Go” repair kit
(for versions/markets, where provided)●●●●●●●●●●
Check operation of lighting system (headlights, direction
indicators, hazard warning lights, boot, passenger
compartment, glove compartment, instrument panel
warning lights, etc.)●●●●●●●●●●
Check and, if necessary, top up fluid levels (1)●●●●●●●●●●
Check exhaust emissions●●●●●●●●●●
Use the diagnosis socket to check supply/engine
management system operation, emissions and, for
versions/markets, where provided, engine oil degradation●●●●●●●●●●
Visually inspect the condition of: bodywork, underbody
protection, pipes and hoses (exhaust - fuel - brakes),
rubber parts (boots, sleeves, bushes, etc.)●●●●●
Check windscreen/rear window wiper blade position/wear
(for markets/versions, where provided)●●●●●
(1) Topping up must be carried out with the fluids indicated in this Owner Handbook and only after checking that the system is undamaged
140
SERVICING AND CARE
Page 146 of 228
REGULAR CHECKS
Every 1,000 km or before long
journeys, check and, if necessary, top
up:
engine coolant level;
brake fluid level;
windscreen washer fluid level;
tyre inflation pressure and condition;
operation of lighting system
(headlights, direction indicators, hazard
warning lights, etc.);
operation of windscreen washer/
wiper system and positioning/wear of
rear window wiper blades.
Every 3,000 km check and top up if
required: engine oil level.
You are advised to use PETRONAS
LUBRICANTS products, which have
been designed and produced
specifically for Fiat cars (see table
“Capacities” in the “Technical
specifications” section).DEMANDING USE OF THE
CAR
If the vehicle is mainly used in one of
the following particularly harsh
conditions:
towing a trailer or caravan;
dusty roads;
short, repeated journeys (less than
7-8 Km) at sub-zero outdoor
temperatures;
engine often idling or driving long
distances at low speeds or long periods
of inactivity;
perform the following inspections more
frequently than shown on the
Scheduled Servicing Plan:
check front disc brake pad condition
and wear;
check cleanliness of bonnet and
luggage compartment locks,
cleanliness and lubrication of linkage;
visually inspect conditions of:
engine, gearbox, transmission, pipes
and hoses (exhaust/fuel system/brakes)
and rubber elements (gaiters/sleeves/
bushes, etc.);
check battery charge and battery
fluid level (electrolyte);
visually inspect conditions of the
accessory drive belts;
check and, if necessary, change
engine oil and replace oil filter;
check and, if necessary, replace
pollen filter;
check and, if necessary, replace air
cleaner.
144
SERVICING AND CARE
Page 194 of 228
Recording and transferring trip data
The trip data can be stored in the
system memory and transferred using a
suitably configured USB memory stick
or byUconnect™ LIVEApp. This
allows you to display the history of the
collected data, showing the complete
analysis of the trip data and of your
driving style.
Further information is available at
www.driveuconnect.eu.
WARNING Do not remove the USB
memory stick nor unpair the
smartphone and theUconnect™ LIVE
App before the system has
downloaded the data, otherwise it
could be lost.
During the transfer of data to the
devices, messages may appear on the
radio display to guide the user correctly
through the operation; follow these
instructions. These messages are only
displayed with the ignition key at STOP
and when a delay in the system
switching off is set. The data are
automatically transferred to the devices
when the engine is switched off.
Transferred data will be deleted from
the system memory in this manner. You
can choose to store the trip data or
not, by pressing the "Settings" button
and by setting the storage activation
and the USB or Cloud transfer mode.NOTES When the USB memory stick is
full, the warning messages are shown
on the radio display.
When theeco:Drive™data are not
transferred to USB memory stick for a
long time, the internal memory of the
Uconnect™ LIVEsystem may be
exhausted. Follow the instructions given
by the messages on the radio display.
my:Car
my:Car allows you to keep the
condition of your car always under
control.
my:Car can detect malfunction in real
time and inform the user about the
expiry of the servicing interval. Press
the "my:Car" button to interact with the
application.
The display will show a screen with the
"care:Index" section, which provides
all the detailed information about the
status of the car. Press the "Active
warnings" button (if present) to show
the details of the vehicle's faults which
caused a warning light to switch on.
The status of the car can be viewed on
both the website
www.driveuconnect.eu and using the
Uconnect™ LIVEapp.Settings
Press the
button on the front panel
to display the main “Settings” menu.
NOTE The menu items displayed vary
according to the versions.
The menu includes the following items:
Display;
Units;
Voice commands;
Clock & Date;
Lights (where provided);
Doors & Locks;
Engine Off Options;
Audio;
Phone /Bluetooth®;
Setup SiriusXM (where provided);
Radio Setup;
Restore settings;
Clear Personal Data.
Navigation (Uconnect™
5" Nav LIVE only)
Planning a route
IMPORTANT In the interest of safety
and to reduce distractions while you are
driving, you should always plan a route
before you start driving.
Press the “Nav” button to show the
navigation map on the display.
To plan a route, do the following:
192
MULTIMEDIA
Page 210 of 228
Bluetooth® remains on while
Android Auto is being used
The data connection will depend on
the tariff plan of the smarphone
This information may be subject to
changes that depend on the
smartphone's operating system.
Exiting from the Apple CarPlay and
Android Auto apps
With the CarPlay app enabled, you can
still access the contents of the
Uconnect™system by using the
controls available and viewable on its
display. To return to theUconnect™
system contents with the Android Auto
app enabled, select the last item on
the Android Auto system bar and select
“Back to Uconnect".
To end the Apple CarPlay or Android
Auto session, physically disconnect the
smartphone from the USB port.
SETTINGS
Press the “Settings” button on the
display to show the main “Settings”
menu.
NOTE
The menu items displayed vary
according to the versions.
The menu includes the following items:
Language;
Display;
Units;
Voice commands;
Time and Date;
Safety / Driving Assistance (for
versions/markets, where provided);
Lights;
Doors & Locks;
Engine Off Options;
Audio;
Phone;
Radio Setup;
Restore default settings;
Clear personal data.
NAVIGATION (Uconnect™
7" HD Nav LIVE only)
Press the "Nav" button to show the
navigation map on the display.
NOTE: The navigation system volume
can only be adjusted during navigation
when the system provides voice
indications.
Navigation main menu
In the navigation view, tap the "Main
menu" button to open the menu:
Select the "Search" button to search
for an address, a place or a point of
interest, then plan a route to the
location.
Select the "Current trip" button to
delete or edit the planned route.
Select the "My places" button to
create a collection of useful or preferred
addresses. The following items are
always available in "My places": “Home”
and “Recent destinations”.
Select the "Parking" button to
search for car parks.
Select the "Weather" or "Speed
Camera Warning" button to receive
information on the weather or warnings
about speed camera locations.
NOTE The "Weather" and "Speed
Camera Warnings" functions are only
active if TomTom Services are activated.
Otherwise, the button will appear
greyed out (and the function will not be
available).
Select the "Petrol Station" button to
search for petrol stations.
Select the "TomTom Services"
button to view the activation state of
the following services (subscription
needed): “Traffic”, “Speed cameras”,
“Weather”, “Online search”.
Select this button to open the
"Settings" menu;
208
MULTIMEDIA
Page 223 of 228
INDEX
A
BS system........................68
Active safety systems................68
ASR system.........................69
Battery...........................149
inspecting the charge...........149
replacement...................149
Bodywork (cleaning and
maintenance)....................152
Bonnet.............................34
Brake fluid.........................147
Brakes
maintenance...................150
Changing a bulb..................114
Chassis marking...................156
Checking levels....................145
Child protection systems.............77
Climate control system..............23
CO2 emissions....................171
CODE Card.........................10
Control panel and on-board
instruments.......................40
Dashboard..........................8
Daytime running lights...............17
Demanding use of the car..........144
Dimensions........................163
Dipped headlights/side lights.........18Direction indicators..................18
Display.............................42
Doors...............................12
Driving assistance systems..........72
Dualdrive electric power steering.................................101
Dualogic transmission..............100
EBD system
........................68
ECO function......................101
Electric handle (Soft Touch)..........33
Electric windows....................27
Electronic Cruise Control...........105
Engine
technical specifications.........157
Engine cooling system fluid.........147
Engine marking....................156
Engine oil (consumption)............147
Engine oil (level check)..............147
ESC system.........................68
Exterior lights.......................17
Fiat CODE system
..................12
Fix&Go kit.........................131
Fixed glass sunroof..................28
Fluids and lubricants...............167
Fog lights/rear fog lights.............19
Follow Me Home....................18
Front airbags........................89
Front ceiling light....................20
Front seats..........................13
Fuel consumption..................171Fuel cut-off system.................135
Fuel tank cap......................110
Fuses (replacement)................121
Handbrake.........................98
Hazard warning lights..............114
HBA system........................70
Headrests...........................15
HH system..........................69
Identification data
bodywork paint plate...........156
identification data plate.........156
Ignition switch.......................11
Interior lights........................20
Interiors (cleaning)..................154
iTPMS..............................72
Jump starting.....................134
Key with remote control.............10
Keys................................10
LPG/petrol switch..................36
Luggage compartment..............33
Main beam headlights..............18
Manual transmission.................99
Mechanical key......................10
Mopar Connect....................211
MSR system........................68
Occupant protection systems
.......73
Official type approvals..............212
Paintwork (maintenance)...........152
Parking lights.......................18
Page 225 of 228
Warning lights on panel
.............46
Weights...........................164
Wheels and tyres...................152
Window bag........................92
Windscreen washer (jets)...........151
Windscreen wiper / washer..........20
Windscreen/rear window washer
fluid.............................147