Fig 38 FIAT 500 2020 Owner handbook (in English)
[x] Cancel search | Manufacturer: FIAT, Model Year: 2020, Model line: 500, Model: FIAT 500 2020Pages: 228, PDF Size: 6.01 MB
Page 167 of 228
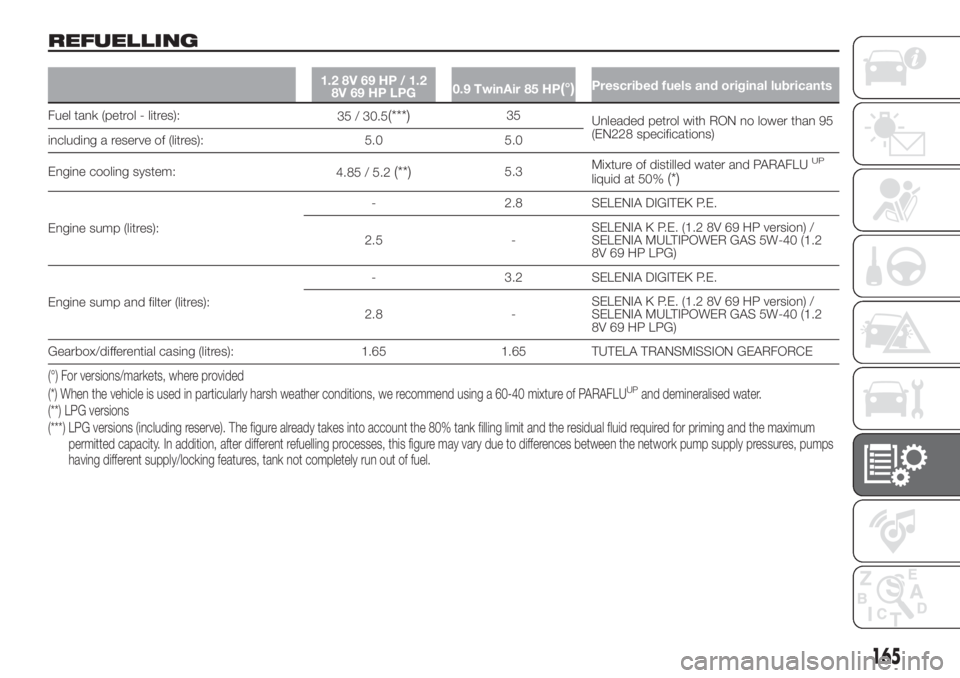
REFUELLING
1.2 8V 69 HP / 1.2
8V 69 HP LPG0.9 TwinAir 85 HP(°)Prescribed fuels and original lubricants
Fuel tank (petrol - litres):
35 / 30.5(***)35
Unleaded petrol with RON no lower than 95
(EN228 specifications)
including a reserve of (litres): 5.0 5.0
Engine cooling system:
4.85 / 5.2
(**)5.3Mixture of distilled water and PARAFLUUP
liquid at 50%(*)
Engine sump (litres):- 2.8 SELENIA DIGITEK P.E.
2.5 -SELENIA K P.E. (1.2 8V 69 HP version) /
SELENIA MULTIPOWER GAS 5W-40 (1.2
8V 69 HP LPG)
Engine sump and filter (litres):- 3.2 SELENIA DIGITEK P.E.
2.8 -SELENIA K P.E. (1.2 8V 69 HP version) /
SELENIA MULTIPOWER GAS 5W-40 (1.2
8V 69 HP LPG)
Gearbox/differential casing (litres): 1.65 1.65 TUTELA TRANSMISSION GEARFORCE
(°) For versions/markets, where provided
(***) LPG versions (including reserve). The figure already takes into account the 80% tank filling limit and the residual fluid required for priming and the maximum
permitted capacity. In addition, after different refuelling processes, this figure may vary due to differences between the network pump supply pressures, pumps
having different supply/locking features, tank not completely run out of fuel. (**) LPG versions (*) When the vehicle is used in particularly harsh weather conditions, we recommend using a 60-40 mixture of PARAFLUUPand demineralised water.
165
Page 173 of 228
FUEL CONSUMPTION AND CO2EMISSIONS
The fuel consumption and CO2emission figures declared by the manufacturer are determined on the basis of the type-approval
tests laid down by the applicable standards in the country where the vehicle is registered.
The type of route, traffic conditions, weather conditions, driving style, general condition of the car, trim level/equipment/
accessories, use of the climate control system, car load, presence of roof racks and other situations that adversely affect the
aerodynamics or wind resistance lead to different fuel consumption values than those measured. The fuel consumption will only
become more regular after driving the first 3000 km.
To find the specific fuel consumption and CO
2emission figures for this car, please refer to the data in the Certificate of
Conformity, and the related documentation that accompanies the vehicle.
171
Page 189 of 228
Switching the system
on/off
The system is switched on/off by
pressing the
(ON/OFF) button/knob.
Turn the button/knob clockwise to
increase the radio volume or
anticlockwise to decrease it.
Radio mode
After the desired radio station is
selected, the following information is
shown on the display:
At the top: the list of radio stations
stored (preset) is displayed; the station
currently playing is highlighted.
In the middle: display of the name of
the current radio station and the
buttons for selecting the previous or
next radio station.
At the bottom: display of the following
buttons:
“Browse”: list of the radio stations
available;
“AM/FM”, “AM/DAB”, “FM/DAB”:
selection of the desired frequency band
(button reconfigurable according to
the band selected: AM, FM or DAB);
“Tune”: manual radio station tuning
(not available for DAB radio)
“Info”: additional information on the
source being listened to;
“Audio”: access to the “Audio
Settings” screen.Audio menu
The following adjustments can be
carried out using the “Audio” menu:
“Equaliser” (where provided);
“Balance” (left/right audio balance
adjustment);
“Speed/Volume” (speed-dependent
automatic volume control);
“Loudness” (where provided);
“Auto-On Radio”;
“Radio Off Delay”.
To exit the “Audio” menu, press the
/
Done button.
Media mode
Audio source selection
Press the "Source" button to select the
desired audio source among those
available: USB orBluetooth®.
Applications used on portable devices
may be not compatible with the
Uconnect™system.
Track selection (Browse)
With Media mode active, briefly press
buttons
/to play the
previous/next track or keep buttons
/pressed to fast rewind/
forward the track.NOTE The keyboard is not available for
languages not supported by the system
which feature special characters (e.g.
Greek). In these cases this function will
be limited.
NOTE TheUconnect™system may
not support some USB keys: in this
case, it will not automatically switch
from “Radio” mode to “Media” mode. If
the device used does not play, verify
its compatibility by selecting Media
mode: a dedicated message will
appear on theUconnect™system
display.
Bluetooth® source
Pairing a Bluetooth® audio device
To pair aBluetooth® audio device,
proceed as follows:
activate theBluetooth® function on
the device;
press the MEDIA button on the front
panel;
if the “Media” source is active, press
the “Source” button;
select theBluetooth® Media
source;
press the “Add Device” button;
search forUconnect™on theBlu-
etooth® audio device (during the pair-
ing stage a screen is displayed showing
the progress of the operation);
187
Page 192 of 228
Uconnect™ LIVE
Services
Press the APPS button to access a
radio menu which shows all the
application functions of the system,
such as: Trip computer (where
provided), Settings, Compass (for
versions/markets, where provided),
Uconnect™ LIVEapplications.
If there is aUconnect™ LIVEicon, the
system is set up for the connected
services and allows the applications to
be used directly from the radio, for a
more efficient and advanced use of the
vehicle. The application functions are
present according to the vehicle
configuration and to the market.
To use theUconnect™LIVEservices,
you must:
Download theUconnect™ LIVE
App from the "Apple Store" or "Google
play" on your compatible smartphone,
making sure that the data connection is
enabled.
Use theUconnect™ LIVEApp to
register on www.driveuconnect.eu
or on the www.fiat.it website.
Start theUconnect™ LIVEApp on
the smartphone and enter your details.
For further information about the
services available in your market, visit
the www.driveuconnect.eu website.First access to the car
Once you have launched the
Uconnect™LIVEApp and entered
your details, you have to pair theBlu-
etooth® with your smartphone and the
radio, as described in the "Pairing a
mobile phone" paragraph, to access
theUconnect™LIVE services in your
car.
The list of supported mobile phones is
available on www.driveuconnect.eu.
When pairing is complete, the
connected services can be accessed
by pressing theUconnect™ LIVEicon
on the radio.
When the activation process is
complete, a message will inform the
user. If a personal profile is necessary
for the services, your accounts can
be connected through theUconnect™
LIVEApp, or in your personal area on
www.driveuconnect.eu.
User not connected
If the user does not pair the phone with
Bluetooth®, when theUconnect™
LIVEbutton is pressed, the radio menu
shows disabled icons, except foreco-
:Drive™.
Further information about the
eco:Drive™functions is available in
the dedicated paragraph.Settings of the Uconnect™ services
that can be managed through the
radio
You can access the the "Settings"
section from theUconnect™ LIVE
radio menu by pressing the
icon. In
this section the user can check the
system options and change them
according to their preferences.
Systems updating
If an update is available for the
Uconnect™ LIVEsystem while you
are using theUconnect™services,
you will be informed with a message on
the radio screen.
The update requires downloading the
new version of theUconnect™ LIVE
services management software. It is
done using the data connection of the
paired smartphone. The amount of
traffic generated will be communicated
to the user.
THE Uconnect™ LIVE APP
TheUconnect™ LIVEApp must be
installed on your smartphone to access
the connected services on the car.
This can be used to manage your
profile and customise your
Uconnect™ LIVEexperience.
The App can be downloaded from "App
Store" or "Google Play".
190
MULTIMEDIA
Page 194 of 228
Recording and transferring trip data
The trip data can be stored in the
system memory and transferred using a
suitably configured USB memory stick
or byUconnect™ LIVEApp. This
allows you to display the history of the
collected data, showing the complete
analysis of the trip data and of your
driving style.
Further information is available at
www.driveuconnect.eu.
WARNING Do not remove the USB
memory stick nor unpair the
smartphone and theUconnect™ LIVE
App before the system has
downloaded the data, otherwise it
could be lost.
During the transfer of data to the
devices, messages may appear on the
radio display to guide the user correctly
through the operation; follow these
instructions. These messages are only
displayed with the ignition key at STOP
and when a delay in the system
switching off is set. The data are
automatically transferred to the devices
when the engine is switched off.
Transferred data will be deleted from
the system memory in this manner. You
can choose to store the trip data or
not, by pressing the "Settings" button
and by setting the storage activation
and the USB or Cloud transfer mode.NOTES When the USB memory stick is
full, the warning messages are shown
on the radio display.
When theeco:Drive™data are not
transferred to USB memory stick for a
long time, the internal memory of the
Uconnect™ LIVEsystem may be
exhausted. Follow the instructions given
by the messages on the radio display.
my:Car
my:Car allows you to keep the
condition of your car always under
control.
my:Car can detect malfunction in real
time and inform the user about the
expiry of the servicing interval. Press
the "my:Car" button to interact with the
application.
The display will show a screen with the
"care:Index" section, which provides
all the detailed information about the
status of the car. Press the "Active
warnings" button (if present) to show
the details of the vehicle's faults which
caused a warning light to switch on.
The status of the car can be viewed on
both the website
www.driveuconnect.eu and using the
Uconnect™ LIVEapp.Settings
Press the
button on the front panel
to display the main “Settings” menu.
NOTE The menu items displayed vary
according to the versions.
The menu includes the following items:
Display;
Units;
Voice commands;
Clock & Date;
Lights (where provided);
Doors & Locks;
Engine Off Options;
Audio;
Phone /Bluetooth®;
Setup SiriusXM (where provided);
Radio Setup;
Restore settings;
Clear Personal Data.
Navigation (Uconnect™
5" Nav LIVE only)
Planning a route
IMPORTANT In the interest of safety
and to reduce distractions while you are
driving, you should always plan a route
before you start driving.
Press the “Nav” button to show the
navigation map on the display.
To plan a route, do the following:
192
MULTIMEDIA
Page 203 of 228
Switching the system
on/off
The system is switched on/off by
pressing the
button/knob.
Turn the button/knob clockwise to
increase the radio volume or
anticlockwise to decrease it. The
electronic volume adjustment control
rotates continuously (360°) in both
directions, without stop positions.
Radio mode
After the desired radio station is
selected, the following information is
shown on the display:
At the top: the list of radio stations
stored (preset) is displayed; the station
currently playing is highlighted.
In the middle: display of the name of
the current radio station and the
buttons for selecting the previous or
next radio station.
On the left:display of the "AM", "FM”,
“DAB” buttons for selecting the desired
frequency band (reconfigurable button
depending on the selected band:
AM, FM or DAB);
On the right:display of the following
buttons:
“Info”: additional information on the
source being listened to;
“Map": navigation map view
(Uconnect™ 7" HD Nav LIVE
versions only).
At the bottom:display of the following
buttons:
“Browse": list of the radio stations
available;
/: select previous/next
radio station;
“Tune”: manual radio station tuning;
“Audio”: access to the “Audio
Settings” screen.
Audio menu
To access the "Audio" menu press the
"Audio" button located at the bottom of
the display.
The following adjustments can be
carried out using the “Audio” menu:
“Balance & Fader" (left/right and
front/rear audio balance adjustment);
“Equaliser” (where provided);
“Speed Adj Volume” (speed-
dependent automatic volume control);
“Loudness” (where provided);
“AutoPlay”;
“Auto-On Radio”.Media mode
Press the "Media" button to select the
desired audio source among those
available: USB,Bluetooth®.
IMPORTANT NOTE Applications used
on portable devices may be not
compatible with theUconnect™
system
After Media mode is selected, the
following information is shown on the
display:
At the top:information on the track
being played and the following graphic
buttons:
“Repeat”: to repeat the track being
played;
“Shuffle”: to play the tracks in
random order.
In the middle:information on the track
being played.
On the left:display of the following
buttons:
Selected device or audio source;
“Select Source”: select the required
audio source.
On the right:display of the following
buttons:
“Info”: additional information on the
track being played;
“Tracks”: list of available tracks.
201
Page 207 of 228
See you later.
I will be delayed by 5 (or 10, 15, 20,
25, 30, 45, 60) minutes (*).
See you in 5 (or 10, 15, 20, 25, 30,
45, 60) minutes (*).
(*) Only use the numbers listed,
otherwise the system will not take the
message.
DO NOT DISTURB FUNCTION
By pressing the "Do not disturb"
graphic button the user will not receive
notifications in case of incoming calls
or text messages. The user can reply
with a default or customised message
by means of the settings.
SIRI EYES FREE
(available only with iPhone 4S and
subsequent versions and compatible
iOS versions)
After having paired the Siri enabled
device toUconnect™, hold the
button on the steering wheel
pressed and then release it.
After the double beep, you can start
interacting with Siri, to listen to music,
get directions, read text messages
and more.APPS MODE
Press the “Uconnect” button on the
display to access the radio menu
containing all the system application
operations.
The menu includes the following items:
"Uconnect™ LIVE";
"Media";
“Phone";
“Settings”;
"Radio";
"Trip".
Uconnect™ LIVE
SERVICES
Press theUconnect™button to
access theUconnect™ LIVE
applications.
The services available depend on the
car configuration and the market.
To use theUconnect™LIVEservices,
you need to download the
Uconnect™LIVEapp from Google
Play or Apple Store and register using
the app or on www.driveuconnect.eu.First access to the car
Once you have launched the
Uconnect™ LIVEApp and entered
your details, you have to pair theBlu-
etooth® with your smartphone and the
radio, as described in the "Pairing a
mobile phone" chapter, to access the
Uconnect™ LIVEservices in your
vehicle.
When pairing is complete, the
connected services can be accessed
by pressing theUconnect™ LIVEicon
on the radio.
Before you can use the connected
services, you must first do theBlu-
etooth® pairing, then complete the
activation procedure by following the
instructions that appear in theUcon-
nect™ LIVEapp.
Uconnect™ LIVE services setup
using the radio
You can access the the "Settings"
section from theUconnect™ LIVE
radio menu by pressing the
icon. In
this section the user can check the
system options and change them
according to their preferences.
System updates
If an update for theUconnect™ LIVE
system is available while the
Uconnect™ LIVEservices are being
used, the user will be informed with
a message on the radio screen.
205
Page 208 of 228
201)
Connected services that can be
accessed on the vehicle
Theeco:Drive™and my:Car
applications were developed to improve
the customer's driving experience,
therefore they are available in all
markets where theUconnect™ LIVE
services can be accessed.
If the navigation system is installed in
the radio, accessing theUconnect™
LIVEservices enables use of the "Live"
services.
eco:Drive™
Theeco:Drive™application allows you
to display your driving behaviour in
real time, in order to help you reach a
more efficient driving style as far as
consumption and emissions are
concerned.
In addition, the data can be saved on a
USB flash drive, and the data analysis
can be made on your personal
computer thanks to theeco:Drive™
desktop application, available on
www.driveuconnect.eu.
Driving style is assessed by means of
four indices, which monitor the
following parameters: acceleration,
deceleration, gear shift, speed.Display of the eco:Drive™
Press theeco:Drive™button to
interact with the function.
A screen will appear on the radio
showing 4 indices: Acceleration,
Deceleration, Speed and Gear. These
indices are grey until the system has
enough data to evaluate the driving
style.
Once sufficient data are available, the
indices will have 5 colours depending
on the evaluation: dark green (very
good), light green, yellow, orange and
red (very bad).
In the event of extended inactivity, the
display will show the average of the
indices up to that moment (“Avg index”)
then the indices will be coloured again
in real time as soon as the car is
restarted.
Recording and transferring trip data
The trip data can be stored in the
system memory and transferred using a
suitably configured USB memory stick
or byUconnect™ LIVEApp.
This allows you to display the history of
the collected data, showing the
complete analysis of the trip data and
of your driving style.
Further information is available at
www.driveuconnect.eu.my:Car202)
my:Car allows you to keep the
condition of your car always under
control.
my:Car can detect malfunction in real
time and inform the user about the
expiry of the servicing interval. Press
the "my:Car" button to interact with the
application.
The display will show a screen with the
"care:Index" section, which provides
all the detailed information about the
status of the vehicle. Press the "Active
warnings" button to show (if present)
the details of the vehicle's faults which
caused a warning light to switch on.
Apple CarPlay and
Android Auto
(for versions/markets, where provided)
The Apple CarPlay and Android Auto
applications allow you to use your
smartphone in the car safely and
intuitively.
To enable them, just connect a
compatible smartphone via the USB
port and the phone's contents will
be automatically shown on the
Uconnect™system display.
206
MULTIMEDIA
Page 209 of 228
To check the compatibility of your
smartphone, see the indications on the
websites: https://www.android.com/
intl/it_it/auto/ and http://
www.apple.com/it/ios/carplay/.
If the smartphone is connected
correctly to the car via the USB port,
the Apple CarPlay or Android Auto icon
will be displayed in place of the
button in the main menu.
Android Auto – app configuration
Before use, download the Android Auto
application to your smartphone from
Google Play Store.
The application is compatible with
Android 5.0 (Lollipop) and later
versions.
To use Android Auto, the smartphone
must be connected to the car with a
USB cable.
On the first connection, you will have to
perform the setup procedure that
appears on the smartphone. You can
only perform this procedure with the
vehicle stationary.
Apple CarPlay – app configuration
Apple CarPlay is compatible with the
iPhone 5 or more recent models, with
the iOS 7.1 operating system or later
versions.Before using Apple CarPlay, enable Siri
from Settings > General > Siri on the
smartphone.
To use Apple CarPlay, the smartphone
must be connected to the car with a
USB cable.
NOTE Enabling Apple CarPlay/Android
Auto or some functions could require
interaction on the smartphone. If
necessary, complete the step on your
device (smartphone).
Interaction
After the setup procedure, on
connecting your smartphone to the
car's USB port, the application will run
automatically on theUconnect™
system.
You can interact with Apple CarPlay
and Android Auto using the steering
wheel controls (long press of the
button), using the SCROLL TUNE
button/knob to select and confirm
or using theUconnect™system
touchscreen.
Navigation
With the Apple CarPlay and Android
Auto applications, the user can choose
to use the navigation system on their
smartphone.If the system's "Nav" mode is already
on, when a device is connected to
the vehicle with a navigation session in
progress, a warning pop-up will appear
on theUconnect™system display.
The pop-up allows the user to choose
between using the system navigation
and using navigation controlled by
the smartphone.
The user can choose to change their
selection at any time by accessing the
navigation system that they want to use
and setting a new destination.
Setting “AutoShow smartphone
display on connection"
Through theUconnect™system
settings, the user can decide to view
the smartphone screen on the
Uconnect™system display as soon
as the smartphone is connected via the
USB port. When this function is set,
each time a connection is made via
USB, the Apple CarPlay or Android
Auto apps will run automatically on the
radio screen.
The"AutoShow smartphone display
on connection"item can be found in
the "Display" submenu.
The function is enabled by default.
NOTES
Bluetooth® is disabled while Apple
CarPlay is being used
207