boot FIAT 500 2020 Owner handbook (in English)
[x] Cancel search | Manufacturer: FIAT, Model Year: 2020, Model line: 500, Model: FIAT 500 2020Pages: 228, PDF Size: 6.01 MB
Page 30 of 228
ROOF
FIXED GLASS SUNROOF
(for versions/markets, where provided)
The roof comprises a wide fixed glass
panel and a manually-operated sun
blind. The blind can be used in the "all
closed" or "all open" positions.
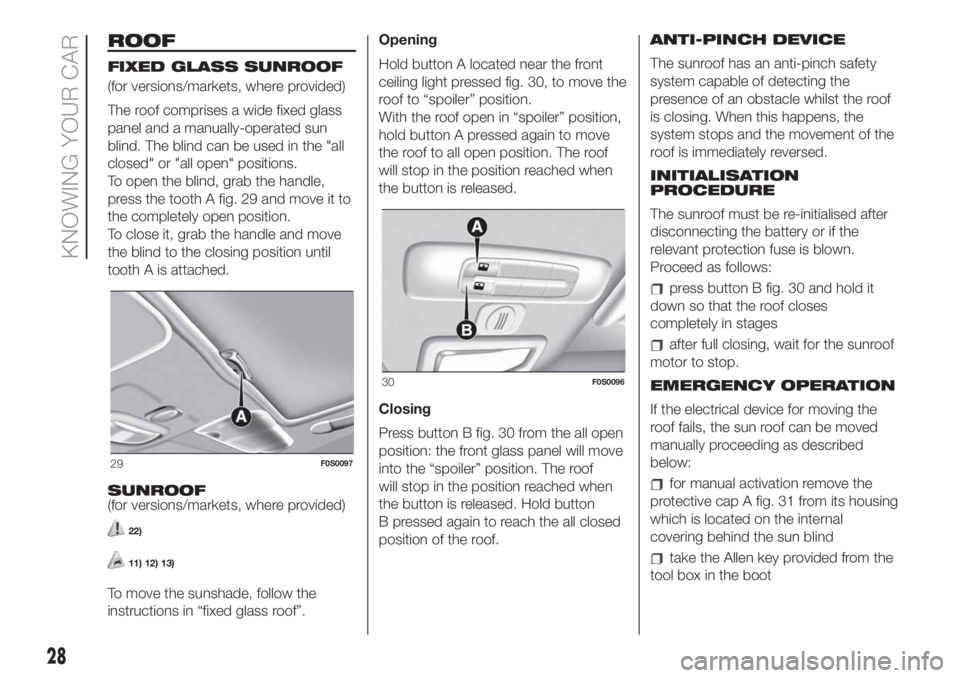
To open the blind, grab the handle,
press the tooth A fig. 29 and move it to
the completely open position.
To close it, grab the handle and move
the blind to the closing position until
tooth A is attached.
SUNROOF
(for versions/markets, where provided)
22)
11) 12) 13)
To move the sunshade, follow the
instructions in “fixed glass roof”.Opening
Hold button A located near the front
ceiling light pressed fig. 30, to move the
roof to “spoiler” position.
With the roof open in “spoiler” position,
hold button A pressed again to move
the roof to all open position. The roof
will stop in the position reached when
the button is released.
Closing
Press button B fig. 30 from the all open
position: the front glass panel will move
into the “spoiler” position. The roof
will stop in the position reached when
the button is released. Hold button
B pressed again to reach the all closed
position of the roof.ANTI-PINCH DEVICE
The sunroof has an anti-pinch safety
system capable of detecting the
presence of an obstacle whilst the roof
is closing. When this happens, the
system stops and the movement of the
roof is immediately reversed.
INITIALISATION
PROCEDURE
The sunroof must be re-initialised after
disconnecting the battery or if the
relevant protection fuse is blown.
Proceed as follows:
press button B fig. 30 and hold it
down so that the roof closes
completely in stages
after full closing, wait for the sunroof
motor to stop.
EMERGENCY OPERATION
If the electrical device for moving the
roof fails, the sun roof can be moved
manually proceeding as described
below:
for manual activation remove the
protective cap A fig. 31 from its housing
which is located on the internal
covering behind the sun blind
take the Allen key provided from the
tool box in the boot
29F0S0097
30F0S0096
28
KNOWING YOUR CAR
Page 31 of 228
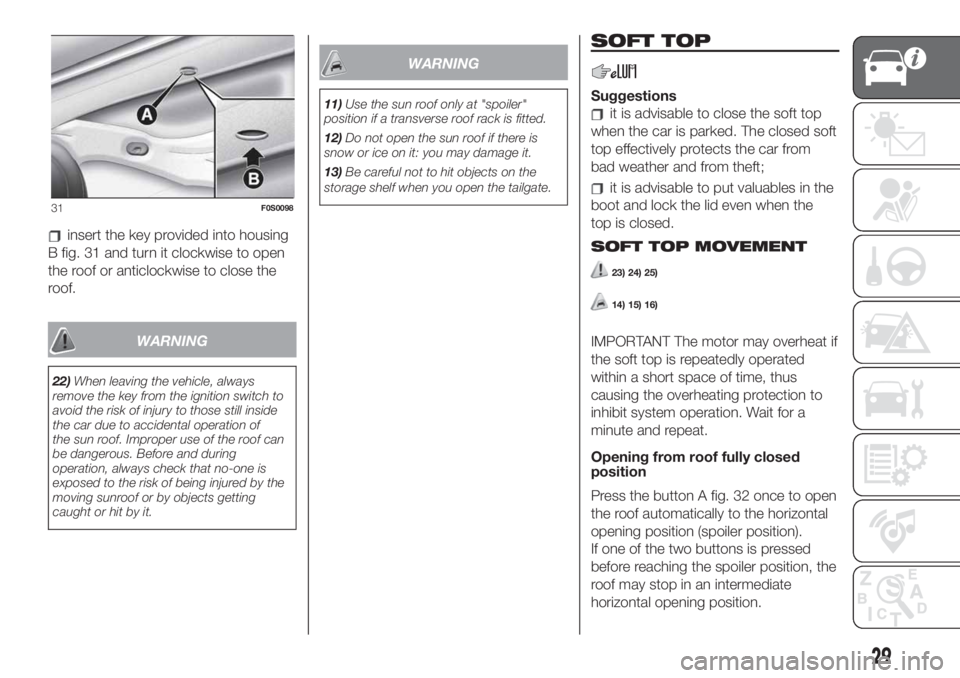
insert the key provided into housing
B fig. 31 and turn it clockwise to open
the roof or anticlockwise to close the
roof.
WARNING
22)When leaving the vehicle, always
remove the key from the ignition switch to
avoid the risk of injury to those still inside
the car due to accidental operation of
the sun roof. Improper use of the roof can
be dangerous. Before and during
operation, always check that no-one is
exposed to the risk of being injured by the
moving sunroof or by objects getting
caught or hit by it.
WARNING
11)Use the sun roof only at "spoiler"
position if a transverse roof rack is fitted.
12)Do not open the sun roof if there is
snow or ice on it: you may damage it.
13)Be careful not to hit objects on the
storage shelf when you open the tailgate.
SOFT TOP
Suggestions
it is advisable to close the soft top
when the car is parked. The closed soft
top effectively protects the car from
bad weather and from theft;
it is advisable to put valuables in the
boot and lock the lid even when the
top is closed.
SOFT TOP MOVEMENT
23) 24) 25)
14) 15) 16)
IMPORTANT The motor may overheat if
the soft top is repeatedly operated
within a short space of time, thus
causing the overheating protection to
inhibit system operation. Wait for a
minute and repeat.
Opening from roof fully closed
position
Press the button A fig. 32 once to open
the roof automatically to the horizontal
opening position (spoiler position).
If one of the two buttons is pressed
before reaching the spoiler position, the
roof may stop in an intermediate
horizontal opening position.
31F0S0098
29
Page 53 of 228
WARNING
31)If the gearbox is faulty, contact a Fiat Dealership as soon as possible to have the system checked.
Warning light What it means
red“DUALDRIVE” ELECTRIC POWER STEERING FAILURE
When the key is turned to MAR, the warning light switches on but it should switch off after a few seconds.
If the warning light stays on, on some versions along with a dedicated message on the display, you may
not have steering assistance and the effort required to operate the steering wheel could be notably
increased; steering is, however, possible.
In this case, contact a Fiat Dealership.
If the warning light switches on while driving (on some versions, together with a dedicated message on the
display) you may not have steering assistance. Although it will still be possible to steer the vehicle, the effort
needed to operate the steering wheel could be increased: contact a Fiat Dealership as soon as possible.
IMPORTANT In some circumstances, factors independent of the electric power steering could cause the
warning light on the instrument panel to switch on. In this case, stop the car immediately (should it be in
motion), stop the engine for about 20 seconds and then restart the engine. If the warning light stays on,
contact a Fiat Dealership.
IMPORTANT After the battery is disconnected, the steering must be initialised. The warning light switches
on to indicate this. To carry out this procedure, simply turn the steering wheel all the way from one end to
the other or drive in a straight line for about a hundred metres.
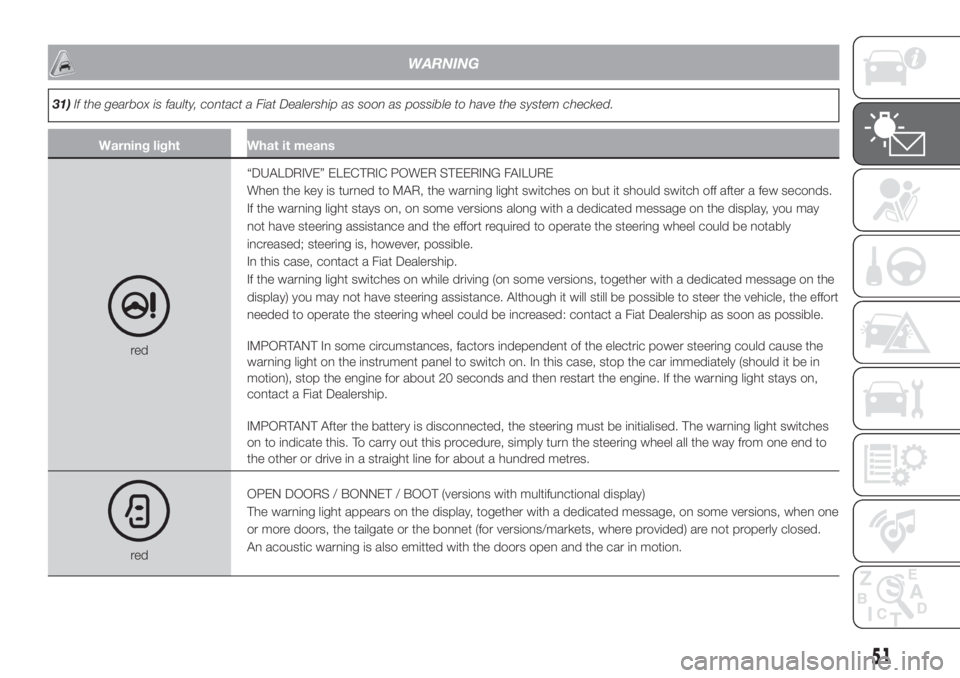
redOPEN DOORS / BONNET / BOOT (versions with multifunctional display)
The warning light appears on the display, together with a dedicated message, on some versions, when one
or more doors, the tailgate or the bonnet (for versions/markets, where provided) are not properly closed.
An acoustic warning is also emitted with the doors open and the car in motion.
51
Page 61 of 228
INSTRUMENT PANEL WARNING SYMBOLS
Red symbols
Symbol What it means
red
red
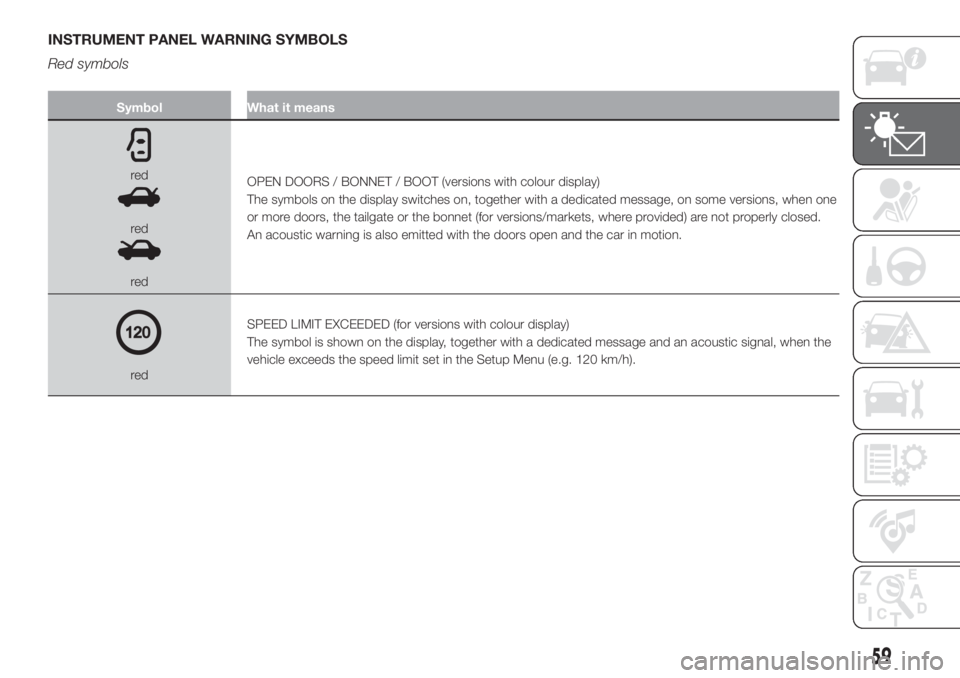
redOPEN DOORS / BONNET / BOOT (versions with colour display)
The symbols on the display switches on, together with a dedicated message, on some versions, when one
or more doors, the tailgate or the bonnet (for versions/markets, where provided) are not properly closed.
An acoustic warning is also emitted with the doors open and the car in motion.
redSPEED LIMIT EXCEEDED (for versions with colour display)
The symbol is shown on the display, together with a dedicated message and an acoustic signal, when the
vehicle exceeds the speed limit set in the Setup Menu (e.g. 120 km/h).
59
Page 118 of 228
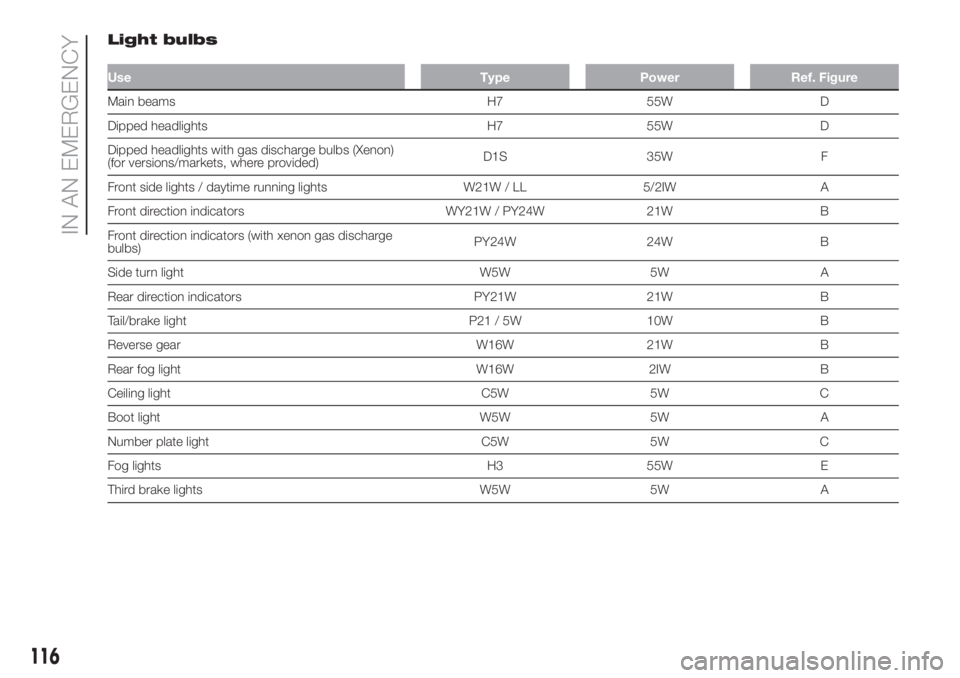
Light bulbs
Use Type Power Ref. Figure
Main beams H7 55W D
Dipped headlights H7 55W D
Dipped headlights with gas discharge bulbs (Xenon)
(for versions/markets, where provided)D1S 35W F
Front side lights / daytime running lights W21W / LL 5/2IW A
Front direction indicators WY21W / PY24W 21W B
Front direction indicators (with xenon gas discharge
bulbs)PY24W 24W B
Side turn light W5W 5W A
Rear direction indicators PY21W 21W B
Tail/brake light P21 / 5W 10W B
Reverse gear W16W 21W B
Rear fog light W16W 2IW B
Ceiling light C5W 5W C
Boot light W5W 5W A
Number plate light C5W 5W C
Fog lights H3 55W E
Third brake lights W5W 5W A
116
IN AN EMERGENCY
Page 133 of 228
159)The jack is a tool developed and
designed only for changing a wheel, if a
tyre gets punctured or damaged, on the
vehicle with which it is supplied or on other
vehicles of the same model. Any other
use, e.g. to jack up other vehicle models or
different things, is strictly prohibited. Never
use it to carry out maintenance or repairs
under the vehicle or to change summer/
winter wheels and vice versa. Never go
under the raised vehicle. If any work under
the vehicle is necessary, contact the Fiat
Service Network. Incorrect placing of
the jack can cause the vehicle to drop: use
it only in the positions indicated. Do not
use the jack for loads higher than the one
shown on its label. Never start the engine
with vehicle raised. If the vehicle is raised
more than necessary, everything can
become more unstable, with the risk of the
vehicle dropping violently. Thus, lift the
vehicle only as needed in order to access
the spare tyre.
160)Snow chains cannot be fitted to the
space-saver wheel. So, if a front (drive)
wheel is punctured and chains are needed,
a rear wheel should be fitted to the front
of the car and the space-saver wheel
should be fitted to the rear. In this way,
equipped with two normal drive wheels at
the front, they can be fitted with snow
chains, thus resolving the emergency
situation.
161)If the hub cap is not fitted correctly, it
may come off when the car is travelling.
Never tamper with the inflation valve. Never
introduce tools of any kind between rim
and tyre. Check tyre and space-saver
wheel pressures regularly, complying with
the values given in the "Technical
specifications" chapter.162)It is extremely dangerous to attempt
to change a wheel on the side of the
vehicle next to the driving lane: make sure
that the vehicle is at a sufficient distance
from the road, to avoid being run over.
163)Be very careful when removing/
refitting the hub cap due to the proximity of
the brake disc. We recommend using
heat protection gloves.
WARNING
53)When turning the jack handle make
sure that it can turn freely without scraping
your hand against the ground. The moving
components of the jack ("worm screw"
and joints) can also cause injuries: do not
touch them. If you come into contact
with lubricating grease, clean yourself
thoroughly.
54)Contact a Fiat Dealership as soon as
possible to have the correct tightening
of the wheel bolts checked.
Fix&Go kit
(where provided)
164) 165)
55)
DESCRIPTION
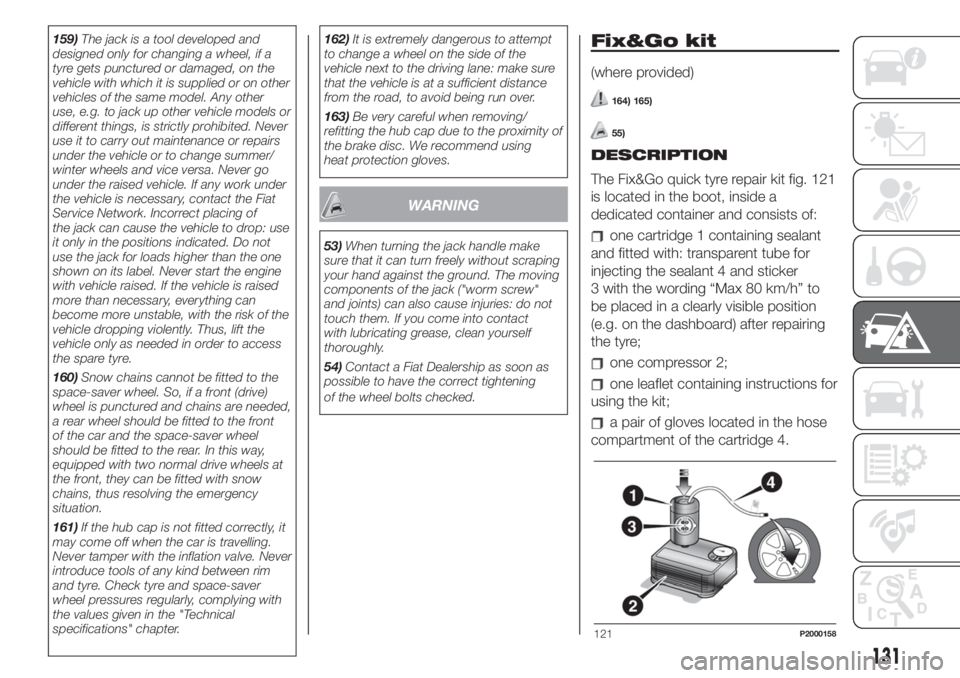
The Fix&Go quick tyre repair kit fig. 121
is located in the boot, inside a
dedicated container and consists of:
one cartridge 1 containing sealant
and fitted with: transparent tube for
injecting the sealant 4 and sticker
3 with the wording “Max 80 km/h” to
be placed in a clearly visible position
(e.g. on the dashboard) after repairing
the tyre;
one compressor 2;
one leaflet containing instructions for
using the kit;
a pair of gloves located in the hose
compartment of the cartridge 4.
121P2000158
131
Page 142 of 228
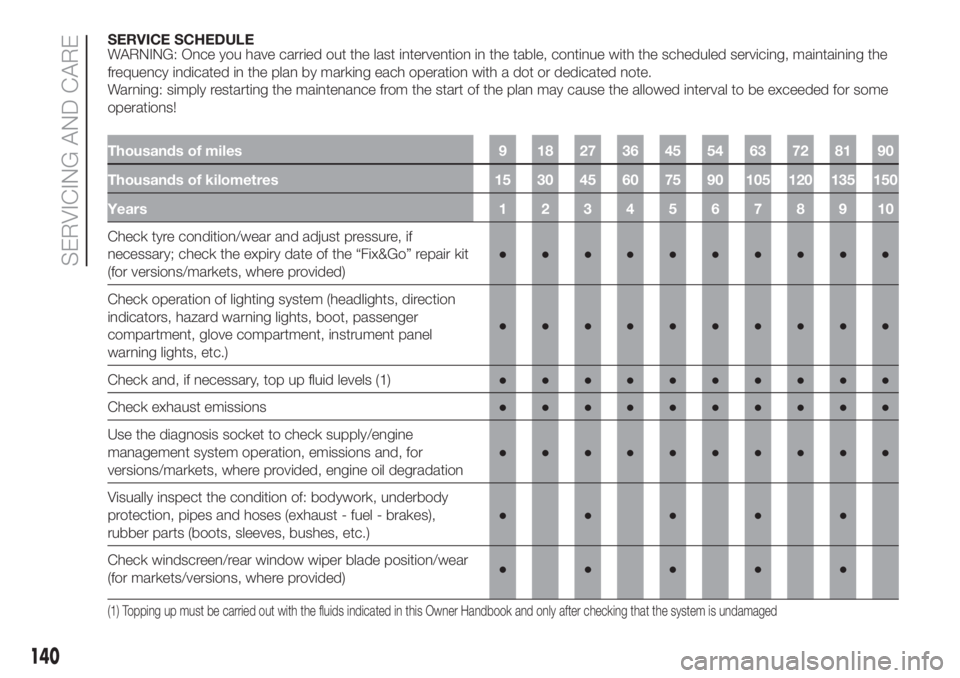
SERVICE SCHEDULE
WARNING: Once you have carried out the last intervention in the table, continue with the scheduled servicing, maintaining the
frequency indicated in the plan by marking each operation with a dot or dedicated note.
Warning: simply restarting the maintenance from the start of the plan may cause the allowed interval to be exceeded for some
operations!
Thousands of miles 9 18 27 36 45 54 63 72 81 90
Thousands of kilometres 15 30 45 60 75 90 105 120 135 150
Years12345678910
Check tyre condition/wear and adjust pressure, if
necessary; check the expiry date of the “Fix&Go” repair kit
(for versions/markets, where provided)●●●●●●●●●●
Check operation of lighting system (headlights, direction
indicators, hazard warning lights, boot, passenger
compartment, glove compartment, instrument panel
warning lights, etc.)●●●●●●●●●●
Check and, if necessary, top up fluid levels (1)●●●●●●●●●●
Check exhaust emissions●●●●●●●●●●
Use the diagnosis socket to check supply/engine
management system operation, emissions and, for
versions/markets, where provided, engine oil degradation●●●●●●●●●●
Visually inspect the condition of: bodywork, underbody
protection, pipes and hoses (exhaust - fuel - brakes),
rubber parts (boots, sleeves, bushes, etc.)●●●●●
Check windscreen/rear window wiper blade position/wear
(for markets/versions, where provided)●●●●●
(1) Topping up must be carried out with the fluids indicated in this Owner Handbook and only after checking that the system is undamaged
140
SERVICING AND CARE
Page 158 of 228
IDENTIFICATION
DATA
It is advisable to take note of the
identification codes. The following
identification codes are printed and
shown on the plates:
VIN plate.
Chassis marking.
Bodywork paint identification plate
(where provided).
Engine marking.
VEHICLE IDENTIFICATION
NUMBER (VIN) PLATE
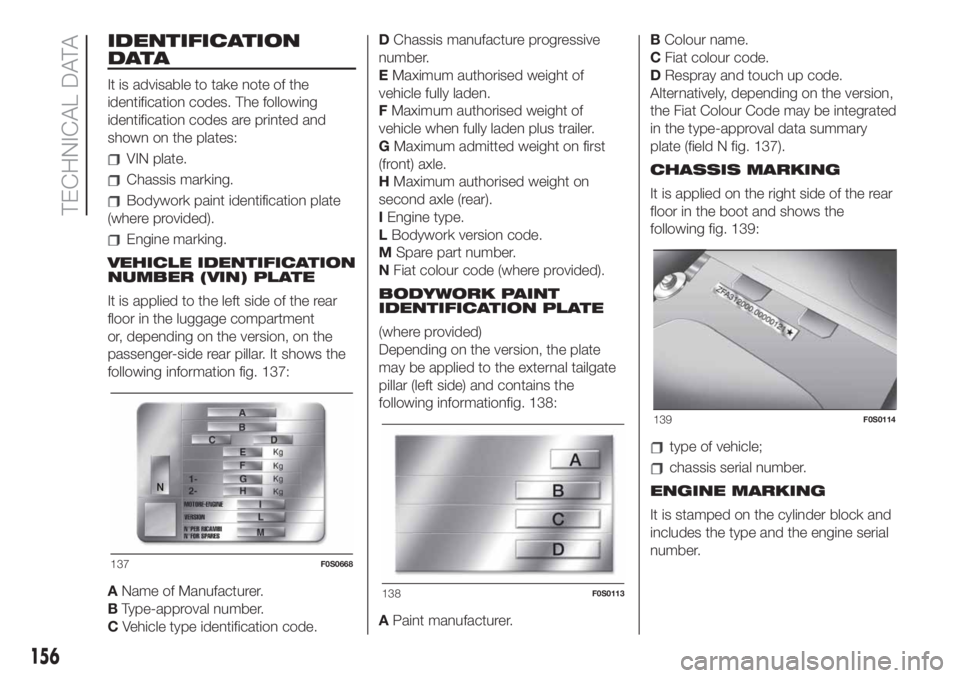
It is applied to the left side of the rear
floor in the luggage compartment
or, depending on the version, on the
passenger-side rear pillar. It shows the
following information fig. 137:
AName of Manufacturer.
BType-approval number.
CVehicle type identification code.DChassis manufacture progressive
number.
EMaximum authorised weight of
vehicle fully laden.
FMaximum authorised weight of
vehicle when fully laden plus trailer.
GMaximum admitted weight on first
(front) axle.
HMaximum authorised weight on
second axle (rear).
IEngine type.
LBodywork version code.
MSpare part number.
NFiat colour code (where provided).
BODYWORK PAINT
IDENTIFICATION PLATE
(where provided)
Depending on the version, the plate
may be applied to the external tailgate
pillar (left side) and contains the
following informationfig. 138:
APaint manufacturer.BColour name.
CFiat colour code.
DRespray and touch up code.
Alternatively, depending on the version,
the Fiat Colour Code may be integrated
in the type-approval data summary
plate (field N fig. 137).
CHASSIS MARKING
It is applied on the right side of the rear
floor in the boot and shows the
following fig. 139:
type of vehicle;
chassis serial number.
ENGINE MARKING
It is stamped on the cylinder block and
includes the type and the engine serial
number.
137F0S0668
138F0S0113
139F0S0114
156
TECHNICAL DATA
Page 165 of 228

DIMENSIONS
Dimensions are expressed in mm and refer to the vehicle equipped with its standard-supplied tyres. Height is measured with
car unladen.
BOOT VOLUMEPetrol versions: capacity (VDA standards): 185 litres.LPG versions: capacity (VDA standards): 165 litres.
Versions A B C D E F G I
0.9 TwinAir 85 HP(°)3571 720 2300 551
1488(*)1413 /
1414(**)16271407 /
1408(**)
1.2 8V 69 HP 3571 720 2300 551
1488(*)1413 1627 1407
(°) For versions/markets, where provided
(*) Small variations in size are possible depending on the dimensions of the rims.
(**) With 195/45 R16 tyres
140F0S0605
163