turn signal FIAT 500 ABARTH 2014 2.G User Guide
[x] Cancel search | Manufacturer: FIAT, Model Year: 2014, Model line: 500 ABARTH, Model: FIAT 500 ABARTH 2014 2.GPages: 392, PDF Size: 8.74 MB
Page 114 of 392
High Beams
With the low beams activated, push the multi-
function lever towards the instrument panel to
turn on the high beams. Pull the multifunction lever
toward the steering wheel to turn off the high beams.
Flash-To-Pass
You can signal another vehicle with your headlights by
lightly pulling the multifunction lever toward the steer-
ing wheel. This will turn on the high beams until the
lever is released.
Parking Lights
To turn on the parking lights, remove the key
or turn the ignition to OFF/LOCK position and
turn on the headlights.
Daytime Running Lights — If Equipped
To activate the Daytime Running Lights (DRL), rotate the
end of the multifunction lever to theOsymbol.
NOTE:The low beams and side/taillights will not be on
with DRL.
If allowed by law in the country in which the vehicle was
purchased the DRL function can be turned on or off using
the display menus. Refer to “Electronic Vehicle Informa-
tion Center (EVIC)” in “Understanding Your Instrument
Panel” for further information.
Turn Signals
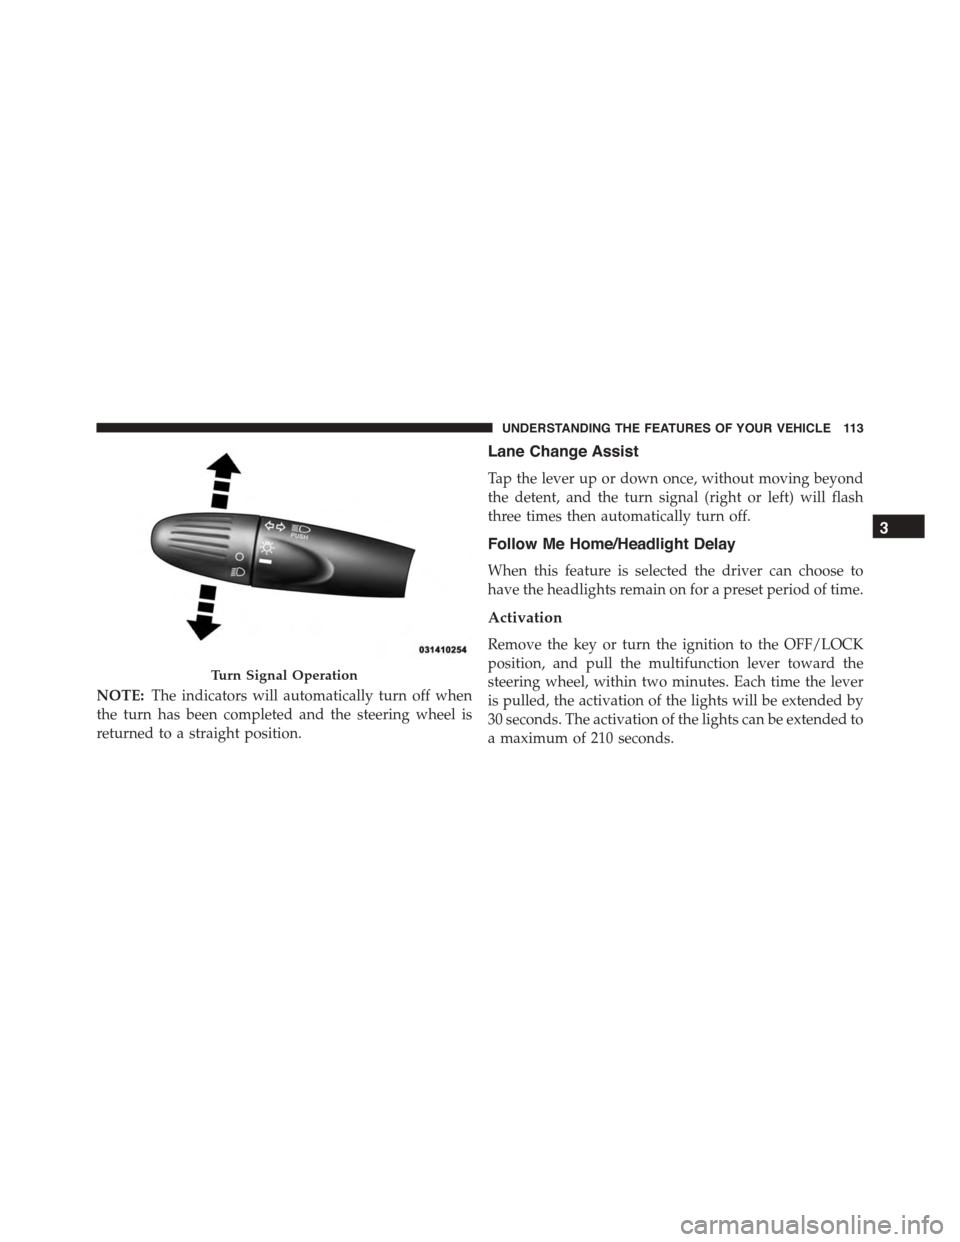
Push the multifunction lever upward to signal a right
turn or downward to signal a left turn. The correspond-
ing indicator in the instrument cluster will blink to
indicate the operation of the turn signal.
11 2 U N D E R S TA N D I N G T H E F E AT U R E S O F Y O U R V E H I C L E
Page 115 of 392
NOTE:The indicators will automatically turn off when
the turn has been completed and the steering wheel is
returned to a straight position.
Lane Change Assist
Tap the lever up or down once, without moving beyond
the detent, and the turn signal (right or left) will flash
three times then automatically turn off.
Follow Me Home/Headlight Delay
When this feature is selected the driver can choose to
have the headlights remain on for a preset period of time.
Activation
Remove the key or turn the ignition to the OFF/LOCK
position, and pull the multifunction lever toward the
steering wheel, within two minutes. Each time the lever
is pulled, the activation of the lights will be extended by
30 seconds. The activation of the lights can be extended to
a maximum of 210 seconds.
Turn Signal Operation
3
UNDERSTANDING THE FEATURES OF YOUR VEHICLE 113
Page 121 of 392
Rear Windshield Washer Operation
Push the windshield wiper/washer lever toward the
instrument panel to activate the rear washer. Push and
hold the lever for more than a half second and the wipers
will activate automatically for three cycles after the lever
is released.
TILT STEERING COLUMN — IF EQUIPPED
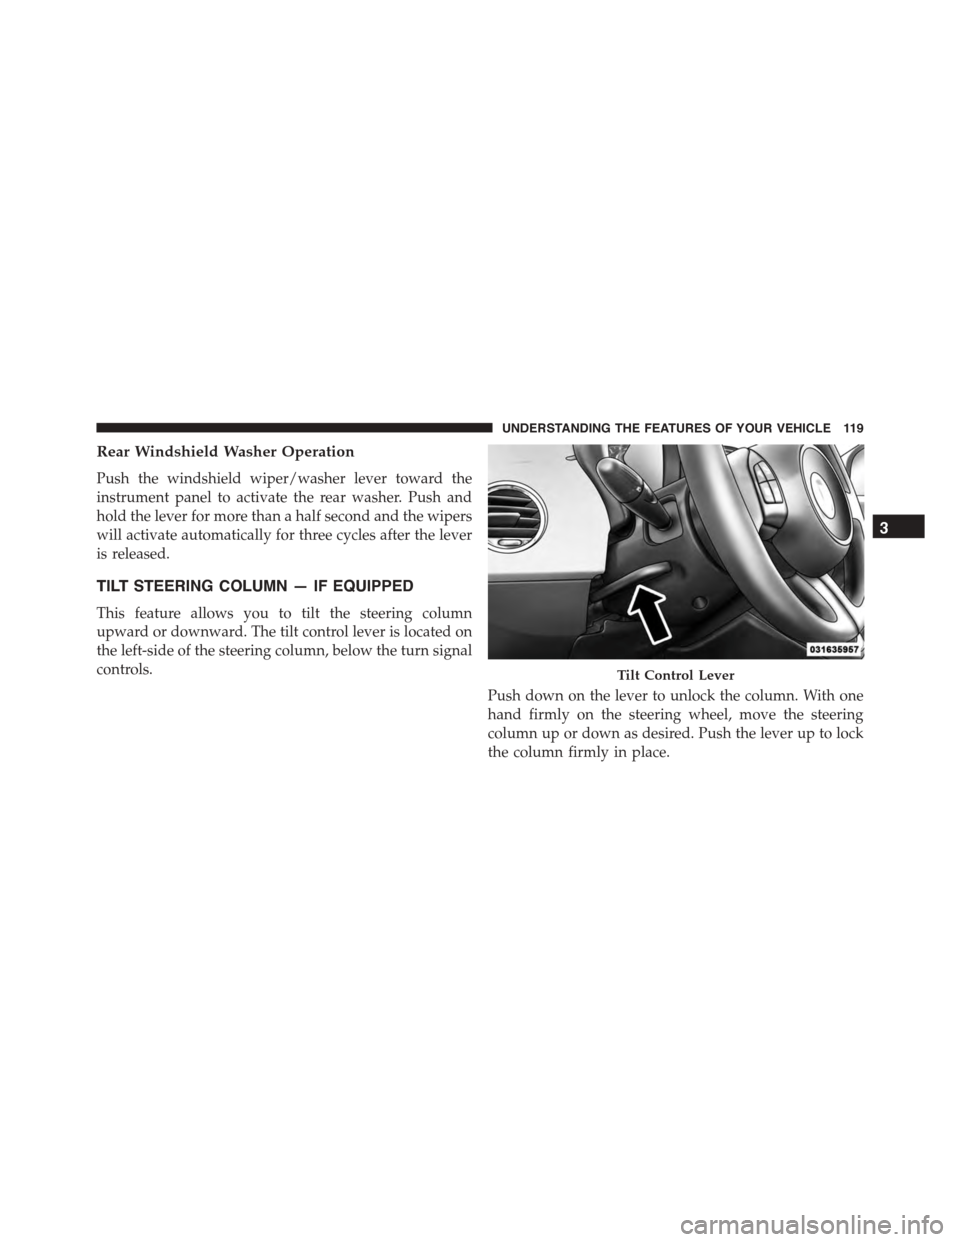
This feature allows you to tilt the steering column
upward or downward. The tilt control lever is located on
the left-side of the steering column, below the turn signal
controls.
Push down on the lever to unlock the column. With one
hand firmly on the steering wheel, move the steering
column up or down as desired. Push the lever up to lock
the column firmly in place.
Tilt Control Lever
3
UNDERSTANDING THE FEATURES OF YOUR VEHICLE 119
Page 128 of 392
While audible signals are emitted, the audio system is not
muted.
The audible signal is turned off immediately if the
distance increases. The tone cycle remains constant if the
distance measured by the inner sensors is constant. If this
condition occurs for the external sensors, the signal is
turned off after 3 seconds (stopping warnings during
maneuvers parallel to walls).
Failure Indications
A malfunction of the Rear Park Assist sensors or system
is indicated, during REVERSE gear engagement, by the
instrument panel warning icon.
The warning icon is illuminated and a message
is displayed on the multifunction display (if
equipped). Refer to “Instrument Cluster De-
scriptions” in “Understanding Your Instrument
Panel” for further information.
The sensors and wiring are tested continuously when the
ignition is in the ON/RUN position. Failures are indi-
cated immediately if they occur when the system is ON.
Even if the system is able to identify that a specific sensor
is in failure condition, the instrument cluster display
shall indicate that the Rear Park Assist system is unavail-
able, without reference to the sensor in failure condition.
If even a single sensor fails, the entire system must be
disabled. The system is turned off automatically.
Cleaning The Rear Park Assist System
Clean the Rear Park Assist sensors with water, car wash
soap and a soft cloth. Do not use rough or hard cloths. In
washing stations, clean sensors quickly keeping the va-
por jet/high pressure washing nozzles at least 4 in (10
cm) from the sensors. Do not scratch or poke the sensors.
Otherwise, you could damage the sensors.
126 UNDERSTANDING THE FEATURES OF YOUR VEHICLE
Page 147 of 392
CAUTION!(Continued)
•Do not use scrapers, sharp instruments, or abrasive
window cleaners on the interior surface of the
window.
•Keep all objects a safe distance from the window.
3. Front Fog Light Indicator — If Equipped
This indicator will illuminate when the front fog
lights are on.
4. Low Fuel Light
When the fuel level reaches approximately 1.0
gallon (3.8L) this light will turn on, and remain on
until fuel is added.
5. High Beam Indicator
This light indicates that the headlights are on high
beam. Pull the turn signal lever toward the steer-
ing wheel to switch the headlights to low beam.
6. Park/Headlight ON Indicator / Follow Me Home
(Headlight Delay) Indicator — If Equipped
This indicator will illuminate when the park
lights or headlights are turned on. If the Follow
Me Home feature is activated this indicator
will illuminate and the EVIC will show how
long the function remains active. For further information,
refer to “Follow Me Home” in “Understanding The
Features of Your Vehicle”.
7. Turn Signal Indicators
The arrows will flash in unison with the exte-
rior turn signal, when using the turn signal
lever.
8. Generic Warning Light
The Generic Warning Light will illuminate if
any of the following conditions occur: Oil
Change Request, Engine Oil Pressure Sensor
4
UNDERSTANDING YOUR INSTRUMENT PANEL 145
Page 270 of 392
vehicle may need to be driven for up to 20 minutes above
15 mph (24 km/h) to receive this information.
Check TPMS Warnings
The Tire Pressure Monitoring Telltale Light will flash on
and off for 75 seconds and remain on solid when a system
fault is detected, and the “Tire Pressure Monitoring
Unavailable” text message will display. If the ignition key
is cycled, this sequence will repeat providing the system
fault still exists. The Tire Pressure Monitoring Telltale
Light will turn off when the fault condition no longer
exists. A system fault can occur with any of the following
scenarios:
1. Jamming due to electronic devices or driving next to
facilities emitting the same radio frequencies as the
TPM sensors.
2. Installing some form of aftermarket window tinting
that affects radio wave signals.
3. Snow or ice around the wheels or wheel housings.
4. Using tire chains on the vehicle.
5. Using wheels/tires not equipped with TPM sensors.
NOTE:Your vehicle may be equipped with a compact
spare wheel and tire assembly.
1. The compact spare tire does not have a tire pressure
monitoring sensor. Therefore, the TPMS will not moni-
tor the tire pressure in the compact spare tire.
2. If you install the compact spare tire in place of a road
tire that has a pressure below the low-pressure warn-
ing limit, upon the next ignition key cycle, a chime will
sound and the Tire Pressure Monitoring Telltale Light
and the “Check Tire Pressure” message will still turn
ON due to the low tire.
3. However, after driving the vehicle for up to 20 min-
utes above 15 mph (24 km/h), the Tire Pressure
268 STARTING AND OPERATING
Page 282 of 392
HAZARD WARNING FLASHERS
The Hazard Warning flasher switch is located on the
instrument panel below the radio.
Press the switch to turn on the Hazard Warning
flashers. When the switch is activated, all direc-
tional turn signals will flash on and off to warn oncoming
traffic of an emergency. Press the switch a second time to
turn off the Hazard Warning flashers.
Do not use this emergency warning system when the
vehicle is in motion. Use it when your vehicle is disabled
and it is creating a safety hazard for other motorists.
If it is necessary to leave the vehicle to go for service, the
Hazard Warning flashers will continue to operate with
the ignition key removed and the vehicle locked.
NOTE:With extended use, the Hazard Warning flashers
may wear down your battery.
IF YOUR ENGINE OVERHEATS
In any of the following situations, you can reduce the
potential for overheating by taking the appropriate ac-
tion.
•On the highways — slow down.
•In city traffic — while stopped, place the transmission
in NEUTRAL, but do not increase engine idle speed.
NOTE:There are steps that you can take to slow down
an impending overheat condition:
•If your air conditioner (A/C) is on, turn it off. The A/C
system adds heat to the engine cooling system and
turning the A/C off can help remove this heat.
•You can also turn the temperature control to maximum
heat, the mode control to floor and the blower control
to high. This allows the heater core to act as a
supplement to the radiator and aids in removing heat
from the engine cooling system.
280 WHAT TO DO IN EMERGENCIES
Page 312 of 392
▫Appearance Care And Protection From
Corrosion...........................338
!FUSES..............................345
▫Interior Fuses........................345
▫Underhood Fuses......................348
!VEHICLE STORAGE....................351
!REPLACEMENT BULBS.................351
!BULB REPLACEMENT..................352
▫Headlamps Low Beam and High Beam......353
▫Front Turn Signal, Parking And Daytime Running
Lamps.............................353
▫Front Fog Lamps......................354
▫Front/Rear Side Marker Lamps............354
▫Rear Tail, Stop, Backup And Turn Signal
Lamps.............................354
▫Center High Mounted Stop Lamp (CHMSL) . . .355
!FLUID CAPACITIES....................356
!FLUIDS, LUBRICANTS AND GENUINE PARTS . . .356
▫Engine.............................356
▫Chassis............................357
310 MAINTAINING YOUR VEHICLE
Page 354 of 392
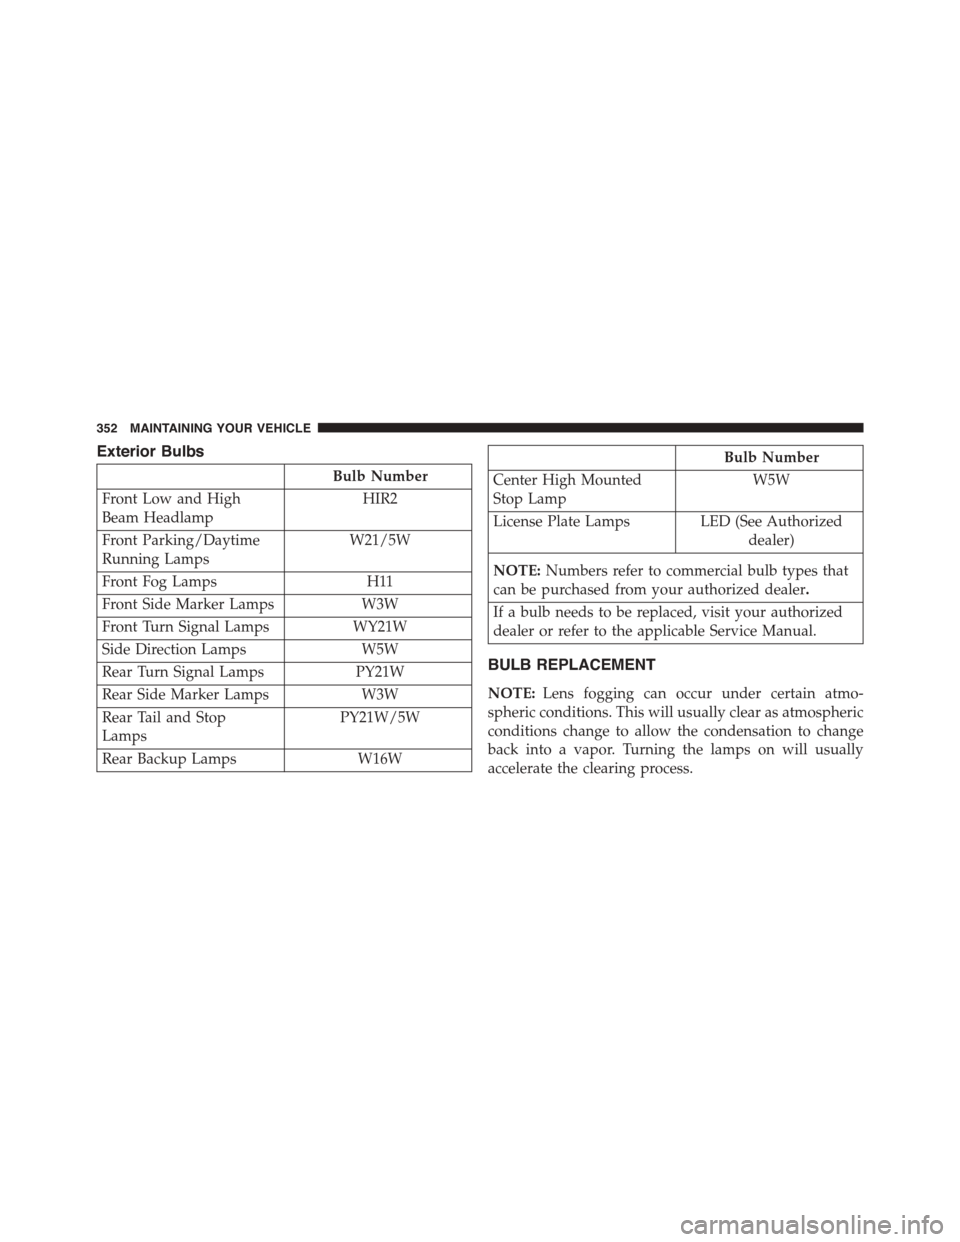
Exterior Bulbs
Bulb Number
Front Low and High
Beam Headlamp
HIR2
Front Parking/Daytime
Running Lamps
W21/5W
Front Fog Lamps H11
Front Side Marker Lamps W3W
Front Turn Signal Lamps WY21W
Side Direction Lamps W5W
Rear Turn Signal Lamps PY21W
Rear Side Marker Lamps W3W
Rear Tail and Stop
Lamps
PY21W/5W
Rear Backup Lamps W16W
Bulb Number
Center High Mounted
Stop Lamp
W5W
License Plate Lamps LED (See Authorized
dealer)
NOTE:Numbers refer to commercial bulb types that
can be purchased from your authorized dealer.
If a bulb needs to be replaced, visit your authorized
dealer or refer to the applicable Service Manual.
BULB REPLACEMENT
NOTE:Lens fogging can occur under certain atmo-
spheric conditions. This will usually clear as atmospheric
conditions change to allow the condensation to change
back into a vapor. Turning the lamps on will usually
accelerate the clearing process.
352 MAINTAINING YOUR VEHICLE
Page 355 of 392
Headlamps Low Beam and High Beam
1. Remove the plastic cap from the back of the headlamp
housing.
2. Rotate the bulb counter-clockwise.
3. Remove the bulb and replace as needed.
4. Install the bulb and rotate clockwise to lock in place.
5. Reinstall the plastic cap.
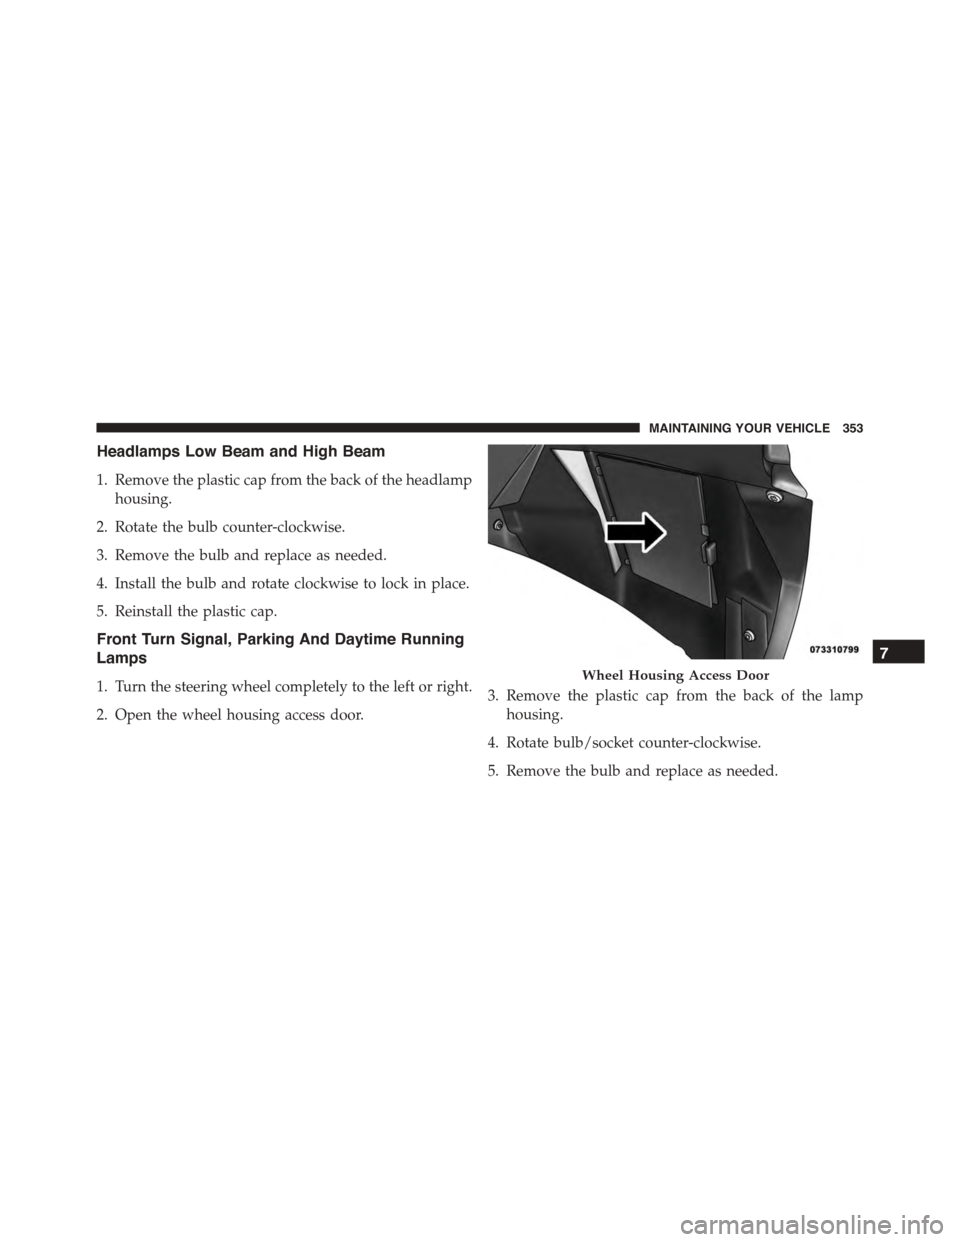
Front Turn Signal, Parking And Daytime Running
Lamps
1. Turn the steering wheel completely to the left or right.
2. Open the wheel housing access door.
3. Remove the plastic cap from the back of the lamp
housing.
4. Rotate bulb/socket counter-clockwise.
5. Remove the bulb and replace as needed.
Wheel Housing Access Door
7
MAINTAINING YOUR VEHICLE 353