steering wheel FIAT 500 ABARTH 2015 2.G Owner's Manual
[x] Cancel search | Manufacturer: FIAT, Model Year: 2015, Model line: 500 ABARTH, Model: FIAT 500 ABARTH 2015 2.GPages: 108, PDF Size: 2.63 MB
Page 46 of 108
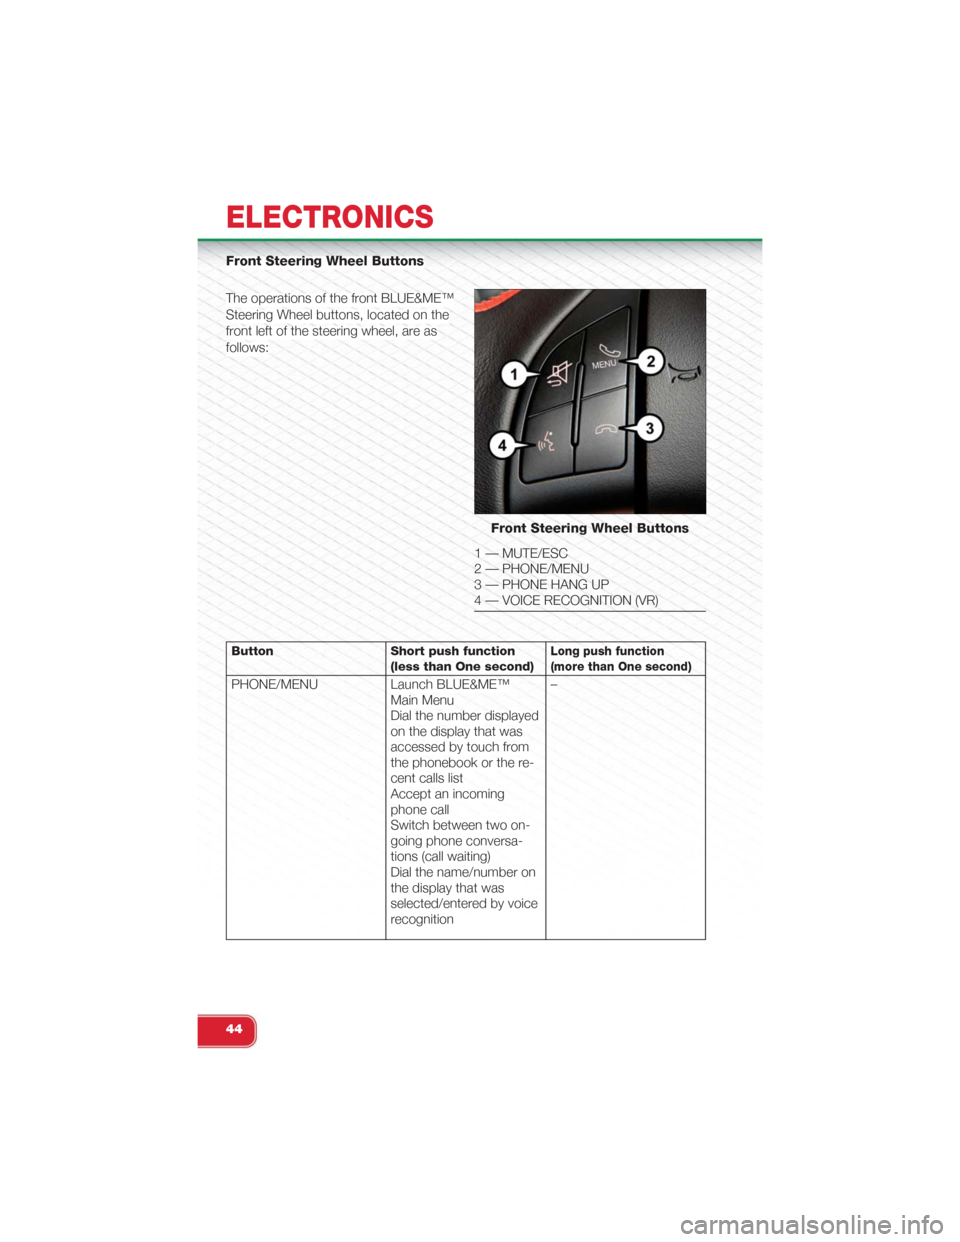
Front Steering Wheel Buttons
The operations of the front BLUE&ME™
Steering Wheel buttons, located on the
front left of the steering wheel, are as
follows:
Button Short push function(less than One second)Long push function(more than One second)
PHONE/MENU Launch BLUE&ME™Main MenuDial the number displayedon the display that wasaccessed by touch fromthe phonebook or the re-cent calls listAccept an incomingphone callSwitch between two on-going phone conversa-tions (call waiting)Dial the name/number onthe display that wasselected/entered by voicerecognition
–
Front Steering Wheel Buttons
1 — MUTE/ESC2 — PHONE/MENU3 — PHONE HANG UP4 — VOICE RECOGNITION (VR)
ELECTRONICS
44
Page 47 of 108
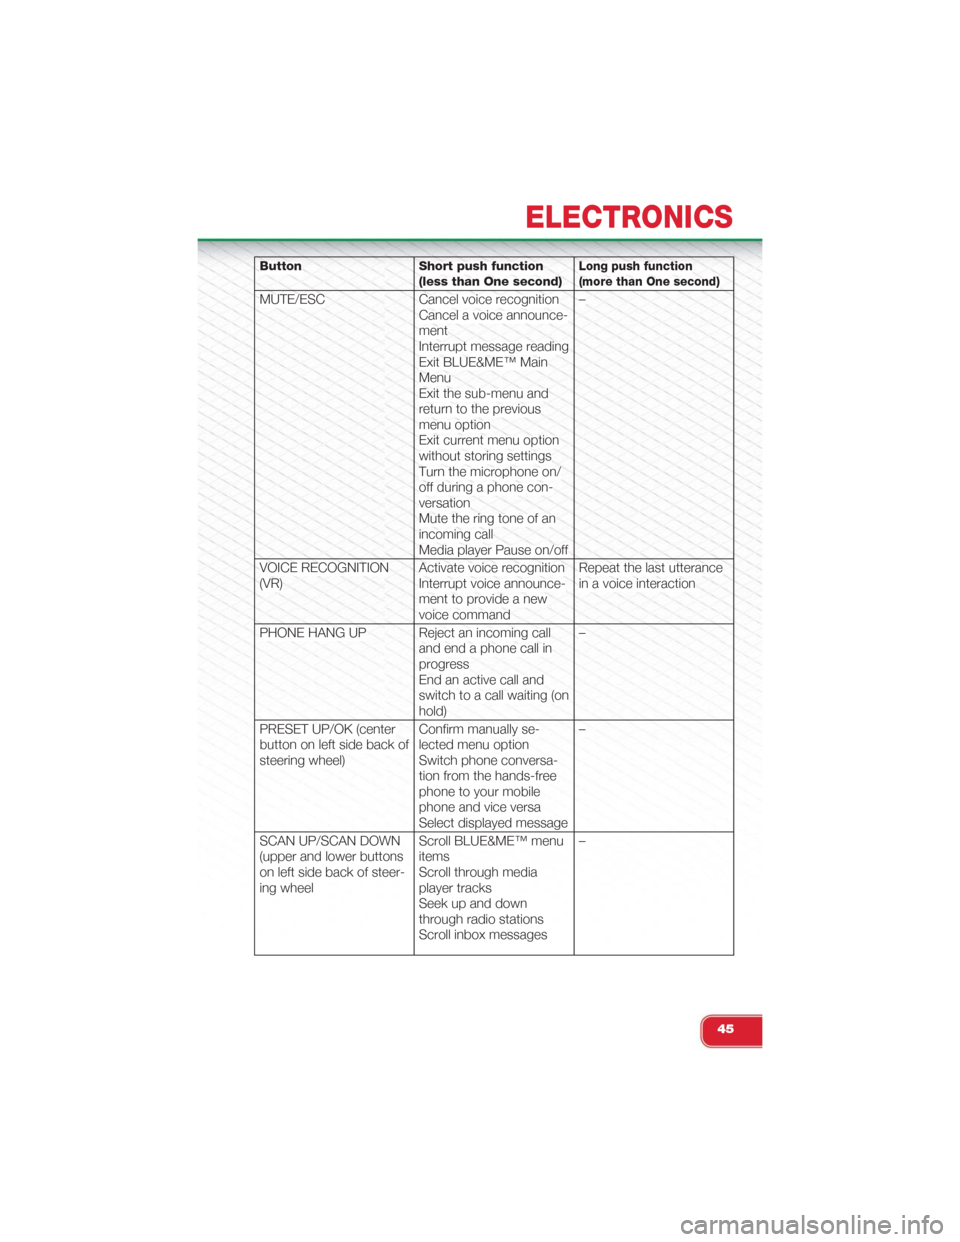
Button Short push function(less than One second)Long push function(more than One second)
MUTE/ESC Cancel voice recognitionCancel a voice announce-mentInterrupt message readingExit BLUE&ME™ MainMenuExit the sub-menu andreturn to the previousmenu optionExit current menu optionwithout storing settingsTurn the microphone on/off during a phone con-versationMute the ring tone of anincoming callMedia player Pause on/off
–
VOICE RECOGNITION(VR)Activate voice recognitionInterrupt voice announce-ment to provide a newvoice command
Repeat the last utterancein a voice interaction
PHONE HANG UP Reject an incoming calland end a phone call inprogressEnd an active call andswitch to a call waiting (onhold)
–
PRESET UP/OK (centerbutton on left side back ofsteering wheel)
Confirm manually se-lected menu optionSwitch phone conversa-tion from the hands-freephone to your mobilephone and vice versaSelect displayed message
–
SCAN UP/SCAN DOWN(upper and lower buttonson left side back of steer-ing wheel
Scroll BLUE&ME™ menuitemsScroll through mediaplayer tracksSeek up and downthrough radio stationsScroll inbox messages
–
ELECTRONICS
45
Page 48 of 108
BLUE&ME™ Hands-Free Communication
•To use the hands-free feature, you need a Bluetooth® wireless technology enabled
mobile phone. This hands-free feature gives you the possibility of interacting vocally
with your mobile phone while driving, even if your mobile device does not feature this
capability. You can also interact with your mobile phone manually and visually using
the steering wheel controls and the instrument panel Electronic Vehicle Information
Center (EVIC) display.
• To get started with BLUE&ME™ hands-free feature with voice recognition, you
have to simply pair your Bluetooth® wireless technology enabled mobile phone
with the system.
• Refer to the BLUE&ME™ User's Manual on the DVD for more details.
Pair Your Mobile Phone
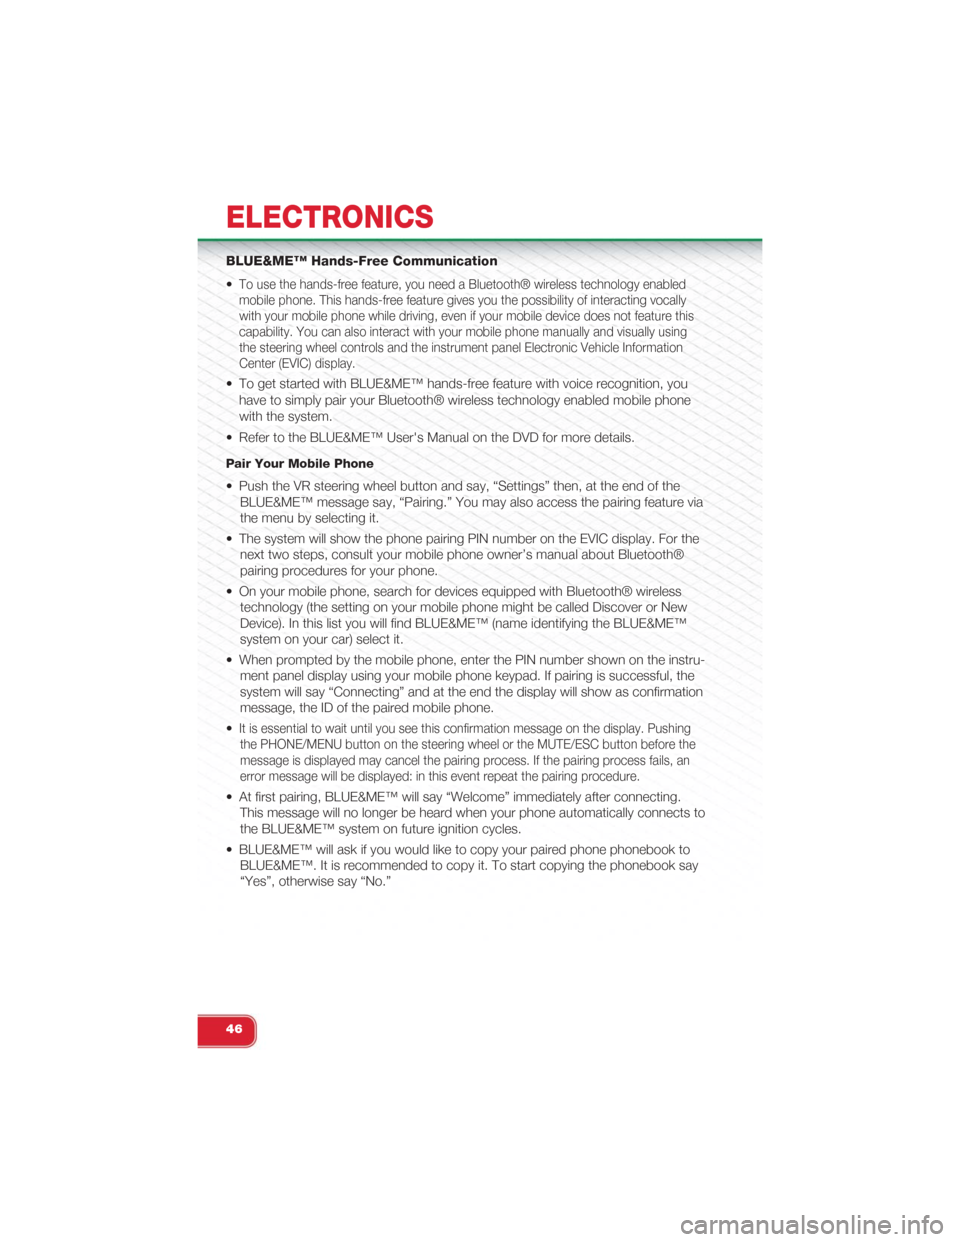
• Push the VR steering wheel button and say, “Settings” then, at the end of the
BLUE&ME™ message say, “Pairing.” You may also access the pairing feature via
the menu by selecting it.
• The system will show the phone pairing PIN number on the EVIC display. For the
next two steps, consult your mobile phone owner’s manual about Bluetooth®
pairing procedures for your phone.
• On your mobile phone, search for devices equipped with Bluetooth® wireless
technology (the setting on your mobile phone might be called Discover or New
Device). In this list you will find BLUE&ME™ (name identifying the BLUE&ME™
system on your car) select it.
• When prompted by the mobile phone, enter the PIN number shown on the instru-
ment panel display using your mobile phone keypad. If pairing is successful, the
system will say “Connecting” and at the end the display will show as confirmation
message, the ID of the paired mobile phone.
•It is essential to wait until you see this confirmation message on the display. Pushing
the PHONE/MENU button on the steering wheel or the MUTE/ESC button before the
message is displayed may cancel the pairing process. If the pairing process fails, an
error message will be displayed: in this event repeat the pairing procedure.
• At first pairing, BLUE&ME™ will say “Welcome” immediately after connecting.
This message will no longer be heard when your phone automatically connects to
the BLUE&ME™ system on future ignition cycles.
• BLUE&ME™ will ask if you would like to copy your paired phone phonebook to
BLUE&ME™. It is recommended to copy it. To start copying the phonebook say
“Yes”, otherwise say “No.”
ELECTRONICS
46
Page 49 of 108
• For certain mobile phones the phonebook is not copied automatically, in this case
you must transfer the phonebook contacts using your mobile phone keypad. If
BLUE&ME™ asks you to do this, then perform this procedure following the in-
structions specific to your mobile phone and push the PHONE/MENU button on
the steering wheel when you have finished. Certain mobile phones may require
you to indicate that you do not want to be asked every time to copy the phone-
book. If this is the case, this could be indicated by checking a box during on the
phone the pairing process. If applicable, this option will only be presented on the
phone during the pairing process.
Making A Phone Call
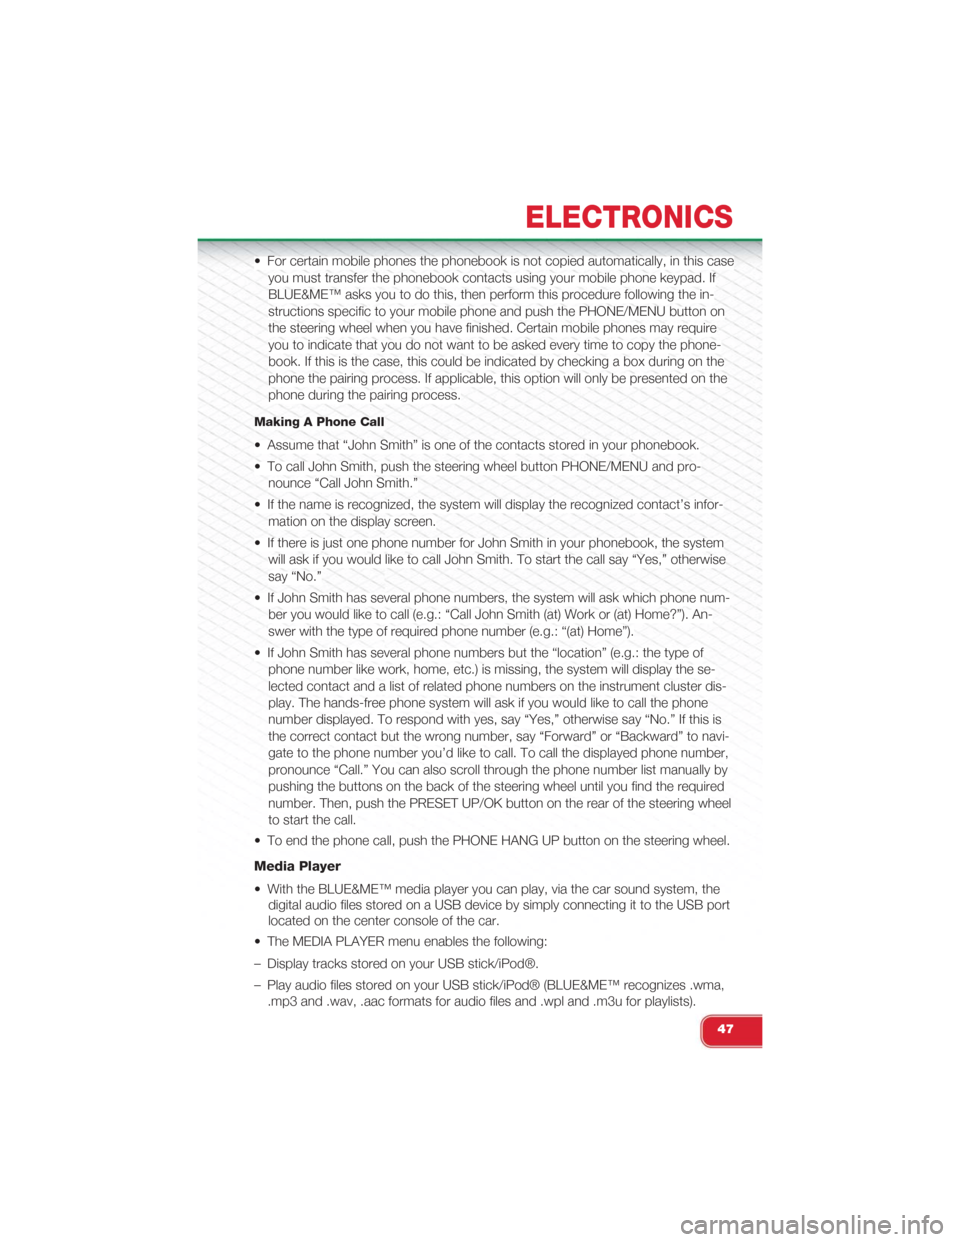
• Assume that “John Smith” is one of the contacts stored in your phonebook.
• To call John Smith, push the steering wheel button PHONE/MENU and pro-
nounce “Call John Smith.”
• If the name is recognized, the system will display the recognized contact’s infor-
mation on the display screen.
• If there is just one phone number for John Smith in your phonebook, the system
will ask if you would like to call John Smith. To start the call say “Yes,” otherwise
say “No.”
• If John Smith has several phone numbers, the system will ask which phone num-
ber you would like to call (e.g.: “Call John Smith (at) Work or (at) Home?”). An-
swer with the type of required phone number (e.g.: “(at) Home”).
• If John Smith has several phone numbers but the “location” (e.g.: the type of
phone number like work, home, etc.) is missing, the system will display the se-
lected contact and a list of related phone numbers on the instrument cluster dis-
play. The hands-free phone system will ask if you would like to call the phone
number displayed. To respond with yes, say “Yes,” otherwise say “No.” If this is
the correct contact but the wrong number, say “Forward” or “Backward” to navi-
gate to the phone number you’d like to call. To call the displayed phone number,
pronounce “Call.” You can also scroll through the phone number list manually by
pushing the buttons on the back of the steering wheel until you find the required
number. Then, push the PRESET UP/OK button on the rear of the steering wheel
to start the call.
• To end the phone call, push the PHONE HANG UP button on the steering wheel.
Media Player
• With the BLUE&ME™ media player you can play, via the car sound system, the
digital audio files stored on a USB device by simply connecting it to the USB port
located on the center console of the car.
• The MEDIA PLAYER menu enables the following:
– Display tracks stored on your USB stick/iPod®.
– Play audio files stored on your USB stick/iPod® (BLUE&ME™ recognizes .wma,
.mp3 and .wav, .aac formats for audio files and .wpl and .m3u for playlists).
ELECTRONICS
47
Page 50 of 108
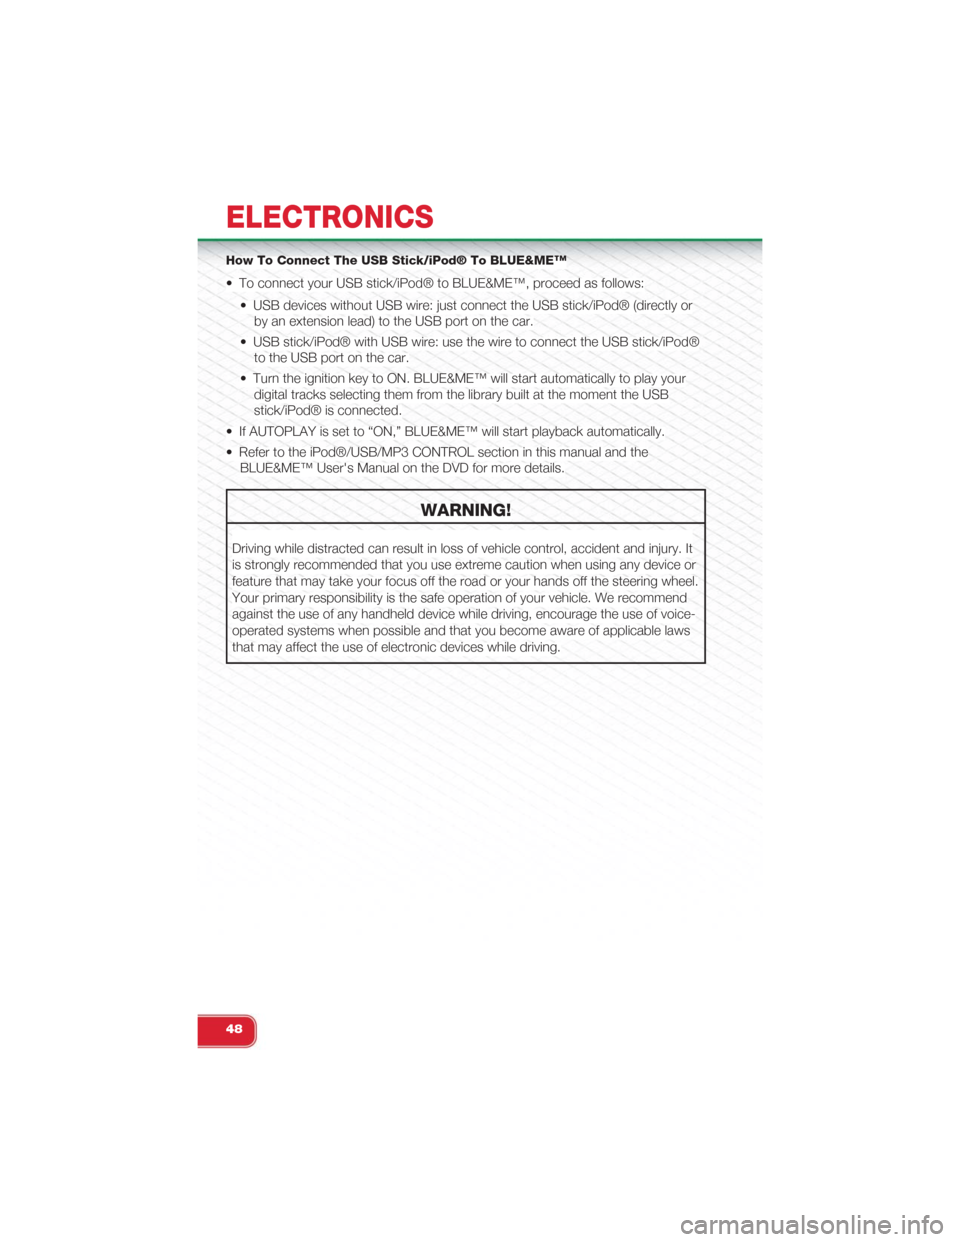
How To Connect The USB Stick/iPod® To BLUE&ME™
• To connect your USB stick/iPod® to BLUE&ME™, proceed as follows:
• USB devices without USB wire: just connect the USB stick/iPod® (directly or
by an extension lead) to the USB port on the car.
• USB stick/iPod® with USB wire: use the wire to connect the USB stick/iPod®
to the USB port on the car.
• Turn the ignition key to ON. BLUE&ME™ will start automatically to play your
digital tracks selecting them from the library built at the moment the USB
stick/iPod® is connected.
• If AUTOPLAY is set to “ON,” BLUE&ME™ will start playback automatically.
• Refer to the iPod®/USB/MP3 CONTROL section in this manual and the
BLUE&ME™ User's Manual on the DVD for more details.
WARNING!
Driving while distracted can result in loss of vehicle control, accident and injury. It
is strongly recommended that you use extreme caution when using any device or
feature that may take your focus off the road or your hands off the steering wheel.
Your primary responsibility is the safe operation of your vehicle. We recommend
against the use of any handheld device while driving, encourage the use of voice-
operated systems when possible and that you become aware of applicable laws
that may affect the use of electronic devices while driving.
ELECTRONICS
48
Page 63 of 108
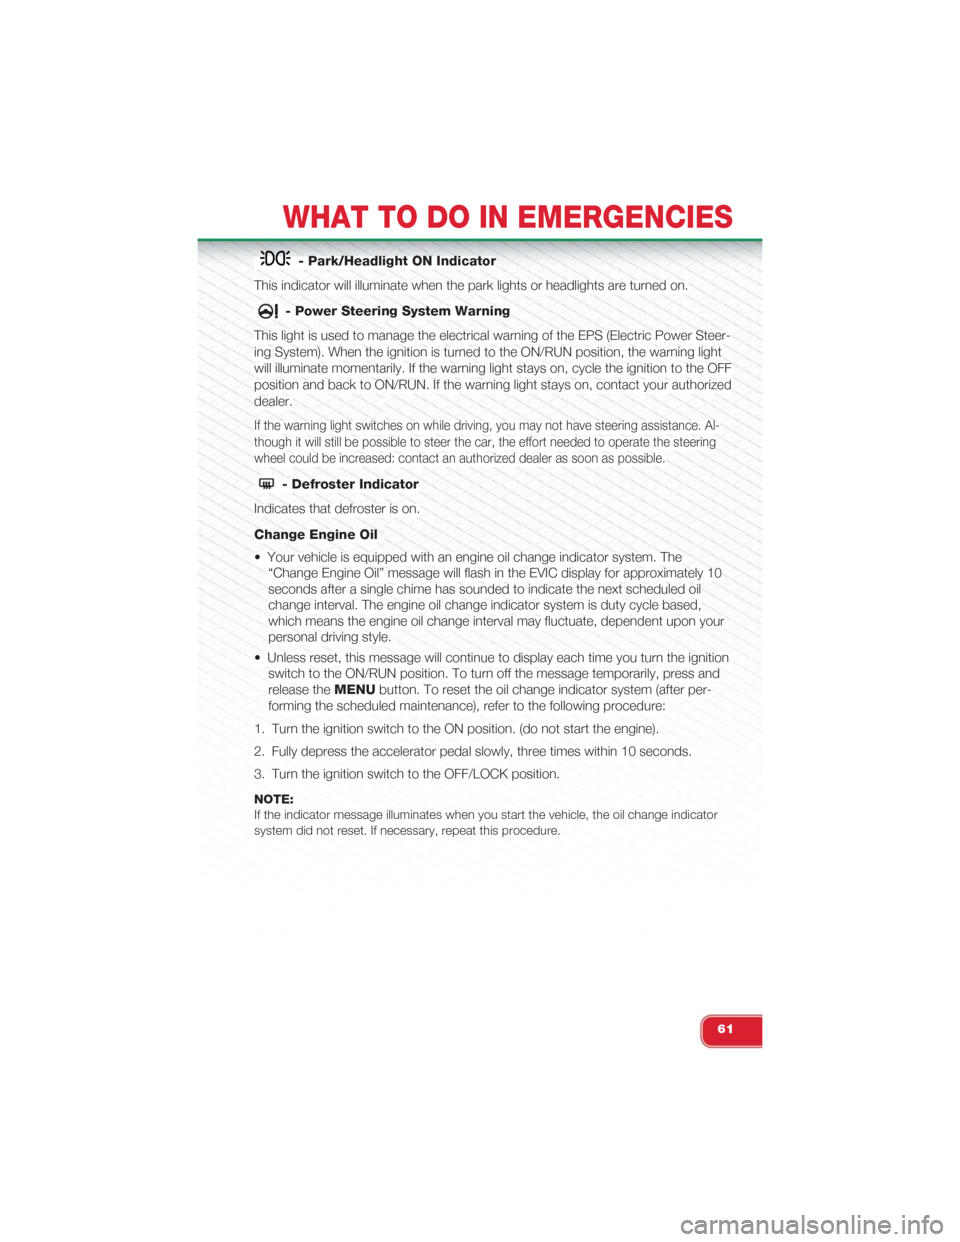
- Park/Headlight ON Indicator
This indicator will illuminate when the park lights or headlights are turned on.
- Power Steering System Warning
This light is used to manage the electrical warning of the EPS (Electric Power Steer-
ing System). When the ignition is turned to the ON/RUN position, the warning light
will illuminate momentarily. If the warning light stays on, cycle the ignition to the OFF
position and back to ON/RUN. If the warning light stays on, contact your authorized
dealer.
If the warning light switches on while driving, you may not have steering assistance. Al-
though it will still be possible to steer the car, the effort needed to operate the steering
wheel could be increased: contact an authorized dealer as soon as possible.
- Defroster Indicator
Indicates that defroster is on.
Change Engine Oil
• Your vehicle is equipped with an engine oil change indicator system. The
“Change Engine Oil” message will flash in the EVIC display for approximately 10
seconds after a single chime has sounded to indicate the next scheduled oil
change interval. The engine oil change indicator system is duty cycle based,
which means the engine oil change interval may fluctuate, dependent upon your
personal driving style.
• Unless reset, this message will continue to display each time you turn the ignition
switch to the ON/RUN position. To turn off the message temporarily, press and
release theMENUbutton. To reset the oil change indicator system (after per-
forming the scheduled maintenance), refer to the following procedure:
1. Turn the ignition switch to the ON position. (do not start the engine).
2. Fully depress the accelerator pedal slowly, three times within 10 seconds.
3. Turn the ignition switch to the OFF/LOCK position.
NOTE:If the indicator message illuminates when you start the vehicle, the oil change indicatorsystem did not reset. If necessary, repeat this procedure.
WHAT TO DO IN EMERGENCIES
61
Page 77 of 108
FREEING A STUCK VEHICLE
• If your vehicle becomes stuck in mud, sand or snow, it can often be moved by a
rocking motion. Turn your steering wheel right and left to clear the area around
the front wheels. Then shift back and forth between 2nd gear and REVERSE.
Using minimal accelerator pedal pressure to maintain the rocking motion, without
spinning the wheels, is most effective.
NOTE:If your vehicle is equipped with Traction Control or Electronic Stability Control (ESC), turnthe system OFF before attempting to “rock” the vehicle.
CAUTION!
• Racing the engine or spinning the wheels may lead to transmission overheat-
ing and failure. Allow the engine to idle with the shift lever in NEUTRAL for at
least one minute after every five rocking-motion cycles. This will minimize
overheating and reduce the risk of transmission failure during prolonged ef-
forts to free a stuck vehicle.
•When “rocking” a stuck vehicle by moving between 1st and REVERSE, do not
spin the wheels faster than 15 mph (24 km/h), or drivetrain damage may result.
• Revving the engine or spinning the wheels too fast may lead to transmission
overheating and failure. It can also damage the tires. Do not spin the wheels
above 30 mph (48 km/h) while in gear (no transmission shifting occurring).
WARNING!
Fast spinning tires can be dangerous. Forces generated by excessive wheel
speeds may cause tire damage or failure. A tire could explode and injure some-
one. Do not spin your vehicle's wheels faster than 30 mph (48 km/h) when you
are stuck. Do not let anyone near a spinning wheel, no matter what the speed.
WHAT TO DO IN EMERGENCIES
75
Page 101 of 108
Tire Pressure Monitoring (TPMS) . .56
Turn Signal. . . . . . . . . . . . . .25
Lower Anchors and Tether for CHildren
(LATCH). . . . . . . . . . . . . . . . .15
Lubrication, Body. . . . . . . . . . . . .81
Maintenance Free Battery . . . . . . . .81
Maintenance, General. . . . . . . . . . .81
Maintenance Procedures . . . .. . . . .81
Maintenance Record. . . . . . . . . . .86
Maintenance Schedule . .. . . . . . . .82
Malfunction Indicator Light (Check
Engine). . . . . . . . . . . . . . . . .59
Manual Transmission. . . . . . . . . . .32
Lubricant Selection. . . . . . . . . .81
Master Cylinder (Brakes). . . . . . . . .81
Mirrors
Heated. . . . . . . . . . . . . . . . .30
MOPAR® Accessories . . .. . . . . . .95
New Vehicle Break-In Period. . . . . . .24
Occupant Restraints. . . . . . . . . . .14
Oil Change Indicator. . . . . . . . . . . .61
Oil Change Indicator, Reset . . .. . . .61
Oil, Engine...............80, 81
Capacity. . . . . . . . . . . . . . . .80
Change Interval. . . . . . . . . . . .81
Checking. . . . . . . . . . . . . . .81
Disposal. . . . . . . . . . . . . . . .81Filter. . . . . . . . . . . . . . . . . .81Filter Disposal. . . . . . . . . . . . .81Materials Added to. . . . . . . . . .81Recommendation........80, 81Viscosity. . . . . . . . . . . . . . . .81Oil Filter, Selection. . . . . . . . . . . . .81Oil Pressure Light. . . . . . . . . . . . .55OutletPower. . . . . . . . . . . . . . . . .53Overheating, Engine. . . . . . . . . . . .62
Paint Care. . . . . . . . . . . . . . . . .81Placard, Tire and Loading Information . .89PowerDoor Locks. . . . . . . . . . . . . .10Outlet (Auxiliary Electrical Outlet) . .53Steering. . . . . . . . . . . . . . . .61
Programmable Electronic Features . . .51
Radio (Sound Systems). . . . . . . . . .40
Rear Seat, Folding. . . . . . . . . . . . .22
Reclining Front Seats. . . . . . . . . . .20
Recreational Towing.. . . . . . . . . . .54
Refrigerant . . .. . . . . . . . . . . . . .81
Remote Keyless Entry (RKE)
Disarm The Alarm . .. . . . . . . . .10
Power Convertible Top Function . . .8Replacement Bulbs. . . . . . . . . . . .92Reporting Safety Defects . . . . .. . . .94
Schedule, Maintenance. . . . . . . . . .82Seat BeltEngage The Automatic LockingMode . . . . . . . . .. . . . . . . .16Seat Belt Maintenance . . .. . . . . . .81Seat Belts. . . . . . . . . . . . . . . . .10Reminder. . . . . . . . . . . . . . .57Seat Belt Warning . .. . . . . . . .11SeatsAdjustment . . . . . . .. . . . . . .20Rear Folding. . . . . . . . . . . . . .22Security Alarm. . . . . . . . . . . . . . .60Disarm The System .. . . . . . . . .10Security Alarm. . . . . . . . . . . . .10Signals, Turn..............25, 60Sound Systems (Radio). . . . . . . . . .40Spare Tire...............90, 91Spark Plugs . . . .. . . . . . . . . . . .80Speed ControlAccel/Decel. . . . . . . . . . . . . .27Cancel . .. . . . . . . . . . . . . . .28Resume. . . . . . . . . . . . . . . .28Set . . . . . . . . . . . . . . . . . . .27Speed Control (Cruise Control). . . . . .27StartingCold Weather. . . . . . . . . . . . .37SteeringTilt Column .. . . . . . . . . . . . .23Steering Wheel Audio Controls .. . . . .42Store Radio Presets . .. . . . . . . . . .41Stuck, Freeing .. . . . . . . . . . . . . .75Supplemental Restraint System -Airbag. . . . . . . . . . . . . . . . . .11
Tilt Steering Column. . . . . . . . . . . .23
INDEX
99