traction control FIAT 500E 2014 2.G User Guide
[x] Cancel search | Manufacturer: FIAT, Model Year: 2014, Model line: 500E, Model: FIAT 500E 2014 2.GPages: 92, PDF Size: 3.24 MB
Page 39 of 92

SPEED CONTROL
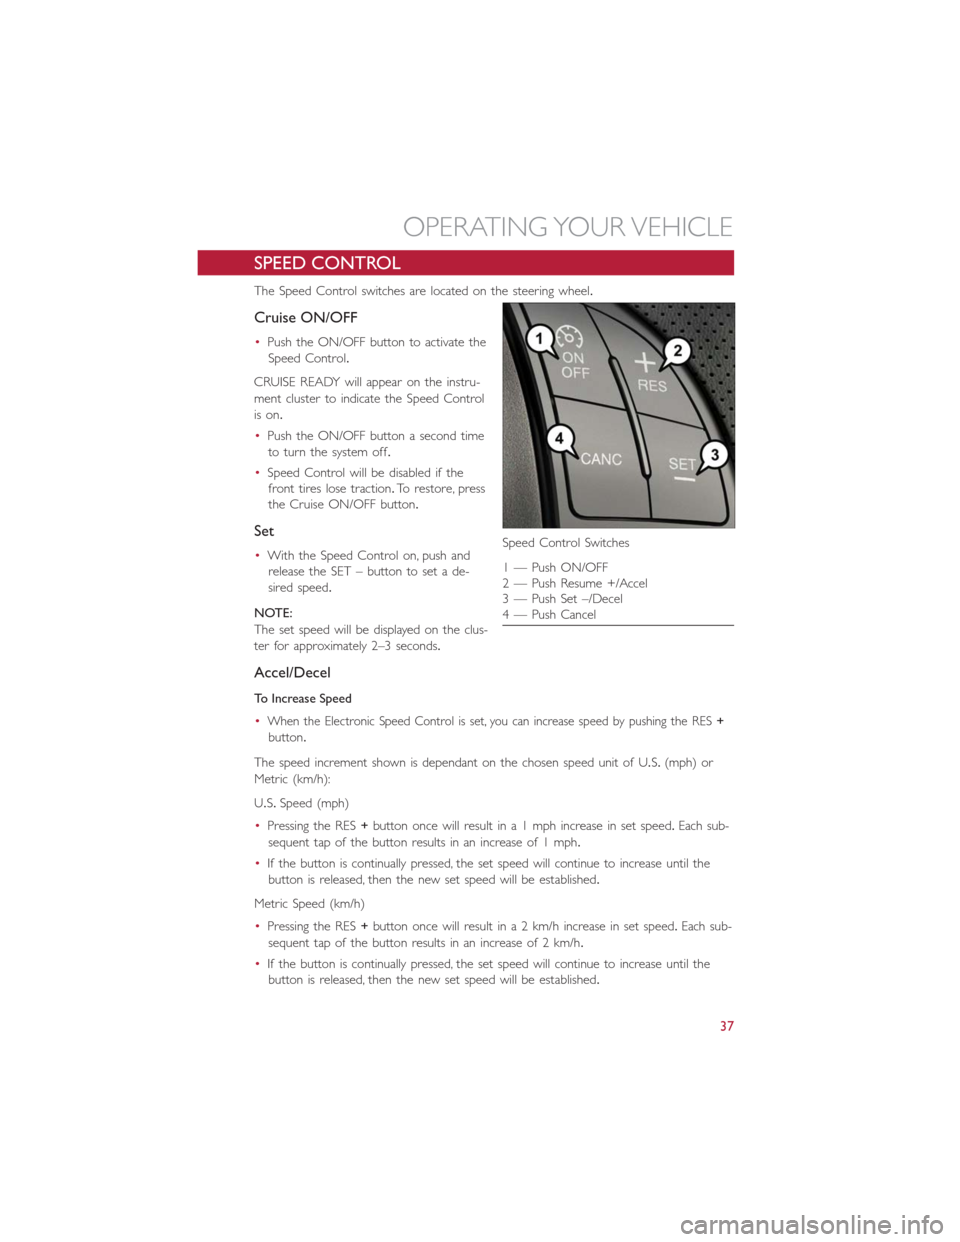
The Speed Control switches are located on the steering wheel.
Cruise ON/OFF
•Push the ON/OFF button to activate the
Speed Control.
CRUISE READY will appear on the instru-
ment cluster to indicate the Speed Control
is on.
•Push the ON/OFF button a second time
to turn the system off.
•Speed Control will be disabled if the
front tires lose traction.To restore, press
the Cruise ON/OFF button.
Set
•With the Speed Control on, push and
release the SET – button to set a de-
sired speed.
NOTE:
The set speed will be displayed on the clus-
ter for approximately 2–3 seconds.
Accel/Decel
To Increase Speed
•
When the Electronic Speed Control is set, you can increase speed by pushing the RES+
button.
The speed increment shown is dependant on the chosen speed unit of U.S.(mph) or
Metric (km/h):
U.S.Speed (mph)
•Pressing the RES+button once will result in a 1 mph increase in set speed.Each sub-
sequent tap of the button results in an increase of 1 mph.
•If the button is continually pressed, the set speed will continue to increase until the
button is released, then the new set speed will be established.
Metric Speed (km/h)
•Pressing the RES+button once will result in a 2 km/h increase in set speed.Each sub-
sequent tap of the button results in an increase of 2 km/h.
•If the button is continually pressed, the set speed will continue to increase until the
button is released, then the new set speed will be established.
Speed Control Switches
1 — Push ON/OFF
2 — Push Resume +/Accel
3 — Push Set –/Decel
4 — Push Cancel
OPERATING YOUR VEHICLE
37
Page 59 of 92

Partial Off
This mode is entered by momentarily pressing the ESC Off switch.This mode is intended
for times when a more spirited driving experience is desired.It is also intended for driv-
ing in deep snow, sand or gravel conditions, when more wheel spin than ESC would nor-
mally allow is required to gain traction.To turn ESC on again, momentarily press the
switch again.This will restore the normal ESC On mode of operation.
Full Off
This mode is intended for off-highway or off-road use only and should not be used on
public roadways.In this mode, all TCS and ESC stability features are turned OFF, except
for the limited slip feature described in the TCS section.To enter the “Full Off ” mode,
depress and hold the ESC OFF switch for five seconds.After five seconds, the ESC OFF
Indicator Light will illuminate, and the “ESC OFF” message will display in the EVIC.To turn
ESC ON again, momentarily press the ESC OFF switch.
- Electronic Stability Control (ESC) Activation / Malfunction
Indicator Light
The “ESC Activation/Malfunction Indicator Light” in the instrument cluster will come on
for four seconds when the ignition switch is turned to the ON/RUN position.If the “ESC
Activation/Malfunction Indicator Light” comes on continuously with the engine running, a
malfunction has been detected in the ESC system.If this light remains on, see your
authorized dealer as soon as possible to have the problem diagnosed and corrected.
NOTE:
•The “ESC Off Indicator Light” and the “ESC Activation/Malfunction Indicator Light”
come on momentarily each time the ignition switch is turned to ON/RUN.
•Each time the ignition is turned to ON/RUN, the ESC system will be ON even if it
was turned off previously.
•ESC Activation/Malfunction Light can blink during a ESC or TC intervention.
- Tire Pressure Monitoring System (TPMS) Light
•Each tire, including the spare (if provided), should be checked monthly when cold and
inflated to the inflation pressure recommended by the vehicle manufacturer on the
vehicle placard or tire inflation pressure label.(If your vehicle has tires of a different
size than the size indicated on the vehicle placard or tire inflation pressure label, you
should determine the proper tire inflation pressure for those tires.)
•As an added safety feature, your vehicle has been equipped with a Tire Pressure Moni-
toring System (TPMS) that illuminates a low tire pressure telltale when one or more
of your tires is significantly under-inflated.Accordingly, when the low tire pressure tell-
tale illuminates, you should stop and check your tires as soon as possible, and inflate
them to the proper pressure.Driving on a significantly under-inflated tire causes the
tire to overheat and can lead to tire failure.Under-inflation also reduces fuel efficiency
and tire tread life, and may affect the vehicle’s handling and stopping ability.
WHAT TO DO IN EMERGENCIES
57
Page 82 of 92

WARNING!
•Overloading of your tires is dangerous.Overloading can cause tire failure, affect
vehicle handling, and increase your stopping distance.Use tires of the recom-
mended load capacity for your vehicle.Never overload them.
•Improperly inflated tires are dangerous and can cause collisions.Under-inflation is
the leading cause of tire failure and may result in severe cracking, component sepa-
ration, or “blow out”.Over-inflation reduces a tire’s ability to cushion shock.Ob-
jects on the road and chuck holes can cause damage that results in tire failure.
Unequal tire pressures can cause steering problems.You could lose control of your
vehicle.Over-inflated or under-inflated tires can affect vehicle handling and can fail
suddenly, resulting in loss of vehicle control.
TIRE ROTATION RECOMMENDATIONS
NOTE:
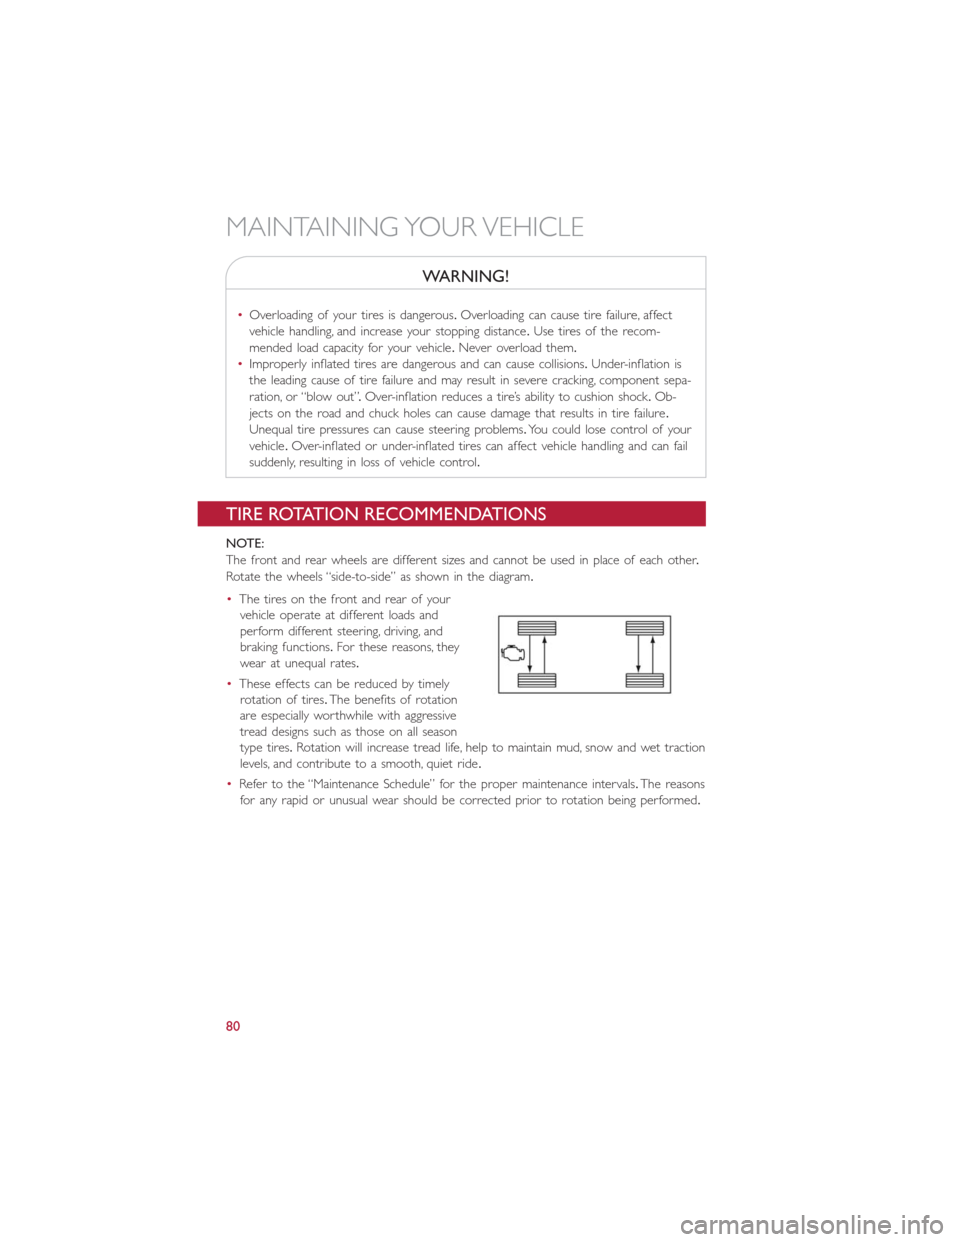
The front and rear wheels are different sizes and cannot be used in place of each other.
Rotate the wheels “side-to-side” as shown in the diagram.
•The tires on the front and rear of your
vehicle operate at different loads and
perform different steering, driving, and
braking functions.For these reasons, they
wear at unequal rates.
•These effects can be reduced by timely
rotation of tires.The benefits of rotation
are especially worthwhile with aggressive
tread designs such as those on all season
type tires.Rotation will increase tread life, help to maintain mud, snow and wet traction
levels, and contribute to a smooth, quiet ride.
•Refer to the “Maintenance Schedule” for the proper maintenance intervals.The reasons
for any rapid or unusual wear should be corrected prior to rotation being performed.
MAINTAINING YOUR VEHICLE
80