FIAT 500E 2016 2.G Owners Manual
500E 2016 2.G
FIAT
FIAT
https://www.carmanualsonline.info/img/10/4512/w960_4512-0.png
FIAT 500E 2016 2.G Owners Manual
Trending: sat nav, low oil pressure, overheating, brake rotor, wiper fluid, key, service schedule
Page 321 of 362
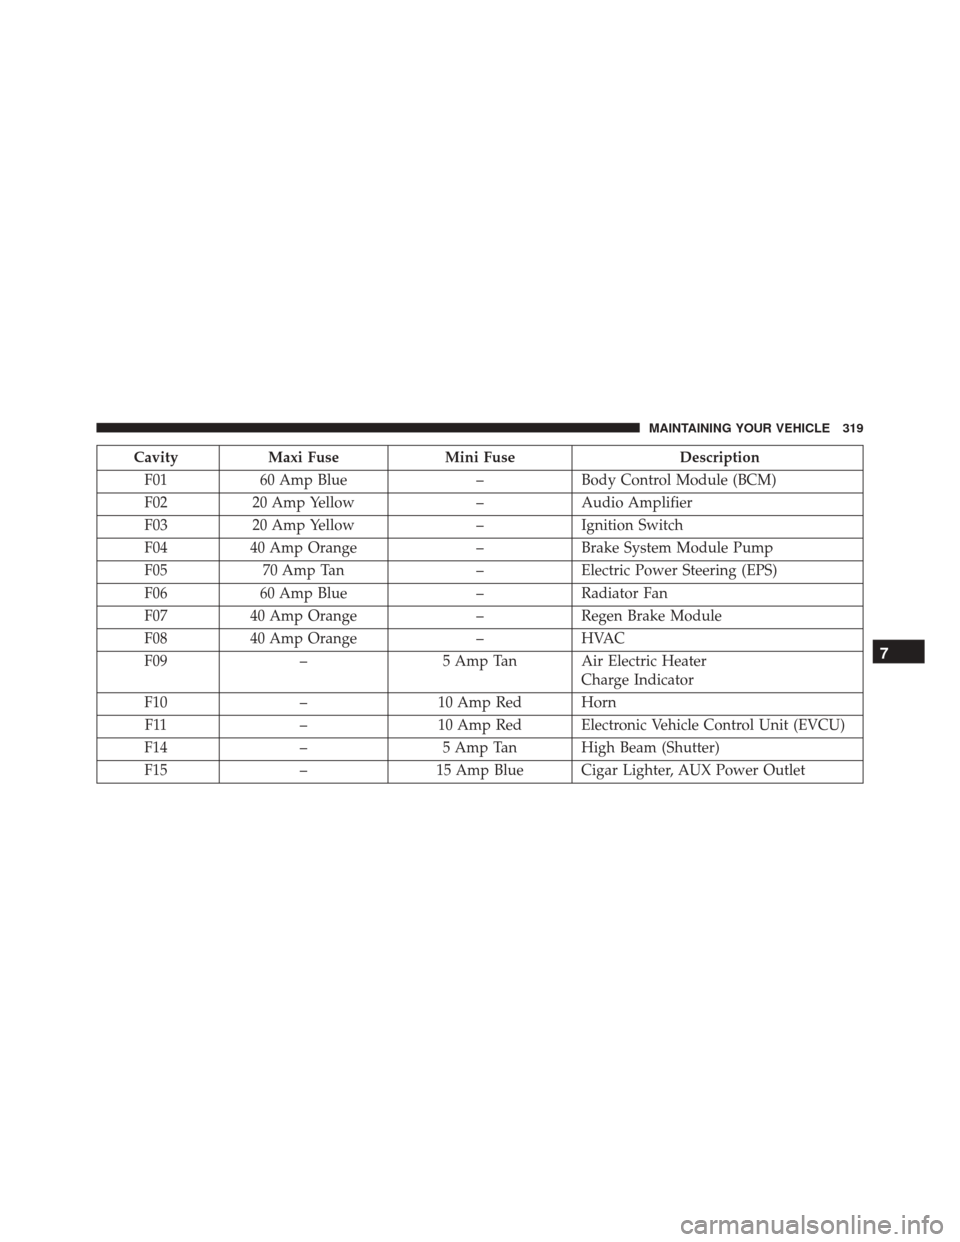
CavityMaxi Fuse Mini Fuse Description
F01 60 Amp Blue –Body Control Module (BCM)
F02 20 Amp Yellow –Audio Amplifier
F03 20 Amp Yellow –Ignition Switch
F04 40 Amp Orange –Brake System Module Pump
F05 70 Amp Tan –Electric Power Steering (EPS)
F06 60 Amp Blue –Radiator Fan
F07 40 Amp Orange –Regen Brake Module
F08 40 Amp Orange –HVAC
F09 –5 Amp Tan Air Electric Heater
Charge Indicator
F10 –10 Amp Red Horn
F11 –10 Amp Red Electronic Vehicle Control Unit (EVCU)
F14 –5 Amp Tan High Beam (Shutter)
F15 –15 Amp Blue Cigar Lighter, AUX Power Outlet
7
MAINTAINING YOUR VEHICLE 319
Page 322 of 362
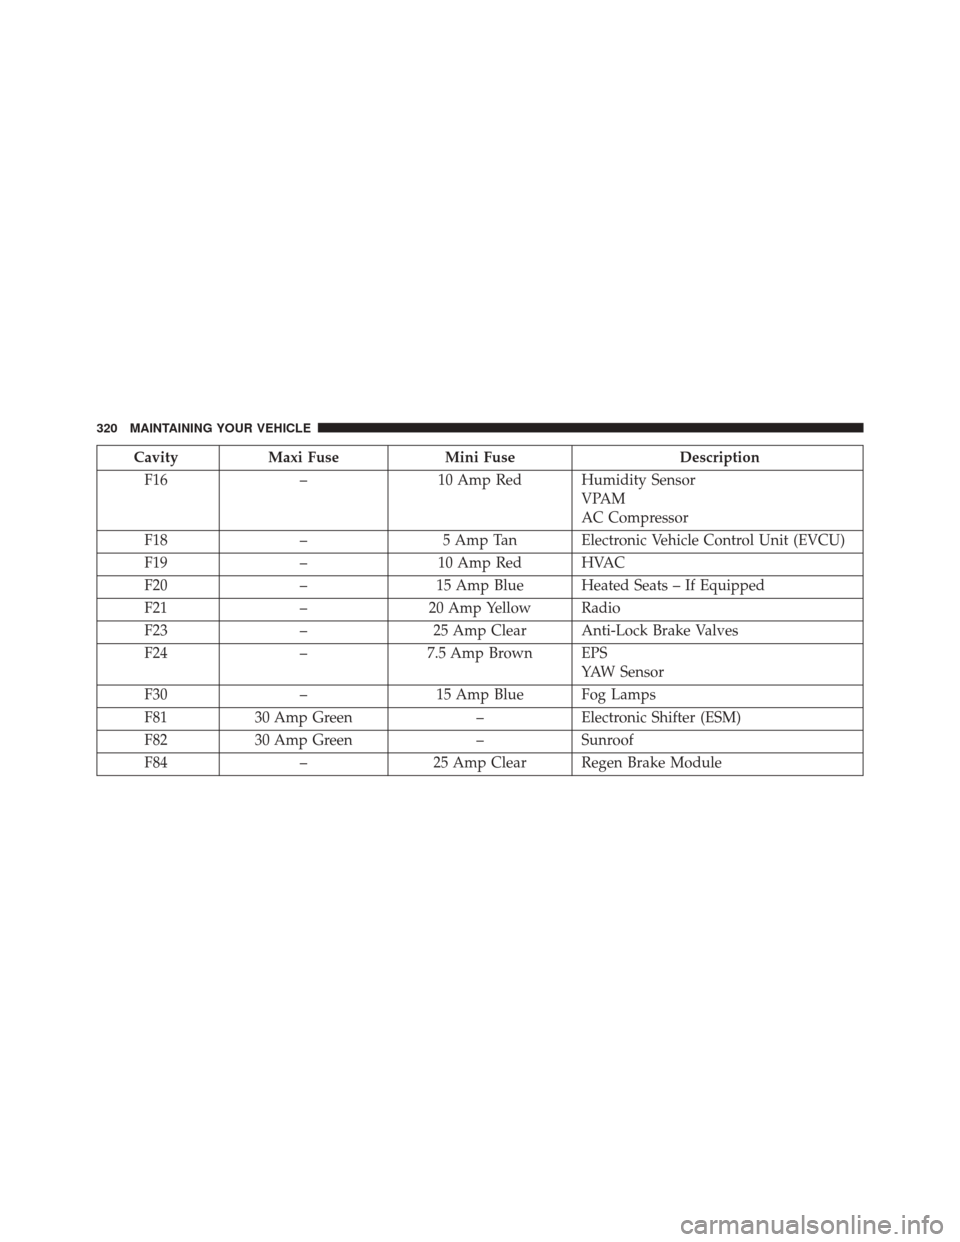
CavityMaxi Fuse Mini Fuse Description
F16 –10 Amp Red Humidity Sensor
VPAM
AC Compressor
F18 –5 Amp Tan Electronic Vehicle Control Unit (EVCU)
F19 –10 Amp Red HVAC
F20 –15 Amp Blue Heated Seats – If Equipped
F21 –20 Amp Yellow Radio
F23 –25 Amp Clear Anti-Lock Brake Valves
F24 –7.5 Amp Brown EPS
YAW Sensor
F30 –15 Amp Blue Fog Lamps
F81 30 Amp Green –Electronic Shifter (ESM)
F82 30 Amp Green –Sunroof
F84 –25 Amp Clear Regen Brake Module
320 MAINTAINING YOUR VEHICLE
Page 323 of 362
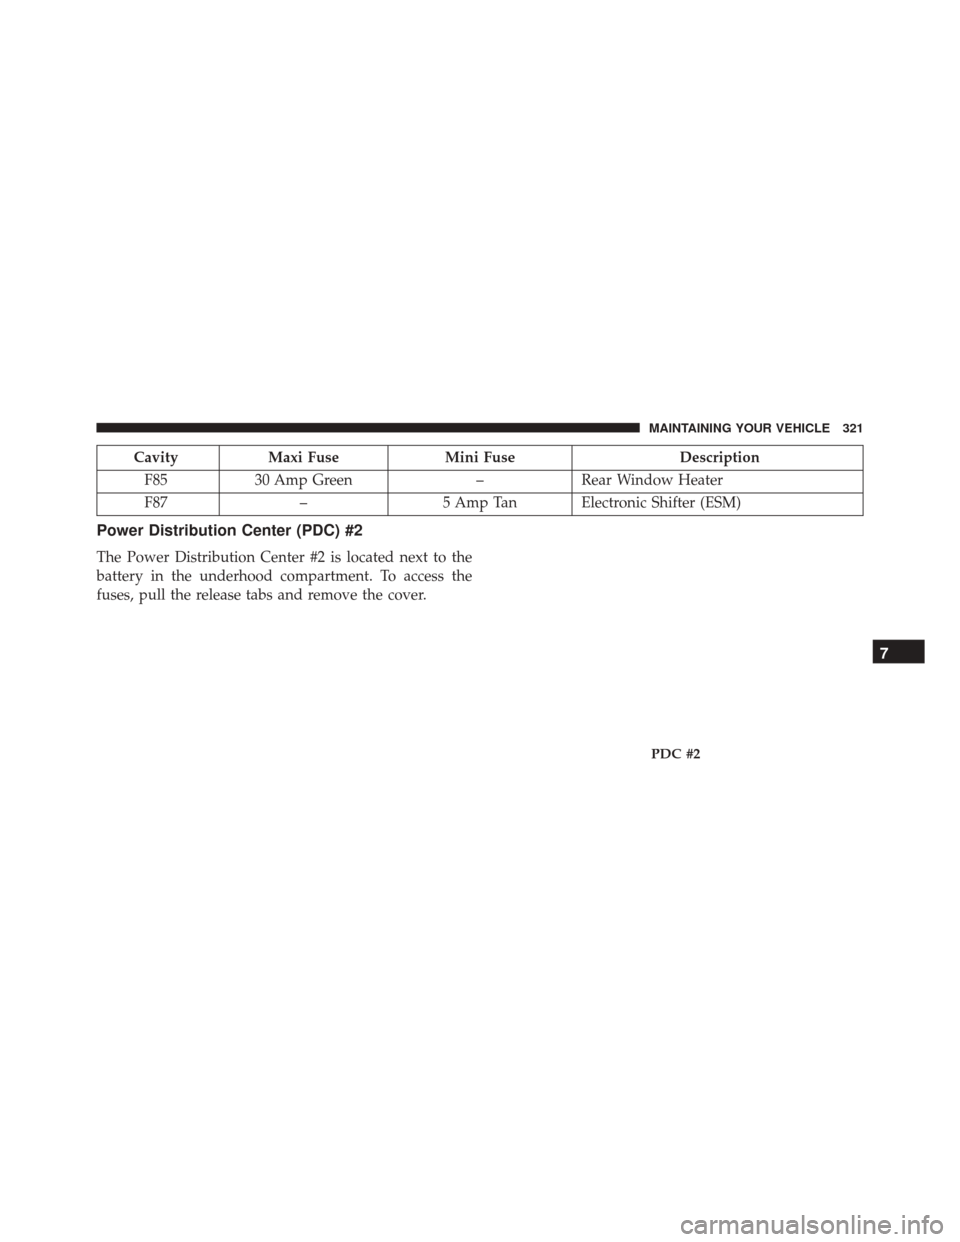
CavityMaxi Fuse Mini Fuse Description
F85 30 Amp Green –Rear Window Heater
F87 –5 Amp Tan Electronic Shifter (ESM)
Power Distribution Center (PDC) #2
The Power Distribution Center #2 is located next to the
battery in the underhood compartment. To access the
fuses, pull the release tabs and remove the cover.
PDC #2
7
MAINTAINING YOUR VEHICLE 321
Page 324 of 362
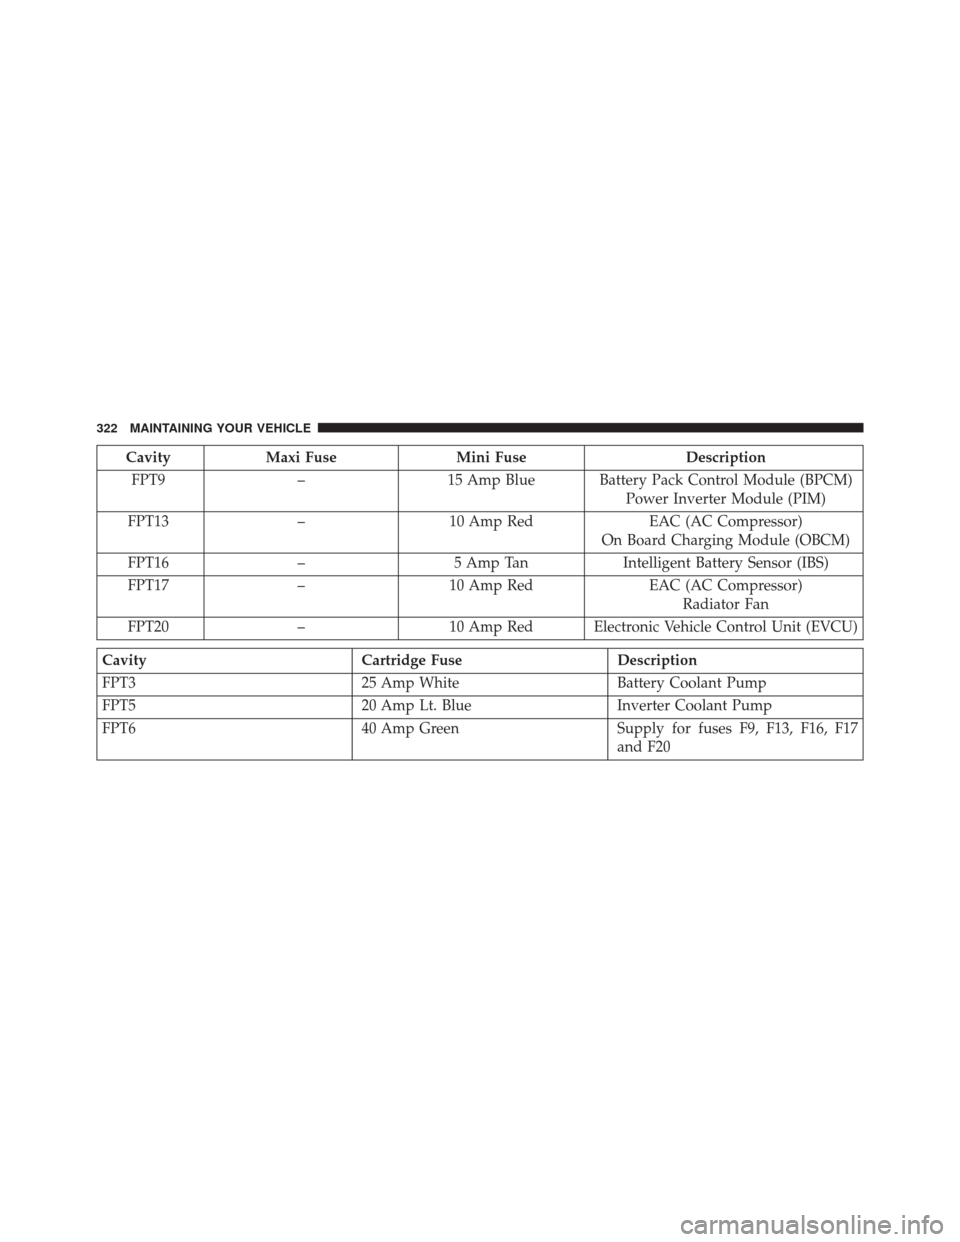
CavityMaxi Fuse Mini Fuse Description
FPT9 –15 Amp Blue Battery Pack Control Module (BPCM)
Power Inverter Module (PIM)
FPT13 –10 Amp Red EAC (AC Compressor)
On Board Charging Module (OBCM)
FPT16 –5 Amp Tan Intelligent Battery Sensor (IBS)
FPT17 –10 Amp Red EAC (AC Compressor)
Radiator Fan
FPT20 –10 Amp Red Electronic Vehicle Control Unit (EVCU)
Cavity Cartridge FuseDescription
FPT3 25 Amp WhiteBattery Coolant Pump
FPT5 20 Amp Lt. BlueInverter Coolant Pump
FPT6 40 Amp GreenSupply for fuses F9, F13, F16, F17
and F20
322 MAINTAINING YOUR VEHICLE
Page 325 of 362
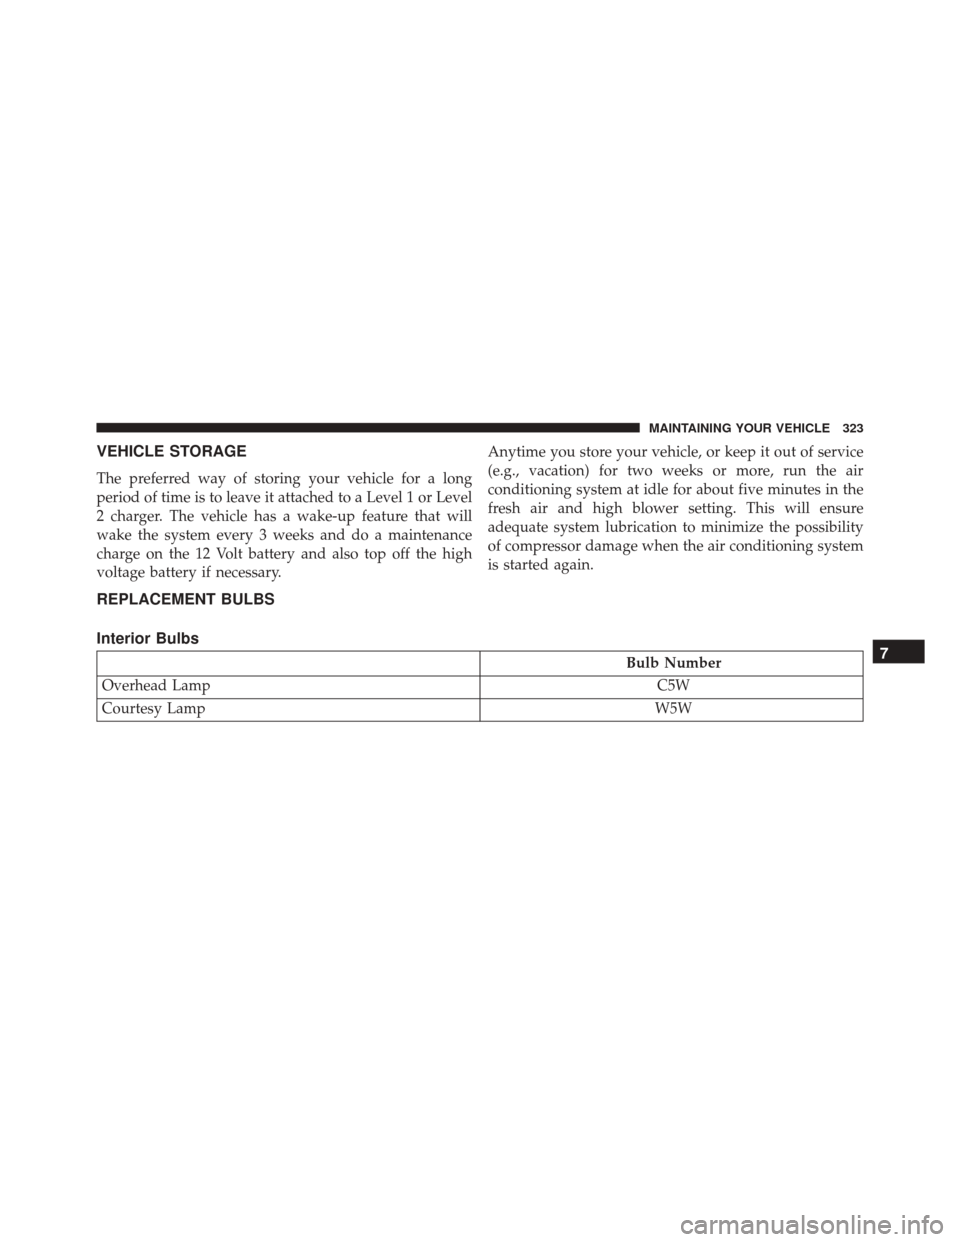
VEHICLE STORAGE
The preferred way of storing your vehicle for a long
period of time is to leave it attached to a Level 1 or Level
2 charger. The vehicle has a wake-up feature that will
wake the system every 3 weeks and do a maintenance
charge on the 12 Volt battery and also top off the high
voltage battery if necessary.Anytime you store your vehicle, or keep it out of service
(e.g., vacation) for two weeks or more, run the air
conditioning system at idle for about five minutes in the
fresh air and high blower setting. This will ensure
adequate system lubrication to minimize the possibility
of compressor damage when the air conditioning system
is started again.
REPLACEMENT BULBS
Interior Bulbs
Bulb Number
Overhead Lamp C5W
Courtesy Lamp W5W7
MAINTAINING YOUR VEHICLE 323
Page 326 of 362
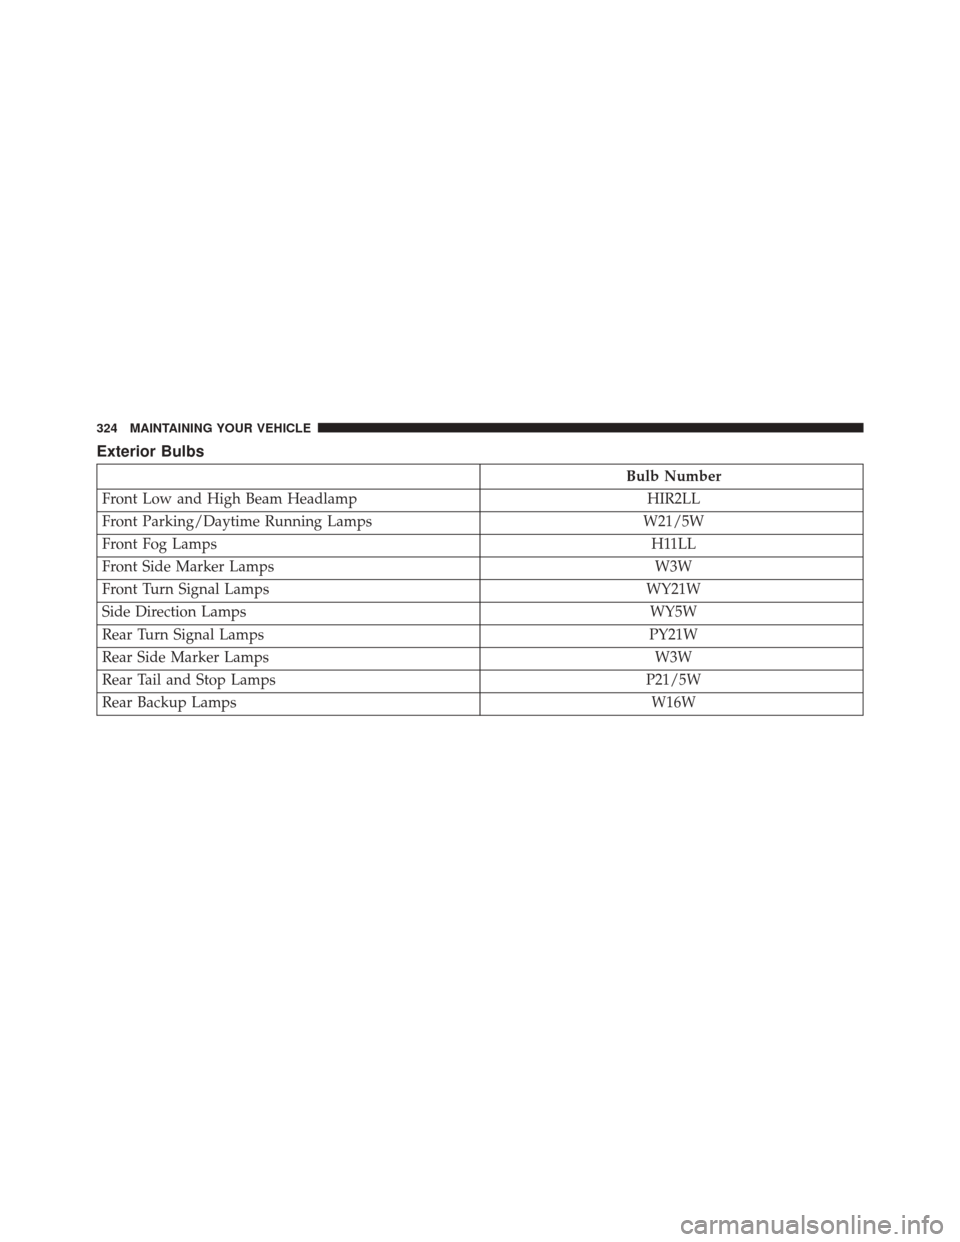
Exterior Bulbs
Bulb Number
Front Low and High Beam Headlamp HIR2LL
Front Parking/Daytime Running Lamps W21/5W
Front Fog Lamps H11LL
Front Side Marker Lamps W3W
Front Turn Signal Lamps WY21W
Side Direction Lamps WY5W
Rear Turn Signal Lamps PY21W
Rear Side Marker Lamps W3W
Rear Tail and Stop Lamps P21/5W
Rear Backup Lamps W16W
324 MAINTAINING YOUR VEHICLE
Page 327 of 362
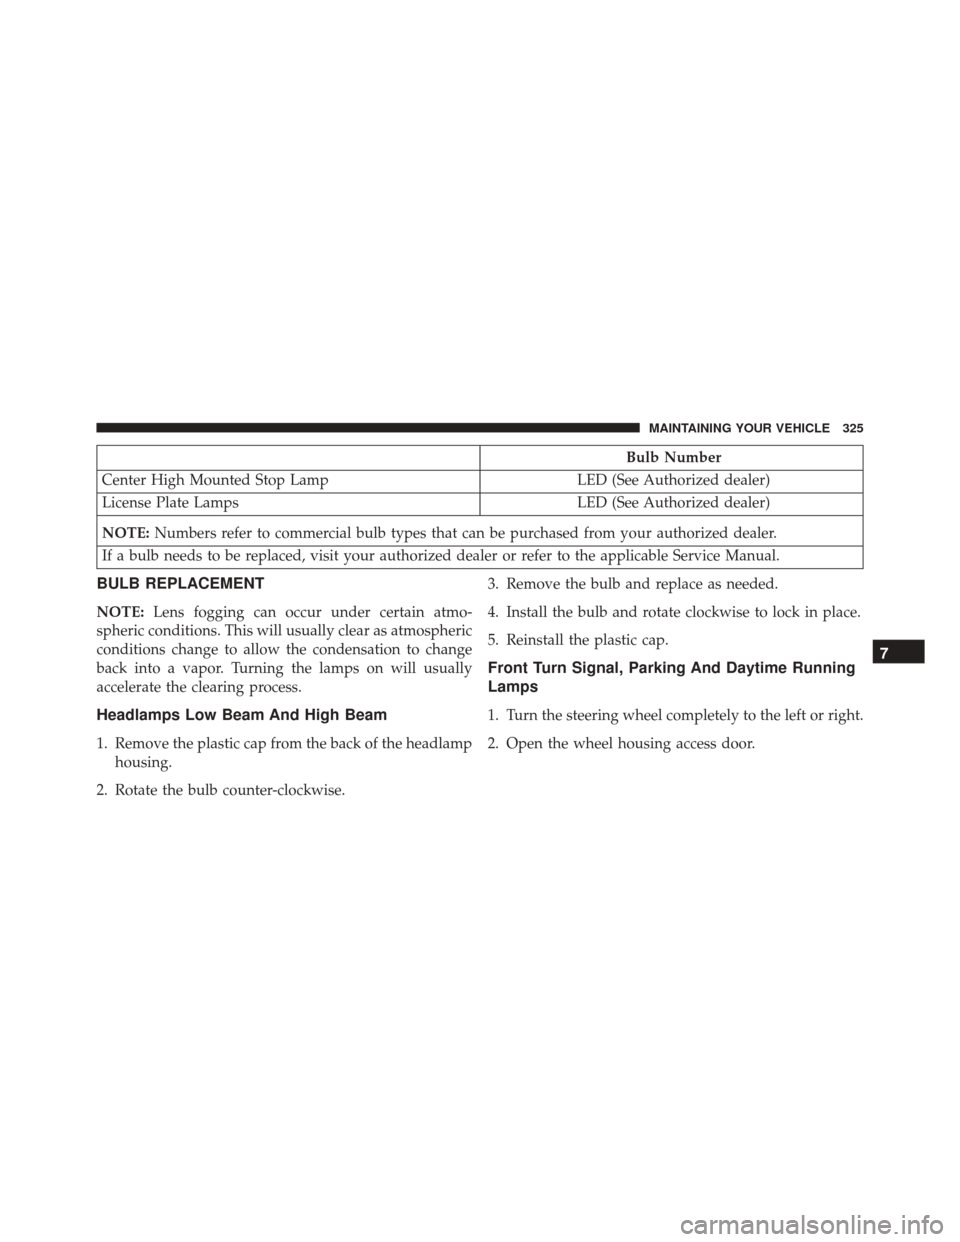
Bulb Number
Center High Mounted Stop Lamp LED (See Authorized dealer)
License Plate Lamps LED (See Authorized dealer)
NOTE: Numbers refer to commercial bulb types that can be purchased from your authorized dealer.
If a bulb needs to be replaced, visit your authorized dealer or refer to the applicable Service Manual.
BULB REPLACEMENT
NOTE: Lens fogging can occur under certain atmo-
spheric conditions. This will usually clear as atmospheric
conditions change to allow the condensation to change
back into a vapor. Turning the lamps on will usually
accelerate the clearing process.
Headlamps Low Beam And High Beam
1. Remove the plastic cap from the back of the headlamp housing.
2. Rotate the bulb counter-clockwise. 3. Remove the bulb and replace as needed.
4. Install the bulb and rotate clockwise to lock in place.
5. Reinstall the plastic cap.
Front Turn Signal, Parking And Daytime Running
Lamps
1. Turn the steering wheel completely to the left or right.
2. Open the wheel housing access door.
7
MAINTAINING YOUR VEHICLE 325
Page 328 of 362
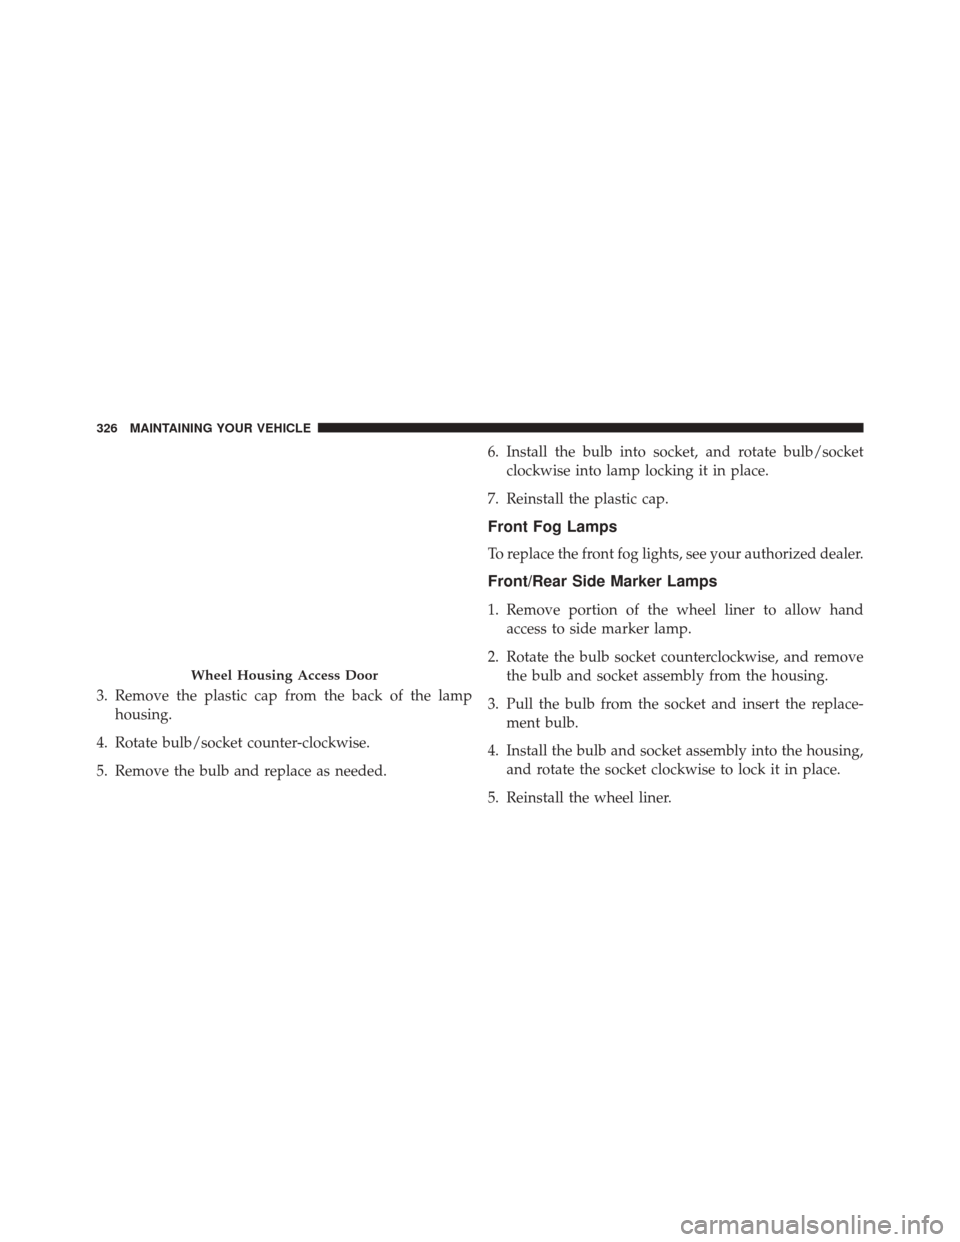
3. Remove the plastic cap from the back of the lamphousing.
4. Rotate bulb/socket counter-clockwise.
5. Remove the bulb and replace as needed. 6. Install the bulb into socket, and rotate bulb/socket
clockwise into lamp locking it in place.
7. Reinstall the plastic cap.
Front Fog Lamps
To replace the front fog lights, see your authorized dealer.
Front/Rear Side Marker Lamps
1. Remove portion of the wheel liner to allow hand access to side marker lamp.
2. Rotate the bulb socket counterclockwise, and remove the bulb and socket assembly from the housing.
3. Pull the bulb from the socket and insert the replace- ment bulb.
4. Install the bulb and socket assembly into the housing, and rotate the socket clockwise to lock it in place.
5. Reinstall the wheel liner.
Wheel Housing Access Door
326 MAINTAINING YOUR VEHICLE
Page 329 of 362
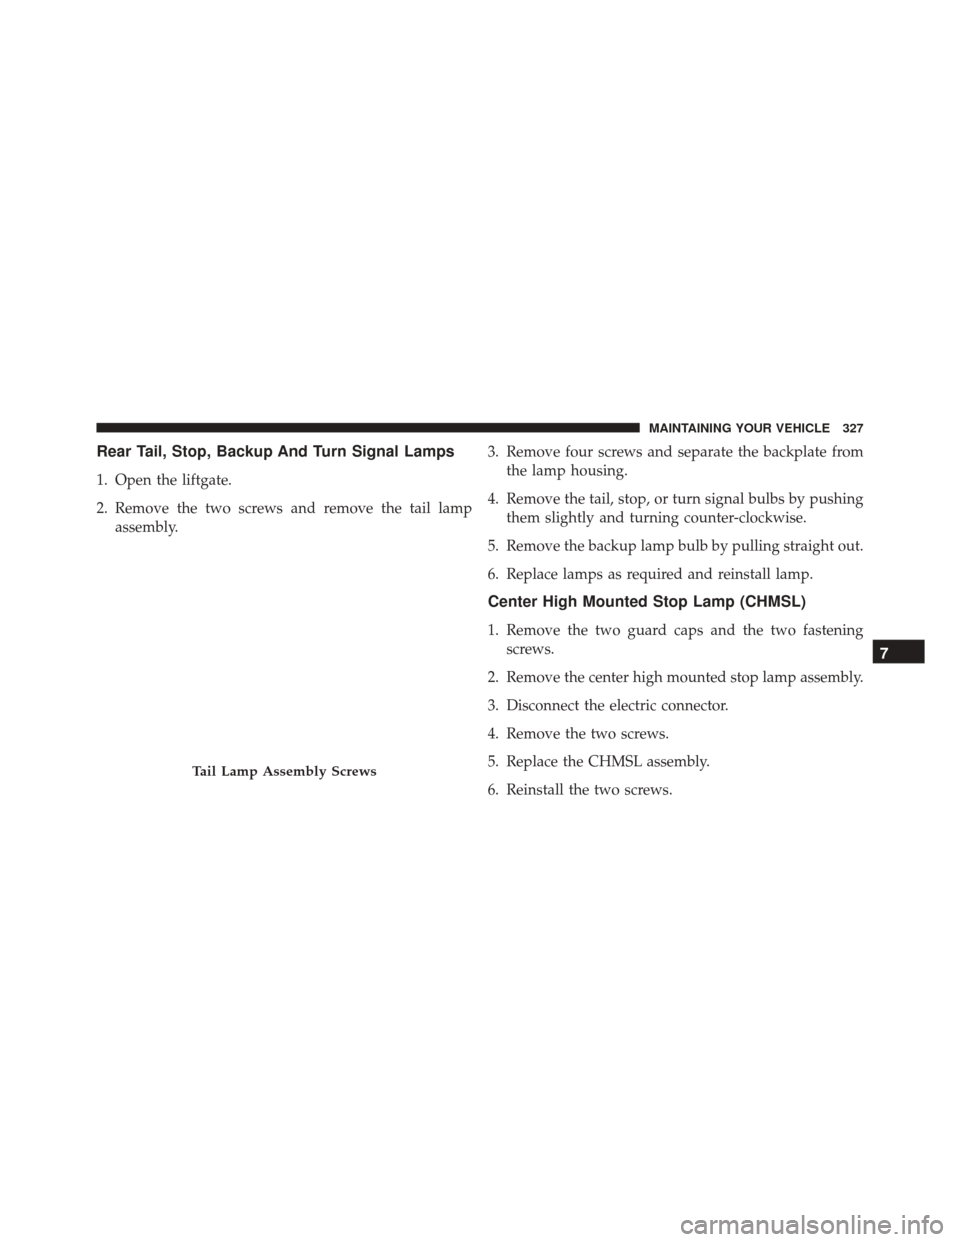
Rear Tail, Stop, Backup And Turn Signal Lamps
1. Open the liftgate.
2. Remove the two screws and remove the tail lampassembly. 3. Remove four screws and separate the backplate from
the lamp housing.
4. Remove the tail, stop, or turn signal bulbs by pushing them slightly and turning counter-clockwise.
5. Remove the backup lamp bulb by pulling straight out.
6. Replace lamps as required and reinstall lamp.
Center High Mounted Stop Lamp (CHMSL)
1. Remove the two guard caps and the two fastening screws.
2. Remove the center high mounted stop lamp assembly.
3. Disconnect the electric connector.
4. Remove the two screws.
5. Replace the CHMSL assembly.
6. Reinstall the two screws.
Tail Lamp Assembly Screws
7
MAINTAINING YOUR VEHICLE 327
Page 330 of 362
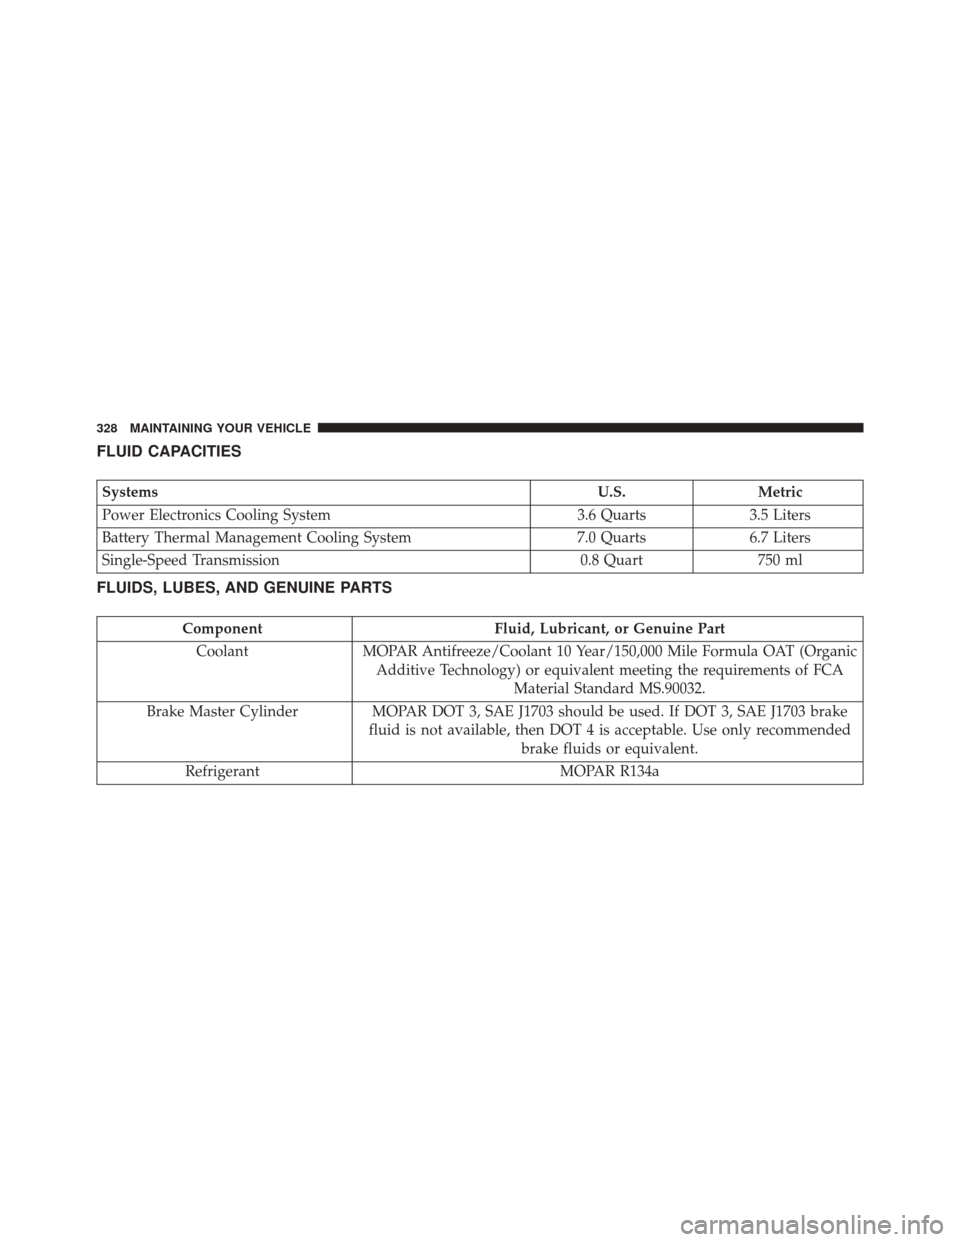
FLUID CAPACITIES
SystemsU.S.Metric
Power Electronics Cooling System 3.6 Quarts3.5 Liters
Battery Thermal Management Cooling System 7.0 Quarts6.7 Liters
Single-Speed Transmission 0.8 Quart750 ml
FLUIDS, LUBES, AND GENUINE PARTS
Component Fluid, Lubricant, or Genuine Part
Coolant MOPAR Antifreeze/Coolant 10 Year/150,000 Mile Formula OAT (Organic
Additive Technology) or equivalent meeting the requirements of FCA Material Standard MS.90032.
Brake Master Cylinder MOPAR DOT 3, SAE J1703 should be used. If DOT 3, SAE J1703 brake fluid is not available, then DOT 4 is acceptable. Use only recommendedbrake fluids or equivalent.
Refrigerant MOPAR R134a
328 MAINTAINING YOUR VEHICLE
Trending: set clock, park assist, airbag, roof, trunk, brake, parking sensors
