ECO mode FIAT 500E 2016 2.G User Guide
[x] Cancel search | Manufacturer: FIAT, Model Year: 2016, Model line: 500E, Model: FIAT 500E 2016 2.GPages: 132, PDF Size: 4.59 MB
Page 38 of 132
Memory Feature
Both front seats have a memory feature, which can operate in two ways:
Memory Function Option 1 — Full Seat Back And Track Fore/Aft Position Memory:
After using the EZ entry function, the seatback angle and the Track fore/aft adjuster can
both re-lock into the position they were most recently adjusted to.This is accomplished if
the seat is moved fully rearward to its last fore/aft position on the tracks before the seat
back is returned upright.
Memory Function Option 2 — Seat Back Only Memory:
After using the EZ entry function, the seat back may first be returned upright prior to
going back to the last fore/aft (memory) position on the tracks.This results in the seat
back memory being set only – The track will then be locked forward of its last set fore/
aft memory position.To then reset the fore/aft track memory feature (to reestablish
Memory Function Option 1), the seat has to be returned fully rearward to its last fore/
aft memory track position as described in Memory Function Option 1.
Heated Seats
On some models, the front driver and passenger seats may be equipped with heaters in
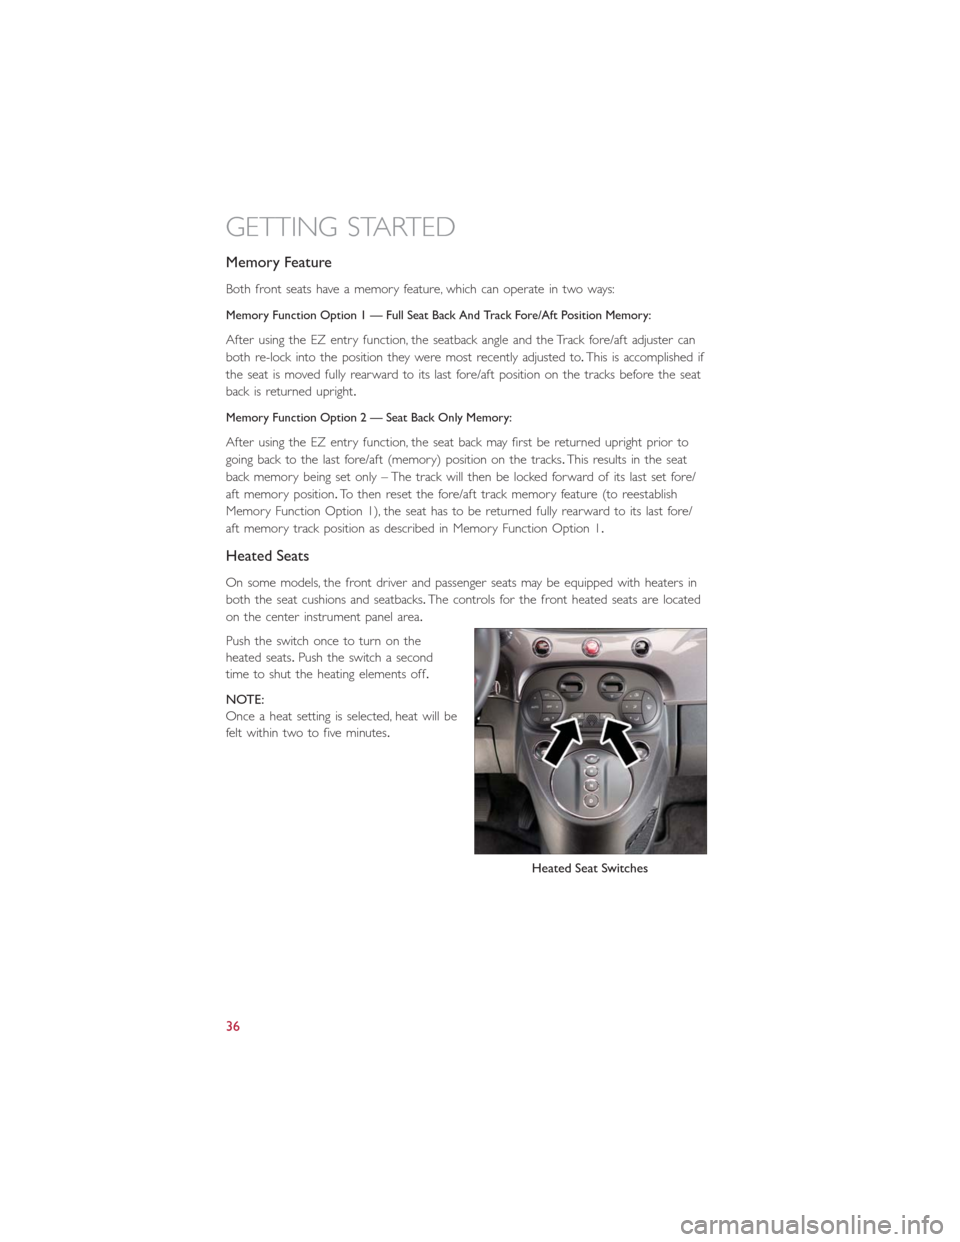
both the seat cushions and seatbacks.The controls for the front heated seats are located
on the center instrument panel area.
Push the switch once to turn on the
heated seats.Push the switch a second
time to shut the heating elements off.
NOTE:
Once a heat setting is selected, heat will be
felt within two to five minutes.
Heated Seat Switches
GETTING STARTED
36
Page 44 of 132
Interior Light Timing (Center Position)
There are four different modes of operation that can be activated in this position:
•When one door is opened a three minute timer is activated.
•When the key is removed from the ignition (within two minutes of the ignition being
turned off ), a 10 second timer is activated.
•When the doors are unlocked with the Key Fob a 10 second timer is activated.
•When the doors are locked with the Key Fob the lights will turn off.
Interior Light Timing (On/Right Position)
•When all doors are closed a 15 minute timer is activated.
NOTE:
The timer is deactivated when the key is moved into the ON/RUN position.
Fog Lights — If Equipped
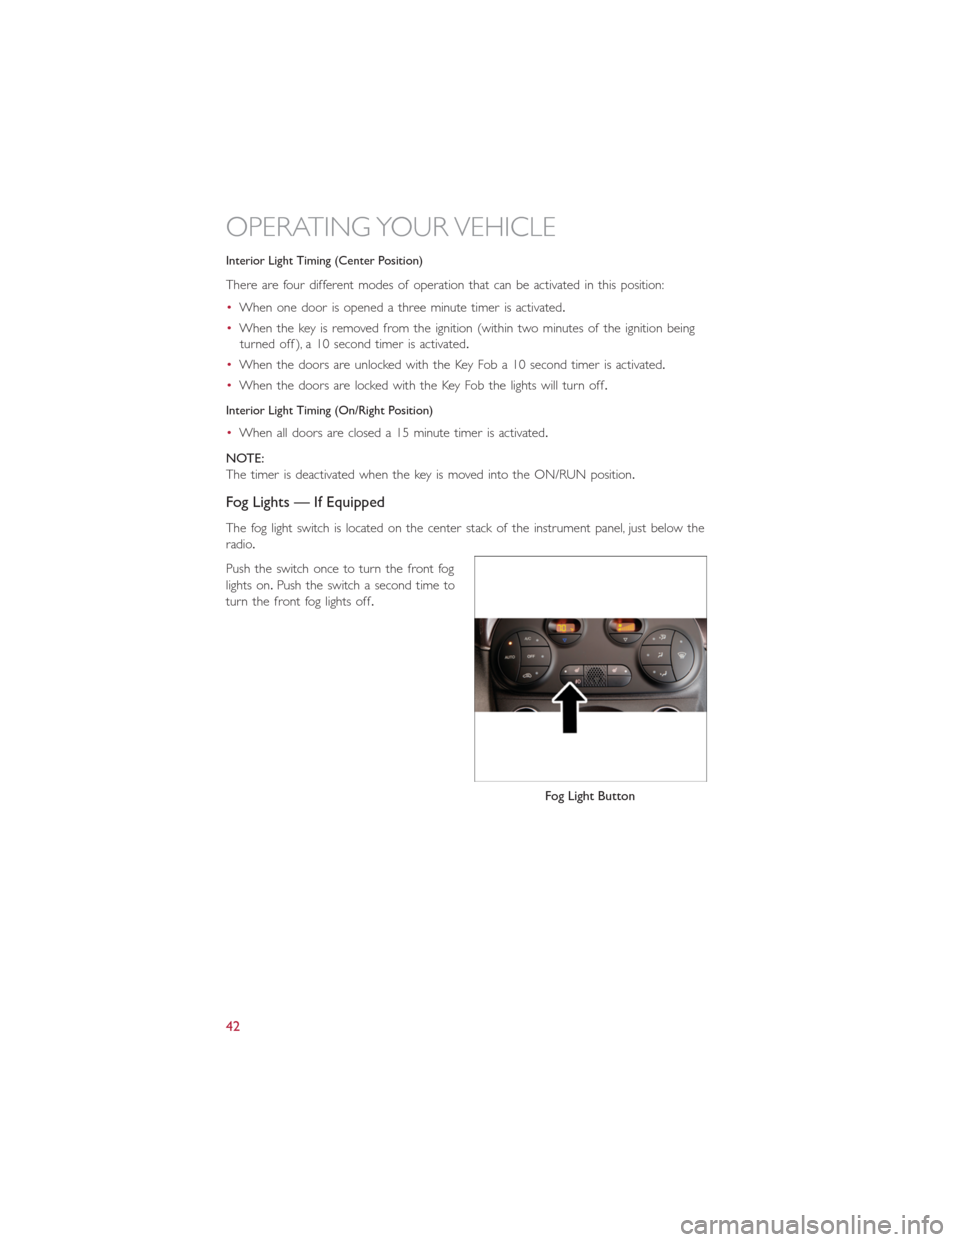
The fog light switch is located on the center stack of the instrument panel, just below the
radio.
Push the switch once to turn the front fog
lights on.Push the switch a second time to
turn the front fog lights off.
Fog Light Button
OPERATING YOUR VEHICLE
42
Page 60 of 132
Radio Operation
Store Radio Presets Manually
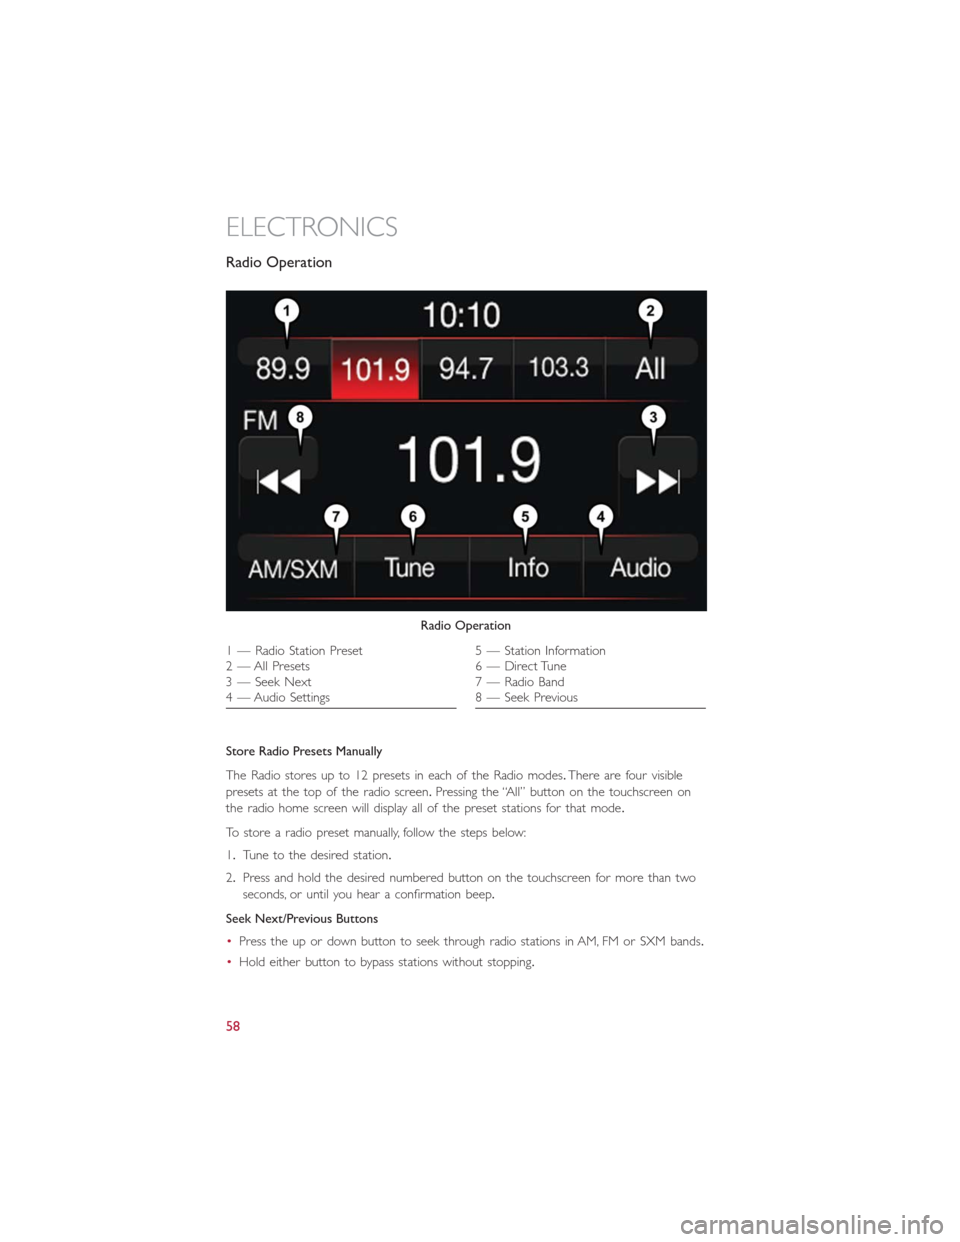
The Radio stores up to 12 presets in each of the Radio modes.There are four visible
presets at the top of the radio screen.Pressing the “All” button on the touchscreen on
the radio home screen will display all of the preset stations for that mode.
To store a radio preset manually, follow the steps below:
1.Tune to the desired station.
2.Press and hold the desired numbered button on the touchscreen for more than two
seconds, or until you hear a confirmation beep.
Seek Next/Previous Buttons
•Press the up or down button to seek through radio stations in AM, FM or SXM bands.
•Hold either button to bypass stations without stopping.
Radio Operation
1 — Radio Station Preset
2 — All Presets
3 — Seek Next
4 — Audio Settings5 — Station Information
6 — Direct Tune
7 — Radio Band
8 — Seek Previous
ELECTRONICS
58
Page 79 of 132
STEERING WHEEL AUDIO CONTROLS
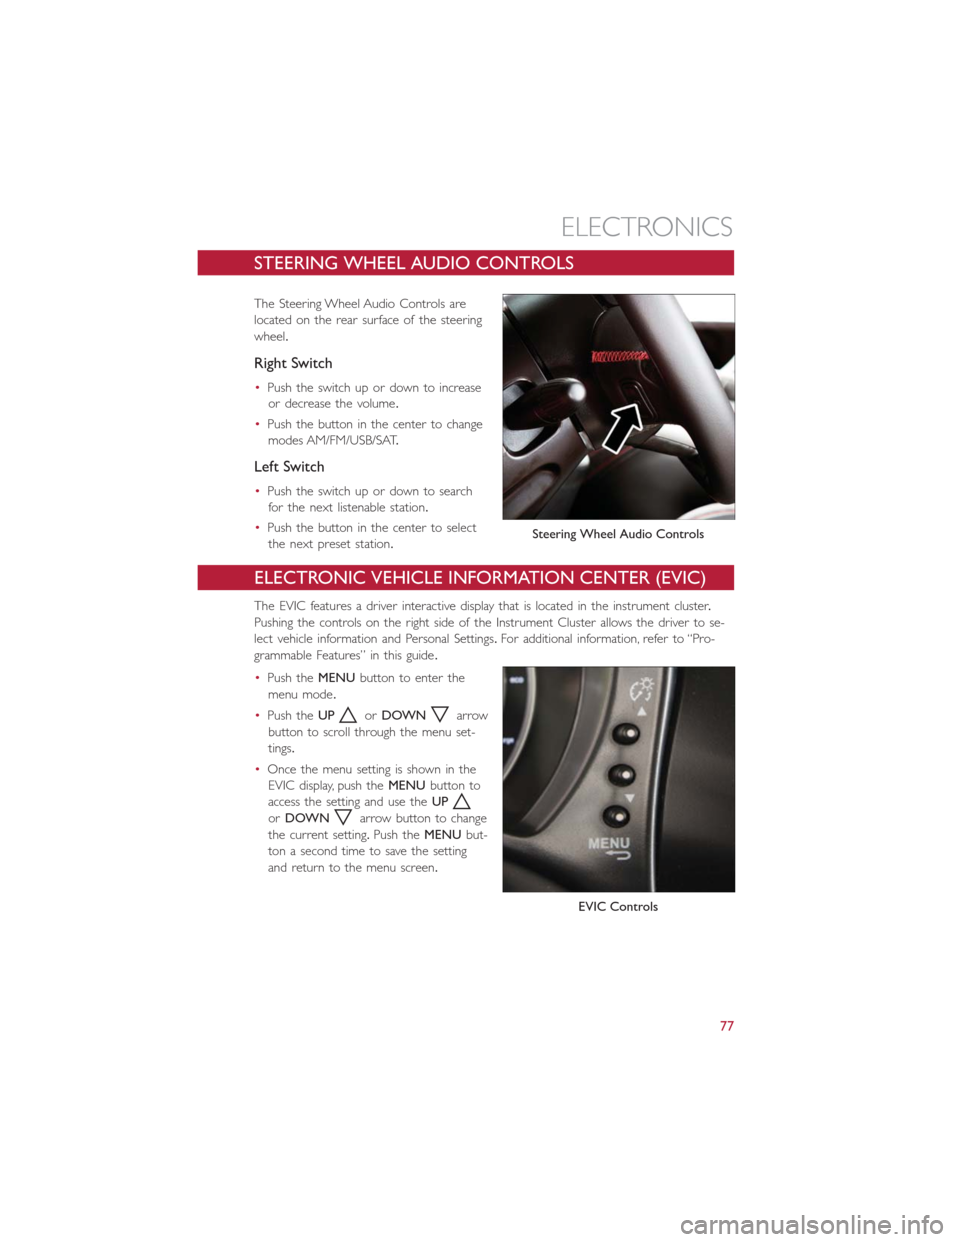
The Steering Wheel Audio Controls are
located on the rear surface of the steering
wheel.
Right Switch
•Push the switch up or down to increase
or decrease the volume.
•Push the button in the center to change
modes AM/FM/USB/SAT.
Left Switch
•Push the switch up or down to search
for the next listenable station.
•Push the button in the center to select
the next preset station.
ELECTRONIC VEHICLE INFORMATION CENTER (EVIC)
The EVIC features a driver interactive display that is located in the instrument cluster.
Pushing the controls on the right side of the Instrument Cluster allows the driver to se-
lect vehicle information and Personal Settings.For additional information, refer to “Pro-
grammable Features” in this guide.
•Push theMENUbutton to enter the
menu mode.
•Push theUP
orDOWNarrow
button to scroll through the menu set-
tings.
•Once the menu setting is shown in the
EVIC display, push theMENUbutton to
access the setting and use theUP
orDOWNarrow button to change
the current setting.Push theMENUbut-
ton a second time to save the setting
and return to the menu screen.
Steering Wheel Audio Controls
EVIC Controls
ELECTRONICS
77
Page 80 of 132
PROGRAMMABLE FEATURES
Electronic Vehicle Information Center (EVIC)
•Push theMENUbutton to enter the menu mode.
•Push theUP
orDOWNarrow button to scroll through the menu settings.
•Once the menu setting is shown in the EVIC display push theMENUbutton to access
the setting and use theUP
orDOWNarrow button to change the current
setting.Push theMENUbutton a second time to save the setting and return to menu
screen.
•Battery % Display•Button Volume
•Stored Warnings•Tutorial
•Connectivity ID•Restore Factory Settings
•Exit Menu
Selecting An Option Of The Main Menu Without Submenu:
•Briefly push theMENUbutton to select the main menu option to set.
•Push theUP
orDOWNarrow button to select the new setting.
•Briefly push theMENUbutton to store the new setting and go back to the main
menu option previously selected.
Selecting An Option Of The Main Menu With Submenu:
•Briefly push theMENUbutton to display the first submenu option.
•Push theUP
orDOWNarrow button to scroll through all the submenu op-
tions.
•Briefly push theMENUbutton to select the displayed submenu option and to open
the relevant setup menu.
•Push theUP
orDOWNarrow button to select the new setting for this sub-
menu option.
•Briefly push theMENUbutton to store the new setting and go back to the previously
selected submenu option.
•Push and hold theMENUbutton to return to the main menu (short hold) or the
main screen (longer hold).
NOTE:
The charging schedule is based on the date and time programmed in the EVIC.
ELECTRONICS
78
Page 92 of 132
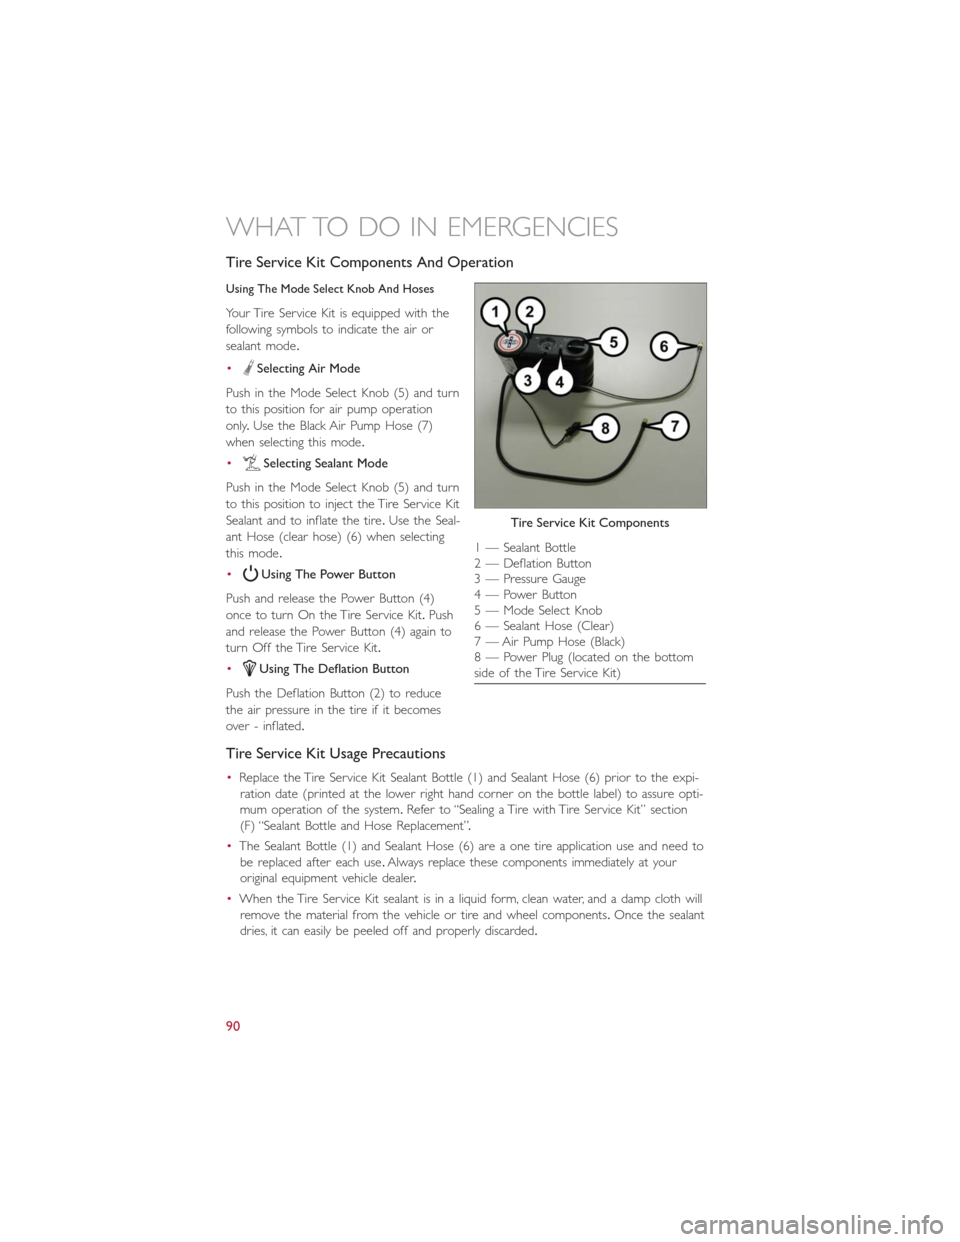
Tire Service Kit Components And Operation
Using The Mode Select Knob And Hoses
Your Tire Service Kit is equipped with the
following symbols to indicate the air or
sealant mode.
•
Selecting Air Mode
Push in the Mode Select Knob (5) and turn
to this position for air pump operation
only.Use the Black Air Pump Hose (7)
when selecting this mode.
•
Selecting Sealant Mode
Push in the Mode Select Knob (5) and turn
to this position to inject the Tire Service Kit
Sealant and to inflate the tire.Use the Seal-
ant Hose (clear hose) (6) when selecting
this mode.
•
Using The Power Button
Push and release the Power Button (4)
once to turn On the Tire Service Kit.Push
and release the Power Button (4) again to
turn Off the Tire Service Kit.
•
Using The Deflation Button
Push the Deflation Button (2) to reduce
the air pressure in the tire if it becomes
over - inflated.
Tire Service Kit Usage Precautions
•Replace the Tire Service Kit Sealant Bottle (1) and Sealant Hose (6) prior to the expi-
ration date (printed at the lower right hand corner on the bottle label) to assure opti-
mum operation of the system.Refer to “Sealing a Tire with Tire Service Kit” section
(F) “Sealant Bottle and Hose Replacement”.
•The Sealant Bottle (1) and Sealant Hose (6) are a one tire application use and need to
be replaced after each use.Always replace these components immediately at your
original equipment vehicle dealer.
•When the Tire Service Kit sealant is in a liquid form, clean water, and a damp cloth will
remove the material from the vehicle or tire and wheel components.Once the sealant
dries, it can easily be peeled off and properly discarded.
Tire Service Kit Components
1 — Sealant Bottle
2 — Deflation Button
3 — Pressure Gauge
4 — Power Button
5 — Mode Select Knob
6 — Sealant Hose (Clear)
7 — Air Pump Hose (Black)
8 — Power Plug (located on the bottom
side of the Tire Service Kit)
WHAT TO DO IN EMERGENCIES
90
Page 95 of 132
If the sealant (white fluid) does not flow within0–10seconds through the Sealant
Hose (6):
1.Push the Power Button (4) to turn Off the Tire Service Kit.Disconnect the Sealant
Hose (6) from the valve stem.Make sure the valve stem is free of debris.Reconnect
the Sealant Hose (6) to the valve stem.Check that the Mode Select Knob (5) is in
the Sealant Mode position and not Air Mode.Push the Power Button (4) to turn On
the Tire Service Kit.
2.Connect the Power Plug (8) to a different 12 Volt power outlet in your vehicle or
another vehicle, if available.Make sure the engine is running before turning ON the
Tire Service Kit.
3.The Sealant Bottle (1) may be empty due to previous use.Call for assistance.
NOTE:
If the Mode Select Knob (5) is on Air Mode and the pump is operating, air will dispense
from the Air Pump Hose (7) only, not the Sealant Hose (6).
If the sealant (white fluid) does flow through the Sealant Hose (6):
1.Continue to operate the pump until sealant is no longer flowing through hose (typi-
cally takes 30 - 70 seconds).As the sealant flows through the Sealant Hose (6), the
Pressure Gauge (3) can read as high as 70 psi (4.8 Bar).The Pressure Gauge (3) will
decrease quickly from approximately 70 psi (4.8 Bar) to the actual tire pressure when
the Sealant Bottle (1) is empty.
2.The pump will start to inject air into the tire immediately after the Sealant Bottle (1)
is empty.Continue to operate the pump and inflate the tire to the pressure indicated
on the tire pressure label on the driver-side latch pillar (recommended pressure).
Check the tire pressure by looking at the Pressure Gauge (3).
If the tire does not inflate to at least 26 psi (1.8 Bar) pressure within 15 minutes:
•The tire is too badly damaged.Do not attempt to drive the vehicle further.Call for
assistance.
NOTE:
If the tire becomes over-inflated, push the Deflation Button to reduce the tire pressure
to the recommended inflation pressure before continuing.
If the tire inflates to the recommended pressure or is at least 26 psi (1.8 Bar) pressure
within 15 minutes:
1.Push the Power Button (4) to turn off the Tire Service Kit.
2.Remove the Speed Limit sticker from the top of the Sealant Bottle (1) and place the
sticker on the instrument panel.
3.Immediately disconnect the Sealant Hose (6) from the valve stem, reinstall the cap on
the fitting at the end of the hose, and place the Tire Service Kit in the vehicle storage
location.Quickly proceed to (D) “Drive Vehicle.”
WHAT TO DO IN EMERGENCIES
93
Page 103 of 132
In order to move your vehicle to the side of the road the transmission must be in NEU-
TRAL and the 12 Volt system must be functional.To place the transmission into NEU-
TRAL you must turn the ignition OFF and then back to the RUN position (cycle the igni-
tion) then push the NEUTRAL button.
NOTE:
The high voltage battery will remain disabled after an Enhanced Accident Response Event
and must be reset by your authorized dealership.
FREEING A STUCK VEHICLE
If your vehicle becomes stuck in mud, sand or snow, it can often be moved using a rock-
ing motion.Turn the steering wheel right and left to clear the area around the front
wheels.Then shift back and forth between DRIVE and REVERSE while gently pushing the
accelerator.Use the least amount of accelerator pedal pressure that will maintain the
rocking motion, without spinning the wheels.
NOTE:
Push the “ESC Off ” switch, to place the Electronic Stability Control (ESC) system in “Par-
tial Off ” mode, before rocking the vehicle.Refer to “Electronic Brake Control” in “Start-
ing And Operating” on the DVD for further information.Once the vehicle has been
freed, push the “ESC Off ” switch again to restore “ESC On” mode.
CAUTION!
•When “rocking” a stuck vehicle by shifting between DRIVE and REVERSE, do not
spin the wheels faster than 15 mph (24 km/h), or drivetrain damage may result.
•Spinning the wheels too fast may lead to transmission overheating and failure.It
can also damage the tires.Do not spin the wheels above 30 mph (48 km/h) while
in gear.
WARNING!
Fast spinning tires can be dangerous.Forces generated by excessive wheel speeds may
cause damage, or even failure, of the axle and tires.A tire could explode and injure
someone.Do not spin your vehicle's wheels faster than 30 mph (48 km/h) or for lon-
ger than 30 seconds continuously without stopping when you are stuck and do not let
anyone near a spinning wheel, no matter what the speed.
WHAT TO DO IN EMERGENCIES
101
Page 125 of 132
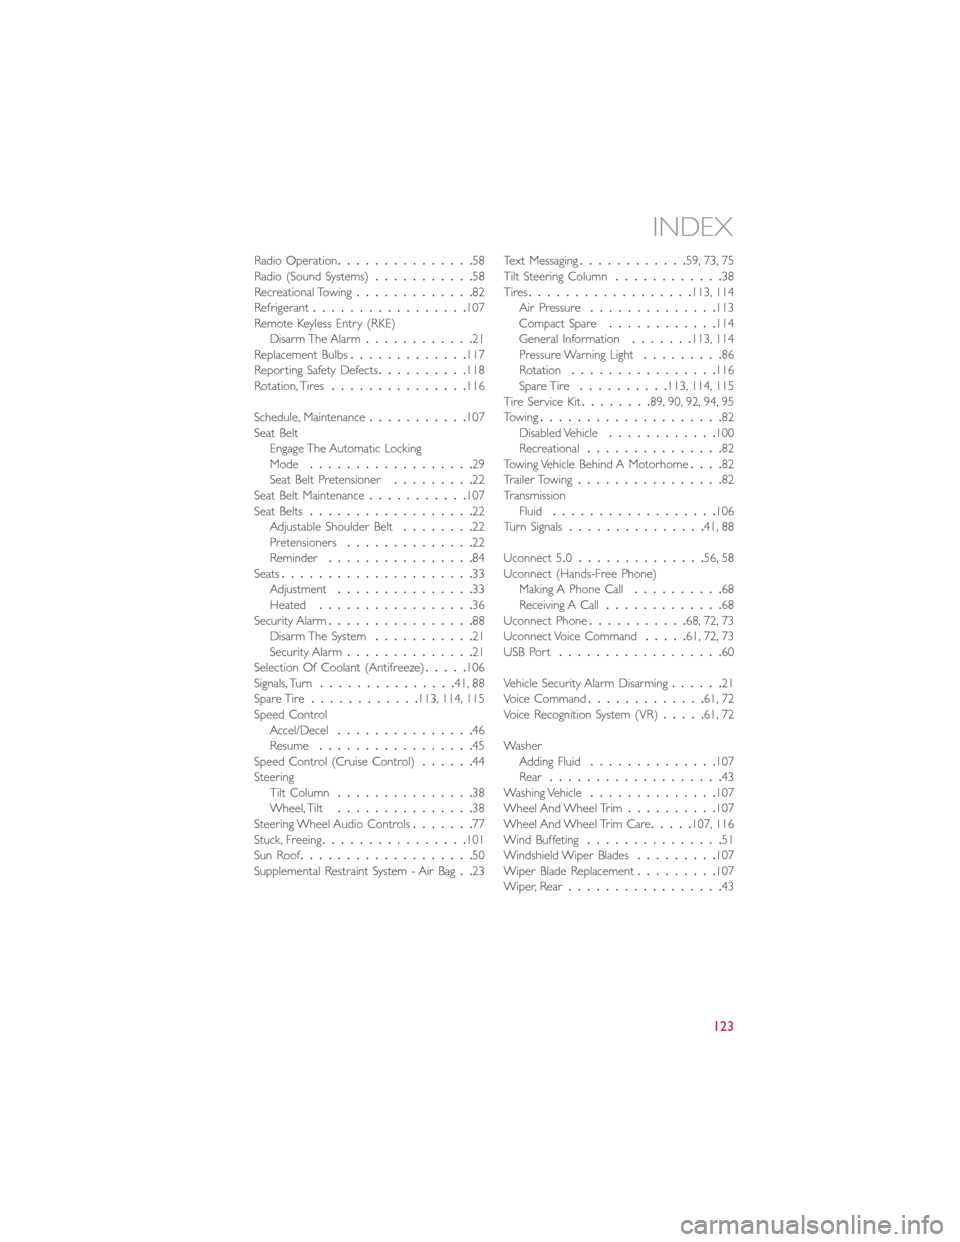
Radio Operation...............58
Radio (Sound Systems)...........58
Recreational Towing.............82
Refrigerant.................107
Remote Keyless Entry (RKE)
Disarm The Alarm............21
Replacement Bulbs.............117
Reporting Safety Defects..........118
Rotation, Tires...............116
Schedule, Maintenance...........107
Seat Belt
Engage The Automatic Locking
Mode..................29
Seat Belt Pretensioner.........22
Seat Belt Maintenance...........107
Seat Belts..................22
Adjustable Shoulder Belt........22
Pretensioners..............22
Reminder................84
Seats.....................33
Adjustment...............33
Heated.................36
Security Alarm................88
Disarm The System...........21
Security Alarm..............21
Selection Of Coolant (Antifreeze).....106
Signals, Turn...............41, 88
Spare Tire............113, 114, 115
Speed Control
Accel/Decel...............46
Resume.................45
Speed Control (Cruise Control)......44
Steering
Tilt Column...............38
Wheel, Tilt...............38
Steering Wheel Audio Controls.......77
Stuck, Freeing................101
Sun Roof
...................50
Supplemental Restraint System - Air Bag..23Text Messaging............59, 73, 75
Tilt Steering Column............38
Tires..................113, 114
Air Pressure..............113
Compact Spare............114
General Information.......113, 114
Pressure Warning Light.........86
Rotation................116
Spare Tire..........113, 114, 115
Tire Service Kit........89, 90, 92, 94, 95
Towing....................82
Disabled Vehicle............100
Recreational...............82
Towing Vehicle Behind A Motorhome....82
Trailer Towing................82
Transmission
Fluid..................106
Turn Signals...............41, 88
Uconnect 5.0..............56, 58
Uconnect (Hands-Free Phone)
Making A Phone Call..........68
Receiving A Call.............68
Uconnect Phone...........68, 72, 73
Uconnect Voice Command.....61, 72, 73
USB Port..................60
Vehicle Security Alarm Disarming......21
Voice Command.............61, 72
Voice Recognition System (VR).....61, 72
Washer
Adding Fluid..............107
Rear...................43
Washing Vehicle..............107
Wheel And Wheel Trim..........107
Wheel And Wheel Trim Care
.....107, 116
Wind Buffeting...............51
Windshield Wiper Blades.........107
Wiper Blade Replacement.........107
Wiper, Rear.................43
INDEX
123