clock setting FIAT 500E 2016 2.G User Guide
[x] Cancel search | Manufacturer: FIAT, Model Year: 2016, Model line: 500E, Model: FIAT 500E 2016 2.GPages: 132, PDF Size: 4.59 MB
Page 58 of 132

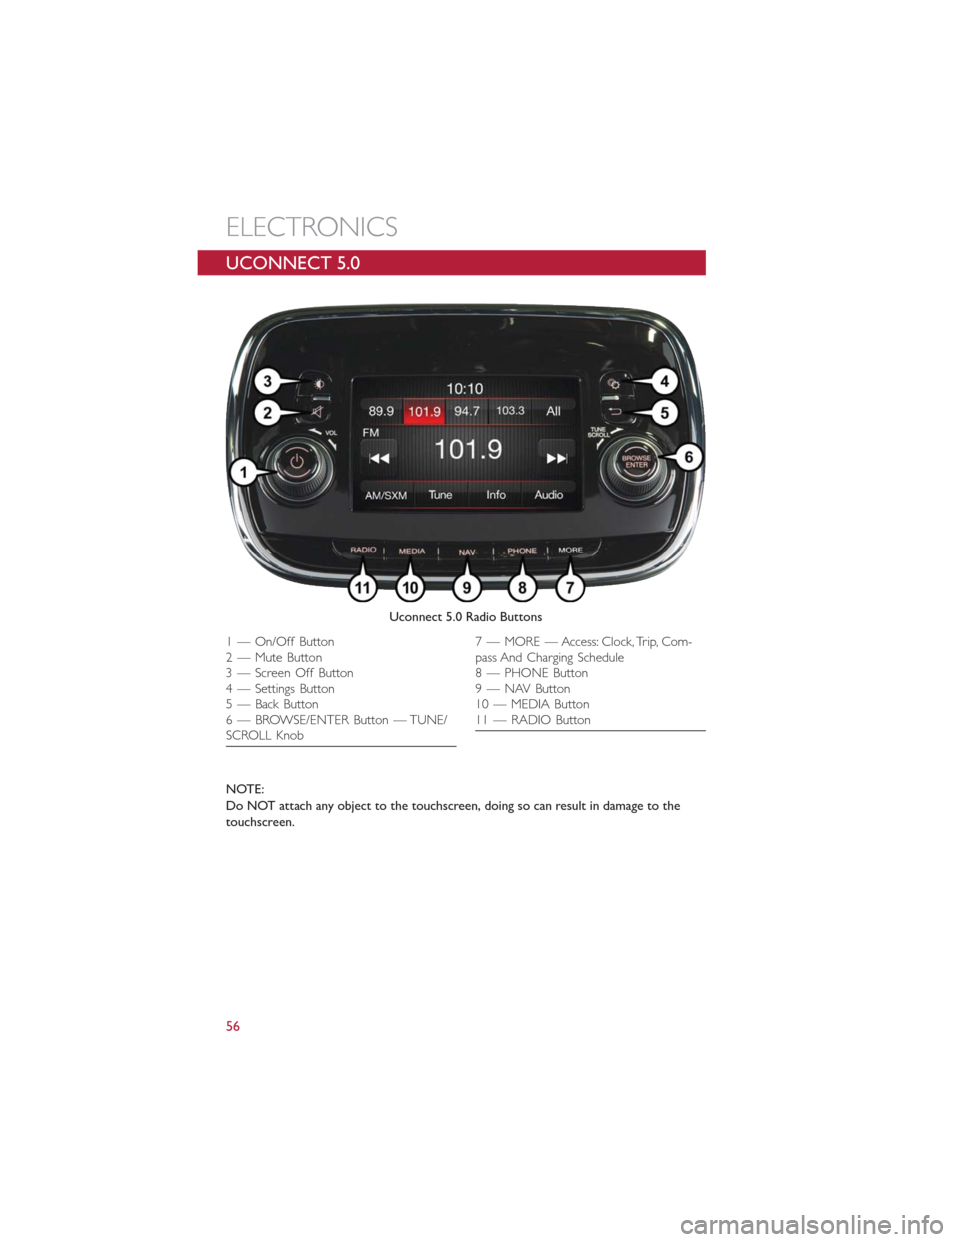
UCONNECT 5.0
NOTE:
Do NOT attach any object to the touchscreen, doing so can result in damage to the
touchscreen.
Uconnect 5.0 Radio Buttons
1 — On/Off Button
2 — Mute Button
3 — Screen Off Button
4 — Settings Button
5 — Back Button
6 — BROWSE/ENTER Button — TUNE/
SCROLL Knob7 — MORE — Access: Clock, Trip, Com-
pass And Charging Schedule
8 — PHONE Button
9 — NAV Button
10 — MEDIA Button
11 — RADIO Button
ELECTRONICS
56
Page 59 of 132

Clock Setting
To start the clock setting procedure:
1.Push the Settings button on the faceplate and then press the “Clock and Date” button
on the touchscreen.
2.Press the “Set Time” button on the touchscreen.
3.Press the “Up” or “Down” arrows to adjust the hours or minutes, then select the
“AM” or “PM” button on the touchscreen.You can also select 12hr or 24hr format by
pressing the desired button on the touchscreen.
4.Once the time is set press the “Done” button on the touchscreen to exit the time
screen.
NOTE:
In the Clock Setting Menu you can also select Display Clock.Display Clock turns the
clock display in the status bar on or off.
Equalizer, Balance And Fade
1.Push the Settings button on the faceplate.
2.Scroll down and press the “Audio” button on the touchscreen to open the Audio
menu.
3.The Audio Menu shows the following options for you to customize your audio set-
tings.
Equalizer
Press the “Equalizer” button on the touchscreen to adjust the Bass, Mid and Treble.Use
the “+” or “-” button on the touchscreen to adjust the equalizer to your desired settings.
Balance/Fade
Press the “Balance/Fade” button on the touchscreen to adjust the sound from the speak-
ers.Use the arrow buttons on the touchscreen to adjust the sound level from the front
and rear or right and left side speakers.Press the Center “C” button on the touchscreen
to reset the balance and fade to the factory setting.
Speed Adjusted Volume
Press the “Speed Adjusted Volume” button on the touchscreen to select between OFF, 1,
2or3.This will decrease the radio volume relative to a decrease in vehicle speed.
Surround Sound
Press the “Surround Sound” button on the touchscreen, select On or Off followed by
pressing the back arrow button on the touchscreen.When this feature is activated, it pro-
vides simulated surround sound mode.
ELECTRONICS
57
Page 81 of 132

Uconnect Customer Programmable Features
The Uconnect system allows you to access Customer Programmable feature settings.
To change a setting:
1.Push the SETTINGS
button located on the right side of the display.
2.Select a programmable feature you would like to adjust.
3.Make your selection highlighting the button.
Depending on the vehicles options, the following feature settings are available:
•Display•Audio
•Clock & Date•Phone/Bluetooth
•Safety/Assistance•SiriusXM Setup
•Lights•Voice
•Doors & Locks•Restore Settings
•Engine Off Options•Units
•Clear Personal Data•Charging Schedule
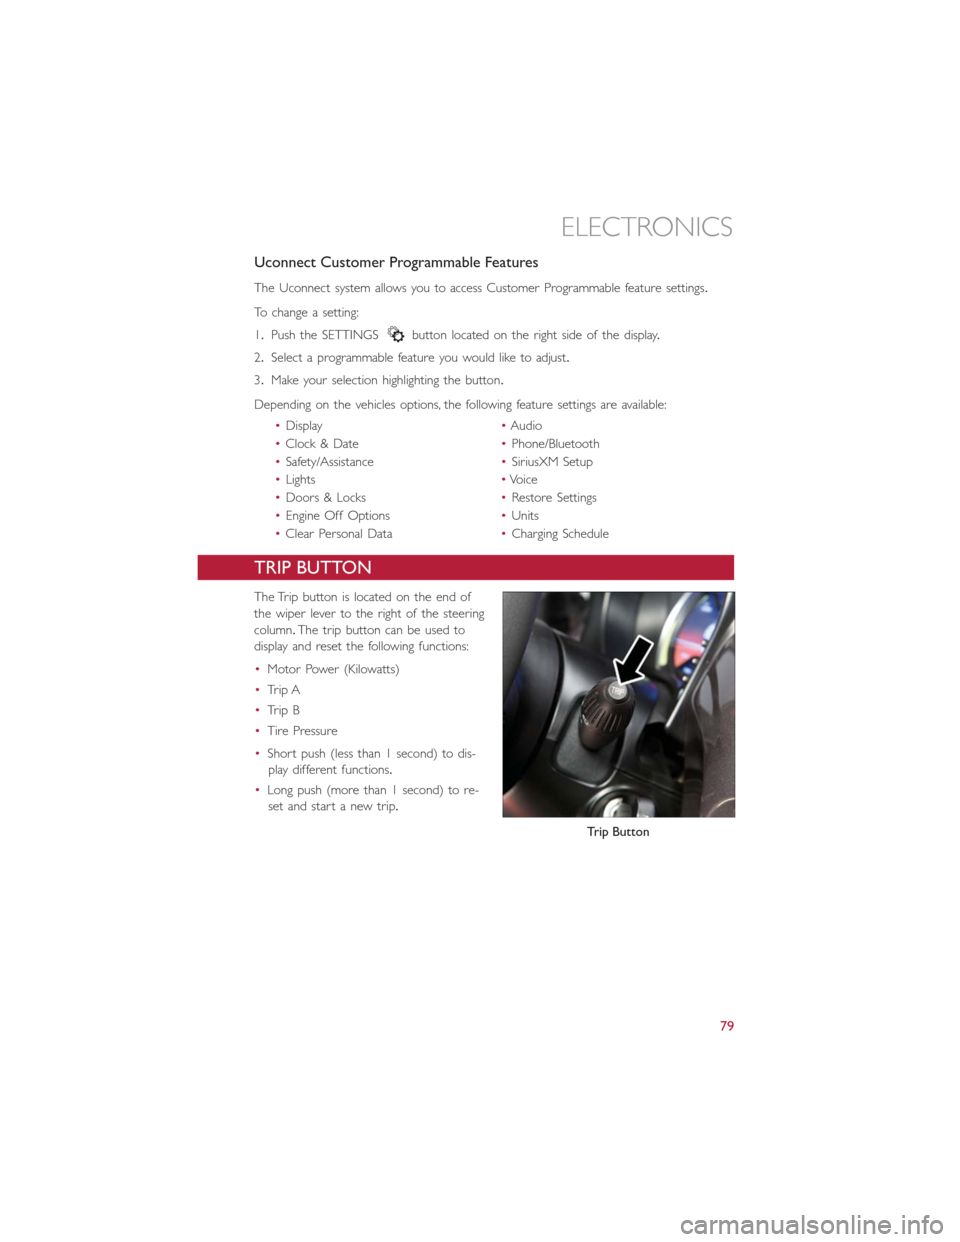
TRIP BUTTON
The Trip button is located on the end of
the wiper lever to the right of the steering
column.The trip button can be used to
display and reset the following functions:
•Motor Power (Kilowatts)
•Trip A
•Trip B
•Tire Pressure
•Short push (less than 1 second) to dis-
play different functions.
•Long push (more than 1 second) to re-
set and start a new trip.
Trip Button
ELECTRONICS
79
Page 123 of 132

Adding Washer Fluid............107
Air Bag
Advanced Front Air Bag.........23
Advance Front Air Bag.........23
Air Bags.................23
Air Bag Warning Light........23, 26
Driver Knee Air Bag...........24
Enhanced Accident Response......25
Event Data Recorder (EDR)......26
Front Air Bag..............23
Passenger Knee Air Bag.........24
Rollover.................23
Side Impacts...............23
Air Bag Light...............26, 84
Air Conditioner Maintenance.......107
Air Conditioning Refrigerant........107
Air Conditioning System..........107
Alarm
Disarm The System...........21
Vehicle Security Alarm.........21
Alarm (Security Alarm).........21, 88
Anti-Lock Warning Light...........84
Appearance Care.............107
Audio Systems (Radio)...........58
Automatic Temperature Control (ATC)...48
Battery...................107
Body Mechanism Lubrication........107
Brake Fluid.................106
Brakes...................107
Brake System................107
Master Cylinder............107
Warning Light..............85
Bulb Replacement.............117
Bulbs, Light.................117
Capacities, Fluid...............106
Car Washes................107
Charging...................16
Child Restraints...............27
Installing Child Restraints Using The
Vehicle Seat Belt.............29
Lower Anchors And Tethers For
Children.................29
Using The Top Tether Anchorage....29
Child Seat Installation............27
Cleaning
Wheels................107Windshield Wiper Blades.......107
Climate Control
Automatic................48
Clock....................57
Clock Setting................57
Cluster Warning/Indicator Lights
Anti-Lock Brake (ABS) Light......84
Brake Warning Light...........85
Electronic Speed Control SET
Indicator.................88
Front Fog Light Indicator........88
High Beam Indicator..........88
Park/Headlight ON Indicator......88
Turn Signal Indicator..........88
Vehicle Security Light..........88
Compact Spare Tire............114
Cooling System...............107
Adding Coolant (Antifreeze).....107
Coolant Capacity...........106
Coolant Level.............107
Disposal Of Used Coolant......107
Drain, Flush, And Refill.........107
Inspection...............107
Points To Remember.........107
Pressure Cap.............107
Selection Of Coolant
(Antifreeze)...........106, 107
Corrosion Protection...........107
Customer Assistance............
118
Customer Programmable Features.....79
Daytime Running Lights...........40
Defects, Reporting.............118
Disarming, Security System.........21
Door Locks.................20
Electronics
Your Vehicle's Sound System......52
Electronic Speed Control
(Cruise Control).............44
Electronic Vehicle Information Center
(EVIC)................77, 78
Emergency, In Case Of
Towing.................100
Engine...................104
Enhanced Accident Response
Feature...............25, 100
Event Data Recorder............102
INDEX
121