ESP FIAT 500E 2019 Owners Manual
[x] Cancel search | Manufacturer: FIAT, Model Year: 2019, Model line: 500E, Model: FIAT 500E 2019Pages: 300, PDF Size: 3.03 MB
Page 2 of 300

VEHICLES SOLD IN CANADA
With respect to any Vehicles Sold in Canada, the name
FCA US LLC shall be deemed to be deleted and the name
FCA Canada Inc. used in substitution therefore.
DRIVING AND ALCOHOL
Drunken driving is one of the most frequent causes of
accidents.
Your driving ability can be seriously impaired with blood
alcohol levels far below the legal minimum. If you are
drinking, don’t drive. Ride with a designated non-
drinking driver, call a cab, a friend, or use public trans-
portation.
WARNING!
Driving after drinking can lead to an accident.
Your perceptions are less sharp, your reflexes are
slower, and your judgment is impaired when you
have been drinking. Never drink and then drive.
This manual illustrates and describes the operation of
features and equipment that are either standard or op-
tional on this vehicle. This manual may also include a
description of features and equipment that are no longer
available or were not ordered on this vehicle. Please
disregard any features and equipment described in this
manual that are not on this vehicle.
FCA US LLC reserves the right to make changes in design
and specifications, and/or make additions to or improve-
ments to its products without imposing any obligation
upon itself to install them on products previously manu-
factured.
Copyright © 2018 FCA US LLC
Page 41 of 300
General Information
The following regulatory statement applies to all radio
frequency (RF) devices equipped in this vehicle:
This device complies with Part 15 of the FCC Rules and
with Industry Canada license-exempt RSS standard(s).
Operation is subject to the following two conditions:
1. This device may not cause harmful interference, and
2. This device must accept any interference received, in-cluding interference that may cause undesired opera-
tion.
NOTE: Changes or modifications not expressly approved
by the party responsible for compliance could void the
user ’s authority to operate the equipment.
IGNITION SWITCH
Mechanical Ignition Switch
The ignition switch can be turned to three different posi-
tions:
• STOP: the vehicle is off, and the key can be removed.
Some electrical devices (e.g. sound system, central door
locking system, etc.) can operate.
NOTE: The transmission must be placed in PARK before
the key is turned to the STOP position. Then, the key can be
removed.
• AVV: vehicle start-up.
• MAR: driving position. All electrical devices are en-
abled.
3
GETTING TO KNOW YOUR VEHICLE 39
Page 44 of 300
Key Programming
Programming key fobs may be performed at an authorized
dealer.
Replacement Keys
NOTE:Only keys that have been programmed to the
vehicle electronics can be used to start the vehicle. Once a
Sentry Key has been programmed to a vehicle, it cannot be
programmed to any other vehicle. When having the Sen-
try Key Immobilizer System serviced, bring all vehicle
keys with you to an authorized dealer.
General Information
The following regulatory statement applies to all radio
frequency (RF) devices equipped in this vehicle:
This device complies with Part 15 of the FCC Rules and
with Industry Canada license-exempt RSS standard(s).
Operation is subject to the following two conditions:
1. This device may not cause harmful interference, and
2. This device must accept any interference received, in- cluding interference that may cause undesired opera-
tion. NOTE:
Changes or modifications not expressly approved
by the party responsible for compliance could void the
user ’s authority to operate the equipment.
VEHICLE SECURITY ALARM
The vehicle security alarm monitors the vehicle doors for
unauthorized entry and the ignition switch for unauthor-
ized operation. While the vehicle security alarm is armed,
interior switches for door locks and liftgate release are
disabled. If something triggers the alarm, the vehicle
security alarm will provide the following audible and
visible signals: the horn will pulse, the park lamps and/or
turn signals will flash, and the vehicle security light on the
instrument panel will flash.
To Arm The System
1. Remove the key from the ignition switch and get out of the vehicle.
2. Lock the door using either the Central Lock/Unlock switch or the Remote Keyless Entry key fob and close all
doors.
42 GETTING TO KNOW YOUR VEHICLE
Page 52 of 300
adjuster can both re-lock into the position they were
most recently adjusted to. This is accomplished if the
seat is moved fully rearward to its last fore/aft position
on the tracks before the seat back is returned upright.
•
Memory Function Option 2 (Seat Back Only Memory) —
After using the EZ entry function, the seat back may first
be returned upright prior to going back to the last fore/aft
(memory) position on the tracks. This results in the seat
back memory being set only – The track will then be
locked forward of its last set fore/aft memory position. To
then reset the fore/aft track memory feature (to reestab-
lish Memory Function Option 1), the seat has to be
returned fully rearward to its last fore/aft memory track
position as described in Memory Function Option 1.
Heated Seats — If Equipped
On some models, the front driver and passenger seats may
be equipped with heaters in both the seat cushions and
seatbacks. The controls for the front heated seats are
located on the center instrument panel area.
Push the switch once to turn on the heated seats.
Push the switch a second time to shut the heating
elements off. NOTE:
Once a heat setting is selected, heat will be felt
within two to five minutes.
WARNING!
• Persons who are unable to feel pain to the skin
because of advanced age, chronic illness, diabetes,
spinal cord injury, medication, alcohol use, exhaus-
tion or other physical condition must exercise care
when using the seat heater. It may cause burns even
at low temperatures, especially if used for long
periods of time.
• Do not place anything on the seat or seatback that
insulates against heat, such as a blanket or cushion.
This may cause the seat heater to overheat. Sitting in
a seat that has been overheated could cause serious
burns due to the increased surface temperature of the
seat.
50 GETTING TO KNOW YOUR VEHICLE
Page 62 of 300
Follow Me Home/Headlight Delay
When this feature is selected, the driver can choose to have
the headlights remain on for a preset period of time.
Activation
Remove the key or turn the ignition to the STOP (OFF/
LOCK) position, and pull the multifunction lever toward
the steering wheel within two minutes. Each time the lever
is pulled, the activation of the lights will be extended by 30
seconds. The activation of the lights can be extended to a
maximum of 210 seconds.
Deactivation
Pull the multifunction lever toward the steering wheel and
hold it for more than two seconds.
Fog Lights — If Equipped
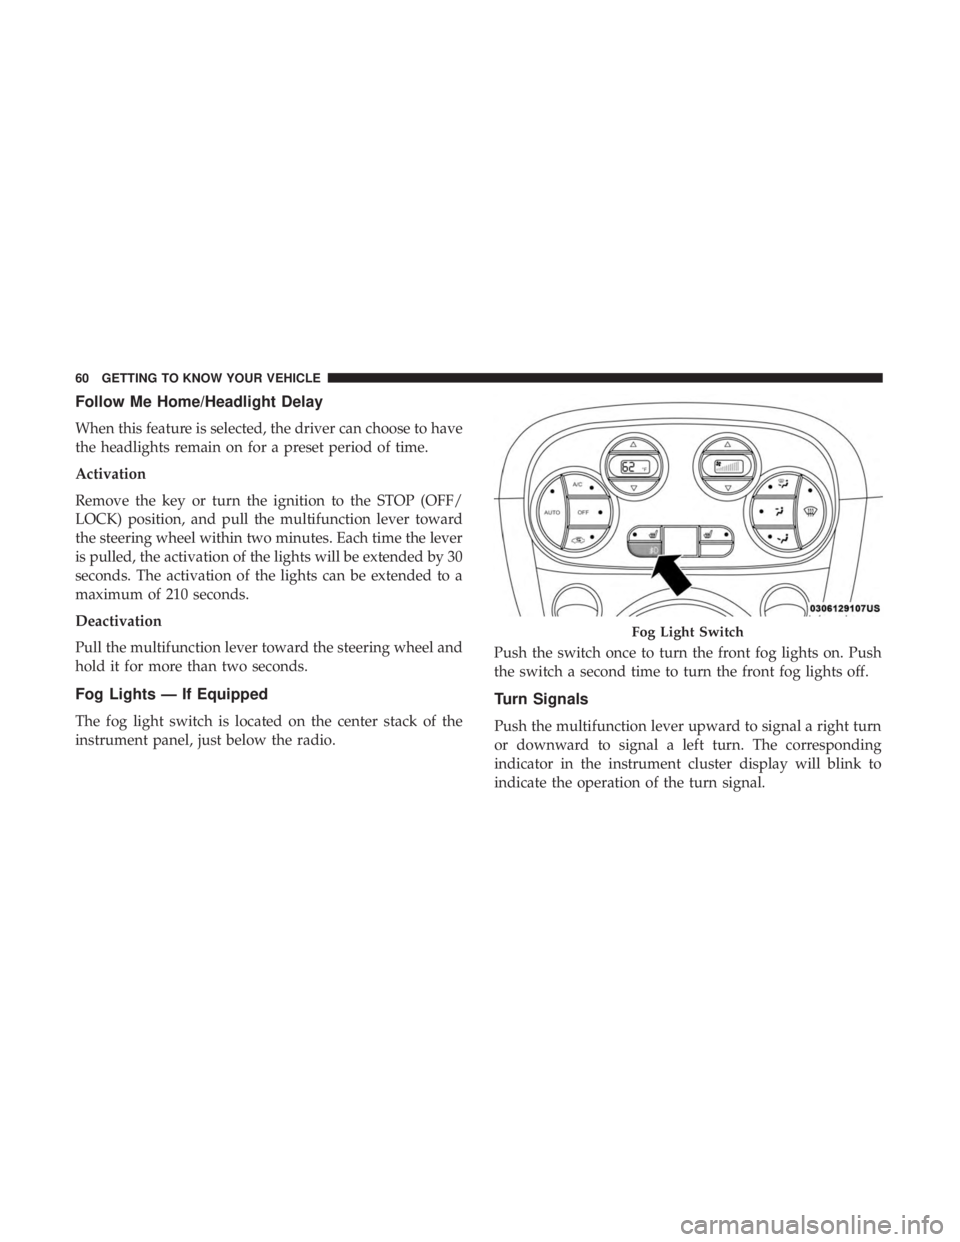
The fog light switch is located on the center stack of the
instrument panel, just below the radio.Push the switch once to turn the front fog lights on. Push
the switch a second time to turn the front fog lights off.
Turn Signals
Push the multifunction lever upward to signal a right turn
or downward to signal a left turn. The corresponding
indicator in the instrument cluster display will blink to
indicate the operation of the turn signal.
Fog Light Switch
60 GETTING TO KNOW YOUR VEHICLE
Page 98 of 300
Each time the ignition is turned to ON/RUN or ACC/ON/
RUN, the ESC system will be on, even if it was turned off
previously.
— External Light Failure Indicator Light — If
Equipped
The External Light Failure Indicator will come on when a
failure to one of the following lights is detected:
• Direction Indicators
• Backup Lights
• Parking Lights
• Daytime Running Lights
• License Plate Lights
The failure relating to these lights could be:
• One or more blown bulbs
• A blown protection fuse
• A break in the electrical connection
— Tire Pressure Monitoring System (TPMS)
Warning Light
The warning light switches on and a message is displayed
to indicate that the tire pressure is lower than the recom-
mended value and/or that slow pressure loss is occurring.
In these cases, optimal tire duration and fuel consumption
may not be guaranteed.
Should one or more tires be in the condition mentioned
above, the display will show the indications corresponding
to each tire.
CAUTION!
Do not continue driving with one or more flat tires as
handling may be compromised. Stop the vehicle,
avoiding sharp braking and steering. If a tire puncture
occurs, repair immediately using the dedicated tire
repair kit and contact an authorized dealer as soon as
possible.
Each tire, including the spare (if provided), should be
checked monthly when cold and inflated to the inflation
pressure recommended by the vehicle manufacturer on the
vehicle placard or tire inflation pressure label. (If your
vehicle has tires of a different size than the size indicated
96 GETTING TO KNOW YOUR INSTRUMENT PANEL
Page 99 of 300
on the vehicle placard or tire inflation pressure label, you
should determine the proper tire inflation pressure for
those tires.)
As an added safety feature, your vehicle has been
equipped with a Tire Pressure Monitoring System (TPMS)
that illuminates a low tire pressure telltale when one or
more of your tires is significantly under-inflated. Accord-
ingly, when the low tire pressure telltale illuminates, you
should stop and check your tires as soon as possible, and
inflate them to the proper pressure. Driving on a signifi-
cantly under-inflated tire causes the tire to overheat and
can lead to tire failure. Under-inflation also reduces fuel
efficiency and tire tread life, and may affect the vehicle’s
handling and stopping ability.
Please note that the TPMS is not a substitute for proper tire
maintenance, and it is the driver ’s responsibility to main-
tain correct tire pressure, even if under-inflation has not
reached the level to trigger illumination of the TPMS low
tire pressure telltale.
Your vehicle has also been equipped with a TPMS malfunc-
tion indicator to indicate when the system is not operating
properly. The TPMS malfunction indicator is combined
with the low tire pressure telltale. When the system detects
a malfunction, the telltale will flash for approximately oneminute and then remain continuously illuminated. This
sequence will continue upon subsequent vehicle start-ups
as long as the malfunction exists. When the malfunction
indicator is illuminated, the system may not be able to
detect or signal low tire pressure as intended. TPMS
malfunctions may occur for a variety of reasons, including
the installation of replacement or alternate tires or wheels
on the vehicle that prevent the TPMS from functioning
properly. Always check the TPMS malfunction telltale after
replacing one or more tires or wheels on your vehicle to
ensure that the replacement or alternate tires and wheels
allow the TPMS to continue to function properly.
CAUTION!
The TPMS has been optimized for the original equip-
ment tires and wheels. TPMS pressures and warning
have been established for the tire size equipped on
your vehicle. Undesirable system operation or sensor
damage may result when using replacement equip-
ment that is not of the same size, type, and/or style.
Aftermarket wheels can cause sensor damage. Using
aftermarket tire sealants may cause the Tire Pressure
(Continued)
4
GETTING TO KNOW YOUR INSTRUMENT PANEL 97
Page 111 of 300
•Under-inflation also reduces the high voltage battery
range and tire tread life, and may affect the vehicle’s
handling and stopping ability.
• It is particularly important for you to check the tire
pressure in all of the tires on your vehicle monthly and
to maintain the proper pressure.
• The TPMS is not a substitute for proper tire mainte-
nance, and it is the driver ’s responsibility to maintain
correct tire pressure using an accurate tire pressure
gauge, even if under-inflation has not reached the level
to trigger illumination of the Tire Pressure Monitoring
System Warning Light.
• Seasonal temperature changes will affect tire pressure,
and the TPMS will monitor the actual tire pressure in the
tire.TPM System
The Tire Pressure Monitor System (TPMS) uses wireless
technology with wheel rim mounted electronic sensors to
monitor tire pressure levels. Sensors, mounted to each
wheel as part of the valve stem, transmit tire pressure
readings to the receiver module.
The TPMS consists of the following components:
• Receiver module
• Four Tire Pressure Monitoring Sensors
• Various Tire Pressure Monitoring System messages,
which display in the instrument cluster
• Tire Pressure Monitoring System Warning Light
5
SAFETY 109
Page 114 of 300
•For each subsequent ignition switch cycle, a chime will
sound, the Tire Pressure Monitoring System Warning
Light will flash on and off for 75 seconds and then
remain on solid, and the instrument cluster will display
a “Service TPM System” message.
Once you repair or replace the original road tire and
reinstall it, the TPMS will update automatically. In addi-
tion, the Tire Pressure Monitoring System Warning Light
will turn off, as long as no tire pressure is below the
low-pressure warning limit in any of the four active road
tires. The vehicle may need to be driven for up to 20
minutes above 15 mph (24 km/h) in order for the TPMS to
receive this information.
General Information
This device complies with Part 15 of the FCC rules and RSS
210 of Industry Canada. Operation is subject to the follow-
ing conditions:
1. This device may not cause harmful interference.
2. This device must accept any interference received, in- cluding interference that may cause undesired opera-
tion. NOTE:
Changes or modifications not expressly approved
by the party responsible for compliance could void the
user ’s authority to operate the equipment.
OCCUPANT RESTRAINT SYSTEMS
Some of the most important safety features in your vehicle
are the restraint systems:
Occupant Restraint Systems Features
• Seat Belt Systems
• Supplemental Restraint Systems (SRS) Air Bags
• Child Restraints
Some of the safety features described in this section may be
standard equipment on some models, or may be optional
equipment on others. If you are not sure, ask an authorized
dealer.
Important Safety Precautions
Please pay close attention to the information in this section.
It tells you how to use your restraint system properly, to
keep you and your passengers as safe as possible.
112 SAFETY
Page 132 of 300
Side Impacts
The Side Air Bags are designed to activate in certain side
impacts. The Occupant Restraint Controller (ORC) deter-
mines whether the deployment of the Side Air Bags in a
particular impact event is appropriate, based on the sever-
ity and type of collision. The side impact sensors aid the
ORC in determining the appropriate response to impact
events. The system is calibrated to deploy the Side Air Bags
on the impact side of the vehicle during impacts that
require Side Air Bag occupant protection. In side impacts,
the Side Air Bags deploy independently; a left side impact
deploys the left Side Air Bags only and a right-side impact
deploys the right Side Air Bags only. Vehicle damage by
itself is not a good indicator of whether or not Side Air
Bags should have deployed.
The Side Air Bags will not deploy in all side collisions,
including some collisions at certain angles, or some side
collisions that do not impact the area of the passenger
compartment. The Side Air Bags may deploy during
angled or offset frontal collisions where the front air bags
deploy.Side Air Bags are a supplement to the seat belt restraint
system. Side Air Bags deploy in less time than it takes to
blink your eyes.
WARNING!
•
Occupants, including children, who are up against or
very close to Side Air Bags can be seriously injured
or killed. Occupants, including children, should
never lean on or sleep against the door, side win-
dows, or area where the side air bags inflate, even if
they are in an infant or child restraint.
• Seat belts (and child restraints where appropriate)
are necessary for your protection in all collisions.
They also help keep you in position, away from an
inflating Side Air Bag. To get the best protection
from the Side Air Bags, occupants must wear their
seat belts properly and sit upright with their backs
against the seats. Children must be properly re-
strained in a child restraint or booster seat that is
appropriate for the size of the child.
130 SAFETY