FIAT 500L 2014 2.G Owners Manual
500L 2014 2.G
FIAT
FIAT
https://www.carmanualsonline.info/img/10/4515/w960_4515-0.png
FIAT 500L 2014 2.G Owners Manual
Trending: engine oil capacity, airbag, radio antenna, battery replacement, jump start, buttons, ad blue
Page 361 of 409
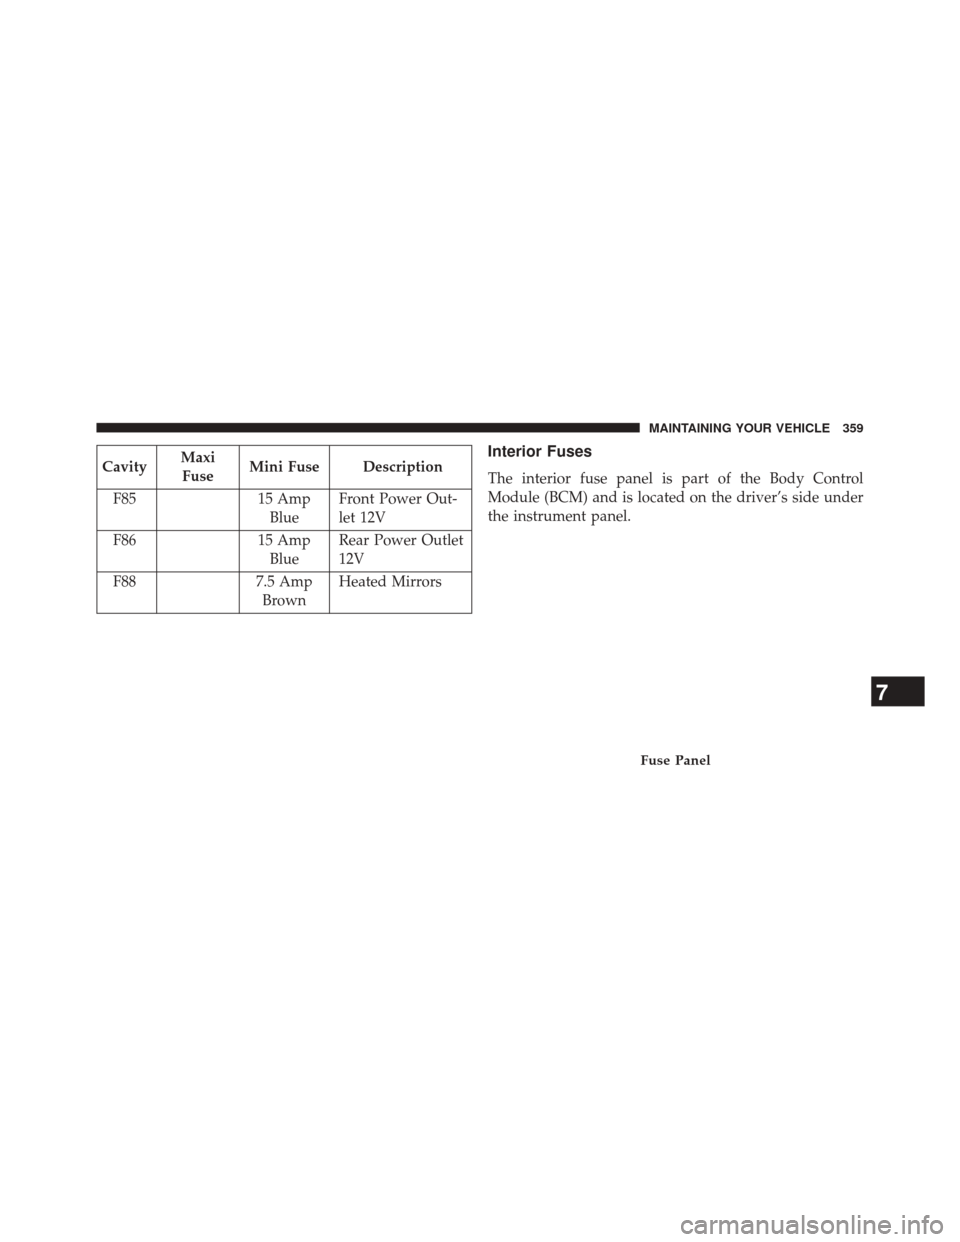
CavityMaxi
Fuse Mini Fuse Description
F85 15 Amp
Blue Front Power Out-
let 12V
F86 15 Amp
Blue Rear Power Outlet
12V
F88 7.5 Amp
Brown Heated MirrorsInterior Fuses
The interior fuse panel is part of the Body Control
Module (BCM) and is located on the driver’s side under
the instrument panel.
Fuse Panel
7
MAINTAINING YOUR VEHICLE 359
Page 362 of 409
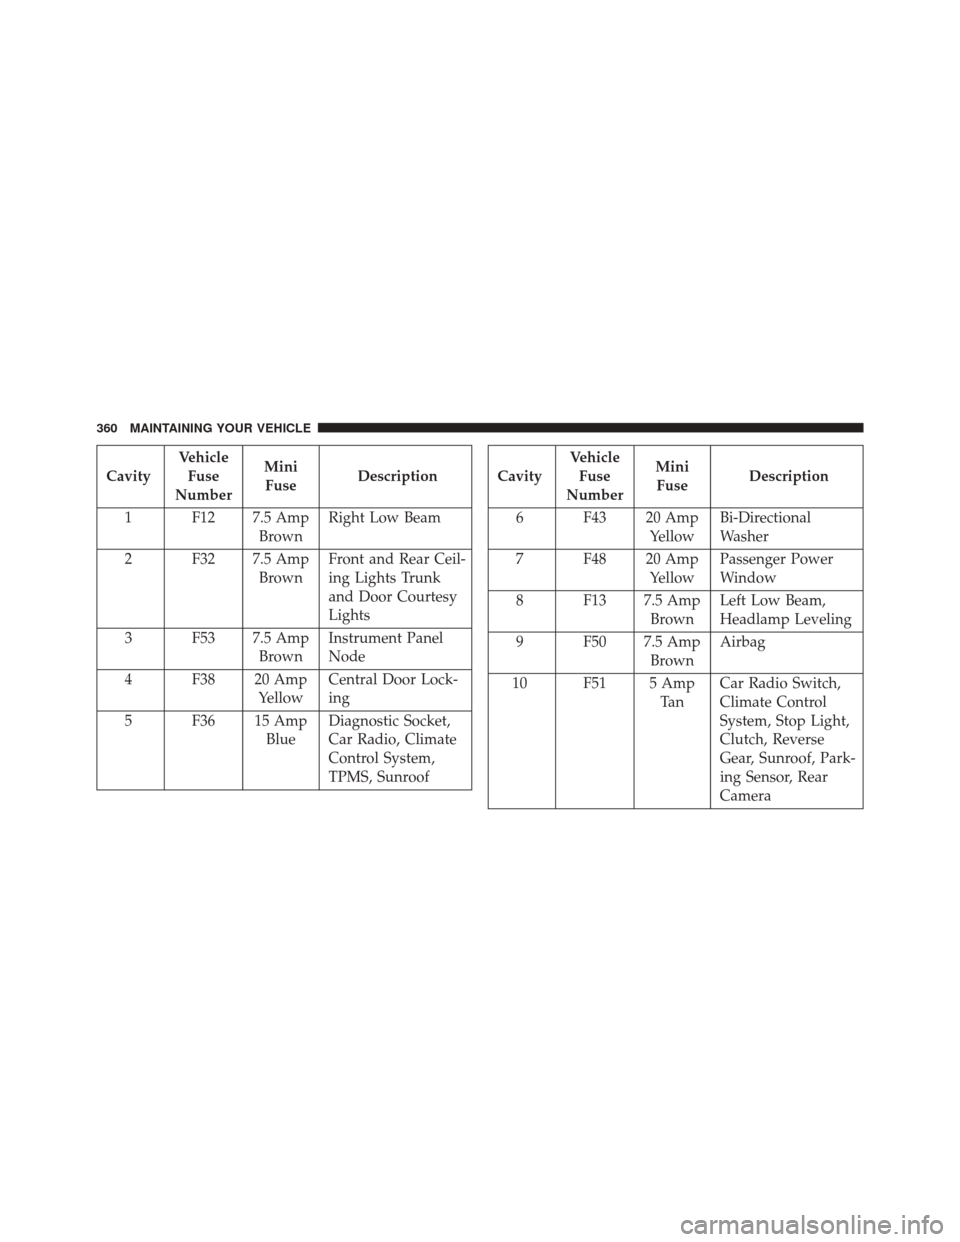
CavityVehicle
Fuse
Number Mini
Fuse Description
1 F12 7.5 Amp BrownRight Low Beam
2 F32 7.5 Amp BrownFront and Rear Ceil-
ing Lights Trunk
and Door Courtesy
Lights
3 F53 7.5 Amp BrownInstrument Panel
Node
4 F38 20 Amp YellowCentral Door Lock-
ing
5 F36 15 Amp BlueDiagnostic Socket,
Car Radio, Climate
Control System,
TPMS, SunroofCavity Vehicle
Fuse
Number Mini
Fuse Description
6 F43 20 Amp YellowBi-Directional
Washer
7 F48 20 Amp YellowPassenger Power
Window
8 F13 7.5 Amp BrownLeft Low Beam,
Headlamp Leveling
9 F50 7.5 Amp BrownAirbag
10 F51 5 Amp Ta nCar Radio Switch,
Climate Control
System, Stop Light,
Clutch, Reverse
Gear, Sunroof, Park-
ing Sensor, Rear
Camera
360 MAINTAINING YOUR VEHICLE
Page 363 of 409
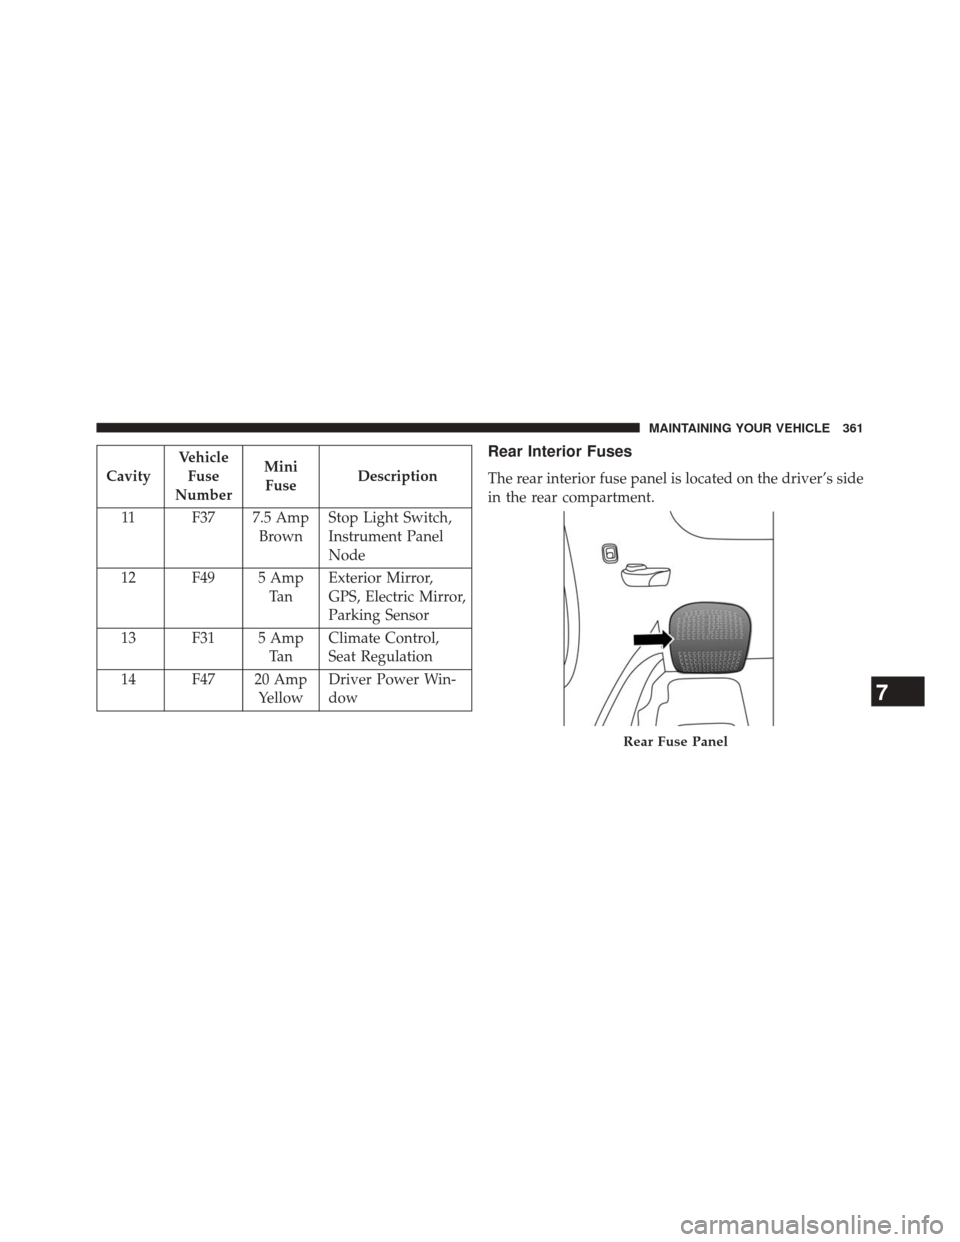
CavityVehicle
Fuse
Number Mini
Fuse Description
11 F37 7.5 Amp BrownStop Light Switch,
Instrument Panel
Node
12 F49 5 Amp Ta nExterior Mirror,
GPS, Electric Mirror,
Parking Sensor
13 F31 5 Amp Ta nClimate Control,
Seat Regulation
14 F47 20 Amp YellowDriver Power Win-
dow
Rear Interior Fuses
The rear interior fuse panel is located on the driver’s side
in the rear compartment.
Rear Fuse Panel
7
MAINTAINING YOUR VEHICLE 361
Page 364 of 409
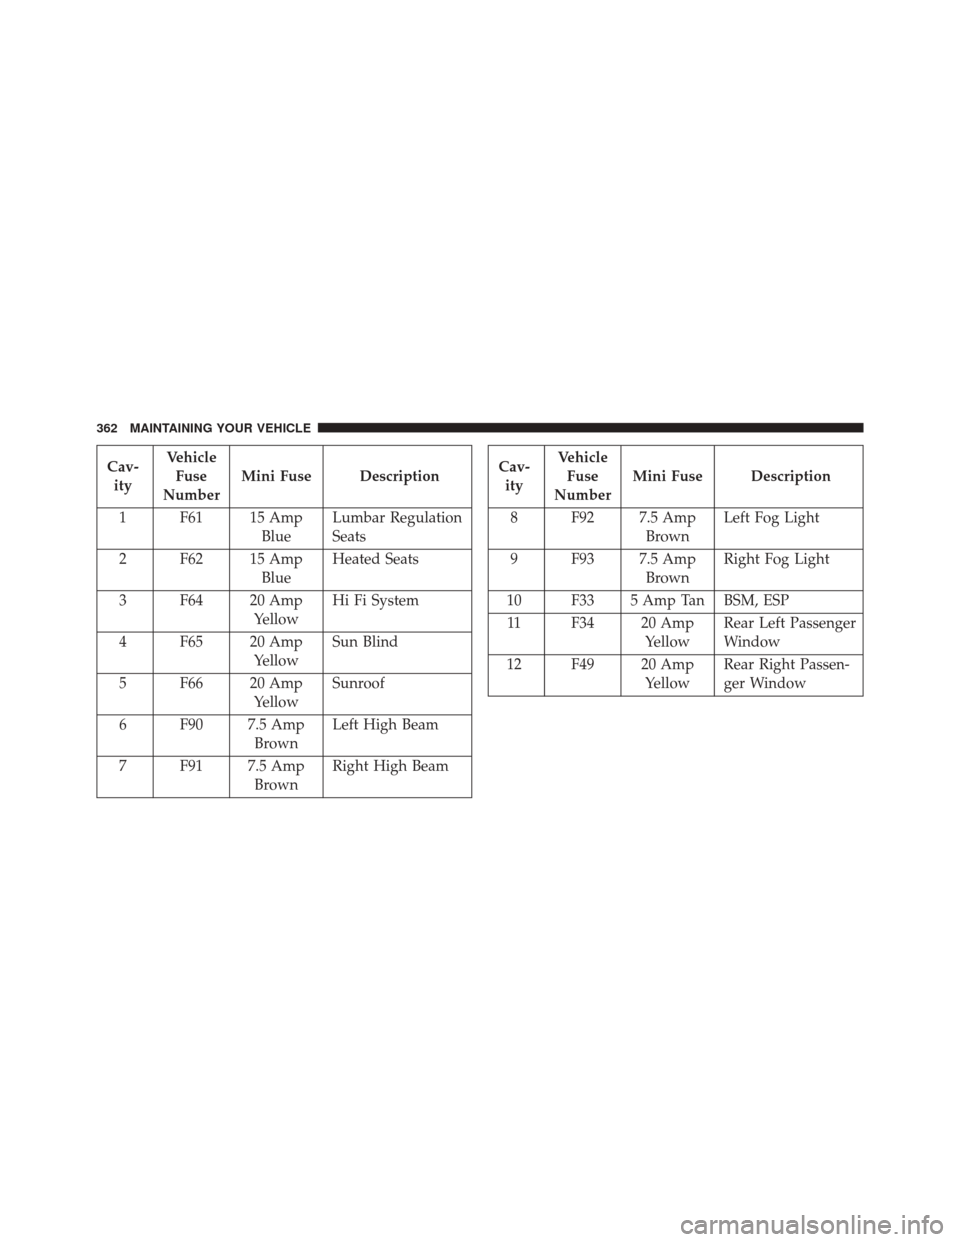
Cav-ity Vehicle
Fuse
Number Mini Fuse Description
1 F61 15 Amp BlueLumbar Regulation
Seats
2 F62 15 Amp BlueHeated Seats
3 F64 20 Amp YellowHi Fi System
4 F65 20 Amp YellowSun Blind
5 F66 20 Amp YellowSunroof
6 F90 7.5 Amp BrownLeft High Beam
7 F91 7.5 Amp BrownRight High BeamCav-
ity Vehicle
Fuse
Number Mini Fuse Description
8 F92 7.5 Amp BrownLeft Fog Light
9 F93 7.5 Amp BrownRight Fog Light
10 F33 5 Amp Tan BSM, ESP 11 F34 20 Amp YellowRear Left Passenger
Window
12 F49 20 Amp YellowRear Right Passen-
ger Window
362 MAINTAINING YOUR VEHICLE
Page 365 of 409
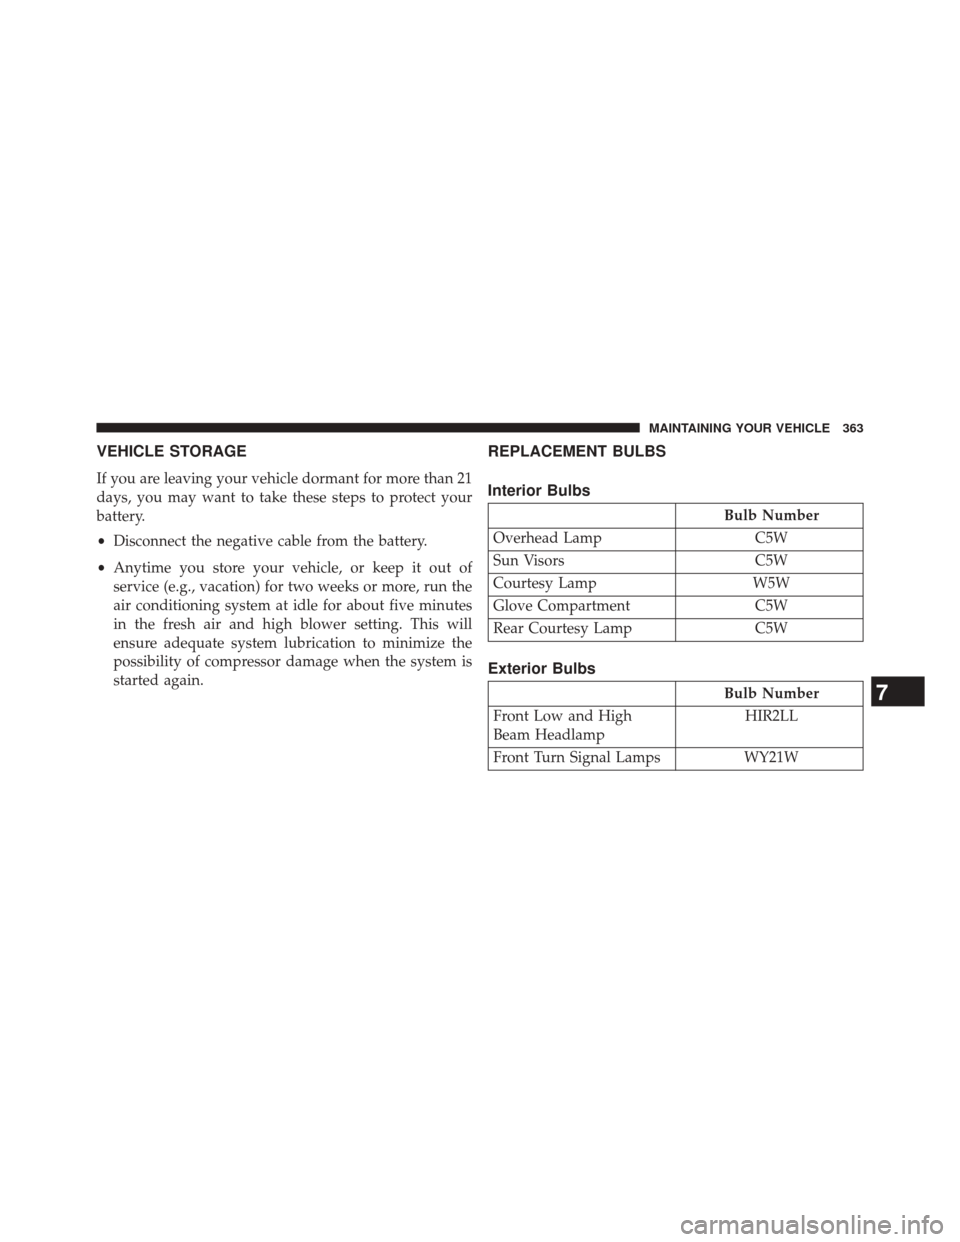
VEHICLE STORAGE
If you are leaving your vehicle dormant for more than 21
days, you may want to take these steps to protect your
battery.
•Disconnect the negative cable from the battery.
• Anytime you store your vehicle, or keep it out of
service (e.g., vacation) for two weeks or more, run the
air conditioning system at idle for about five minutes
in the fresh air and high blower setting. This will
ensure adequate system lubrication to minimize the
possibility of compressor damage when the system is
started again.
REPLACEMENT BULBS
Interior Bulbs
Bulb Number
Overhead Lamp C5W
Sun Visors C5W
Courtesy Lamp W5W
Glove Compartment C5W
Rear Courtesy Lamp C5W
Exterior Bulbs
Bulb Number
Front Low and High
Beam Headlamp HIR2LL
Front Turn Signal Lamps WY21W7
MAINTAINING YOUR VEHICLE 363
Page 366 of 409
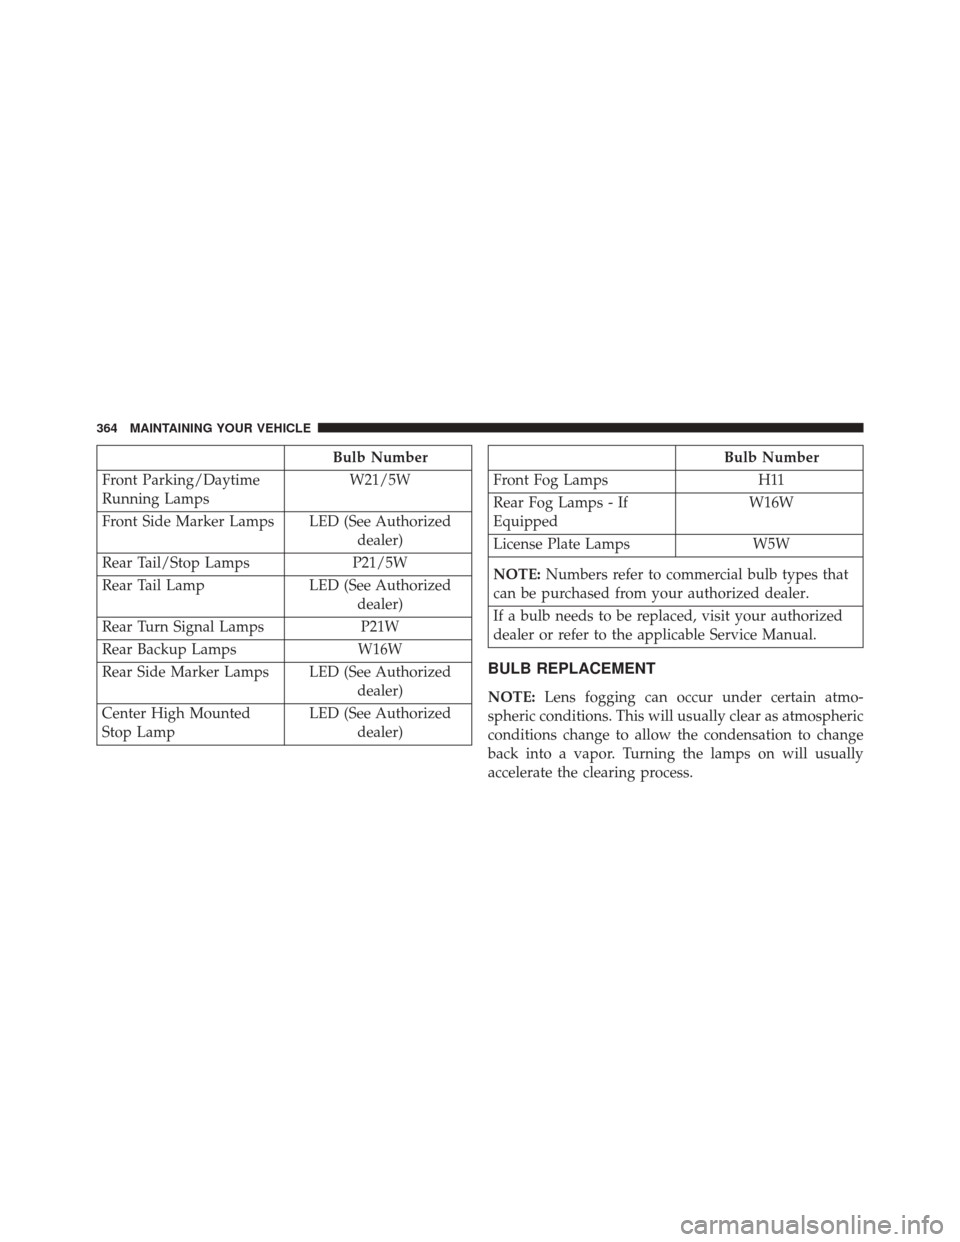
Bulb Number
Front Parking/Daytime
Running Lamps W21/5W
Front Side Marker Lamps LED (See Authorized dealer)
Rear Tail/Stop Lamps P21/5W
Rear Tail Lamp LED (See Authorized dealer)
Rear Turn Signal Lamps P21W
Rear Backup Lamps W16W
Rear Side Marker Lamps LED (See Authorized dealer)
Center High Mounted
Stop Lamp LED (See Authorized
dealer)Bulb Number
Front Fog Lamps H11
Rear Fog Lamps - If
Equipped W16W
License Plate Lamps W5W
NOTE: Numbers refer to commercial bulb types that
can be purchased from your authorized dealer.
If a bulb needs to be replaced, visit your authorized
dealer or refer to the applicable Service Manual.
BULB REPLACEMENT
NOTE: Lens fogging can occur under certain atmo-
spheric conditions. This will usually clear as atmospheric
conditions change to allow the condensation to change
back into a vapor. Turning the lamps on will usually
accelerate the clearing process.
364 MAINTAINING YOUR VEHICLE
Page 367 of 409
Headlamps Low Beam and High Beam
1. Remove the plastic sealing cap from the back of theheadlamp housing by turning it counter-clockwise. 2. Rotate the bulb counter-clockwise.
Headlamp Sealing Cap Removal
Bulb Removal Procedure7
MAINTAINING YOUR VEHICLE 365
Page 368 of 409
3. Remove the bulb when all the tabs are aligned withthe openings in the metal holder.
4. Disconnect the electrical connector from the bulb. 5. Install the new bulb and rotate clockwise to lock in
place.
6. Reinstall the plastic cap.
Electrical Connector Removal
New Bulb Installation
366 MAINTAINING YOUR VEHICLE
Page 369 of 409
Front Turn Signal, Parking And Daytime Running
Lamps
1. Turn front wheels inboard to access upper cover inwheel liner.
2. Open the upper cover on the front of the wheel liner. 3. Remove the cap from the back of the lower headlamp
housing.
4. Rotate the bulb counter clockwise and remove.
5. Install the bulb into socket, and rotate bulb/socket clockwise into lamp locking it in place.
6. Reinstall the plastic cap and close the cover on the wheel liner.
Front Fog Lamps
To replace the front fog lights, see your authorized dealer.
Front, Rear Roof Lamps
1. Remove two screw and remove the lamp assembly.
2. Remove the socket bulb by turning counterclockwise.
3. Remove bulb and replace as needed.
Headlamp Sealing Cap Installation
7
MAINTAINING YOUR VEHICLE 367
Page 370 of 409
4. Reinstall the bulb socket and rotate clockwise to lockin place.
5. Reinstall lamp.
Rear Tail, Stop, Backup And Turn Signal Lamps
1. Open the liftgate.
2. Remove the tail lamp access panel.
3. Remove the two screws that secure the tail lamp to the body of the vehicle.
4. Remove the tail lamp assembly.
5. Remove the two screws that secure the backplate to the tail lamp housing. 6. Separate the backplate from the tail lamp housing.
7. Remove the tail, stop, or turn signal bulbs by pushing
them slightly and turning counter-clockwise.
8. Remove the backup lamp bulb by pulling straight out.
9. Replace lamps as required and reinstall lamp.
Center High-Mounted Stop Lamp (CHMSL)
This light is an LED assembly. See your authorized dealer
for replacement.
368 MAINTAINING YOUR VEHICLE
Trending: key battery, parking brake, wheel size, transmission cable, alarm, height adjustment, fog light bulb
