parking FIAT 500L 2014 2.G Owner's Manual
[x] Cancel search | Manufacturer: FIAT, Model Year: 2014, Model line: 500L, Model: FIAT 500L 2014 2.GPages: 116, PDF Size: 4.53 MB
Page 85 of 116
(C) Injecting TIREFIT Sealant Into The Deflated Tire:
Always start the engine before turning ON the TIREFIT kit.
NOTE:
Manual transmission vehicles must have the parking brake engaged and the shift lever in
NEUTRAL.
After pressing the Power Button (4), the sealant (white fluid) will flow from the Sealant
Bottle (1) through the Sealant Hose (6) and into the tire.
NOTE:
Sealant may leak out through the puncture in the tire.
If the sealant (white fluid) does not flow within0–10seconds through the Sealant Hose
(6):
1.Press the Power Button (4) to turn Off the TIREFIT kit.Disconnect the Sealant Hose
(6) from the valve stem.Make sure the valve stem is free of debris.Reconnect the
Sealant Hose (6) to the valve stem.Check that the Mode Select Knob (5) is in the
Sealant Mode position and not Air Mode.Press the Power Button (4) to turn On the
TIREFIT kit.
2.Connect the Power Plug (8) to a different 12 Volt power outlet in your vehicle or
another vehicle, if available.Make sure the engine is running before turning ON the
TIREFIT kit.
3.The Sealant Bottle (1) may be empty due to previous use.Call for assistance.
NOTE:
If the Mode Select Knob (5) is on Air Mode and the pump is operating, air will dispense
from the Air Pump Hose (7) only, not the Sealant Hose (6).
If the sealant (white fluid) does flow through the Sealant Hose (6):
1.Continue to operate the pump until sealant is no longer flowing through the hose
(typically takes 30 - 70 seconds).As the sealant flows through the Sealant Hose (6),
the Pressure Gauge (3) can read as high as 70 psi (4.8 Bar).The Pressure Gauge (3)
will decrease quickly from approximately 70 psi (4.8 Bar) to the actual tire pressure
when the Sealant Bottle (1) is empty.
2.The pump will start to inject air into the tire immediately after the Sealant Bottle (1)
is empty.Continue to operate the pump and inflate the tire to the pressure indicated
on the tire pressure label on the driver-side latch pillar (recommended pressure).
Check the tire pressure by looking at the Pressure Gauge (3).
WHAT TO DO IN EMERGENCIES
83
Page 89 of 116
Preparations For Jump-Start
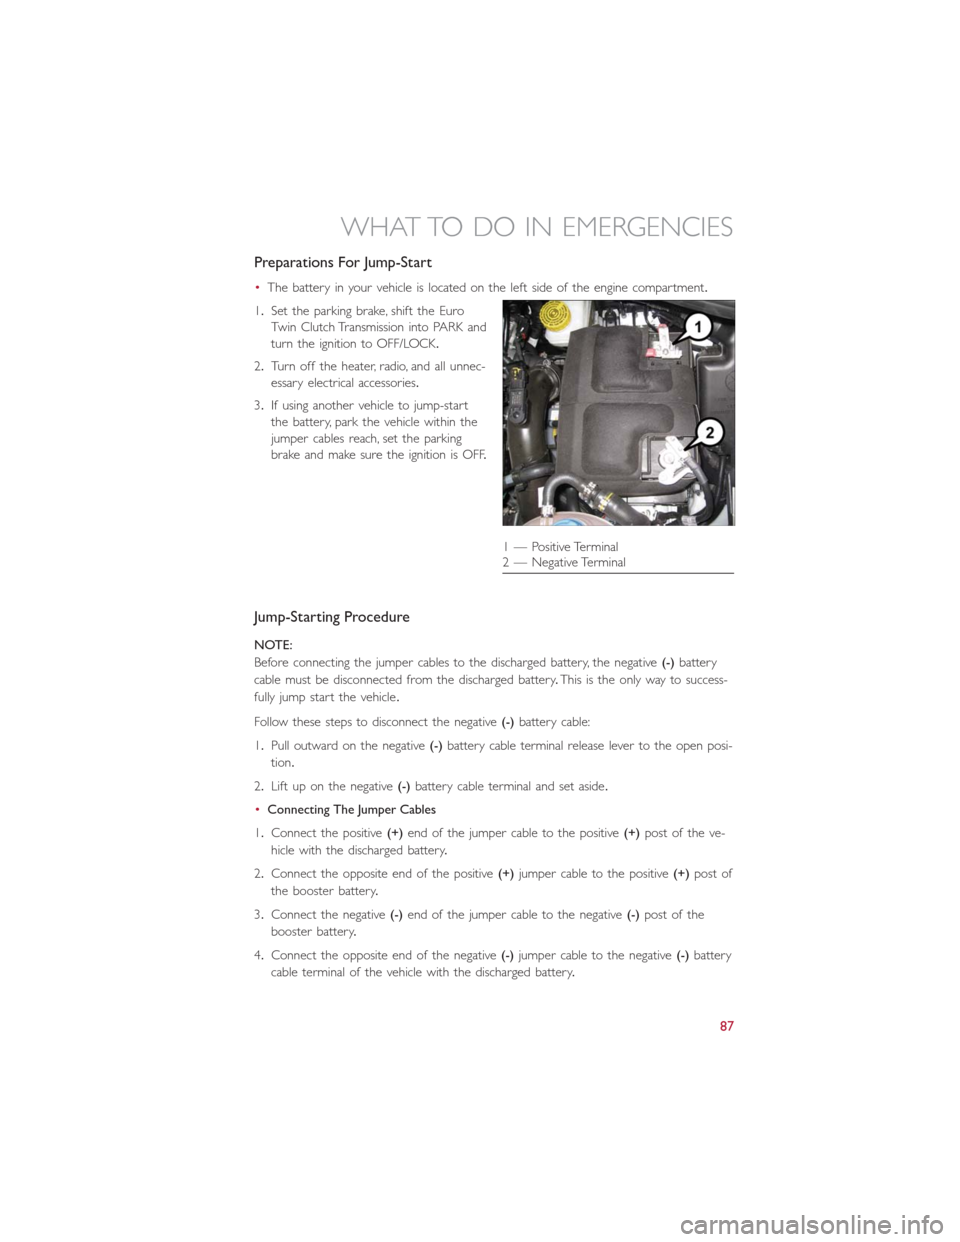
•The battery in your vehicle is located on the left side of the engine compartment.
1.Set the parking brake, shift the Euro
Twin Clutch Transmission into PARK and
turn the ignition to OFF/LOCK.
2.Turn off the heater, radio, and all unnec-
essary electrical accessories.
3.If using another vehicle to jump-start
the battery, park the vehicle within the
jumper cables reach, set the parking
brake and make sure the ignition is OFF.
Jump-Starting Procedure
NOTE:
Before connecting the jumper cables to the discharged battery, the negative(-)battery
cable must be disconnected from the discharged battery.This is the only way to success-
fully jump start the vehicle.
Follow these steps to disconnect the negative(-)battery cable:
1.Pull outward on the negative(-)battery cable terminal release lever to the open posi-
tion.
2.Lift up on the negative(-)battery cable terminal and set aside.
•Connecting The Jumper Cables
1.Connect the positive(+)end of the jumper cable to the positive(+)post of the ve-
hicle with the discharged battery.
2.Connect the opposite end of the positive(+)jumper cable to the positive(+)post of
the booster battery.
3.Connect the negative(-)end of the jumper cable to the negative(-)post of the
booster battery.
4.Connect the opposite end of the negative(-)jumper cable to the negative(-)battery
cable terminal of the vehicle with the discharged battery.
1 — Positive Terminal
2 — Negative Terminal
WHAT TO DO IN EMERGENCIES
87
Page 91 of 116
WARNING!
•Do not attempt jump-starting if the battery is frozen.It could rupture or explode
and cause personal injury.
•Take care to avoid the radiator cooling fan whenever the hood is raised.It can
start anytime the ignition switch is on.You can be injured by moving fan blades.
•Remove any metal jewelry such as watch bands or bracelets that might make an
inadvertent electrical contact.You could be seriously injured.
•Batteries contain sulfuric acid that can burn your skin or eyes and generate hydro-
gen gas which is flammable and explosive.Keep open flames or sparks away from
the battery.
•Do not allow vehicles to touch each other as this could establish a ground con-
nection and personal injury could result.
•Failure to follow this procedure could result in personal injury or property damage
due to battery explosion.
•
Do not connect the cable to the negative post (-)
of the discharged battery.The resulting electrical spark could cause the battery to
explode and could result in personal injury.
SHIFT LEVER OVERRIDE
•If a malfunction occurs and the shift lever cannot be moved out of the PARK position,
you can use the following procedure to temporarily move the shift lever:
•Turn the ignition switch to the OFF position.
•Firmly set the parking brake.
•Remove the rubber storage tray liner from the center console, then lift up the front
of the shift lever bezel, carefully disengage the bezel from the shift lever housing, and
slide it up to the top of the shift lever.
•Press and maintain firm pressure on the brake pedal.
•Insert a small screwdriver or similar tool down into the access slot at the right rear
corner of the shift lever assembly, and push and hold the white override release lever
down.
•Move the shift lever into the NEUTRAL position.
•The vehicle may then be started in NEUTRAL.
•Reinstall the shift lever bezel (use care to avoid pinching the wiring), and the rubber
storage tray liner.
WHAT TO DO IN EMERGENCIES
89
Page 100 of 116
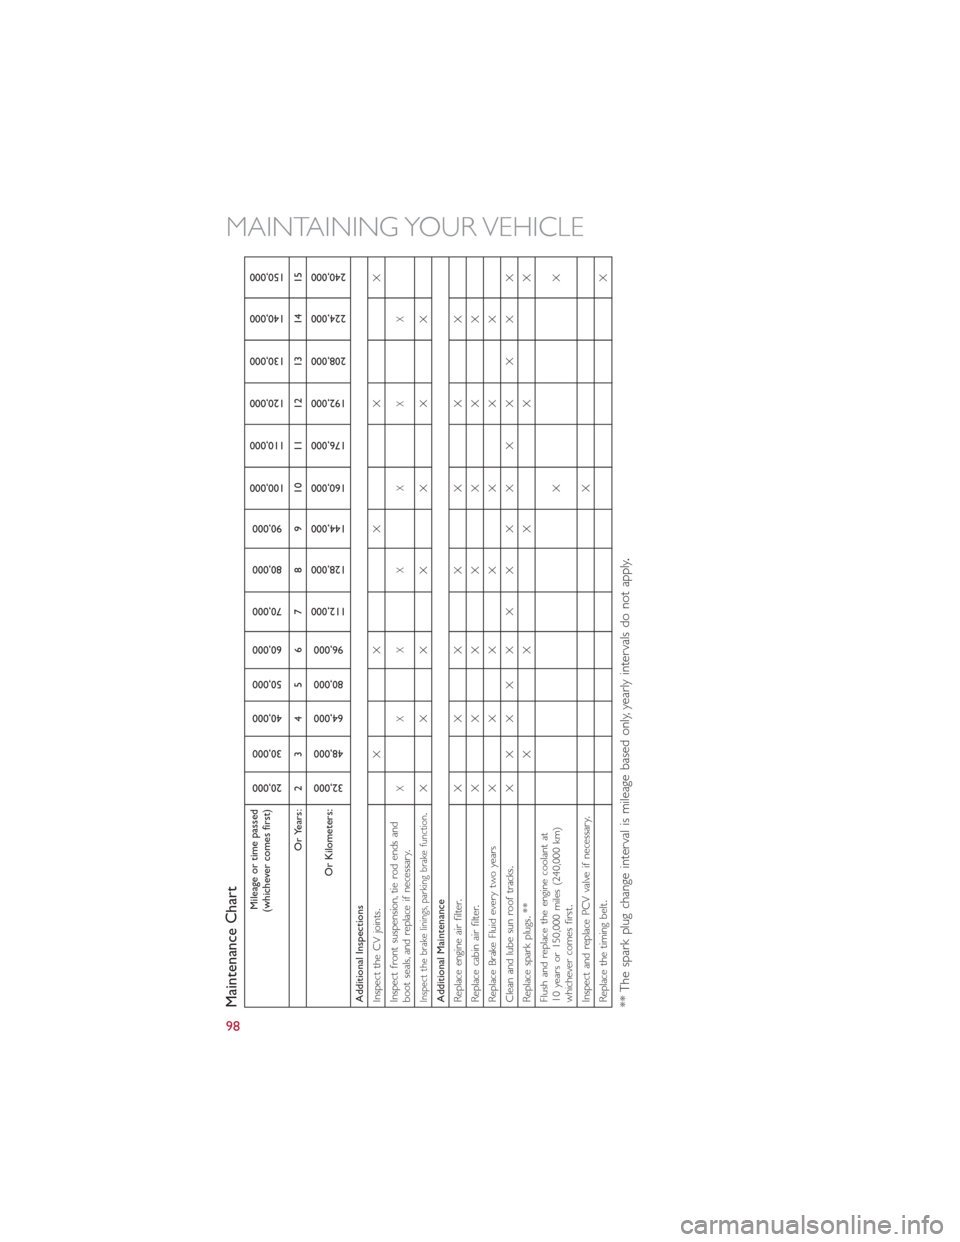
Maintenance Chart
Mileage or time passed
(whichever comes first)
20,000
30,000
40,000
50,000
60,000
70,000
80,000
90,000
100,000
110,000
120,000
130,000
140,000
150,000
Or Years: 2 3 4 5 6 7 8 9 10 11 12 13 14 15
Or Kilometers:
32,000
48,000
64,000
80,000
96,000
112,000
128,000
144,000
160,000
176,000
192,000
208,000
224,000
240,000
Additional Inspections
Inspect the CV joints.XX X X X
Inspect front suspension, tie rod ends and
boot seals, and replace if necessary.
XXXXXXX
Inspect the brake linings, parking brake function.
XXXXXXX
Additional Maintenance
Replace engine air filter.XXXXXXX
Replace cabin air filter.XXXXXXX
Replace Brake Fluid every two years X X X X X X X
Clean and lube sun roof tracks.XXXXXXXXXXXXXX
Replace spark plugs.** X X X X X
Flush and replace the engine coolant at
10 years or 150,000 miles (240,000 km)
whichever comes first.XX
Inspect and replace PCV valve if necessary.X
Replace the timing belt.X
** The spark plug change interval is mileage based only, yearly intervals do not apply.
MAINTAINING YOUR VEHICLE
98
Page 104 of 116
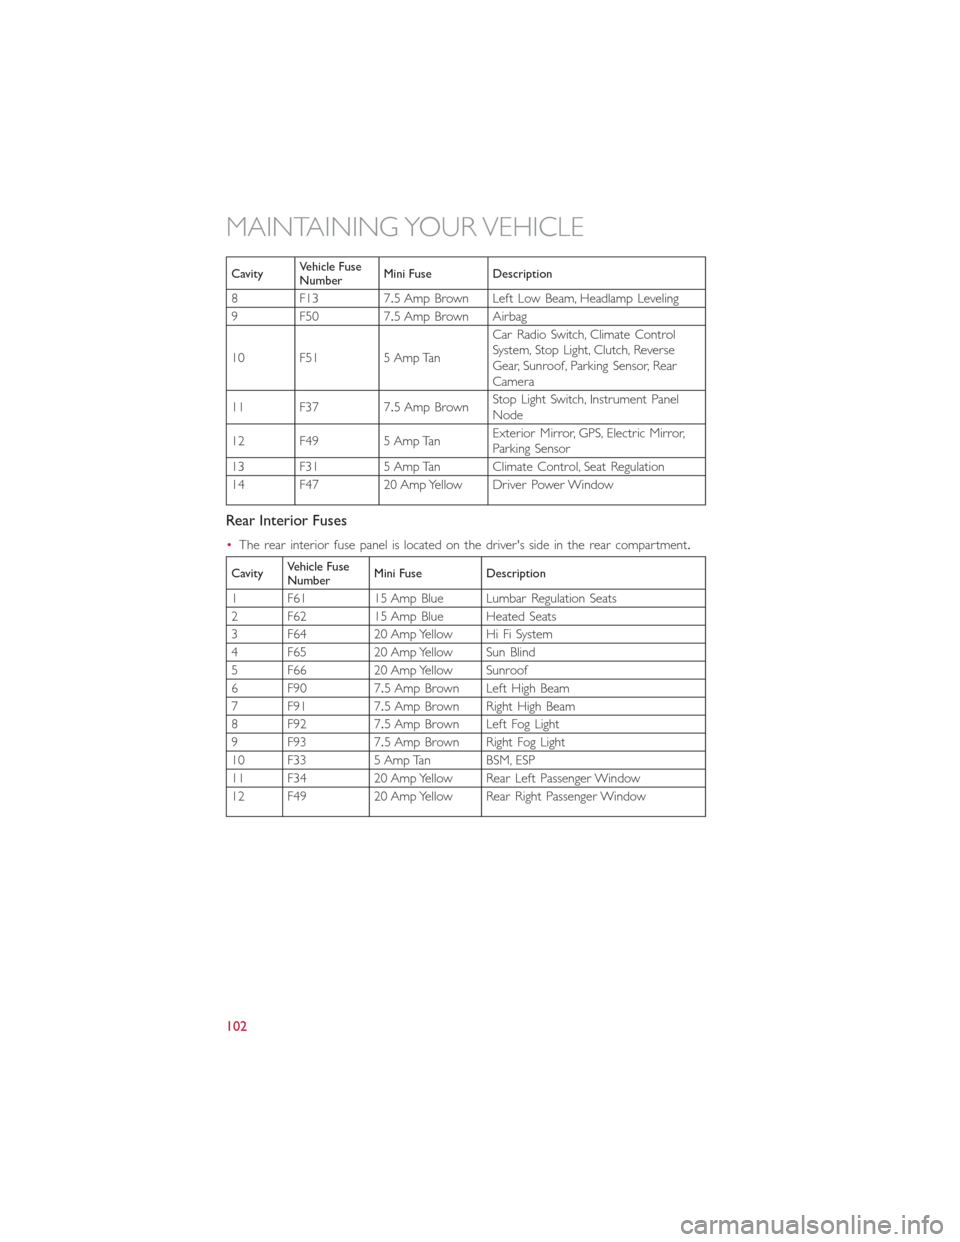
CavityVehicle Fuse
NumberMini Fuse Description
8 F13 7.5 Amp Brown Left Low Beam, Headlamp Leveling
9 F50 7.5 Amp Brown Airbag
10 F51 5 Amp TanCar Radio Switch, Climate Control
System, Stop Light, Clutch, Reverse
Gear, Sunroof, Parking Sensor, Rear
Camera
11 F37 7.5 Amp BrownStop Light Switch, Instrument Panel
Node
12 F49 5 Amp TanExterior Mirror, GPS, Electric Mirror,
Parking Sensor
13 F31 5 Amp Tan Climate Control, Seat Regulation
14 F47 20 Amp Yellow Driver Power Window
Rear Interior Fuses
•The rear interior fuse panel is located on the driver's side in the rear compartment.
CavityVehicle Fuse
NumberMini Fuse Description
1 F61 15 Amp Blue Lumbar Regulation Seats
2 F62 15 Amp Blue Heated Seats
3 F64 20 Amp Yellow Hi Fi System
4 F65 20 Amp Yellow Sun Blind
5 F66 20 Amp Yellow Sunroof
6 F90 7.5 Amp Brown Left High Beam
7 F91 7.5 Amp Brown Right High Beam
8 F92 7.5 Amp Brown Left Fog Light
9 F93 7.5 Amp Brown Right Fog Light
10 F33 5 Amp Tan BSM, ESP
11 F34 20 Amp Yellow Rear Left Passenger Window
12 F49 20 Amp Yellow Rear Right Passenger Window
MAINTAINING YOUR VEHICLE
102
Page 106 of 116
WHEEL AND WHEEL TRIM CARE
•All wheels and wheel trim, especially aluminum and chrome plated wheels, should be
cleaned regularly with a mild soap and water to prevent corrosion.
•To remove heavy soil and/or excessive brake dust, use a wheel cleaner or equivalent
or select a non-abrasive, non-acidic cleaner.
CAUTION!
Do not use scouring pads, steel wool, a bristle brush, or metal polishes.Do not use
oven cleaner.These products may damage the wheel's protective finish.Avoid automatic
car washes that use acidic solutions or harsh brushes that may damage the wheel's pro-
tective finish.
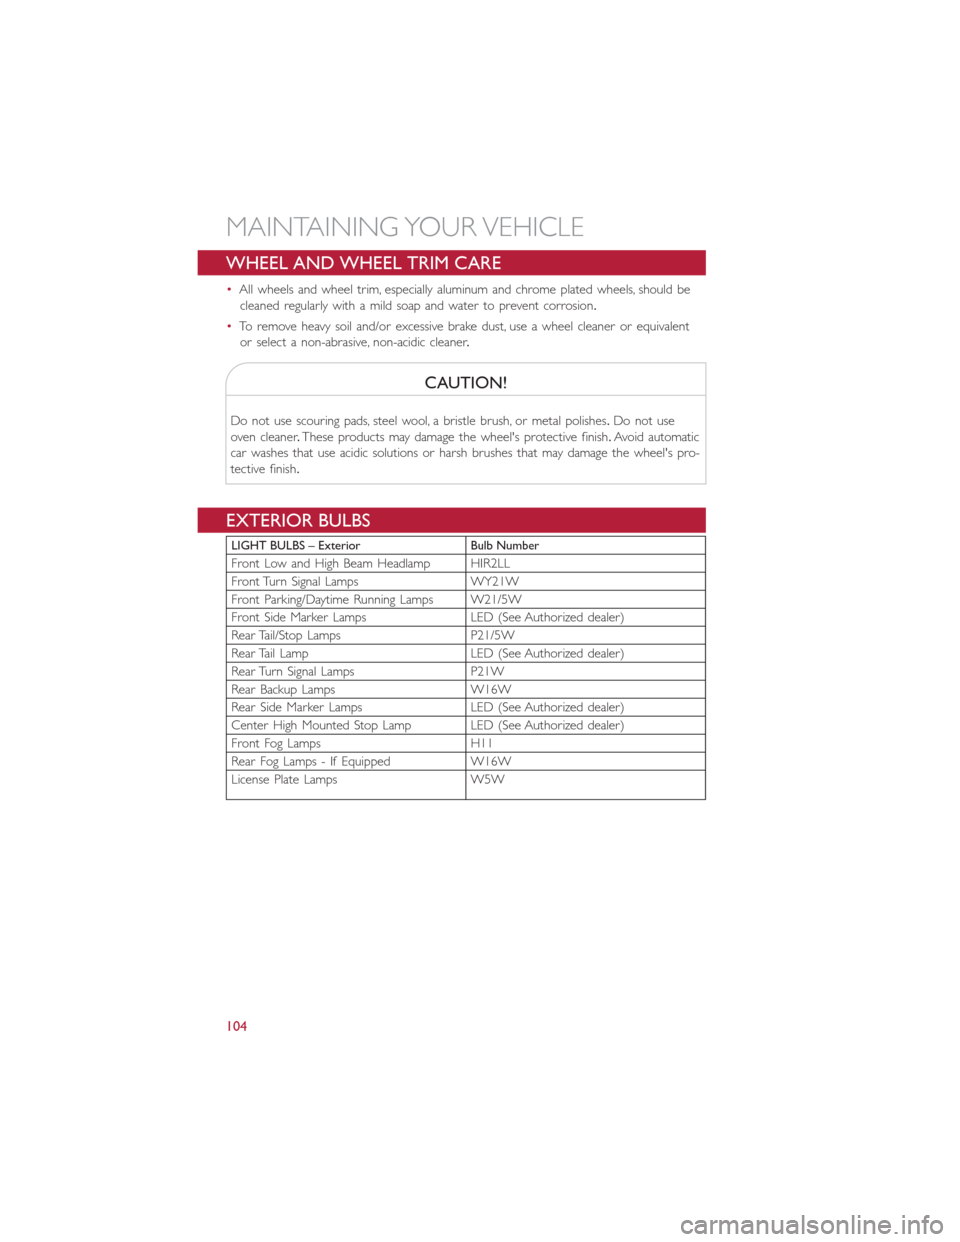
EXTERIOR BULBS
LIGHT BULBS – Exterior Bulb Number
Front Low and High Beam Headlamp HIR2LL
Front Turn Signal Lamps WY21W
Front Parking/Daytime Running Lamps W21/5W
Front Side Marker Lamps LED (See Authorized dealer)
Rear Tail/Stop Lamps P21/5W
Rear Tail Lamp LED (See Authorized dealer)
Rear Turn Signal Lamps P21W
Rear Backup Lamps W16W
Rear Side Marker Lamps LED (See Authorized dealer)
Center High Mounted Stop Lamp LED (See Authorized dealer)
Front Fog Lamps H11
Rear Fog Lamps - If Equipped W16W
License Plate Lamps W5W
MAINTAINING YOUR VEHICLE
104