warning FIAT 500L 2014 2.G Owner's Manual
[x] Cancel search | Manufacturer: FIAT, Model Year: 2014, Model line: 500L, Model: FIAT 500L 2014 2.GPages: 116, PDF Size: 4.53 MB
Page 18 of 116
FRONT SEATS
Manual Front Seat Adjustment
Forward/Rearward
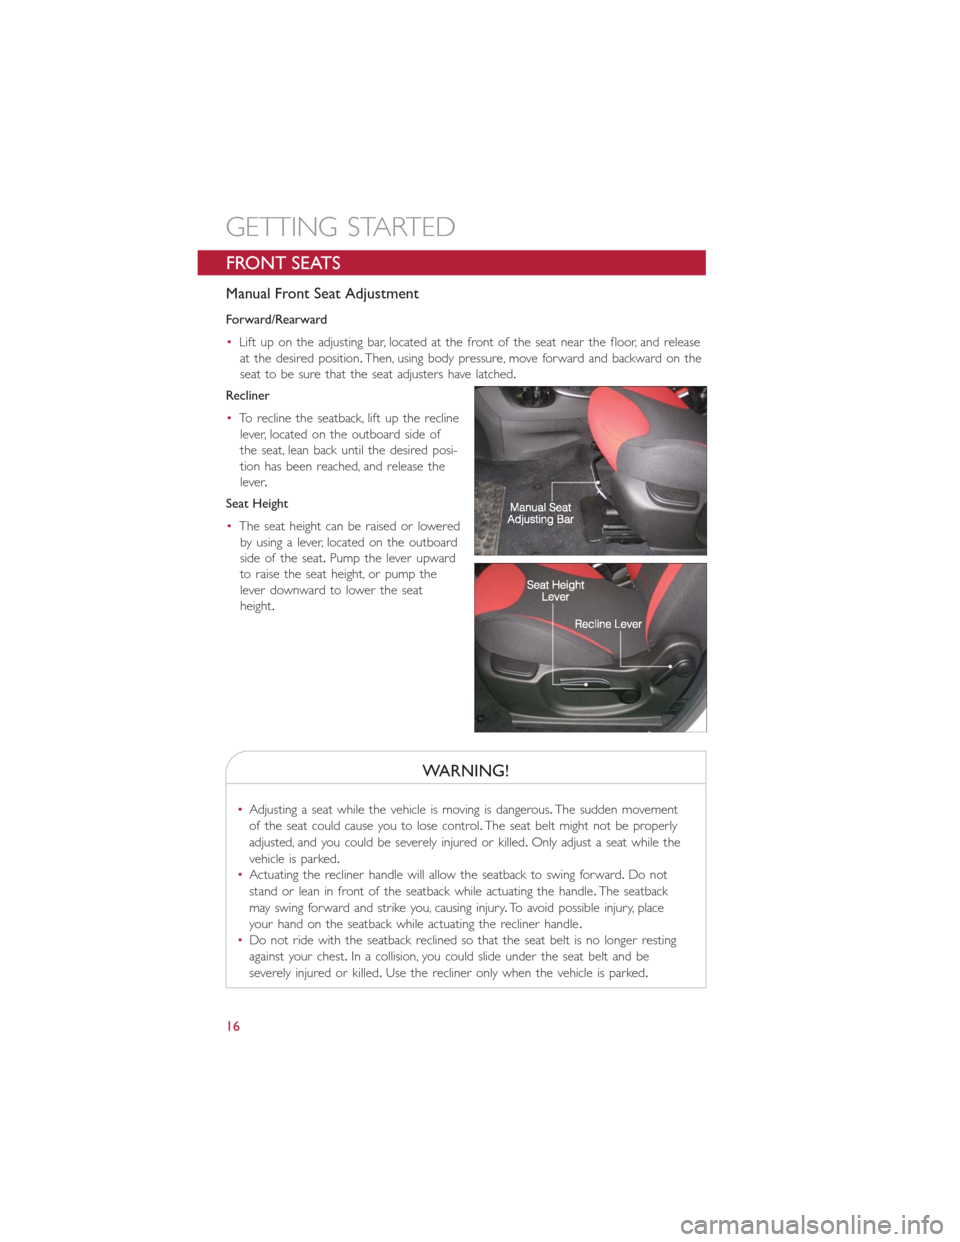
•Lift up on the adjusting bar, located at the front of the seat near the floor, and release
at the desired position.Then, using body pressure, move forward and backward on the
seat to be sure that the seat adjusters have latched.
Recliner
•To recline the seatback, lift up the recline
lever, located on the outboard side of
the seat, lean back until the desired posi-
tion has been reached, and release the
lever.
Seat Height
•The seat height can be raised or lowered
by using a lever, located on the outboard
side of the seat.Pump the lever upward
to raise the seat height, or pump the
lever downward to lower the seat
height.
WARNING!
•Adjusting a seat while the vehicle is moving is dangerous.The sudden movement
of the seat could cause you to lose control.The seat belt might not be properly
adjusted, and you could be severely injured or killed.Only adjust a seat while the
vehicle is parked.
•Actuating the recliner handle will allow the seatback to swing forward.Do not
stand or lean in front of the seatback while actuating the handle.The seatback
may swing forward and strike you, causing injury.To avoid possible injury, place
your hand on the seatback while actuating the recliner handle.
•Do not ride with the seatback reclined so that the seat belt is no longer resting
against your chest.In a collision, you could slide under the seat belt and be
severely injured or killed.Use the recliner only when the vehicle is parked.
GETTING STARTED
16
Page 19 of 116
REAR SEATS
Manual Rear Seat Adjustment
Forward/Rearward
•Lift up on the adjusting handle, located at the front of the seat near the floor, and re-
lease at the desired position.Then, using body pressure, move forward and backward
on the seat to be sure that the seat adjusters have latched.
Recliner
•To recline the seatback, lift up the recline lever, located on the outboard side of the
seat, lean back until the desired position has been reached, and release the lever.
Fold And Tumble Rear Seat
•Be sure that the front seats are fully upright and positioned forward.This will allow the
rear seat to fold down easily.
•Lift the seatback release lever located on the upper outboard side of the seat and fold
the seatback forward.
•To tumble the seat, lift upward on the recliner lever and slowly flip the entire seat
forward.
WARNING!
•Adjusting a seat while the vehicle is moving is dangerous.The sudden movement
of the seat could cause you to lose control.The seat belt might not be properly
adjusted, and you could be severely injured or killed.Only adjust a seat while the
vehicle is parked.
•Actuating the recliner handle will allow the seatback to swing forward.Do not
stand or lean in front of the seatback while actuating the handle.The seatback
may swing forward and strike you, causing injury.To avoid possible injury, place
your hand on the seatback while actuating the recliner handle.
•Do not ride with the seatback reclined so that the seat belt is no longer resting
against your chest.In a collision, you could slide under the seat belt and be
severely injured or killed.Use the recliner only when the vehicle is parked.
GETTING STARTED
17
Page 20 of 116
HEATED SEATS
Front Heated Seats
The controls for the front heated seats are located on the outboard side of the seat.
•Press the switch once to turn on the heated seat.
•Press the switch a second time to turn off the heated seat.
WARNING!
•Persons who are unable to feel pain to the skin because of advanced age, chronic
illness, diabetes, spinal cord injury, medication, alcohol use, exhaustion or other
physical conditions must exercise care when using the seat heater.It may cause
burns even at low temperatures, especially if used for long periods of time.
•Do not place anything on the seat that insulates against heat, such as a blanket or
cushion.This may cause the seat heater to overheat.Sitting in a seat that has been
overheated could cause serious burns due to the increased surface temperature of
the seat.
TILT/TELESCOPING STEERING COLUMN
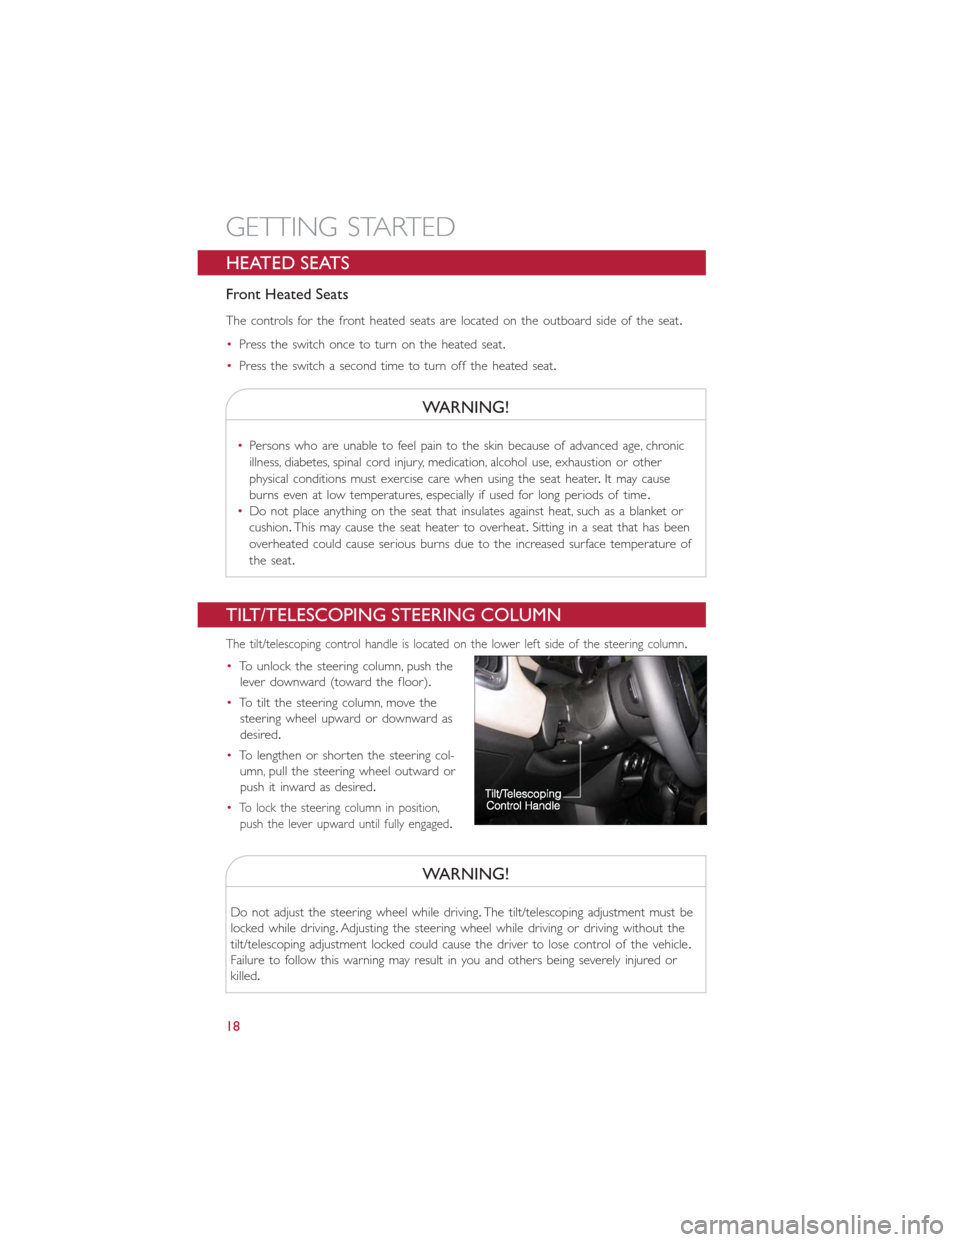
The tilt/telescoping control handle is located on the lower left side of the steering column.
•To unlock the steering column, push the
lever downward (toward the floor).
•To tilt the steering column, move the
steering wheel upward or downward as
desired.
•To lengthen or shorten the steering col-
umn, pull the steering wheel outward or
push it inward as desired.
•
To lock the steering column in position,
push the lever upward until fully engaged.
WARNING!
Do not adjust the steering wheel while driving.The tilt/telescoping adjustment must be
locked while driving.Adjusting the steering wheel while driving or driving without the
tilt/telescoping adjustment locked could cause the driver to lose control of the vehicle.
Failure to follow this warning may result in you and others being severely injured or
killed.
GETTING STARTED
18
Page 25 of 116
To Decrease Speed
•When the Electronic Speed Control is set, you can decrease speed by pushing the SET
-button.
The speed decrement shown is dependant on the chosen speed unit of U.S.(mph) or
Metric (km/h):
U.S.Speed (mph)
•Pressing the SET-button once will result in a 1 mph decrease in set speed.Each sub-
sequent tap of the button results in a decrease of 1 mph.
•If the button is continually pressed, the set speed will continue to decrease until the
button is released, then the new set speed will be established.
Metric Speed (km/h)
•Pressing the SET-button once will result in a 2 km/h decrease in set speed.Each sub-
sequent tap of the button results in a decrease of 2 km/h.
•If the button is continually pressed, the set speed will continue to decrease until the
button is released, then the new set speed will be established.
Resume
•To resume a previously selected set speed in memory, push the RES + button and
release.
Cancel
•Push the CANCEL button, or apply the brakes to cancel the set speed and maintain
the set speed memory.
•Push the ON/OFF button to turn the system off and erase the set speed memory.
WARNING!
•Leaving the Electronic Speed Control system on when not in use is dangerous.Yo u
could accidentally set the system or cause it to go faster than you want.You could
lose control and have a collision.Always leave the Electronic Speed Control system
off when you are not using it.
•Electronic Speed Control can be dangerous where the system cannot maintain a
constant speed.Your vehicle could go too fast for the conditions, and you could
lose control.A collision could be the result.Do not use Electronic Speed Control
in heavy traffic or on roads that are winding, icy, snow-covered or slippery.
OPERATING YOUR VEHICLE
23
Page 29 of 116
WARNING!
•Do not let children play with the sunroof, or leave children unattended in the ve-
hicle, and do not leave the key in or near the vehicle (or in a location accessible
to children).Occupants, particularly unattended children, can become entrapped by
the power sunroof while operating the power sunroof switch.Such entrapment
may result in serious injury or death.
•In a collision, there is a greater risk of being thrown from a vehicle with an open
sunroof.You could also be seriously injured or killed.Always fasten your seat belt
properly and make sure all passengers are properly secured.
•Do not allow small children to operate the sunroof.Never allow your fingers,
other body parts, or any object to project through the sunroof opening.Injury
may result.
WIND BUFFETING
Wind buffeting can be described as a helicopter-type percussion sound.If buffeting
occurs with the rear windows open, adjust the front and rear windows together.
If buffeting occurs with the sunroof open, adjust the sunroof opening, or adjust any
window.This will minimize buffeting.
EURO TWIN CLUTCH SIX-SPEED TRANSMISSION
•This vehicle may be equipped with a fuel efficient Euro Twin Clutch Six Speed Trans-
mission.This transmission offers a sportier driving experience with faster AutoStick®
shifting.
•During low-speed driving conditions in first gear, vehicle momentum changes may feel
exaggerated in response to changes in accelerator pedal position.This behavior is nor-
mal and is similar to vehicles equipped with a manual transmission.
NOTE:
•Very aggressive driving may result in some clutch odor similar to a manual transmission.
An active warning message will display in the Instrument Cluster if cool down actions
are needed.
•The first few shifts on a new vehicle may be somewhat abrupt.This is a normal condi-
tion, and precision shifts will develop within a few hundred miles (kilometers).
•
At low speeds you may hear mechanical noises similar to a manual transmission as the
transmission changes gears.These noises are normal and will not damage the transmission.
•Before and after the engine is started, you may hear a hydraulic pump for a short
period of time.This noise is normal and will not damage the transmission.
OPERATING YOUR VEHICLE
27
Page 43 of 116
Voice Command Tips
•Using the complete name of a contact, as stored in your phonebook, (e.g.Call John
Doe vs.Call John) results in greater system accuracy.
•You can ‘chain’ commands together for faster results.Say “Call John Doe, mobile,” for
example.
•If you are listening to available voice command options, you do not have to listen to
the entire list.When you hear the command that you need, press the
button
on the steering wheel, wait for the beep and say your command.
Changing The Volume
•Start a dialogue by pressing the Phone button, then say a command for example
- "Help".
•Use the radio ON/OFF VOLUME rotary knob to adjust the volume to a comfortable
level while the Uconnect® system is speaking.Please note the volume setting for
Uconnect® is different than the audio system.
NOTE:
To access help, press the Uconnect® Phone
button on the steering wheel and say
"help." Touch the display or push either
orbutton and say "cancel" to
cancel the help session.
Voice Text Reply
•Uconnect® Phone can read or send new text messages on your mobile phone.
•Your mobile phone must be MAP (Message Access Profile) compatible to support SMS
via Bluetooth® to use this feature.If the Uconnect® Phone determines your phone is
not compatible with SMS messaging over Bluetooth® the “Messaging” button is greyed
out and the feature is not available for use.
NOTE:
For mobile phone compatibility and pairing instructions, please visit www.UconnectPhone.com
WARNING!
•Any voice commanded system should be used only in safe driving conditions fol-
lowing applicable laws regarding phone use.Your attention should be focused on
safely operating the vehicle.Failure to do so may result in a collision causing you
and others to be severely injured or killed.
•In an emergency, to use Uconnect® Phone, your mobile phone must be:
•turned on,
•paired to Uconnect® Phone,
•and have network coverage.
ELECTRONICS
41
Page 60 of 116
WARNING!
•Any voice commanded system should be used only in safe driving conditions fol-
lowing applicable laws regarding phone use.Your attention should be focused on
safely operating the vehicle.Failure to do so may result in a collision causing you
and others to be severely injured or killed.
•In an emergency, to use Uconnect® Phone, your mobile phone must be:
•turned on,
•paired to Uconnect® Phone,
•and have network coverage.
VOICE COMMAND QUICK REFERENCE
Uconnect® 6.5N Voice Command
If the Uconnect® Voice Commandbutton exists on your steering wheel, you have
the Voice Command feature, which is optimized for the driver.The Voice Command fea-
ture lets you keep your hands on the wheel, and your eyes on the road.
When you push the Voice Command
button located on the steering wheel, you
will hear a beep.After the beep, give your command.If you do not know what com-
mands to say, you can say “help” and the system will provide options to you.If you ever
wish to interrupt the system while it lists options, push the “Voice Command
”
button, after the beep, say your command.
NOTE:
All phone oriented voice commands are accessible by first pushing the “Phone Pick Up
” button, not the Voice Command button.To end a call, simply push the “Phone
Hang Up
” button.In some vehicles, the “Phone Pickup” button serves the
dual purpose of ending calls as well.
Voice Command (VR) User TIPs
•To hear available commands, push the Uconnect® Voice Command button and say
“Help”.You will hear available commands for the menu displayed.
•At any time, you can say the words “Cancel” or “Help”.These commands are universal
and can be used from virtually any menu.All other specific commands can be used
depending upon the active application.
•You can interrupt the system prompts at any time by pushing the Uconnect® Voice
Command button while the system is speaking.After the beep, you can say a com-
mand.
•You can ‘chain’ commands together for faster results.Say “Call Joe Doe mobile”, for
example.
ELECTRONICS
58
Page 64 of 116
STEERING WHEEL AUDIO CONTROLS
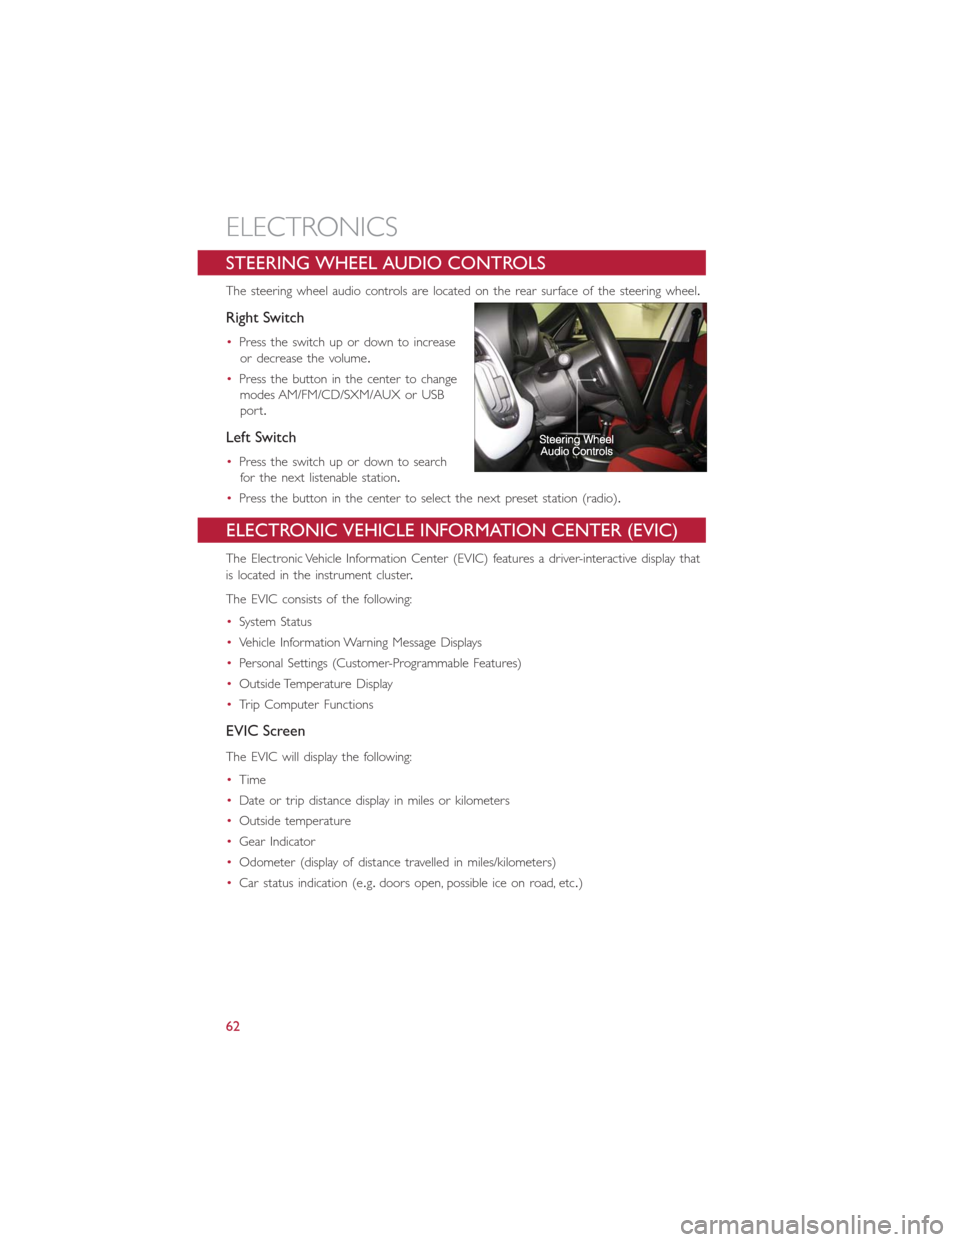
The steering wheel audio controls are located on the rear surface of the steering wheel.
Right Switch
•Press the switch up or down to increase
or decrease the volume.
•Press the button in the center to change
modes AM/FM/CD/SXM/AUX or USB
port.
Left Switch
•Press the switch up or down to search
for the next listenable station.
•Press the button in the center to select the next preset station (radio).
ELECTRONIC VEHICLE INFORMATION CENTER (EVIC)
The Electronic Vehicle Information Center (EVIC) features a driver-interactive display that
is located in the instrument cluster.
The EVIC consists of the following:
•System Status
•Vehicle Information Warning Message Displays
•Personal Settings (Customer-Programmable Features)
•Outside Temperature Display
•Trip Computer Functions
EVIC Screen
The EVIC will display the following:
•Time
•Date or trip distance display in miles or kilometers
•Outside temperature
•Gear Indicator
•Odometer (display of distance travelled in miles/kilometers)
•Car status indication (e.g.doors open, possible ice on road, etc.)
ELECTRONICS
62
Page 68 of 116
WARNING!
•Your motorized door or gate will open and close while you are programming the
universal transceiver.Do not program the transceiver if people or pets are in the
path of the door or gate.
•Do not run your vehicle in a closed garage or confined area while programming
the transceiver.Exhaust gas from your vehicle contains Carbon Monoxide (CO)
which is odorless and colorless.Carbon Monoxide is poisonous when inhaled and
can cause you and others to be severely injured or killed.
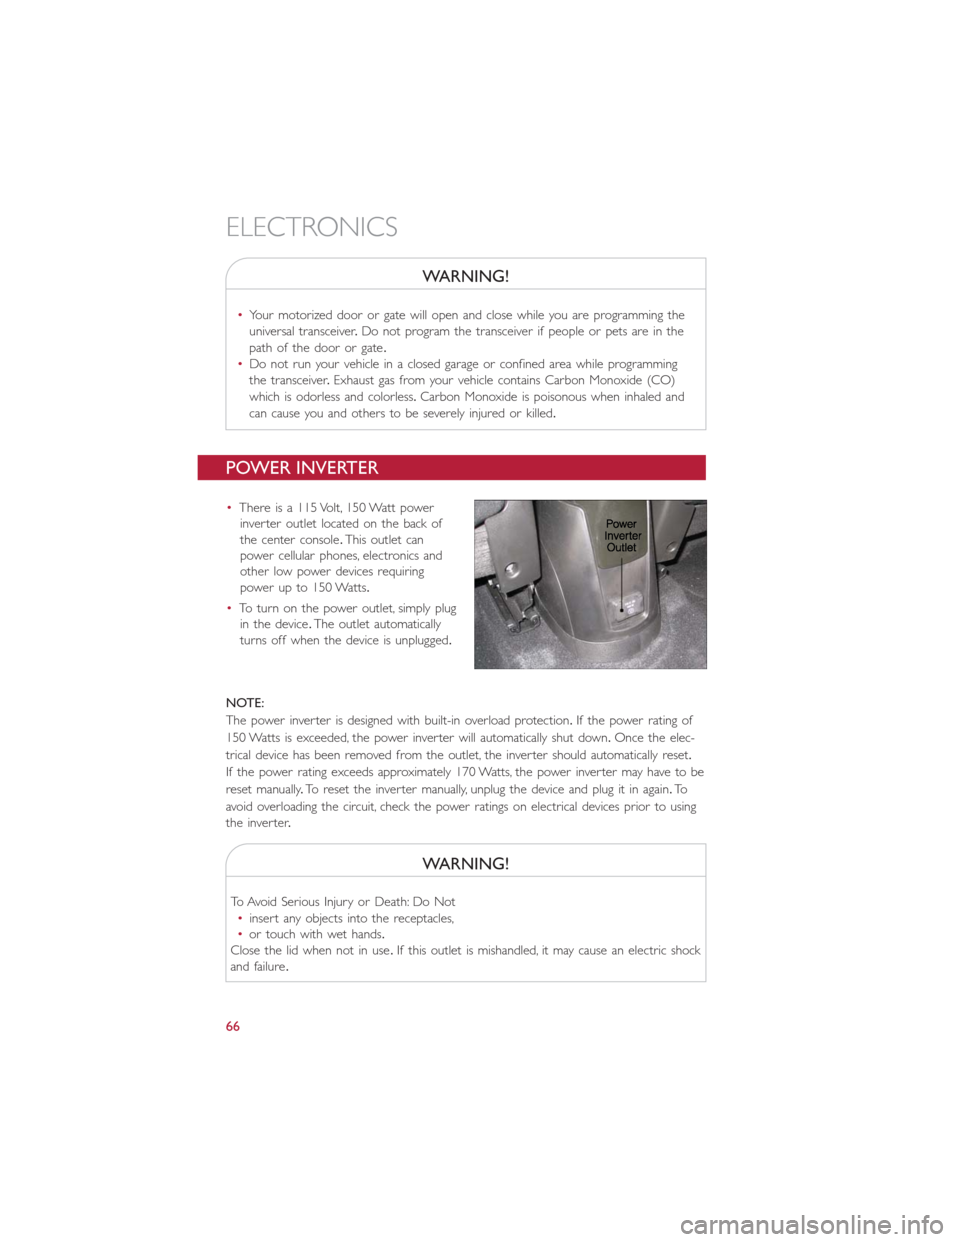
POWER INVERTER
•There is a 115 Volt, 150 Watt power
inverter outlet located on the back of
the center console.This outlet can
power cellular phones, electronics and
other low power devices requiring
power up to 150 Watts.
•To turn on the power outlet, simply plug
in the device.The outlet automatically
turns off when the device is unplugged.
NOTE:
The power inverter is designed with built-in overload protection.If the power rating of
150 Watts is exceeded, the power inverter will automatically shut down.Once the elec-
trical device has been removed from the outlet, the inverter should automatically reset.
If the power rating exceeds approximately 170 Watts, the power inverter may have to be
reset manually.To reset the inverter manually, unplug the device and plug it in again.To
avoid overloading the circuit, check the power ratings on electrical devices prior to using
the inver ter.
WARNING!
To Avoid Serious Injury or Death: Do Not
•insert any objects into the receptacles,
•or touch with wet hands.
Close the lid when not in use.If this outlet is mishandled, it may cause an electric shock
and failure.
ELECTRONICS
66
Page 71 of 116
24-HOUR ROADSIDE ASSISTANCE
•If your FIAT 500 L requires jump start assistance, out of gas/fuel delivery, tire service,
lockout service or towing due to a defect covered under the Basic Limited Warranty,
dial toll-free 1-888-242-6342 or 1-800-363-4869 for Canadian Residents.See your
Warranty booklet for further details.
•Provide your name, vehicle identification number and license plate number.
•Provide your location, including telephone number, from which you are calling.
•Briefly describe the nature of the problem and answer a few simple questions.
•You will be given the name of the service provider and an estimated time of arrival.
If you feel you are in an “unsafe situation,” please let us know.With your consent,
we will contact local police or safety authorities.
INSTRUMENT CLUSTER WARNING LIGHTS
- Generic Warning Light
The Generic Warning Light will illuminate if any of the following conditions occur: Oil
Change Request, Engine Oil Pressure Sensor Failure, External Light Failure, Fuel Cut-Off
Intervention, Fuel Cut-Off Not Available, Parking Sensor Failure, DST System Failure.
- Power Steering System Warning
This light is used to manage the electrical warning of the EPS (Electric Power Steering
System).When the ignition is turned to the ON/RUN position, the warning light will illu-
minate momentarily.If the warning light stays on, cycle the ignition to the OFF position
and back to ON/RUN.If the warning light stays on, contact your authorized dealer.
If the warning light switches on while driving you may not have steering assistance.
Although it will still be possible to steer the car, the effort needed to operate the
steering wheel could be increased: contact an authorized dealer as soon as possible.
- EURO Twin Clutch Transmission — If Equipped
•This light will illuminate when there is an EURO Twin Clutch Transmission fault.
•Have the vehicle serviced by an authorized dealer immediately.
- Engine Temperature Warning Light
This light warns of an overheated engine condition.
If the light turns on or flashes continuously while driving, safely pull over and stop the
vehicle.If the A/C system is on, turn it off.Also, shift the transmission into NEUTRAL and
idle the vehicle.If the temperature reading does not return to normal, turn the engine
off immediately.
We recommend that you do not operate the vehicle or engine damage will occur.
Have the vehicle serviced immediately.
WHAT TO DO IN EMERGENCIES
69