wheel FIAT 500L 2014 2.G Owner's Guide
[x] Cancel search | Manufacturer: FIAT, Model Year: 2014, Model line: 500L, Model: FIAT 500L 2014 2.GPages: 116, PDF Size: 4.53 MB
Page 84 of 116
TIREFIT Usage Precautions
•Replace the TIREFIT Sealant Bottle (1) and Sealant Hose (6) prior to the expiration
date (printed on the bottle label) to assure optimum operation of the system.Refer to
“Sealing a Tire with TIREFIT” section (F) “Sealant Bottle and Hose Replacement.”
•The Sealant Bottle (1) and Sealant Hose (6) are a one tire application use.After each
use, always replace these components immediately at an authorized dealer.
•When the TIREFIT sealant is in a liquid form, clean water, and a damp cloth will re-
move the material from the vehicle or tire and wheel components.Once the sealant
dries, it can easily be peeled off and properly discarded.
•For optimum performance, make sure the valve stem on the wheel is free of debris
before connecting the TIREFIT kit.
•
You can use the TIREFIT air pump to inflate bicycle tires.The kit also comes with two
needles, located in the Accessory Storage Compartment (on the bottom of the air pump)
for inflating sport balls, rafts, or similar inflatable items.However, use only the Air Pump
Hose (7) and make sure the Mode Select Knob (5) is in the Air Mode when inflating such
items to avoid injecting sealant into them.The TIREFIT Sealant is only intended to seal
punctures less than 1/4” (6 mm) diameter in the tread of your vehicle.
•Do not lift or carry the TIREFIT kit by the hoses.
Sealing A Tire With TIREFIT
(A) Whenever You Stop To Use TIREFIT:
1.Pull over to a safe location and turn on the vehicle’s Hazard Warning flashers.
2.Verify that the valve stem (on the wheel with the deflated tire) is in a position that is
near to the ground.This will allow the TIREFIT Hoses (6) and (7) to reach the valve
stem and keep the TIREFIT kit flat on the ground.This will provide the best position-
ing of the kit when injecting the sealant into the deflated tire and running the air
pump.Move the vehicle as necessary to place the valve stem in this position before
proceeding.
3.Place the transmission in PARK (auto transmission) or in Gear (manual transmission)
and cycle the ignition to the OFF position.
4.Set the parking brake.
(B) Setting Up To Use TIREFIT:
1.Turn the Mode Select Knob (5) to the Sealant Mode position.
2.Uncoil the Sealant Hose (6) and then remove the cap from the fitting at the end of
the hose.
3.Place the TIREFIT kit flat on the ground next to the deflated tire.
4.Remove the cap from the valve stem and then screw the fitting at the end of the
Sealant Hose (6) onto the valve stem.
5.Uncoil the Power Plug (8) and insert the plug into the vehicle’s 12 Volt power outlet.
6.Do not remove foreign objects (e.g., screws or nails) from the tire.
WHAT TO DO IN EMERGENCIES
82
Page 88 of 116
WARNING!
•Do not attempt to seal a tire on the side of the vehicle closest to traffic.Pull far
enough off the road to avoid the danger of being hit when using the TIREFIT kit.
•Do not use TIREFIT or drive the vehicle under the following circumstances:
•If the puncture in the tire tread is approximately 1/4”.(6 mm) or larger.
•If the tire has any sidewall damage.
•If the tire has any damage from driving with extremely low tire pressure.
•If the tire has any damage from driving on a flat tire.
•If the wheel has any damage.
•If you are unsure of the condition of the tire or the wheel.
•Keep TIREFIT away from open flames or heat source.
•A loose TIREFIT kit thrown forward in a collision or hard stop could endanger the
occupants of the vehicle.Always stow the TIREFIT kit in the place provided.Failure
to follow these warnings can result in injuries that are serious or fatal to you, your
passengers, and others around you.
•Take care not to allow the contents of TIREFIT to come in contact with hair, eyes,
or clothing.TIREFIT is harmful if inhaled, swallowed, or absorbed through the skin.
It causes skin, eye, and respiratory irritation.Flush immediately with plenty of water
if there is any contact with eyes or skin.Change clothing as soon as possible, if
there is any contact with clothing.
•TIREFIT Sealant solution contains latex.In case of an allergic reaction or rash, con-
sult a physician immediately.Keep TIREFIT out of reach of children.If swallowed,
rinse mouth immediately with plenty of water and drink plenty of water.Do not
induce vomiting! Consult a physician immediately.
•TIREFIT is not a permanent flat tire repair.Have the tire inspected and repaired
or replaced after using TIREFIT.Do not exceed 55 mph (88 km/h) until the tire is
repaired or replaced.Failure to follow this warning can result in injuries that are
serious or fatal to you, your passengers, and others around you.
JUMP-STARTING PROCEDURE
•If your vehicle has a discharged battery, it can be jump-started using a set of jumper
cables and a battery in another vehicle or by using a portable battery booster pack.
Jump-starting can be dangerous if done improperly so please follow the procedures in
this section carefully.
NOTE:
When using a portable battery booster pack, follow the manufacturer’s operating instruc-
tions and precautions.
WHAT TO DO IN EMERGENCIES
86
Page 92 of 116
TOWING A DISABLED VEHICLE
With Ignition Key
Euro Twin Clutch Transmission
•Vehicle can be towed with the front wheels elevated.
•Vehicle can be towed on a flatbed truck (all wheels off the ground).
Manual Transmission
•Vehicle can be flat towed (all four wheels on the ground) with the transmission in
NEUTRAL.
•Vehicle can be towed with the front wheels elevated.
•Vehicle can be towed on a flatbed truck (all wheels off the ground).
NOTE:
If it is necessary to use the accessories while being towed (wipers, defrosters, etc.),
the key must be in the ON/RUN position.Make certain the transmission remains in
NEUTRAL.
All Transmissions
•If it is necessary to use the accessories while being towed (wipers, defrosters, etc.),
the key must be in the ON/RUN position.Make certain the transmission remains in
NEUTRAL.
Without The Ignition Key
•Special care must be taken when the vehicle is towed with the ignition in the OFF/
LOCK position.A dolly should be used under the front wheels if the rear wheels are
raised.Proper towing equipment is necessary to prevent damage to the vehicle.
•Battery power is required to release the brake/transmission interlock system (Euro
Twin Clutch Transmission only).There is a removable plug in the right side of the shift
lever housing that allows you to override the system.Refer to Shift Lever Override in
this guide.
CAUTION!
•Failure to follow these towing methods can cause severe transmission damage.
Such damage is not covered by the New Vehicle Limited Warranty.
•DO NOT flat tow any vehicle equipped with a Euro Twin Clutch Transmission.
Damage to the drivetrain will result.
•If the vehicle being towed requires steering, the ignition switch must be in the
ON/RUN position.
•Do not attempt to use sling-type equipment when towing.When securing the
vehicle to a flatbed truck, do not attach to front or rear suspension components.
Damage to your vehicle may result from improper towing.
WHAT TO DO IN EMERGENCIES
90
Page 93 of 116
FREEING A STUCK VEHICLE
•If your vehicle becomes stuck in mud, sand or snow, it can often be moved by a rock-
ing motion.Turn your steering wheel right and left to clear the area around the front
wheels.Then shift back and forth between DRIVE/2nd gear and REVERSE.Using mini-
mal accelerator pedal pressure to maintain the rocking motion, without spinning the
wheels, is most effective.
NOTE:
If your vehicle is equipped with Traction Control or Electronic Stability Control (ESC),
turn the system OFF before attempting to “rock” the vehicle.
CAUTION!
•Racing the engine or spinning the wheels may lead to transmission overheating and
failure.Allow the engine to idle with the shift lever in NEUTRAL for at least one
minute after every five rocking-motion cycles.This will minimize overheating and
reduce the risk of transmission failure during prolonged efforts to free a stuck
vehicle.
•When “rocking” a stuck vehicle by moving between DRIVE/2nd and REVERSE,
do not spin the wheels faster than 15 mph (24 km/h), or drivetrain damage may
result.
•Revving the engine or spinning the wheels too fast may lead to transmission over-
heating and failure.It can also damage the tires.Do not spin the wheels above
30 mph (48 km/h) while in gear (no transmission shifting occurring).
WARNING!
Fast spinning tires can be dangerous.Forces generated by excessive wheel speeds may
cause damage, or even failure, of the axle and tires.A tire could explode and injure
someone.Do not spin your vehicle's wheels faster than 30 mph (48 km/h) or for
longer than 30 seconds continuously without stopping when you are stuck and do not
let anyone near a spinning wheel, no matter what the speed.
WHAT TO DO IN EMERGENCIES
91
Page 106 of 116
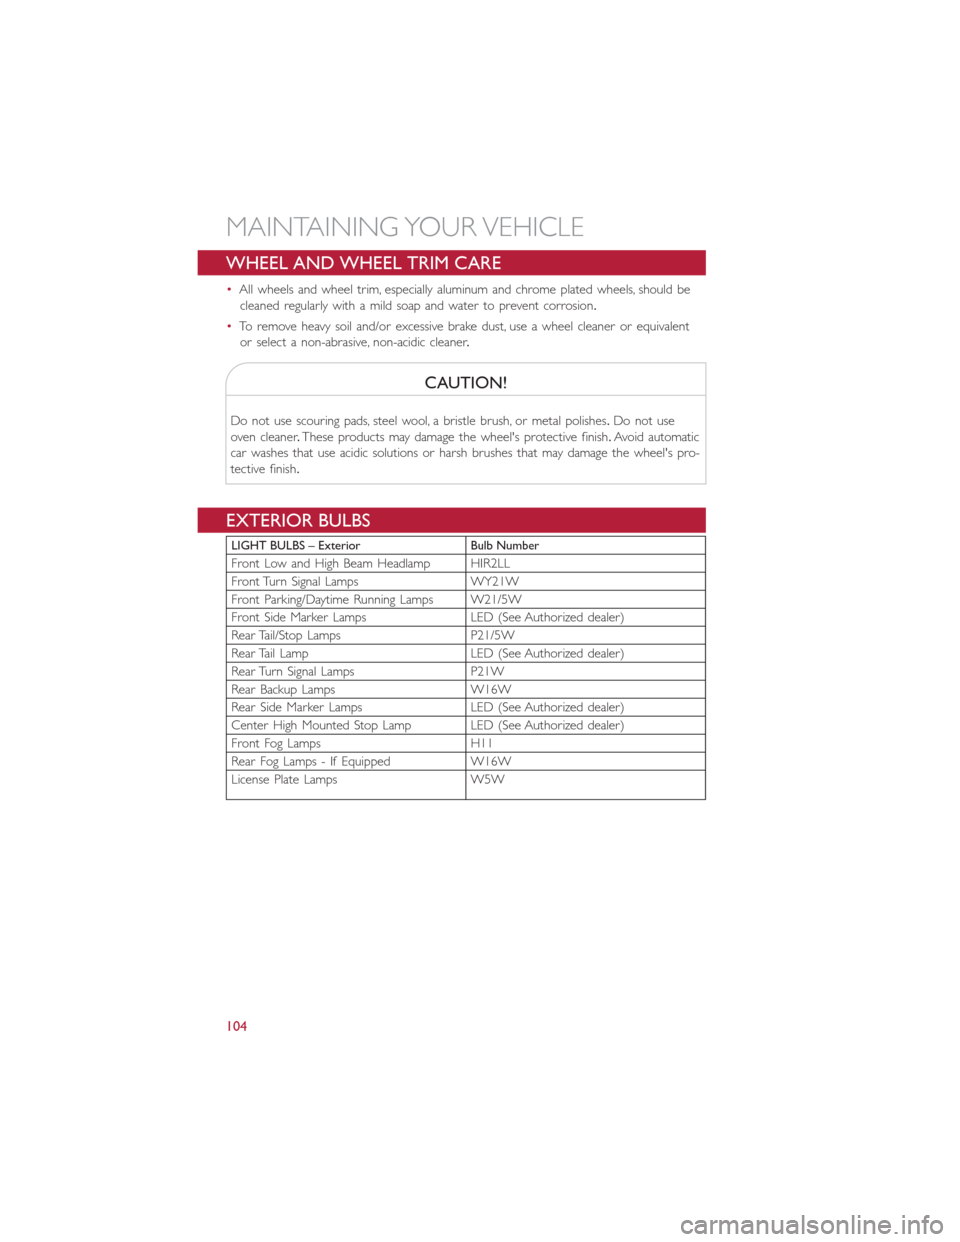
WHEEL AND WHEEL TRIM CARE
•All wheels and wheel trim, especially aluminum and chrome plated wheels, should be
cleaned regularly with a mild soap and water to prevent corrosion.
•To remove heavy soil and/or excessive brake dust, use a wheel cleaner or equivalent
or select a non-abrasive, non-acidic cleaner.
CAUTION!
Do not use scouring pads, steel wool, a bristle brush, or metal polishes.Do not use
oven cleaner.These products may damage the wheel's protective finish.Avoid automatic
car washes that use acidic solutions or harsh brushes that may damage the wheel's pro-
tective finish.
EXTERIOR BULBS
LIGHT BULBS – Exterior Bulb Number
Front Low and High Beam Headlamp HIR2LL
Front Turn Signal Lamps WY21W
Front Parking/Daytime Running Lamps W21/5W
Front Side Marker Lamps LED (See Authorized dealer)
Rear Tail/Stop Lamps P21/5W
Rear Tail Lamp LED (See Authorized dealer)
Rear Turn Signal Lamps P21W
Rear Backup Lamps W16W
Rear Side Marker Lamps LED (See Authorized dealer)
Center High Mounted Stop Lamp LED (See Authorized dealer)
Front Fog Lamps H11
Rear Fog Lamps - If Equipped W16W
License Plate Lamps W5W
MAINTAINING YOUR VEHICLE
104
Page 109 of 116
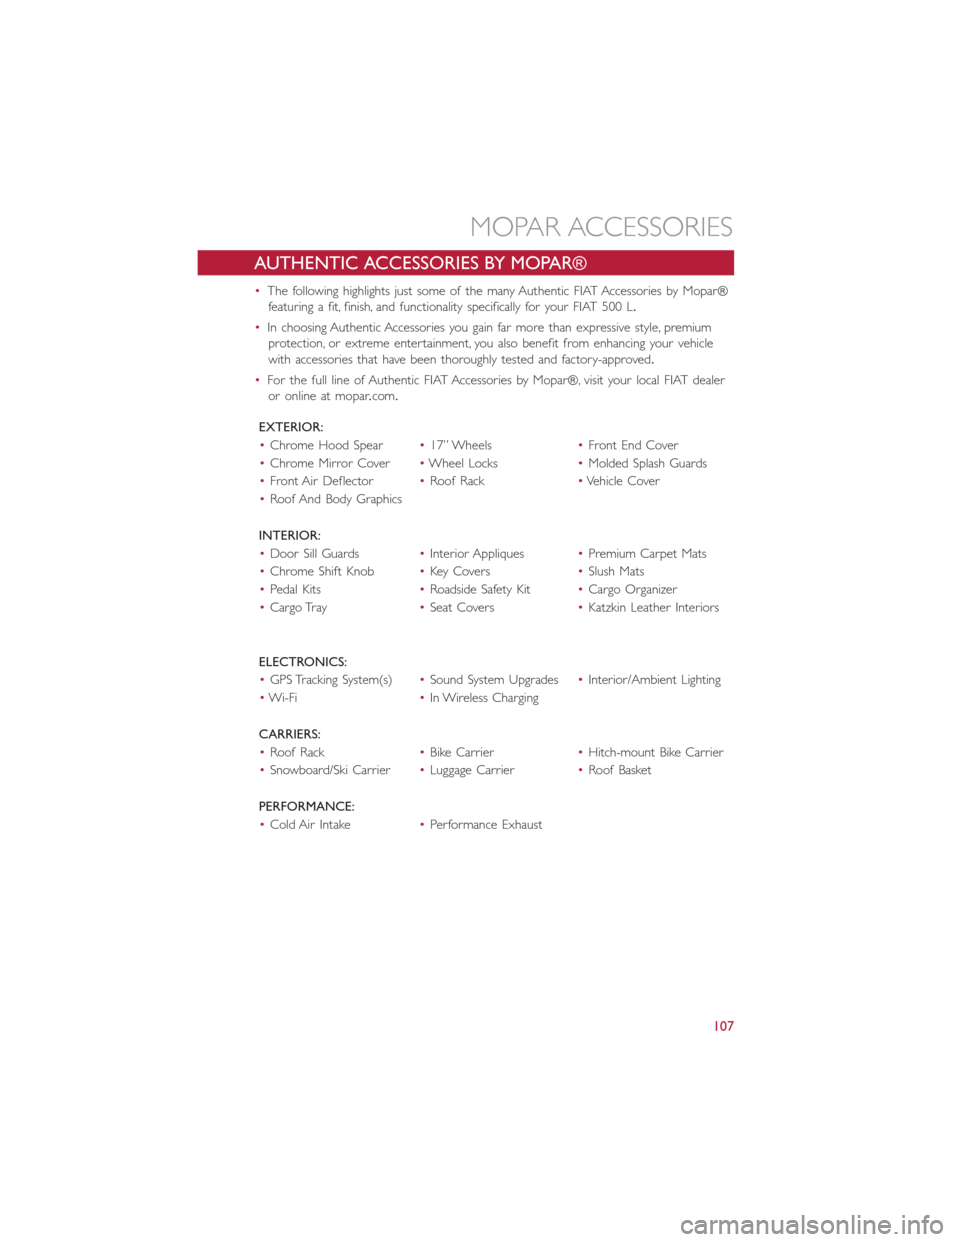
AUTHENTIC ACCESSORIES BY MOPAR®
•The following highlights just some of the many Authentic FIAT Accessories by Mopar®
featuring a fit, finish, and functionality specifically for your FIAT 500 L.
•In choosing Authentic Accessories you gain far more than expressive style, premium
protection, or extreme entertainment, you also benefit from enhancing your vehicle
with accessories that have been thoroughly tested and factory-approved.
•For the full line of Authentic FIAT Accessories by Mopar®, visit your local FIAT dealer
or online at mopar.com.
EXTERIOR:
•Chrome Hood Spear•17” Wheels•Front End Cover
•Chrome Mirror Cover•Wheel Locks•Molded Splash Guards
•Front Air Deflector•Roof Rack•Vehicle Cover
•Roof And Body Graphics
INTERIOR:
•Door Sill Guards•Interior Appliques•Premium Carpet Mats
•Chrome Shift Knob•Key Covers•Slush Mats
•Pedal Kits•Roadside Safety Kit•Cargo Organizer
•Cargo Tray•Seat Covers•Katzkin Leather Interiors
ELECTRONICS:
•GPS Tracking System(s)•Sound System Upgrades•Interior/Ambient Lighting
•Wi-Fi•In Wireless Charging
CARRIERS:
•Roof Rack•Bike Carrier•Hitch-mount Bike Carrier
•Snowboard/Ski Carrier•Luggage Carrier•Roof Basket
PERFORMANCE:
•Cold Air Intake•Performance Exhaust
MOPAR ACCESSORIES
107
Page 112 of 116
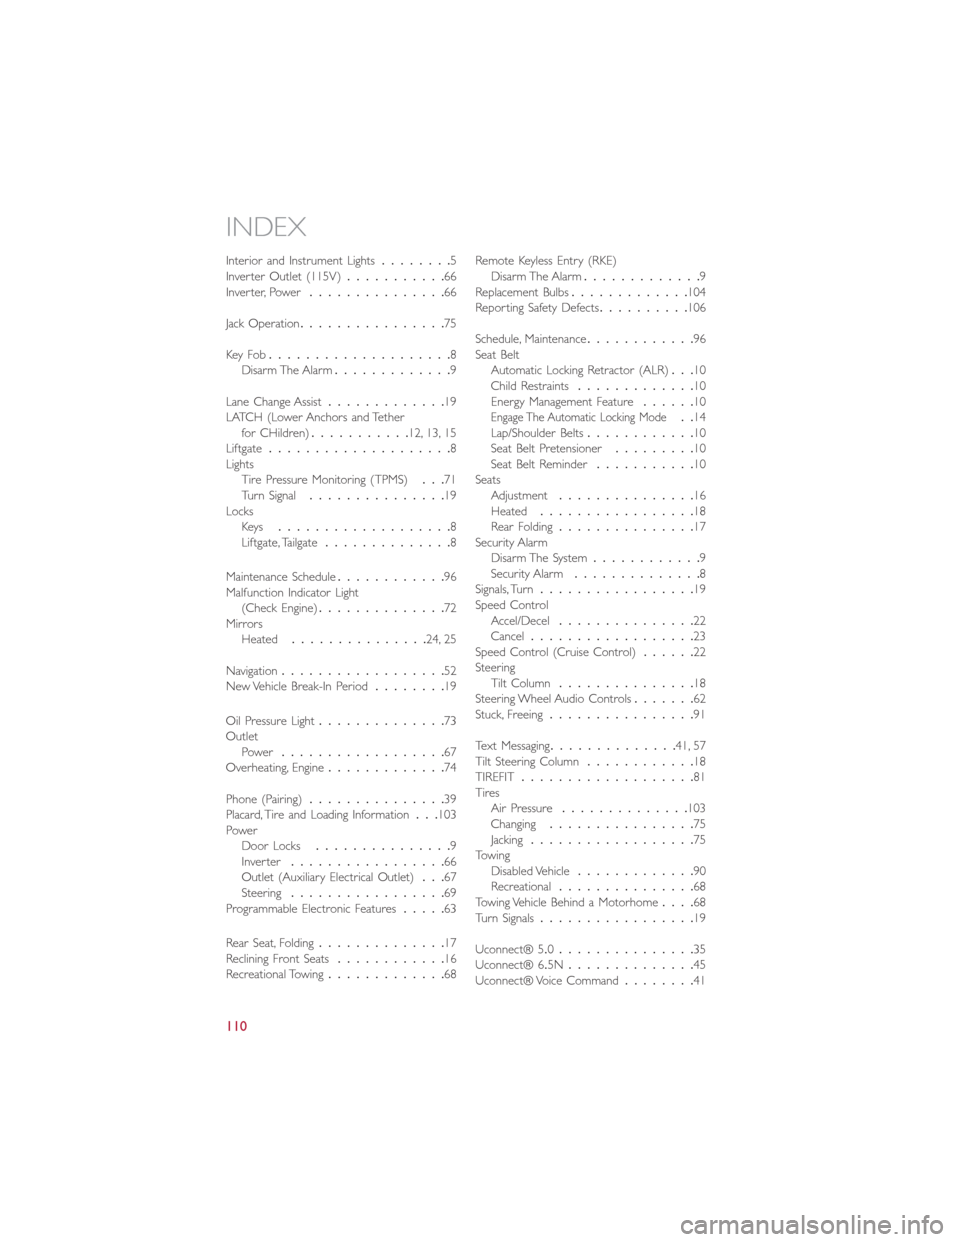
Interior and Instrument Lights........5
Inverter Outlet (115V)...........66
Inverter, Power...............66
Jack Operation................75
Key Fo b....................8
Disarm The Alarm.............9
Lane Change Assist.............19
LATCH (Lower Anchors and Tether
for CHildren)...........12, 13, 15
Liftgate....................8
Lights
Tire Pressure Monitoring (TPMS)...71
Turn Signal...............19
Locks
Key s...................8
Liftgate, Tailgate..............8
Maintenance Schedule............96
Malfunction Indicator Light
(Check Engine)..............72
Mirrors
Heated...............24, 25
Navigation..................52
New Vehicle Break-In Period........19
Oil Pressure Light..............73
Outlet
Power..................67
Overheating, Engine.............74
Phone (Pairing)...............39
Placard, Tire and Loading Information...103
Power
Door Locks...............9
Inver ter.................66
Outlet (Auxiliary Electrical Outlet)...67
Steering.................69
Programmable Electronic Features.....63
Rear Seat, Folding..............17
Reclining Front Seats............16
Recreational Towing.............68Remote Keyless Entry (RKE)Disarm The Alarm.............9
Replacement Bulbs.............104
Reporting Safety Defects..........106
Schedule, Maintenance............96
Seat Belt
Automatic Locking Retractor (ALR)...10
Child Restraints.............10
Energy Management Feature......10
Engage The Automatic Locking Mode..14
Lap/Shoulder Belts............10
Seat Belt Pretensioner.........10
Seat Belt Reminder...........10
Seats
Adjustment...............16
Heated.................18
Rear Folding...............17
Security Alarm
Disarm The System............9
Security Alarm..............8
Signals, Turn.................19
Speed Control
Accel/Decel...............22
Cancel..................23
Speed Control (Cruise Control)......22
Steering
Tilt Column...............18
Steering Wheel Audio Controls.......62
Stuck, Freeing................91
Text Messaging..............41, 57
Tilt Steering Column............18
TIREFIT...................81
Tires
Air Pressure..............103
Changing................75
Jacking..................75
Towing
Disabled Vehicle.............90
Recreational...............68
Towing Vehicle Behind a Motorhome....68
Turn Signals.................19
Uconnect® 5.0...............35
Uconnect® 6.5N..............45
Uconnect® Voice Command........41
INDEX
110
Page 113 of 116
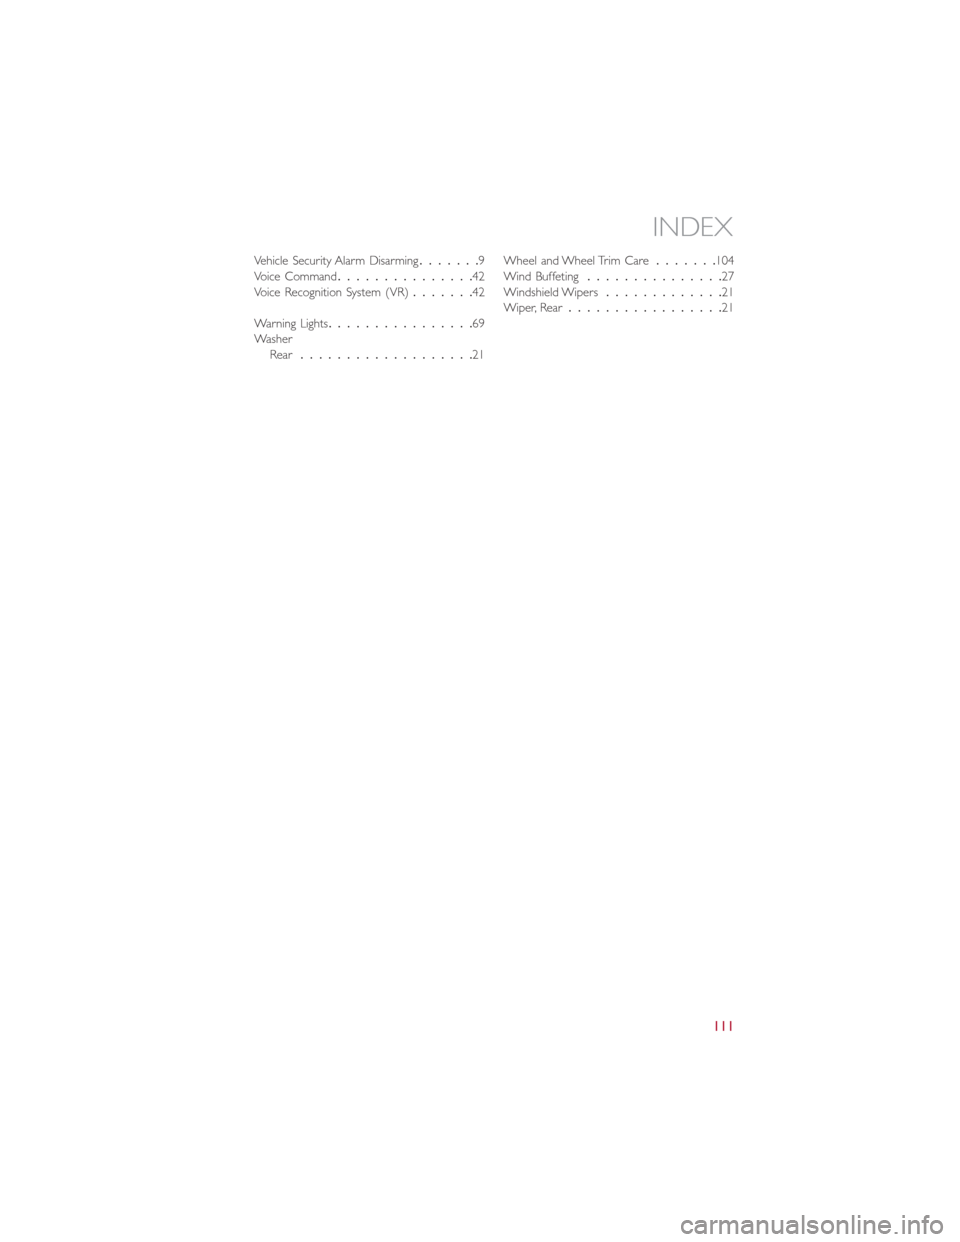
Vehicle Security Alarm Disarming.......9
Voice Command...............42
Voice Recognition System (VR).......42
Warning Lights................69
Washer
Rear...................21Wheel and Wheel Trim Care.......104
Wind Buffeting...............27
Windshield Wipers.............21
Wiper, Rear.................21
INDEX
111