steering wheel FIAT 500L 2014 2.G User Guide
[x] Cancel search | Manufacturer: FIAT, Model Year: 2014, Model line: 500L, Model: FIAT 500L 2014 2.GPages: 116, PDF Size: 4.53 MB
Page 3 of 116
INTRODUCTION/WELCOME
WELCOME FROM FIAT...............2
CONTROLS AT A GLANCE
DRIVER COCKPIT..................4
INSTRUMENT CLUSTER...............6
GETTING STARTED
KEY FOB.......................8
VEHICLE SECURITY ALARM............8
POWER DOOR LOCKS...............9
SEAT BELT......................10
SUPPLEMENTAL RESTRAINT SYSTEM (SRS) —
AIR BAGS......................11
CHILD RESTRAINTS................12
FRONT SEATS....................16
REAR SEATS.....................17
HEATED SEATS...................18
TILT/TELESCOPING STEERING COLUMN...18
OPERATING YOUR VEHICLE
ENGINE BREAK-IN RECOMMENDATIONS...19
TURN SIGNAL/LIGHTS/HIGH BEAM LEVER...19
WIPER/WASHER LEVER..............21
SPEED CONTROL..................22
MANUAL CLIMATE CONTROLS.........24
AUTOMATIC TEMPERATURE CONTROLS
(ATC).........................25
REAR PARK ASSIST.................26
POWER SUNROOF.................26
WIND BUFFETING.................27
EURO TWIN CLUTCH SIX-SPEED
TRANSMISSION...................27
ADDING FUEL...................30
ELECTRONIC STABILITY CONTROL (ESC)...31
ELECTRONICSYOUR VEHICLE'S SOUND SYSTEM.......32
IDENTIFYING YOUR RADIO............34
Uconnect® 5.0...................35
Uconnect® 6.5N..................45
STEERING WHEEL AUDIO CONTROLS.....62
ELECTRONIC VEHICLE INFORMATION
CENTER (EVIC)...................62
PROGRAMMABLE FEATURES...........63UNIVERSAL GARAGE DOOR OPENER
(HomeLink®)....................64
POWER INVERTER.................66
POWER OUTLETS.................67
UTILITYTRAILER TOWING.................68
RECREATIONAL TOWING (BEHIND
MOTORHOME, ETC.)...............68
WHAT TO DO IN EMERGENCIES24-HOUR ROADSIDE ASSISTANCE........69
INSTRUMENT CLUSTER WARNING LIGHTS..69
IF YOUR ENGINE OVERHEATS..........74
JACKING AND TIRE CHANGING.........75
TIREFIT KIT......................81
JUMP-STARTING PROCEDURE..........86
SHIFT LEVER OVERRIDE..............89
TOWING A DISABLED VEHICLE.........90
FREEING A STUCK VEHICLE............91
EVENT DATA RECORDER (EDR).........92
CAP-LESS FUEL FILL FUNNEL...........92
MAINTAINING YOUR VEHICLEOPENING THE HOOD..............93
ENGINE COMPARTMENT.............94
FLUIDS AND CAPACITIES.............95
MAINTENANCE SCHEDULE...........96
FUSES........................100
TIRE PRESSURES.................103
WHEEL AND WHEEL TRIM CARE.......104
EXTERIOR BULBS.................104
CONSUMER ASSISTANCEFIAT CUSTOMER CENTER............105
FIAT CANADA CUSTOMER CENTER......105
ASSISTANCE FOR THE HEARING IMPAIRED...105
PUBLICATIONS ORDERING...........105
REPORTING SAFETY DEFECTS IN THE
UNITED STATES..................106
MOPAR ACCESSORIESAUTHENTIC ACCESSORIES BY MOPAR®...107
FAQ ’sFREQUENTLY ASKED QUESTIONS.......108
INDEX......................109
TABLE OF CONTENTS
1
Page 6 of 116
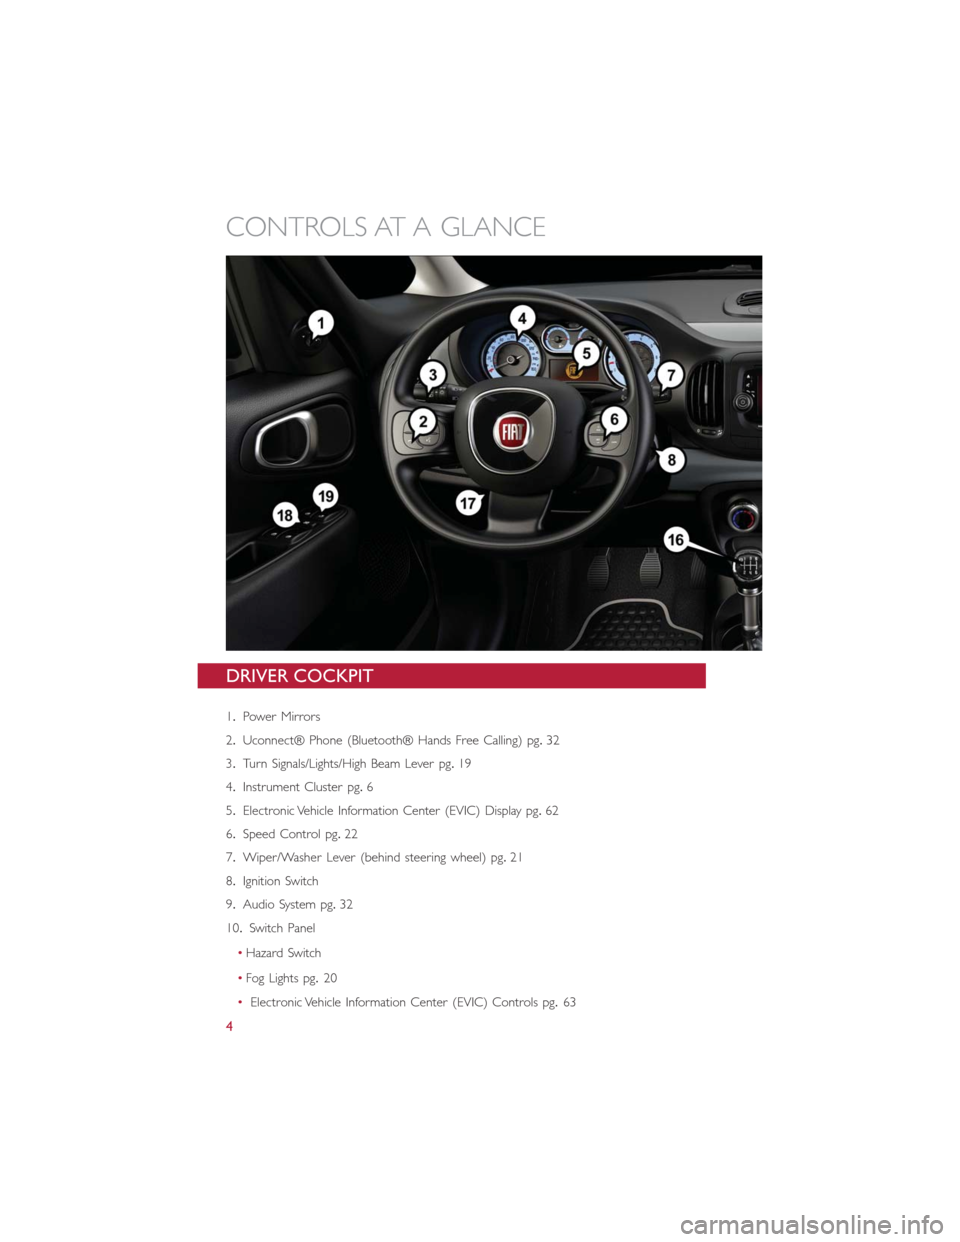
DRIVER COCKPIT
1.Power Mirrors
2.Uconnect® Phone (Bluetooth® Hands Free Calling) pg.32
3.Turn Signals/Lights/High Beam Lever pg.19
4.Instrument Cluster pg.6
5.Electronic Vehicle Information Center (EVIC) Display pg.62
6.Speed Control pg.22
7.Wiper/Washer Lever (behind steering wheel) pg.21
8.Ignition Switch
9.Audio System pg.32
10.Switch Panel
•Hazard Switch
•Fog Lights pg.20
•Electronic Vehicle Information Center (EVIC) Controls pg.63
CONTROLS AT A GLANCE
4
Page 14 of 116
WARNING!
•Relying on the air bags alone could lead to more severe injuries in a collision.
The air bags work with your seat belt to restrain you properly.In some collisions,
the air bags won't deploy at all.Always wear your seat belts even though you have
air bags.
•Being too close to the steering wheel or instrument panel during Advanced Front
Air Bag deployment could cause serious injury, including death.Air bags need
room to inflate.Sit back, comfortably extending your arms to reach the steering
wheel or instrument panel.
•Supplemental Side Air Bag Inflatable Curtains and Supplemental Seat-Mounted
Side Air Bags need room to inflate.Do not lean against the door or window.
Sit upright in the center of the seat.
•Being too close to the Supplemental Side Air Bag Inflatable Curtain and/or Seat-
Mounted Side Air Bag during deployment could cause you to be severely injured
or killed.
•Do not drive your vehicle after the air bags have deployed.If you are involved in
another collision, the air bags will not be in place to protect you.
•
After any collision, the vehicle should be taken to an authorized dealer immediately.
CHILD RESTRAINTS
•Children 12 years or younger should ride properly buckled up in a rear seat, if avail-
able.According to crash statistics, children are safer when properly restrained in the
rear seats rather than in the front.
•
Every state in the United States and all Canadian provinces require that small children ride
in proper restraint systems.This is the law, and you can be prosecuted for ignoring it.
NOTE:
•For additional information, refer to www.seatcheck.org or call 1–866–SEAT-CHECK
(1–866–732–8243).
•Canadian residents, should refer to Transport Canada’s website for additional informa-
tion: http://www.tc.gc.ca/eng/roadsafety/safedrivers-childsafety-index-53.htm
GETTING STARTED
12
Page 20 of 116
HEATED SEATS
Front Heated Seats
The controls for the front heated seats are located on the outboard side of the seat.
•Press the switch once to turn on the heated seat.
•Press the switch a second time to turn off the heated seat.
WARNING!
•Persons who are unable to feel pain to the skin because of advanced age, chronic
illness, diabetes, spinal cord injury, medication, alcohol use, exhaustion or other
physical conditions must exercise care when using the seat heater.It may cause
burns even at low temperatures, especially if used for long periods of time.
•Do not place anything on the seat that insulates against heat, such as a blanket or
cushion.This may cause the seat heater to overheat.Sitting in a seat that has been
overheated could cause serious burns due to the increased surface temperature of
the seat.
TILT/TELESCOPING STEERING COLUMN
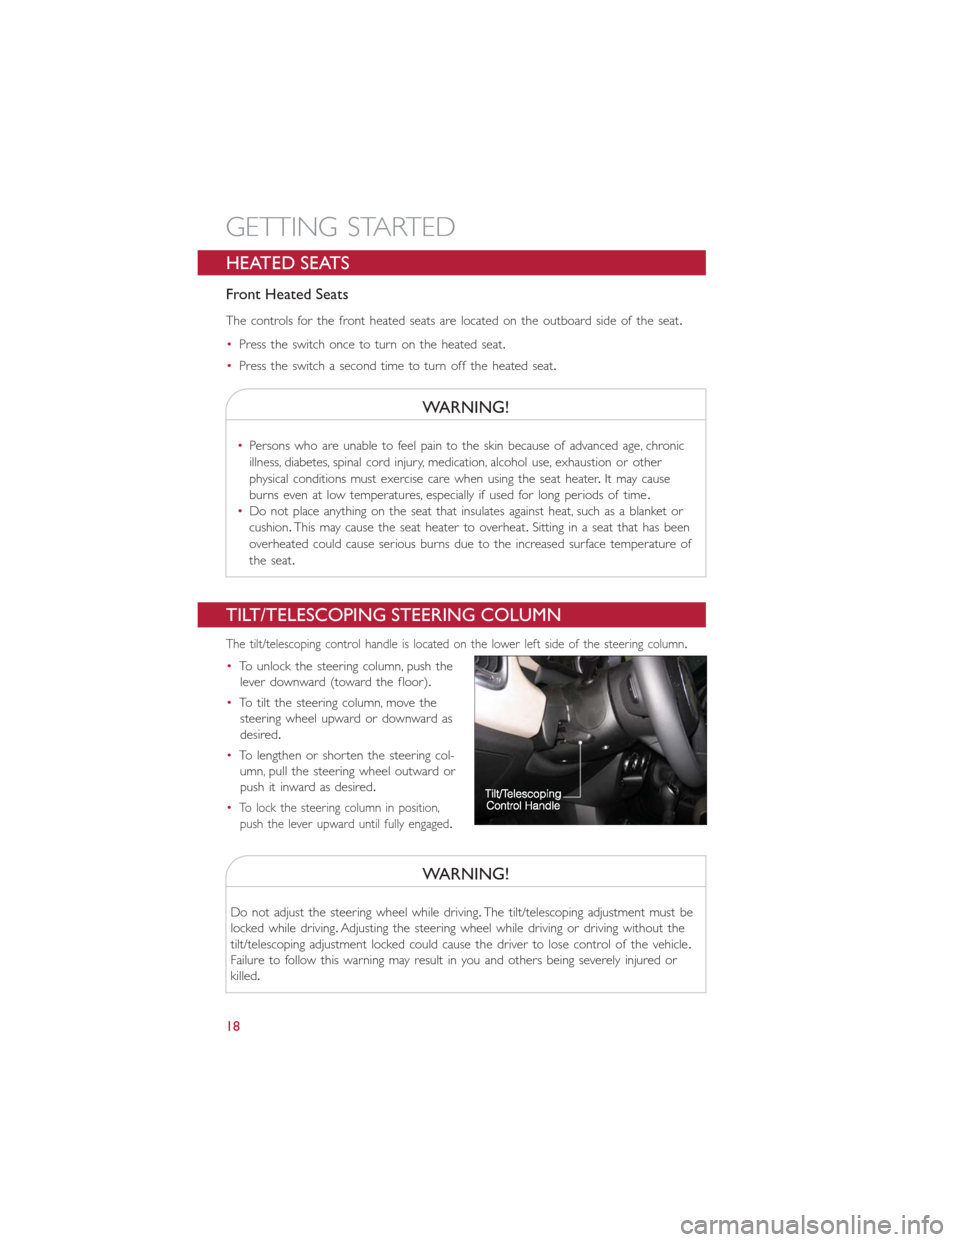
The tilt/telescoping control handle is located on the lower left side of the steering column.
•To unlock the steering column, push the
lever downward (toward the floor).
•To tilt the steering column, move the
steering wheel upward or downward as
desired.
•To lengthen or shorten the steering col-
umn, pull the steering wheel outward or
push it inward as desired.
•
To lock the steering column in position,
push the lever upward until fully engaged.
WARNING!
Do not adjust the steering wheel while driving.The tilt/telescoping adjustment must be
locked while driving.Adjusting the steering wheel while driving or driving without the
tilt/telescoping adjustment locked could cause the driver to lose control of the vehicle.
Failure to follow this warning may result in you and others being severely injured or
killed.
GETTING STARTED
18
Page 22 of 116
High Beams
•Pull the lever rearward to activate the high beams.
•A high beam symbol will illuminate in the cluster to indicate the high beams are on.
NOTE:
For safe driving, turn off the high beams when oncoming traffic is present to prevent
headlight glare and as a courtesy to other motorists.
Flash To Pass
•Pull the lever toward you to activate the high beams.The high beams will remain on
until the lever is released.
Headlight Delay (Follow Me Home)
•Within two minutes of the ignition switch being turned to the OFF/LOCK position or
the ignition key being removed from the ignition, pull the turn signal lever toward the
steering wheel.
•Each movement of the lever toward the steering wheel will increase the illumination
period by 30 seconds, up to a maximum of 210 seconds.
•To deactivate, pull the multifunction lever toward the steering wheel and hold it for
more than two seconds.
NOTE:
Activation of Follow Me Home is only enabled once per key cycle and the steps outlined
above must be repeated each time you want to activate it.
Fog Lights
•Push the fog light button, located on the center stack of the instrument panel just be-
low the radio, once to turn on the fog lights.
•Push the button a second time to turn the fog lights off.
OPERATING YOUR VEHICLE
20
Page 24 of 116
SPEED CONTROL
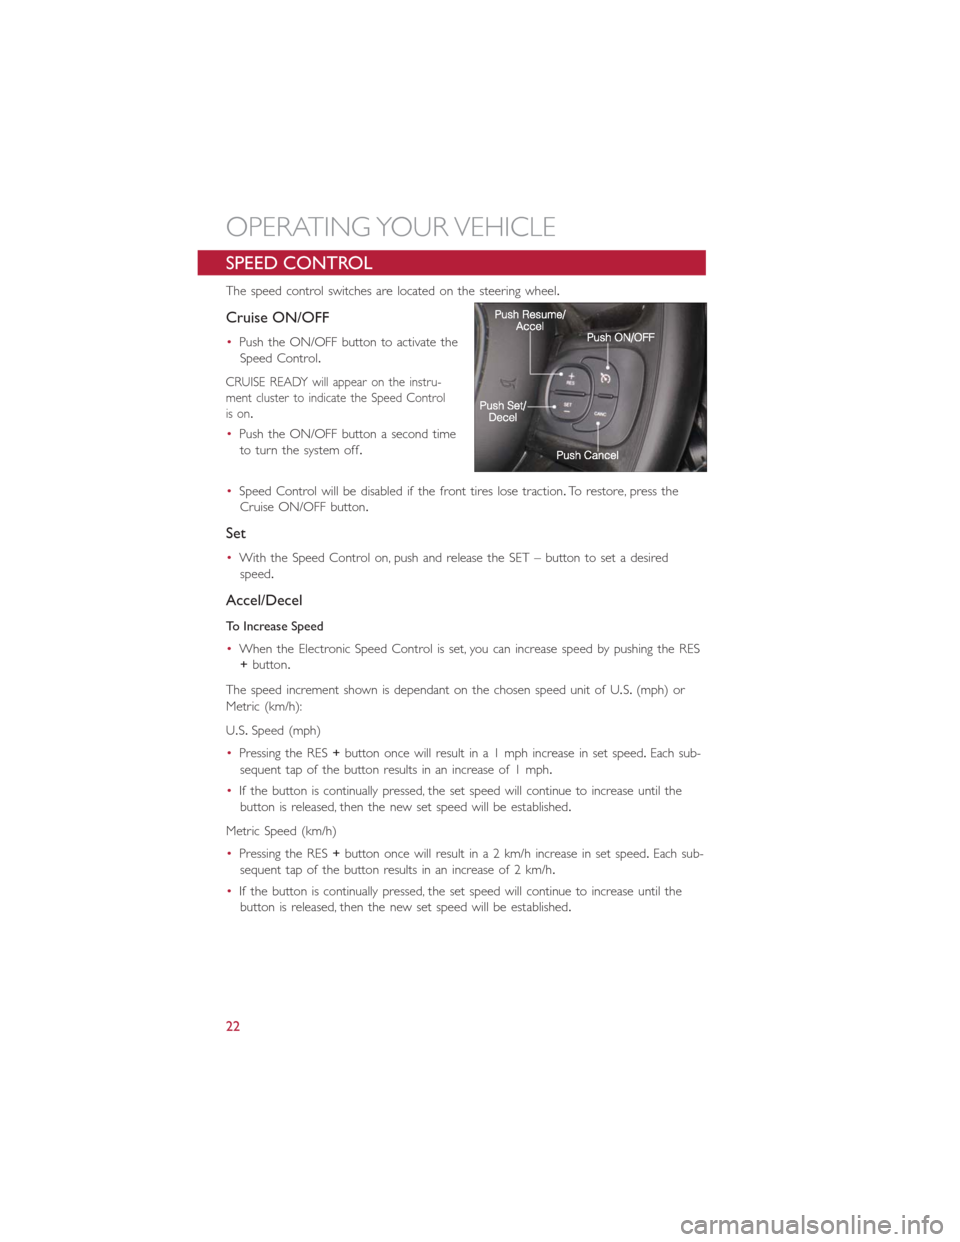
The speed control switches are located on the steering wheel.
Cruise ON/OFF
•Push the ON/OFF button to activate the
Speed Control.
CRUISE READY will appear on the instru-
ment cluster to indicate the Speed Control
is on.
•Push the ON/OFF button a second time
to turn the system off.
•Speed Control will be disabled if the front tires lose traction.To restore, press the
Cruise ON/OFF button.
Set
•With the Speed Control on, push and release the SET – button to set a desired
speed.
Accel/Decel
To Increase Speed
•When the Electronic Speed Control is set, you can increase speed by pushing the RES
+button.
The speed increment shown is dependant on the chosen speed unit of U.S.(mph) or
Metric (km/h):
U.S.Speed (mph)
•Pressing the RES+button once will result in a 1 mph increase in set speed.Each sub-
sequent tap of the button results in an increase of 1 mph.
•If the button is continually pressed, the set speed will continue to increase until the
button is released, then the new set speed will be established.
Metric Speed (km/h)
•Pressing the RES+button once will result in a 2 km/h increase in set speed.Each sub-
sequent tap of the button results in an increase of 2 km/h.
•If the button is continually pressed, the set speed will continue to increase until the
button is released, then the new set speed will be established.
OPERATING YOUR VEHICLE
22
Page 34 of 116
YOUR VEHICLE'S SOUND SYSTEM
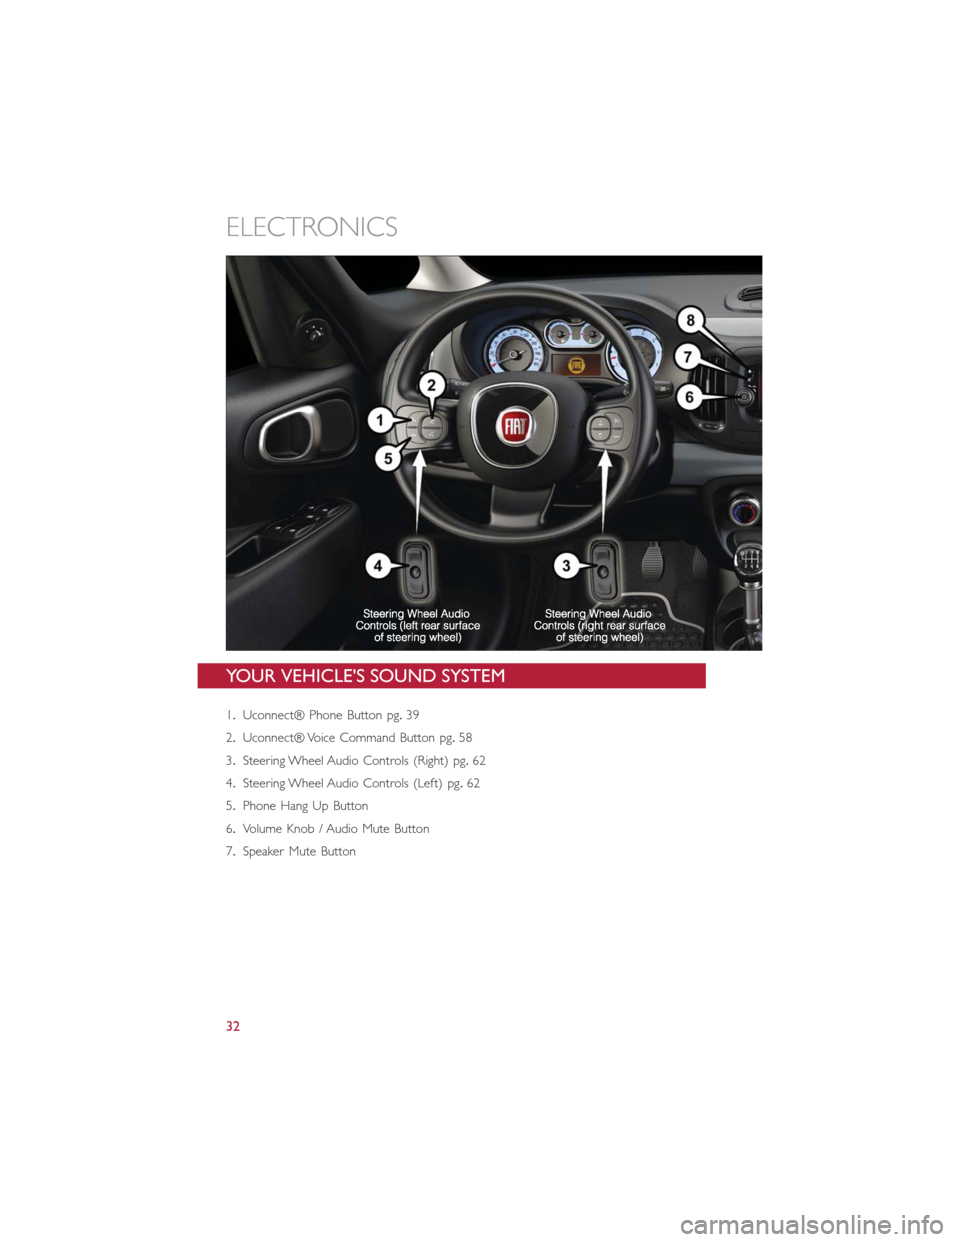
1.Uconnect® Phone Button pg.39
2.Uconnect® Voice Command Button pg.58
3.Steering Wheel Audio Controls (Right) pg.62
4.Steering Wheel Audio Controls (Left) pg.62
5.Phone Hang Up Button
6.Volume Knob / Audio Mute Button
7.Speaker Mute Button
ELECTRONICS
32
Page 41 of 116
Uconnect® 5.0 Phone
Bluetooth® Hands Free Calling
•If the Uconnect® Phone Buttonexists on your steering wheel, then you have
the Uconnect® Phone features.
•The Uconnect® Phone is a voice-activated, hands-free, in-vehicle communications sys-
tem with Voice Command Capability (see Voice Command section).
•The Uconnect® Phone allows you to dial a phone number with your mobile phone
using simple voice commands or using screen soft-keys.
•Refer to the Understand The Features Of Your Vehicle section of your vehicle's
Owner's Manual on the DVD for further details.
NOTE:
The Uconnect® Phone requires a mobile phone equipped with the Bluetooth® Hands-Free
Profile, Version 1.0 or higher.For Uconnect® Customer Support: U.S.residents visit
www.UconnectPhone.com or call 1-888-242-6342.Canadian Residents visit
www.UconnectPhone.com or call 1-800-465–2001 (English) or 1-800-387-9983 (French).
Pairing A Phone
•To use the Uconnect® Phone feature, you must first pair your Bluetooth® phone with
the Uconnect® system.
Start Pairing Procedure On Mobile Phone
•
Search for available devices on your Bluetooth® enabled mobile phone.This is usually
within Settings or Options under “Bluetooth.” See your mobile phone’s manual for details.
•When your phone finds the system, select “Uconnect” as the paired device.Yo u m a y
be prompted by your phone to download the phonebook.This is so you can make
calls by saying the name of your contact (PBAP-Phone Book Access Profile).
Start Pairing Procedure On The Radio
•Press the PHONE hard-key then press “Yes” to start searching for the mobile phone.
•Uconnect® Phone will display an “In progress” screen while the system is connecting.
Complete The Pairing Procedure
•When prompted on the phone, verify with radio password shown on the Uconnect®
Screen.
•If your phone asks you to accept a connection request from Uconnect®, select “Yes.”
If available, check the box telling it not to ask again – that way your phone automati-
cally connects each time you start the vehicle.
Select The Mobile Phone's Priority Level
•When the pairing process has successfully completed, the system prompts you to
choose whether or not this is your favorite phone.Selecting “Yes” makes this phone
the highest priority.This phone takes precedence over other paired phones within
range.Only one phone can be paired at a time.
•You are now ready to make hands-free calls.Press the Uconnect® Phone button on
your steering wheel to begin.
ELECTRONICS
39
Page 43 of 116
Voice Command Tips
•Using the complete name of a contact, as stored in your phonebook, (e.g.Call John
Doe vs.Call John) results in greater system accuracy.
•You can ‘chain’ commands together for faster results.Say “Call John Doe, mobile,” for
example.
•If you are listening to available voice command options, you do not have to listen to
the entire list.When you hear the command that you need, press the
button
on the steering wheel, wait for the beep and say your command.
Changing The Volume
•Start a dialogue by pressing the Phone button, then say a command for example
- "Help".
•Use the radio ON/OFF VOLUME rotary knob to adjust the volume to a comfortable
level while the Uconnect® system is speaking.Please note the volume setting for
Uconnect® is different than the audio system.
NOTE:
To access help, press the Uconnect® Phone
button on the steering wheel and say
"help." Touch the display or push either
orbutton and say "cancel" to
cancel the help session.
Voice Text Reply
•Uconnect® Phone can read or send new text messages on your mobile phone.
•Your mobile phone must be MAP (Message Access Profile) compatible to support SMS
via Bluetooth® to use this feature.If the Uconnect® Phone determines your phone is
not compatible with SMS messaging over Bluetooth® the “Messaging” button is greyed
out and the feature is not available for use.
NOTE:
For mobile phone compatibility and pairing instructions, please visit www.UconnectPhone.com
WARNING!
•Any voice commanded system should be used only in safe driving conditions fol-
lowing applicable laws regarding phone use.Your attention should be focused on
safely operating the vehicle.Failure to do so may result in a collision causing you
and others to be severely injured or killed.
•In an emergency, to use Uconnect® Phone, your mobile phone must be:
•turned on,
•paired to Uconnect® Phone,
•and have network coverage.
ELECTRONICS
41
Page 44 of 116
VOICE COMMAND QUICK REFERENCE
Uconnect® 5.0 Voice Command
•If the Uconnect Voice Commandbutton exists on your steering wheel, you
have the Voice Command feature, which is optimized for the driver.The Voice Com-
mand feature lets you keep your hands on the wheel, and your eyes on the road.
•When you press the Voice Command
button located on the steering wheel,
you hear a beep.After the beep, give your command.If you do not know what com-
mands to say, you can say “help” and the system provides options to you.If you ever
wish to interrupt the system while it lists options, press the Voice Command
button, and after the beep, say your command.
NOTE:
All phone oriented voice commands are accessible by first pressing the Phone Pick Up
button, not the Voice Command button.To end a call, simply press the Phone Hang Up
button.In some vehicles, the Phone Pickup button serves the dual purpose of ending calls
as well.
Voice Command (VR) User TIPs
•To hear available commands, press the Uconnect® Voice Command button and say
“Help.” You hear available commands for the menu displayed.
•At any time, you can say the words “Cancel” or “Help.” These commands are universal
and can be used from virtually any menu.All other specific commands can be used
depending upon the active application.
•You can interrupt the system prompts at any time by pressing the Uconnect® Voice
Command button while the system is speaking.After the beep, you can say a com-
mand.
•You can ‘chain’ commands together for faster results.Say “Call Joe Doe mobile,” for
example.
•For best performance, adjust the rearview mirror to provide at least ½ inch (1 cm)
gap between the overhead console (if equipped) and the mirror.This creates an
unobstructed path to the microphone on the overhead console.
•Always wait for the beep before speaking.
•Speak normally, without pausing, just as you would speak to a person sitting a few
feet/meters away from you.
•Ensure that no one other than you is speaking during a Voice Command period.
ELECTRONICS
42